Dashboard Module How Tos
How To: Add a Module Summary Widget to the Dashboard
To add a module summary widget to the dashboard, go to the Dashboard Module and select the specific Dashboard you wish to add widgets to.

Select the “+ Add Widget” button from the right-hand sign of the screen.

This opens a modal with three options: Speed dial, Module summary, and Chart.
Select the “Module Summary” icon opening the Add Module Summary Modal.
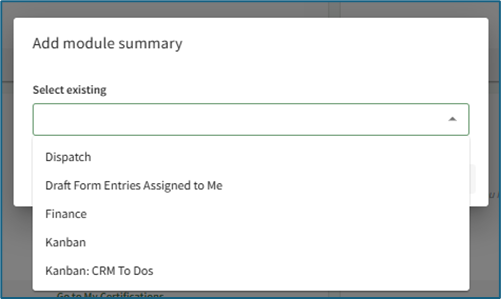
Any possible module summaries that are not yet included on the current dashboard will show in a dropdown menu on the modal.
Select the desired widget to be added to the dashboard. Multiple module summaries can be selected at once if desired.

Click the “Add Widget” button and the selected module summary will now show at the bottom of the Dashboard.
Module summary widgets can only be added to one dashboard at a time. For the widget to show on multiple dashboards, it must be added to each dashboard individually.
How To: Add Forms to the Forms Module Summary Widget
To add a specific form so that it is displayed on specific user's the Forms Module Summary dashboard widget, go to the Form you want included on the Home Page of the Forms Module. Select the three-dot icon opening the Forms context menu.
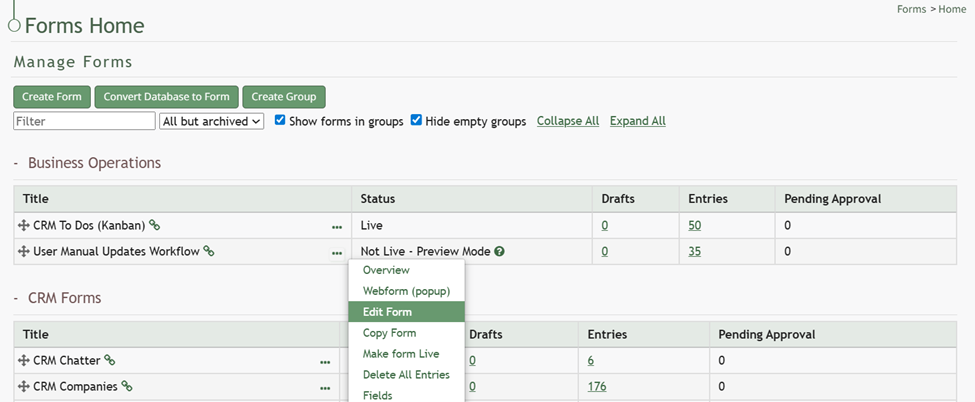
Select “Edit Form” opening the Edit Form Modal and go to the Advanced Settings section.
Input the users or certification roles you wish to see the selected form in their Dashboard Forms Module Summary Widget.

Select “Save” and the form will now be visible on the dashboard to the selected users.
How To: Create a Chart Widget
To create a Chart widget, select the Add Widget button (from the top right-hand corner of the page or the dashboard context menu accessed by the vertical three dot icon next to the Dashboard name).

This opens the Add Widget modal.

Select “Chart” opening the Add Chart Modal.

Existing charts will show on the dropdown menu. Select the desired chart and click the “Add Widget” button.
Note: In order to create a Chart Widget, you must first create a chart by going to a report in the Reports Module and clicking the Chart Wizard Icon. If no charts exist in the Reports Module, the Add Chart Modal will state, “No widgets available.”
How To: Create a Chart Widget
To create a Chart widget, select the Add Widget button (from the top right-hand corner of the page or the dashboard context menu accessed by the vertical three dot icon next to the Dashboard name).
This opens the Add Widget modal.
Select “Chart” opening the Add Chart Modal.
Existing charts will show on the dropdown menu. Select the desired chart and click the “Add Widget” button.
Note: In order to create a Chart Widget, you must first create a chart by going to a report in the Reports Module and clicking the Chart Wizard Icon. If no charts exist in the Reports Module, the Add Chart Modal will state, “No widgets available.”
How To: Create a Chart Widget
{{@13}}
How To: Create a New Dashboard
To create a new dashboard, click the “+” icon located to the right of any existing dashboard tabs.

This opens the New Dashboard Modal.

Input the desired title for the new dashboard and select the “Create Dashboard” button. Dashboard names must be unique from other Dashboards on your account.

The new dashboard opens, stating “No widgets on the dashboard yet.” Click either of the “+ Add Widget” buttons on the page, opening the Add Widget Modal and begin designing the new dashboard.
How To: Add a Module Summary Widget to the Dashboard
To add a module summary widget to the dashboard, go to the Dashboard Module and select the specific Dashboard you wish to add widgets to.
Select the “+ Add Widget” button from the right-hand sign of the screen.
This opens a modal with three options: Speed dial, Module summary, and Chart.
Select the “Module Summary” icon opening the Add Module Summary Modal.
Any possible module summaries that are not yet included on the current dashboard will show in a dropdown menu on the modal.
Select the desired widget to be added to the dashboard. Multiple module summaries can be selected at once if desired.
Click the “Add Widget” button and the selected module summary will now show at the bottom of the Dashboard.
Module summary widgets can only be added to one dashboard at a time. For the widget to show on multiple dashboards, it must be added to each dashboard individually.
How To: Create a Speed Dial
To create a Speed Dial, select the Add Widget button (from the top right-hand corner of the page or the dashboard context menu accessed by the vertical three dot icon next to the Dashboard name).

This opens the Add Widget modal.

Select “Speed Dial” opening the Add Speed Dial Modal.

If no speed dials have been created yet on your account, the modal will state “No widgets available.” Select “Create New Speed Dial” opening the New Speed Dial Modal.

Input the speed dial title.
The title of the speed dial will be used to identify the speed dial when it is pinned to a Dashboard. It is not the name of an individual Link.
Select the desired placement (top, floating or widget) of the speed dial.
Click the “+ Add Link” button opening the New Speed Dial Link Modal.

There are three types of speed dial links: a URL website link, a KAStrack Form, or a KAStrack Document. Select the appropriate type.
If the speed dial type is a URL Link, input the link and give the link a title. If a KAStrack Document or Form type is selected, select the desired file/form from the dropdown menu and give it a title. The name of the chosen file/form is pre-filled for convenience.
Select the “Add Link” button. Once you’ve added all desired links for this speed dial, click “Confirm”. The modal will close, creating the speed dial, but the speed dial is not yet visible on the dashboard. Click the “+ Add Widget” button and select Speed Dial to open the Add Speed Dial Modal.

Now that the speed dial has been created, it will show in the select existing dropdown menu. Select the Speed Dial to show on the dashboard. Click the “Add Widget” button.
The Speed Dial will now show on the dashboard in the desired placement.
You can select multiple speed dials (if there are more than one available) from the dropdown to add them all to the Dashboard at the same time.
How To: Create a Chart Widget
To create a Chart widget, select the Add Widget button (from the top right-hand corner of the page or the dashboard context menu accessed by the vertical three dot icon next to the Dashboard name).
This opens the Add Widget modal.
Select “Chart” opening the Add Chart Modal.
Existing charts will show on the dropdown menu. Select the desired chart and click the “Add Widget” button.
Note: In order to create a Chart Widget, you must first create a chart by going to a report in the Reports Module and clicking the Chart Wizard Icon. If no charts exist in the Reports Module, the Add Chart Modal will state, “No widgets available.”
How To: Create a Chart Widget
{{@13}}
How To: Create a Speed Dial
To create a Speed Dial, select the Add Widget button (from the top right-hand corner of the page or the dashboard context menu accessed by the vertical three dot icon next to the Dashboard name).
This opens the Add Widget modal.
Select “Speed Dial” opening the Add Speed Dial Modal.
If no speed dials have been created yet on your account, the modal will state “No widgets available.” Select “Create New Speed Dial” opening the New Speed Dial Modal.
Input the speed dial title.
The title of the speed dial will be used to identify the speed dial when it is pinned to a Dashboard. It is not the name of an individual Link.
Select the desired placement (top, floating or widget) of the speed dial.
Click the “+ Add Link” button opening the New Speed Dial Link Modal.
There are three types of speed dial links: a URL website link, a KAStrack Form, or a KAStrack Document. Select the appropriate type.
If the speed dial type is a URL Link, input the link and give the link a title. If a KAStrack Document or Form type is selected, select the desired file/form from the dropdown menu and give it a title. The name of the chosen file/form is pre-filled for convenience.
Select the “Add Link” button. Once you’ve added all desired links for this speed dial, click “Confirm”. The modal will close, creating the speed dial, but the speed dial is not yet visible on the dashboard. Click the “+ Add Widget” button and select Speed Dial to open the Add Speed Dial Modal.
Now that the speed dial has been created, it will show in the select existing dropdown menu. Select the Speed Dial to show on the dashboard. Click the “Add Widget” button.
The Speed Dial will now show on the dashboard in the desired placement.
You can select multiple speed dials (if there are more than one available) from the dropdown to add them all to the Dashboard at the same time.
Delete a Speed Dial
To delete a speed dial, go to the Dashboard Module and select the dashboard you wish to make speed dial edits on.
The most efficient way to delete a speed dial is from its current placement. Refer to the table below to identify how to access the “Edit” option from each of the various speed dial placements.
| How to Select Edit Based on Speed Dial Placement | |||
| Placement | Top | Floating | Widget |
| Image | 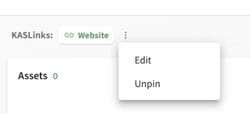 |
 |
 |
| Notes | Selecting the vertical three dot icon opens the context menu with the “Edit” option. | Click the floating speed dial icon to open it, showing the “Edit” option. | Selecting the vertical three dot icon opens the context menu with the “Edit” option. |
Click the “Edit” button for the speed dial you wish to alter, opening the Edit Speed Dial Modal.
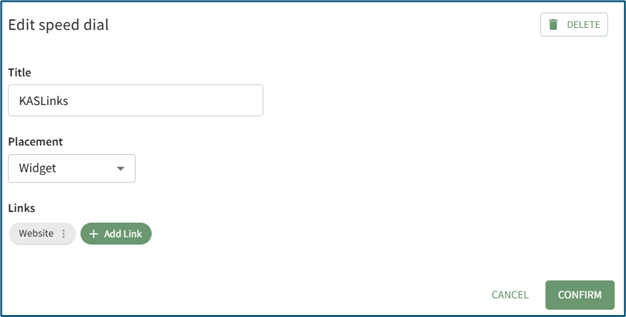
Select the “Delete” button in the top right hand corner of the modal.

This opens the Delete Speed Dial Confirmation Modal that states, “This will affect all dashboards where the speed dial is present. Are you sure you want to permanently delete this speed dial?”
Select the “Confirm” button.
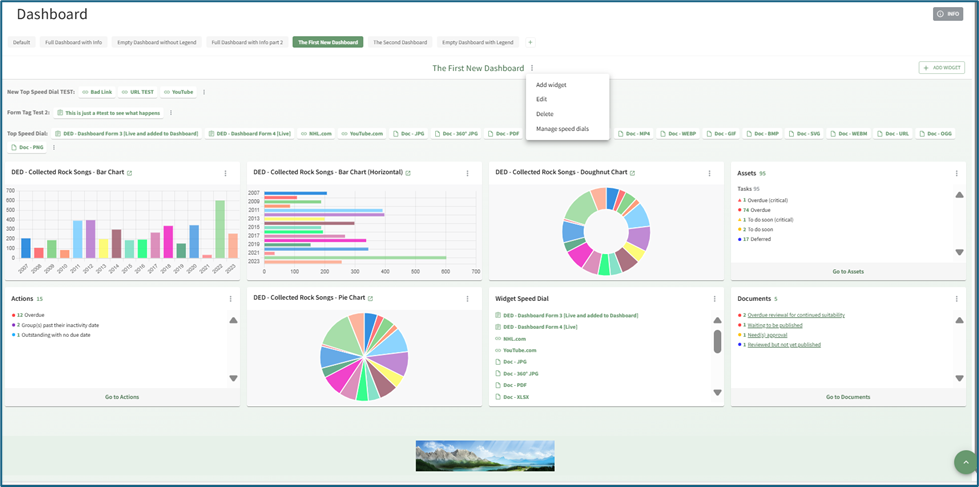
You can also select the “+ Add Widget” button from the top right-hand corner of any dashboard and click the speed dial icon.

This opens the Add speed dial modal.

Select the “Manage Speed Dials” button opening the Manage Speed Dial Modal.

Click the “Delete” button for the speed dial you wish to delete, opening the Delete Speed Dial Confirmation Modal that states, “This will affect all dashboards where the speed dial is present. Are you sure you want to permanently delete this speed dial?”
Select the “Confirm” button.
How To: Edit a Dashboard
To edit a dashboard, go to the Dashboard Module and select the specific Dashboard you wish to edit. Select the vertical three dot menu to the right of the Dashboard’s name in the center of the page. Select “Edit”.
This opens the Edit Dashboard Modal.

Make changes as desired to the Dashboard name and select the “Confirm” button.
Deselecting the “Include Info button” checkbox will remove the grey “INFO” button that expands with an explanation of the in the top right-hand corner of the Dashboard Page.

How To: Edit a Speed Dial
To edit an existing Speed Dial, go to the Dashboard Module and select the dashboard you wish to make speed dial edits on.
The most efficient way to edit a speed dial is from its current placement. Refer to the table below to identify how to access the “Edit” option from each of the various speed dial placements.
|
How to Select Edit Based on Speed Dial Placement |
|||
|
Placement |
Top |
Floating |
Widget |
|
Image |
|
|
|
|
Notes |
Selecting the vertical three dot icon opens the context menu with the “Edit” option. |
Click the floating speed dial icon to open it, showing the “Edit” option. |
Selecting the vertical three dot icon opens the context menu with the “Edit” option. |


Click the “Edit” button for the speed dial you wish to alter, opening the Edit Speed Dial Modal.

Make the desired changes and select “Confirm” to save them. Your edits will now be reflected on the dashboard.
You can also select the “+ Add Widget” button from the top right-hand corner of any dashboard and click the speed dial icon.

This opens the Add speed dial modal.

Select the “Manage Speed Dials” button opening the Manage Speed Dial Modal.
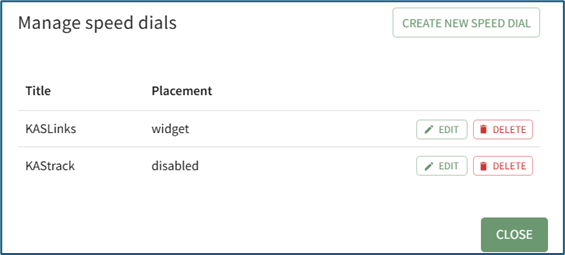
Click the “Edit” button for the speed dial you wish to alter, opening the Edit Speed Dial Modal.

Make the desired changed and select “Confirm”.
How To: Unpin a Widget or Speed Dial from the Dashboard
To unpin a widget from the dashboard, go to Dashboard Module and select the specific Dashboard you wish to edit.

Click the vertical triple dot icon in the top right-hand corner of the widget.

Doing so opens a dropdown menu (options on the dropdown menu vary based on the widget type).
Select “Unpin” and the widget will no longer be seen on the dashboard. To add the widget back to the Dashboard, click the Add Widget button at the top right-hand corner of the screen.
No comments to display
No comments to display