Edit Inactive Accounts Settings
To edit inactive account settings, go to the Inactive Accounts Tab in the Site Settings Module.

Select the “Edit Inactive Accounts Settings” button, opening the editable Inactive Accounts Page.

To allow inactive users to reactivate their account by logging in, select the checkbox to the right of “Can inactive users log in?”.
To automatically deactivate accounts that have been inactive for a customizable period, select the checkbox to the right of “Automatically deactivate accounts for inactivity?” Enter the selected numerical value into the textbox and select the units (days, weeks, months, or years) from the dropdown menu.
Accounts are checked for inactivity every 24 hours.
To deactivate an account when a role or certification turns red, select the checkbox to the right of “Automatically deactivate accounts when role or certification turns red?” Select the “Add a Deactivation Rule” button, opening the Add Account Deactivation Rule Modal.

Establish the parameters for the account deactivation role by selecting a role/certification from the dropdown menu that opens when you put the cursor in the textbox. You can choose multiple roles / certifications per rule. Specify the time period after a role/certification turns red for the system to deactivate the account by inputting a numerical value into the textbox, and then select the units (days, weeks, months, or years) from the dropdown menu.
Accounts are checked for inactivity every 24 hours.
Click “Cancel” to return to the editable Inactive Accounts Page without creating a new rule. Select “Save’ and the new deactivation rule will show in the editable Inactive Accounts Page.

The Pencil Icon opens the deactivation rule for editing. The X icon will delete the rule.
To exempt users from being deactivated based on access levels, select which access levels should be exempt from automatic deactivation from the dropdown menu.
To send alerts to users before their account is deactivated, select the checkbox to the right of “Alerts for inactivity.” Select the “Add a Warning Rule” button to add alert parameters, opening the Add Deactivation Warning Rule Modal.
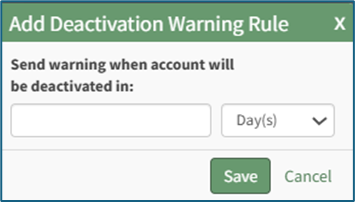
Specify how far in advance of deactivation an alert should be sent by inputting a numerical value into the textbox, and then select the units (days, weeks, months, or years) from the dropdown menu. Click “Cancel” to return to the editable Inactive Accounts Page without creating a new warning rule. Select “Save’ and the new deactivation warning rule will show in the editable Inactive Accounts Page.

The Pencil Icon opens the deactivation rule for editing. The X icon will delete the rule.
Click “Cancel” to return to the Inactive Accounts Tab without making any changes.
Select the “Save” button. The changes made and saved are now reflected on the Email Settings Tab.
No comments to display
No comments to display