Attendance Module How Tos
How To: Create the Base Form for an Attendance Log
To create the base form required to create a new attendance log, go to the Home Page of the Forms Module.

Select the “Create Form” button opening the New Form Modal.
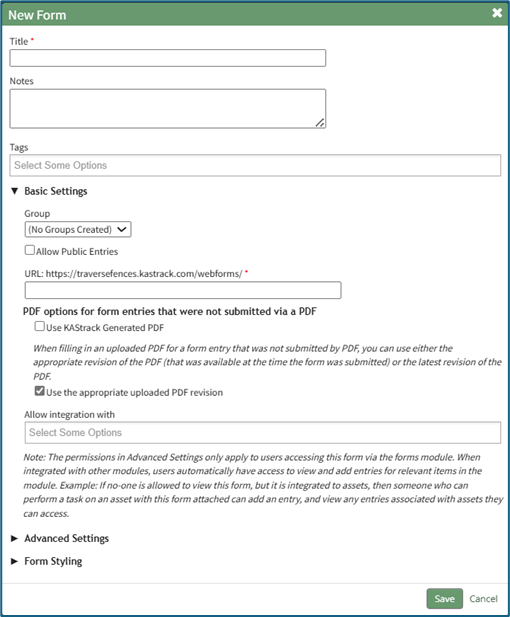
Input a title for the form and include any notes as desired. You can tag the form with open, permissive, or restrictive tags to customize visibility if desired, and place the form in the group of your choosing.
Select the “Allow Public Entries” checkbox if your attendance log will record users who are not logged in to KAStrack or who do not have an account. If the attendance log will solely be used by individuals who use KAStrack and have an account, you can leave this checkbox blank.
If you will be using a customized PDF output for attendance log sign in / sign out entries, select the “Use the appropriate uploaded PDF revision” checkbox. If the generic output is sufficient, select “Use KAStrack Generated PDF”.
To ensure that your form integrates with the attendance log, select “Attendance: Integrate with the Attendance Module” from the drop-down menu below the Field Title “Allow Integration With”.

Details regarding Advanced Settings and Form Styling when creating a new form can be explored in the Customizable Options for Form Creation Section of the User Manual.
After customizing the form for your need, select the “Save” button at the bottom of the modal opening the Fields Tab for your newly created form.
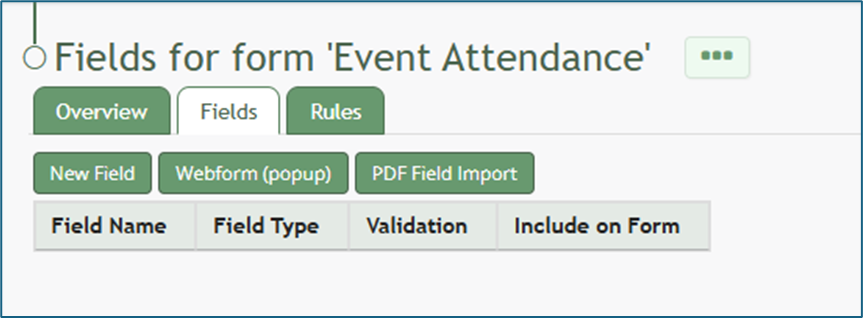
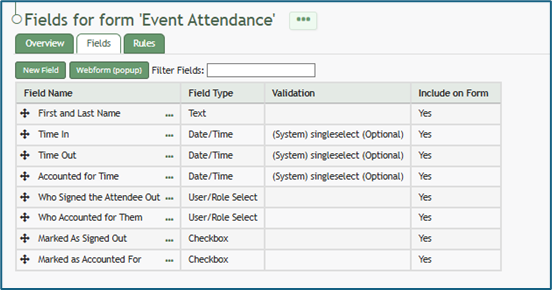
To create an attendance log, your form must have the following seven fields and all of them should be set to start hidden.
Required Field 1 of 7
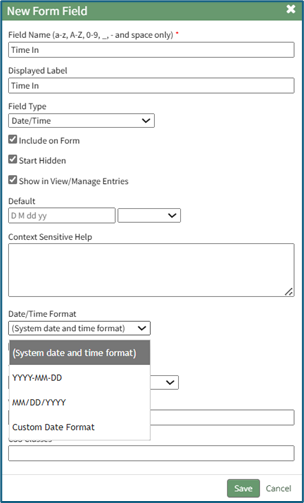
The first field to be created is a date/time field to be used when a person signs in (Time In). Select the “New Field” button opening the New Form Field modal. At a minimum, input the field name. Select Date/Time from the Field Type drop-down menu. Select the “Start Hidden” checkbox. Under Date/Time Format, select your preferred format from the drop-down menu.
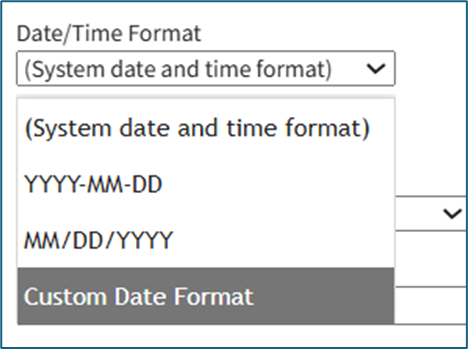
The date and time format used for your attendance log can be customized if desired.
How To: Create a Custom Date/Time Format for an Attendance Log
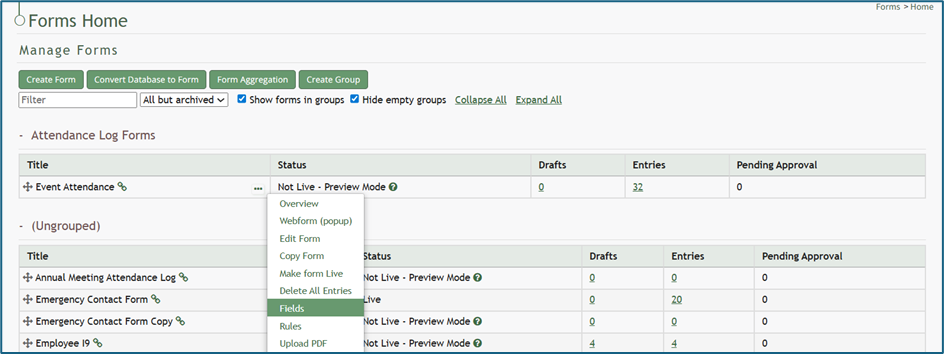
To create a custom date/ time format for your attendance log, go to the Home Page of the Forms Module and click the three-dot icon to the right of the form the attendance log is based on. This opens the context menu. Select “Fields”.
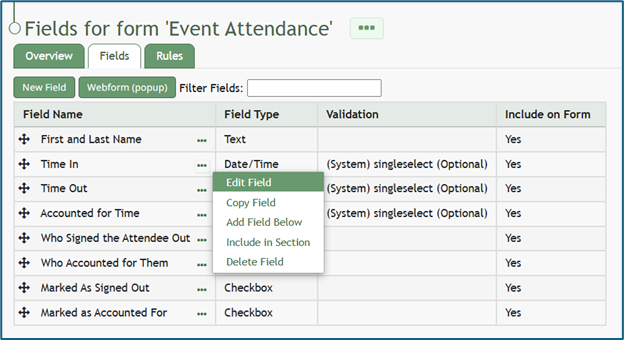
This opens the Fields Tab of the Form. Select the three-dot icon next to the Field Name for the date/time field type and select “Edit Field”.
This opens the Edit Form Field Modal, which includes a Date/Time Format field. Select “Custom Date Format” from the drop-down menu.
This expands the Edit Form Field Modal. Input the PHP date format and the jQuery date format desired.
Time is not included in the Custom Date Format field.

To create a custom date format, the software needs to know how to both read and display the date. PHP (the server side) processes the date after it’s submitted. jQuery (the browser side) displays/formats the date in the date picker the user sees. Both systems have their own “language” for writing date formats, so you are required to provide a version both sides understand.
PHP uses letters to represent parts of the date, explained in the table below.
PHP Language Explanation | ||
What It Represents | PHP Letter | Example |
Day (with leading 0) | d | 02 |
Month (with leading 0) | m | 02 |
Year (4 digits) | y | 2025 |
jQuery uses similar but slightly different letters, explained in the table below.
jQuery Language Explanation | ||
What It Represents | jQuery Letter | Example |
Day (with leading 0) | dd | 02 |
Month (with leading 0) | mm | 02 |
Year (4 digits) | yy | 2025 |
Select “Save” at the bottom of the Edit Form Field Modal, and the customized date and time format will now be utilized.
Select the “Save” button at the bottom of the modal and return to the Form’s Fields Tab.
Required Field 2 of 7
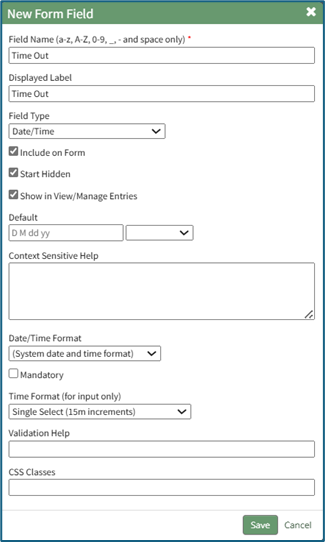
The second field to be created is a date/time field to be used when a person signs out (Time Out). Select the “New Field” button opening the New Form Field modal. At a minimum, input the field name. Select Date/Time from Field Type drop-down menu. Select the “Start Hidden” checkbox. Select your preferred Date/Time Format from the drop-down menu.
Select the “Save” button at the bottom of the modal to return to the Form’s Fields Tab.
Required Field 3 of 7
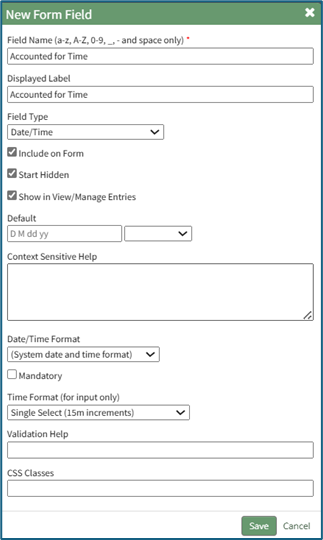
The third field to be created is a date/time field to be used when a person is accounted for when mustering. Select the “New Field” button opening the New Form Field modal. At a minimum, input the field name. Select Date/Time from Field Type drop-down menu. Select the “Start Hidden” checkbox. Select your preferred Date/Time Format from a drop-down menu.
Select the “Save” button at the bottom of the modal and return to the Form’s Fields Tab.
Required Field 4 of 7
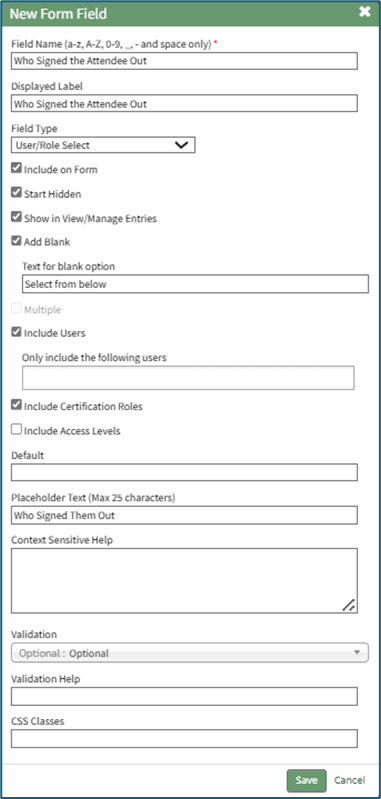
The fourth field to be created is a user/role select field for when someone is signed out (to indicate who signed them out). Select the “New Field” button opening the New Form Field modal. At a minimum, input the field name. Select User / Role Select (in the accounts category) from the Field Type drop-down menu. Select the “Start Hidden” checkbox. You can customize who is visible on the drop-down menu if desired. Indicate if you would like to show all users, specific users, certification roles, and / or access levels. This will be used to indicate who signed the individual out. Select the “Multiple” checkbox if you want to allow multiple options to be selected when indicating who signed an individual out of the attendance log.
Select the “Save” button at the bottom of the modal and return to the Form’s Fields Tab.
Required Field 5 of 7
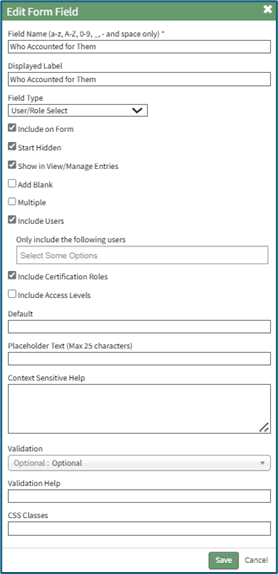
The fifth field to be created is a user/role select field for when someone is accounted for (to indicate who accounted for them). Select the “New Field” button opening the New Form Field modal. At a minimum, input the field name. Select User / Role Select (in the accounts category) from the Field Type drop-down menu. Select the “Start Hidden” checkbox. Make any other customizable choices as desired.
Select the “Save” button at the bottom of the modal and return to the Form’s Fields Tab.
Required Field 6 of 7
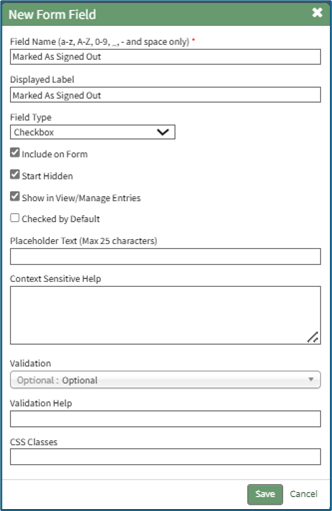
The sixth field to be created is a checkbox field for when someone is signed out (to indicate whether they signed out themselves or were marked as signed out). Select the “New Field” button opening the New Form Field modal. At a minimum, input the field name. Select Checkbox from the Field Type drop-down menu. Select the “Start Hidden” checkbox. Make any other customizable choices as desired.
Select the “Save” button at the bottom of the modal to return to the Form’s Fields Tab.
Required Field 7 of 7
The seventh field to be created is a checkbox field for when someone is accounted for (to indicate whether they accounted for themselves or were marked as accounted for). Select the “New Field” button opening the New Form Field modal. At a minimum, input the field name. Select Checkbox from the Field Type drop-down menu. Select the “Start Hidden” checkbox. Make any other customizable choices as desired.
Select the “Save” button at the bottom of the modal and return to the Form’s Fields Tab.
Now that all required fields have been created, you will need at least one more field that will be used to capture details of the person signing in. Examples might include (but are not limited to) “Name,” “Company,” “Cellphone,” or “Department.” Multiple fields can be utilized here based on your organization’s desires for the attendance log. Select the “New Field” button opening the New Field Modal. Create your additional fields for identification purposes, and select “Save” when done to return to the Fields Tab. Your Form fields are now complete.
Form Rules
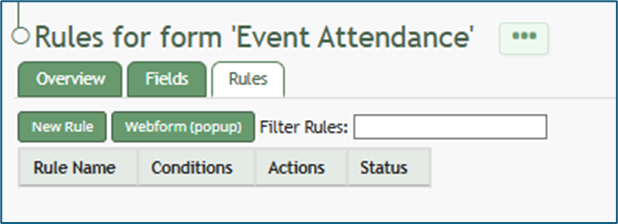
Your Attendance Log Form should have a rule established to set the sign in date/time field to the current time. To create this rule, select the Rules Tab at the top of the page or select “Rules” from the context menu accessible from the three-dot icon to the right of the page header. This opens the Form’s Rules Tab.
Select the “New Rule” button opening the New Form Rule Modal. Input a Rule Name.
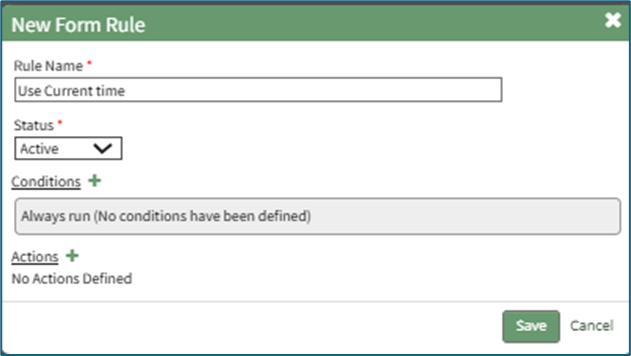
Leave the status as Active and leave the condition as “Always run.”
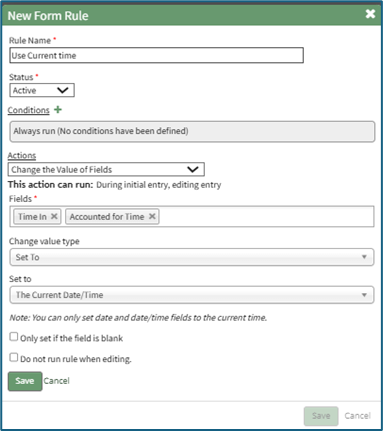
Select the “+” plus sign icon to the right of Actions to expand the modal. Select “Change the Value of Fields” from the Field Management Category as the Action. Select the field(s) you wish to always run the current date/time rule on.
Select “Set To” from the drop-down menu for the Change Value Type field.
Select “The Current Date / Time” from the drop-down menu for the Set To field.
Select “Save” and the action just outlined will be saved and shows on the New Form Rule Modal.
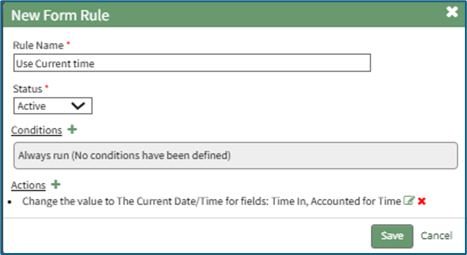
Select the New Form Rule “Save” button and the rule will now show as active on the Rules Tab.

While there are dozens of options for the customization of your attendance log form, this is the basic requirements for functionality. The attendance log is now ready to be created.
Example of how the form fields will be utilized in an attendance log:
How To: Create an Attendance Log
In order to create an attendance log, you must first create a form that is integrated with the Attendance Module.
How To: Create the Base Form for an Attendance Log
To create the base form required to create a new attendance log, go to the Home Page of the Forms Module.
Select the “Create Form” button opening the New Form Modal.
Input a title for the form and include any notes as desired. You can tag the form with open, permissive, or restrictive tags to customize visibility if desired, and place the form in the group of your choosing.
Select the “Allow Public Entries” checkbox if your attendance log will record users who are not logged in to KAStrack or who do not have an account. If the attendance log will solely be used by individuals who use KAStrack and have an account, you can leave this checkbox blank.
If you will be using a customized PDF output for attendance log sign in / sign out entries, select the “Use the appropriate uploaded PDF revision” checkbox. If the generic output is sufficient, select “Use KAStrack Generated PDF”.
To ensure that your form integrates with the attendance log, select “Attendance: Integrate with the Attendance Module” from the drop-down menu below the Field Title “Allow Integration With”.
Details regarding Advanced Settings and Form Styling when creating a new form can be explored in the Customizable Options for Form Creation Section of the User Manual.
After customizing the form for your need, select the “Save” button at the bottom of the modal opening the Fields Tab for your newly created form.
To create an attendance log, your form must have the following seven fields and all of them should be set to start hidden.
Required Field 1 of 7
The first field to be created is a date/time field to be used when a person signs in (Time In). Select the “New Field” button opening the New Form Field modal. At a minimum, input the field name. Select Date/Time from the Field Type drop-down menu. Select the “Start Hidden” checkbox. Under Date/Time Format, select your preferred format from the drop-down menu.
The date and time format used for your attendance log can be customized if desired.
How To: Create a Custom Date/Time Format for an Attendance Log
To create a custom date/ time format for your attendance log, go to the Home Page of the Forms Module and click the three-dot icon to the right of the form the attendance log is based on. This opens the context menu. Select “Fields”.
This opens the Fields Tab of the Form. Select the three-dot icon next to the Field Name for the date/time field type and select “Edit Field”.
This opens the Edit Form Field Modal, which includes a Date/Time Format field. Select “Custom Date Format” from the drop-down menu.
This expands the Edit Form Field Modal. Input the PHP date format and the jQuery date format desired.
Time is not included in the Custom Date Format field.
To create a custom date format, the software needs to know how to both read and display the date. PHP (the server side) processes the date after it’s submitted. jQuery (the browser side) displays/formats the date in the date picker the user sees. Both systems have their own “language” for writing date formats, so you are required to provide a version both sides understand.
PHP uses letters to represent parts of the date, explained in the table below.
PHP Language Explanation | ||
What It Represents | PHP Letter | Example |
Day (with leading 0) | d | 02 |
Month (with leading 0) | m | 02 |
Year (4 digits) | y | 2025 |
jQuery uses similar but slightly different letters, explained in the table below.
jQuery Language Explanation | ||
What It Represents | jQuery Letter | Example |
Day (with leading 0) | dd | 02 |
Month (with leading 0) | mm | 02 |
Year (4 digits) | yy | 2025 |
Select “Save” at the bottom of the Edit Form Field Modal, and the customized date and time format will now be utilized.
Select the “Save” button at the bottom of the modal and return to the Form’s Fields Tab.
Required Field 2 of 7
The second field to be created is a date/time field to be used when a person signs out (Time Out). Select the “New Field” button opening the New Form Field modal. At a minimum, input the field name. Select Date/Time from Field Type drop-down menu. Select the “Start Hidden” checkbox. Select your preferred Date/Time Format from the drop-down menu.
Select the “Save” button at the bottom of the modal to return to the Form’s Fields Tab.
Required Field 3 of 7
The third field to be created is a date/time field to be used when a person is accounted for when mustering. Select the “New Field” button opening the New Form Field modal. At a minimum, input the field name. Select Date/Time from Field Type drop-down menu. Select the “Start Hidden” checkbox. Select your preferred Date/Time Format from a drop-down menu.
Select the “Save” button at the bottom of the modal and return to the Form’s Fields Tab.
Required Field 4 of 7
The fourth field to be created is a user/role select field for when someone is signed out (to indicate who signed them out). Select the “New Field” button opening the New Form Field modal. At a minimum, input the field name. Select User / Role Select (in the accounts category) from the Field Type drop-down menu. Select the “Start Hidden” checkbox. You can customize who is visible on the drop-down menu if desired. Indicate if you would like to show all users, specific users, certification roles, and / or access levels. This will be used to indicate who signed the individual out. Select the “Multiple” checkbox if you want to allow multiple options to be selected when indicating who signed an individual out of the attendance log.
Select the “Save” button at the bottom of the modal and return to the Form’s Fields Tab.
Required Field 5 of 7
The fifth field to be created is a user/role select field for when someone is accounted for (to indicate who accounted for them). Select the “New Field” button opening the New Form Field modal. At a minimum, input the field name. Select User / Role Select (in the accounts category) from the Field Type drop-down menu. Select the “Start Hidden” checkbox. Make any other customizable choices as desired.
Select the “Save” button at the bottom of the modal and return to the Form’s Fields Tab.
Required Field 6 of 7
The sixth field to be created is a checkbox field for when someone is signed out (to indicate whether they signed out themselves or were marked as signed out). Select the “New Field” button opening the New Form Field modal. At a minimum, input the field name. Select Checkbox from the Field Type drop-down menu. Select the “Start Hidden” checkbox. Make any other customizable choices as desired.
Select the “Save” button at the bottom of the modal to return to the Form’s Fields Tab.
Required Field 7 of 7
The seventh field to be created is a checkbox field for when someone is accounted for (to indicate whether they accounted for themselves or were marked as accounted for). Select the “New Field” button opening the New Form Field modal. At a minimum, input the field name. Select Checkbox from the Field Type drop-down menu. Select the “Start Hidden” checkbox. Make any other customizable choices as desired.
Select the “Save” button at the bottom of the modal and return to the Form’s Fields Tab.
Now that all required fields have been created, you will need at least one more field that will be used to capture details of the person signing in. Examples might include (but are not limited to) “Name,” “Company,” “Cellphone,” or “Department.” Multiple fields can be utilized here based on your organization’s desires for the attendance log. Select the “New Field” button opening the New Field Modal. Create your additional fields for identification purposes, and select “Save” when done to return to the Fields Tab. Your Form fields are now complete.
Form Rules
Your Attendance Log Form should have a rule established to set the sign in date/time field to the current time. To create this rule, select the Rules Tab at the top of the page or select “Rules” from the context menu accessible from the three-dot icon to the right of the page header. This opens the Form’s Rules Tab.
Select the “New Rule” button opening the New Form Rule Modal. Input a Rule Name.
Leave the status as Active and leave the condition as “Always run.”
Select the “+” plus sign icon to the right of Actions to expand the modal. Select “Change the Value of Fields” from the Field Management Category as the Action. Select the field(s) you wish to always run the current date/time rule on.
Select “Set To” from the drop-down menu for the Change Value Type field.
Select “The Current Date / Time” from the drop-down menu for the Set To field.
Select “Save” and the action just outlined will be saved and shows on the New Form Rule Modal.
Select the New Form Rule “Save” button and the rule will now show as active on the Rules Tab.
While there are dozens of options for the customization of your attendance log form, this is the basic requirements for functionality. The attendance log is now ready to be created.
Example of how the form fields will be utilized in an attendance log:
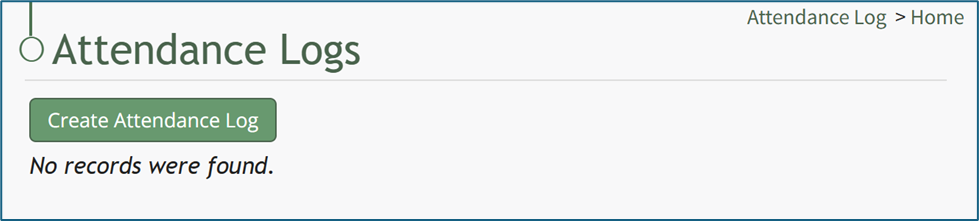
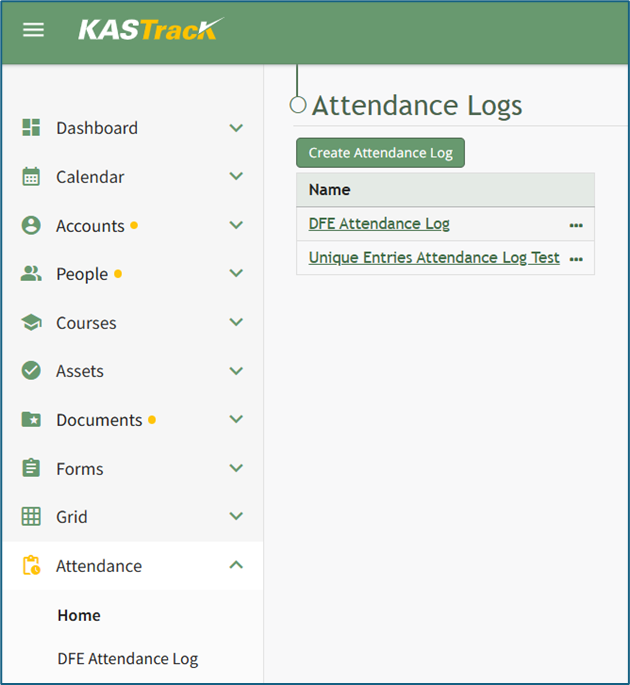
Once the base form required for the attendance log field mappings has been created, you are ready to create an Attendance Log. Go to the Home Page of the Attendance Module. Select the “Create Attendance Log” button.
This opens the New Attendance Log Modal.
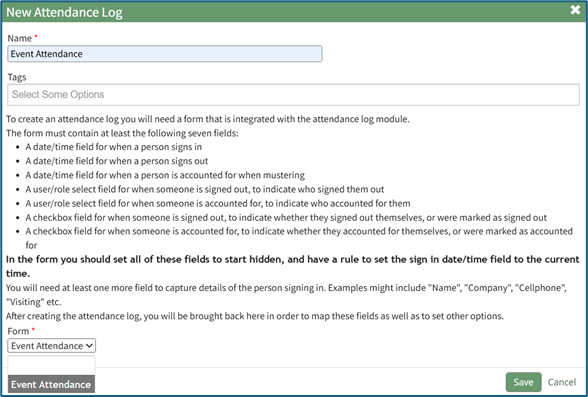
Input the Name of the new attendance log and, if needed, select any tags to be associated with the attendance log.
Select the form for the attendance log from the Form drop-down menu, which will list all forms integrated with the Attendance Module. Select the “Save” button at the bottom of the New Attendance Log Modal.
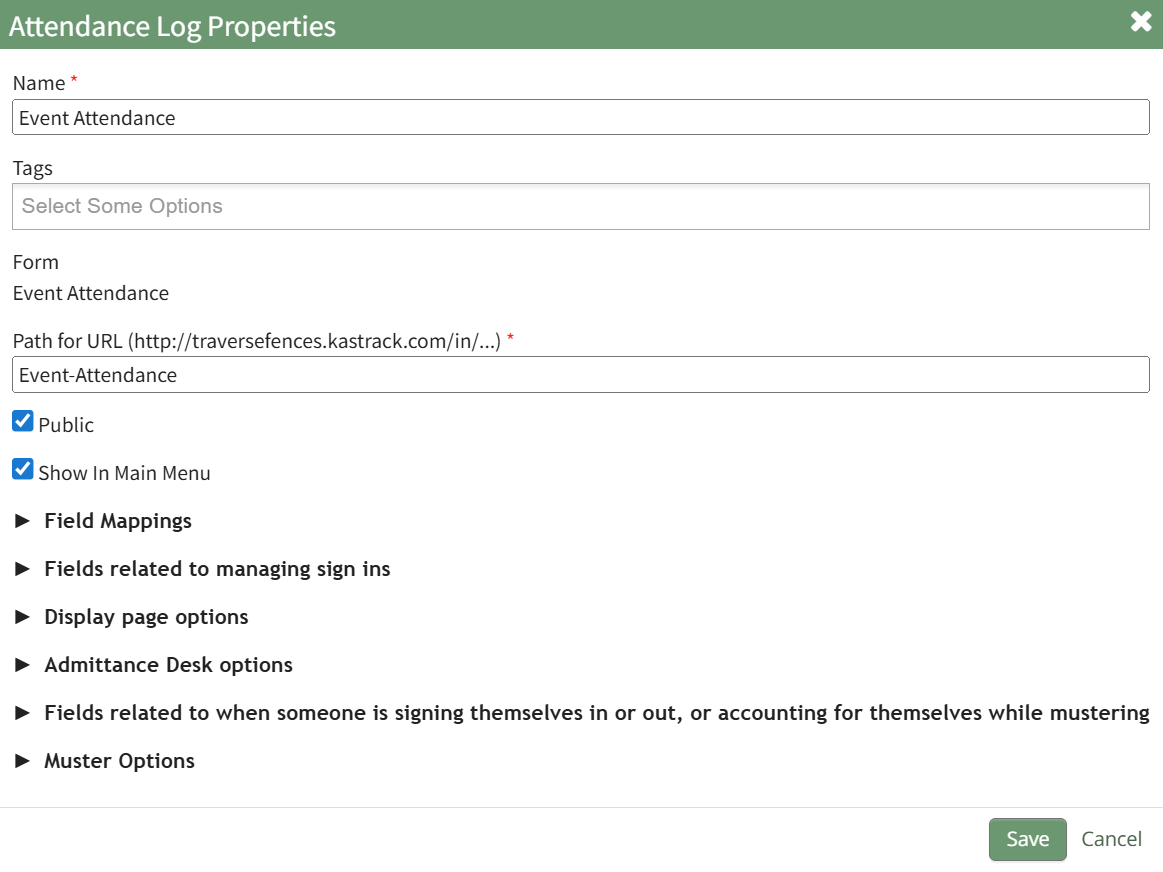
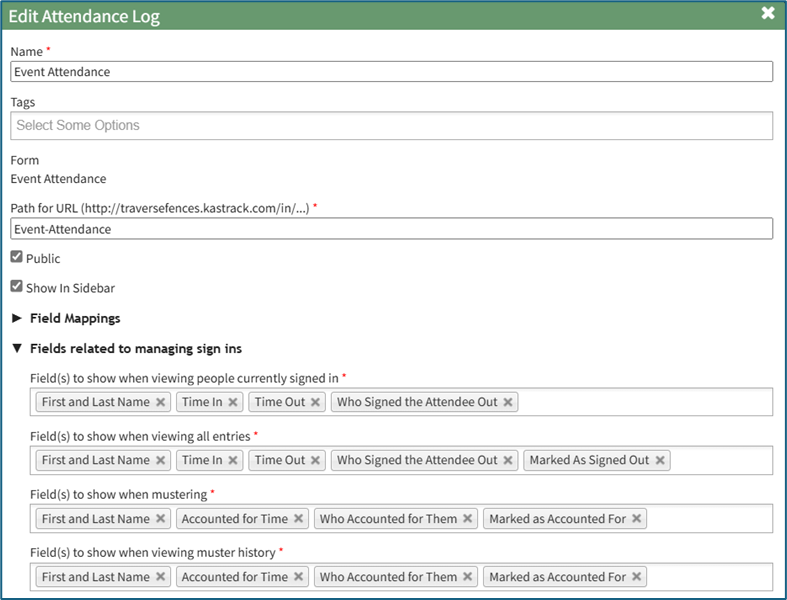
This opens the Edit Attendance Log Modal.
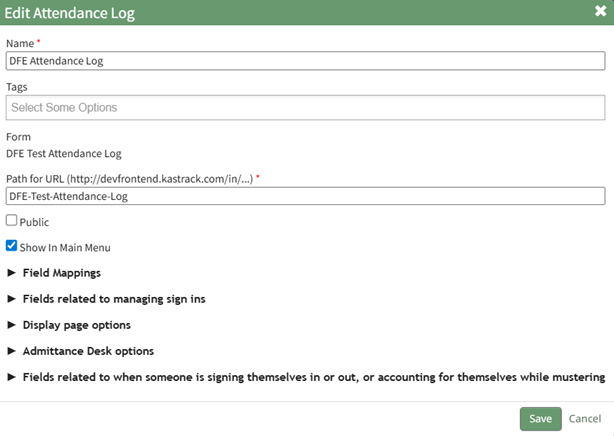
The attendance log name already shows, along with any associated tags. Tags can also be added here if desired. The URL path will add the form’s name to the end, but this can also be edited if desired.
If the associated form was set to public, the public checkbox will automatically be selected on the Edit Attendance Log Modal. If the form was not made public, the attendance log cannot be made public and this option would not be selectable.
You can set the form to public by editing the form in the Forms module and clicking the “Allow Public Entries” checkbox.
Select “Show in Main Menu” if you would like the Attendance Log to show as an option on the Main Menu.
In order to see the new attendance log on the main menu, you will either have to refresh the page, or log out and log back in once the new attendance log has been created.
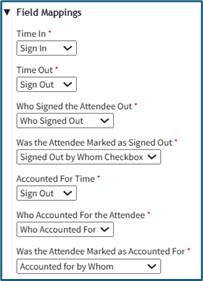
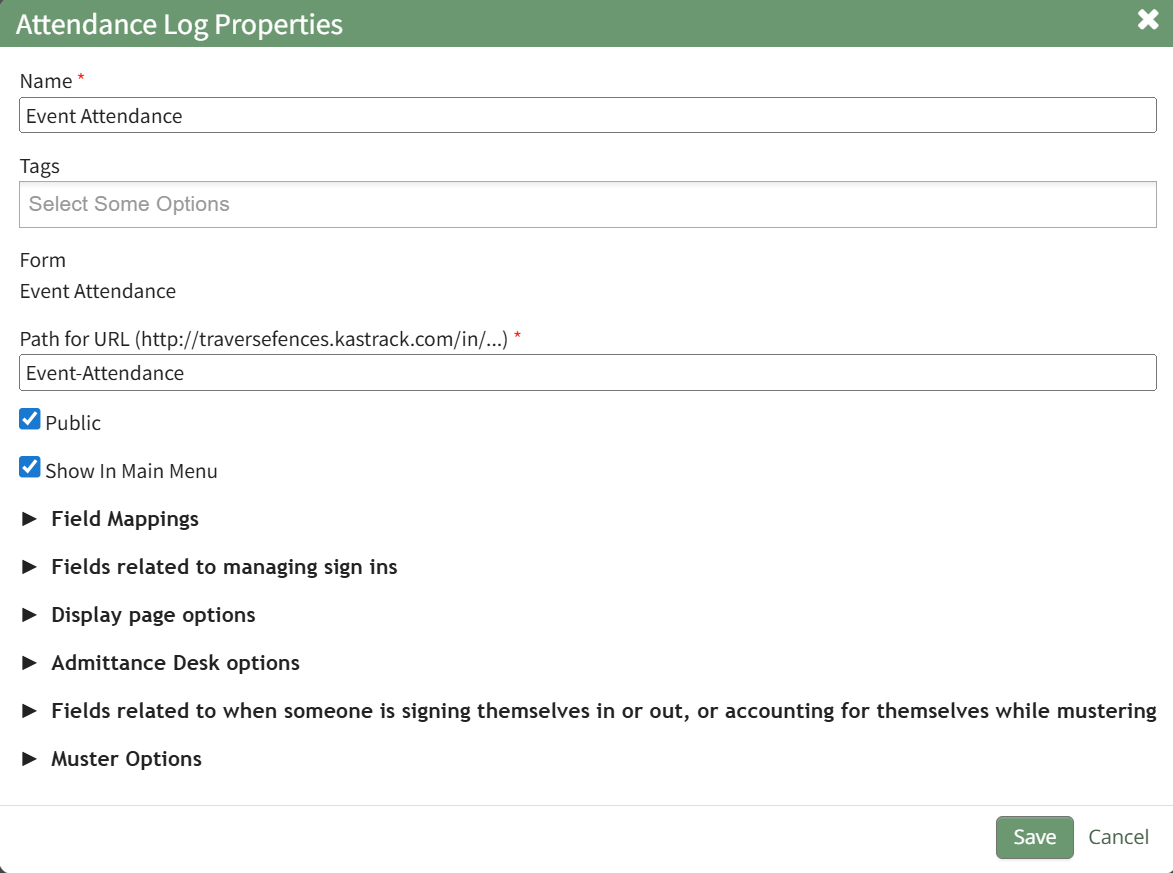
The Edit Attendance Log Modal has five different sections: Field Mappings*, Fields Related to Managing Sign Ins*, Display Page Options, Admittance Desk Options, and Fields Related to When Someone is signing themselves in or out (or accounting for themselves while mustering) *.
An * asterisk denotes a required field.
After going through each section, select “Save” at the bottom of the modal to return to the Attendance Home Page where the newly created attendance log will show in the Attendance Log Table.
The following How Tos are applicable once a new Attendance Log has been created.
How To: Activate Muster Mode for a Drill
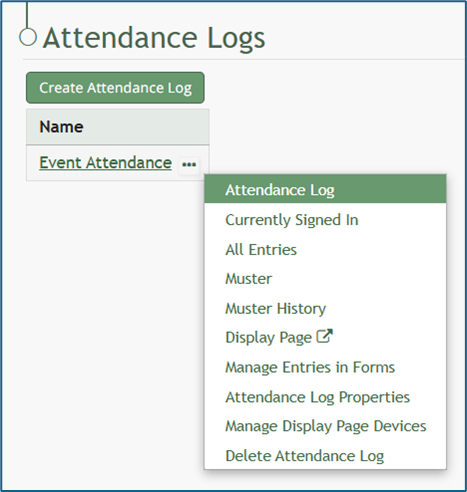
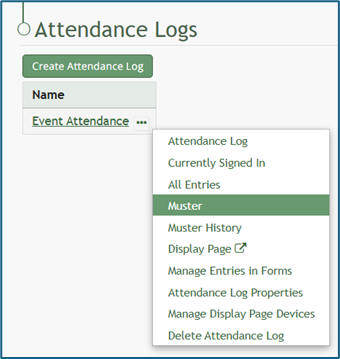
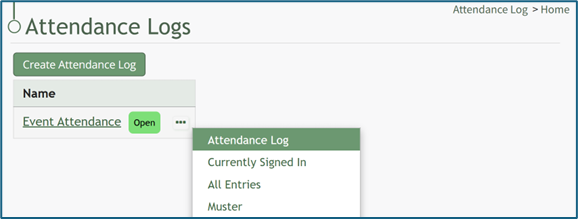
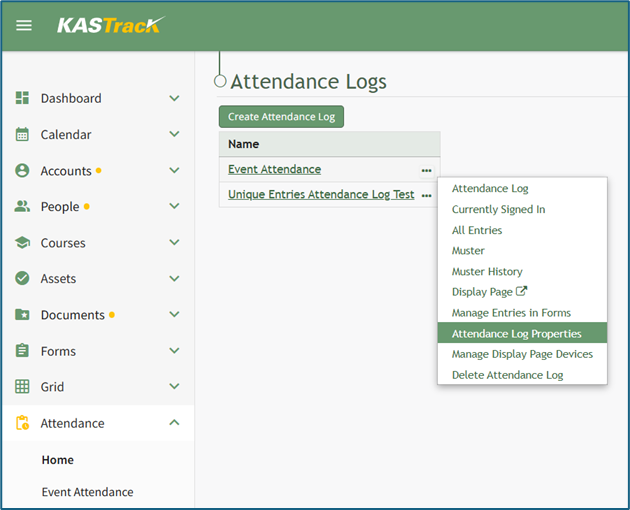
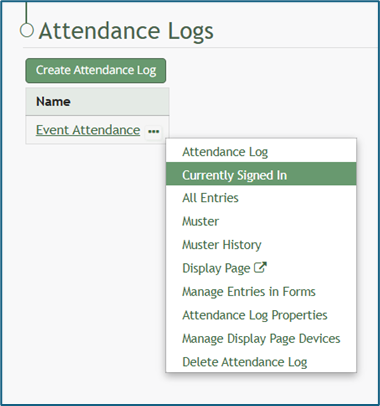
To activate muster mode for a Drill, open the attendance log you wish to activate muster mode for by going to the Home Page of the Attendance Module and clicking on the attendance log’s name, or clicking the three-dot icon to the right of the attendance log’s name, opening the context menu. Select “Attendance Log”.
If you select “Muster” from the context menu, you will not be able to run a muster mode drill. This option directs you to a muster mode emergency.
This opens the attendance log’s Information Page.
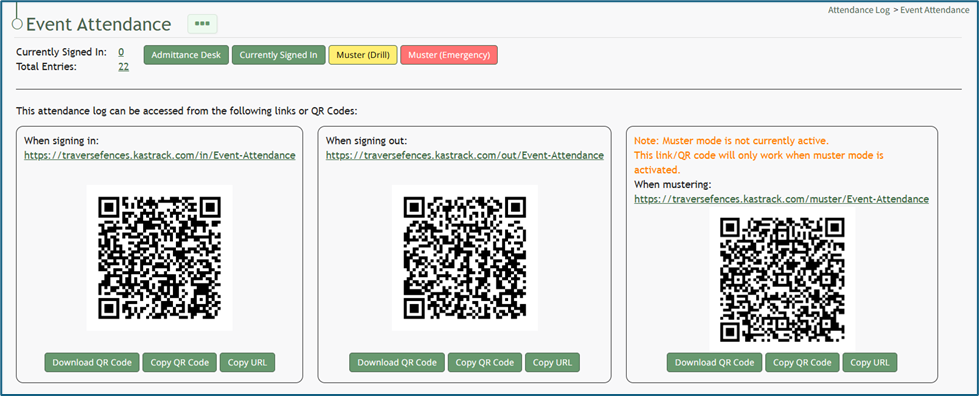
Select the yellow “Muster (Drill)” button at the top of the page. This opens the Muster Page, but muster mode is not yet activated.
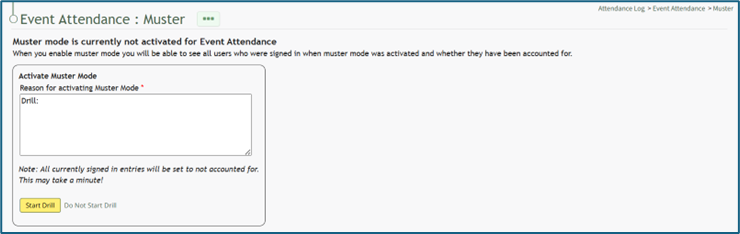
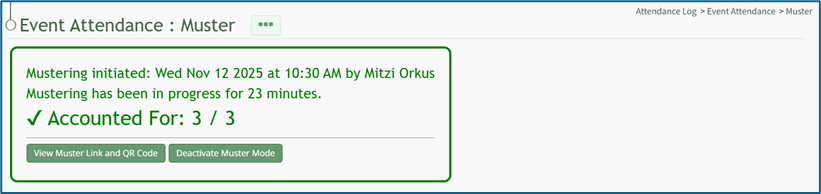
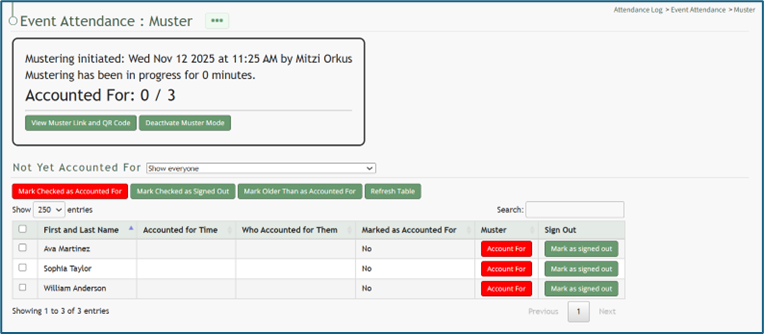
Input the appropriate notes for activating muster mode. The textbox for notes already indicates that this is a drill. Once including additional reasoning, select the yellow “Start Drill” button. The page being displayed changes, and the summary information at the top of the Muster Page indicates that Muster Mode has been initiated.
How To: Deactivate Muster Mode
Muster mode can only be deactivated from the Muster Page when muster mode has been activated.
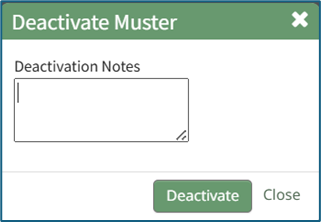
Select the “Deactivate Muster Mode” button, opening the Deactivate Muster Modal. Input any desired Deactivation Notes in the textbox provided.
Select “Deactivate” and you will be redirected to the attendance log’s Information Page.
How To: Activate Muster Mode for an Emergency
You can initiate muster mode for an emergency situation from both the Attendance Module Home Page as well as a specific attendance log’s Information Page.
To activate from the Attendance Module Home Page:
Open the Home Page of the Attendance Module and click the three-dot icon to the right of the attendance log you wish to activate muster mode in, opening the context menu. Select “Muster”, opening the Muster Page.
To activate from an attendance log’s Information Page:
Select the attendance log you wish to initiate muster mode in from the Main Menu (if configured to be shown there) or click the name on the Home Page.
This opens the attendance log’s Information Page.
Select the red “Muster (Emergency)” button.
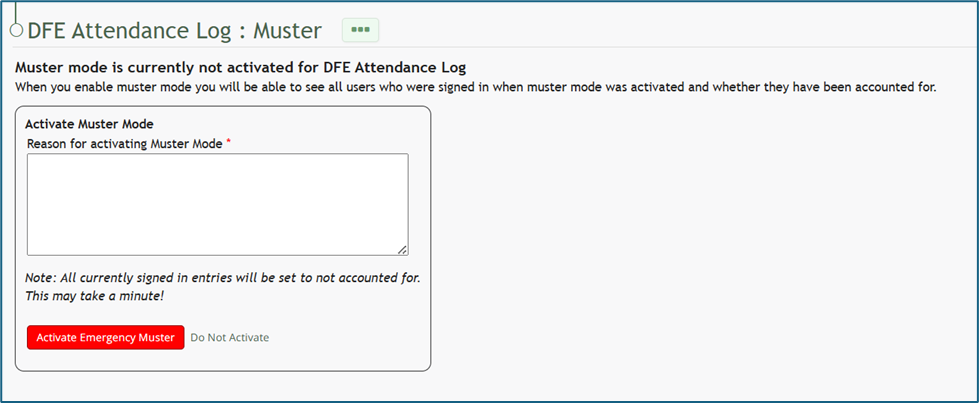
Input any relevant information into the “Reason for Activating Muster Mode” textbox and click the red “Activate Emergency Muster” button.
If this is not an emergency, select the clickable “Do Not Activate” link and you will be returned to the Information Page where you can select to enter Muster Mode in a Drill.
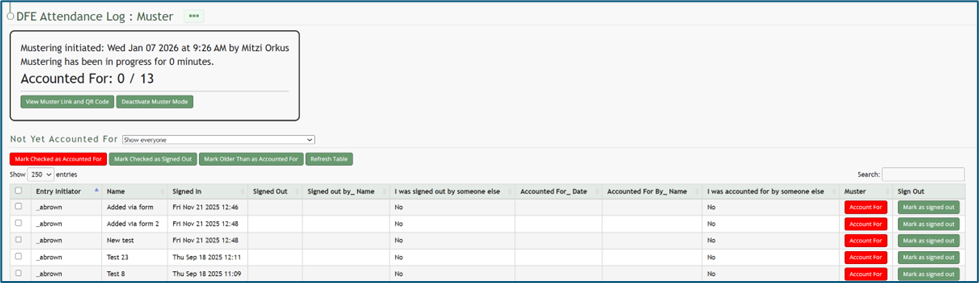
Once Emergency Muster has been activated, the page will change. The muster summary at the top of the page communicates that muster mode has been initiated.
How To: Deactivate Muster Mode
Muster mode can only be deactivated from the Muster Page when muster mode has been activated.
Select the “Deactivate Muster Mode” button, opening the Deactivate Muster Modal. Input any desired Deactivation Notes in the textbox provided.
Select “Deactivate” and you will be redirected to the attendance log’s Information Page.
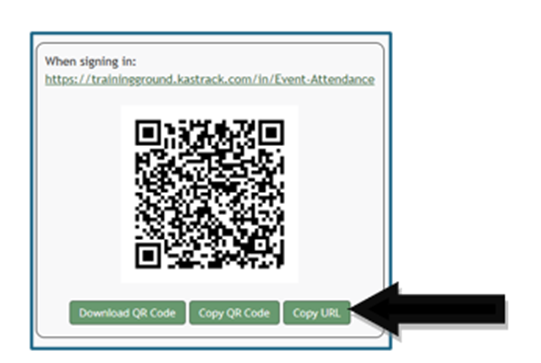
How To: Copy an Attendance Log URL Link
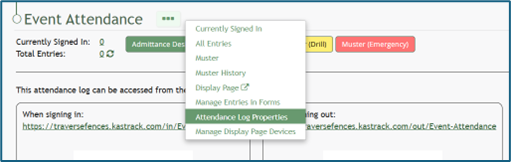
To copy an attendance log’s Sign In, Sign Out, or Muster Link, go to the Home Page of the Attendance Module. Click the attendance log’s name or click the three-dot icon to the right of the specific attendance log, opening the context menu.
Select “Attendance Log”, opening the attendance log’s Information Page.
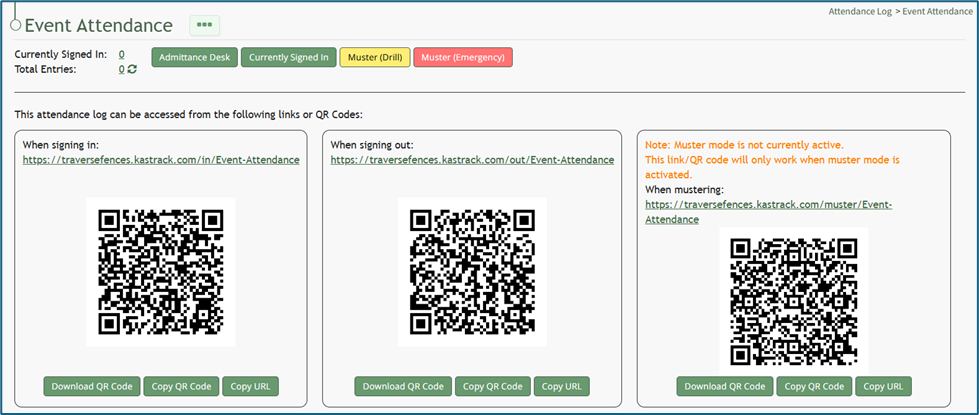
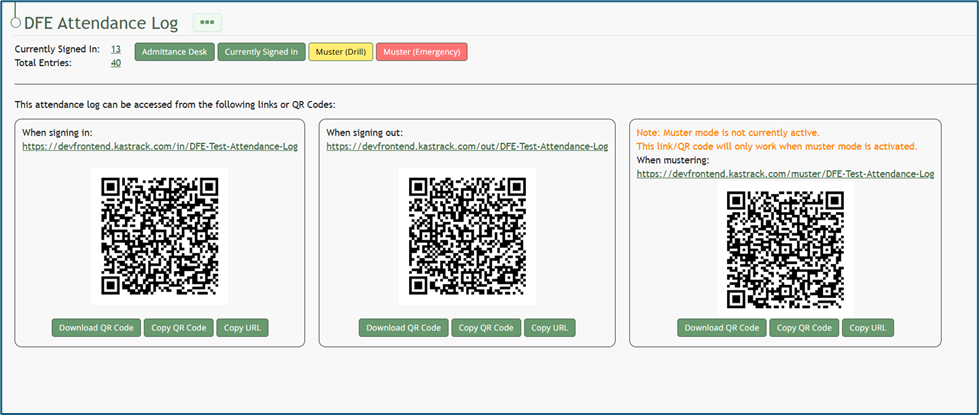
Within the Signing In, Signing Out, and Mustering sections of the Information Page, there are “Copy URL” buttons. To use the Mustering link, muster mode needs to be activated.
How To: Create a Custom Date/Time Format for an Attendance Log
To create a custom date/ time format for your attendance log, go to the Home Page of the Forms Module and click the three-dot icon to the right of the form the attendance log is based on. This opens the context menu. Select “Fields”.
This opens the Fields Tab of the Form. Select the three-dot icon next to the Field Name for the date/time field type and select “Edit Field”.
This opens the Edit Form Field Modal, which includes a Date/Time Format field. Select “Custom Date Format” from the drop-down menu.
This expands the Edit Form Field Modal. Input the PHP date format and the jQuery date format desired.
Time is not included in the Custom Date Format field.
To create a custom date format, the software needs to know how to both read and display the date. PHP (the server side) processes the date after it’s submitted. jQuery (the browser side) displays/formats the date in the date picker the user sees. Both systems have their own “language” for writing date formats, so you are required to provide a version both sides understand.
PHP uses letters to represent parts of the date, explained in the table below.
PHP Language Explanation | ||
What It Represents | PHP Letter | Example |
Day (with leading 0) | d | 02 |
Month (with leading 0) | m | 02 |
Year (4 digits) | y | 2025 |
jQuery uses similar but slightly different letters, explained in the table below.
jQuery Language Explanation | ||
What It Represents | jQuery Letter | Example |
Day (with leading 0) | dd | 02 |
Month (with leading 0) | mm | 02 |
Year (4 digits) | yy | 2025 |
Select “Save” at the bottom of the Edit Form Field Modal, and the customized date and time format will now be utilized.
How To: Deactivate Muster Mode
Muster mode can only be deactivated from the Muster Page when muster mode has been activated.
Select the “Deactivate Muster Mode” button, opening the Deactivate Muster Modal. Input any desired Deactivation Notes in the textbox provided.
Select “Deactivate” and you will be redirected to the attendance log’s Information Page.
How To: Delete an Attendance Log
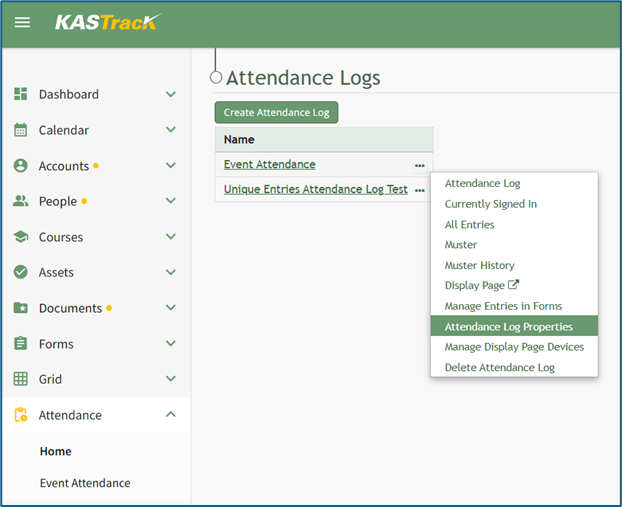
To delete an attendance log, go to the Home Page of the Attendance Module. Click the three-dot icon to the right of the attendance log you wish to delete opening the context menu. Select “Delete Attendance Log”.

This opens the Delete Attendance Log Confirmation Modal which lists the name of the Attendance Log to be deleted and states, “Are you sure you want to delete this Attendance Log?”
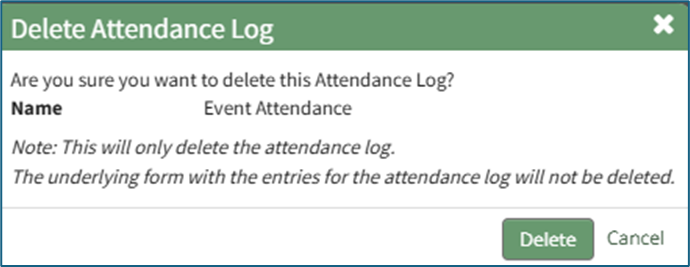
Select the “Delete” button. A confirmation message will appear stating, “This Attendance Log has been deleted.” The deleted attendance log will no longer be visible on the Home Page.

How To: Delete an Individual Attendance Log Entry
An entry that was submitted directly in the Attendance Module cannot be deleted in the Manage Entries Page of the Forms Module. If you attempt to do so, a Delete Form Entry Modal will direct you to delete the entry directly from the Attendance Log. 
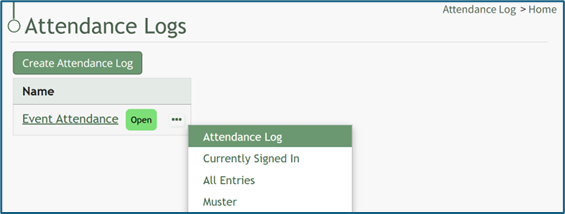
To delete an individual attendance log entry, open the attendance log you wish to delete the entry in by going to the Home Page of the Attendance Module and clicking the three-dot icon to the right of the attendance log’s name, opening the context menu.
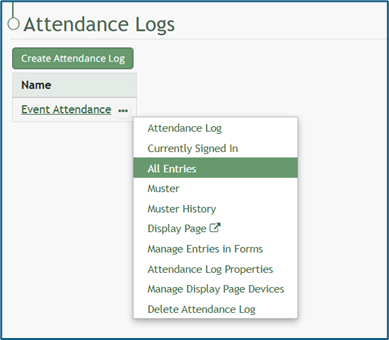
Select “All Entries”, opening the attendance log’s All Entries Page.
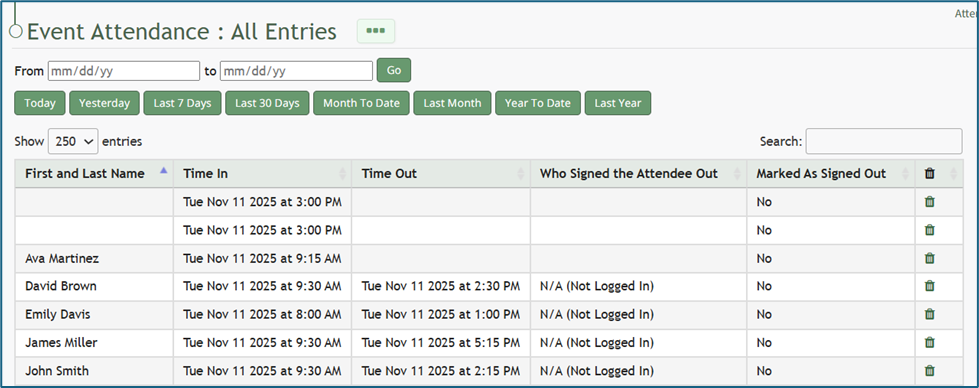
To delete an individual entry, select the trash can icon for the correct row in the far-right column of the All Entries Table. This opens a deletion confirmation modal which states, “Are you sure you wish to delete this entry?”
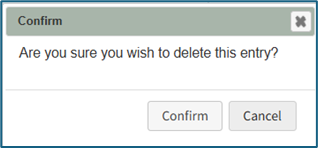
Select “Confirm” and the individual entry will be deleted from the attendance log.
How To: Download / Copy an Attendance Log QR Code
To download or copy an attendance log’s Sign In, Sign Out or Muster QR Code, go to the Home Page of the Attendance Module. Click the attendance log’s name or click the three-dot icon to the right of the attendance log you wish to download or copy the QR Code for, opening the context module.
Select “Attendance Log”, opening the attendance log’s Information Page.

Within the Signing In, Signing Out, and Mustering sections of the Information Page, there are buttons to Download QR Code or Copy QR Code. To use the Mustering QR Code, muster mode should be activated first.
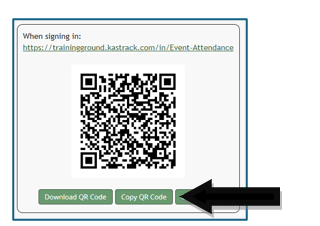
Click the desired button and the QR Code will be downloaded/copied to your device.
How To: Edit the Admittance Desk Page
To edit the Admittance Desk Page for an Attendance Log, open the attendance log you wish to edit by going to the Home Page of the Attendance Module and clicking the three-dot icon to the right of the attendance log title, opening the context menu.
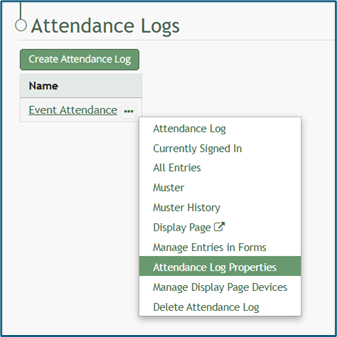
Select “Attendance Log Properties” from the context menu, opening the Attendance Log Properties Modal.
Click the arrow to the left of “Admittance Desk Options” to expand the section.
Here, a certification role can be associated with the attendance log or changed. This feature is useful is there are requirements for individuals to access a facility or event. Refer to the People Module for an understanding of certification roles.
How To: Create, Define, and Assign Users to a New Certification Role
To create and define a new certification role, select Roles in the People Module on the Main Menu opening the Certification Roles Page.
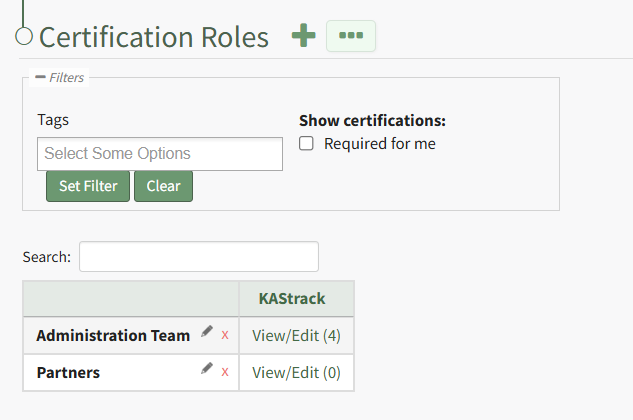
Click the plus sign icon to the right of the Certification Roles header to open the Add Role Name Modal.
Clicking the three-dot icon to the right of the header and selecting Add Role Name from the Certification Roles Page Context Menu will initiate the same action as selecting the plus sign icon.
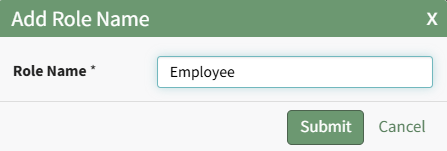
Input the new role's name and click the Submit button. The newly created role is now visible on the Certification Roles Table in alphabetical order.
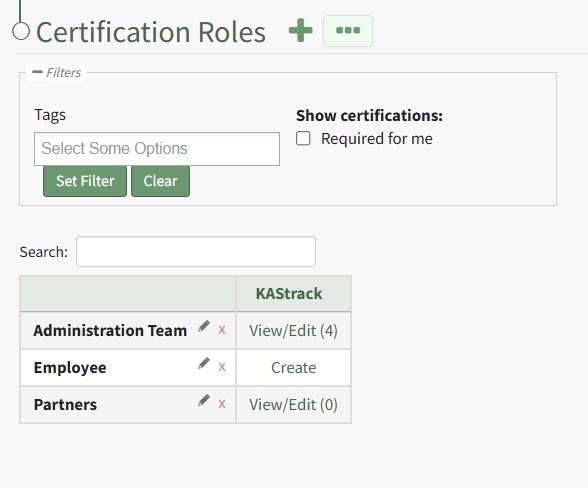
Select the clickable link to "Create" opening the Define Role Page.
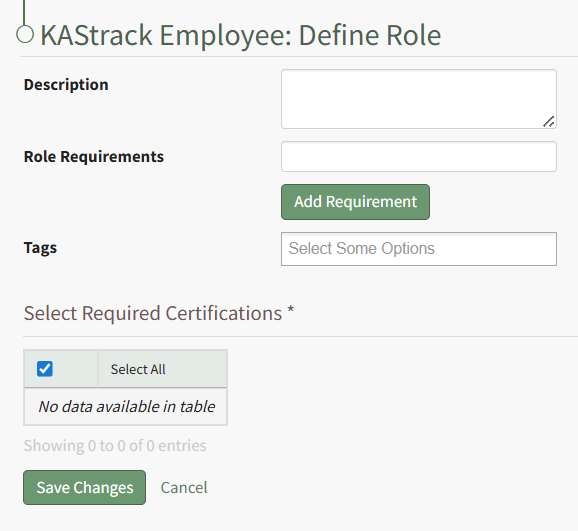
Input the role description and any relevant role requirements. Role requirements are specific to your organization. Multuple requirements can be included.
Any existing certifications will be listed in the table in the Select Required Certifications Table and can be selected via checkbox.
Certification roles are not required to have a certification associated with them.
Select "Save Changes" and certification role's Edit Users Page opens.

Identify the users that should be assigned to the certification role by selecting the checkbox to the left of the user's name.
Selecting the checkbox on the top row of the table will select/deselect all checkboxes in the table.
Click the Save Changes button below the table and the assigned users will now show in the newly created certification role.
How To: Add a Custom/Additional User Account Information Field
To add a user account information field, open the Account Fields Tab in the Site Settings Module from the Main Menu.
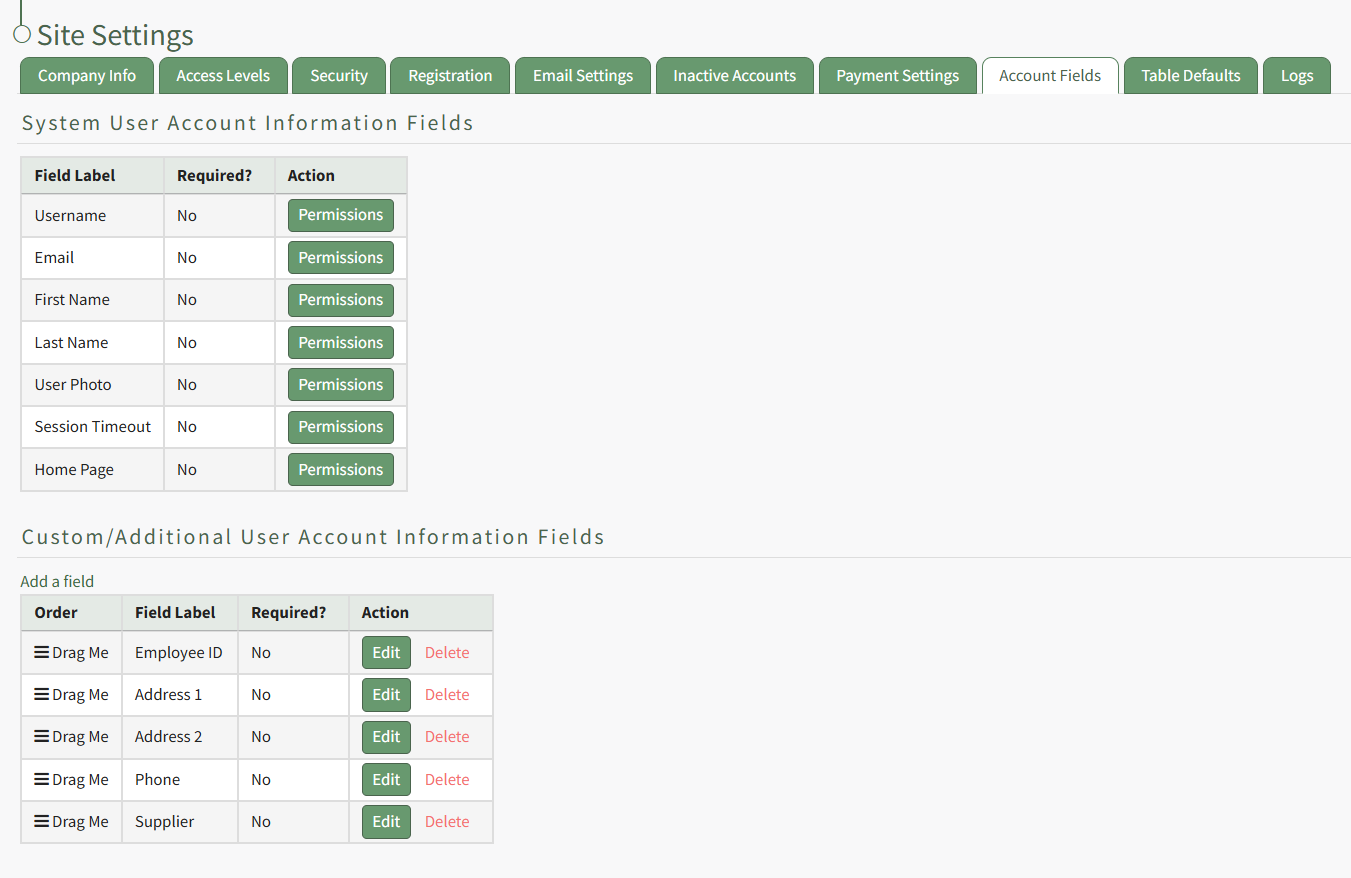
Click the "Add a Field" clickable link above the Custom / Additional User Account Information Fields opening the Add Field Modal.
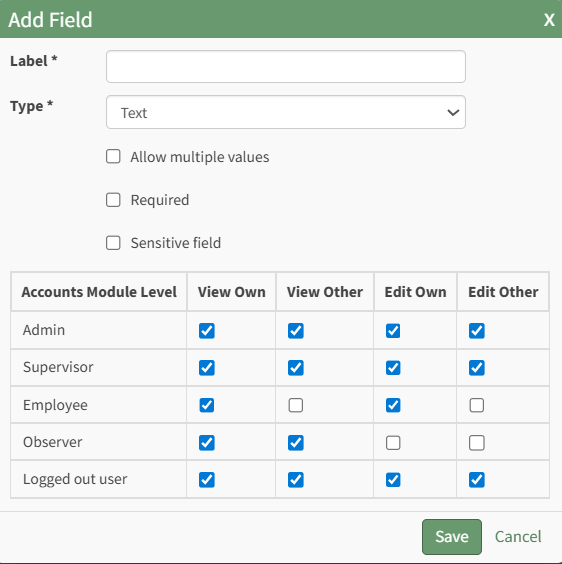
Input the label for the field.
Select the field type (text or email) from the dropdown menu.
Selecting the checkbox enables customization to "Allow multiple values," make the field "Required," or make it a "Sensitive Field."
Designating the field as a "Sensitive Field" allows an extra step in form security when integrating these fields within the Form module. The Form Designer must explicitly choose when they wish to use a sensitive field.
The Permissions Table determines who can view / edit their own and other user's fields. Selecting the checkbox gives the individual the specified permission. Deselecting the checkbox removed the permission.
Select the "Save" button and the custom field now shows in the table.
Use the Drag Me icon to drag and drop the field into your desired position of choice.

How To: Edit the Columns on the All Entries Page Table
To edit the columns that show on the All Entries Table, open the attendance log you want to make changes in. You can access an attendance log on the Main Menu (if selected to be shown there) or from the Home Page of the Attendance Module.
How To: Show an Attendance Log on the Main Menu
To show an attendance log on the main menu, open the attendance log and go to the Attendance Module Home Page. All available attendance logs will be visible in the table with a three-dot icon to the right of the attendance log’s name. Click the three-dot icon to open the context menu. Select “Attendance Log Properties.”

This opens the Attendance Log Properties Modal. Select the “Show In Main Menu” checkbox.

Click “Save” at the bottom of the Attendance Log Properties Modal.
To see the attendance log as its own page in the Main Menu, refresh the page or log out and sign back in to KAStrack. The attendance log will now show as its own page in the Main Menu.
From the Home Page:
By going to the Attendance Module Home Page, all available attendance logs will be visible in the table, with a three-dot icon to the right of the attendance log’s name.
Click on the three-dot icon to the right of the attendance log’s name, which opens the context menu. Then, select “Attendance Log Properties.”

This opens the Attendance Log Properties Modal. The columns visible on the All Entries Table can be edited from the section titled Fields Related to Managing Sign Ins.
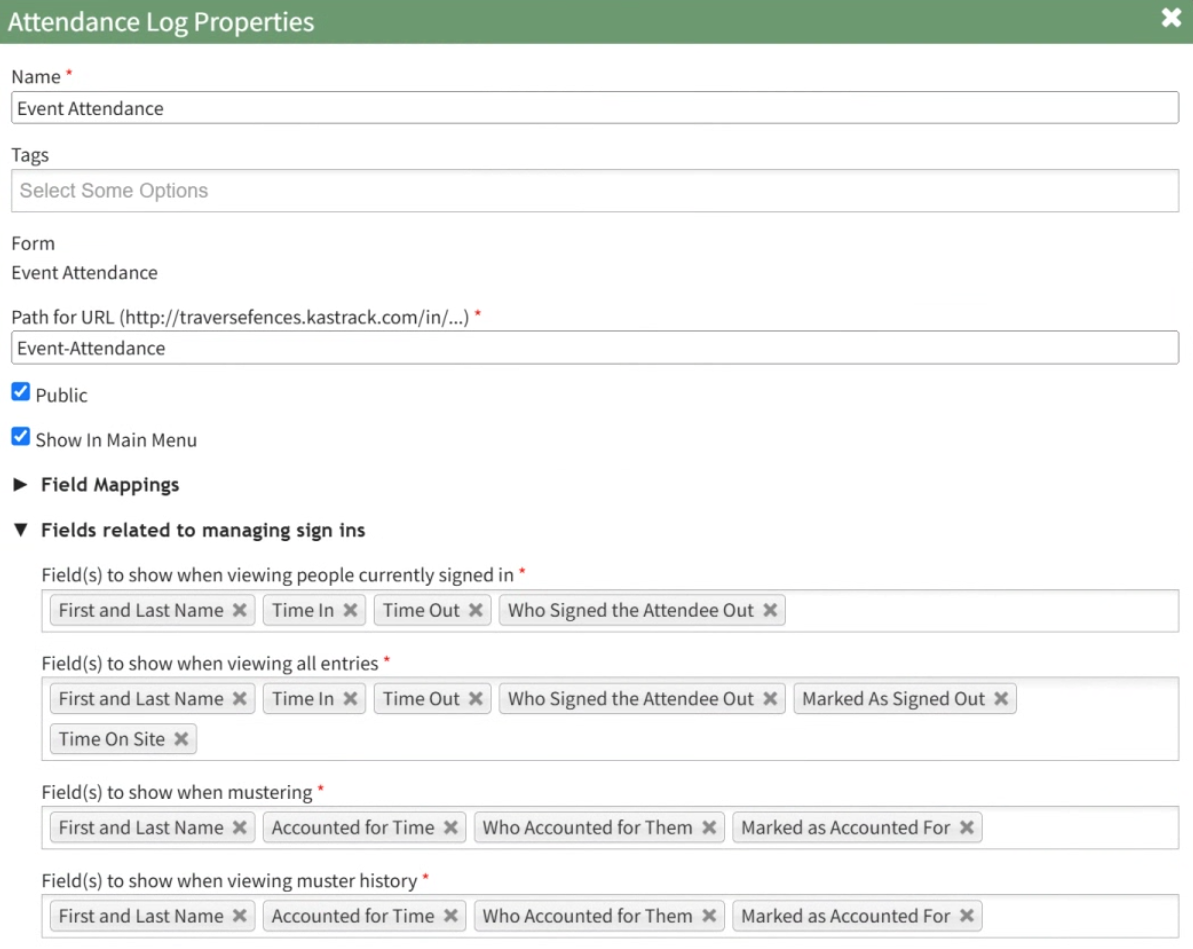
Add and remove fields as desired from the field named “Field(s) to show when viewing all entries”. The order of the fields here corresponds to the order of the columns in the All Entries Table.

Select “Save” at the bottom of the Attendance Log Properties Modal, and you can check your edits on the All Entries Page.
How To: Edit the Columns on the Currently Signed In Page Table
To edit the columns that show on the Currently Signed In Table, open the attendance log you want to make changes in. You can access an attendance log on the Main Menu (if selected to be shown there) or from the Home Page of the Attendance Module.
How To: Show an Attendance Log on the Main Menu
To show an attendance log on the main menu, open the attendance log and go to the Attendance Module Home Page. All available attendance logs will be visible in the table with a three-dot icon to the right of the attendance log’s name. Click the three-dot icon to open the context menu. Select “Attendance Log Properties.”
This opens the Attendance Log Properties Modal. Select the “Show In Main Menu” checkbox.
Click “Save” at the bottom of the Attendance Log Properties Modal.
To see the attendance log as its own page in the Main Menu, refresh the page or log out and sign back in to KAStrack. The attendance log will now show as its own page in the Main Menu.

From the Home Page:
By going to the Attendance Module Home Page, all available attendance logs will be visible in the table, with a three-dot icon to the right of the attendance log’s name.
Click on the three-dot icon to the right of the attendance log’s name, which opens the context menu. Then, select “Attendance Log Properties.”
This opens the Attendance Log Properties Modal. The columns visible on the Currently Signed In Table can be edited in the section titled Fields Related to Managing Sign Ins.

Add and remove fields as desired in the field named “Field(s) to show when viewing people currently signed in”. The order of the fields here corresponds to the order of the columns in the Currently Signed In Table.

Select “Save” at the bottom of the Attendance Log Properties Modal and your edits will now show on the Currently Signed In Page.
How To: Edit the Columns on the Muster History Page
To edit the columns that show on the Muster History Table, open the attendance log you want to make changes in. You can access an attendance log on the Main Menu (if selected to be shown there) or from the Home Page of the Attendance Module.
How To: Show an Attendance Log on the Main Menu
To show an attendance log on the main menu, open the attendance log and go to the Attendance Module Home Page. All available attendance logs will be visible in the table with a three-dot icon to the right of the attendance log’s name. Click the three-dot icon to open the context menu. Select “Attendance Log Properties.”
This opens the Attendance Log Properties Modal. Select the “Show In Main Menu” checkbox.
Click “Save” at the bottom of the Attendance Log Properties Modal.
To see the attendance log as its own page in the Main Menu, refresh the page or log out and sign back in to KAStrack. The attendance log will now show as its own page in the Main Menu.

From the Home Page:
By going to the Attendance Module Home Page, all available attendance logs will be visible in the table, with a three-dot icon to the right of the attendance log’s name.
Click on the three-dot icon to the right of the attendance log’s name, which opens the context menu. Then, select “Attendance Log Properties.”

This opens the Attendance Log Properties Modal. The columns visible on the Muster History Table can be edited in the section titled Fields Related to Managing Sign Ins.
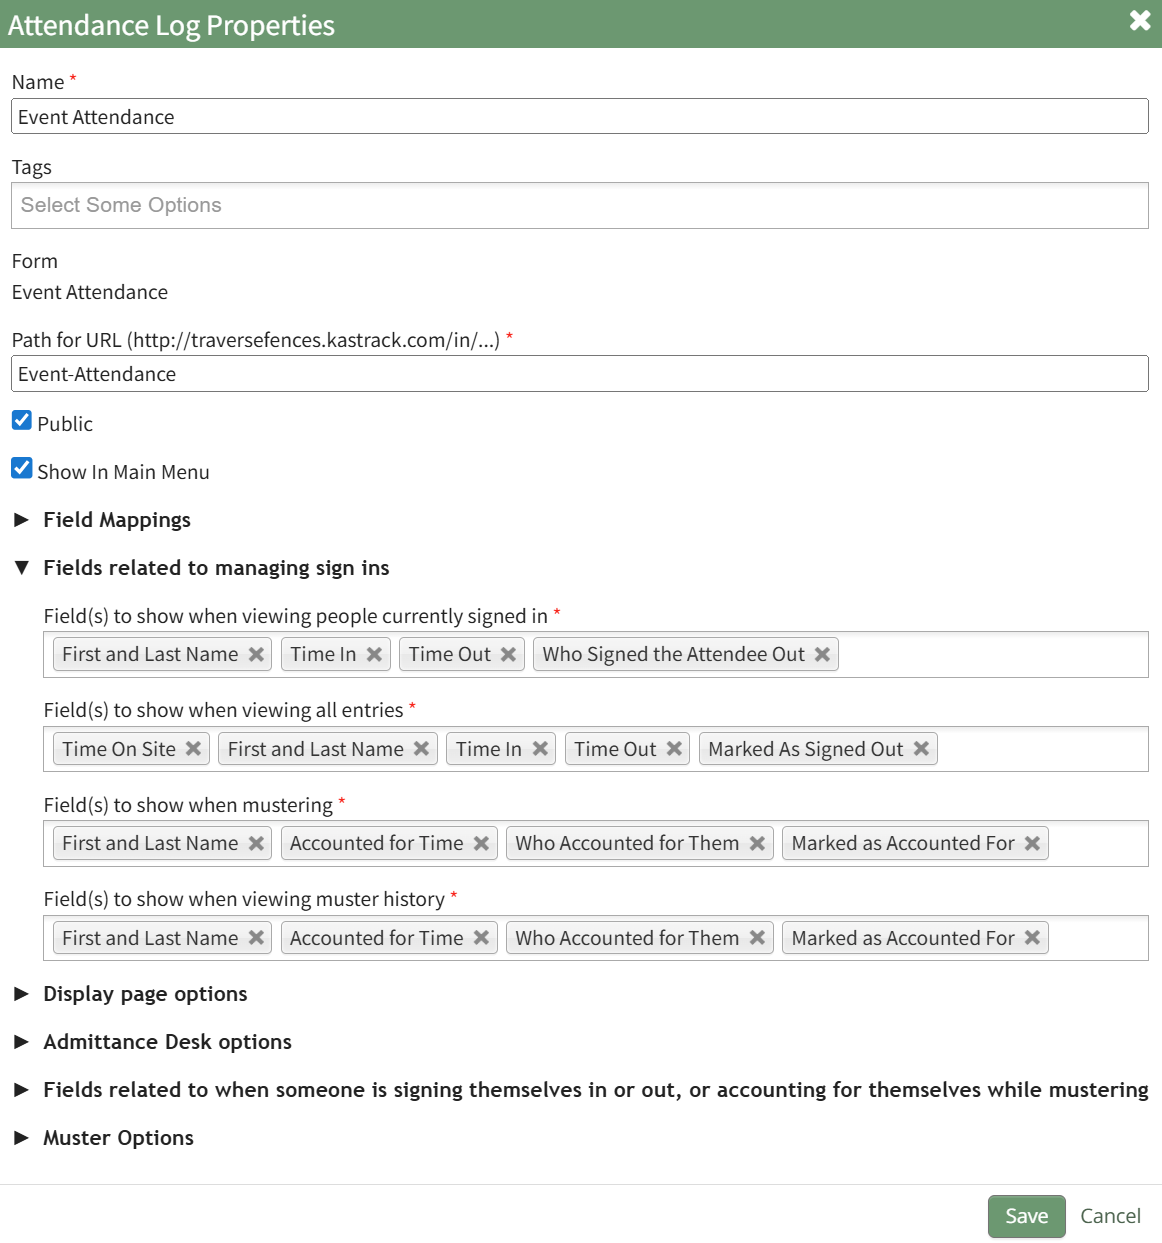
Add and remove fields as desired in the field named “Field(s) to show when viewing muster history”. The order of the fields here corresponds to the order of the columns in the Muster History Table.

Select “Save” at the bottom of the Attendance Log Properties Modal and your edits will now show on all of your attendance log’s Muster History Pages.
How To: Edit the Columns that Show when Mustering
To edit the columns that show when mustering (drill or emergency), open the attendance log you want to make changes in. You can access an attendance log on the Main Menu (if selected to be shown there) or from the Home Page of the Attendance Module.
How To: Show an Attendance Log on the Main Menu
To show an attendance log on the main menu, open the attendance log and go to the Attendance Module Home Page. All available attendance logs will be visible in the table with a three-dot icon to the right of the attendance log’s name. Click the three-dot icon to open the context menu. Select “Attendance Log Properties.”
This opens the Attendance Log Properties Modal. Select the “Show In Main Menu” checkbox.
Click “Save” at the bottom of the Attendance Log Properties Modal.
To see the attendance log as its own page in the Main Menu, refresh the page or log out and sign back in to KAStrack. The attendance log will now show as its own page in the Main Menu.
From the Home Page:
By going to the Attendance Module Home Page, all available attendance logs will be visible in the table, with a three-dot icon to the right of the attendance log’s name.
Click on the three-dot icon to the right of the attendance log’s name, which opens the context menu. Then, select “Attendance Log Properties.”

This opens the Edit Attendance Log Modal. The columns visible on the Muster Page can be edited in the section titled Fields Related to Managing Sign Ins.
Add and remove fields as desired in the field named “Field(s) to show when mustering”. The order of the fields here corresponds to the order of the columns in the Muster Table.

Select “Save” at the bottom of the Attendance Log Properties Modal and your edits will now show on the Muster Page.
How To: Edit the Display Page
To edit the Display Page for an Attendance Log, open the attendance log you’ve enabled the Display Page feature in by going to the Home Page of the Attendance Module and clicking the three-dot icon to the right of the attendance log title, opening the context menu.

Select “Attendance Log Properties” from the context menu, opening the Attendance Log Properties Modal.
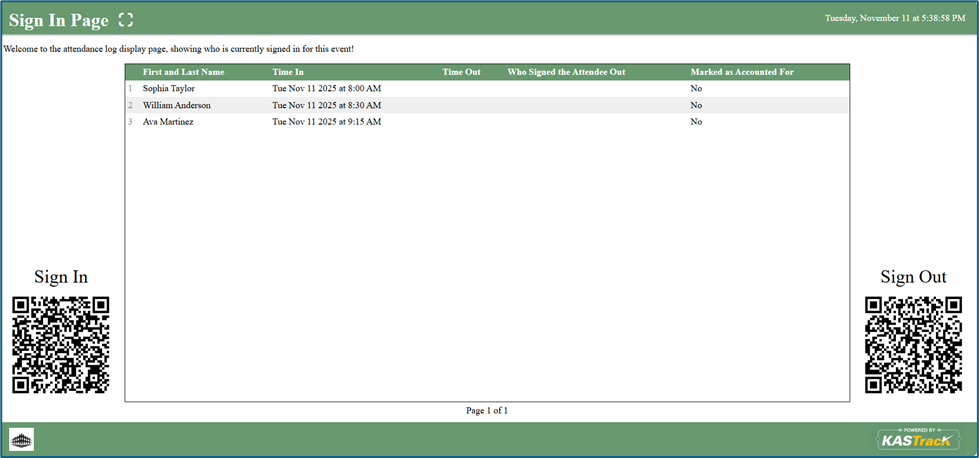
Click the arrow to the left of “Display Page Options” to expand the section. The Display Page Option Section impacts the design and layout of the Display Page shown below. The Display Page Option Section Explanations Table shown beneath the example of the Display Page gives details for each of the editable fields.
Display Page Option Section Explanations | |||
Field | Comments | ||
Title for the Display Page | You can give the display page a title different that is different from the name of the attendance log. The Display Page Title will show in the top left-hand corner of the Display Page. | ||
Text for the Display Page | The text for the Display Page is seen immediately beneath the page header. You can customize this text or leave it blank. | ||
Field(s) to Include on the Display Page | Select the fields you want to be visible on the Display Page. All fields included on the Attendance Log Form will show as Display Page field options. | ||
Font Size (em) | Font size is automatically set a 1em. Input the desired font size. An em is a unit in the field of typography, equal to the currently specified point size that corresponds to the body height of the typeface. | ||
Field Widths (pixels) | Leave this blank for auto widths, or specify one width per column, separated by spaces. Use ‘auto’ to use auto width for a column. (For example, if there are three columns then ‘auto 100 100’ will set the column width for the last two columns to 100px, and auto-size the first column). | ||
On the Display Page, Show... | There are two selections provided via drop-down menu for who shows on the display page: “People who are currently signed in” OR “People Who Have Signed In Today” | ||
Scroll Rate (seconds) | The scroll rate is automatically set to 30 seconds. If your screen only shows 25 entries at a time, scroll rate dictates how long the screen will show those 25 entries before scrolling to the next 25 entries. | ||
Include the Sign In QR Code Checkbox | Selecting this checkbox will result in the Sign In QR Code being displayed on the Display Page. | ||
Include the Sign Out QR Code Checkbox | Selecting this checkbox will result in the Sign Out QR Code being displayed on the Display Page. | ||
Use Muster Display When Mustering | Selecting this checkbox will result in the Mustering Display Page being shown as opposed to the regular Display Page when in Muster mode. When selected, it expands to show additional fields. | ||
Fields | Comments | ||
Muster Mode | There are two options for this drop-down menu. The first option is “Show not accounted for people and stats”, which will show information about individuals who have not accounted for themselves or have not been marked as accounted for. The second option is “Only show QR Code”, which will display the muster mode QR Code instead. | ||
Fields to Include on the display page when mustering | Select the fields you would like to be visible on the Mustering Display Page. All fields included on the attendance log form will show as options. | ||
Include the muster QR code | Selecting this checkbox will show the Muster QR Code on the Muster Display Page. | ||
Show Accounted For List | Selecting this checkbox results in the Accounted For List showing on the Muster Display Page. It expands when selected with additional options. | ||
Fields | Comments | ||
Pattern for the Accounted for List | You can use the pattern field to reference your form fields in the Accounted For List. Input the fields you would like displayed in order. Example: #FieldName1# #FieldName2# | ||
Accounted for List Font Size (em) | The font size for the accounted for list is set at 1em but can be altered. | ||
Accounted for List Pagination Speed (seconds) | The pagination speed of the accounted for list is set at 30 seconds but can be altered. | ||
Sort By Field | Select which field you would like the Muster Display Page to use for sorting. | ||
QR Code Size (pixels) | The QR Code size is set for 200 pixels but can be altered. | ||
How To: Enable the Admittance Desk Page
To enable the Admittance Desk Page for an attendance log, open the attendance log you wish to enable the Admittance Desk feature in by going to the Home Page of the Attendance Module and clicking the three-dot icon to the right of an attendance log’s name, opening the context menu. Select “Attendance Log Properties” from the context menu which will open the Attendance Log Properties Modal.

Click the arrow to the left of “Admittance Desk Options” to expand the section. The Admittance Desk Option Section impacts the layout of the Admittance Desk Page.
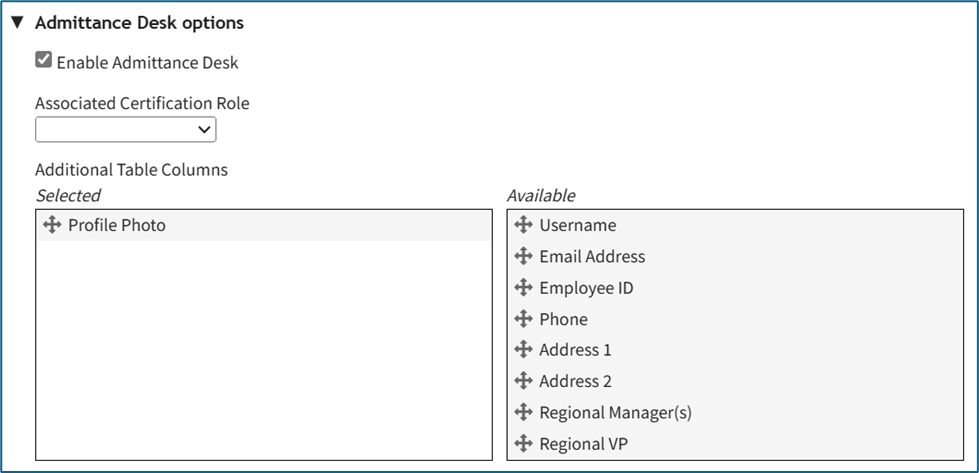
Select the “Enable Admittance Desk” checkbox. Now you can select the Associated Certification Role, and drag and drop any additional columns you want to see on the table. (Note: The available columns are based on your site’s account and custom account fields).
Click “Save” at the bottom of the Attendance Log Properties Modal. Next, navigate to the attendance log’s Information Page by clicking on the attendance log’s name, or by clicking the 3-dot icon to the right of the attendance log’s name to open the context menu, and select “Attendance Log”. You will see the Admittance Desk Button on the attendance log’s Information Page.
Click the Admittance Desk Button to view your Admittance Desk and use the Search Bar to find and manage individuals within the role.
If you enable the Admittance Desk directly from an attendance log’s Information Page by using the 3-dot icon on the page, you will need to refresh the page to see the button.
How To: Enable the Display Page
To edit the Display Page for an Attendance Log, open the attendance log you’ve enabled the Display Page feature in by going to the Home Page of the Attendance Module and clicking the three-dot icon to the right of the attendance log title, opening the context menu.
Select “Attendance Log Properties” from the context menu, opening the Attendance Log Properties Modal.
Click the arrow to the left of “Display Page Options” to expand the section. The Display Page Option Section impacts the design and layout of the Display Page shown below. The Display Page Option Section Explanations Table shown beneath the example of the Display Page gives details for each of the editable fields.
Display Page Option Section Explanations | |||
Field | Comments | ||
Title for the Display Page | You can give the display page a title different that is different from the name of the attendance log. The Display Page Title will show in the top left-hand corner of the Display Page. | ||
Text for the Display Page | The text for the Display Page is seen immediately beneath the page header. You can customize this text or leave it blank. | ||
Field(s) to Include on the Display Page | Select the fields you want to be visible on the Display Page. All fields included on the Attendance Log Form will show as Display Page field options. | ||
Font Size (em) | Font size is automatically set a 1em. Input the desired font size. An em is a unit in the field of typography, equal to the currently specified point size that corresponds to the body height of the typeface. | ||
Field Widths (pixels) | Leave this blank for auto widths, or specify one width per column, separated by spaces. Use ‘auto’ to use auto width for a column. (For example, if there are three columns then ‘auto 100 100’ will set the column width for the last two columns to 100px, and auto-size the first column). | ||
On the Display Page, Show... | There are two selections provided via drop-down menu for who shows on the display page: “People who are currently signed in” OR “People Who Have Signed In Today” | ||
Scroll Rate (seconds) | The scroll rate is automatically set to 30 seconds. If your screen only shows 25 entries at a time, scroll rate dictates how long the screen will show those 25 entries before scrolling to the next 25 entries. | ||
Include the Sign In QR Code Checkbox | Selecting this checkbox will result in the Sign In QR Code being displayed on the Display Page. | ||
Include the Sign Out QR Code Checkbox | Selecting this checkbox will result in the Sign Out QR Code being displayed on the Display Page. | ||
Use Muster Display When Mustering | Selecting this checkbox will result in the Mustering Display Page being shown as opposed to the regular Display Page when in Muster mode. When selected, it expands to show additional fields. | ||
Fields | Comments | ||
Muster Mode | There are two options for this drop-down menu. The first option is “Show not accounted for people and stats”, which will show information about individuals who have not accounted for themselves or have not been marked as accounted for. The second option is “Only show QR Code”, which will display the muster mode QR Code instead. | ||
Fields to Include on the display page when mustering | Select the fields you would like to be visible on the Mustering Display Page. All fields included on the attendance log form will show as options. | ||
Include the muster QR code | Selecting this checkbox will show the Muster QR Code on the Muster Display Page. | ||
Show Accounted For List | Selecting this checkbox results in the Accounted For List showing on the Muster Display Page. It expands when selected with additional options. | ||
Fields | Comments | ||
Pattern for the Accounted for List | You can use the pattern field to reference your form fields in the Accounted For List. Input the fields you would like displayed in order. Example: #FieldName1# #FieldName2# | ||
Accounted for List Font Size (em) | The font size for the accounted for list is set at 1em but can be altered. | ||
Accounted for List Pagination Speed (seconds) | The pagination speed of the accounted for list is set at 30 seconds but can be altered. | ||
Sort By Field | Select which field you would like the Muster Display Page to use for sorting. | ||
QR Code Size (pixels) | The QR Code size is set for 200 pixels but can be altered. | ||
How To: Generate A Time on Site Summary Report
To generate a time on site summary report, open the Attendance Module Home Page from the Main Menu. Click the three-dot icon to the right of the attendence log you wish to generate a time on site summary report for opening the attendance log context menu.
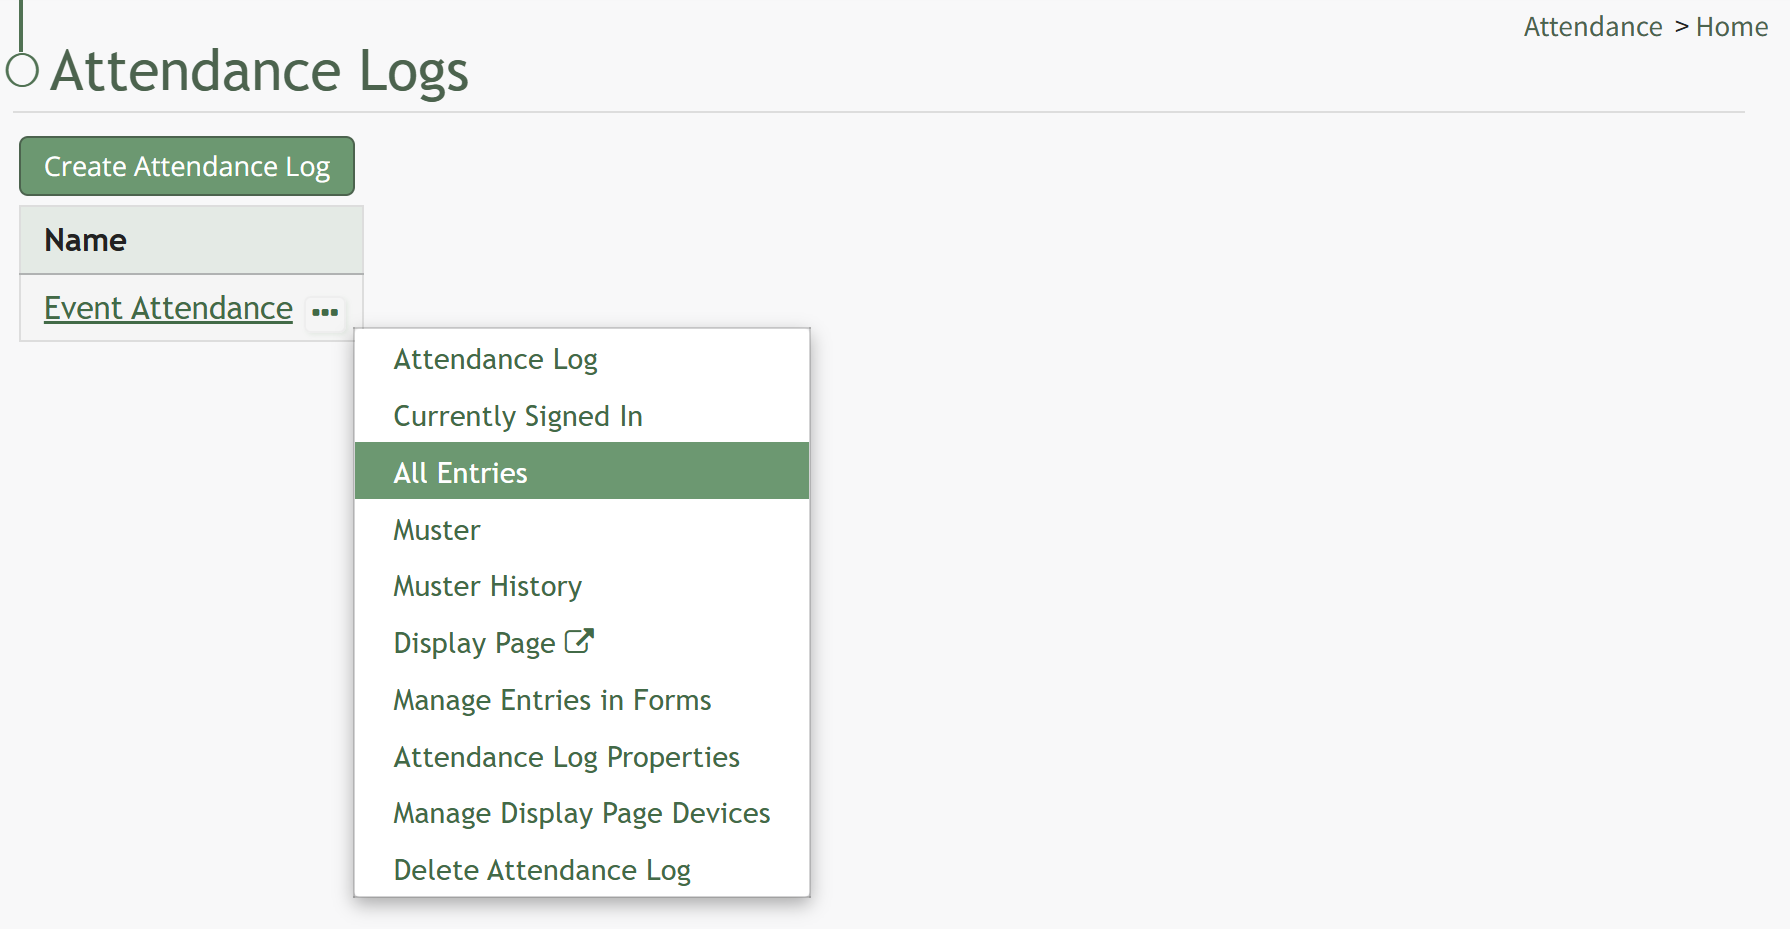
Select All Entries on the context menu to open the All Entries Page.
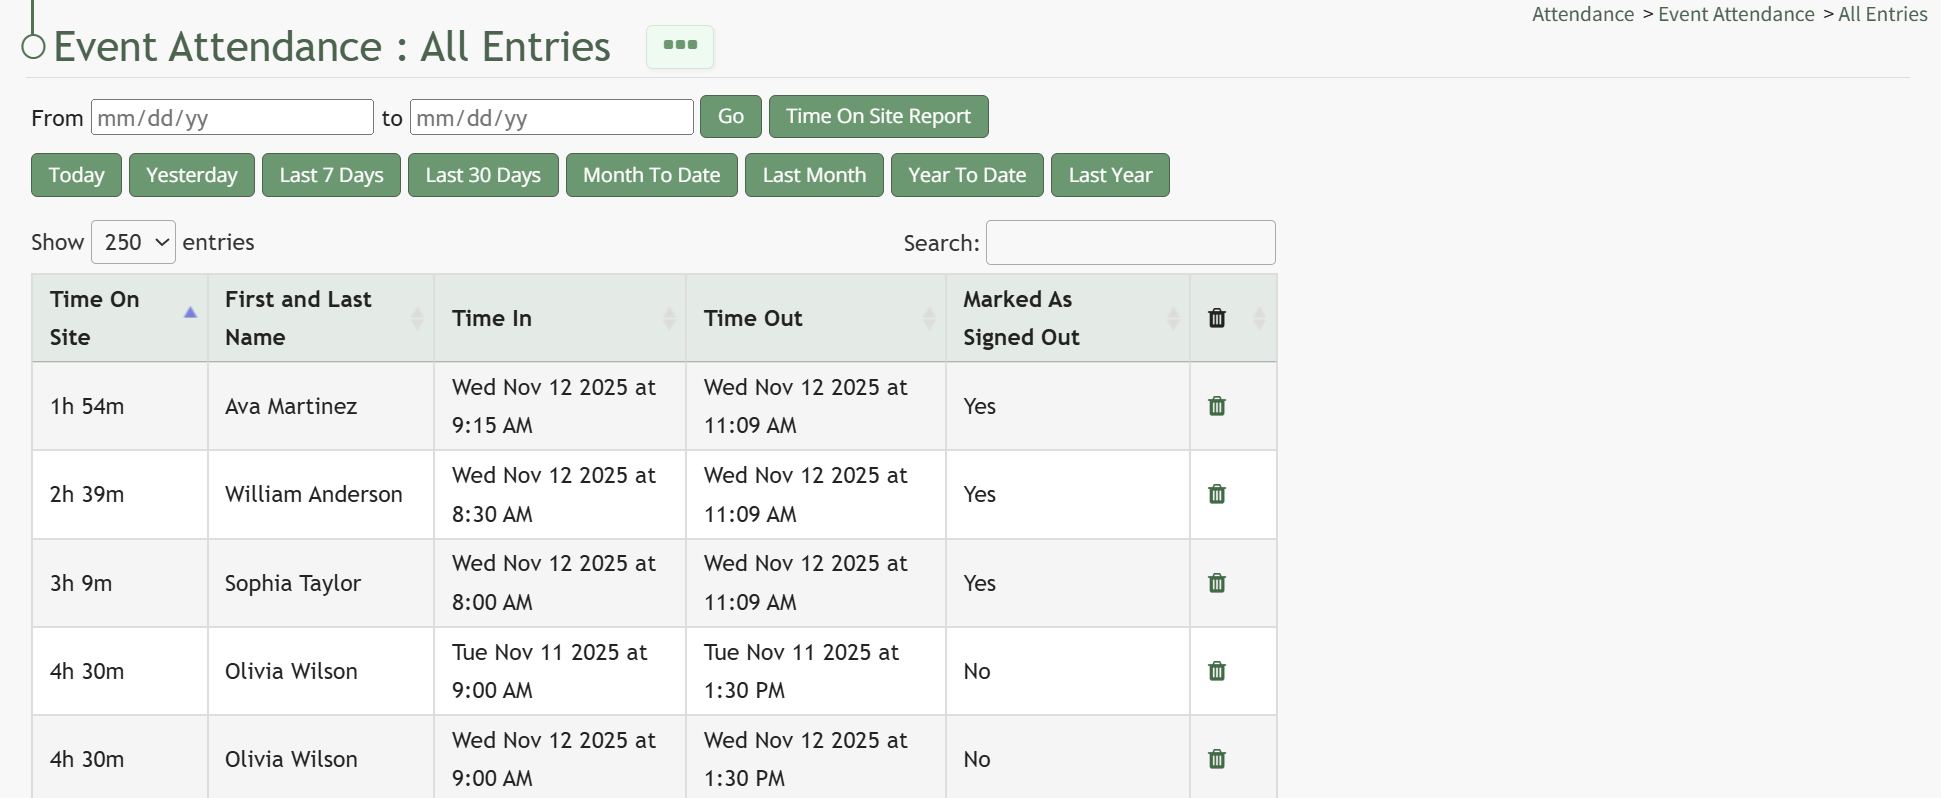
Click the Time On Site Report button opening the Time on Site Summary Report Modal.
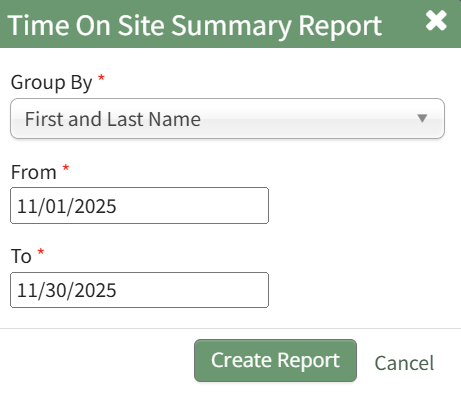
Select how you would like the time on site information to be grouped from the dropdown menu. Input a start date (From) and an end date (To) that you would like the time on site calculated for. (All fields on the modal are mandatory.)
Click the Create Report button, and a summary of time on site is generated within the Attendance Module.

How To: Make Entries Prior to a Date/Time as Signed Out
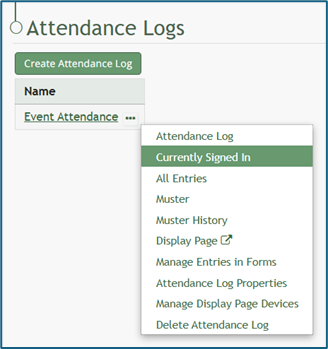
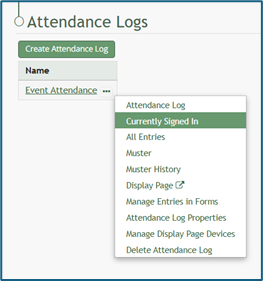
To mark specific entries prior to a date/time as signed out, go to the Home Page and select the three-dot icon to the right of the attendance log you wish to sign out entries for. This opens the context menu. Select “Currently Signed In”.
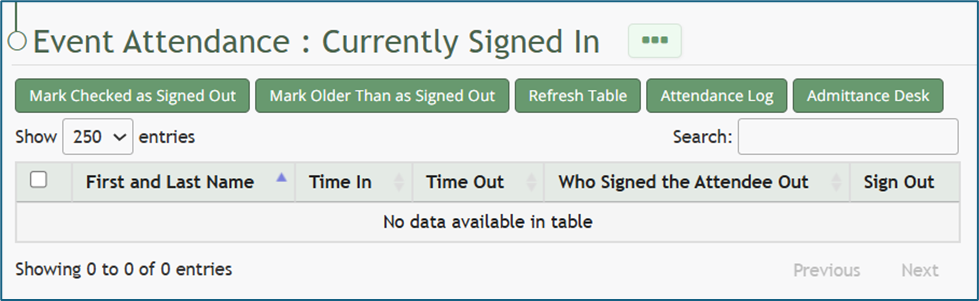
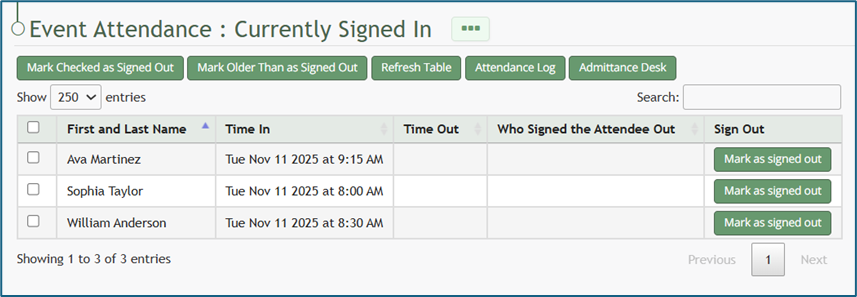
This opens the Currently Signed In Page.
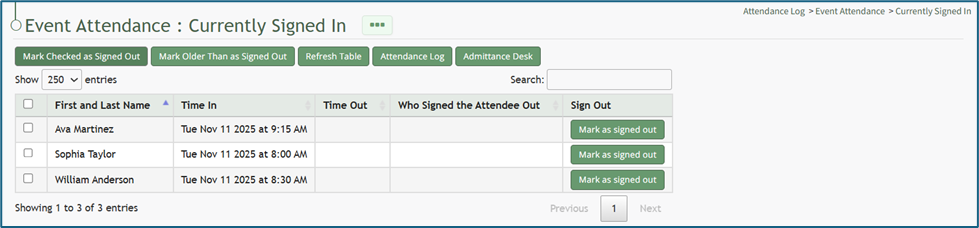
Select the “Mark Older Than as Signed Out” button, opening the Mark Older Than Modal. Click within the date box and a calendar appears for ease in selecting the appropriate date.
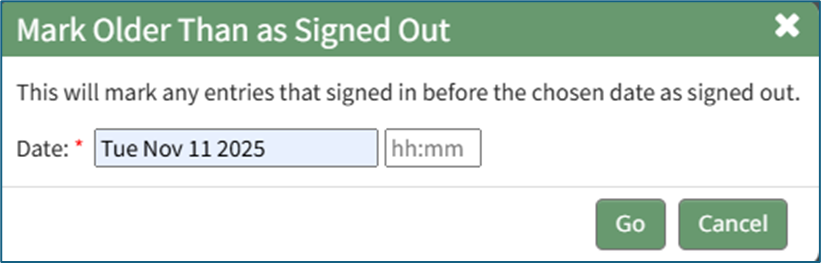
Click “Go” and a Confirmation Modal indicates the number of entries that were impacted by the action.

The Currently Signed In Table now reflects the changes that were made.
How To: Mark Individuals Signed In Prior to A Certain Date/Time as Accounted For While in Muster Mode
Once muster mode has been activated, individuals who signed in prior to a specific date and time can be marked as accounted for.

To do so, click the “Mark Older Than as Accounted For” button opening the Mark Older Than as Accounted For Modal.
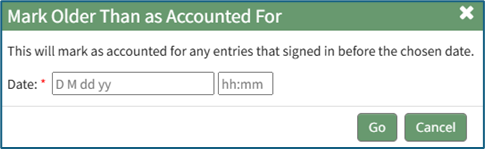
Input the desired date and time. Anyone who signed in before this date/time will be marked as accounted for in the muster table. A calendar is provided for ease in accurately setting the desired date.
Click “Go” at the bottom of the modal and a confirmation modal will appear, communicating how many entries were accounted for by the action.

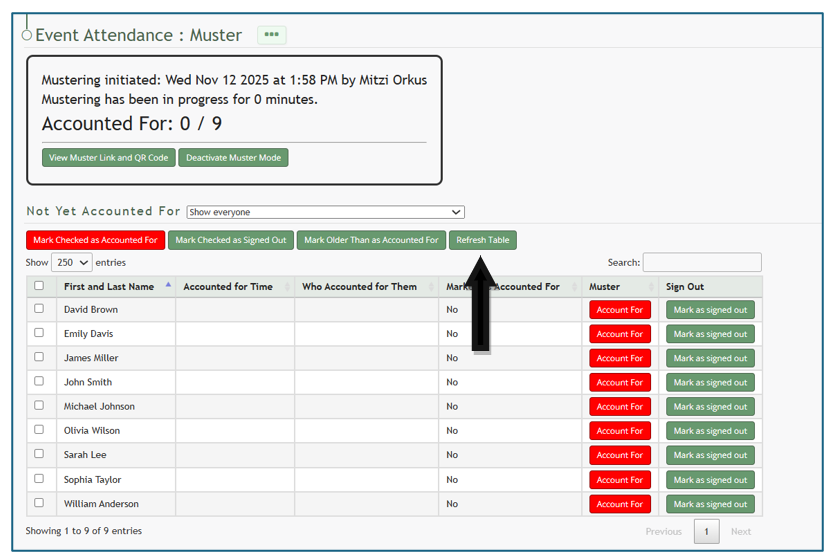
How To: Refresh the Currently Signed In Table
To refresh the Currently Signed In Table and reload the data currently shown in the table, open the attendance log you wish to refresh the table for by going to the Home Page of the Attendance Module and clicking the three-dot icon to the right of the attendance log’s name, opening the context menu.

Select “Currently Signed In” opening the Currently Signed In Page.
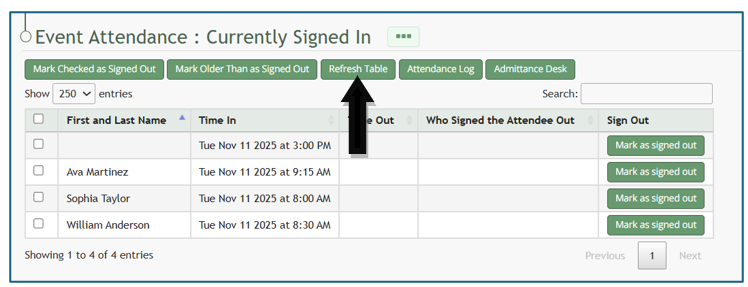
Click the “Refresh Table” button beneath the page header, and the latest records will replace the information currently shown on the table.
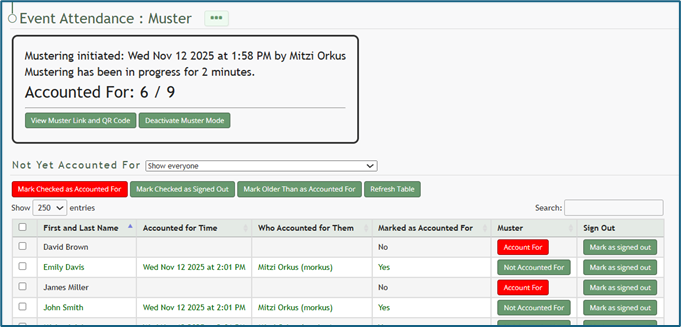
How To: Refresh the Muster Table while in Muster Mode
Refreshing the Muster table while in muster mode is a beneficial feature, particularly if individuals are using the QR Code or URL Link to account for themselves.
To refresh the table, select the “Refresh Table” button.
The muster table will automatically refresh, and the updated summary will show the accounted for individuals.
How To: Show an Attendance Log on the Main Menu
To show an attendance log on the main menu, open the attendance log and go to the Attendance Module Home Page. All available attendance logs will be visible in the table with a three-dot icon to the right of the attendance log’s name. Click the three-dot icon to open the context menu. Select “Attendance Log Properties.”
This opens the Attendance Log Properties Modal. Select the “Show In Main Menu” checkbox.
Click “Save” at the bottom of the Attendance Log Properties Modal.
To see the attendance log as its own page in the Main Menu, refresh the page or log out and sign back in to KAStrack. The attendance log will now show as its own page in the Main Menu.
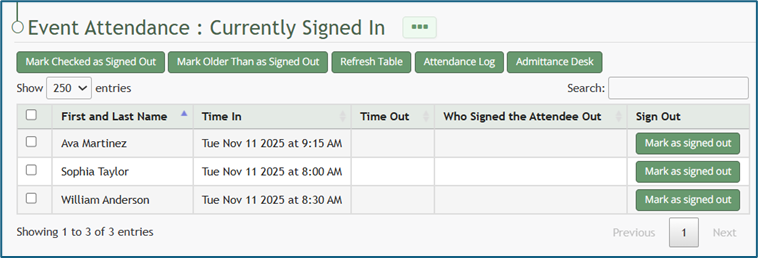
How To: Sign Out an Individual
To sign out an individual from the attendance log, open the attendance log you wish to sign individuals out of by going to the Home Page of the Attendance Module and clicking the three-dot icon to the right of the attendance log’s name, opening the context menu.
Select “Currently Signed In” opening the Currently Signed In Page.
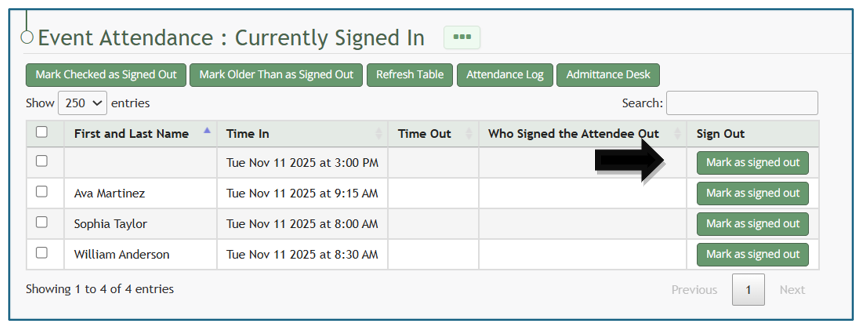
Click the “Mark as Signed Out” button in the row of the entry you wish to be signed out.
The entry will no longer show on the Currently Signed In Page.
How To: Sign Out Individuals when In Muster Mode
Once muster mode has been activated, individuals can be signed out rather than accounted for if needed. To do so, select the checkboxes to the left of the individuals you wish to sign out.
Selecting the checkbox in the top row will select all entries.
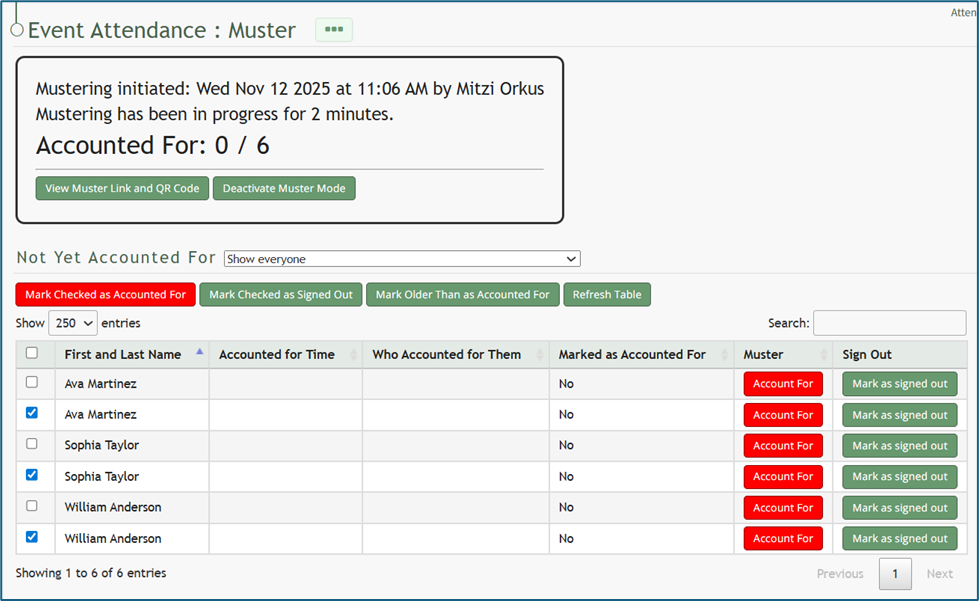
Click the “Marked Checked Out as Signed Out” button above the table.
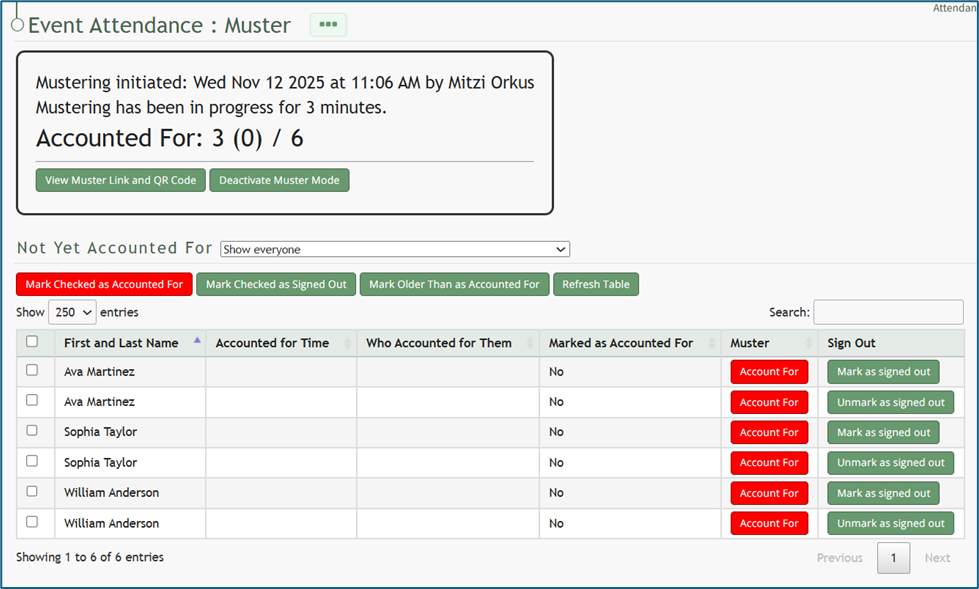
The summary box at the top of the muster page now shows those individuals that were signed out as (indirectly) accounted for.
If an individual was signed out in error, you can select the “Unmark as Signed Out” button to correct the issue.
How To: Sign Out Other Individuals (In Bulk)
To sign out multiple other individuals at one time, open the attendance log you wish to sign individuals out of by going to the Home Page of the Attendance Module and clicking the three-dot icon to the right of the attendance log’s name, opening the context menu.
Select “Currently Signed In” opening the Currently Signed In Page.
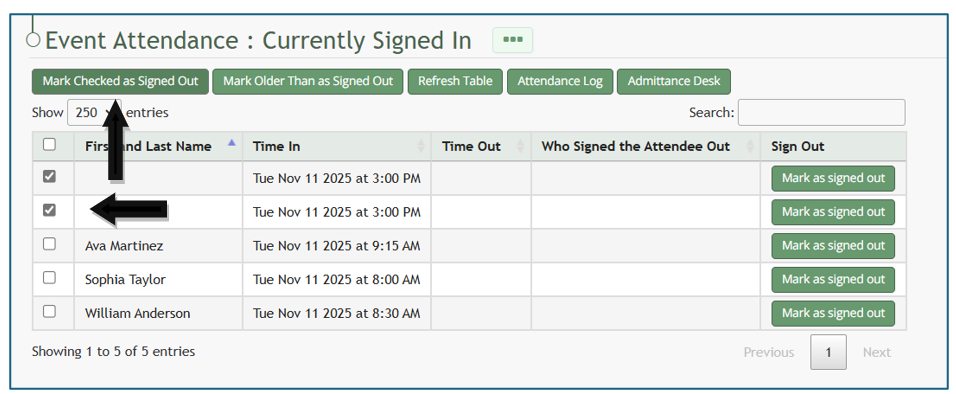
First, select checkboxes on the left-hand column to select the individuals that you wish to sign out.
Selecting the checkbox in the top row will select all entries.
After selecting individuals to be signed out, click the “Marked Checked as Signed Out” button.
The individuals selected will no longer show on the Currently Signed In Page.
No comments to display
No comments to display