Site Settings Module How Tos
How To: Add a Custom/Additional User Account Information Field
To add a user account information field, open the Account Fields Tab in the Site Settings Module from the Main Menu.
Click the "Add a Field" clickable link above the Custom / Additional User Account Information Fields opening the Add Field Modal.
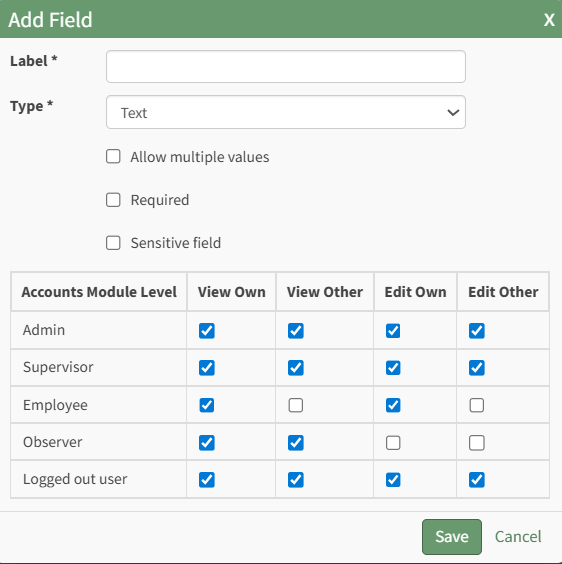
Input the label for the field.
Select the field type (text or email) from the dropdown menu.
Selecting the checkbox enables customization to "Allow multiple values," make the field "Required," or make it a "Sensitive Field."
Designating the field as a "Sensitive Field" allows an extra step in form security when integrating these fields within the Form module. The Form Designer must explicitly choose when they wish to use a sensitive field.
The Permissions Table determines who can view / edit their own and other user's fields. Selecting the checkbox gives the individual the specified permission. Deselecting the checkbox removed the permission.
Select the "Save" button and the custom field now shows in the table.
Use the Drag Me icon to drag and drop the field into your desired position of choice.
How To: Assign Remote Access Profiles
Remote access profiles are utilized by franchises and organizations that use multiple, different subdomains. If this applies to your organization, contact the KAStrack Technical Support team directly due the complexity of setting up remote access profiles. The customization of this feature is a part of your support services.
How To: Create a Customized Access Level
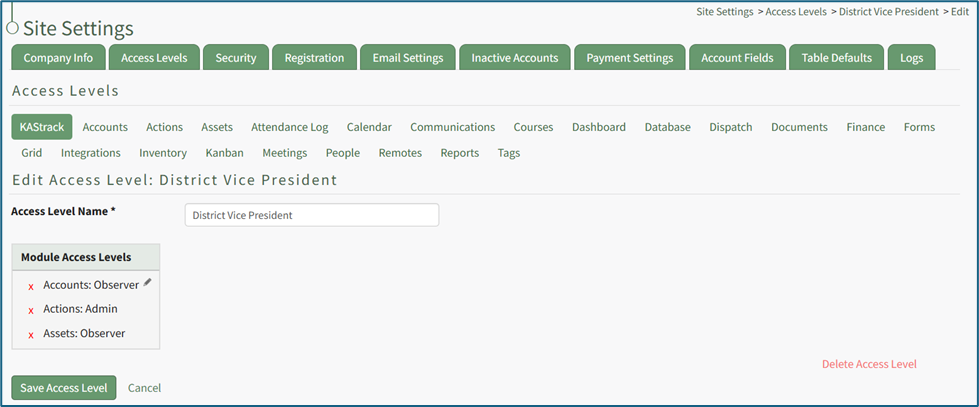
Go to the Access Level Tab in the Site Settings Module and select “KAStrack”, the first clickable link below the Access Levels header.

Select the “Create Access Level” button opening the editable Create Access Level Page.

Input your new access level name.
Click the pencil icon opening the Add Module Level modal.


As module levels are added to the new access level, they will show in the Module Access Levels table. Continue clicking the pencil icon and adding module levels as desired.
If a module level is not assigned to the access level for a specific module, the user assigned to the access level will not be able to view the module.
After all desired module levels have been assigned, select the “Create Access Level” button. The customized access level now shows under “KAStrack” on the Access Levels Tab of the Site Settings Module.

How To: Create Payment Configuration Using Stripe
To make a payment configuration, go to the Payment Settings Tab in the Site Settings Module.

Click the plus sign icon to the right of the Payment Settings header, opening the Create Payment Configuration Modal.
Some payment configuration required fields, such as configuration name and credit card statement entry, are set by your organization. Other required fields, such as display name, publishable key, and secret key, are specific to your Merchant and must be found on your Merchant’s dashboard.

Input a configuration name.
Configuration Name is a KAStrack term, not associated with Stripe, that is used as a label for a specific payment process configuration.
Input the display name.
Display Name is the name your organization has configured in your Stripe account settings under public business information. It shows when Stripe displays who is charging the customer.
Input the publishable key.
The Publishable Key is the public facing API key used in client-side code that identifies your Stripe account. It can be found in the left-hand menu of the Stripe Dashboard under Developers → API Keys.
Input the secret key.
Secret Key is the private API key used by the server to make requests to Stripe’s API. It can be found in the left-hand menu of the Stripe Dashboard under Developers → API Keys.
Input the credit card statement entry.
The credit card statement entry is the comment that will show on a payment statement.
Click the “Enabled” checkbox to enable the Payment Configuration.
Click “Cancel” to return to the Payment Settings Tab without making any changes.
Select the “Save” button. The payment configuration now shows on the Payment Settings tab.
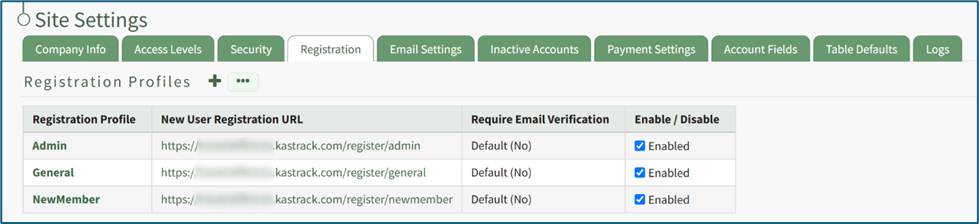
How To: Create Registration Profiles
To create a new registration profile, go to the Registration Tab in the Site Settings Module.

Click the plus icon next to the Registration Profiles header or select “Create” from the three dot (…) icon context menu. This will open the Create Registration Profile Page.
The fields used in a Registration Profile are optional. You are not required to make selections for all when generating a new profile.
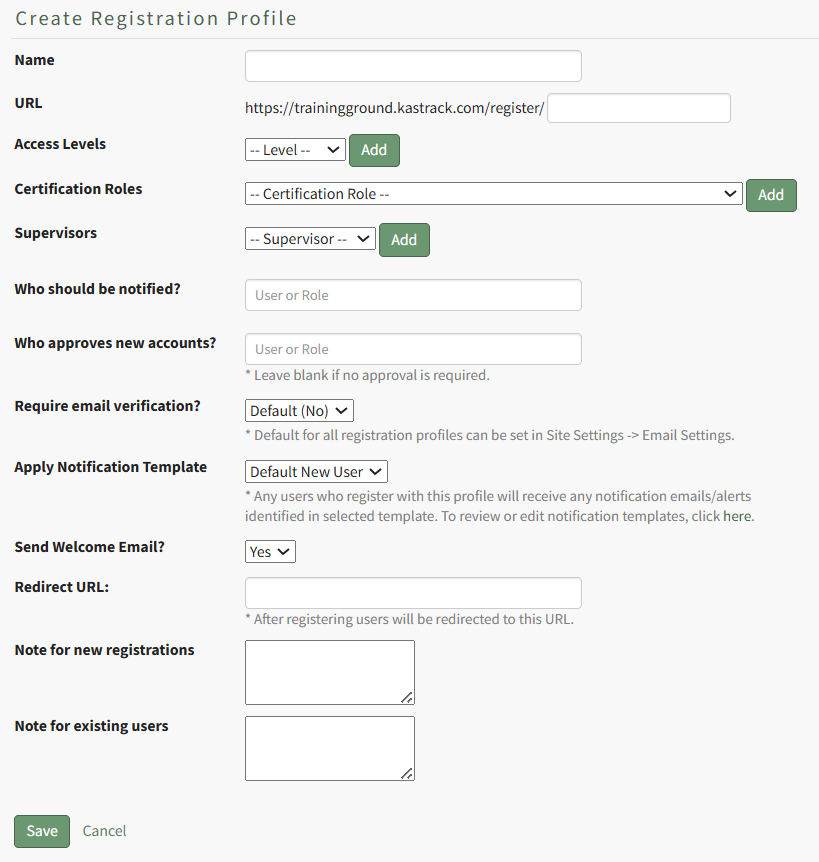
Input a name for the new registration profile, which will automatically fill in the URL link textbox.

Select any desired access level(s) for this registration profile from the dropdown menu list and click “Add”. Multiple Access Levels can be selected. The X icon to the left of the access level will remove the selection if it was made in error.
It is recommended to include at least one access level if this Registration Profile will be used to register new user accounts, as they must have an access level to see anything in KAStrack.

Select any desired Certification Role(s) for this registration profile from the dropdown menu list and click “Add”. Multiple Certification Roles can be selected. The X icon to the left of the Certification Roles will remove the selection if it was made in error.

Select any desired supervisor(s) that are to be assigned to the new accounts that register with this profile from the dropdown menu list and click “Add”. Multiple supervisors can be selected. The X icon to the left of the supervisor will remove the selection if it was made in error.

If desired, you can specify individual users and/or certification roles that are to receive notification of the new user account’s registration. When you type into the textbox, users and certification roles will show on a dropdown menu for selection. Multiple users and/or certification roles can be selected. The X icon to the left of the user / role will remove the selection if it was made in error.
If new registrations require approval, you can specify individual users and/or certification roles that are responsible for approving the new registrations. When you type into the textbox, users and certification roles will show on a dropdown menu for selection. Multiple users and/or certification roles can be selected. The X icon to the left of the user / role will remove the selection if it was made in error. Leave this field blank if no approval is required.
The default is set to not require email verification for new account generation, but you can select Yes or No from a dropdown menu. Users will then receive an email after registration asking them to verify their email address.
The default for all registration profiles can be set on the Email Settings Tab in the Site Settings Module, but the Registration Profile being created will override the default settings.
A default new user notification template is applied for all registration profiles.

Any users who register with this profile will receive notification emails/alerts that have been specified through the new user template. The Default New User Notification Template details are shown on the Notification Templates Tab on the Settings Page of the Communications Module. Clicking the word “here” will redirect the user to the Notification Template Tab where the Default New User Template can be edited or a new notification template can be created for your organization’s preferences.
How To: Edit New User Notification Templates
To edit new user notification templates, go to the Notification Templates Tab on the Settings Page of the Communications Module.
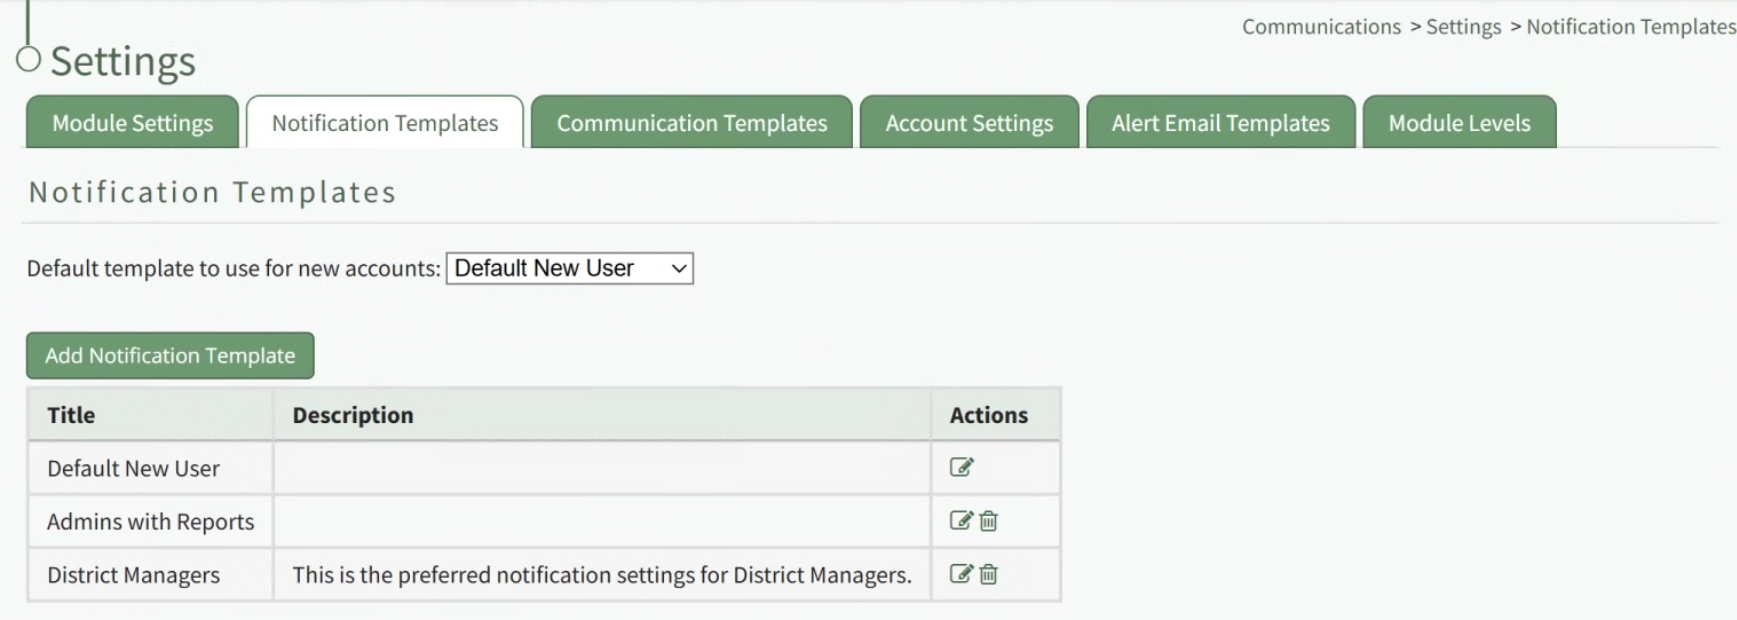
Existing templates will be shown in the Notification Template Table.
Select the edit icon in the action column of the template you wish to edit opening the Edit Notification Template Page.
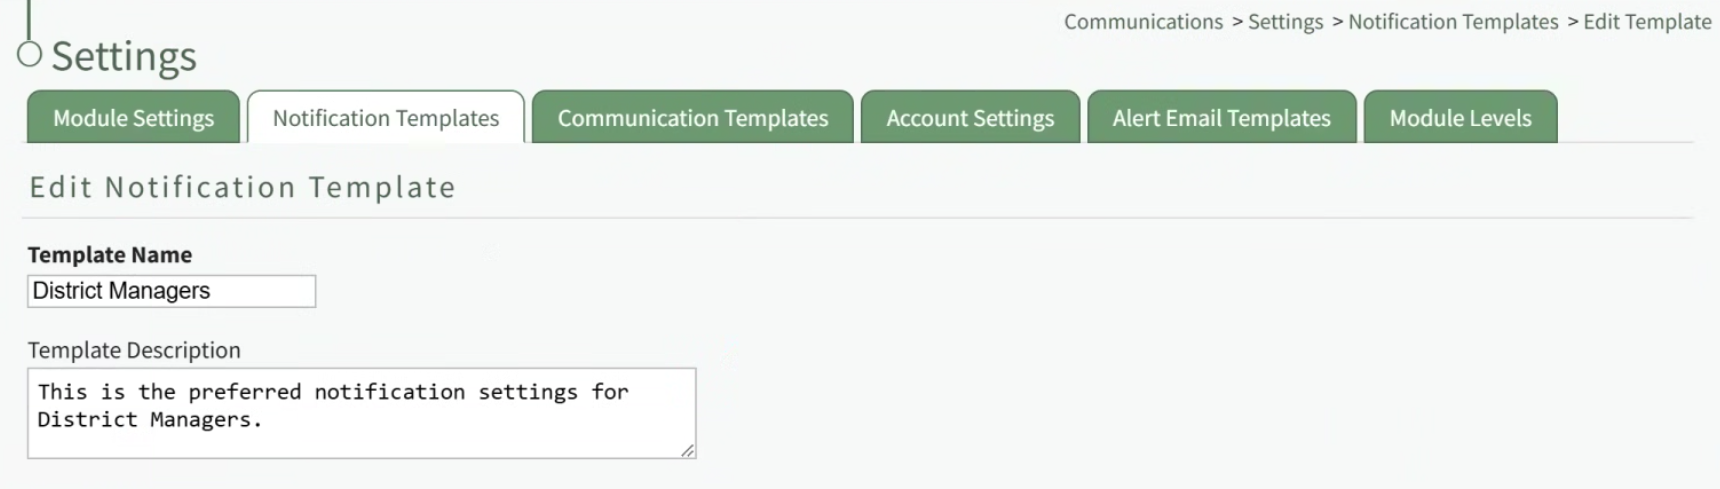
A notification template is comprised of two parts: Reports and Alerts.
Indicate the desired status for email report notifications: Not Active or Active.
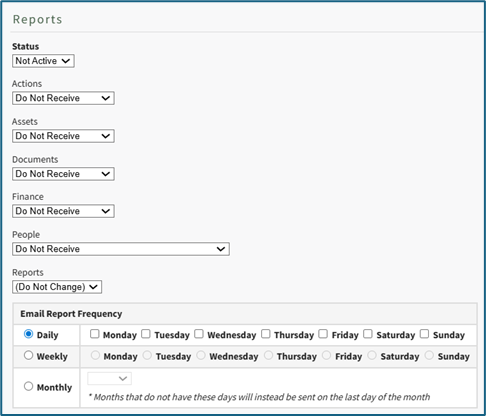
Alter the desired reports selected for each module or leave as “Do Not Receive”.
Email Report Frequency has three options: daily (or on specified days of the week), weekly (on the day of your choosing), or monthly (which requires the user to specify which numerical day of the month from a dropdown menu you wish to receive the report summary).
After setting template preferences for reports, scroll down to set template preferences for email alerts.
Alter email preferences as set by module through a dropdown menu with three options that designate when an email alert should be sent: “Real Time”, “Digest”, and “Do Not Receive”.
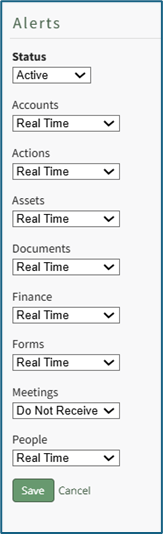
After making edits to your preferences for both Email Report and Email Alert Settings, select “Save”, returning you to the Notification Templates Tab on the Settings Page of the Communications Module.
The newly created notification template will now be shown on the Notification Template Table.
If you would like new user accounts that use this registration profile to receive a Welcome Email, select yes from the dropdown menu.
The default for all registration profiles can be set on the Email Settings Tab in the Site Settings Module, but the Registration Profile being created will override the default settings.
A redirect URL can be designated, so that any user registering with this profile will be redirected to the specified URL after registering.

Input a custom message for new registrations and a custom message for existing users if desired.
If an existing user logs in from a Registration Profile link, the access level(s), certification role(s), and supervisor(s) listed on the Registration Profile will be added to the user’s account. Any existing access levels, certification roles, and supervisors on their account are not removed.
Select “Cancel” at any time to return to the Registration Profile Tab in the Site Settings Module without saving the profile. Select the “Save” button and the new registration profile now shows on the Registration Tab in the Registration Profile Table.
Registration profiles can be enabled/disabled via a checkbox in the Registration Profile Table so that your organization has control of when this link is activated.
How To: Delete a Custom/Additional User Account Information Field
To delete a custom user account information field, open the Account Fields Tab in the Site Settings Module from the Main Menu.
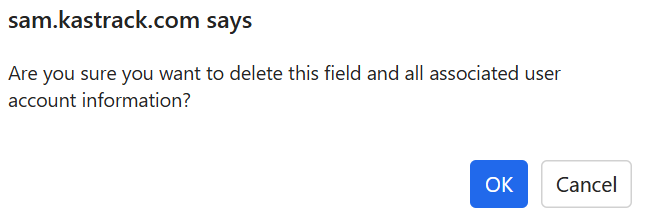
Custom account fields show in the Additional User Account Information Table. Select the clickable "Delete" link in the actions column to the right of the field you wish to delete. This opens the Field Deletion Confirmation Modal which states, "Are you sure you want to delete this field and all associated user account information?"
How To: Delete a Customized Access Level
To delete a customized access level, go to the Access Levels Tab in the Site Settings Module.
Only customized access levels can be edited or deleted. The KAStrack generated default Access Levels (admin, supervisor, employee, and observer) cannot be edited or deleted.

The three dot (…) icon next to your customized access level opens a context menu with three options: View Access Level, Edit Access Level, and Edit Module Access.

Selecting “Edit Access Level” from the context menu opens the Edit Access Level Page.
In the bottom right corner is a clickable “Delete Access Level” link. Selecting this opens a confirmation modal that states, “This will delete the access level. Are you sure you want to delete this access level?”
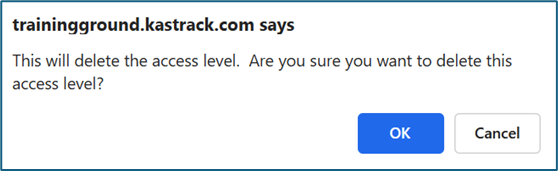
Click “Cancel” if you do not wish to delete the access level. Select “OK” to permanently delete the Access Level and return to the KAStrack Access Level Page.
How To: Edit a Custom/Additional User Account Information Field
To edit a custom user account information field, open the Account Fields Tab in the Site Settings Module from the Main Menu.
Custom Fields show in the Additional User Account Information Fields Table. Click the Edit button in the Action column of the table opening the Edit Field Modal.
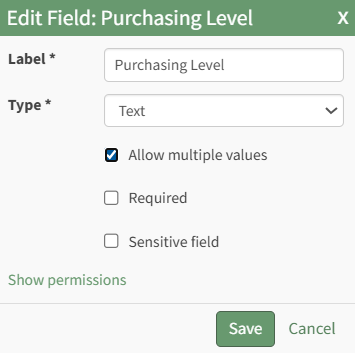
Make the desired changes and select the Save button, returning to the Account Fields Tab.
How To: Edit a Customized Access Level
To edit a customized access level, go to the Access Levels Tab in the Site Settings Module.
Only customized access levels can be edited or deleted. The KAStrack generated default Access Levels (admin, supervisor, employee, and observer) cannot be edited or deleted.

The three dot (…) icon next to the customized access level opens a context menu with three options: View Access Level, Edit Access Level, and Edit Module Access.

Selecting “Edit Access Level” from the context menu opens the Edit Access Level Page where the pencil icon can be used to add module levels and the X icon can be used to delete module levels.

Selecting “Edit Module Access” from the context menu opens the (Access Level): Edit Module Access Modal.

Selecting a module’s checkbox will prohibit a user with this access level from accessing the specified module.
How To: Edit Company Info
To edit company information, open the Company Info Tab from the Site Settings Page in the Site Settings Module.

Select the “Edit Company Info Button” opening the Edit Company Info Page.
Add or make changes to Company Info as desired. Notes on possible inputs can be found under the Company Info Tab Heading. WIKI LINK COMPANY INFO TAB

Click “Cancel” to return to the Company Info Tab without making any changes.
Select the “Submit” button and return to the Company Info Tab. The changes made and saved are now reflected on the Company Info Tab.

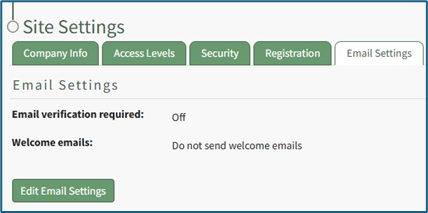
How To: Edit Email Settings
To edit email requirements that help manage system emails for account management, open the Email Settings Tab in the Site Settings Module. The default system settings will show before changes are made.
Select the “Edit Email Settings” button, opening an editable Email Settings Page.
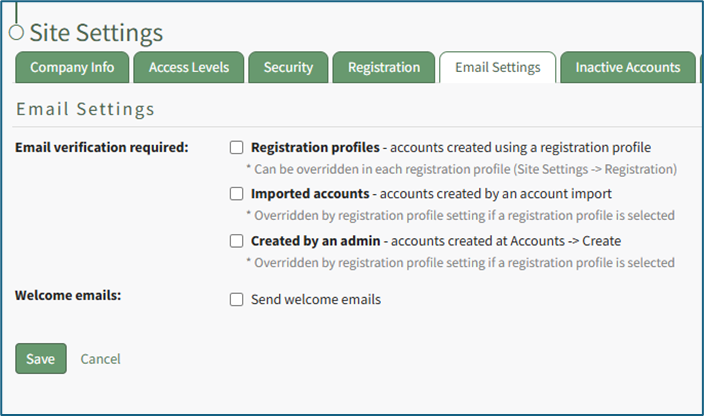
There are three different scenarios where email verification can be required. You can select all, none, or a combination of the available options based on your preferences. See the Email Verification Requirement Options Table below for an explanation of each checkbox.
Email Verification Requirement Options | |
Checkbox | Explanation |
Registration profiles | Selecting the Registration profiles checkbox will require email verification for any new user accounts that were created using a registration profile. This setting can be overridden by a selection in the registration profile. |
Imported accounts | Selecting the Imported accounts checkbox will require email verification for any new user accounts that are created through a CSV import. This selection can be overridden by a registration profile assigned to new user accounts during import account creation. |
Created by an admin | Selecting the Created by an admin checkbox will require email verification for any new user accounts created manually by an admin on the Create Tab of the Accounts Module. This selection can be overridden by a registration profile assigned to new user accounts during manual account creation. |
A checkbox can be selected to indicate if you would like the system to send welcome emails to new users by default.
Click “Cancel” to return to the Email Settings Tab without making any changes.
Select the “Save” button. The changes made and saved are now reflected on the Email Settings Tab.
How To: Edit Inactive Account Settings
To edit inactive account settings, go to the Inactive Accounts Tab in the Site Settings Module.

Select the “Edit Inactive Accounts Settings” button, opening the editable Inactive Accounts Page.

To allow inactive users to reactivate their account by logging in, select the checkbox to the right of “Can inactive users log in?”.
To automatically deactivate accounts that have been inactive for a customizable period, select the checkbox to the right of “Automatically deactivate accounts for inactivity?” Enter the selected numerical value into the textbox and select the units (days, weeks, months, or years) from the dropdown menu.
Accounts are checked for inactivity every 24 hours.
To deactivate an account when a role or certification turns red, select the checkbox to the right of “Automatically deactivate accounts when role or certification turns red?” Select the “Add a Deactivation Rule” button, opening the Add Account Deactivation Rule Modal.

Establish the parameters for the account deactivation role by selecting a role/certification from the dropdown menu that opens when you put the cursor in the textbox. You can choose multiple roles / certifications per rule. Specify the time period after a role/certification turns red for the system to deactivate the account by inputting a numerical value into the textbox, and then select the units (days, weeks, months, or years) from the dropdown menu.
Accounts are checked for inactivity every 24 hours.
Click “Cancel” to return to the editable Inactive Accounts Page without creating a new rule. Select “Save’ and the new deactivation rule will show in the editable Inactive Accounts Page.

The Pencil Icon opens the deactivation rule for editing. The X icon will delete the rule.
To exempt users from being deactivated based on access levels, select which access levels should be exempt from automatic deactivation from the dropdown menu.
To send alerts to users before their account is deactivated, select the checkbox to the right of “Alerts for inactivity.” Select the “Add a Warning Rule” button to add alert parameters, opening the Add Deactivation Warning Rule Modal.
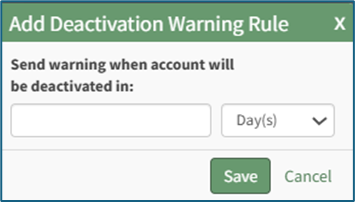
Specify how far in advance of deactivation an alert should be sent by inputting a numerical value into the textbox, and then select the units (days, weeks, months, or years) from the dropdown menu. Click “Cancel” to return to the editable Inactive Accounts Page without creating a new warning rule. Select “Save’ and the new deactivation warning rule will show in the editable Inactive Accounts Page.

The Pencil Icon opens the deactivation rule for editing. The X icon will delete the rule.
Click “Cancel” to return to the Inactive Accounts Tab without making any changes.
Select the “Save” button. The changes made and saved are now reflected on the Email Settings Tab.
How To: Edit Password Requirements
To edit password requirements, open the Security Tab in the Site Settings Module. The current settings will show before changes are made.

Select the “Edit Security Settings” button, opening an editable Password Requirements Page.

Input a whole number as your preferred minimum length requirement into the textbox.
Select the appropriate checkboxes to require users to have an uppercase letter, lowercase letter, special character, and/or number in the password.
Selecting the “Force users who do not meet requirements to reset on next login” checkbox will require any existing users whose password is no longer compliant to reset their password when they attempt to login next.
New users will be forced to meet the requirements when they login for the first time / register their account.

Click “Cancel” to return to the Security Tab without making any changes.
Select the “Save” button and return to the Security Tab. The changes made and saved are now reflected on the Security Tab.
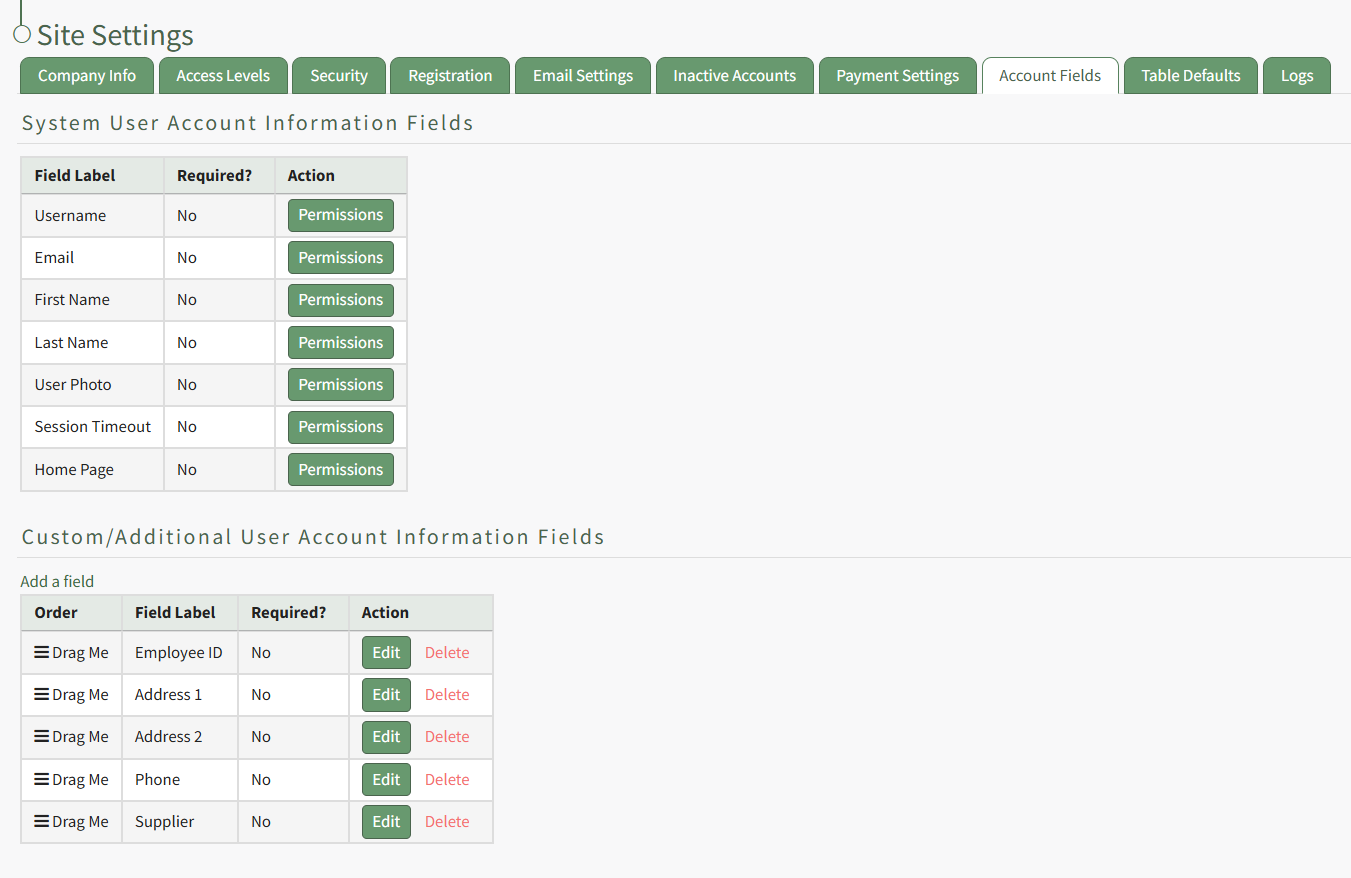
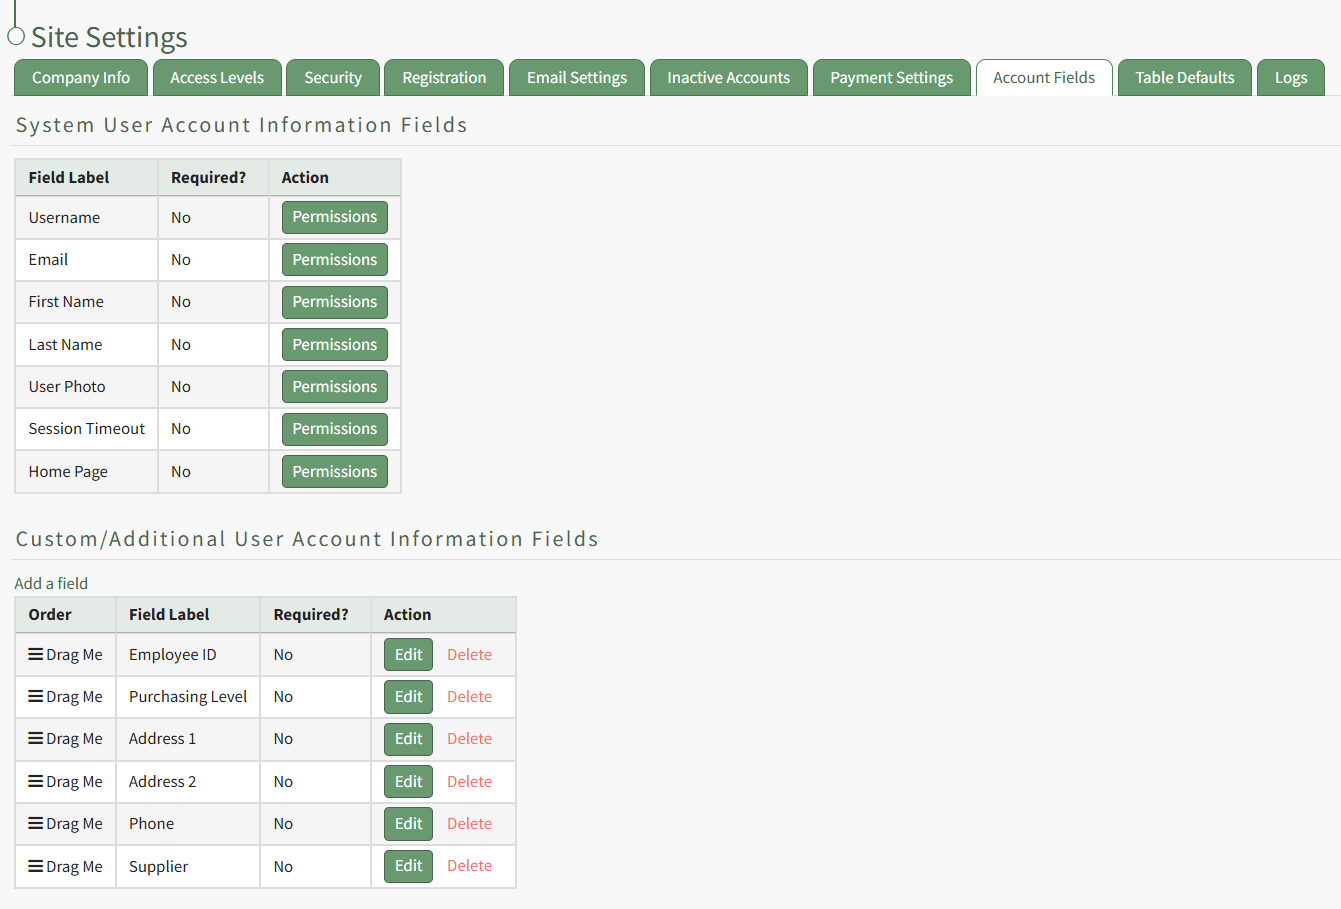
How To: Edit Permissions for System User Account Information Fields
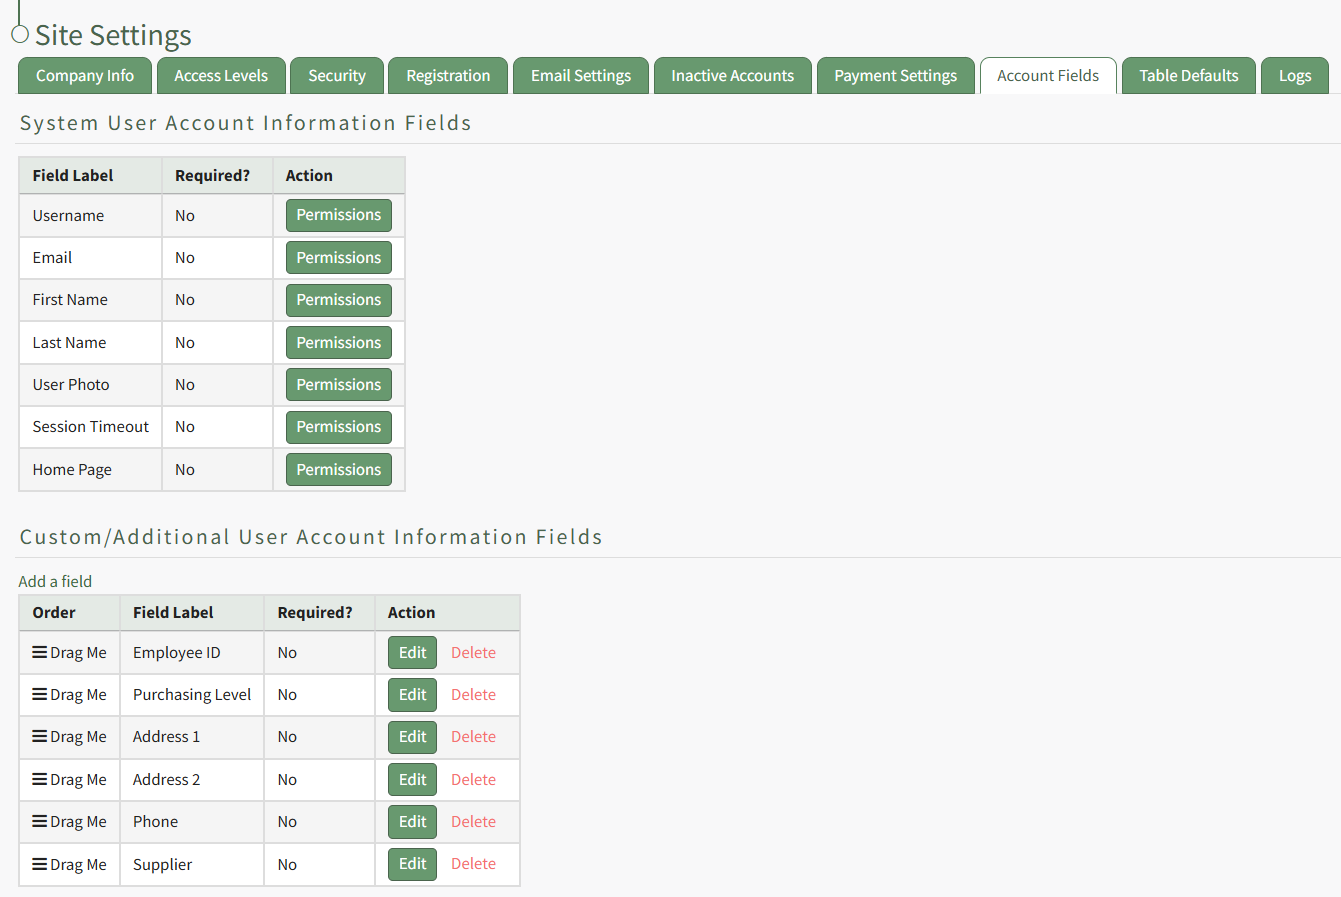
To edit the permissions associated with system user account information fields, open the Account Fields Tab in the Site Settings Module from the Main Menu.
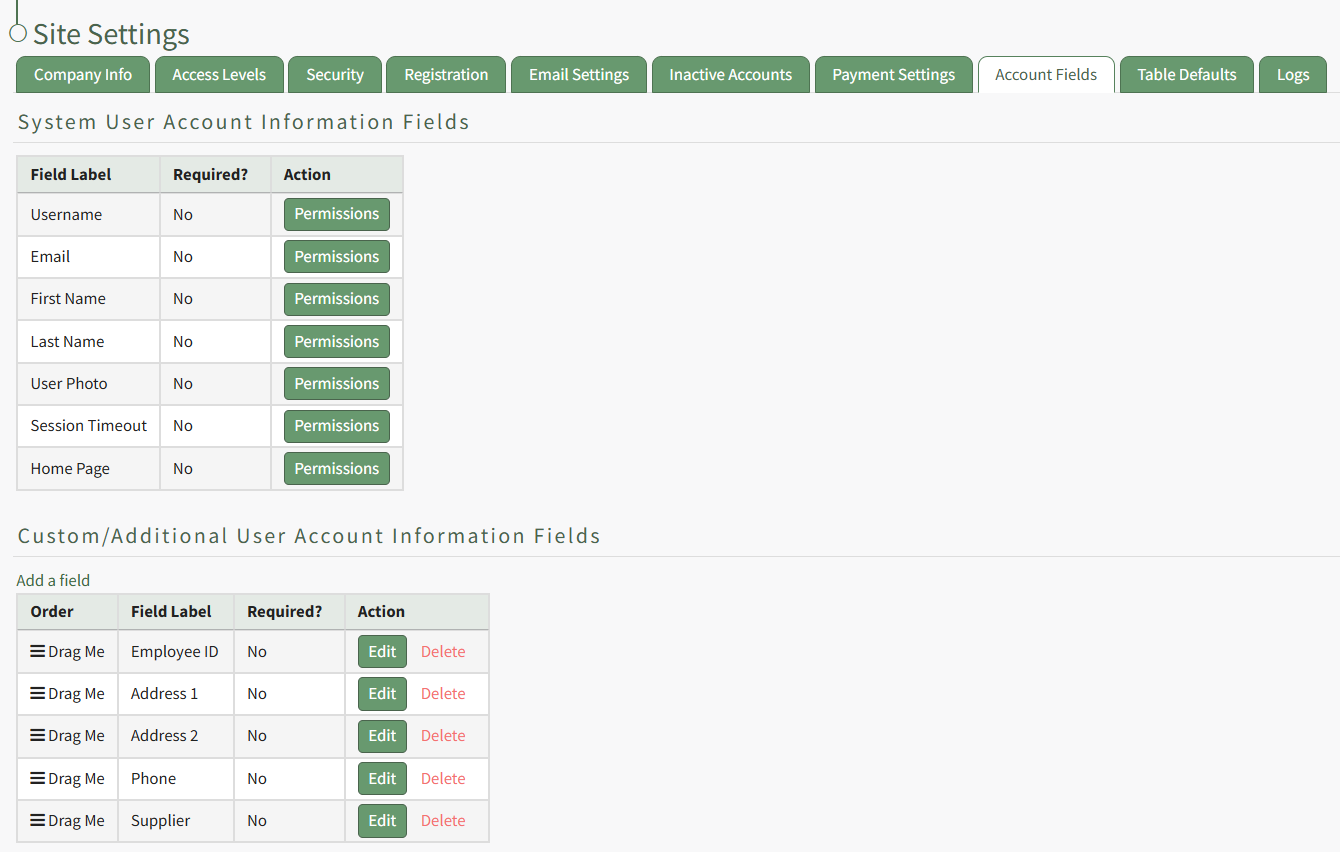
System User Account Information Fields are displayed in the first table. Select the Permissions button in the Action column opening the Edit Field Restrictions Modal.
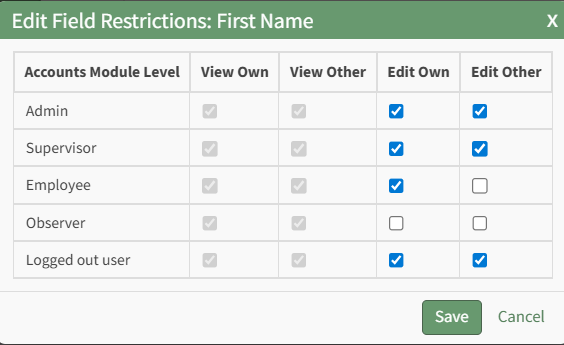
Selecting a checkbox will give permission to the module level. Deselecting the checkbox will remove the permission from the module level.
Select the Save button and return to the Account Fields Tab.
How To: Edit the Accounts Module Active Accounts Table
To edit the Active Accounts Table in the Accounts Module, go to the Table Defaults Tab in the Site Settings Module.
Select “Accounts: Active” from the dropdown menu.

Select the “Edit Columns” button, opening the Choose Columns Modal. The default column choices include: name, username, email, access levels, supervisors, become, status, last active, login, archive, first name, last night, employee ID, phone, Address 1 and Address 2 and any customized account fields.
How To: Add a Custom/Additional User Account Information Field
To add a user account information field, open the Account Fields Tab in the Site Settings Module from the Main Menu.
Click the "Add a Field" clickable link above the Custom / Additional User Account Information Fields opening the Add Field Modal.
Input the label for the field.
Select the field type (text or email) from the dropdown menu.
Selecting the checkbox enables customization to "Allow multiple values," make the field "Required," or make it a "Sensitive Field."
Designating the field as a "Sensitive Field" allows an extra step in form security when integrating these fields within the Form module. The Form Designer must explicitly choose when they wish to use a sensitive field.
The Permissions Table determines who can view / edit their own and other user's fields. Selecting the checkbox gives the individual the specified permission. Deselecting the checkbox removed the permission.
Select the "Save" button and the custom field now shows in the table.
Use the Drag Me icon to drag and drop the field into your desired position of choice.
The bars icon allows the columns to be positioned in the order of your choosing.
Click “Cancel” to return to the Table Defaults Tab without making any changes.
Select the “Save” button to make the desired changes and return to the Table Defaults Tab. A preview of the first five rows of the table is shown. Select the “View Live Table” button to be directed to the live table in the Accounts Module.
How To: Edit the Accounts Module Archived Accounts Table
To edit the Archived Accounts Table in the Accounts Module, go to the Table Defaults Tab in the Site Settings Module.
Select “Accounts: Archived” from the dropdown menu.

Select the “Edit Columns” button, opening the Choose Columns Modal. The default column choices include: name, username, email, last active, un-archive, delete, first name, last name, employee ID, phone, Address 1 and Address 2 and any customized account fields.
How To: Add a Custom/Additional User Account Information Field
To add a user account information field, open the Account Fields Tab in the Site Settings Module from the Main Menu.
Click the "Add a Field" clickable link above the Custom / Additional User Account Information Fields opening the Add Field Modal.
Input the label for the field.
Select the field type (text or email) from the dropdown menu.
Selecting the checkbox enables customization to "Allow multiple values," make the field "Required," or make it a "Sensitive Field."
Designating the field as a "Sensitive Field" allows an extra step in form security when integrating these fields within the Form module. The Form Designer must explicitly choose when they wish to use a sensitive field.
The Permissions Table determines who can view / edit their own and other user's fields. Selecting the checkbox gives the individual the specified permission. Deselecting the checkbox removed the permission.
Select the "Save" button and the custom field now shows in the table.
Use the Drag Me icon to drag and drop the field into your desired position of choice.
The bars icon allows the columns to be positioned in the order of your choosing.
Click “Cancel” to return to the Table Defaults Tab without making any changes.
Select the “Save” button to make the desired changes and return to the Table Defaults Tab. A preview of the first five rows of the table is shown. Select the “View Live Table” button to be directed to the live table in the Accounts Module.
How To: Edit the Accounts Module Pending Registrations Table
To edit the Pending Registrations Table in the Accounts Module, go to the Table Defaults Tab in the Site Settings Module.
Select “Accounts: Registration” from the dropdown menu.

Select the “Edit Columns” button, opening the Choose Columns Modal. The default column choices include: name, username, email, date, reason, email verification, approval, first name, last name, employee ID, phone, Address 1 and Address 2 and any customized account fields.
How To: Add a Custom/Additional User Account Information Field
To add a user account information field, open the Account Fields Tab in the Site Settings Module from the Main Menu.
Click the "Add a Field" clickable link above the Custom / Additional User Account Information Fields opening the Add Field Modal.
Input the label for the field.
Select the field type (text or email) from the dropdown menu.
Selecting the checkbox enables customization to "Allow multiple values," make the field "Required," or make it a "Sensitive Field."
Designating the field as a "Sensitive Field" allows an extra step in form security when integrating these fields within the Form module. The Form Designer must explicitly choose when they wish to use a sensitive field.
The Permissions Table determines who can view / edit their own and other user's fields. Selecting the checkbox gives the individual the specified permission. Deselecting the checkbox removed the permission.
Select the "Save" button and the custom field now shows in the table.
Use the Drag Me icon to drag and drop the field into your desired position of choice.
The bars icon allows the columns to be positioned in the order of your choosing.
Click “Cancel” to return to the Table Defaults Tab without making any changes.
Select the “Save” button to make the desired changes and return to the Table Defaults Tab. A preview of the first five rows of the table is shown. Select the “View Live Table” button to be directed to the live table in the Accounts Module.
How To: Edit the Finance Module Active Budgets Table
To edit the Active Budgets Table in the Finance Module, go to the Table Defaults Tab in the Site Settings Module.
Select “Finance: Active Budget” from the dropdown menu.
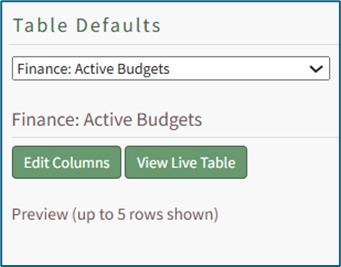
Select the “Edit Columns” button, opening the Choose Columns Modal. The default column choices include: account, name, most recent activity, outstanding items, attachments, pending approvals, total budget, amount used, amount remaining, actions, description, system notes, username, email, first name, last name, phone, Address 1, and Address 2, employee ID and any customized account fields.
How To: Add a Custom/Additional User Account Information Field
To add a user account information field, open the Account Fields Tab in the Site Settings Module from the Main Menu.
Click the "Add a Field" clickable link above the Custom / Additional User Account Information Fields opening the Add Field Modal.
Input the label for the field.
Select the field type (text or email) from the dropdown menu.
Selecting the checkbox enables customization to "Allow multiple values," make the field "Required," or make it a "Sensitive Field."
Designating the field as a "Sensitive Field" allows an extra step in form security when integrating these fields within the Form module. The Form Designer must explicitly choose when they wish to use a sensitive field.
The Permissions Table determines who can view / edit their own and other user's fields. Selecting the checkbox gives the individual the specified permission. Deselecting the checkbox removed the permission.
Select the "Save" button and the custom field now shows in the table.
Use the Drag Me icon to drag and drop the field into your desired position of choice.
The bars icon allows the columns to be positioned in the order of your choosing.
Click “Cancel” to return to the Table Defaults Tab without making any changes.
Select the “Save” button to make the desired changes and return to the Table Defaults Tab. A preview of the first five rows of the table is shown. Select the “View Live Table” button to be directed to the live table in the Finance Module.
How To: Edit the Finance Module Budget Items Per Budget Table
To edit the Budget Items per Budget Table in the Finance Module, go to the Table Defaults Tab in the Site Settings Module.
Select “Finance: Budget Items Per Budget” from the dropdown menu.

Select the “Edit Columns” button, opening the Choose Columns Modal. The default column choices include: item name, date, invoice number, attachment(s), amount, remaining funds, notes, approval status, approve / reject, paid, actions, username, email, first name, last name, employee ID, phone, Address 1 and Address 2 and any customized account fields.
How To: Add a Custom / Additional User Account Information Field
To add a user account information field, open the Account Fields Tab in the Site Settings Module from the Main Menu.
Click the "Add a Field" clickable link above the Custom / Additional User Account Information Fields opening the Add Field Modal.
Input the label for the field.
Select the field type (text or email) from the dropdown menu.
Selecting the checkbox enables customization to "Allow multiple values," make the field "Required," or make it a "Sensitive Field."
Designating the field as a "Sensitive Field" allows an extra step in form security when integrating these fields within the Form module. The Form Designer must explicitly choose when they wish to use a sensitive field.
The Permissions Table determines who can view / edit their own and other user's fields. Selecting the checkbox gives the individual the specified permission. Deselecting the checkbox removed the permission.
Select the "Save" button and the custom field now shows in the table.
Use the Drag Me icon to drag and drop the field into your desired position of choice.
The bars icon allows the columns to be positioned in the order of your choosing.
Click “Cancel” to return to the Table Defaults Tab without making any changes.
Select the “Save” button to make the desired changes and return to the Table Defaults Tab. A preview of the first five rows of the table is shown. Select the “View Live Table” button to be directed to the live table in the Finance Module.
How To: Edit the People Module Users Assigned to a Role Table
To edit the Users Assigned to a Role Table in the People Module, go to the Table Defaults Tab in the Site Settings Module.
Select “People: Users Assigned to a Role” from the dropdown menu.
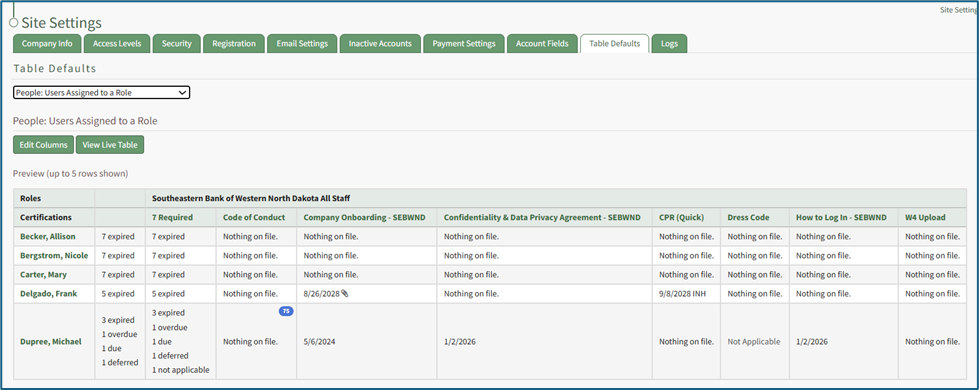
Select the “Edit Columns” button, opening the Choose Columns Modal. The default column choices include name, username, email, first name, last name, employee ID, phone, Address 1, and Address 2.
Customizable account information fields can be created on the Account Fields Tab of the Site Settings Module.
How To: Add a Custom/Additional User Account Information Field
To add a user account information field, open the Account Fields Tab in the Site Settings Module from the Main Menu.
Click the "Add a Field" clickable link above the Custom / Additional User Account Information Fields opening the Add Field Modal.
Input the label for the field.
Select the field type (text or email) from the dropdown menu.
Selecting the checkbox enables customization to "Allow multiple values," make the field "Required," or make it a "Sensitive Field."
Designating the field as a "Sensitive Field" allows an extra step in form security when integrating these fields within the Form module. The Form Designer must explicitly choose when they wish to use a sensitive field.
The Permissions Table determines who can view / edit their own and other user's fields. Selecting the checkbox gives the individual the specified permission. Deselecting the checkbox removed the permission.
Select the "Save" button and the custom field now shows in the table.
Use the Drag Me icon to drag and drop the field into your desired position of choice.
The bars icon allows the columns to be positioned in the order of your choosing.
Click “Cancel” to return to the Table Defaults Tab without making any changes.
Select the “Save” button to make the desired changes and return to the Table Defaults Tab. A preview of the first five rows of the table is shown. Select the “View Live Table” button to be directed to the live table in the People Module.
How To: Edit the People Module Users Associated with a Certification Table
To edit the Users Associated with a Certification Table in the People Module, go to the Table Defaults Tab in the Site Settings Module.
Select “People: Users Associated with a Certification” from the dropdown menu.

Select the “Edit Columns” button, opening the Choose Columns Modal. The default column choices include: name, username, certification expiration date, attachment(s), time until expiration, required, other required certification, email, first name, last name, employee ID, phone, Address 1, and Address 2.
Customizable account information fields can be created on the Account Fields Tab of the Site Settings Module.
How To: Add a Custom/Additional User Account Information Field
To add a user account information field, open the Account Fields Tab in the Site Settings Module from the Main Menu.
Click the "Add a Field" clickable link above the Custom / Additional User Account Information Fields opening the Add Field Modal.
Input the label for the field.
Select the field type (text or email) from the dropdown menu.
Selecting the checkbox enables customization to "Allow multiple values," make the field "Required," or make it a "Sensitive Field."
Designating the field as a "Sensitive Field" allows an extra step in form security when integrating these fields within the Form module. The Form Designer must explicitly choose when they wish to use a sensitive field.
The Permissions Table determines who can view / edit their own and other user's fields. Selecting the checkbox gives the individual the specified permission. Deselecting the checkbox removed the permission.
Select the "Save" button and the custom field now shows in the table.
Use the Drag Me icon to drag and drop the field into your desired position of choice.
The bars icon allows the columns to be positioned in the order of your choosing.
Click “Cancel” to return to the Table Defaults Tab without making any changes.
Select the “Save” button to make the desired changes and return to the Table Defaults Tab. A preview of the first five rows of the table is shown. Select the “View Live Table” button to be directed to the live table in the People Module.
How To: Edit the People Module Users Table
To edit the Users Table in the People Module, go to the Table Defaults Tab in the Site Settings Module.
Select “People: Users” from the dropdown menu.
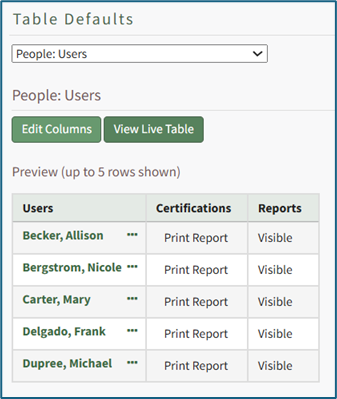
Select the “Edit Columns” button, opening the Choose Columns Modal. The default column choices include users, certifications, reports, username, email, first name, last name, employee ID, phone, Address 1, and Address 2.
Customizable account information fields can be created on the Account Fields Tab of the Site Settings Module.
How To: Add a Custom/Additional User Account Information Field
To add a user account information field, open the Account Fields Tab in the Site Settings Module from the Main Menu.
Click the "Add a Field" clickable link above the Custom / Additional User Account Information Fields opening the Add Field Modal.
Input the label for the field.
Select the field type (text or email) from the dropdown menu.
Selecting the checkbox enables customization to "Allow multiple values," make the field "Required," or make it a "Sensitive Field."
Designating the field as a "Sensitive Field" allows an extra step in form security when integrating these fields within the Form module. The Form Designer must explicitly choose when they wish to use a sensitive field.
The Permissions Table determines who can view / edit their own and other user's fields. Selecting the checkbox gives the individual the specified permission. Deselecting the checkbox removed the permission.
Select the "Save" button and the custom field now shows in the table.
Use the Drag Me icon to drag and drop the field into your desired position of choice.
The bars icon allows the columns to be positioned in the order of your choosing.
Click “Cancel” to return to the Table Defaults Tab without making any changes.
Select the “Save” button to make the desired changes and return to the Table Defaults Tab. A preview of the first five rows of the table is shown. Select the “View Live Table” button to be directed to the live table in the People Module.
How To: Export Registration Profiles
To export a CSV spreadsheet of existing registration profiles, go to the Registration Tab of the Site Settings Module.
Click the three dot (…) icon to open a context menu. Select “Export”.
The CSV file will automatically be downloaded to your personal device.
How To: Import Registration Profiles
To import a CSV spreadsheet of existing registration profiles, go to the Registration Tab of the Site Settings Module.

Click the three dot (…) icon to open a context menu. Select “Import” opening the Import Registration Profiles Modal.

Select the “Download Template” button to download a CSV file with 13 pre-labeled columns.
Helpful Tips for Filing out the Registration Profile Template CSV File | |
Registration Profile ID | This is left blank for new registration profiles. Export a CSV to get the registration profile ID for existing profiles that need editing. |
Name | Input a name for the registration profile name. |
URL | https://SiteName.kastrack.com/register/RegistrationProfileName Specify your organization’s site name and the registration profile name selected above |
Access Level | Separate multiple Access Levels with a semi-colon |
Certification Role | List the Company Name (from the Companies Page of the People Module) before the Certification Role Name with a space in-between the two; Separate multiple Certification Roles with a semi-colon Example: Company Name Certification Role |
Supervisor | Separate multiple Supervisors with a semi-colon |
Who Should be Notified | Separate multiple users or certification roles with a semi-colon |
Who approves new accounts | Separate multiple users or certification roles with a semi-colon; Leave blank if no approval is required |
Require email verification | Select “Yes” or “No” |
Apply Notification Template | Input “Default New User” unless you have created a customized Notification Template (in the Communications Module) that you would prefer to use instead. |
Send Welcome Email | Input “Yes” or “No” |
Registration Note | Input a custom note to be included for new registrations. |
Login Note | Input a custom note to be included for existing system users. |
When all information has been included in the CSV file, save it with the CSV format UTF-8. Click the “Choose File” button or drag the CSV file into the Import Registration Profiles Modal.
The Import Registration Profile Modal expands.

After selecting your CSV, KAStrack will scan the first row for matching column headers and attempt to map those column headers to the names of the Registration Profile settings fields. The dropdown next to each field will automatically be set to any matching column headings from the CSV.
If a matching column couldn't be found, or if your import file uses column headers with different names than the Registration Profile settings fields, you can manually choose which column should map to those settings by choosing an option from the dropdown.
Select the “Import Profiles” button. If there are no issues with the imported CSV file, the new registration profiles will now show in the Registration Profiles Table.
If there were any issues during importing, the error will be explained in the Import Registration Profile Modal. Make the necessary changes and select the “Start Over” button to resubmit the corrected CSV file.
No comments to display
No comments to display