Customizable Tables in the Accounts Module
There are three tables in the Accounts Module than can be customized for your organization's specific needs.
The Active Accounts Table (on the Active Tab of the Accounts Module), the Archived Accounts Table (on the Archived Tab of the Accounts Module), and the Pending Account Registrations Table (on the Registrations Tab of the Accounts Module) are all customizable.
How To: Edit the Accounts Module Active Accounts Table
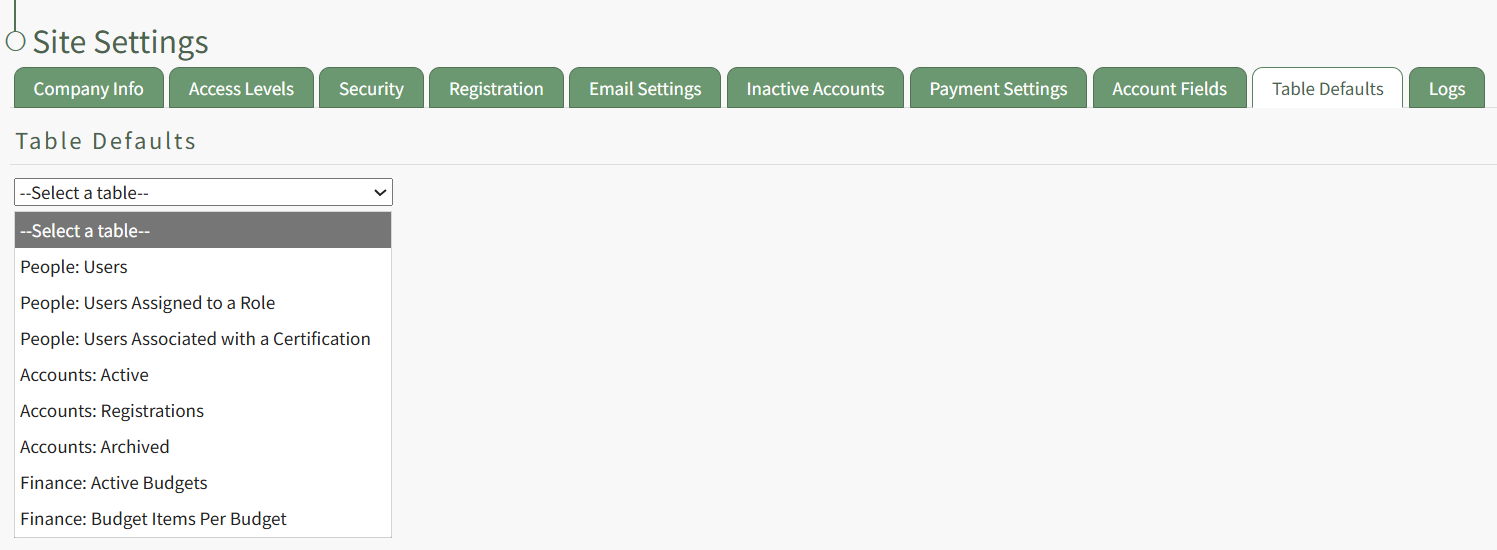
To edit the Active Accounts Table in the Accounts Module, go to the Table Defaults Tab in the Site Settings Module.
Select “Accounts: Active” from the dropdown menu.

Select the “Edit Columns” button, opening the Choose Columns Modal. The default column choices include: name, username, email, access levels, supervisors, become, status, last active, login, archive, first name, last night, employee ID, phone, Address 1 and Address 2 and any customized account fields.
How To: Add a Custom/Additional User Account Information Field
To add a user account information field, open the Account Fields Tab in the Site Settings Module from the Main Menu.
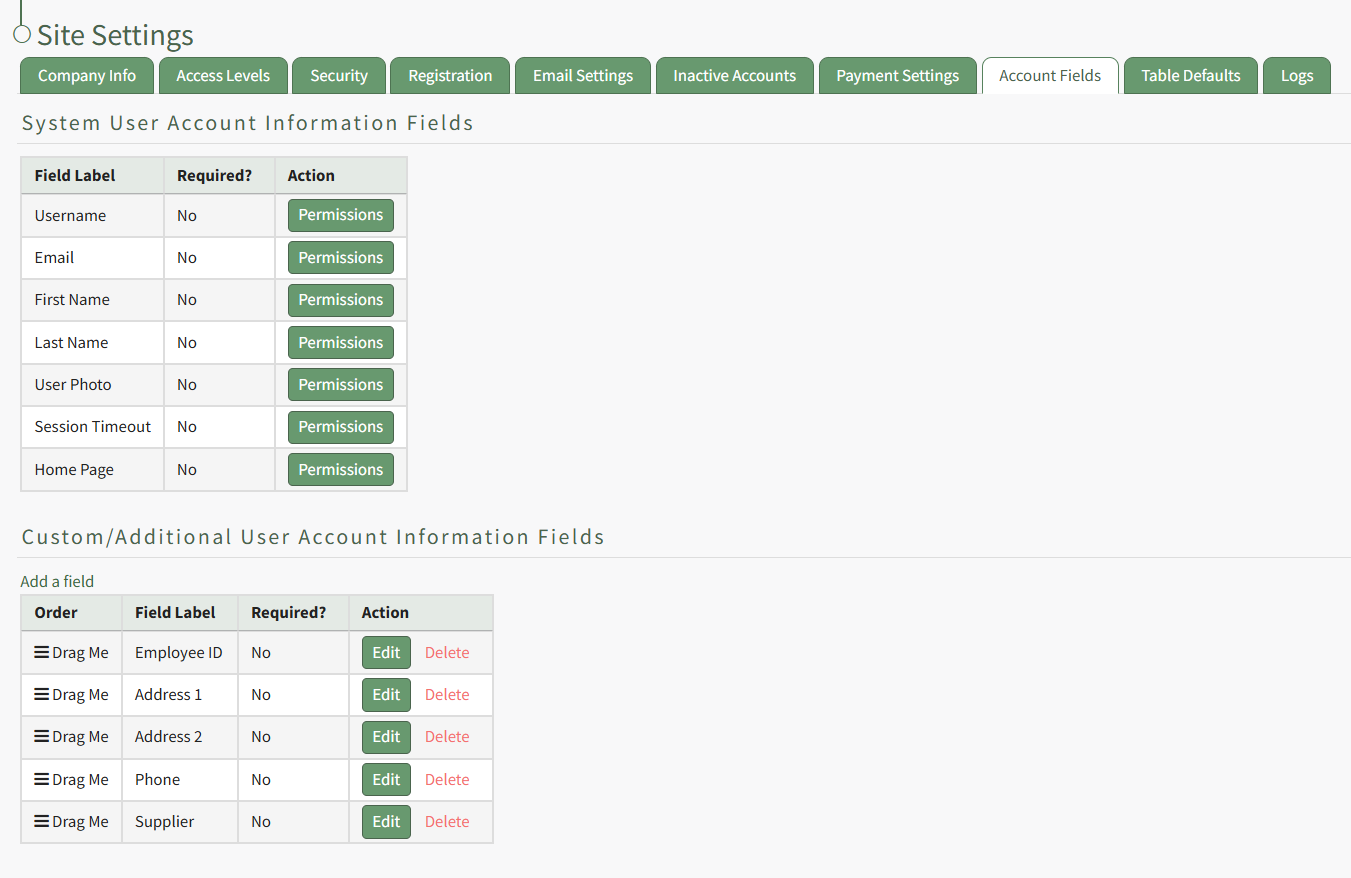
Click the "Add a Field" clickable link above the Custom / Additional User Account Information Fields opening the Add Field Modal.
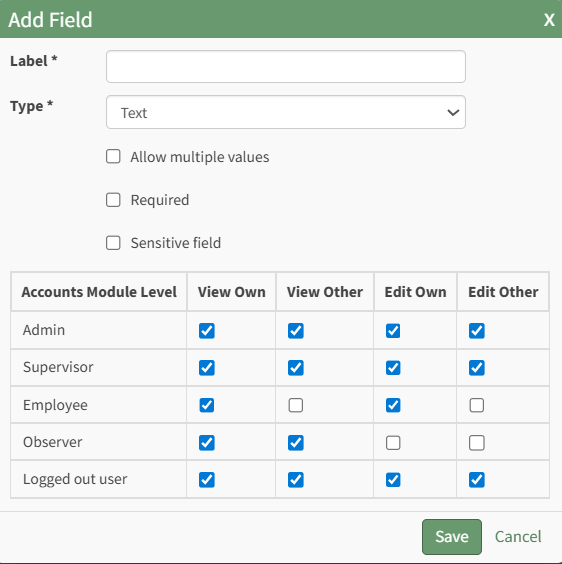
Input the label for the field.
Select the field type (text or email) from the dropdown menu.
Selecting the checkbox enables customization to "Allow multiple values," make the field "Required," or make it a "Sensitive Field."
Designating the field as a "Sensitive Field" allows an extra step in form security when integrating these fields within the Form module. The Form Designer must explicitly choose when they wish to use a sensitive field.
The Permissions Table determines who can view / edit their own and other user's fields. Selecting the checkbox gives the individual the specified permission. Deselecting the checkbox removed the permission.
Select the "Save" button and the custom field now shows in the table.
Use the Drag Me icon to drag and drop the field into your desired position of choice.
The bars icon allows the columns to be positioned in the order of your choosing.
Click “Cancel” to return to the Table Defaults Tab without making any changes.
Select the “Save” button to make the desired changes and return to the Table Defaults Tab. A preview of the first five rows of the table is shown. Select the “View Live Table” button to be directed to the live table in the Accounts Module.
How To: Edit the Accounts Module Archived Accounts Table
To edit the Archived Accounts Table in the Accounts Module, go to the Table Defaults Tab in the Site Settings Module.
Select “Accounts: Archived” from the dropdown menu.

Select the “Edit Columns” button, opening the Choose Columns Modal. The default column choices include: name, username, email, last active, un-archive, delete, first name, last name, employee ID, phone, Address 1 and Address 2 and any customized account fields.
How To: Add a Custom/Additional User Account Information Field
To add a user account information field, open the Account Fields Tab in the Site Settings Module from the Main Menu.
Click the "Add a Field" clickable link above the Custom / Additional User Account Information Fields opening the Add Field Modal.
Input the label for the field.
Select the field type (text or email) from the dropdown menu.
Selecting the checkbox enables customization to "Allow multiple values," make the field "Required," or make it a "Sensitive Field."
Designating the field as a "Sensitive Field" allows an extra step in form security when integrating these fields within the Form module. The Form Designer must explicitly choose when they wish to use a sensitive field.
The Permissions Table determines who can view / edit their own and other user's fields. Selecting the checkbox gives the individual the specified permission. Deselecting the checkbox removed the permission.
Select the "Save" button and the custom field now shows in the table.
Use the Drag Me icon to drag and drop the field into your desired position of choice.
The bars icon allows the columns to be positioned in the order of your choosing.
Click “Cancel” to return to the Table Defaults Tab without making any changes.
Select the “Save” button to make the desired changes and return to the Table Defaults Tab. A preview of the first five rows of the table is shown. Select the “View Live Table” button to be directed to the live table in the Accounts Module.
How To: Edit the Accounts Module Pending Registrations Table
To edit the Pending Registrations Table in the Accounts Module, go to the Table Defaults Tab in the Site Settings Module.
Select “Accounts: Registration” from the dropdown menu.

Select the “Edit Columns” button, opening the Choose Columns Modal. The default column choices include: name, username, email, date, reason, email verification, approval, first name, last name, employee ID, phone, Address 1 and Address 2 and any customized account fields.
How To: Add a Custom/Additional User Account Information Field
To add a user account information field, open the Account Fields Tab in the Site Settings Module from the Main Menu.
Click the "Add a Field" clickable link above the Custom / Additional User Account Information Fields opening the Add Field Modal.
Input the label for the field.
Select the field type (text or email) from the dropdown menu.
Selecting the checkbox enables customization to "Allow multiple values," make the field "Required," or make it a "Sensitive Field."
Designating the field as a "Sensitive Field" allows an extra step in form security when integrating these fields within the Form module. The Form Designer must explicitly choose when they wish to use a sensitive field.
The Permissions Table determines who can view / edit their own and other user's fields. Selecting the checkbox gives the individual the specified permission. Deselecting the checkbox removed the permission.
Select the "Save" button and the custom field now shows in the table.
Use the Drag Me icon to drag and drop the field into your desired position of choice.
The bars icon allows the columns to be positioned in the order of your choosing.
Click “Cancel” to return to the Table Defaults Tab without making any changes.
Select the “Save” button to make the desired changes and return to the Table Defaults Tab. A preview of the first five rows of the table is shown. Select the “View Live Table” button to be directed to the live table in the Accounts Module.
Customizable user account information fields can be created and utilized in the tables as needed.
How To: Add a Custom / Additional User Account Information Field
To add a user account information field, open the Account Fields Tab in the Site Settings Module from the Main Menu.
Click the "Add a Field" clickable link above the Custom / Additional User Account Information Fields opening the Add Field Modal.
Input the label for the field.
Select the field type (text or email) from the dropdown menu.
Selecting the checkbox enables customization to "Allow multiple values," make the field "Required," or make it a "Sensitive Field."
Designating the field as a "Sensitive Field" allows an extra step in form security when integrating these fields within the Form module. The Form Designer must explicitly choose when they wish to use a sensitive field.
The Permissions Table determines who can view / edit their own and other user's fields. Selecting the checkbox gives the individual the specified permission. Deselecting the checkbox removed the permission.
Select the "Save" button and the custom field now shows in the table.
Use the Drag Me icon to drag and drop the field into your desired position of choice.
No comments to display
No comments to display