Accounts Page Registrations Tab
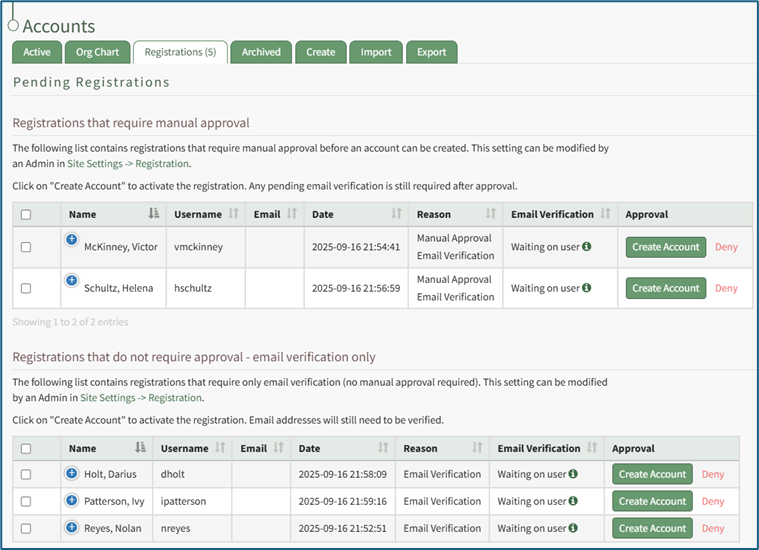
The Registration Tab on the Accounts Page displays the Pending Registration Table which allows for a quick view of the pending new user account registrations. Approvals/Verifications only show on the Registrations Tab when an individual manually registers themselves. The number of registrations that require approval show directly on the tab, Registrations (#), and as a badge next to the Registration page on the Main Menu.
Only individuals with an Admin module level access will see the Archived Accounts Tab.
The Pending Registrations Table shows account information for the user accounts whose system registration is pending confirmation. Account fields are used as the column headers. The default columns are Name, Username, Email, Date, Reason, Email Verification, and Approval.
Any desired account field can be created by an administrator.
How To: Add a Custom/Additional User Account Information Field
To add a user account information field, open the Account Fields Tab in the Site Settings Module from the Main Menu.
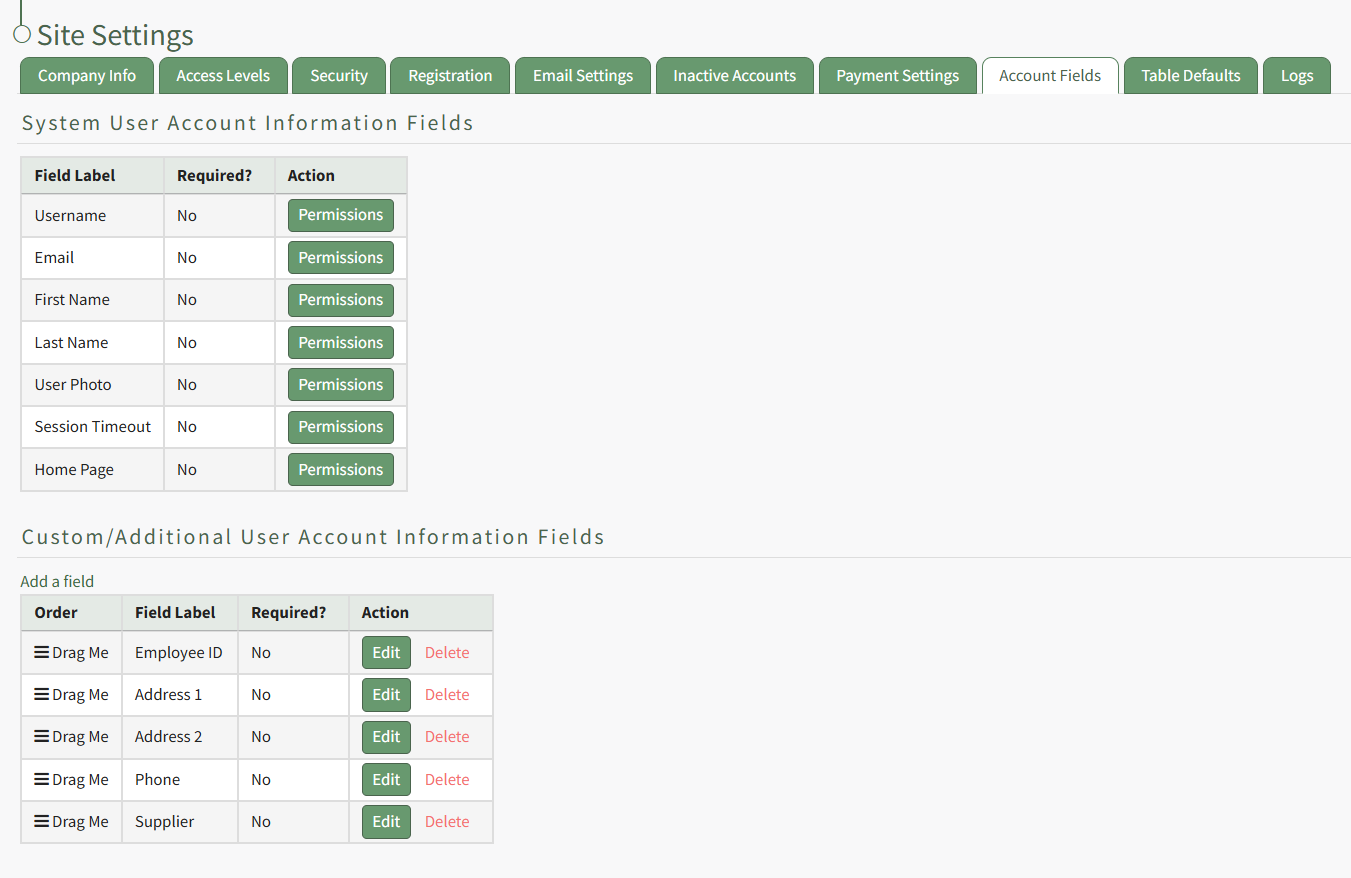
Click the "Add a Field" clickable link above the Custom / Additional User Account Information Fields opening the Add Field Modal.
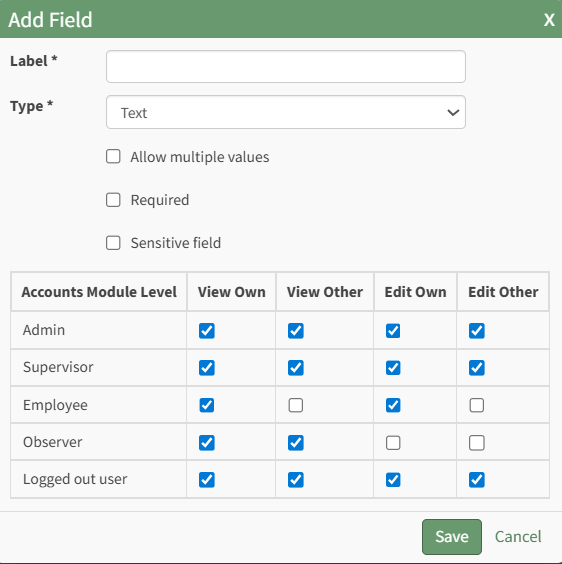
Input the label for the field.
Select the field type (text or email) from the dropdown menu.
Selecting the checkbox enables customization to "Allow multiple values," make the field "Required," or make it a "Sensitive Field."
Designating the field as a "Sensitive Field" allows an extra step in form security when integrating these fields within the Form module. The Form Designer must explicitly choose when they wish to use a sensitive field.
The Permissions Table determines who can view / edit their own and other user's fields. Selecting the checkbox gives the individual the specified permission. Deselecting the checkbox removed the permission.
Select the "Save" button and the custom field now shows in the table.
Use the Drag Me icon to drag and drop the field into your desired position of choice.
The Pending Registrations Table is customizable via the Table Defaults Tab in the Site Settings Module.
How To: Edit the Accounts Module Pending Registrations Table
To edit the Pending Registrations Table in the Accounts Module, go to the Table Defaults Tab in the Site Settings Module.
Select “Accounts: Registration” from the dropdown menu.

Select the “Edit Columns” button, opening the Choose Columns Modal. The default column choices include: name, username, email, date, reason, email verification, approval, first name, last name, employee ID, phone, Address 1 and Address 2 and any customized account fields.
How To: Add a Custom/Additional User Account Information Field
To add a user account information field, open the Account Fields Tab in the Site Settings Module from the Main Menu.
Click the "Add a Field" clickable link above the Custom / Additional User Account Information Fields opening the Add Field Modal.
Input the label for the field.
Select the field type (text or email) from the dropdown menu.
Selecting the checkbox enables customization to "Allow multiple values," make the field "Required," or make it a "Sensitive Field."
Designating the field as a "Sensitive Field" allows an extra step in form security when integrating these fields within the Form module. The Form Designer must explicitly choose when they wish to use a sensitive field.
The Permissions Table determines who can view / edit their own and other user's fields. Selecting the checkbox gives the individual the specified permission. Deselecting the checkbox removed the permission.
Select the "Save" button and the custom field now shows in the table.
Use the Drag Me icon to drag and drop the field into your desired position of choice.
The bars icon allows the columns to be positioned in the order of your choosing.
Click “Cancel” to return to the Table Defaults Tab without making any changes.
Select the “Save” button to make the desired changes and return to the Table Defaults Tab. A preview of the first five rows of the table is shown. Select the “View Live Table” button to be directed to the live table in the Accounts Module.
This would include any additional account fields created as discussed above plus other existing account fields such as First Name, Last Name, Employee ID, Phone, Address 1, and Address 2.
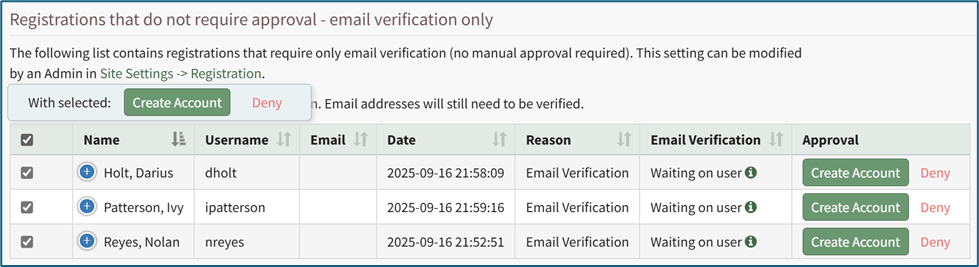
Pending registrations are separated into two tables: Registrations that require manual approval and Registrations that do not require approval (email verification only). Registrations require manual approval when a user creates an account using a KAStrack registration link if the registration profile is set to require it. The parameters for registration links are established on the Registration Tab in the Site Settings Module.
How To: Manually Approve / Deny User Registrations
To manually approve user registrations, open the Registrations Tab on the Accounts Page in the Accounts Module.
Approvals/Verifications only show on the Registrations Tab when an individual manually registers themselves.
Selecting any checkbox in a row opens a bulk actions modal above the table. Selecting the checkbox in the first column of the top row selects / deselects all rows in the table.
Bulk action options on the Registrations Tab are Create Account and Deny.
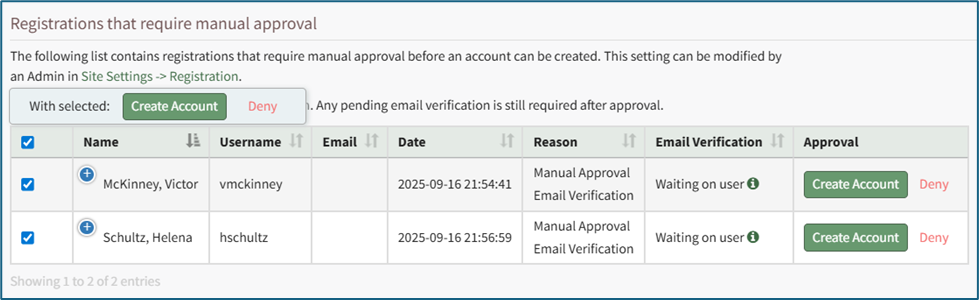
There are two options in the Approval column for all prospective accounts in the Pending Registrations table. Select “Create Account” to manually approve it or click “Deny” to deny an individual user.
There are two icons that can be selected to open modals in the Pending Registrations Table: the plus sign icon in the Name column and the information icon in the Email Verification column.

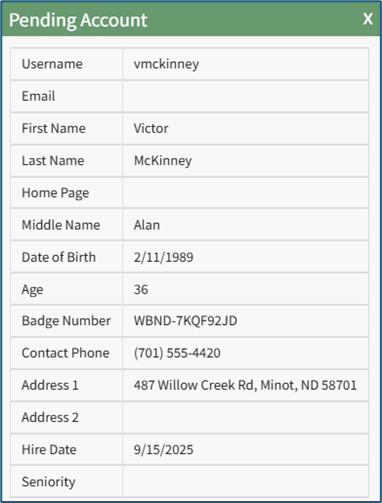
Selecting the plus sign icon to the left of the user’s name opens the Pending Account Modal which lists all the account information for the new user.
Selecting the information icon to the right of “Waiting on user” opens the Email Verification Requirement Modal. The modal states, “This user has not yet verified their email address and will not be able to log in until they click the verification link sent to the provided email address.”
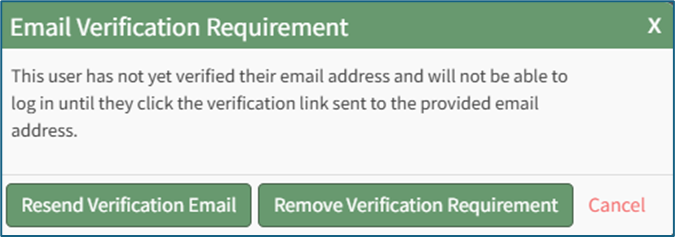
Select the “Resend Verification Email” to resend the verification email to the new user. A confirmation modal will appear, confirming the verification email was resent.
Select the “Remove Verification Requirement” button and a warning modal appears stating, “Warning: This user has not verified their email address. Removing the email verification requirement will allow the user to log in without verifying their email address. Are you sure you want to proceed?”
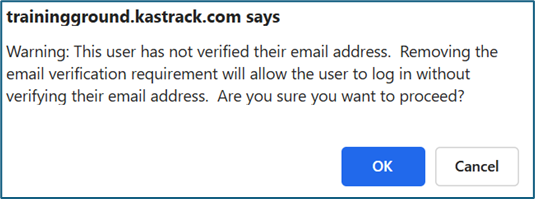
Select the “OK” button to remove the verification requirement, or click “Cancel” to return to the registration tab without saving any changes.
If there are no pending registrations, the tables are not visible. In their place is the statement, “There are no registrations that require manual approval/email verification at this time.”

Selecting any checkbox in a row opens a bulk actions modal above the table. Selecting the checkbox in the first column of the top row selects / deselects all rows in the table.
Bulk action options on the Registrations Tab are Create Account and Deny.
No comments to display
No comments to display