Creating A New Attendance Log
In order to create an attendance log, you must first create a form that is integrated with the Attendance Module.
How To: Create the Base Form for an Attendance Log
To create the base form required to create a new attendance log, go to the Home Page of the Forms Module.

Select the “Create Form” button opening the New Form Modal.
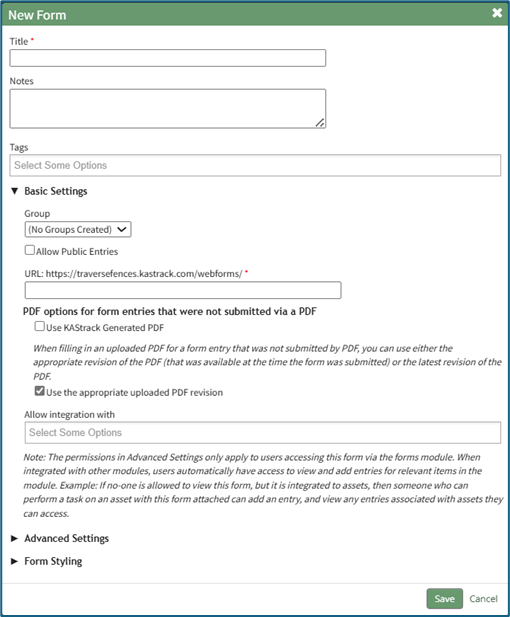
Input a title for the form and include any notes as desired. You can tag the form with open, permissive, or restrictive tags to customize visibility if desired, and place the form in the group of your choosing.
Select the “Allow Public Entries” checkbox if your attendance log will record users who are not logged in to KAStrack or who do not have an account. If the attendance log will solely be used by individuals who use KAStrack and have an account, you can leave this checkbox blank.
If you will be using a customized PDF output for attendance log sign in / sign out entries, select the “Use the appropriate uploaded PDF revision” checkbox. If the generic output is sufficient, select “Use KAStrack Generated PDF”.
To ensure that your form integrates with the attendance log, select “Attendance: Integrate with the Attendance Module” from the drop-down menu below the Field Title “Allow Integration With”.

Details regarding Advanced Settings and Form Styling when creating a new form can be explored in the Customizable Options for Form Creation Section of the User Manual.
After customizing the form for your need, select the “Save” button at the bottom of the modal opening the Fields Tab for your newly created form.
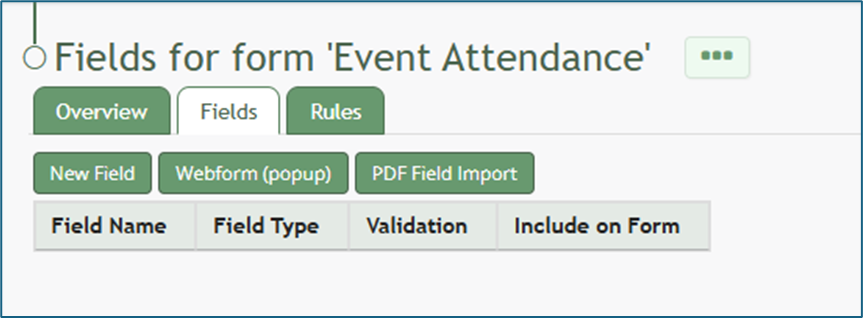
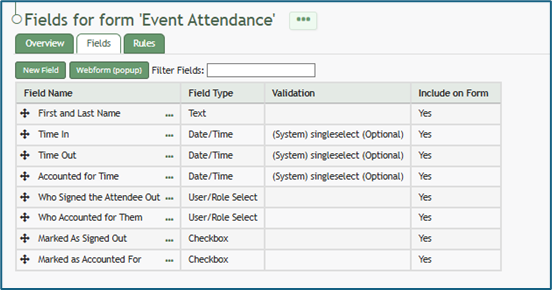
To create an attendance log, your form must have the following seven fields and all of them should be set to start hidden.
Required Field 1 of 7
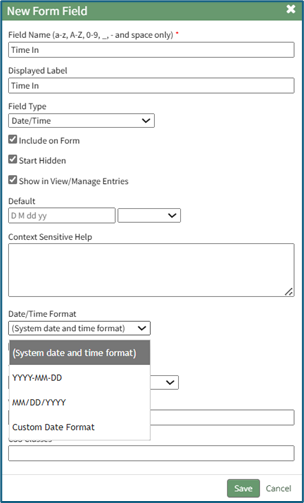
The first field to be created is a date/time field to be used when a person signs in (Time In). Select the “New Field” button opening the New Form Field modal. At a minimum, input the field name. Select Date/Time from the Field Type drop-down menu. Select the “Start Hidden” checkbox. Under Date/Time Format, select your preferred format from the drop-down menu.
The date and time format used for your attendance log can be customized if desired.
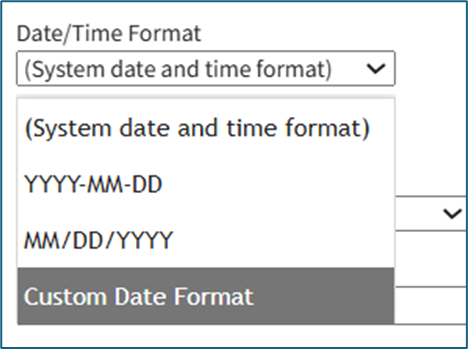
How To: Create a Custom Date/Time Format for an Attendance Log
To create a custom date/ time format for your attendance log, go to the Home Page of the Forms Module and click the three-dot icon to the right of the form the attendance log is based on. This opens the context menu. Select “Fields”.
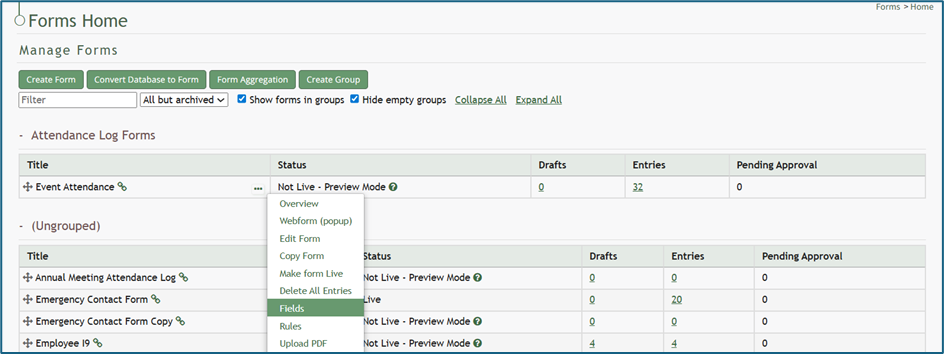
This opens the Fields Tab of the Form. Select the three-dot icon next to the Field Name for the date/time field type and select “Edit Field”.
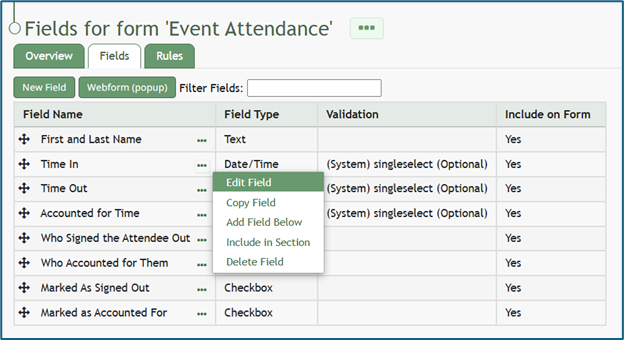
This opens the Edit Form Field Modal, which includes a Date/Time Format field. Select “Custom Date Format” from the drop-down menu.
This expands the Edit Form Field Modal. Input the PHP date format and the jQuery date format desired.
Time is not included in the Custom Date Format field.

To create a custom date format, the software needs to know how to both read and display the date. PHP (the server side) processes the date after it’s submitted. jQuery (the browser side) displays/formats the date in the date picker the user sees. Both systems have their own “language” for writing date formats, so you are required to provide a version both sides understand.
PHP uses letters to represent parts of the date, explained in the table below.
PHP Language Explanation | ||
What It Represents | PHP Letter | Example |
Day (with leading 0) | d | 02 |
Month (with leading 0) | m | 02 |
Year (4 digits) | y | 2025 |
jQuery uses similar but slightly different letters, explained in the table below.
jQuery Language Explanation | ||
What It Represents | jQuery Letter | Example |
Day (with leading 0) | dd | 02 |
Month (with leading 0) | mm | 02 |
Year (4 digits) | yy | 2025 |
Select “Save” at the bottom of the Edit Form Field Modal, and the customized date and time format will now be utilized.
Select the “Save” button at the bottom of the modal and return to the Form’s Fields Tab.
Required Field 2 of 7
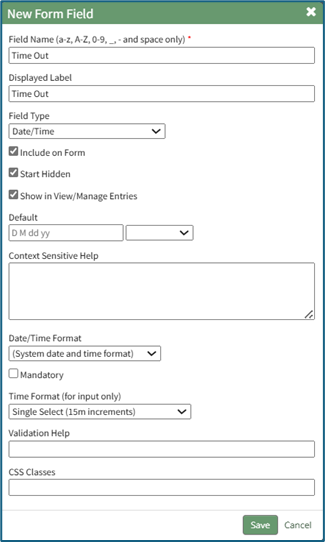
The second field to be created is a date/time field to be used when a person signs out (Time Out). Select the “New Field” button opening the New Form Field modal. At a minimum, input the field name. Select Date/Time from Field Type drop-down menu. Select the “Start Hidden” checkbox. Select your preferred Date/Time Format from the drop-down menu.
Select the “Save” button at the bottom of the modal to return to the Form’s Fields Tab.
Required Field 3 of 7
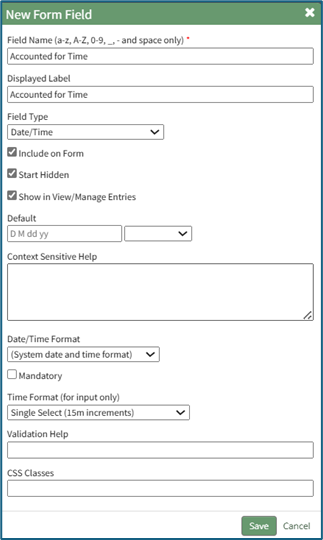
The third field to be created is a date/time field to be used when a person is accounted for when mustering. Select the “New Field” button opening the New Form Field modal. At a minimum, input the field name. Select Date/Time from Field Type drop-down menu. Select the “Start Hidden” checkbox. Select your preferred Date/Time Format from a drop-down menu.
Select the “Save” button at the bottom of the modal and return to the Form’s Fields Tab.
Required Field 4 of 7
The fourth field to be created is a user/role select field for when someone is signed out (to indicate who signed them out). Select the “New Field” button opening the New Form Field modal. At a minimum, input the field name. Select User / Role Select (in the accounts category) from the Field Type drop-down menu. Select the “Start Hidden” checkbox. You can customize who is visible on the drop-down menu if desired. Indicate if you would like to show all users, specific users, certification roles, and / or access levels. This will be used to indicate who signed the individual out. Select the “Multiple” checkbox if you want to allow multiple options to be selected when indicating who signed an individual out of the attendance log.
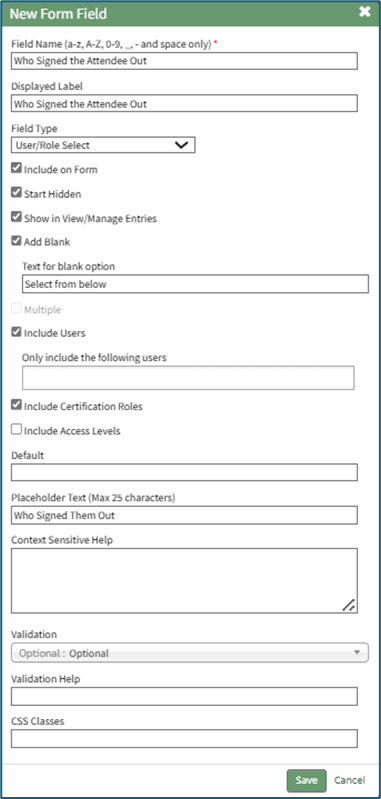
Select the “Save” button at the bottom of the modal and return to the Form’s Fields Tab.
Required Field 5 of 7
The fifth field to be created is a user/role select field for when someone is accounted for (to indicate who accounted for them). Select the “New Field” button opening the New Form Field modal. At a minimum, input the field name. Select User / Role Select (in the accounts category) from the Field Type drop-down menu. Select the “Start Hidden” checkbox. Make any other customizable choices as desired.
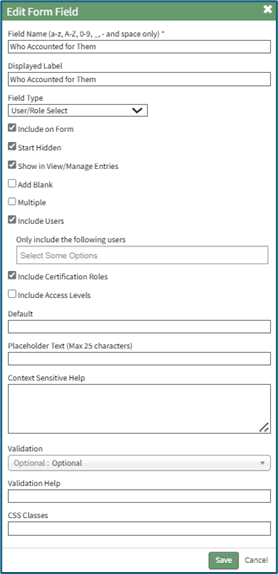
Select the “Save” button at the bottom of the modal and return to the Form’s Fields Tab.
Required Field 6 of 7
The sixth field to be created is a checkbox field for when someone is signed out (to indicate whether they signed out themselves or were marked as signed out). Select the “New Field” button opening the New Form Field modal. At a minimum, input the field name. Select Checkbox from the Field Type drop-down menu. Select the “Start Hidden” checkbox. Make any other customizable choices as desired.
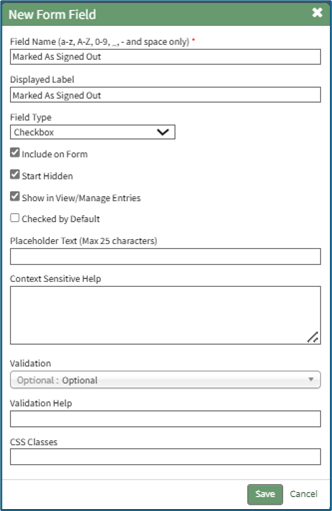
Select the “Save” button at the bottom of the modal to return to the Form’s Fields Tab.
Required Field 7 of 7
The seventh field to be created is a checkbox field for when someone is accounted for (to indicate whether they accounted for themselves or were marked as accounted for). Select the “New Field” button opening the New Form Field modal. At a minimum, input the field name. Select Checkbox from the Field Type drop-down menu. Select the “Start Hidden” checkbox. Make any other customizable choices as desired.
Select the “Save” button at the bottom of the modal and return to the Form’s Fields Tab.
Now that all required fields have been created, you will need at least one more field that will be used to capture details of the person signing in. Examples might include (but are not limited to) “Name,” “Company,” “Cellphone,” or “Department.” Multiple fields can be utilized here based on your organization’s desires for the attendance log. Select the “New Field” button opening the New Field Modal. Create your additional fields for identification purposes, and select “Save” when done to return to the Fields Tab. Your Form fields are now complete.
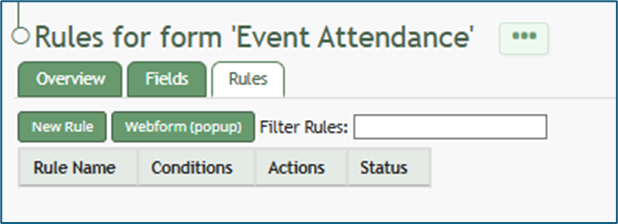
Form Rules
Your Attendance Log Form should have a rule established to set the sign in date/time field to the current time. To create this rule, select the Rules Tab at the top of the page or select “Rules” from the context menu accessible from the three-dot icon to the right of the page header. This opens the Form’s Rules Tab.
Select the “New Rule” button opening the New Form Rule Modal. Input a Rule Name.
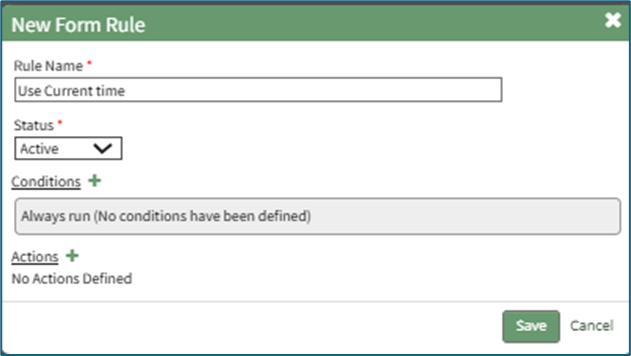
Leave the status as Active and leave the condition as “Always run.”
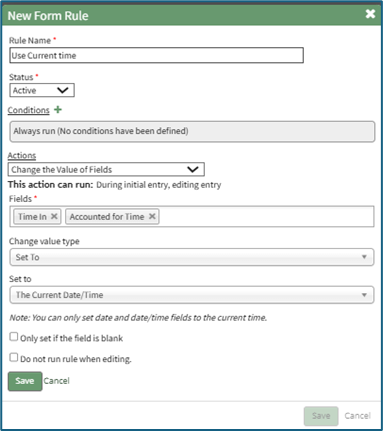
Select the “+” plus sign icon to the right of Actions to expand the modal. Select “Change the Value of Fields” from the Field Management Category as the Action. Select the field(s) you wish to always run the current date/time rule on.
Select “Set To” from the drop-down menu for the Change Value Type field.
Select “The Current Date / Time” from the drop-down menu for the Set To field.
Select “Save” and the action just outlined will be saved and shows on the New Form Rule Modal.
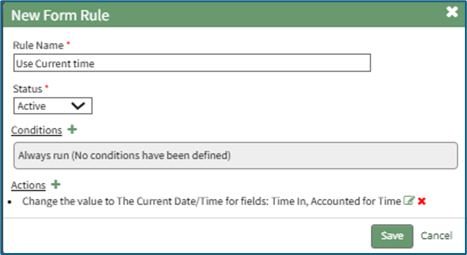
Select the New Form Rule “Save” button and the rule will now show as active on the Rules Tab.

While there are dozens of options for the customization of your attendance log form, this is the basic requirements for functionality. The attendance log is now ready to be created.
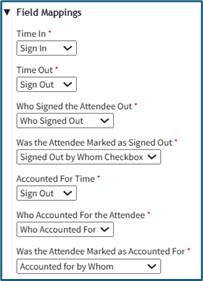
Example of how the form fields will be utilized in an attendance log:
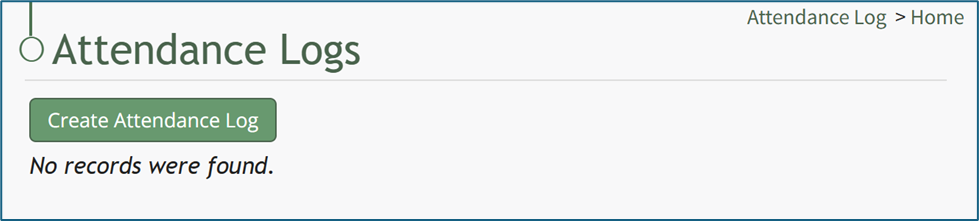
Once the base form required for the attendance log field mappings has been created, you are ready to create an Attendance Log. Go to the Home Page of the Attendance Module. Select the “Create Attendance Log” button.
This opens the New Attendance Log Modal.
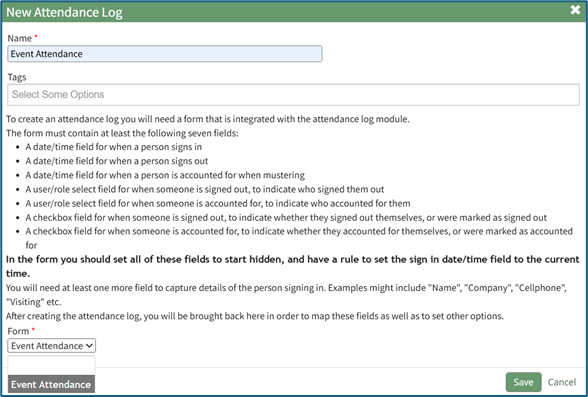
Input the Name of the new attendance log and, if needed, select any tags to be associated with the attendance log.
Select the form for the attendance log from the Form drop-down menu, which will list all forms integrated with the Attendance Module. Select the “Save” button at the bottom of the New Attendance Log Modal.
This opens the Edit Attendance Log Modal.
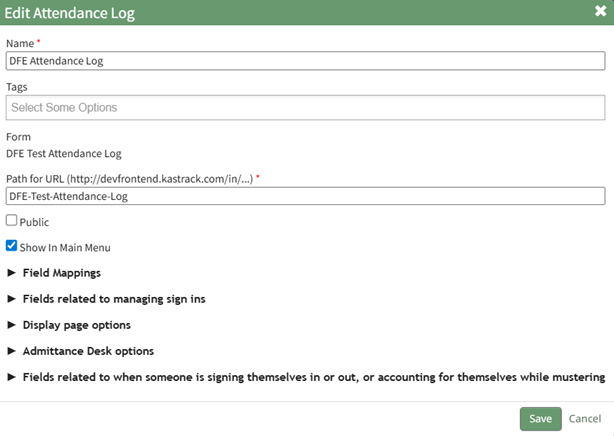
The attendance log name already shows, along with any associated tags. Tags can also be added here if desired. The URL path will add the form’s name to the end, but this can also be edited if desired.
If the associated form was set to public, the public checkbox will automatically be selected on the Edit Attendance Log Modal. If the form was not made public, the attendance log cannot be made public and this option would not be selectable.
You can set the form to public by editing the form in the Forms module and clicking the “Allow Public Entries” checkbox.
Select “Show in Main Menu” if you would like the Attendance Log to show as an option on the Main Menu.
In order to see the new attendance log on the main menu, you will either have to refresh the page, or log out and log back in once the new attendance log has been created.
The Edit Attendance Log Modal has five different sections: Field Mappings*, Fields Related to Managing Sign Ins*, Display Page Options, Admittance Desk Options, and Fields Related to When Someone is signing themselves in or out (or accounting for themselves while mustering) *.
An * asterisk denotes a required field.
After going through each section, select “Save” at the bottom of the modal to return to the Attendance Home Page where the newly created attendance log will show in the Attendance Log Table.
No comments to display
No comments to display