Attendance Log Property Explanations
The Edit Attendance Log Modal has five separate sections that expand for customization of each individual attendance log. An explanation of each section has been included below.
An * asterisk denotes a required field.
Field Mappings
Field Mappings correlate to the seven required fields that were created in the base form for the attendance log. Each are a required field. Match the field names used in your attendance log form to the appropriate title using the drop-down menus provided.
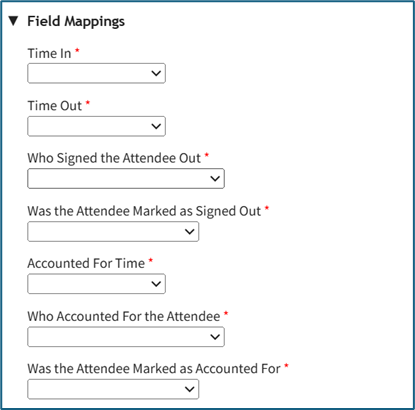
An explanation of the Field Mapping Fields are included in the table below.
Field Mappings Field Explanations | |
Field | Explanation |
*Time In | Time In is referring to the date / time field created for when a person signs in. |
*Time Out | Time Out is referring to the date / time field created for when a person signs out. |
*Who Signed the Attendee Out | Who Signed the Attendee Out is referring to the user / role select field created for when someone is signed out, to indicate who signed them out. |
*Was the Attendee Marked As Signed Out | Was the Attendee Marked as Signed Out is referring to the checkbox field created for when someone is signed out, to indicate whether they signed out themselves, or were marked as signed out. |
*Accounted for Time | Accounted For Time is referring to the date / time field created for when a person is accounted for when mustering. |
*Who Accounted for the Attendee | Who Accounted for the Attendee is referring to the user / role select field created for when someone is accounted for, to indicate who accounted for them. |
*Was the Attendee Marked As Accounted For | Was the Attendee Marked as Accounted For is referring to the checkbox field created for when someone is accounted for, to indicate whether they accounted for themselves, or were marked as accounted for. |
Fields Related to Managing Sign Ins
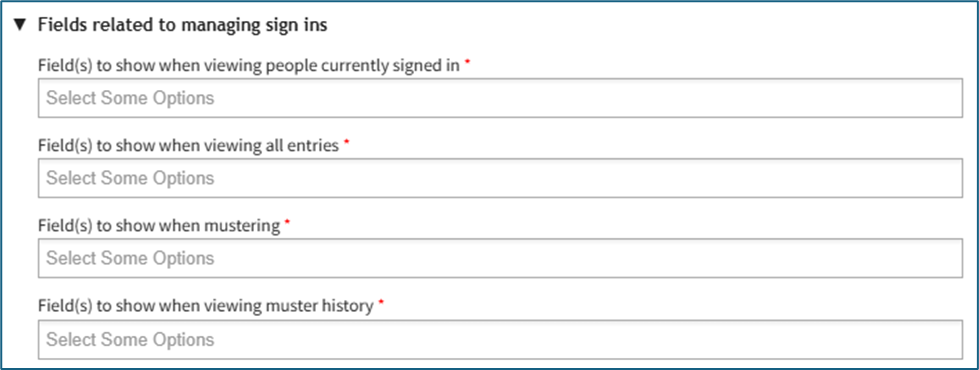
Fields Related to Managing Sign Ins Explanations | |
Field | What is Being Impacted |
*Field(s) to show when viewing people currently signed in | The fields selected from the drop-down menu here will be the columns displayed on the Currently Signed In Page. |
*Field(s) to show when viewing all entries | The fields selected from the drop-down menu here will be the columns displayed on the All Entries Page. |
*Field(s) to show when mustering | The fields selected from the drop-down menu here will be the columns displayed on the Muster Page. |
*Field(s) to show when viewing muster history | The fields selected from the drop-down menu here will be the columns displayed on the Muster History Page. |
Display Option Pages
The Display Page Options section has one checkbox, “Enable the display page”.

The Display Page is a screen that will show information based on your selections and will update as individuals use the attendance log.
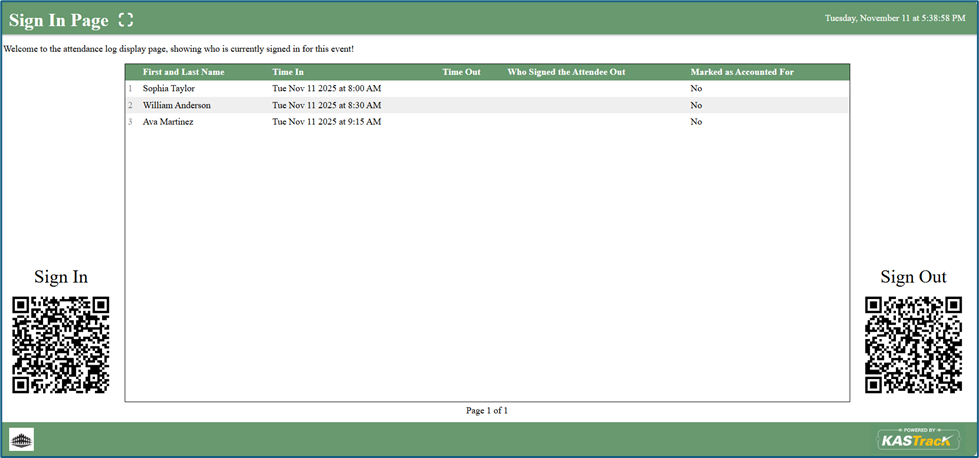
When this checkbox is selected, the modal expands with additional options for customization of the display.
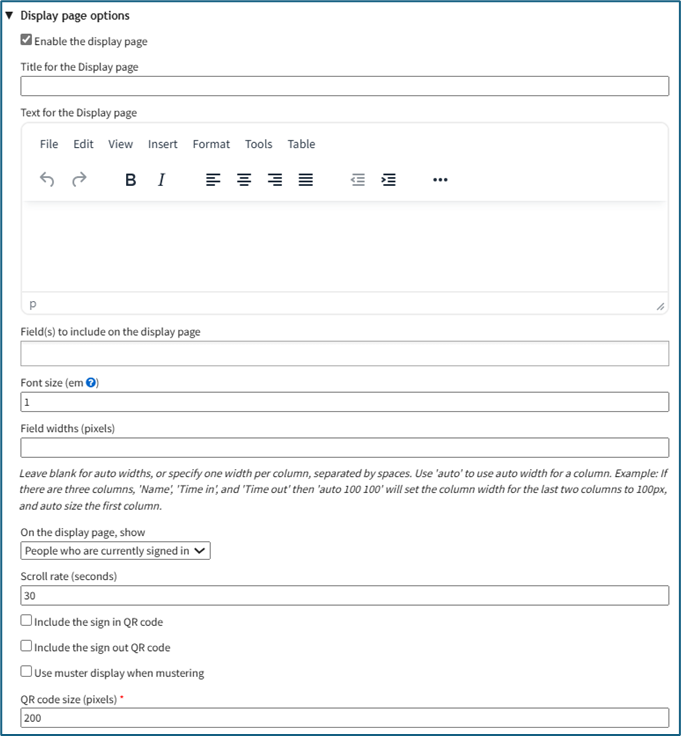
Display Page Option Section Explanations | |||
Field | Comments | ||
Title for the Display Page | You can give the display page a title different that is different from the name of the attendance log. The Display Page Title will show in the top left-hand corner of the Display Page. | ||
Text for the Display Page | The text for the Display Page is seen immediately beneath the page header. You can customize this text or leave it blank. | ||
Field(s) to Include on the Display Page | Select the fields you want to be visible on the Display Page. All fields included on the Attendance Log Form will show as Display Page field options. | ||
Font Size (em) | Font size is automatically set a 1em. Input the desired font size. An em is a unit in the field of typography, equal to the currently specified point size that corresponds to the body height of the typeface. | ||
Field Widths (pixels) | Leave this blank for auto widths, or specify one width per column, separated by spaces. Use ‘auto’ to use auto width for a column. (For example, if there are three columns then ‘auto 100 100’ will set the column width for the last two columns to 100px, and auto-size the first column). | ||
On the Display Page, Show... | There are two selections provided via drop-down menu for who shows on the display page: “People who are currently signed in” OR “People Who Have Signed In Today” | ||
Scroll Rate (seconds) | The scroll rate is automatically set to 30 seconds. If your screen only shows 25 entries at a time, scroll rate dictates how long the screen will show those 25 entries before scrolling to the next 25 entries. | ||
Include the Sign In QR Code Checkbox | Selecting this checkbox will result in the Sign In QR Code being displayed on the Display Page. | ||
Include the Sign Out QR Code Checkbox | Selecting this checkbox will result in the Sign Out QR Code being displayed on the Display Page. | ||
Use Muster Display When Mustering | Selecting this checkbox will result in the Mustering Display Page being shown as opposed to the regular Display Page when in Muster mode. When selected, it expands to show additional fields. | ||
Fields | Comments | ||
Muster Mode | There are two options for this drop-down menu. The first option is “Show not accounted for people and stats”, which will show information about individuals who have not accounted for themselves or have not been marked as accounted for. The second option is “Only show QR Code”, which will display the muster mode QR Code instead. | ||
Fields to Include on the display page when mustering | Select the fields you would like to be visible on the Mustering Display Page. All fields included on the attendance log form will show as options. | ||
Include the muster QR code | Selecting this checkbox will show the Muster QR Code on the Muster Display Page. | ||
Show Accounted For List | Selecting this checkbox results in the Accounted For List showing on the Muster Display Page. It expands when selected with additional options. | ||
Fields | Comments | ||
Pattern for the Accounted for List | You can use the pattern field to reference your form fields in the Accounted For List. Input the fields you would like displayed in order. Example: #FieldName1# #FieldName2# | ||
Accounted for List Font Size (em) | The font size for the accounted for list is set at 1em but can be altered. | ||
Accounted for List Pagination Speed (seconds) | The pagination speed of the accounted for list is set at 30 seconds but can be altered. | ||
Sort By Field | Select which field you would like the Muster Display Page to use for sorting. | ||
QR Code Size (pixels) | The QR Code size is set for 200 pixels but can be altered. | ||
Admittance Desk Options
Admittance Desk Options are relevant when you want an individual (e.g. a receptionist) to easily check role status and sign someone in or out.
Select the “Enable Admittance Desk” checkbox to enable this feature.
The Associated Certification Role field shows a drop-down menu with all of the certification roles. After selecting a role, the Admittance Desk Page will display the status for that role and its relevant certifications a user. This feature is useful if, for example, you only wanted to admit individuals who have a Valid (green) status for a specific certification role.

Drag and drop any additional table column options desired from the Available Box on the right-hand side into the Selected Box on the left-hand side. These options are based on your site’s account and custom account fields.
Fields Related to when Someone is Signing In/Out or Accounting for Themselves while Mustering
The following fields are related to when someone is signing themselves in or out, or accounting for themselves while mustering. An explanation of the fields has been included in the Fields Related to Signing In / Out or Mustering Explanations Table below.
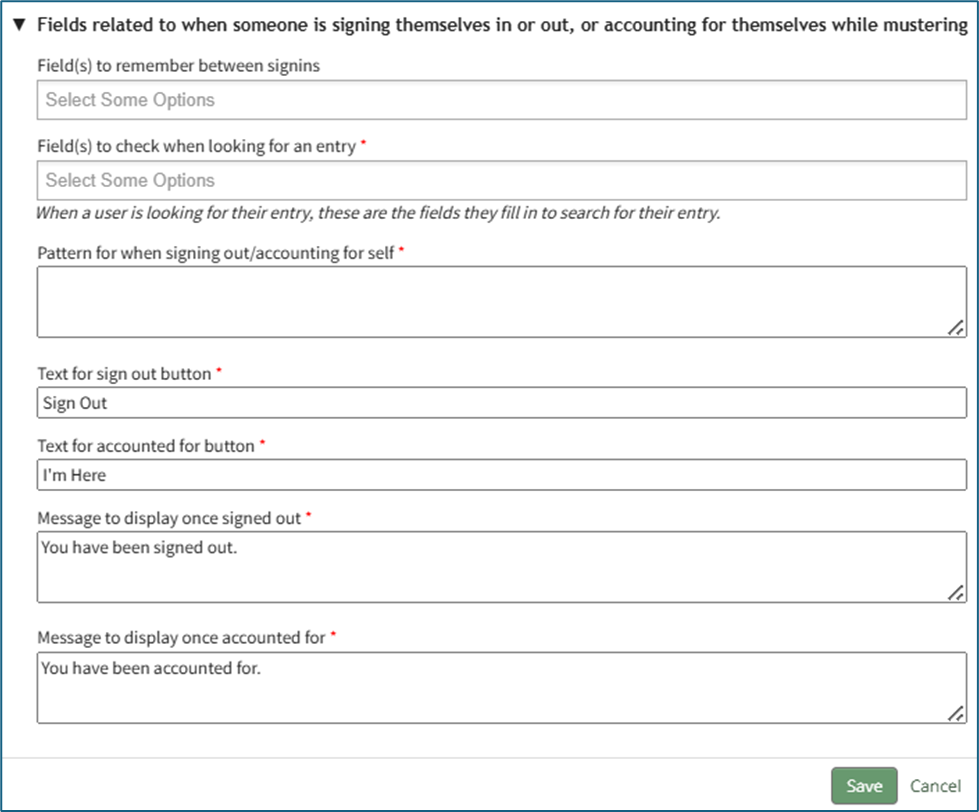
Fields Related to Signing In/Out and Mustering Explanations | |
Field | Explanation |
Field(s) to Remember between Sign Ins | For attendance logs that have repeat sign ins, this feature will allow for key information to be saved by the system so that it doesn’t have to be re-entered by the individual every time they sign in. |
*Field(s) to check when looking for an entry | When a user is looking for an entry, these are the fields they fill in to search for an entry. |
*Pattern for when signing out / accounting for self | This pattern defines what an individual sees when they are signing out/accounting for themself during mustering. Input the fields you would like displayed in order. Example: #FieldName1# #FieldName2# |
*Text for Sign Out button | The field has the automatic input “Sign Out” that can be customized in this textbox as desired. |
*Text for Accounted For button | The field has the automatic input “I’m Here” that can be customized in this textbox as desired. |
*Message to display once signed out | The field has the automatic input “You have been signed out.” The message can be customized as desired. |
*Message to display once accounted for | The field has the automatic input “You have been accounted for.” The message can be customed as desired. |
No comments to display
No comments to display