Actions Home Page
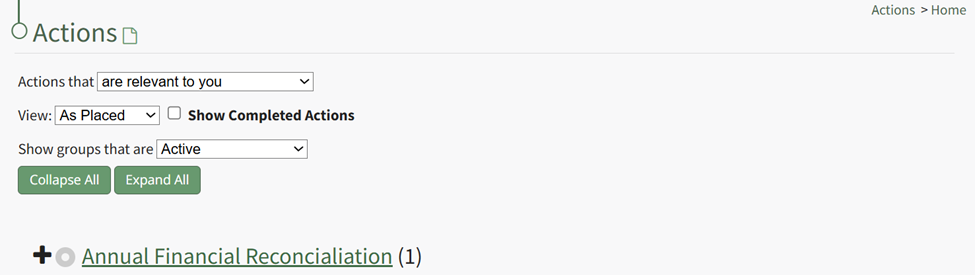
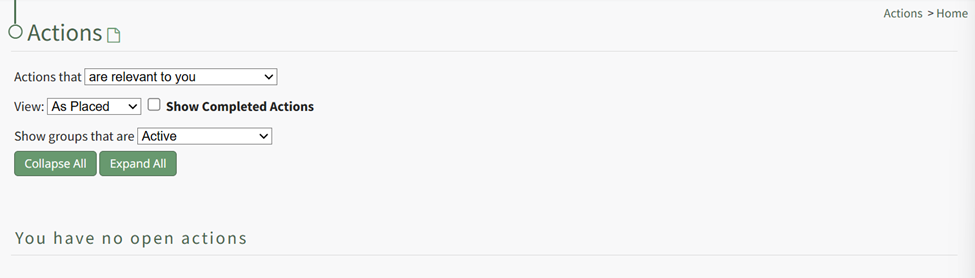
The Actions Module Home Page, the Actions Page, lists all open actions associated with a user account. If you have no open actions under the filter conditions applied, the system will state you have no open actions.

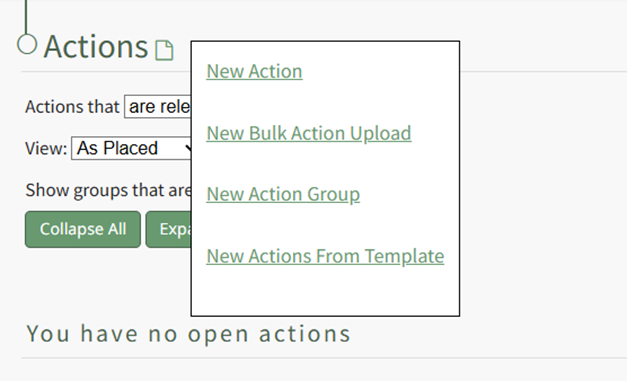
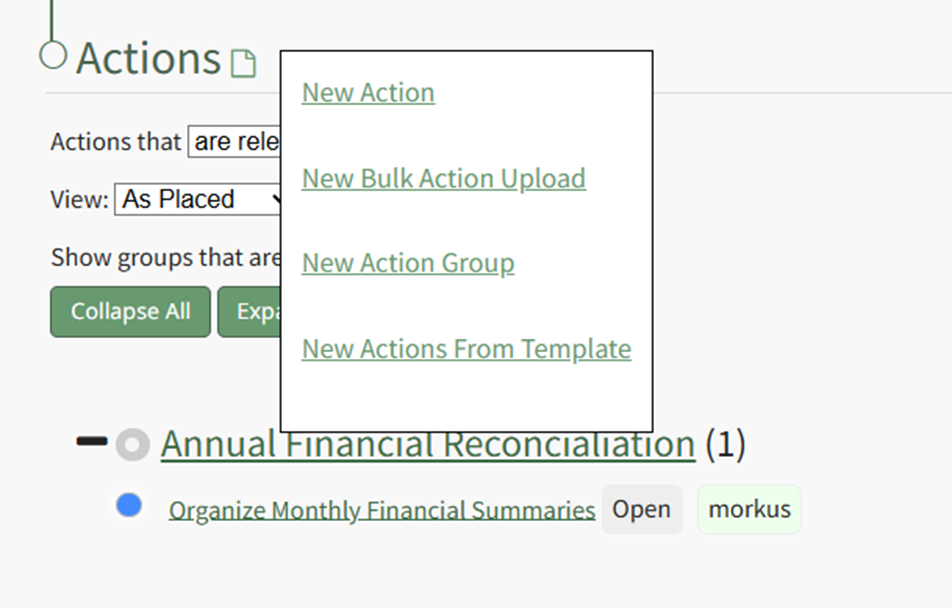
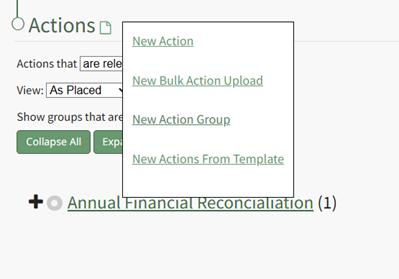
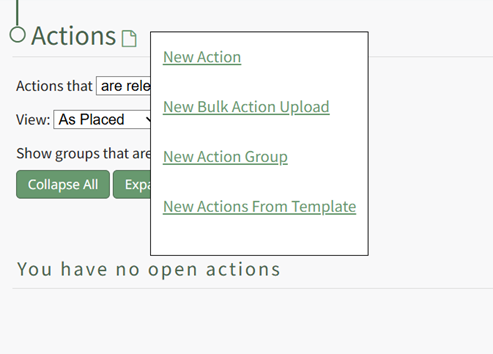
Hovering the cursor over the page icon to the right of the Actions header opens a context menu with quick link options to navigate the module. An explanation of the Actions Module Home Page Context Menu is included in the table below. Both New Actions and New Action Groups can be created on the Actions Home Page through the use of the context menu.
How To: Create a New Action
To create a new action from the Actions Home Page, hover your cursor over the page icon opening the home page context menu.
A new action can also be created from the context menu on the Groups Page via the three-dot icon, as well as the Bulk Edit Tab on the Actions Settings Page.
Select “New Action” opening the New Action Modal.
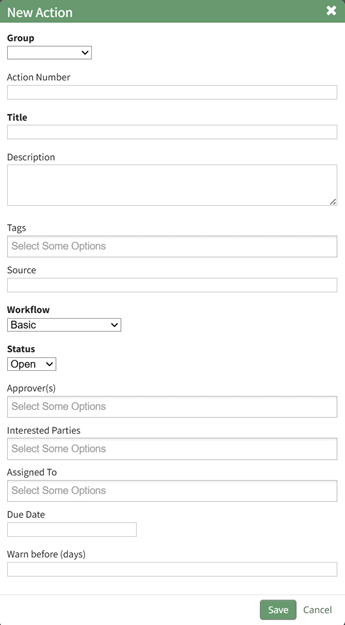
The fields in the New Action Modal are explained in the table below.
New Action Modal Field Explanations | |
Field | Explanation |
Group | Input the Title of the Action Group this action should be associated with. If the Action Group the action is to be associated with has already been created, it will be available on the Group dropdown menu. If the action group has not been created, see notes on how to add one below. |
Action Number | Action Numbers are used to differentiate each task in a chronological order. Actions within the same Action Group cannot have the same Action Number. You can leave the field blank. You can also input text if you wish to use the alphabet as a way to categorize actions. |
Title | Input the title of the action. |
Description | Input the description for the action. |
Tags | Open, Permissive, and Restrictive Tags can be applied to individual actions. |
Source | The Source field is intended to serve as an input for the source of the action. Source is a free text field, allowing you to input any desired response. Customer, Internal Request, a user’s name, role or department are all examples of potential Source field categories. |
Due Date | Input the date the action must be completed by. Relevant due dates cannot be imported. That feature is specific to Action Group Templates. |
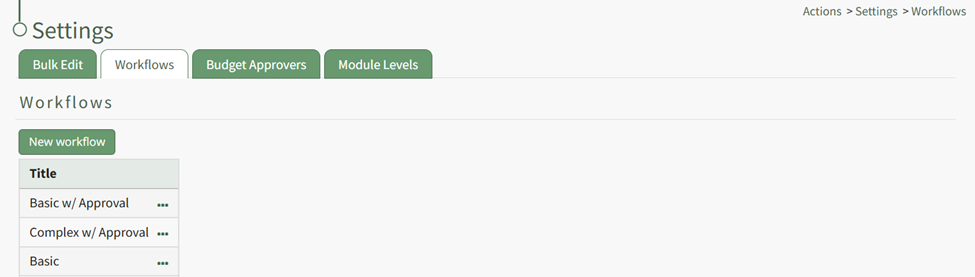
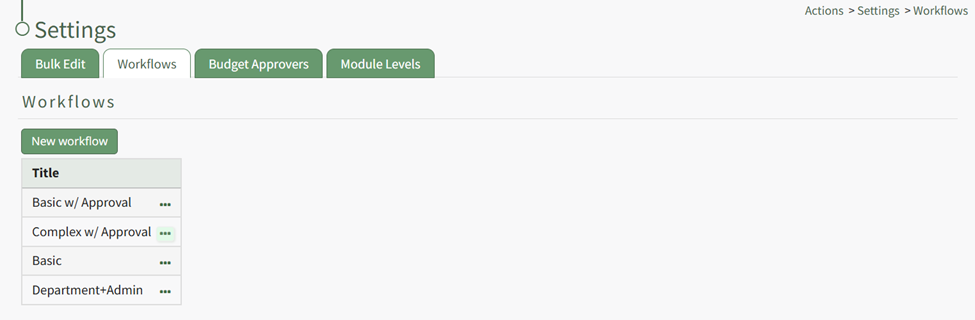
Workflow | Select a default workflow (basic, basic with approval, complex) or a customized workflow specific to your organization. How To: Create New WorkflowTo create a new workflow, select Settings under the Action Module on the Main Menu. Open the Workflows tab.
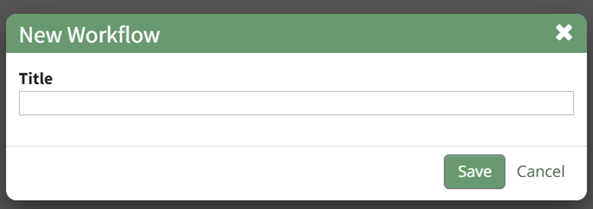
Click the “New Workflow” button opening the New Workflow Title Modal.
Input the title of the new workflow and select the “Save” button.
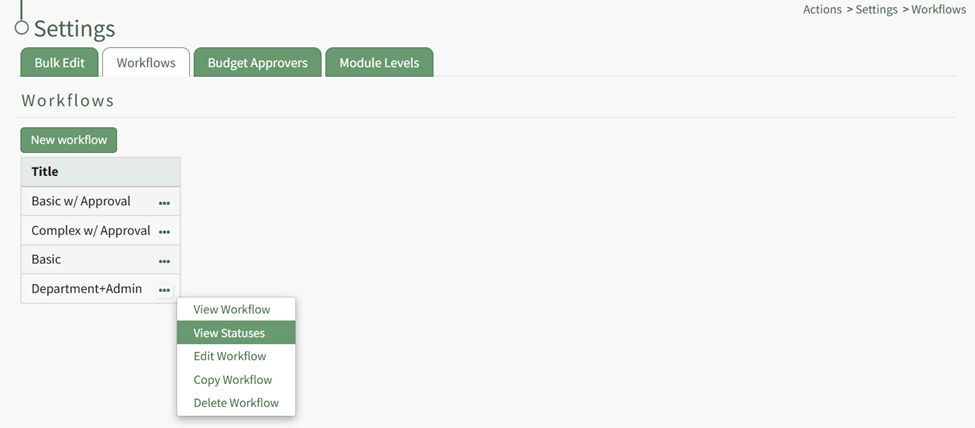
The new workflow is now visible in the Workflow Title Table. Click the three dot icon to the right of the new workflow opening the Workflow Context Menu.
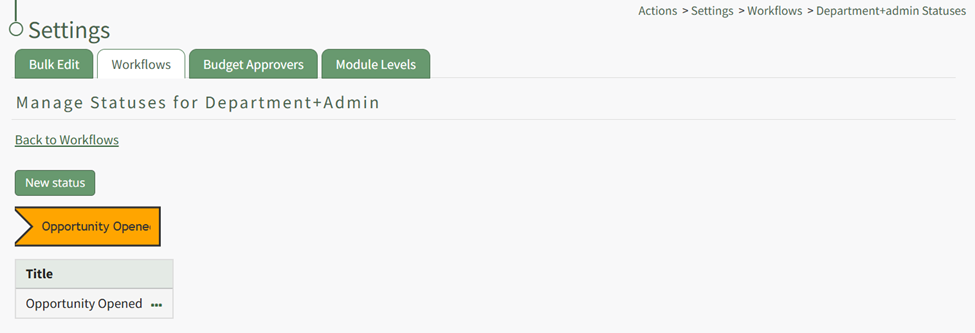
Select “View Statuses” opening the Manage Statuses Page for your workflow.
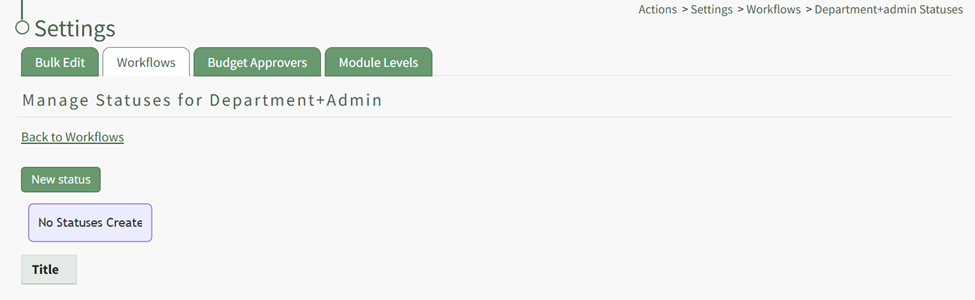
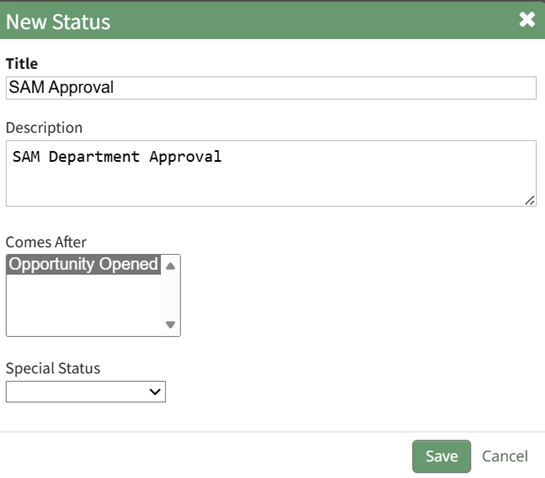
Click the “New Status” button opening the New Status Modal.
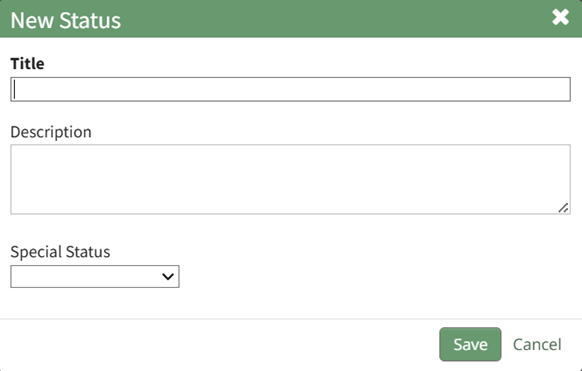
Input a title and description for the new workflow status. The Special Status dropdown menu displays: Close, Close and Repeat, and Opened. Select which if it applies and select the “Save” button. The status now shows on the Manage Status Page.
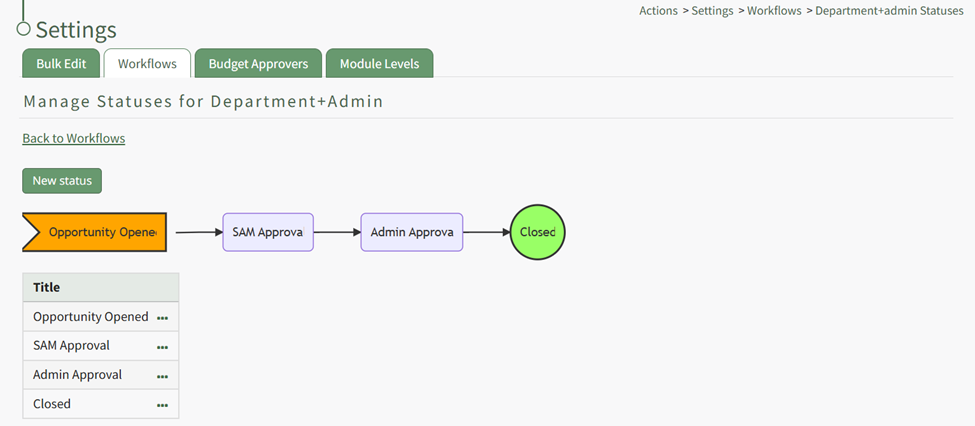
Repeat the process to create the next stage of your workflow.
The New Status Modal will now require you to repeat the process, now requiring you to select which step this status is to follow. Repeat the process until your customized workflow has been completed.
|
Status | The status of the action is based on the workflow selected. Basic with Approval: Open, Pending Approval, Completed Actions can be imported with any status and not just the first status of the workflow. |
Action Approvers | Input the users (by username or First and Last Name) that can approve an action. Only individual users can be added to this field. Multiple users can be designated as an action approver. When importing, use a semicolon to separate individuals assigned to an action. |
Interested Parties | Input the users (by username or First and Last Name) or Certification Roles that are identified as Interested Parties. Multiple users or roles can be designated as an Identified Party. When importing, use a semicolon to separate users/roles. |
Assigned To | Input the users (by username or First and Last Name) that you want to assign the action to. Actions cannot be assigned to roles or access levels. An Action can be assigned to multiple people. When importing, use a semicolon to separate individuals assigned to an action. |
Due Date | Input the date the action must be completed by. Action Group Templates allow additional control over due dates in the Relative Due Dates section when creating or editing a template. |
Warn Before (Days) | Input a numerical value for the number of days ahead of the due date you want users to get a system email alert reminder of the outstanding action (converting from blue to yellow status). |
Action Response | The information input into the Action Response field will add a comment to the action task when imported, prefaced with “The following response was imported.” |
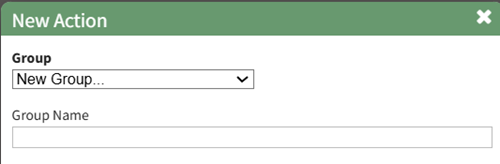
If the action group the action is to be associated with has not been created, select “New Group…” from the Group dropdown menu
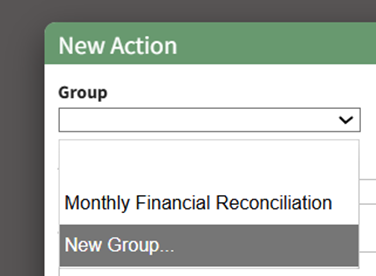
This expands the New Action Modal, allowing you to input the New Group Name.
After inputting all relevant information for the new action, select save. A green confirmation modal will appear, confirming the new action.
The action will only appear on the Actions Home Page if it applies to the currently applied filter.
The newly created action group can be edited to customize the action group preferences, or additional actions can be added.
How To: Edit An Action Group
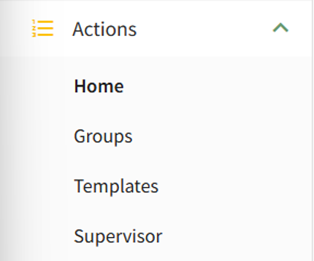
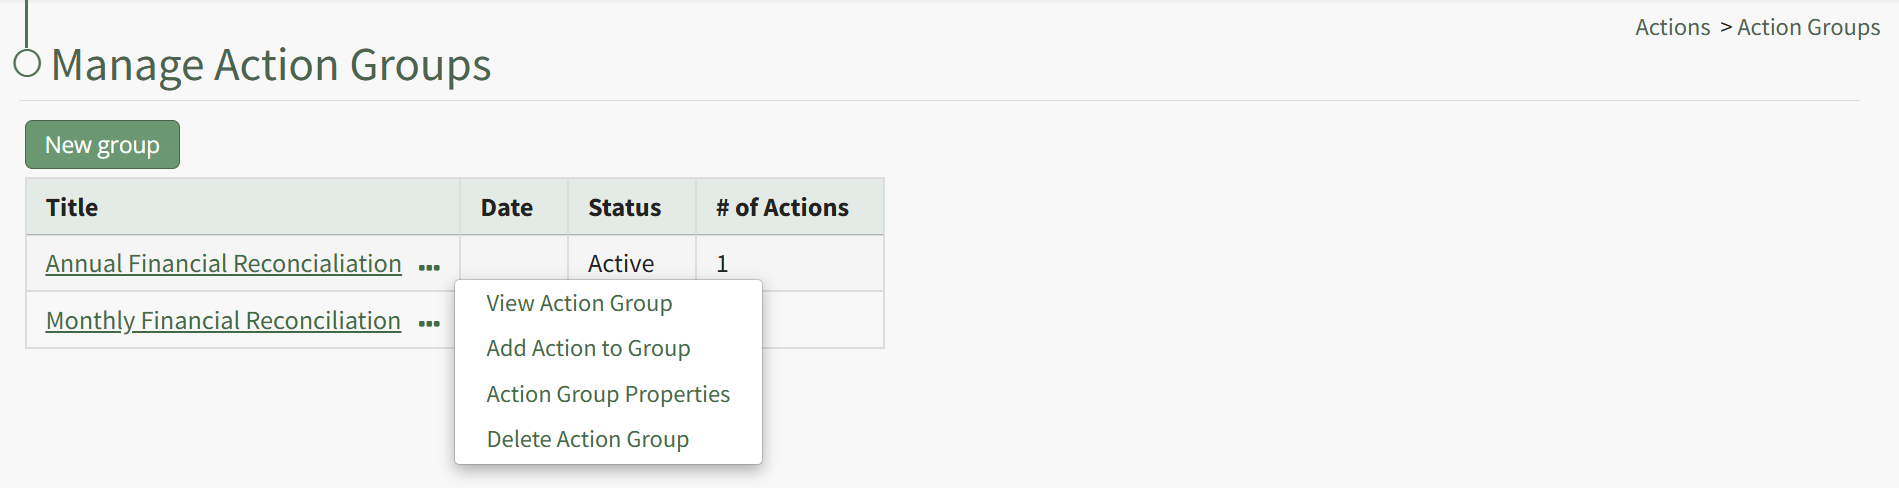
To edit a specific action group, you can click the edit icon next to the group's title on the Actions Home Page, or select the Groups Page on the Main Menu, opening the Manage Action Groups Page. Then click the three-dot icon to the right of the action group to open the Action Group Context Menu.
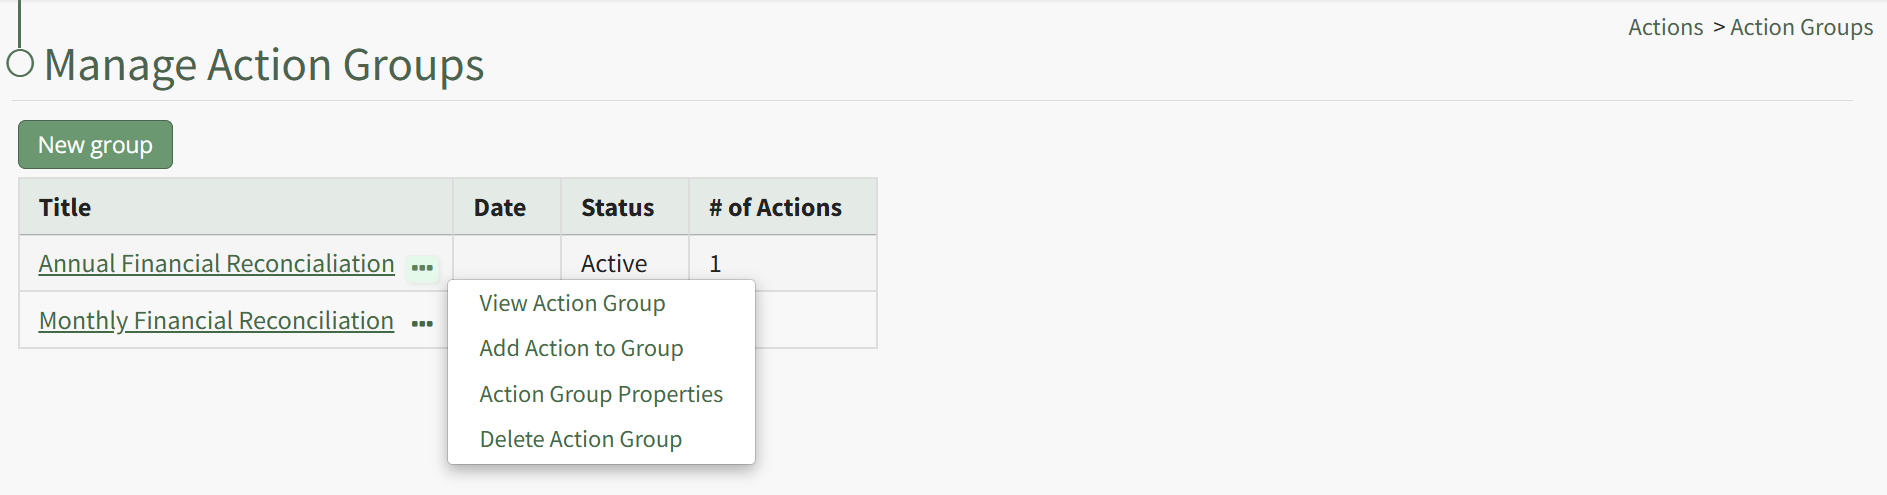
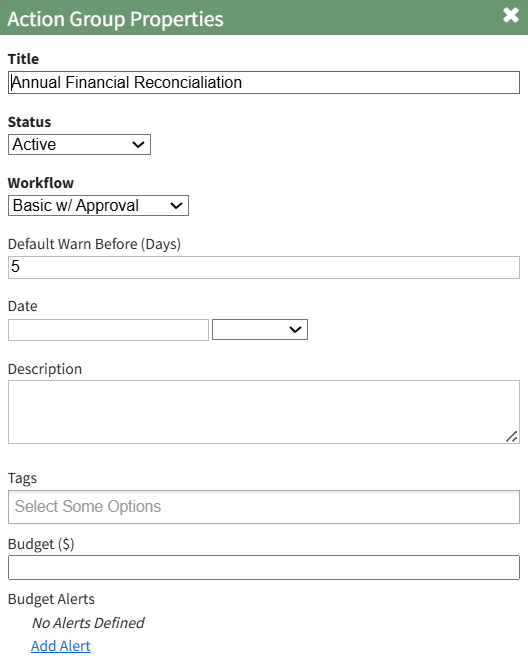
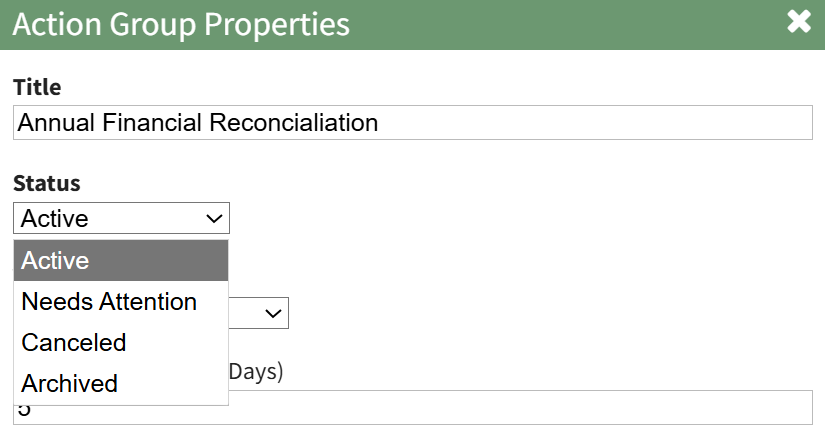
Select “Action Group Properties” from the context menu opening the Action Group Properties Modal.
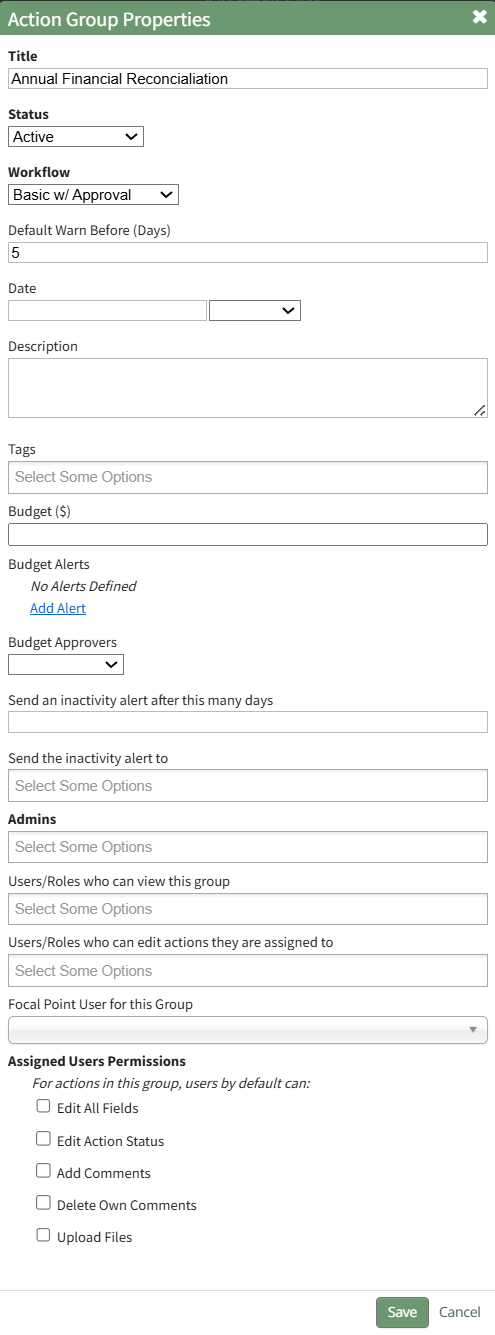
Make the desired changes to the action group. Use the Actions Group Field Input Explanations Table for information about individual field inputs.
Action Group Field Input Explanations | |
Field | Explanation |
Title | Input the title for the new action group. |
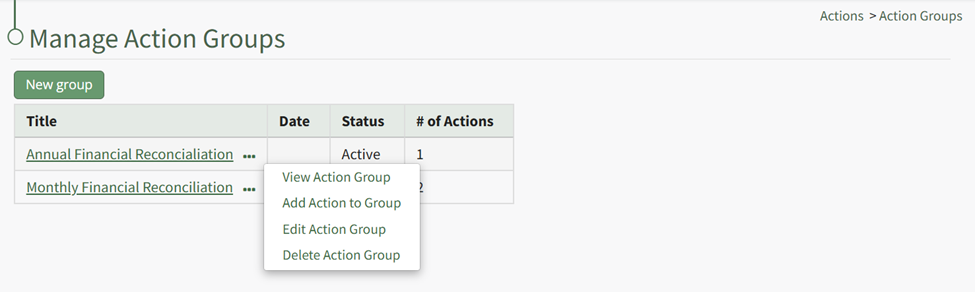
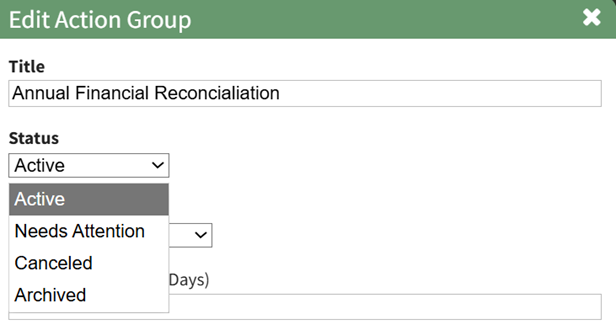
Status | An action group can be assigned a status of Active, Needs Attention, Canceled, or Archived. Select the appropriate status from the Status dropdown menu on the modal. The status of an action group is manually applied and edited. How To: Edit an Action Group StatusAction groups are manually assigned a group status than can be manually edited as needed for the action group. Default Group Status include Active, Needs Attention, Cancelled, and Archived. To change the action group status, select the Groups Page on the Main Menu, opening the Manage Action Groups Page. Clicking the three-dot icon to the right of the action group opens the Action Group Context Menu.
Select “Edit Action Group” from the context menu opening the Edit Action Group Modal.
Select the appropriate action group status from the dropdown menu provided, and select “Save”.
|
Workflow | The workflow dropdown menu will offer the system default workflows (Basic, Basic with Approval, Complex with Approval), as well as any workflows that have been created by your organization. |
Default Warn Before | Input a numerical value for the number of days a default warning will be sent. This input determines when action within the action group will turn from blue (the action is outstanding) to yellow (the action is nearing its due date). |
Date | The Action Group Date is flexible in concept and can be used as bet fit by your organization. |
Description | Input a description for the action group. |
Tags | Include any open, permissive, or restrictive tags as desired. |
Budget ($) | Leave this blank if you do not want to generate a new budget in the Finance Module for the Action Group. Input a dollar amount to create the budget. |
Budget Alerts | Click "Add Alert" in the Budget Alerts Section to create a budget alert to be associated with the action group budget. This will expand the modal displaying budget alert preferences. How To: Add a Budget Alert for an Action GroupTo add a budget alert for an action group, edit the group from the Groups Page, or go to the Actions Home Page and click the title of the action group you wish to create a budget alert for.
This opens the specific action group page. The second icon to the right of the action group header is the edit action group icon.
Select the Action Group Properties Icon, opening the Action Group Properties Modal.
Select the clickable “Add Alert” link, expanding the modal to include new fields.
The alert can be triggered by the amount remaining in the budget falling below a specified amount, or if the percentage remaining falls before a specified percentage. Budget alerts can be sent to users or roles. Input the preferred alert specifics and select add. The newly saved budget alert will show as saved in the modal.
Multiple budget alerts can be customized within the action group. |
Budget Approvers | Select the desired budget approver group from the dropdown menu. Budget approval groups at the Action Group level must be created on the Settings Page: Budget Approvers Tab. |
Send an Inactivity alert after # of days | An Action Group inactivity alert will be sent to the designated users / roles after a specified number of days of inactivity. Input a numerical value telling the system to send a notice after the specified days of inactivity. Within an action group, a workflow status change, creating or completing an action, a file upload, or action comment will reset the inactivity alert. Permission for comments to reset the inactivity alert is a customizable preference. |
Send the inactivity alert to | Input the users and roles you wish to receive the inactivity alert. |
Admins | Input the users who are to be identified as Admins for the Action Groups. |
Users / Roles who can view this group | Select the Users / Roles who can view this action group. The users / roles selected will have view only permissions for every action within the action group. |
Users / Roles who can edit their own actions | Select the Users / Roles who can edit their own actions. The users / roles selected will have the ability to edit any actions they created or are assigned to in the action group. |
Focal Point User For this Group | Identify the focal point user of the group. A group focal point will be able to see actions on the Action Group Summary page. Viewing an actions detail page will be dependent on their permissions. Organization can utilize this field to identify a key contact for an action group. If this action group is being utilized for certification or training processes, using the relevant individual’s name as the focal point provides a database reference that enables reports and organizational capabilities. Only one user can be designated as the focal point. |
Assigned User Permissions Section The permissions established in this section will be applied to all users in the group by default. | |
Edit All Fields | Selecting the "Edit All Fields" checkbox will remove all other checkboxes from the modal and will give all users in the action group the ability to edit action status, add comments, delete own comments, and upload files. |
Edit Action Status | Selecting the "Edit Action Status" checkbox will give all assigned users in the action group the ability to edit the action status. |
Add Comments | Selecting the "Add Comments" checkbox will give all users in the action group the ability to add comments to an action. |
Delete Own Comments | Selecting the "Delete Own Comments" checkbox will give all users in the action group the ability to delete their own comments made regarding an action. |
Upload Files | Selecting the "Upload Files" checkbox will give all users in the action group the ability to upload files to an action. |


Select the Save button when done making field changes, and the action group is now edited.
How To: Import Bulk Actions
To import new actions in bulk using a CSV file, go to the Actions Module Home Page and hover your cursor over the page icon opening the home page context menu.
Click “New Bulk Action Upload” opening the Import Actions Page.
Clicking the “Download Template” clickable link will automatically download a CSV file to your personal device, with the fields to be filled in for each action, designated by the column headers. The table below explains each of the field inputs.
Import Actions Template Field Explanations | |
Field | Explanation |
Group | If importing actions from the Actions Home Page, input the Title of the Action Group this action should be associated with. If importing actions from within a group (by clicking on the group name), this cell can be left blank because the actions will automatically be added to the group you're uploading to. |
Group Date | The action group date is flexible and can be utilized by your organization as best fit. When action groups are duplicated or created from a template, the action group date can be used as the distinguishing feature. |
Action Number | Action Numbers are used to differentiate each task in a chronological order. Actions within the same Action Group cannot have the same Action Number. You can leave the field blank. You can also input text if you wish to use the alphabet as way to categorize actions. |
Title | Input the title of the action. |
Description | Input the description for the action. |
Source | The Source field is intended to serve as an input for the source of the action. Source is a free text field, allowing you to input any desired response. Customer, Internal Request, a user’s name, role or department are all examples of potential Source field categories. |
Due Date | Input the date the action must be completed by. Action Group Templates allow additional control regarding due dates in the Relative Due Dates section when creating or editing a template. |
Workflow | Select a default workflow (basic, basic with approval, complex) or a customized workflow specific to your organization. How To: Create New WorkflowTo create a new workflow, select Settings under the Action Module on the Main Menu. Open the Workflows tab.
Click the “New Workflow” button opening the New Workflow Title Modal.
Input the title of the new workflow and select the “Save” button.
The new workflow is now visible in the Workflow Title Table. Click the three dot icon to the right of the new workflow opening the Workflow Context Menu.
Select “View Statuses” opening the Manage Statuses Page for your workflow.
Click the “New Status” button opening the New Status Modal.
Input a title and description for the new workflow status. The Special Status dropdown menu displays: Close, Close and Repeat, and Opened. Select which if it applies and select the “Save” button. The status now shows on the Manage Status Page.
Repeat the process to create the next stage of your workflow.
The New Status Modal will now require you to repeat the process, now requiring you to select which step this status is to follow. Repeat the process until your customized workflow has been completed.
|
Status | The status of the action is based on the workflow selected. Basic with Approval: Open, Pending Approval, Completed Actions can be imported with any status and not just the first status of the workflow. |
Date Complete | This field should be blank unless the task is already complete. If the action is already completed, include the completion date here. |
Warn (Days) | Input a numerical value for the number of days ahead of the due date you want users to get a system email alert reminder of the outstanding action (converting from blue to yellow status). |
Assigned To | Input the users (by username or First and Last Name) that you want to assign the action to. Actions cannot be assigned to roles or access levels. An Action can be assigned to multiple people. Use a semicolon to separate individuals assigned to an action. |
Action Approvers | Input the users (by username or First and Last Name) that can approve an action. Action Approvers cannot be assigned to roles or access levels. Multiple users can be designated as an action approver. Use a semicolon to separate individuals assigned to an action. |
Interested Parties | Input the users (by username or First and Last Name) or Certification Roles that are identified as Interested Parties. Multiple users or roles can be designated as an Identified Party. Use a semicolon to separate users/roles. |
Action Response | The information input into the Action Response field will add a comment to the action task when imported, prefaced with “The following response was imported.” |
Before importing your bulk actions, save the file as a UTF 8.

Select the “Choose Files” button and select the saved UTF 8 CSV file to be imported.
Click the “Next Step >” button and confirm that your column headers match the new action form fields and complete the import.
How To: Create a New Actions Group
New Action Groups can be created from both the Home Actions Page as well as the Groups Page, both accessible from the Main Menu.
To create a new action group from the Actions Home Page, hover your icon over the page icon to the right of the Actions page header, displaying the Home Page Context Menu. Click “New Action Group” to open the New Action Group Modal.
To create a new action group from the Groups Page, select Groups on the Main Menu opening the Manage Action Groups Page.
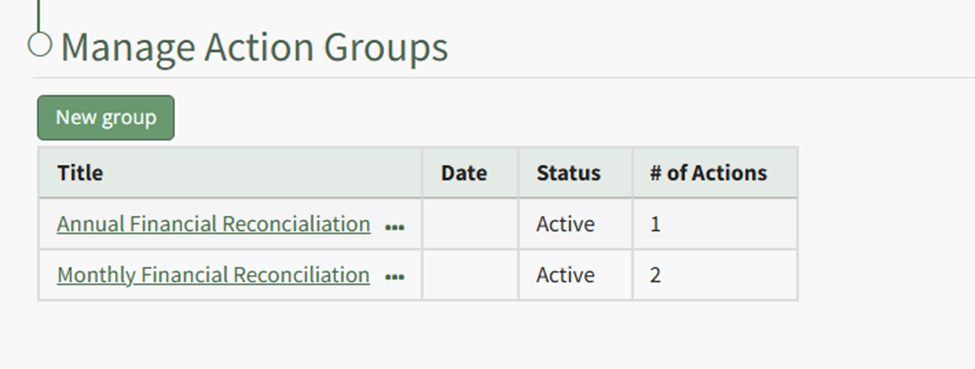
Select the “New Group” button to open the New Action Group Modal.
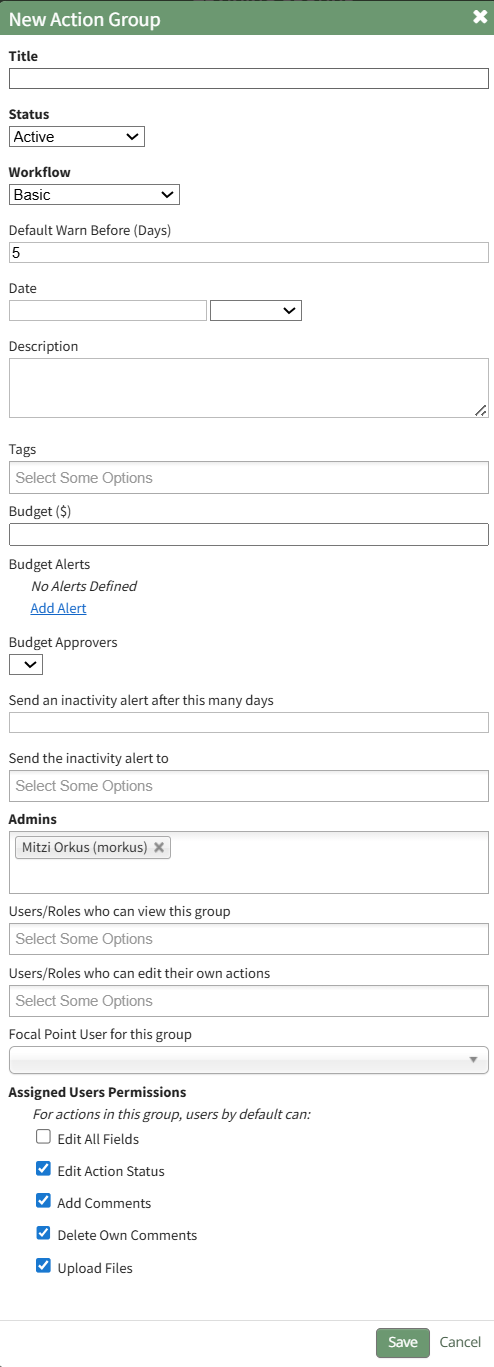
The Action Group Field Input Explanation Table below explains the fields on the New Action Group Modal so that you can customize the action group.
Action Group Field Input Explanations | |
Field | Explanation |
Title | Input the title for the new action group. |
Status | An action group can be assigned a status of Active, Needs Attention, Canceled, or Archived. Select the appropriate status from the Status dropdown menu on the modal. The status of an action group is manually applied and can be edited. How To: Edit an Action Group StatusAction groups are manually assigned a group status that can be manually edited as needed for the action group. The default Group Statuses include Active, Needs Attention, Cancelled, and Archived. To change the action group status, click the edit icon next to the group's title on the Actions Home Page, or select the Groups Page on the Main Menu, opening the Manage Action Groups Page. Then click the three-dot icon to the right of the action group to open the Action Group Context Menu.
Select “Action Group Properties” from the context menu opening the Action Group Properties Modal.
Select the appropriate action group status from the dropdown menu provided and select “Save”. |
Workflow | The workflow dropdown menu will offer the system default workflows (Basic, Basic with Approval, Complex with Approval), as well as any workflows that have been created by your organization. |
Default Warn Before | To send a warning prior to the due date, input a numerical value for the default number of days. This input determines when the action within the action group will turn from blue (the action is outstanding) to yellow (the action is nearing its due date). |
Date | The Action Group Date is flexible in concept and can be used as bet fit by your organization. |
Description | Input a description for the action group. |
Tags | Include any open, permissive, or restrictive tags as desired. |
Budget ($) | Leave this blank if you do not want to generate a new budget in the Finance Module for the Action Group. Input a dollar amount to create the budget. |
Budget Alerts | Click "Add Alert" in the Budget Alerts Section to create a budget alert to be associated with the action group budget. This will expand the modal displaying budget alert preferences. How To: Add A Budget Alert for an Action GroupTo add a budget alert for an action group, edit the group from the Groups Page, or go to the Actions Home Page and click the title of the action group you wish to create a budget alert for.
This opens the specific action group page. The second icon to the right of the action group header is the edit action group icon.
Select the Action Group Properties Icon, opening the Action Group Properties Modal.
Select the clickable “Add Alert” link, expanding the modal to include new fields.
The alert can be triggered by the amount remaining in the budget falling below a specified amount, or if the percentage remaining falls before a specified percentage. Budget alerts can be sent to users or roles. Input the preferred alert specifics and select add. The newly saved budget alert will show as saved in the modal.
Multiple budget alerts can be customized within the action group. |
Budget Approvers | Select the desired budget approver group from the dropdown menu. Note: Budget approval groups at the Action Group level must be created on the Settings Page: Budget Approvers Tab. |
Send an Inactivity alert after # of days | An Action Group inactivity alert will be sent to the designated users / roles after a specified number of days of inactivity. Input a numerical value telling the system to send a notice after the specified days of inactivity. Within an action group, a status change, creating or completing an action, a file upload, or action comment will reset inactivity. Permission for comments to reset the inactivity alert is a customizable preference. |
Send the inactivity alert to | Input the users and roles you wish to receive the inactivity alert. |
Admins | Input the users who are to be identified as Admins for the Action Groups. Establishing a user as an Action Group Admin grants the ability to edit the group, plus view, and edit actions in the action group. Action Group Admins also have the ability to delete files associated with action in the action group. |
Users / Roles who can view this group | Select the Users / Roles who can view this action group. The users / roles selected will have view-only permissions for every action within the action group. |
Users / Roles who can edit their own actions | Select the Users / Roles who can edit their own actions. The users / roles selected will have the ability to edit any actions they are assigned to in the action group. |
Focal Point User For this Group | Identify the focal point user of the group. This field is purely informational. There are no permissions associated with the focal point designation. Organization can utilize this field to identify a key contact for an action group. If this action group is being utilized for certification or training processes, using the relevant individual’s name as the focal point provides a database reference that enables reports and organizational capabilities. Only one user can be designated as the focal point. |
Assigned User Permissions Section The permissions established in this section will be applied to all assigned users in the group by default. | |
Edit All Fields | Selecting the "Edit All Fields" checkbox will remove all other checkboxes from the modal and will give all assigned users in the action group the ability to edit action status, add comments, delete own comments, and upload files. |
Edit Action Status | Selecting the "Edit Action Status" checkbox will give all assigned users in the action group the ability to edit the action status. |
Add Comments | Selecting the "Add Comments" checkbox will give all users in the action group the ability to add comments to an action. |
Delete Own Comments | Selecting the "Delete Own Comments" checkbox will give all users in the action group the ability to delete their own comments made regarding an action. |
Upload Files | Selecting the "Upload Files" checkbox will give all users in the action group the ability to upload files to an action. |
After making the appropriate selections in the New Action Group Modal, click the “Save” button to complete new group creation. The group is now created and has been added to the Groups Table on Groups Page.
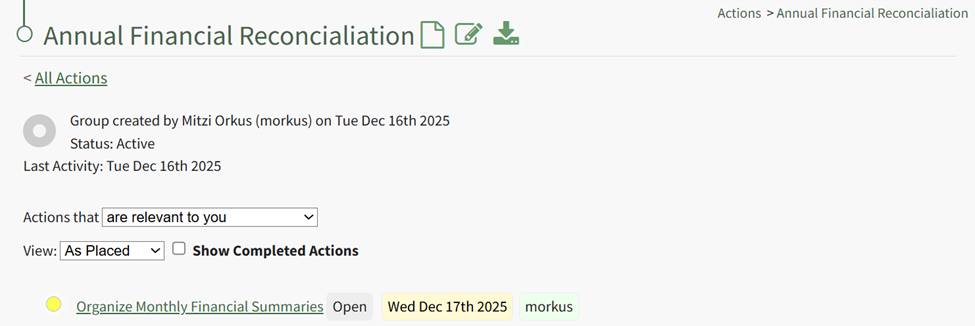
Clicking on the group title will display the action group page which displays the associated actions in the action group in list format.
Actions Home Page Context Menu Option Explanation | |||||||||||||||||||||||||||||||||||||||||||||||||||||||||||||||||||||||||||||||||||||||||||||||||||||||||||||||||||||
Option | Explanation | ||||||||||||||||||||||||||||||||||||||||||||||||||||||||||||||||||||||||||||||||||||||||||||||||||||||||||||||||||||
New Action | Selecting "New Action" from the context menu will open the New Action Modal allowing for the creation of a New Action. How To: Create a New ActionTo create a new action from the Actions Home Page, hover your cursor over the page icon opening the home page context menu. A new action can also be created from the context menu on the Groups Page via the three-dot icon, as well as the Bulk Edit Tab on the Actions Settings Page.
Select “New Action” opening the New Action Modal.
The fields in the New Action Modal are explained in the table below.
If the action group the action is to be associated with has not been created, select “New Group…” from the Group dropdown menu
This expands the New Action Modal, allowing you to input the New Group Name.
After inputting all relevant information for the new action, select save. A green confirmation modal will appear, confirming the new action. The action will only appear on the Actions Home Page if it applies to the currently applied filter. The newly created action group can be edited to customize the action group preferences, or additional actions can be added. How To: Edit An Action GroupTo edit a specific action group, you can click the edit icon next to the group's title on the Actions Home Page, or select the Groups Page on the Main Menu, opening the Manage Action Groups Page. Then click the three-dot icon to the right of the action group to open the Action Group Context Menu.
Select “Action Group Properties” from the context menu opening the Action Group Properties Modal.
Make the desired changes to the action group. Use the Actions Group Field Input Explanations Table for information about individual field inputs.
Select the Save button when done making field changes, and the action group is now edited. How To: Import Bulk ActionsTo import new actions in bulk using a CSV file, go to the Actions Module Home Page and hover your cursor over the page icon opening the home page context menu.
Click “New Bulk Action Upload” opening the Import Actions Page. Clicking the “Download Template” clickable link will automatically download a CSV file to your personal device, with the fields to be filled in for each action, designated by the column headers. The table below explains each of the field inputs.
Before importing your bulk actions, save the file as a UTF 8.
Select the “Choose Files” button and select the saved UTF 8 CSV file to be imported. Click the “Next Step >” button and confirm that your column headers match the new action form fields and complete the import. | ||||||||||||||||||||||||||||||||||||||||||||||||||||||||||||||||||||||||||||||||||||||||||||||||||||||||||||||||||||
New Bulk Action Upload | Selecting "New Bulk Action Upload" opens the Import Actions Page which allows bulk actions to be imported into KAStrack via .csv file. How To: Import Bulk ActionsTo import new actions in bulk using a CSV file, go to the Actions Module Home Page and hover your cursor over the page icon opening the home page context menu.
Click “New Bulk Action Upload” opening the Import Actions Page. Clicking the “Download Template” clickable link will automatically download a CSV file to your personal device, with the fields to be filled in for each action, designated by the column headers. The table below explains each of the field inputs.
Before importing your bulk actions, save the file as a UTF 8.
Select the “Choose Files” button and select the saved UTF 8 CSV file to be imported. Click the “Next Step >” button and confirm that your column headers match the new action form fields and complete the import. | ||||||||||||||||||||||||||||||||||||||||||||||||||||||||||||||||||||||||||||||||||||||||||||||||||||||||||||||||||||
New Action Group | Selecting “New Action Group” opens the New Action Group Modal that create a new action group. How To: Create a New Action GroupNew Action Groups can be created from both the Home Actions Page as well as the Groups Page, both accessible from the Main Menu.
To create a new action group from the Actions Home Page, hover your icon over the page icon to the right of the Actions page header, displaying the Home Page Context Menu. Click “New Action Group” to open the New Action Group Modal.
To create a new action group from the Groups Page, select Groups on the Main Menu opening the Manage Action Groups Page.
Select the “New Group” button to open the New Action Group Modal.
The Action Group Field Input Explanation Table below explains the fields on the New Action Group Modal so that you can customize the action group.
After making the appropriate selections in the New Action Group Modal, click the “Save” button to complete new group creation. The group is now created and has been added to the Groups Table on Groups Page. Clicking on the group title will display the action group page which displays the associated actions in the action group in list format. | ||||||||||||||||||||||||||||||||||||||||||||||||||||||||||||||||||||||||||||||||||||||||||||||||||||||||||||||||||||
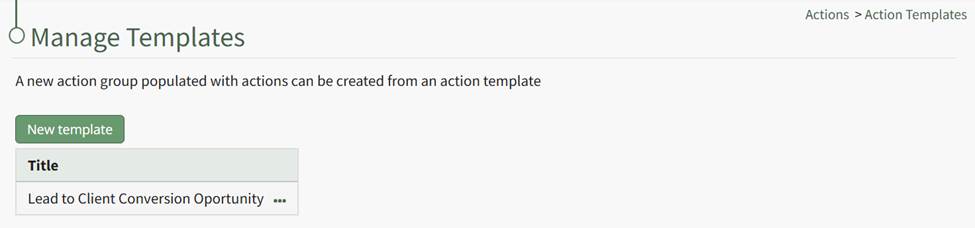
New Actions from Template | Selecting "New Actions from Template" opens the New Group from Template Modal that allows the creation of pre-defined actions in the new action group. How To: Create a New Action Group TemplateTo create a New Action Group Template, select Templates from the Actions Module Main Menu, opening the Manage Templates Page.
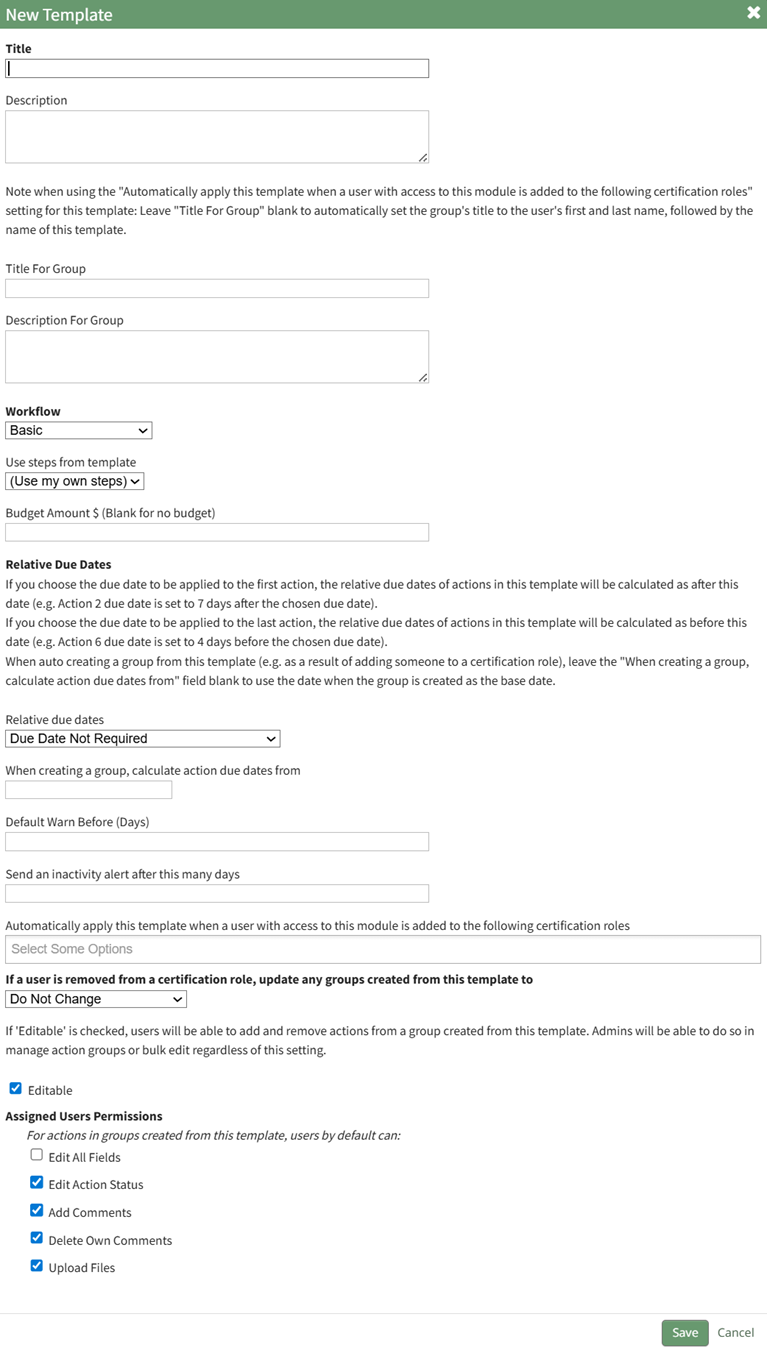
Select the “New Template” button, opening the New Template Modal.
There are several fields associated with the creation of an action group template.
After inputting the appropriate information into the modal, select “Save”. The new Action Group Template will be displayed on the Templates Page in the Action Group Templates Table. | ||||||||||||||||||||||||||||||||||||||||||||||||||||||||||||||||||||||||||||||||||||||||||||||||||||||||||||||||||||
The Home Page displays open actions associated with a user. A filter allows a user to customize the view of open actions.
The Actions Module Home Page Filter Options are explained in the table below.
Actions Module Filter Option Explanations | ||
Field | Options | Explanation |
Actions that (dropdown menu) | are relevant to you | Selecting "are relevant to you" will show a list of all actions that are relevant to you. |
are assigned to you | Selecting "Are Assigned to You" will show a list of all actions that are assigned to you. | |
you are an approver for | Selecting "You are an Approver For" will show a list of all actions that you are identified as an approver for. | |
you are interested party for | Selecting "You are an Interested Party For" will show a list of all actions that you have been identified as an interested party for. | |
show all actions | Selecting "Shows all Actions" will show a list of all actions. | |
View (dropdown menu) | As Placed | Selecting "View As Placed" will show a list of all actions organized by Action Groups. |
By Due Date | Selecting "View by Due Date" will show a list of all actions organized by Overdue, 15-30 days, and No Due Date. | |
By User | Selecting "View by User" will organize alphabetically by the first assigned user. All unassigned actions will show at the bottom of the action list. | |
Show Completed Action (checkbox) | Selecting the "Show Completed Actions" checkbox will include completed actions in the list on the filtered view. | |
Show groups that are (dropdown menu) | Active | Selecting "Active" will only show actions associated with Active status Action Groups on the filtered list. |
In Need of Attention | Selecting "In Need of Attention" will only show actions associated with In Need of Attention status Action Groups on the filtered list. | |
Cancelled | Selecting "Cancelled" will only show actions associated with Cancelled status Action Groups on the filtered list. | |
Archived | Selecting "Archived" will only show actions associated with Archived status Action Groups on the filtered list. | |
Show All Groups | Selecting "Show All Groups" will show all actions associated with any Action Groups on the filtered list. | |
Actions can be edited from the Actions Home Page by hovering the cursor over the action and clicking the edit action icon. Both icons show for an action group and the edit icon shows for an action.
How To: Create a New Action
To create a new action from the Actions Home Page, hover your cursor over the page icon opening the home page context menu.
A new action can also be created from the context menu on the Groups Page via the three-dot icon, as well as the Bulk Edit Tab on the Actions Settings Page.
Select “New Action” opening the New Action Modal.
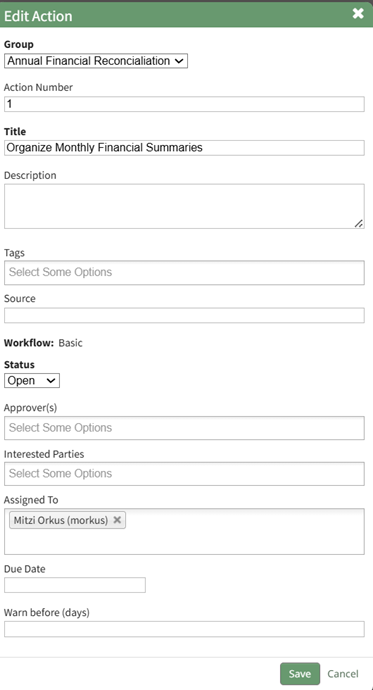
The fields in the New Action Modal are explained in the table below.
New Action Modal Field Explanations | |
Field | Explanation |
Group | Input the Title of the Action Group this action should be associated with. If the Action Group the action is to be associated with has already been created, it will be available on the Group dropdown menu. If the action group has not been created, see notes on how to add one below. |
Action Number | Action Numbers are used to differentiate each task in a chronological order. Actions within the same Action Group cannot have the same Action Number. You can leave the field blank. You can also input text if you wish to use the alphabet as a way to categorize actions. |
Title | Input the title of the action. |
Description | Input the description for the action. |
Tags | Open, Permissive, and Restrictive Tags can be applied to individual actions. |
Source | The Source field is intended to serve as an input for the source of the action. Source is a free text field, allowing you to input any desired response. Customer, Internal Request, a user’s name, role or department are all examples of potential Source field categories. |
Due Date | Input the date the action must be completed by. Relevant due dates cannot be imported. That feature is specific to Action Group Templates. |
Workflow | Select a default workflow (basic, basic with approval, complex) or a customized workflow specific to your organization. How To: Create New WorkflowTo create a new workflow, select Settings under the Action Module on the Main Menu. Open the Workflows tab.
Click the “New Workflow” button opening the New Workflow Title Modal.
Input the title of the new workflow and select the “Save” button.
The new workflow is now visible in the Workflow Title Table. Click the three dot icon to the right of the new workflow opening the Workflow Context Menu.
Select “View Statuses” opening the Manage Statuses Page for your workflow.
Click the “New Status” button opening the New Status Modal.
Input a title and description for the new workflow status. The Special Status dropdown menu displays: Close, Close and Repeat, and Opened. Select which if it applies and select the “Save” button. The status now shows on the Manage Status Page.
Repeat the process to create the next stage of your workflow.
The New Status Modal will now require you to repeat the process, now requiring you to select which step this status is to follow. Repeat the process until your customized workflow has been completed.
|
Status | The status of the action is based on the workflow selected. Basic with Approval: Open, Pending Approval, Completed Actions can be imported with any status and not just the first status of the workflow. |
Action Approvers | Input the users (by username or First and Last Name) that can approve an action. Only individual users can be added to this field. Multiple users can be designated as an action approver. When importing, use a semicolon to separate individuals assigned to an action. |
Interested Parties | Input the users (by username or First and Last Name) or Certification Roles that are identified as Interested Parties. Multiple users or roles can be designated as an Identified Party. When importing, use a semicolon to separate users/roles. |
Assigned To | Input the users (by username or First and Last Name) that you want to assign the action to. Actions cannot be assigned to roles or access levels. An Action can be assigned to multiple people. When importing, use a semicolon to separate individuals assigned to an action. |
Due Date | Input the date the action must be completed by. Action Group Templates allow additional control over due dates in the Relative Due Dates section when creating or editing a template. |
Warn Before (Days) | Input a numerical value for the number of days ahead of the due date you want users to get a system email alert reminder of the outstanding action (converting from blue to yellow status). |
Action Response | The information input into the Action Response field will add a comment to the action task when imported, prefaced with “The following response was imported.” |
If the action group the action is to be associated with has not been created, select “New Group…” from the Group dropdown menu
This expands the New Action Modal, allowing you to input the New Group Name.
After inputting all relevant information for the new action, select save. A green confirmation modal will appear, confirming the new action.
The action will only appear on the Actions Home Page if it applies to the currently applied filter.
The newly created action group can be edited to customize the action group preferences, or additional actions can be added.
How To: Edit An Action Group
To edit a specific action group, you can click the edit icon next to the group's title on the Actions Home Page, or select the Groups Page on the Main Menu, opening the Manage Action Groups Page. Then click the three-dot icon to the right of the action group to open the Action Group Context Menu.
Select “Action Group Properties” from the context menu opening the Action Group Properties Modal.
Make the desired changes to the action group. Use the Actions Group Field Input Explanations Table for information about individual field inputs.
Action Group Field Input Explanations | |
Field | Explanation |
Title | Input the title for the new action group. |
Status | An action group can be assigned a status of Active, Needs Attention, Canceled, or Archived. Select the appropriate status from the Status dropdown menu on the modal. The status of an action group is manually applied and edited. How To: Edit an Action Group StatusAction groups are manually assigned a group status than can be manually edited as needed for the action group. Default Group Status include Active, Needs Attention, Cancelled, and Archived. To change the action group status, select the Groups Page on the Main Menu, opening the Manage Action Groups Page. Clicking the three-dot icon to the right of the action group opens the Action Group Context Menu.
Select “Edit Action Group” from the context menu opening the Edit Action Group Modal.
Select the appropriate action group status from the dropdown menu provided, and select “Save”.
|
Workflow | The workflow dropdown menu will offer the system default workflows (Basic, Basic with Approval, Complex with Approval), as well as any workflows that have been created by your organization. |
Default Warn Before | Input a numerical value for the number of days a default warning will be sent. This input determines when action within the action group will turn from blue (the action is outstanding) to yellow (the action is nearing its due date). |
Date | The Action Group Date is flexible in concept and can be used as bet fit by your organization. |
Description | Input a description for the action group. |
Tags | Include any open, permissive, or restrictive tags as desired. |
Budget ($) | Leave this blank if you do not want to generate a new budget in the Finance Module for the Action Group. Input a dollar amount to create the budget. |
Budget Alerts | Click "Add Alert" in the Budget Alerts Section to create a budget alert to be associated with the action group budget. This will expand the modal displaying budget alert preferences. How To: Add a Budget Alert for an Action GroupTo add a budget alert for an action group, edit the group from the Groups Page, or go to the Actions Home Page and click the title of the action group you wish to create a budget alert for.
This opens the specific action group page. The second icon to the right of the action group header is the edit action group icon.
Select the Action Group Properties Icon, opening the Action Group Properties Modal.
Select the clickable “Add Alert” link, expanding the modal to include new fields.
The alert can be triggered by the amount remaining in the budget falling below a specified amount, or if the percentage remaining falls before a specified percentage. Budget alerts can be sent to users or roles. Input the preferred alert specifics and select add. The newly saved budget alert will show as saved in the modal.
Multiple budget alerts can be customized within the action group. |
Budget Approvers | Select the desired budget approver group from the dropdown menu. Budget approval groups at the Action Group level must be created on the Settings Page: Budget Approvers Tab. |
Send an Inactivity alert after # of days | An Action Group inactivity alert will be sent to the designated users / roles after a specified number of days of inactivity. Input a numerical value telling the system to send a notice after the specified days of inactivity. Within an action group, a workflow status change, creating or completing an action, a file upload, or action comment will reset the inactivity alert. Permission for comments to reset the inactivity alert is a customizable preference. |
Send the inactivity alert to | Input the users and roles you wish to receive the inactivity alert. |
Admins | Input the users who are to be identified as Admins for the Action Groups. |
Users / Roles who can view this group | Select the Users / Roles who can view this action group. The users / roles selected will have view only permissions for every action within the action group. |
Users / Roles who can edit their own actions | Select the Users / Roles who can edit their own actions. The users / roles selected will have the ability to edit any actions they created or are assigned to in the action group. |
Focal Point User For this Group | Identify the focal point user of the group. A group focal point will be able to see actions on the Action Group Summary page. Viewing an actions detail page will be dependent on their permissions. Organization can utilize this field to identify a key contact for an action group. If this action group is being utilized for certification or training processes, using the relevant individual’s name as the focal point provides a database reference that enables reports and organizational capabilities. Only one user can be designated as the focal point. |
Assigned User Permissions Section The permissions established in this section will be applied to all users in the group by default. | |
Edit All Fields | Selecting the "Edit All Fields" checkbox will remove all other checkboxes from the modal and will give all users in the action group the ability to edit action status, add comments, delete own comments, and upload files. |
Edit Action Status | Selecting the "Edit Action Status" checkbox will give all assigned users in the action group the ability to edit the action status. |
Add Comments | Selecting the "Add Comments" checkbox will give all users in the action group the ability to add comments to an action. |
Delete Own Comments | Selecting the "Delete Own Comments" checkbox will give all users in the action group the ability to delete their own comments made regarding an action. |
Upload Files | Selecting the "Upload Files" checkbox will give all users in the action group the ability to upload files to an action. |
Select the Save button when done making field changes, and the action group is now edited.
How To: Import Bulk Actions
To import new actions in bulk using a CSV file, go to the Actions Module Home Page and hover your cursor over the page icon opening the home page context menu.
Click “New Bulk Action Upload” opening the Import Actions Page.
Clicking the “Download Template” clickable link will automatically download a CSV file to your personal device, with the fields to be filled in for each action, designated by the column headers. The table below explains each of the field inputs.
Import Actions Template Field Explanations | |
Field | Explanation |
Group | If importing actions from the Actions Home Page, input the Title of the Action Group this action should be associated with. If importing actions from within a group (by clicking on the group name), this cell can be left blank because the actions will automatically be added to the group you're uploading to. |
Group Date | The action group date is flexible and can be utilized by your organization as best fit. When action groups are duplicated or created from a template, the action group date can be used as the distinguishing feature. |
Action Number | Action Numbers are used to differentiate each task in a chronological order. Actions within the same Action Group cannot have the same Action Number. You can leave the field blank. You can also input text if you wish to use the alphabet as way to categorize actions. |
Title | Input the title of the action. |
Description | Input the description for the action. |
Source | The Source field is intended to serve as an input for the source of the action. Source is a free text field, allowing you to input any desired response. Customer, Internal Request, a user’s name, role or department are all examples of potential Source field categories. |
Due Date | Input the date the action must be completed by. Action Group Templates allow additional control regarding due dates in the Relative Due Dates section when creating or editing a template. |
Workflow | Select a default workflow (basic, basic with approval, complex) or a customized workflow specific to your organization. How To: Create New WorkflowTo create a new workflow, select Settings under the Action Module on the Main Menu. Open the Workflows tab.
Click the “New Workflow” button opening the New Workflow Title Modal.
Input the title of the new workflow and select the “Save” button.
The new workflow is now visible in the Workflow Title Table. Click the three dot icon to the right of the new workflow opening the Workflow Context Menu.
Select “View Statuses” opening the Manage Statuses Page for your workflow.
Click the “New Status” button opening the New Status Modal.
Input a title and description for the new workflow status. The Special Status dropdown menu displays: Close, Close and Repeat, and Opened. Select which if it applies and select the “Save” button. The status now shows on the Manage Status Page.
Repeat the process to create the next stage of your workflow.
The New Status Modal will now require you to repeat the process, now requiring you to select which step this status is to follow. Repeat the process until your customized workflow has been completed.
|
Status | The status of the action is based on the workflow selected. Basic with Approval: Open, Pending Approval, Completed Actions can be imported with any status and not just the first status of the workflow. |
Date Complete | This field should be blank unless the task is already complete. If the action is already completed, include the completion date here. |
Warn (Days) | Input a numerical value for the number of days ahead of the due date you want users to get a system email alert reminder of the outstanding action (converting from blue to yellow status). |
Assigned To | Input the users (by username or First and Last Name) that you want to assign the action to. Actions cannot be assigned to roles or access levels. An Action can be assigned to multiple people. Use a semicolon to separate individuals assigned to an action. |
Action Approvers | Input the users (by username or First and Last Name) that can approve an action. Action Approvers cannot be assigned to roles or access levels. Multiple users can be designated as an action approver. Use a semicolon to separate individuals assigned to an action. |
Interested Parties | Input the users (by username or First and Last Name) or Certification Roles that are identified as Interested Parties. Multiple users or roles can be designated as an Identified Party. Use a semicolon to separate users/roles. |
Action Response | The information input into the Action Response field will add a comment to the action task when imported, prefaced with “The following response was imported.” |
Before importing your bulk actions, save the file as a UTF 8.
Select the “Choose Files” button and select the saved UTF 8 CSV file to be imported.
Click the “Next Step >” button and confirm that your column headers match the new action form fields and complete the import.
How To: Edit an Existing Action
An Action can be edited through the Edit Action Modal or the specified action’s detail page.
To Edit Through the Edit Action Modal
Alter the filter on the Actions Module Action Home Page to see the action you wish to edit. If the actions are displayed by group or due date, expand the section containing the action. Hover your cursor over the individual action you wish to edit displaying the edit action icon to the right of the Action Title.

Click the edit action icon opening the Edit Action Modal.
Make the necessary changes to the action and select save.
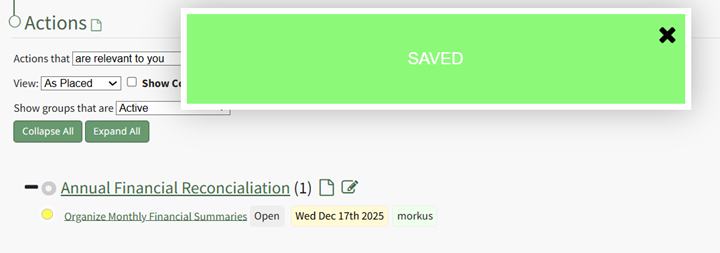
A confirmation modal stating “Saved” will appear, and the changes to the action will now be visible.
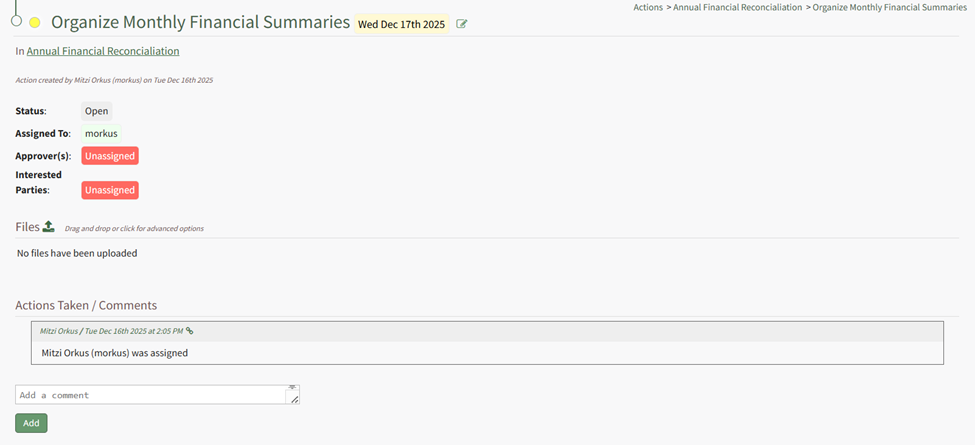
To Edit Through an Individual Action Page
Clicking the Action Title will open the individual action’s Action Page.

The action can be edited by selecting the edit icon to the right of the action title.
Action Home Page Icon Explanation | |
Icon | Explanation |
| Selecting the Page Icon will open the Actions Context Menu that displays options for quick action management. |
| Selecting the Edit Icon will open the Edit Action Group or Edit Action Modal. |
The colored dot before each action or action group indicates information about the action/action group, explained in the table below.
Action Module Legend - Actions Color Coding | |
Icon | Explanation |
| The color green indicates that the action has been completed. |
| The color sky blue indicates that the action is outstanding with no due date. |
| The color blue indicates that the action is outstanding. |
| The color yellow indicates that the action is nearing its due date. |
| The color red indicates that the action is overdue. |
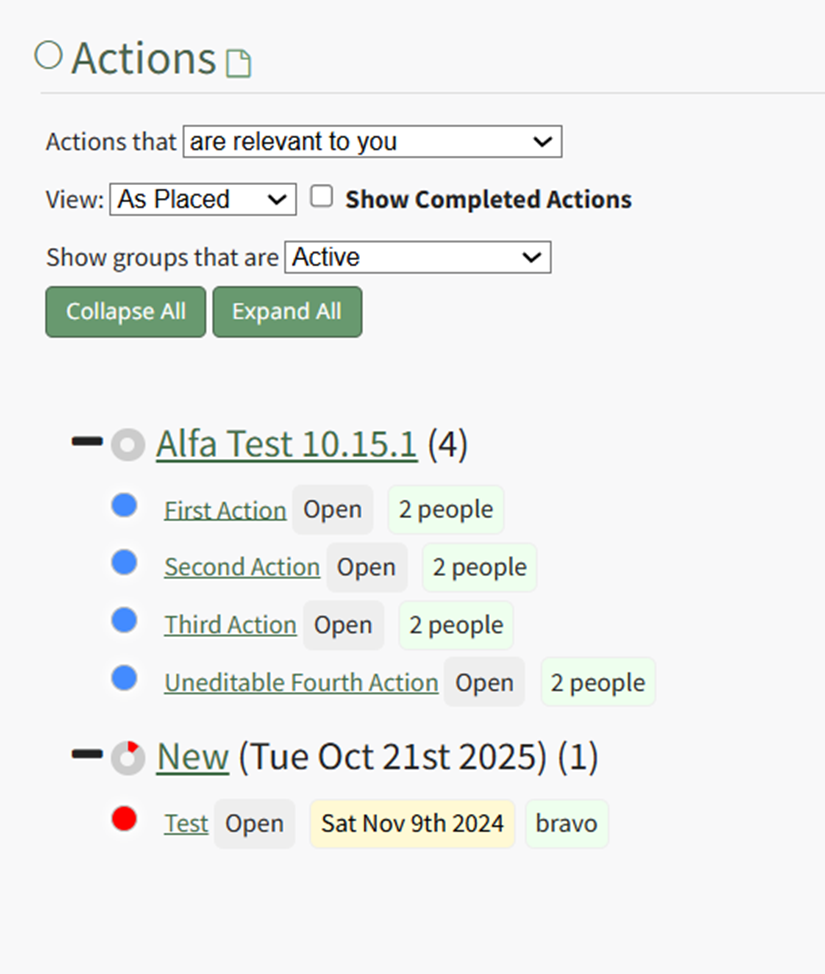
The Action Group Line shows a doughnut chart that highlights the percentage of actions that are completed. When you hover the icon over the doughnut chart, a modal will show the number of action completed and the total number of actions, will stat the percent complete, and will indicate if there are any overdue items.

The Action Group Title follows, along with the action group date and the number of items associated with the action group. If a purple dot follows the Action Group information, it is indicating that the action group is past the number of days of inactivity that was established for the Action Group.

Next to the action title, key information about the action is indicated.

The action status will be shown first, highlighted in grey. The Action Date follows, highlighted in yellow. Finally, the user or role assigned the action will be indicated by green highlight. If no one was assigned the action, Unassigned will be highlighted in red.
The highlighting behind key action information is only for visual clarity and is not representative of any meaning.
No comments to display
No comments to display