Complete List of Inventory Module How Tos
How To: Add a Stock Item to the Inventory
To add an individual stock item to the inventory, go to the Inventory Module Home Page.
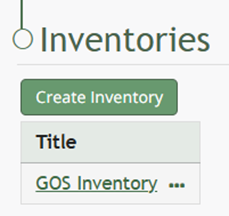
Click on the name of the inventory you want to add a new stock item into.

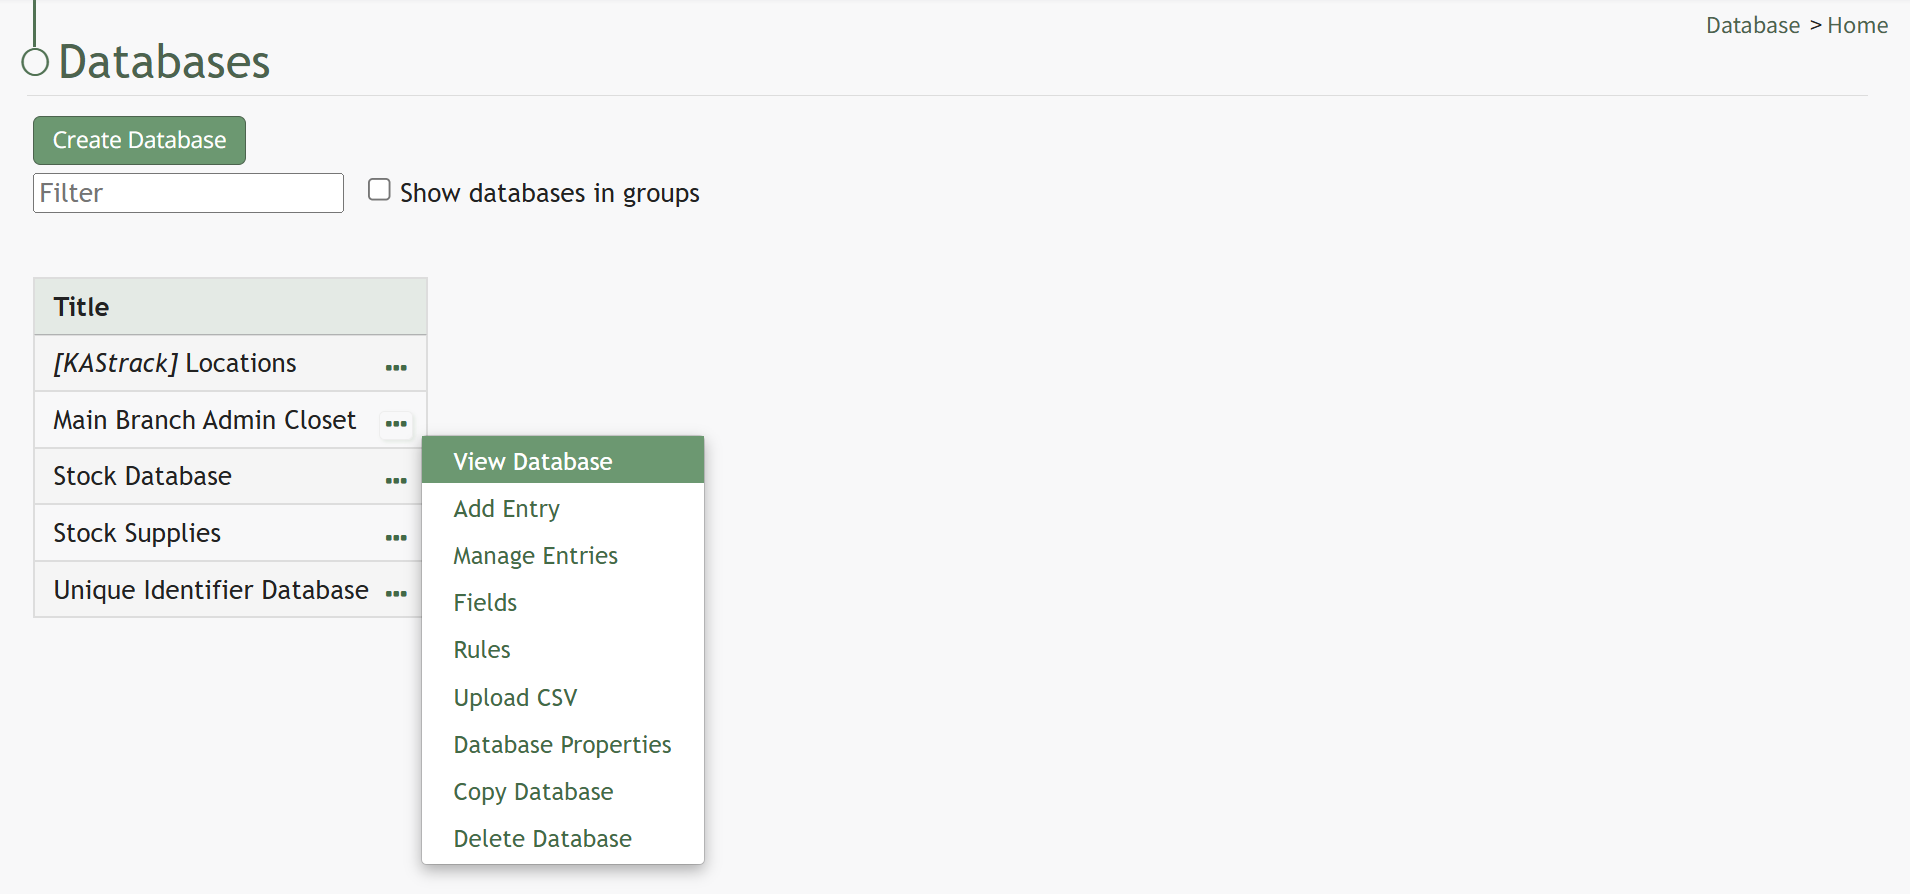
Click the three-dot icon to the right of the inventory name header opening the inventory context menu.

Select “Add Stock Item” opening the New Database Entry Modal.
The data fields requested by this modal for a new stock item will vary based on the way the inventory was setup.
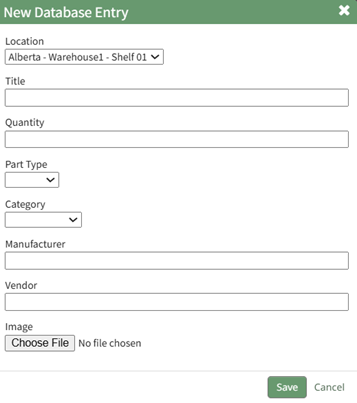
Input the information into the fields and select the “Save” botton.
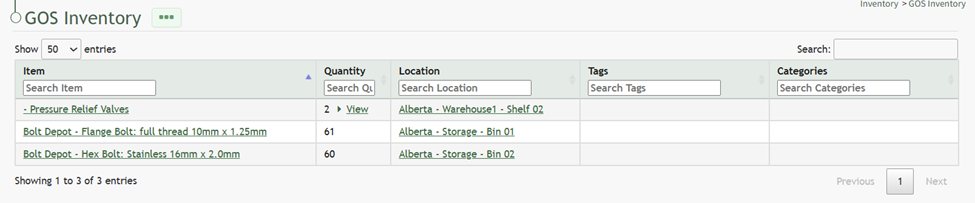
The new stock item will now show in the inventory.
How To: Add a Unique Item to the Inventory
Before a stock item can be assigned its unique identifier, it must first be created as a stock item. Serial numbers or unique identifiers are applied to a stock item, making it unique.
To add a unique item to the inventory, go to the Inventory Module Home Page.

Click on the name of the inventory you want to add a new stock item into.
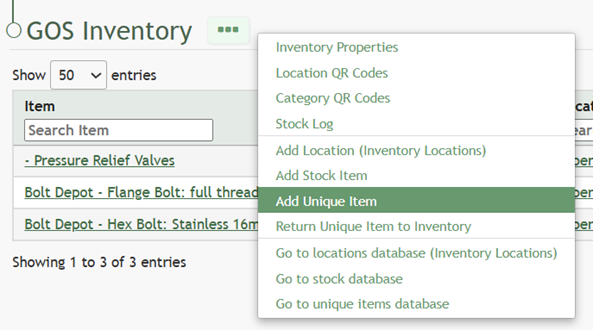
Click the three-dot icon to the right of the inventory name header opening the inventory context menu.

Select “Add Unique Item” opening the New Database Entry Modal.
The data fields requested by this modal for a new stock item will vary based on the way the inventory was setup.
Select which inventory item is to be assigned a unique identifier from the Inventory Item dropdown menu.
Input the information into the fields and select the “Save” button.
The unique item will now show in the inventory.
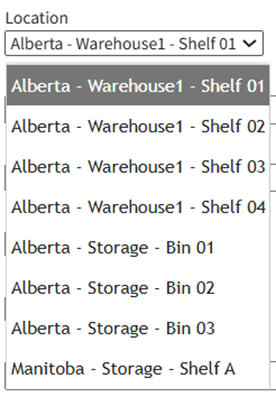
How To: Add an Inventory Location
Adding an inventory location creates an additional location option that can be found on the location dropdown menu in the New Database Entry Modal when “Add Stock Item” has been selected from the Inventory Context Menu.
To add an inventory location, go to the Inventory Module Home Page.

Click on the name of the inventory you want to add a new stock item into

Click the three-dot icon to the right of the inventory name header opening the inventory context menu.
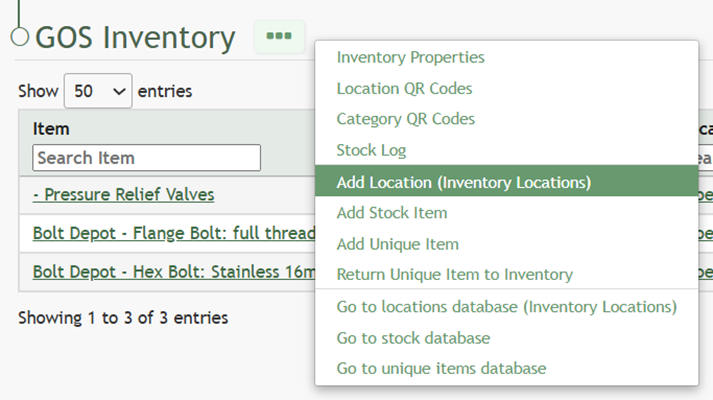
Select “Add Location (Database Name)” opening the New Database Entry Modal.
The Database Name shown in parenthesis will vary, as it is the name of the database used as the Locations Database for inventory set up.
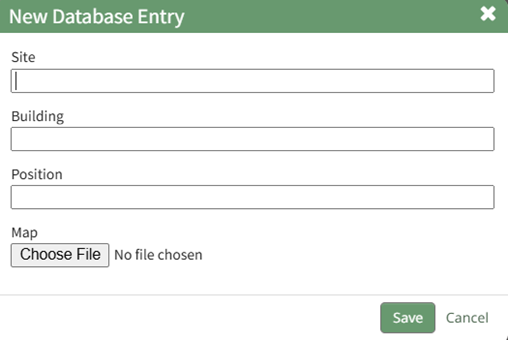
Input the information into the modal for the new location.
The data fields requested by this modal for a new stock item will vary based on the way the inventory was setup.
Select “Save” and the new inventory location will be added to the database identified as the locations database in setup.
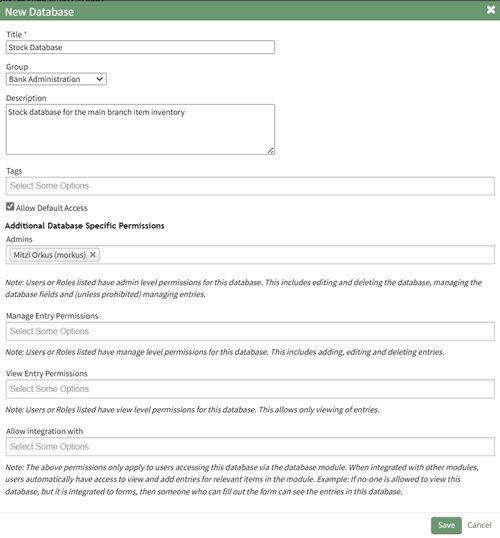
How To: Create a Stock Database
To create a stock database, go to the Home Page of the Database Module and create a new database. Click the “Create Database” button and input a database title and description. Select the appropriate database group from the dropdown menu. You can use default access parameters, or customize database specific parameters.
How To: Create a Database
To create a new database, go to the Home Page of the Database Module.
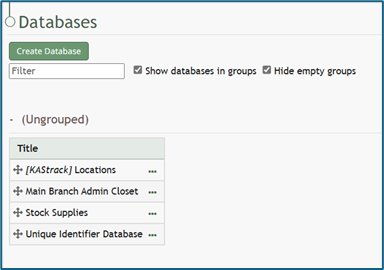
Click the “Create Database” button, opening the New Database Modal.
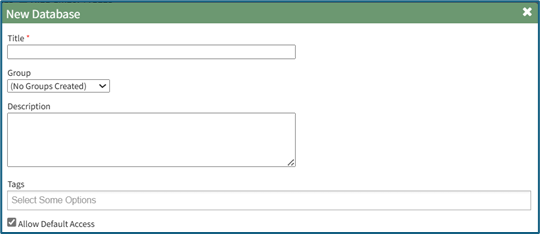
Input a Title for the new database. Select any groups the database should be associated with. Provide a description of the database and its purpose in the textbox provide. Select any tags desired.
Select the “Allow Default Access” checkbox to indicate that the database should follow the defaults established by module and access levels. If this checkbox is not selected, you will be required to establish user specific access based on individual or certification roles.
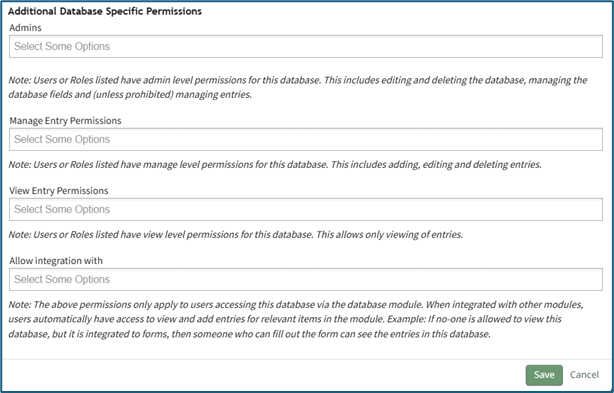
The following database specific permissions are selected via drop down menu lists that include all individuals and certification roles that can be assigned permission.
Admins allows users or role to have admin module level permissions for this particular database. A list of all admin module level permissions is shown in the table below.
Database Admin Module Level Permissions |
Manage roles (add/view/edit/delete, assign hidden roles, role permissions) Database (view/edit/delete/list/add, upload csv) Database Fields (edit/delete/view/list) Database Entry (view/edit/delete/list/add) Can delete entries from other modules |
Manage Entry Permissions gives the indicated users permission to view, add, edit, and delete database entries.
View Entry Permissions gives the indicated users permission to view database entries.
Allow Integration With denotes which other modules can link with and integrate with this database or forms for reference.
The Database Module can be integrated with the following modules:
- Forms
- Database
- Inventory
- Grid
Click “Cancel” and return to the Database Module Home Page without any changes being made. Select “Save” to create the new database and you will be directed to the Fields Table for your newly copied database.
Once a database has been created, you can enter database fields into it.
How To: Import Fields from a CSV File Into a Database
{{@338}}
How To: Import Fields from a PDF Field Import
{{@340}}
How To: Add a Database Field
{{@321}}
Once you have entered database fields, you can add database entries into it.
How To: Add an Individual Database Entry
{{@325}}
How To: Import Database Entries from a CSV
{{@338}}
Select “Save” and the system will direct you to the Fields Page, where new fields can be added. Your stock database can include a variety of fields, but for the Inventory Module to function properly there are required fields.
If no fields have been entered into the database yet, you can import fields in bulk via a PDF Entry or a CSV file. If fields have already been created in the database, new field must be added individually.
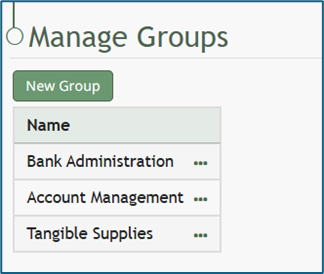
How To: Add a Database Group
To add a database group, go to the Groups Page of the Database Module.
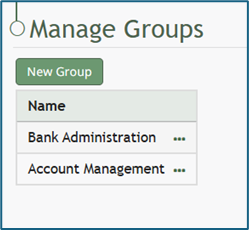
Select the “New Group” button opening the New Group Modal.

Input the desired name of the new group and select the “Save” button.
The new group will now show in the Group Table.
How To: Import Form Fields from a CSV File
To import form entries from a CSV, form fields must have already been created.
How To: Add a Field to a Form
{{@373}}
How To: Import Form Fields from a CSV File
{{@402}}
How To: Import Fields from a PDF Field Import
{{@400}}
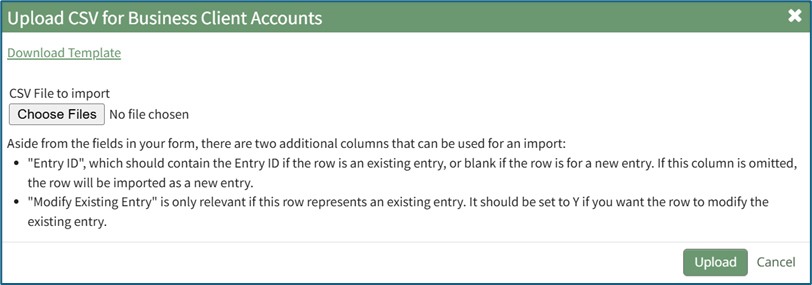
To import form entries from a CSV, go to the Home Page of the Forms Module and click the three-dot icon to the right of the form you wish to import entries into. Select “Manage Entries”.
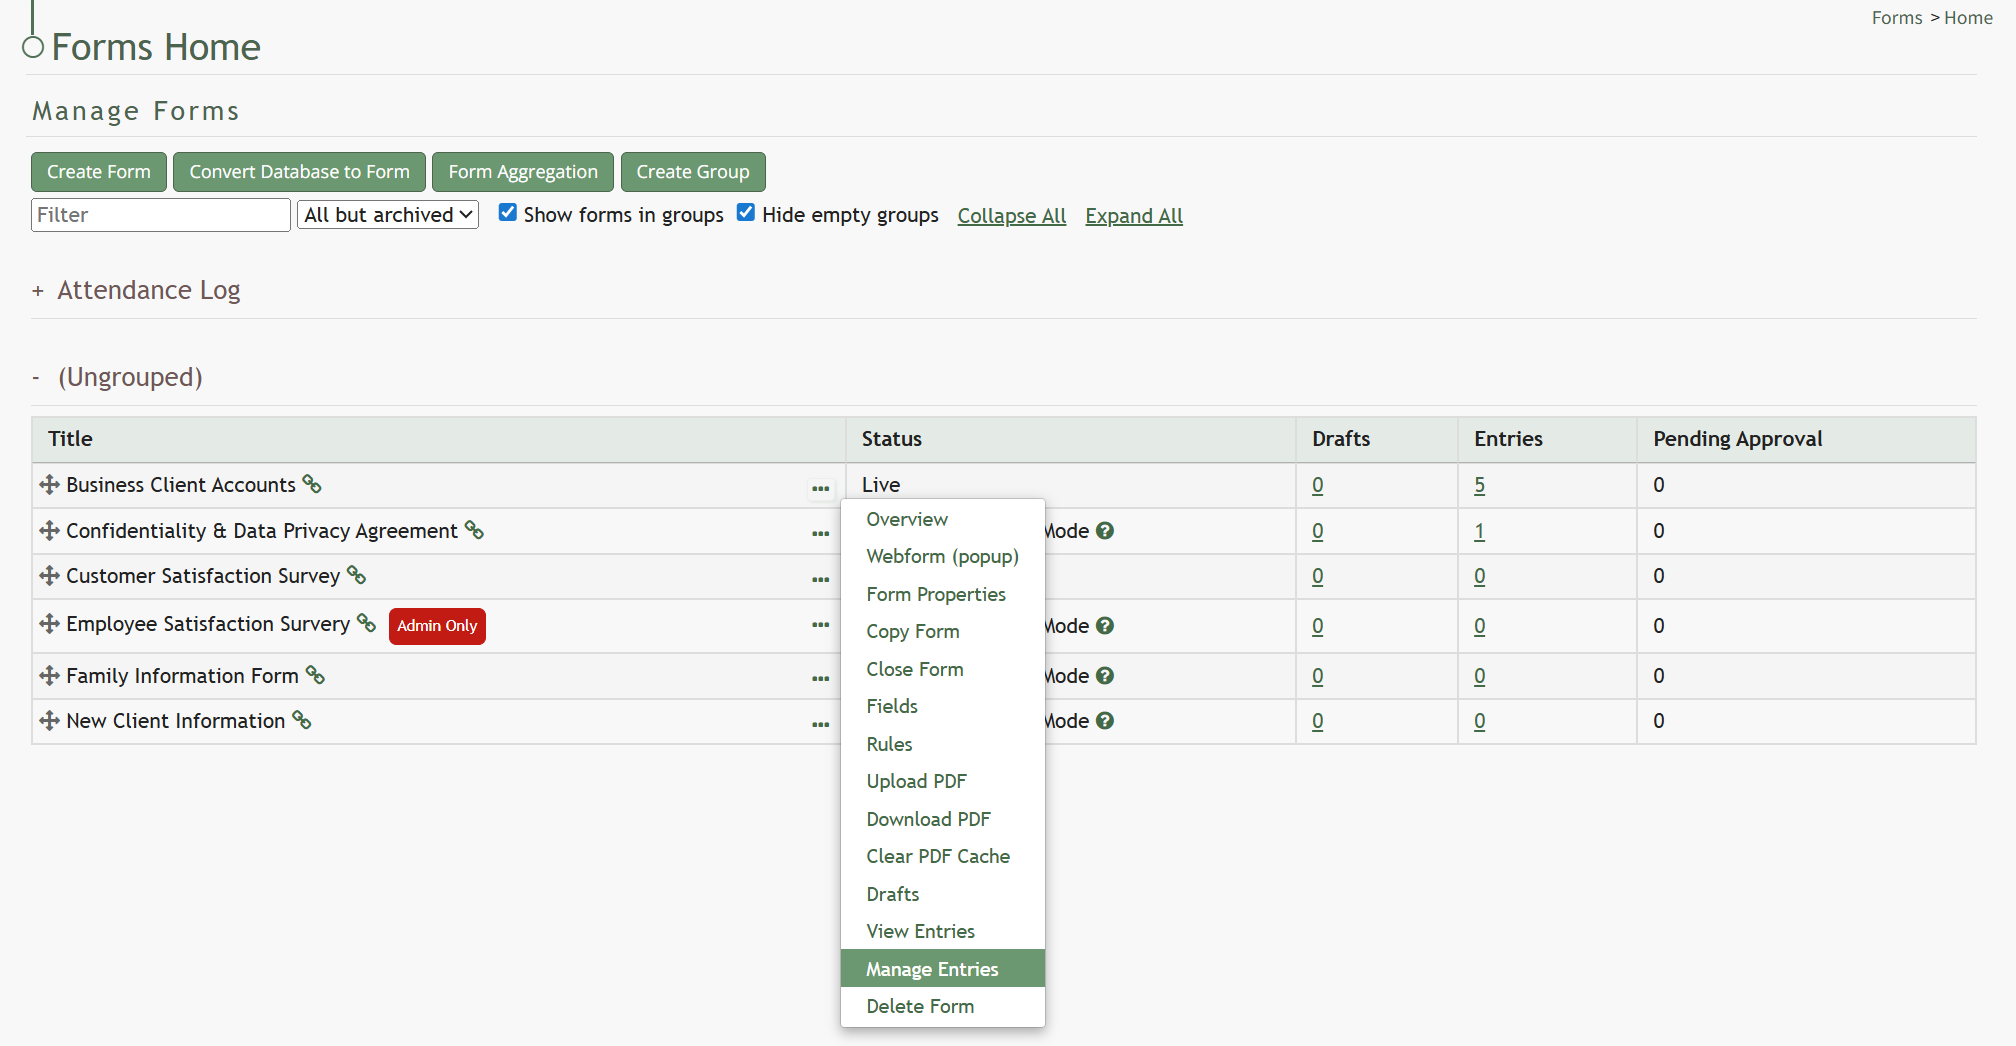
This opens the Manage Entries for (FORM NAME) Page.

Click the “Import Entries” button beneath the page header. This opens the Upload CSV for (FORM NAME) Modal.
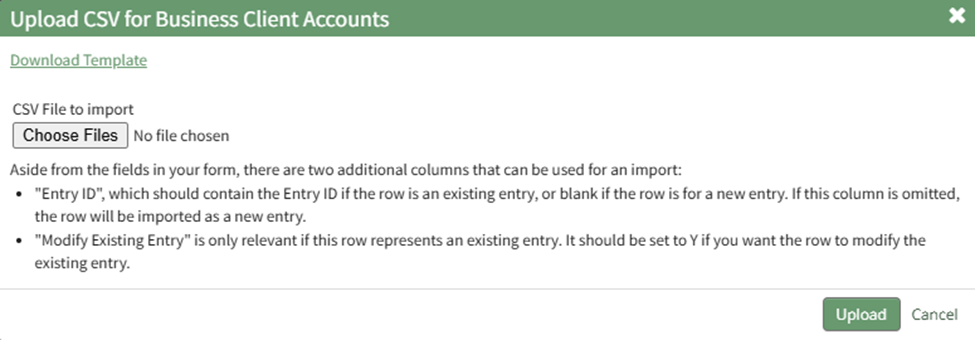
Click the “Download Template” link at the top of the modal and a CSV file will be downloaded to your personal device. Notes have been provided if you are using the downloadable template to Upload bulk CSV form entries.
Notes Regarding the Downloadable Template for Uploading CSV Files
The first row of the CSV file is for each of the form fields. If you download a CSV Template from the Upload CSV Modal, two additional column headers will show that are not form fields: Entry ID and Modify Existing Entry.
If you are importing form entries and no entries have been added to the form yet, leave these columns blank in your upload.
If form entries already exist in the database, the Entry ID column will contain the unique system generated ID for each pre-existing database entry. Leave this column blank if the row is to be imported as a new entry. The second column, Modify Existing Entry, should have a “Y” input if the existing entry is being modified and an “N” input if it has not been modified. Leave this column blank if the entry is new.

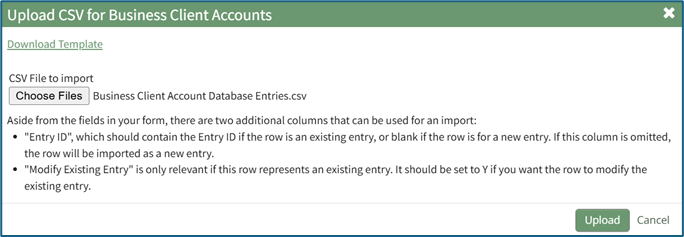
After creating your Forms Entries CSV file, save it as a CSV UTF-8 for importing. Click the “Choose File” button on the Upload CSV Modal and open the relevant file from your personal device.

Confirm that the correct CSV file now shows in the Upload CSV Modal.
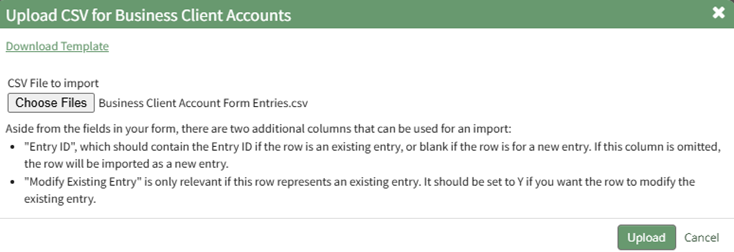
Select the “Upload” button.
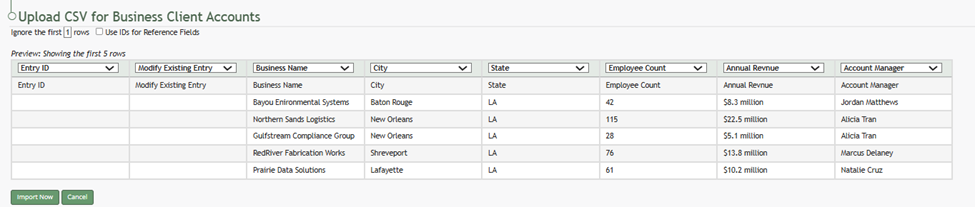
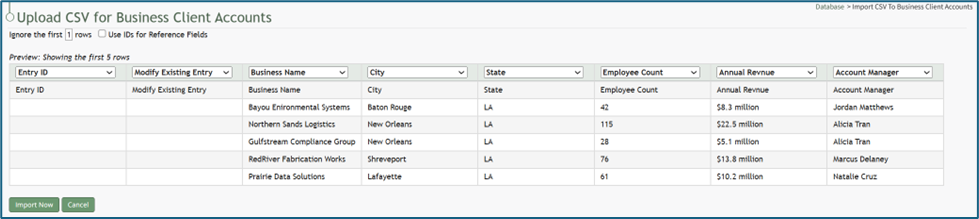
The entries imported from the CSV file will now show on the Upload CSV for (FORM NAME) Page.
The system automatically indicates to ignore the first row. Click “Import Now” if there are no errors.
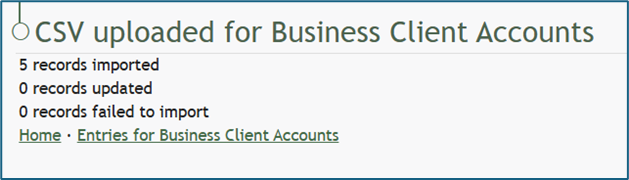
A summary of the import will now show on the CSV Upload Page.
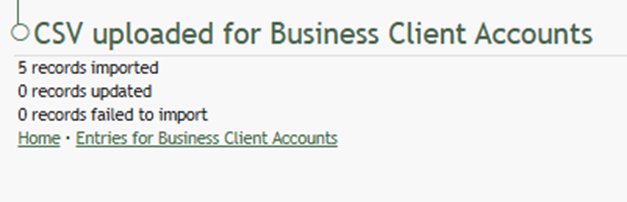
Click the “Entries for (FORM NAME)” link to see all imported entries on the Manage Entries Page.
How To: Import Fields from a PDF Field Import
Importing fields from a PDF Field Import has multiple purposes. Not only will the form fields be generated through this process, the PDF will also be saved by the system, so that future form entries can be downloaded into this PDF, allowing for customizable outputs.
A form must have already been created with no fields added for this method to work. If a field has already been added to the form, you are no longer able to bulk import form field names from a PDF Field Import. You are now required to enter each field name individually. Regardless, you can still upload a PDF Form that the system will use for future form entry downloads.
How To: Create a Form
{{@386}}
How To: Add a Field to a Form
{{@373}}
How To: Upload a PDF Form
{{@408}}
To import field names from a PDF file, go to the Home Page of the Forms Module.
Select the three-dot icon to the right of the Form Title opening the Form’s context menu. Select “Form”.
This opens the Fields Tab for a specific form. Select the “PDF Field Import” button.
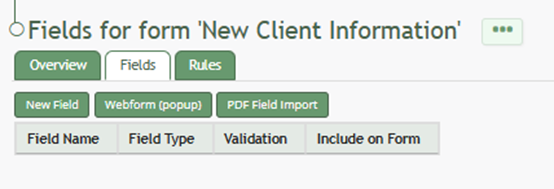
This opens the PDF Field Import Modal.
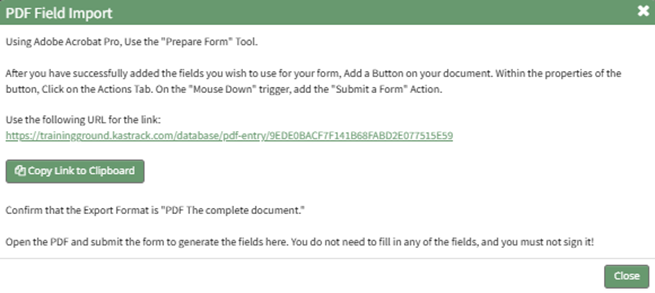
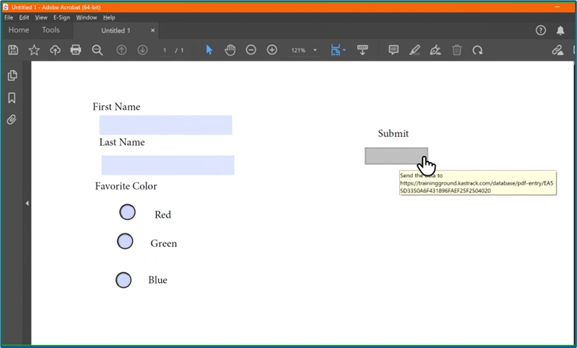
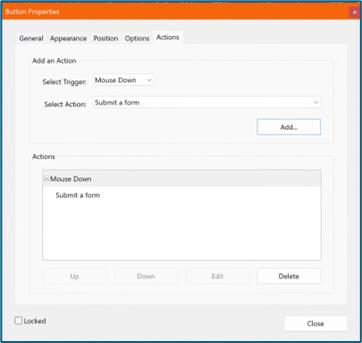
To import fields using a PDF, use the “Prepare Form” tool in Adobe Acrobat Pro. Add the fields you wish to use for your form. Add a button on your document.

Use the URL link provided on the PDF Field Import Modal in KAStrack.
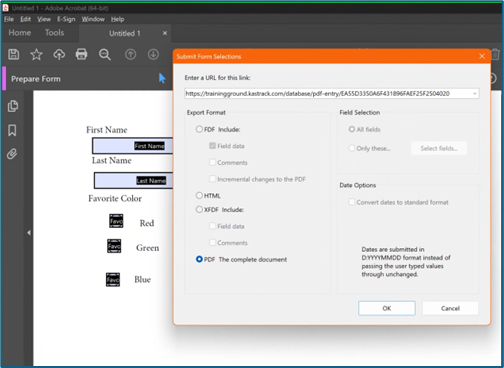
Confirm that the Export Format is “PDF The complete document”.
Open the PDF and submit the form to generate the fields here.
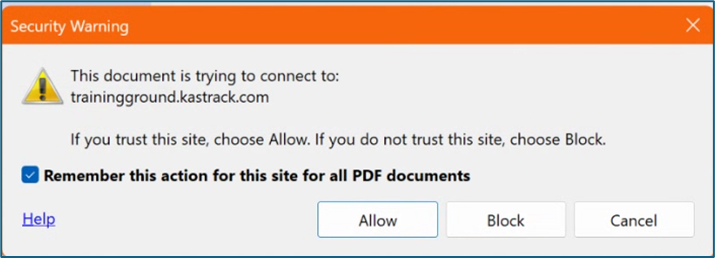
You do not need to fill in any of the fields, and you must not sign it.
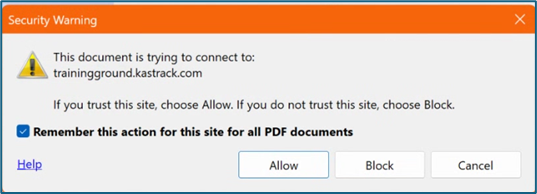
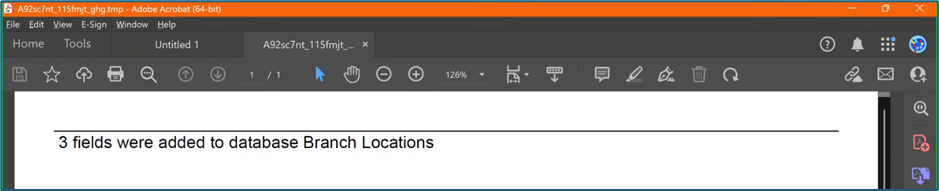
Select “Allow” and the PDF will confirm that the fields were added to the database.
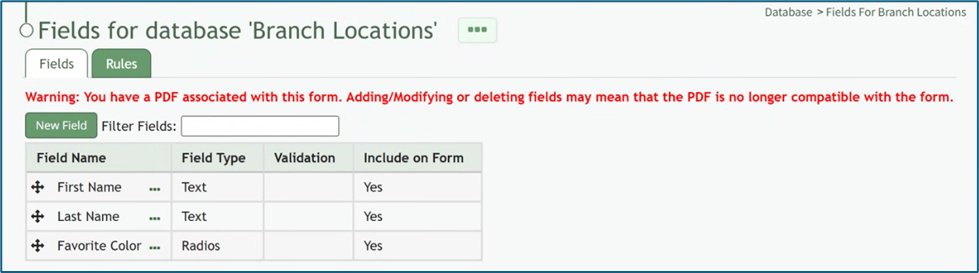
Go to the Fields Table in the database Monday, and a warning now states that a PDF is associated with the form and that adding/editing or deleting fields may result in the PDF no longer being compatible.
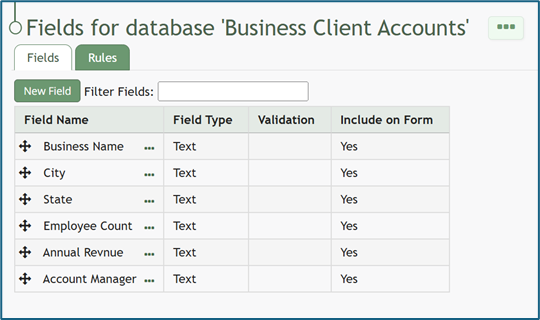
Stock Database Requirements | |
Required Fields* | Explanation |
Location | Inventory location can be defined through a single database, or multiple databases if desired. |
Inventory Item Title | This field will be used to identify the stock inventory item. Some examples of possible field names include title, item, part, etc. The Title will be comprised out of fields in the stock database. |
Quantity | This field will state the number of stock items currently in the inventory. |
Part Type | A inventory item must be specified as generic or unique if the inventory is integrated with a unique items database. Part Type is only a required field if you have both a stock and a unique database. |
* The actual field name for required fields can be customized to your preference. | |
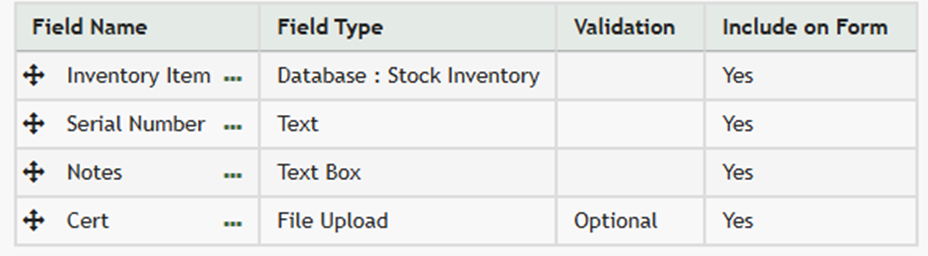
All fields created in the database will show in the Fields Table.
After your fields have been generated, stock inventory items can now be entered into the database in bulk via a CSV file import or entries can be added individually.
How To: Import Database Entries from a CSV
To import database entries from a CSV, database fields must already have been created.
How To: Add a Database Field
{{@321}}
How To: Import Fields from a CSV File Into a Database
{{@339}}
How To: Import Fields from a PDF Field Import
{{@340}}
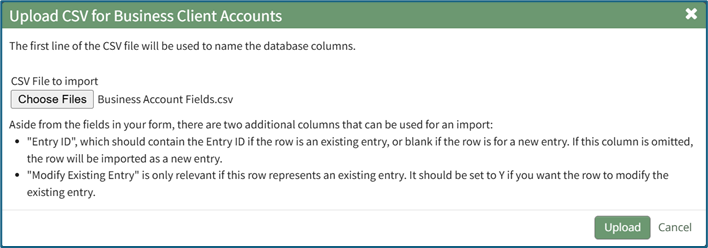
To import database entries from a CSV, go to the Home Page of the Database Module and click the three dot menu to the right of the database you wish to import entries into.
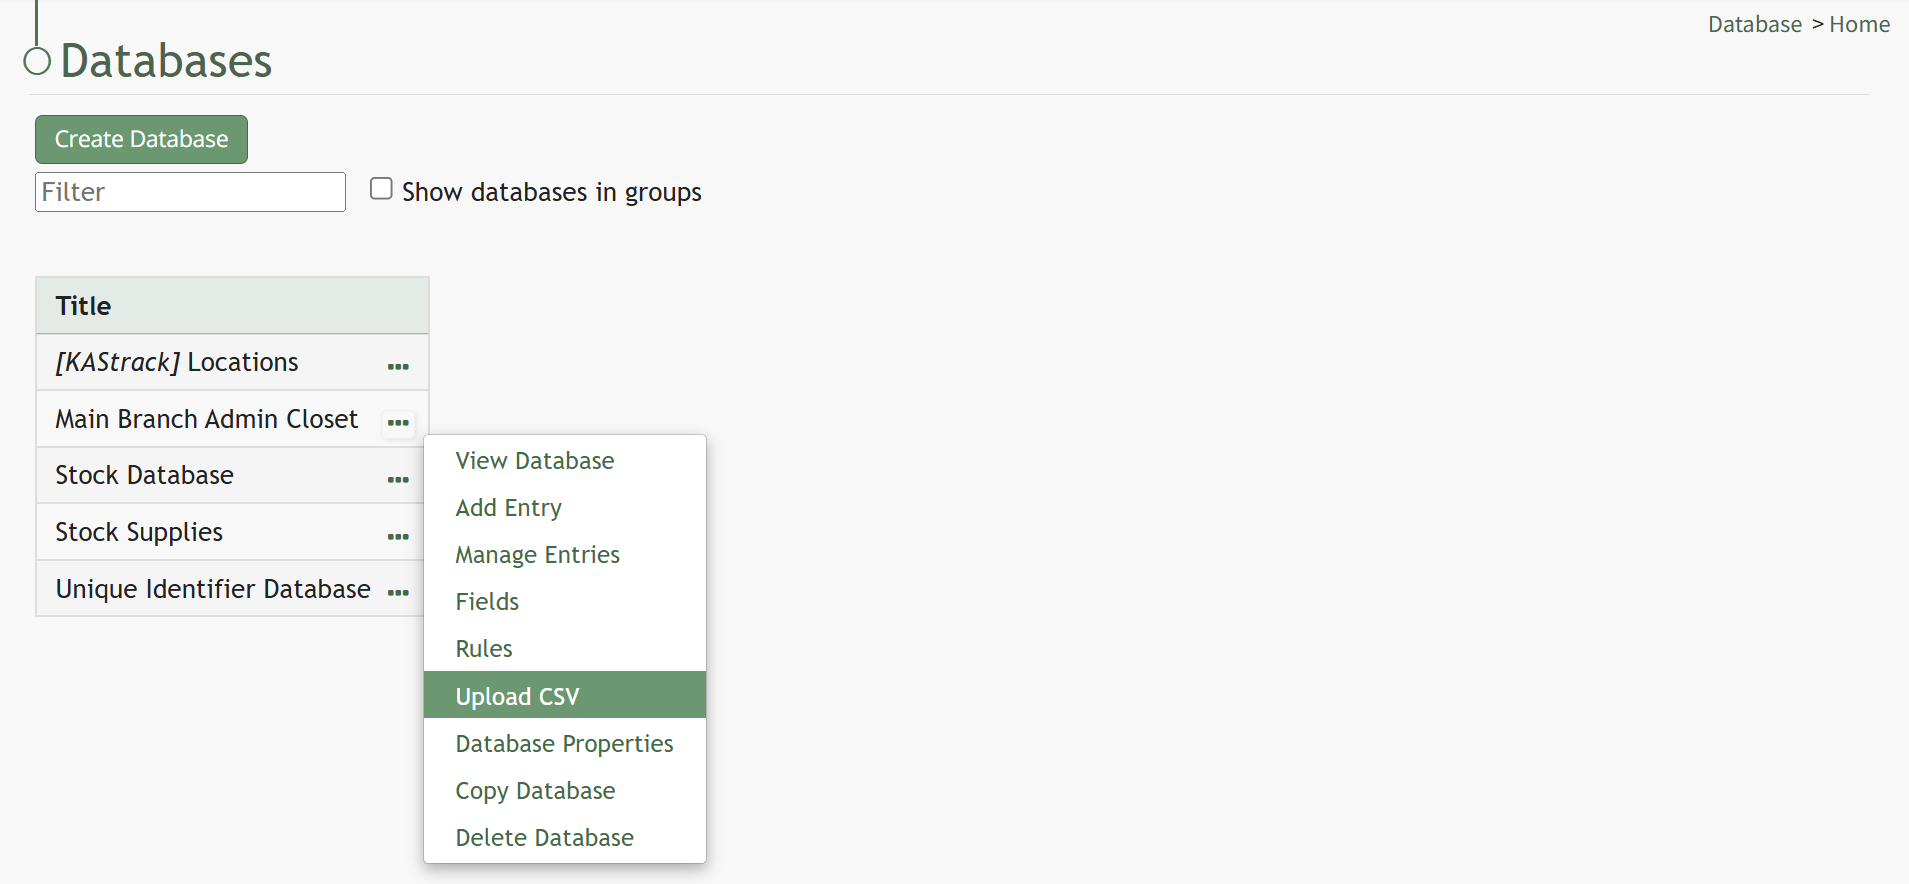
Select “Upload CSV” opening the Upload CSV for (DatabaseName) Modal.
You can also import entries by selecting “Manage Entries” from the context menu and selecting the “Import Entries” button underneath the Database Entries Page header, which opens the same Upload CSV Modal.
Click the “Download Template” link at the top of the modal and a CSV file will be downloaded to your personal device. See Notes on the Download Template before uploading your CSV file to ensure it is done correctly.
Notes Regarding the Downloadable Template for Uploading CSV Files
The first row of the CSV file is for each of the database fields. If you download a CSV Template from the Upload CSV Modal, two additional column headers will show that are not database fields: Entry ID and Modify Existing Entry.
If you are importing database entries and no entries have been added to the database yet, leave these columns blank in your upload.
If database entries already exist in the database, the Entry ID column will contain the unique system generated ID for each pre-existing database entry. Leave this column blank if the row is to be imported as a new entry. The second column, Modify Existing Entry, should have a “Y” input if the existing entry is being modified and an “N” input if it has not been modified. Leave it blank if the entry is new.

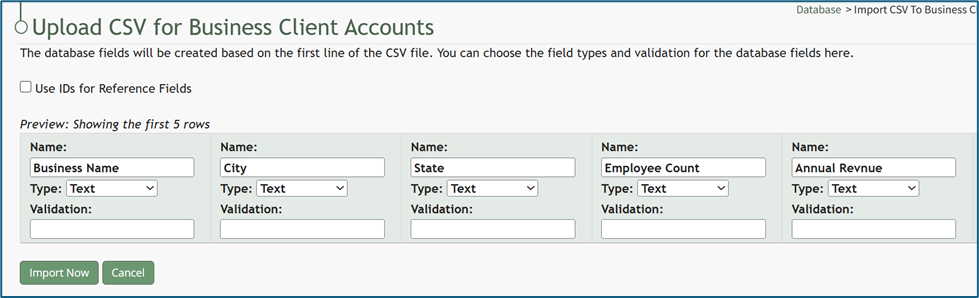
After creating your Database Fields CSV File, save it as a CSV UTF-8 for importing.
Click the “Choose File” button and open the relevant file from your personal device.

Confirm that the correct CSV file now shows in the Upload CSV Modal.
Select the “Upload” button.
The entries imported from the CSV file will now show on the Upload CSV for (DatabaseName) Page.
The system automatically indicates to ignore the first row. Click “Import Now” if there are no errors.
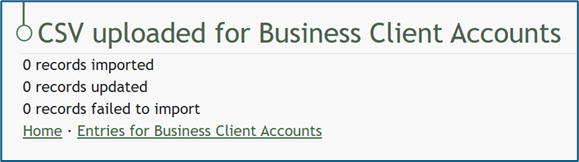
A summary of the import will now show on the CSV Upload Page.
Click the “Entries for (DatabaseName)” link to see all imported entries in the Manage Entry Table.
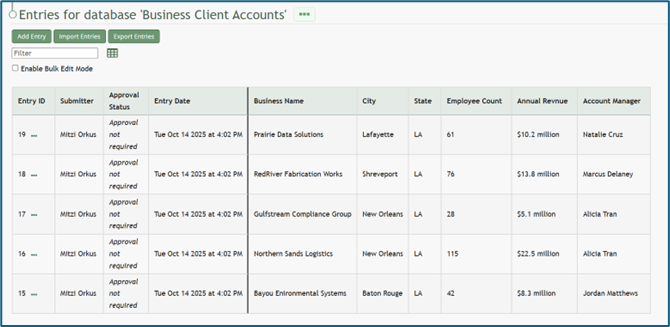
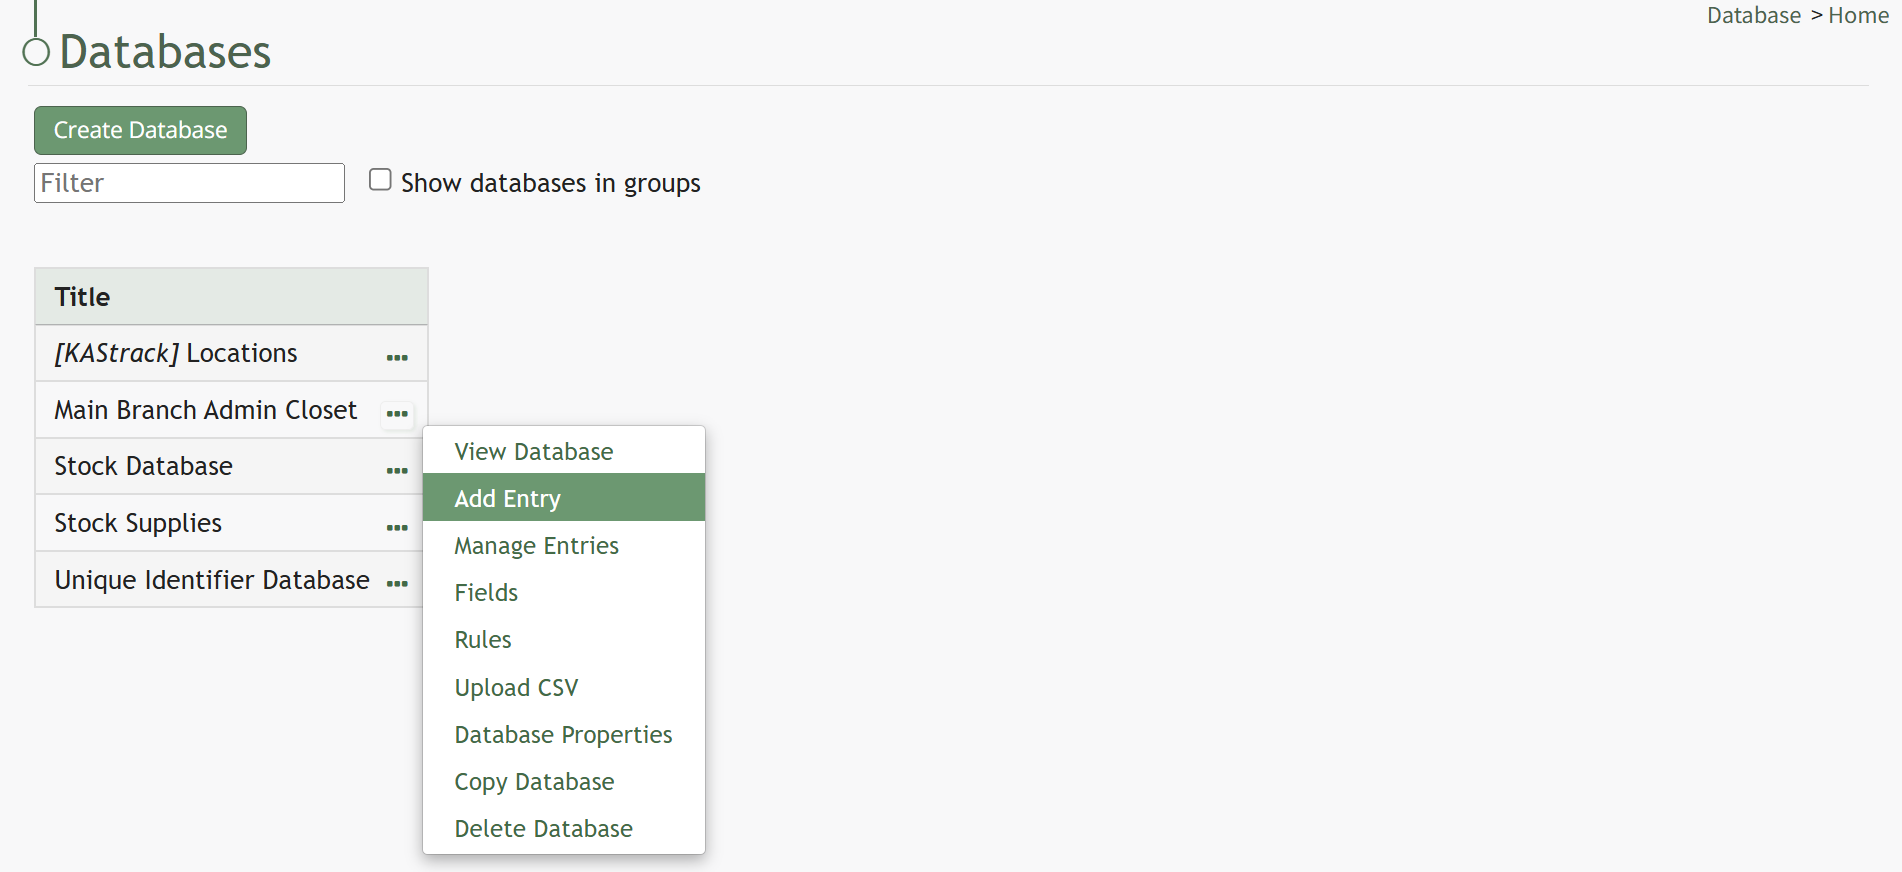
How To: Add an Individual Database Entry
To add a database entry, go to the Home Page of the Database Module. Click the three dot (…) icon to the right of the database you wish to add an entry to opening the context menu. Select “Add Entry”.
You can select “Add Entry” from any context menu in the Database Modal without returning to the Home Page.
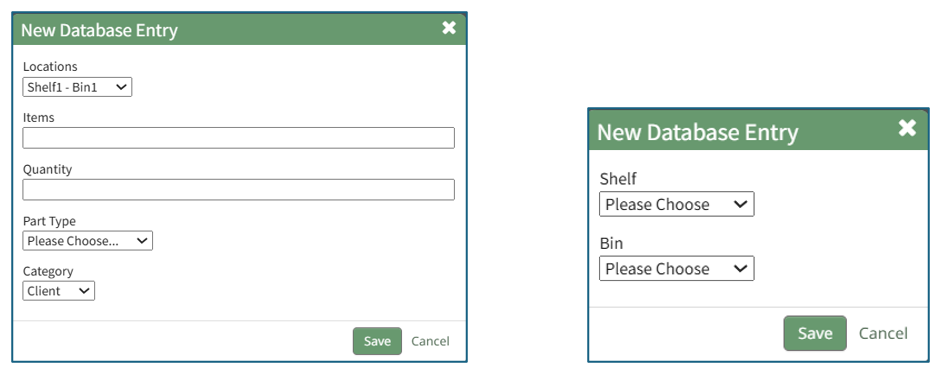
Selecting “Add Entry” opens the New Database Entry modal. Two visual examples of this modal have been included below.
The New Database Entry Modal will vary for every database, based on the fields that have been created for it.
Input the entry data into the modal. Select “Save” for the new entry to be added to the database.
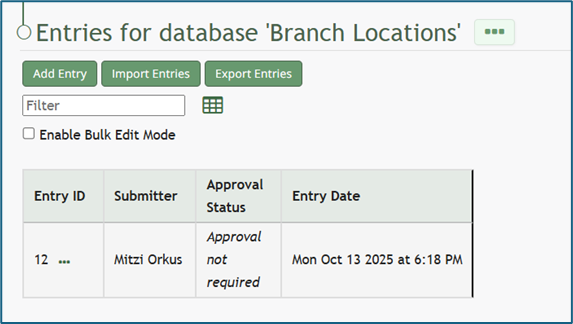
If no fields have been created for the database, the New Database Entry Modal will show without any fields as seen below.

If you select to “Save” a database entry prior to the creation of database fields, an entry will be assigned an Entry ID by the system and will show in the Entries Table. The submitter, approval status, and entry date will be logged.
Now that your stock database has been created and filled with inventory item entries, it is ready to be integrated into an inventory.
How To: Create a Unique Items Database
To create a unique items database, go to the Home Page of the Database Module and create a new database. Click the “Create Database” button and input a database title and description. Select the appropriate database group from the dropdown menu. You can use default access parameters or customize database specific parameters.
How To: Create a Database
To create a new database, go to the Home Page of the Database Module.
Click the “Create Database” button, opening the New Database Modal.
Input a Title for the new database. Select any groups the database should be associated with. Provide a description of the database and its purpose in the textbox provide. Select any tags desired.
Select the “Allow Default Access” checkbox to indicate that the database should follow the defaults established by module and access levels. If this checkbox is not selected, you will be required to establish user specific access based on individual or certification roles.
The following database specific permissions are selected via drop down menu lists that include all individuals and certification roles that can be assigned permission.
Admins allows users or role to have admin module level permissions for this particular database. A list of all admin module level permissions is shown in the table below.
Database Admin Module Level Permissions |
Manage roles (add/view/edit/delete, assign hidden roles, role permissions) Database (view/edit/delete/list/add, upload csv) Database Fields (edit/delete/view/list) Database Entry (view/edit/delete/list/add) Can delete entries from other modules |
Manage Entry Permissions gives the indicated users permission to view, add, edit, and delete database entries.
View Entry Permissions gives the indicated users permission to view database entries.
Allow Integration With denotes which other modules can link with and integrate with this database or forms for reference.
The Database Module can be integrated with the following modules:
- Forms
- Database
- Inventory
- Grid
Click “Cancel” and return to the Database Module Home Page without any changes being made. Select “Save” to create the new database and you will be directed to the Fields Table for your newly copied database.
Once a database has been created, you can enter database fields into it.
How To: Import Fields from a CSV File Into a Database
{{@338}}
How To: Import Fields from a PDF Field Import
{{@340}}
How To: Add a Database Field
{{@321}}
Once you have entered database fields, you can add database entries into it.
How To: Add an Individual Database Entry
{{@325}}
How To: Import Database Entries from a CSV
{{@338}}
Select “Save” and the system will direct you to the Fields Page, where new fields can be added. Your unique items database can include a variety of fields, but for the Inventory Module to function properly, it must have field(s) that identify the inventory item (title) and field(s) that are used to identify the unique item.
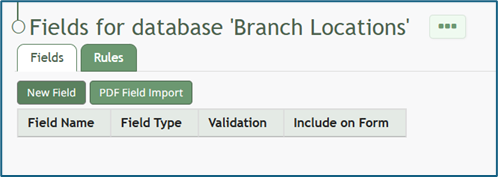
How To: Add a Database Field
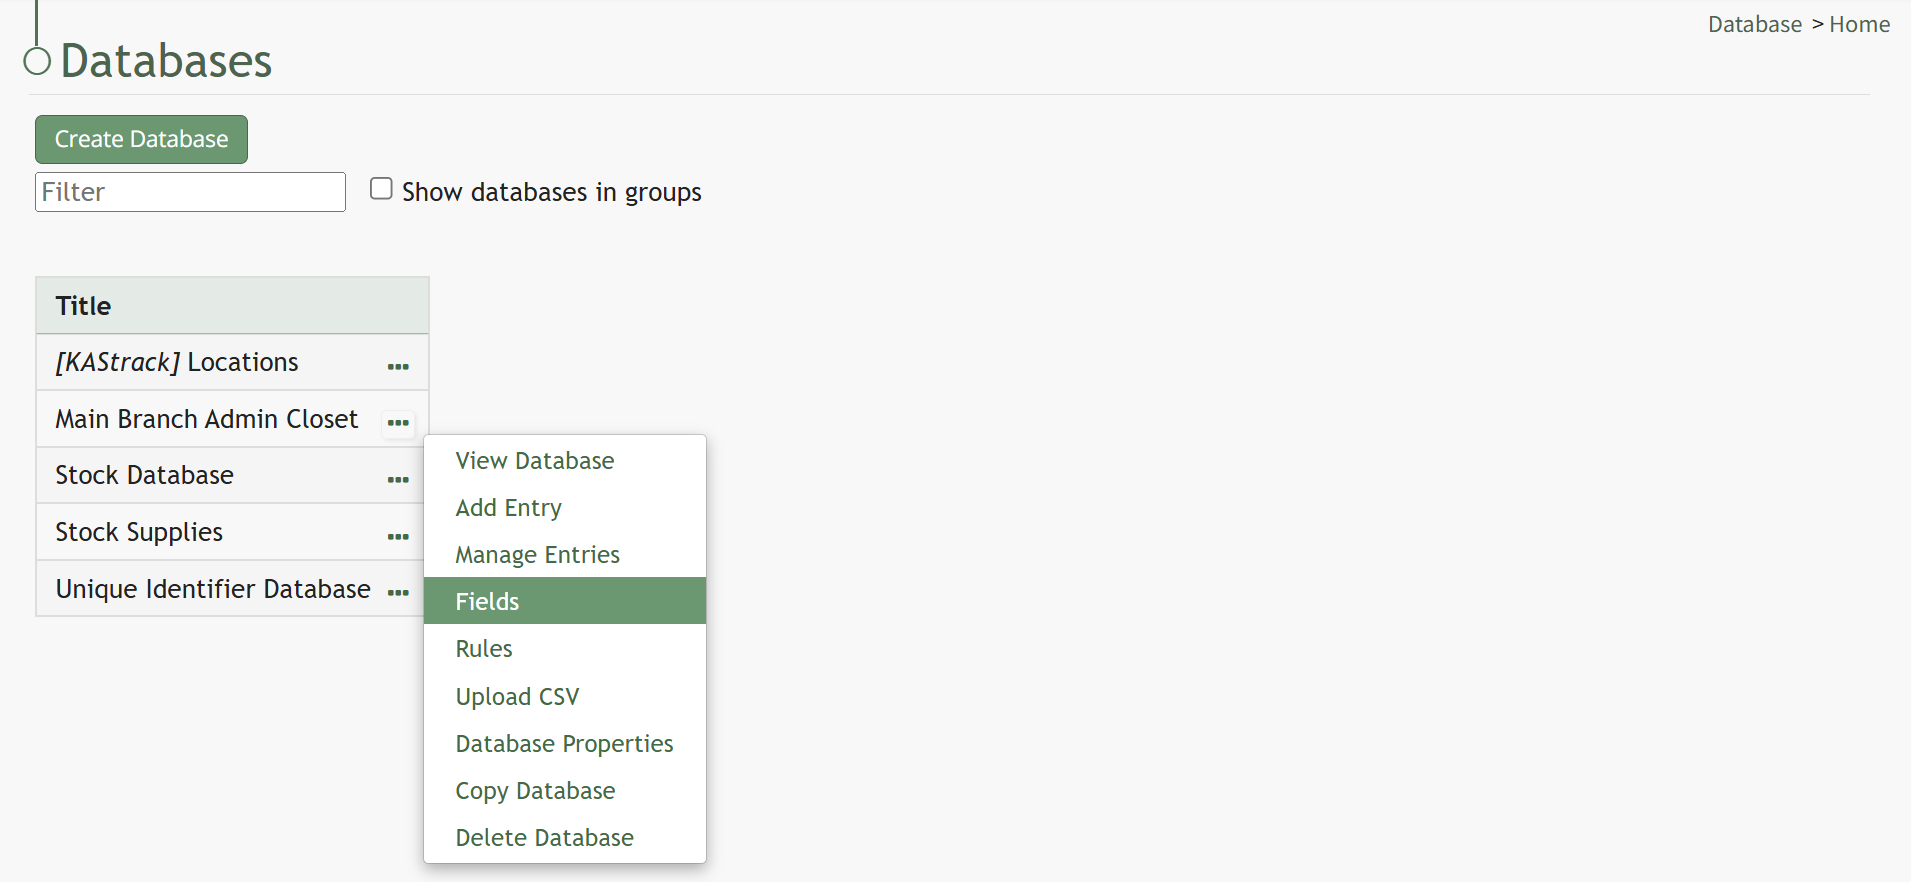
To create a database field, go to the Home Page of the Database Module.
Click the three dot (…) icon to open the context menu of the database you wish to enter fields for.
Select “Fields” opening the Fields for database (DatabaseName) Page.
There are two ways to add a field to the Field Table. Click the “New Field” button above the Field Table or click the three dot (…) icon to the right of the page header opening the context menu and select “Add Entry”.

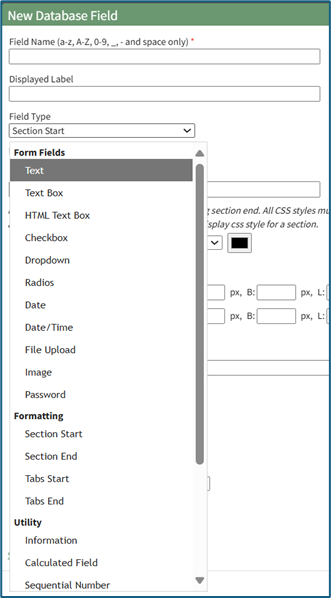
This opens the New Database Field Modal.
The creation of a new field will always require you to enter a field name. Include an input for the displayed label and select the field type from a dropdown menu. The inputs on the New Database Field Modal will vary based on the Field Type.
Possible field types in the database module include Form Fields, Formatting Fields, Utility Fields, or a Reference to Another Database.
A database field can only have one field type. If you need to utilize another (e.g., for formatting purposes), you can set the displayed label to be same, but the field label must be unique.
For an explanation of field types and the formatting choices associated with each one, reference the Understanding Fields Section of the Database Module in the User Manual.
Once you are finished inputting the information for the new field, select “Save” and the new database field will show in the Field Table.
Fields can also be imported in bulk into a Database from a CSV.
How To: Import Fields from a PDF Field Import
{{@340}}
How To: Import Fields from a CSV File Into a Database
If a field has already been added to a database, you are no longer able to bulk import database field names from a CSV file. You are now required to enter each field name individually.
How To: Add a Database Field
{{@321}}
To import database field names from a CSV file, go to the Home Page of the Database Module. Click the three dot (…) icon to open the context menu of the database you wish to enter fields for.
Select “Upload CSV” opening the Upload CSV for (DatabaseName) Modal.

When creating your CSV file, the first row of the CSV file is used. Each individual cell in that row will be a database field used as columns for data entry. When importing bulk field names, the notes in the Upload CSV Modal on “Entry ID” and “Modify Entry ID” are not relevant.

After creating your Database Fields CSV File, save it as a CSV UTF-8 for importing.
Click the “Choose File” button and open the relevant file from your personal device.

Confirm that the correct CSV file now shows in the Upload CSV Modal.
Select the “Upload” button.
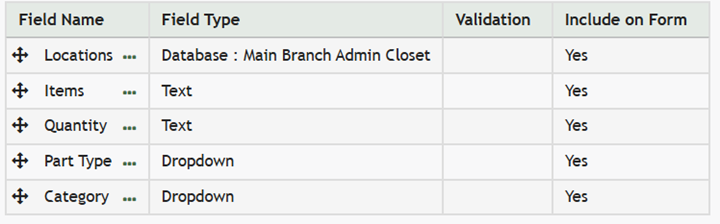
Configure each database field as desired. Field types shown on the dropdown menu include form fields: Text, Text Box, Checkbox, Dropdown, Radios, Data, and Data/Time.
Select “Import Now” and a summary of the import with show on the CSV Upload Page.
All imported field will now show on the Fields for database (DatabaseName) Page in the Fields Table.
How To: Import Fields from a PDF Field Import
This method of importing Fields from a PDF requires access to Adobe Acrobat Pro.
If a field has already been added to a database, you are no longer able to bulk import database field names from a PDF Field Import. You are now required to enter each field name individually.
How To: Add a Database Field
{{@321}}
To import field names in bulk from a CSV file, go to the Home Page of the Database Module. Click the three dot (…) icon to open the context menu of the database you wish to enter fields for.
Select “Fields” opening the Fields for database (DatabaseName) Page.
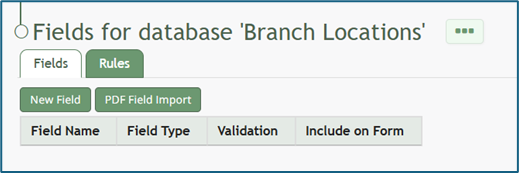
Click the “PDF Field Import” button opening the PDF Field Import Modal.
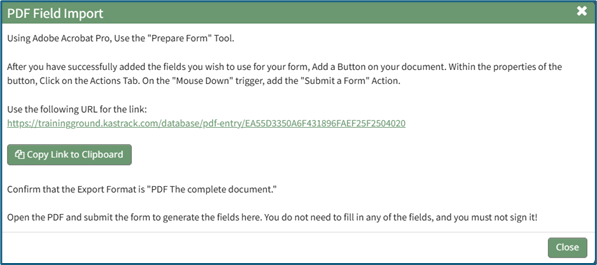
To import fields using a PDF, use the “Prepare Form” tool in Adobe Acrobat Pro. Add the fields you wish to use for your form. Add a button on your document.
Use the URL link provided on the PDF Field Import Modal in KAStrack.

Confirm that the Export Format is “PDF The complete document”.

Open the PDF and submit the form to generate the fields here.
You do not need to fill in any of the fields, and you must not sign it.
Select “Allow” and the PDF will confirm that the fields were added to the database.

Go to the Fields Table in the database Monday, and a warning now states that a PDF is associated with the form and that adding/editing or deleting fields may result in the PDF no longer being compatible.
If no fields have been entered into the database yet, you can import fields in bulk via a PDF Entry or a CSV file. If fields have already been created in the database, new field must be added individually.
After your fields have been generated, unique inventory items can now be entered into the database in bulk via a CSV file import or entries can be added individually.
How To: Import Database Entries from a CSV
To import database entries from a CSV, database fields must already have been created.
How To: Add a Database Field
{{@321}}
How To: Import Fields from a CSV File Into a Database
{{@339}}
How To: Import Fields from a PDF Field Import
{{@340}}
To import database entries from a CSV, go to the Home Page of the Database Module and click the three dot menu to the right of the database you wish to import entries into.
Select “Upload CSV” opening the Upload CSV for (DatabaseName) Modal.
You can also import entries by selecting “Manage Entries” from the context menu and selecting the “Import Entries” button underneath the Database Entries Page header, which opens the same Upload CSV Modal.
Click the “Download Template” link at the top of the modal and a CSV file will be downloaded to your personal device. See Notes on the Download Template before uploading your CSV file to ensure it is done correctly.
Notes Regarding the Downloadable Template for Uploading CSV Files
The first row of the CSV file is for each of the database fields. If you download a CSV Template from the Upload CSV Modal, two additional column headers will show that are not database fields: Entry ID and Modify Existing Entry.
If you are importing database entries and no entries have been added to the database yet, leave these columns blank in your upload.
If database entries already exist in the database, the Entry ID column will contain the unique system generated ID for each pre-existing database entry. Leave this column blank if the row is to be imported as a new entry. The second column, Modify Existing Entry, should have a “Y” input if the existing entry is being modified and an “N” input if it has not been modified. Leave it blank if the entry is new.
After creating your Database Fields CSV File, save it as a CSV UTF-8 for importing.
Click the “Choose File” button and open the relevant file from your personal device.
Confirm that the correct CSV file now shows in the Upload CSV Modal.
Select the “Upload” button.
The entries imported from the CSV file will now show on the Upload CSV for (DatabaseName) Page.
The system automatically indicates to ignore the first row. Click “Import Now” if there are no errors.
A summary of the import will now show on the CSV Upload Page.
Click the “Entries for (DatabaseName)” link to see all imported entries in the Manage Entry Table.
How To: Add an Individual Database Entry
To add a database entry, go to the Home Page of the Database Module. Click the three dot (…) icon to the right of the database you wish to add an entry to opening the context menu. Select “Add Entry”.
You can select “Add Entry” from any context menu in the Database Modal without returning to the Home Page.
Selecting “Add Entry” opens the New Database Entry modal. Two visual examples of this modal have been included below.
The New Database Entry Modal will vary for every database, based on the fields that have been created for it.
Input the entry data into the modal. Select “Save” for the new entry to be added to the database.
If no fields have been created for the database, the New Database Entry Modal will show without any fields as seen below.
If you select to “Save” a database entry prior to the creation of database fields, an entry will be assigned an Entry ID by the system and will show in the Entries Table. The submitter, approval status, and entry date will be logged.
Now that your unique items database has been created and filled with inventory item entries, it is ready to be integrated into an inventory.
How To: Create an Inventory from Scratch
Before you can create a new Inventory from scratch, prepare any necessary underlying databases in the Database Module that are needed for integration with the new inventory.
Databases Integrating with the Inventory Module | ||
Database | Field Requirements | Notes |
Locations Database | None | A database must be selected as a locations inventory. Multiple databases can be utilized if desired. There are no fields that must be specifically included for functionality. |
Stock Database | Location | All inventories are required to integrate with a stock database. An explanation of each required field has been provided below. ** Part Type is only a required field if you have both a stock and a unique database. |
Inventory Item (Title) | ||
Quantity | ||
Part Type** | ||
Unique Item Database | Inventory Item (Title) | Integrating with a unique item database is optional. An explanation of each required field has been provided below. |
Unique Item Identifier | ||
How To: Create a Database
To create a new database, go to the Home Page of the Database Module.
Click the “Create Database” button, opening the New Database Modal.
Input a Title for the new database. Select any groups the database should be associated with. Provide a description of the database and its purpose in the textbox provide. Select any tags desired.
Select the “Allow Default Access” checkbox to indicate that the database should follow the defaults established by module and access levels. If this checkbox is not selected, you will be required to establish user specific access based on individual or certification roles.
The following database specific permissions are selected via drop down menu lists that include all individuals and certification roles that can be assigned permission.
Admins allows users or role to have admin module level permissions for this particular database. A list of all admin module level permissions is shown in the table below.
Database Admin Module Level Permissions |
Manage roles (add/view/edit/delete, assign hidden roles, role permissions) Database (view/edit/delete/list/add, upload csv) Database Fields (edit/delete/view/list) Database Entry (view/edit/delete/list/add) Can delete entries from other modules |
Manage Entry Permissions gives the indicated users permission to view, add, edit, and delete database entries.
View Entry Permissions gives the indicated users permission to view database entries.
Allow Integration With denotes which other modules can link with and integrate with this database or forms for reference.
The Database Module can be integrated with the following modules:
- Forms
- Database
- Inventory
- Grid
Click “Cancel” and return to the Database Module Home Page without any changes being made. Select “Save” to create the new database and you will be directed to the Fields Table for your newly copied database.
Once a database has been created, you can enter database fields into it.
How To: Import Fields from a CSV File Into a Database
{{@338}}
How To: Import Fields from a PDF Field Import
{{@340}}
How To: Add a Database Field
{{@321}}
Once you have entered database fields, you can add database entries into it.
How To: Add an Individual Database Entry
{{@325}}
How To: Import Database Entries from a CSV
{{@338}}
How To: Add a Database Field
To create a database field, go to the Home Page of the Database Module.
Click the three dot (…) icon to open the context menu of the database you wish to enter fields for.
Select “Fields” opening the Fields for database (DatabaseName) Page.
There are two ways to add a field to the Field Table. Click the “New Field” button above the Field Table or click the three dot (…) icon to the right of the page header opening the context menu and select “Add Entry”.
This opens the New Database Field Modal.
The creation of a new field will always require you to enter a field name. Include an input for the displayed label and select the field type from a dropdown menu. The inputs on the New Database Field Modal will vary based on the Field Type.
Possible field types in the database module include Form Fields, Formatting Fields, Utility Fields, or a Reference to Another Database.
A database field can only have one field type. If you need to utilize another (e.g., for formatting purposes), you can set the displayed label to be same, but the field label must be unique.
For an explanation of field types and the formatting choices associated with each one, reference the Understanding Fields Section of the Database Module in the User Manual.
Once you are finished inputting the information for the new field, select “Save” and the new database field will show in the Field Table.
Fields can also be imported in bulk into a Database from a CSV.
How To: Import Fields from a PDF Field Import
{{@340}}
When your databases are complete, go to the Home Page of the Inventory Module.
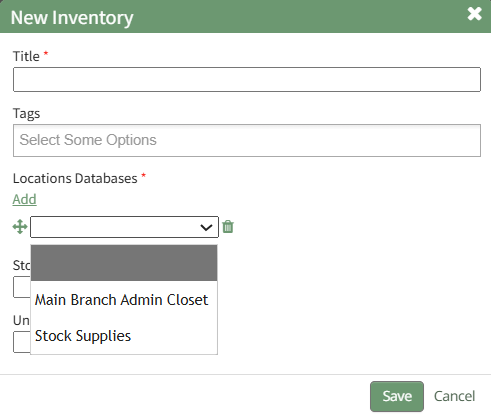
Select the “Create Inventory” button opening the New Inventory Modal.
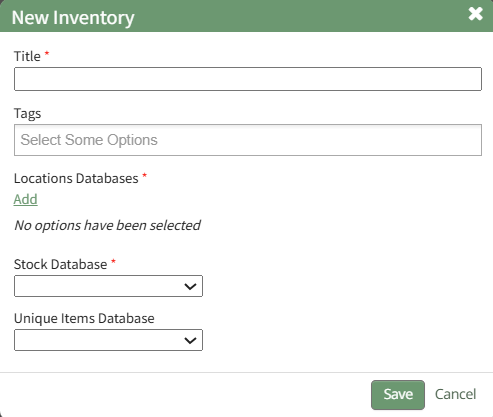
Input the name for the new inventory and any desired tags.
Inventory setup requires you to add the underlying databases: a locations database, a stock database, and a (optional) unique items database.

Click the “Add” link which opens a dropdown menu that shows all databases that have been integrating with the inventory module. If the database needed is not visible, confirm that permissions have been granted for integration.
How To: Integrate a Database with the Inventory Module
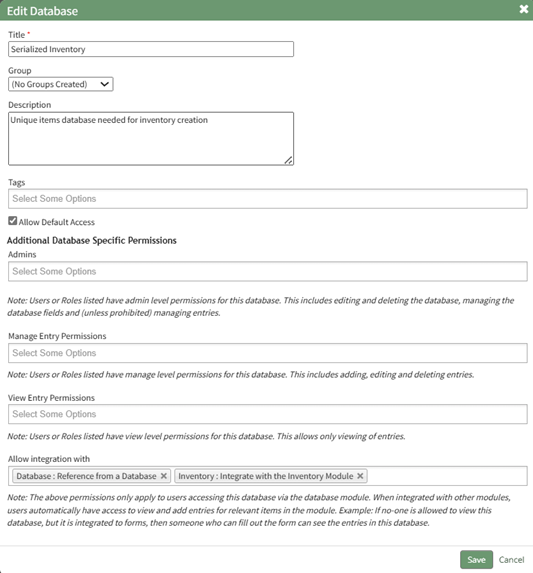
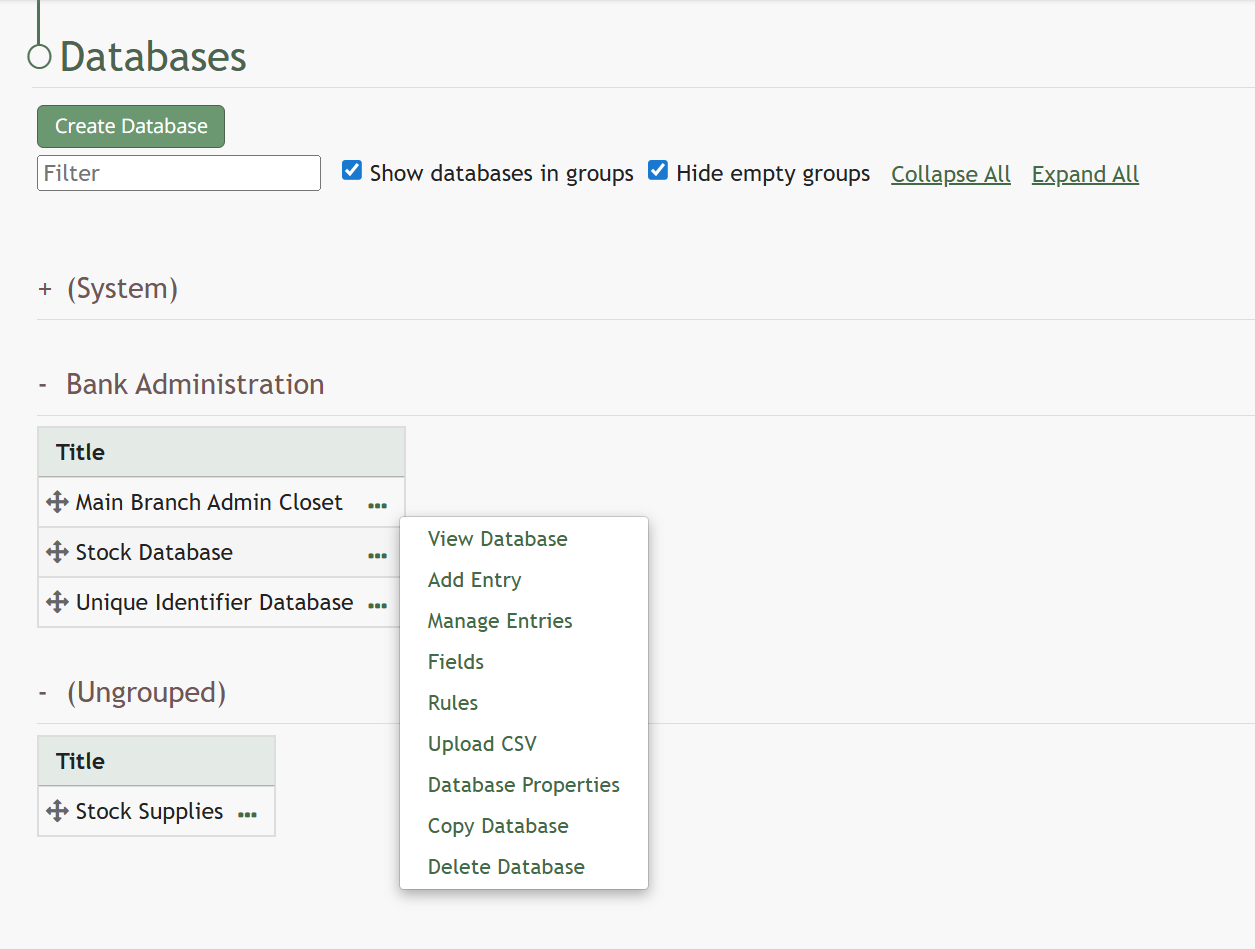
To integrate an existing database with the inventory module, go to the Database Module Home Page. Click the three-dot icon to the right of the database you wish to integrate opening the context menu.
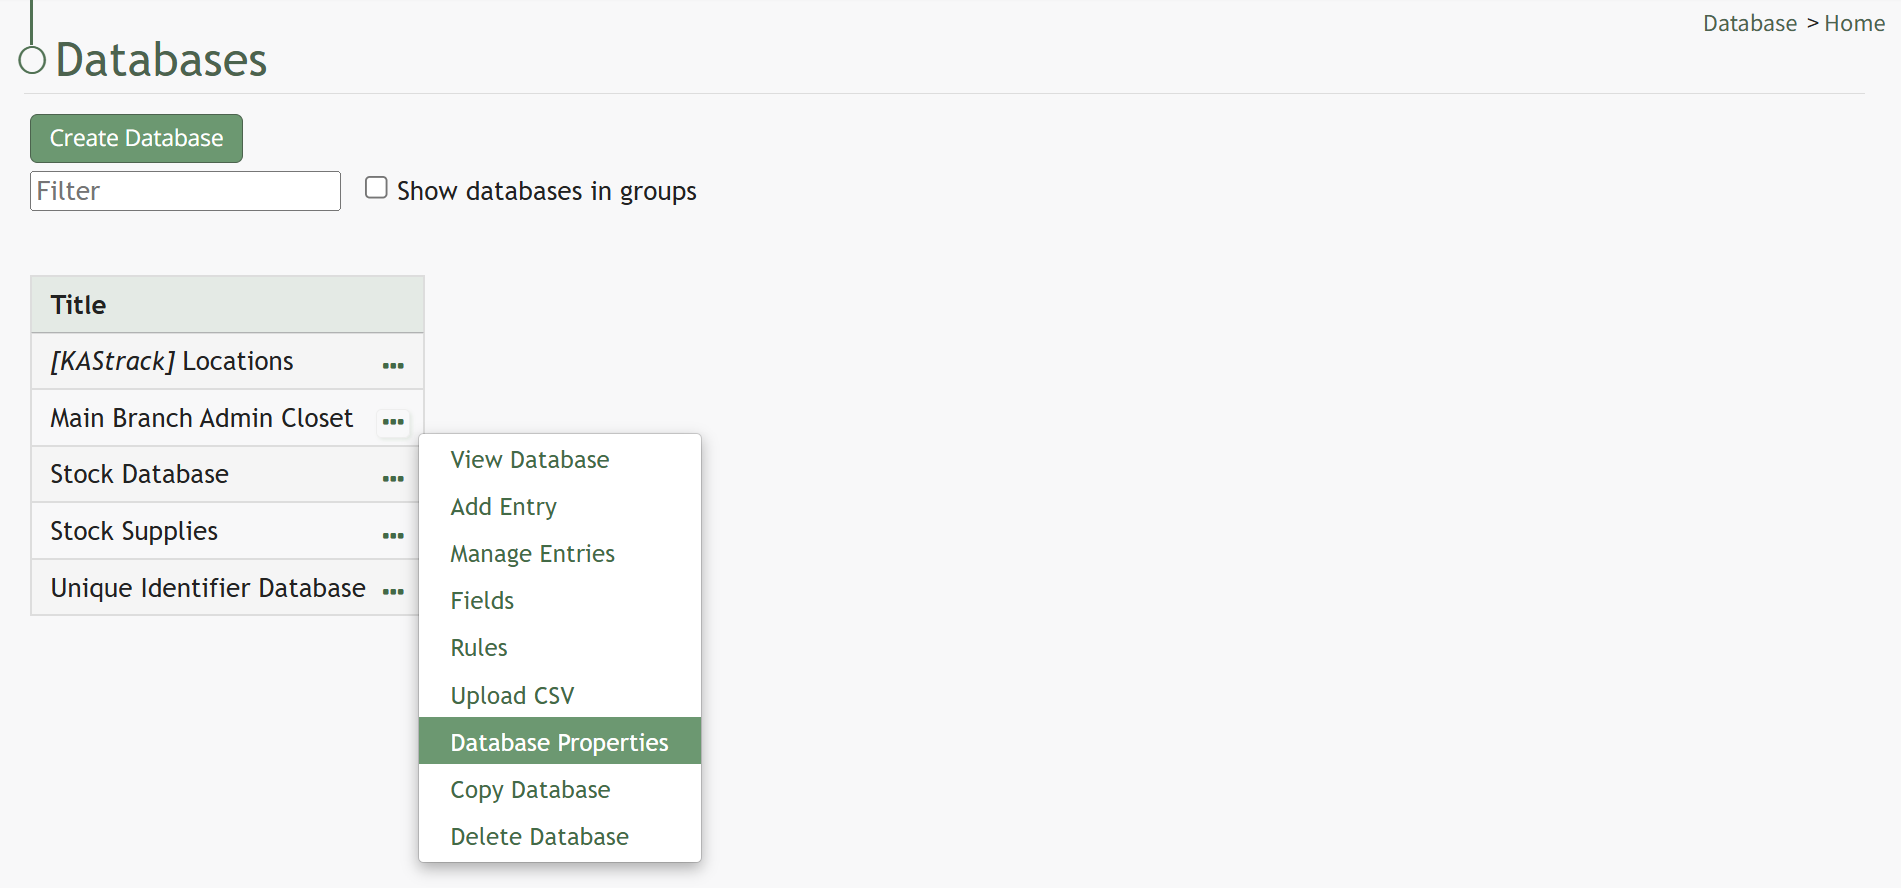
Select “Database Properties” opening the Database Properties Modal.
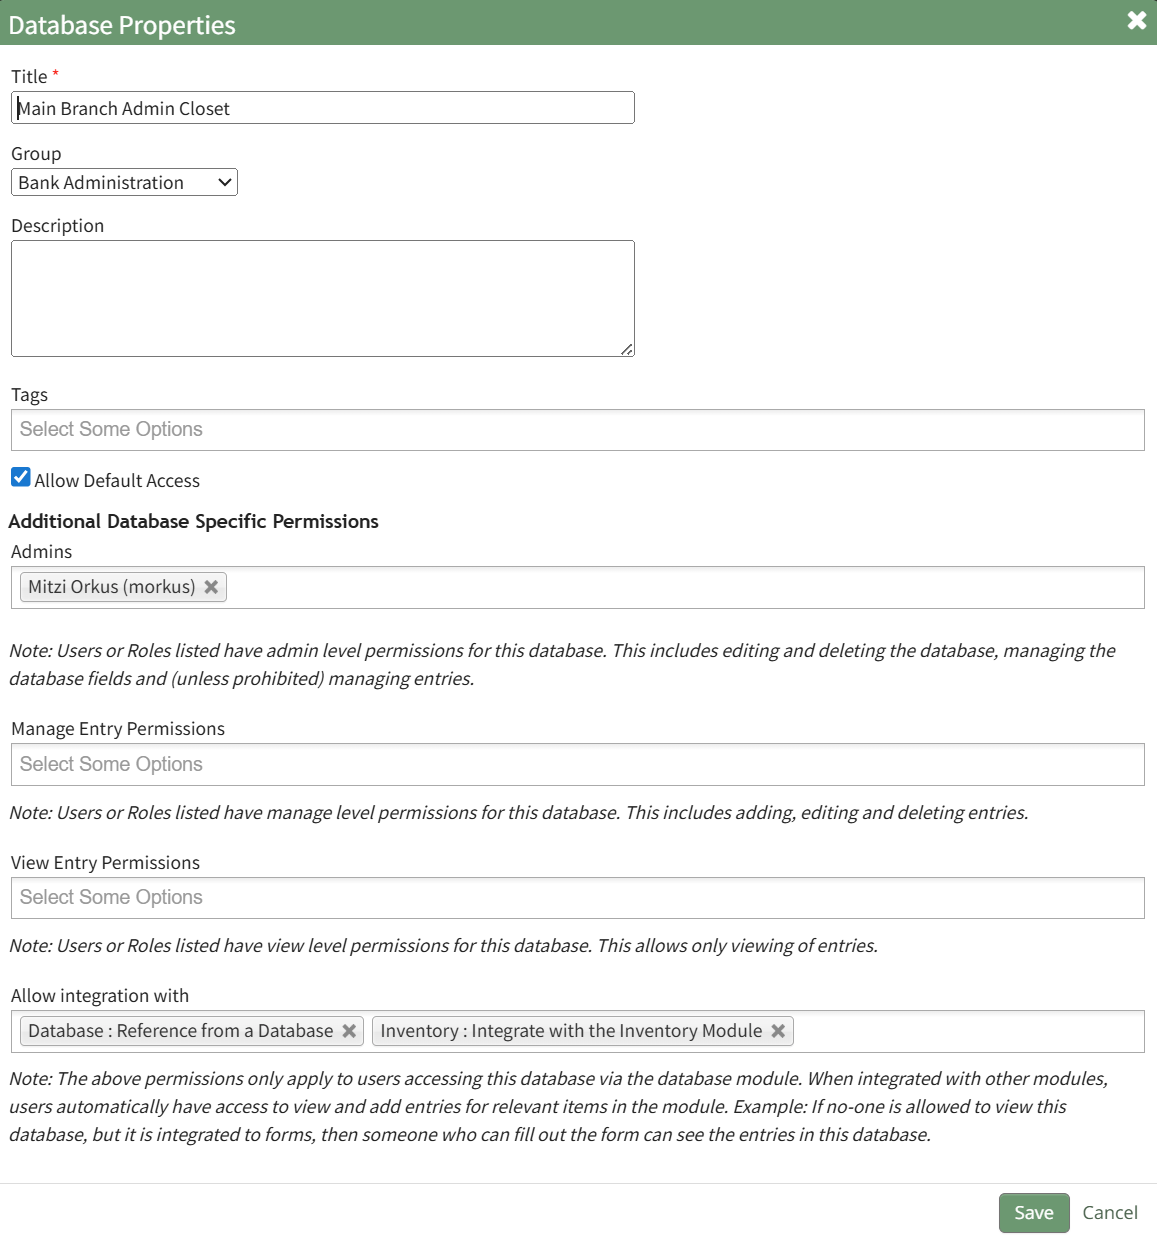
Under Additional Database Specific Permissions is a dropdown menu field labeled “Allow integration with”. Click to open the dropdown menu and select “Inventory: Integrate with the Inventory Module”.
Select “Save” and the database will now be visible in the Inventory Module.
Select the database to be used as your locations database from the dropdown menu.
Select a database from the dropdown menu as the Stock Database and the section expands with additional fields.
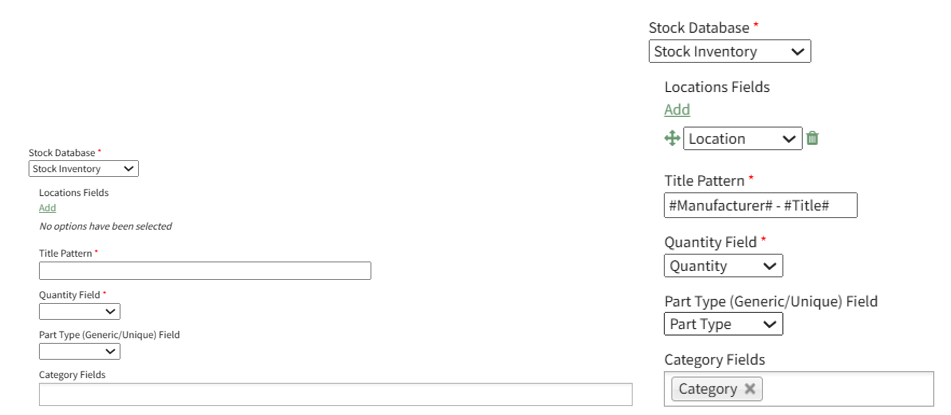
Click “Add” opening a dropdown menu. This dropdown menu will show all of the fields included in the locations database.
This is different from the system generated [KAStrack] Locations database that comes with every KAStrack install. The [KAStrack] Locations database can be used as a locations setup database, but you are not required to work within this one.
Multiple field names can be selected, and the directional arrow icon can be used to alter the order the location fields will show in.
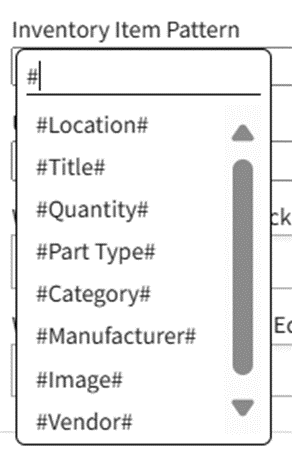
The inventory item Title Pattern is comprised of one or more field names The field names showing are the fields created in the underlying stock database selected via dropdown menu. Type a hashtag and all possible fields that can be used in the title pattern will show.
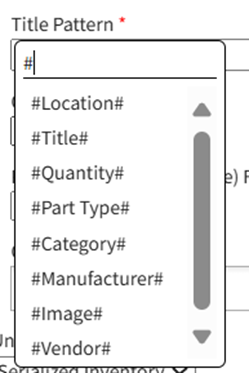
Click the field name to select it. Text, such as a dash or colon, can be used in between field names for clarity. (e.g. #Manufacturer# : #Item# - #Size# ) This is the entry information that will show in the column designated for the item identifier.
Select the field name from dropdown menu that should be used to show the quantity in the inventory. Possible field names for quantity are being pulled from the database selected as the stock database in setup.
If a unique item database will be used by the inventory, select the field input into the underlying stock database that is used to determine whether an inventory item is a generic stock item or a unique item. The field selected for Part Type must have two values – Generic or Unique. Any items marked as Generic will be treated as generic items. Any items marked as unique will be treated as unique items.
Items with a different value (other than generic or unique) will be treated as an unknown, and the quantity values for those items may not be able to be adjusted.
Every inventory will show a column with a Categories header. You are not required to enter information in this field, but are welcome to utilize it to include additional information in your. If you do select fields for the Category column, the entry for those fields will be show in the order selected with commas in between.
You will only be able to choose fields with set values (e.g. dropdown menus, radios, and form/database references).
If your inventory contains unique or serialized items, select a database from the dropdown menu that will serve as the underlying unique items database. The section will expand with additional fields.
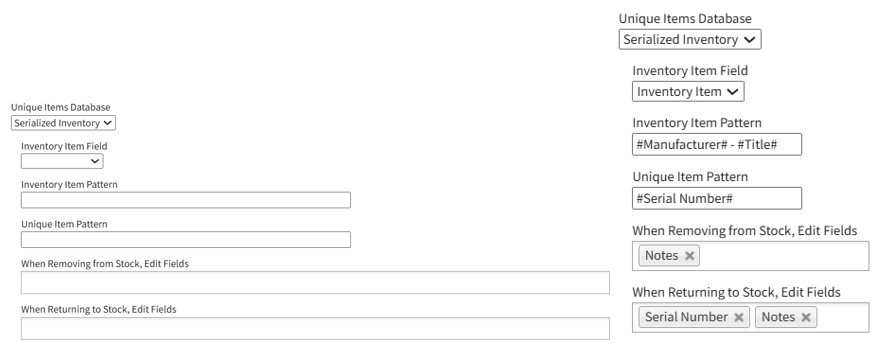
Use the dropdown menu to select which field from the unique item setup database will contain the inventory item entries.
The Inventory Item Pattern is comprised of one or more field names from the database assigned as the unique item item setup database. Type a hashtag and all possible fields that can be used in the inventory item pattern will show.
Click the field name to select it. Text, such as a dash or colon, can be used in between field names for clarity. (e.g. #Manufacturer# : #Item# - #Size# ) This is the information that will serve as the stock inventory item identifier in the database.
The Unique Item Pattern is comprised of one or more field names from the unique item setup database. Type a hastag and all possible fields that can be used in the Unique Item Pattern will show.
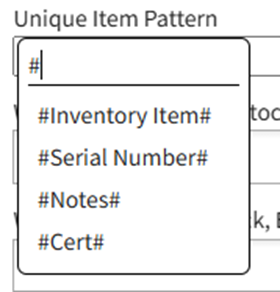
Click the field name to select it. Text, such as a dash or colon, can be used in between field names for clarity. (e.g.#Inventory Item# : #Serial Number#). This is the entry that will serve as the unique identifier in the database.
The fields input into “When Removing from Stock, Edit Fields” are the database fields that a user can update when removing a unique item from stock.
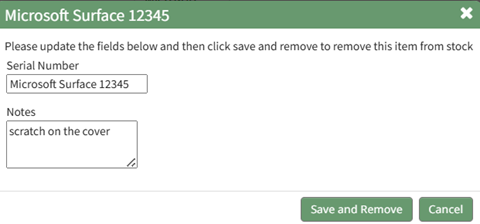
The fields input into “When Returning to Stock, Edit Fields” are the database fields that a user can update when returning a unique item to stock.
Select the “Save” button and the new inventory will now show in the Inventory Table on the Inventory Module Home Page.
How To: Create Module Levels (Inventory Module)
To create a customizable module level in the Inventory Module, go to the Module Level Tab on the Settings Page.
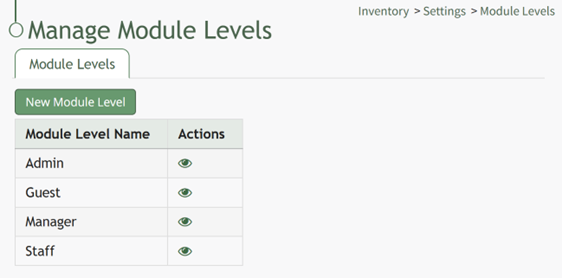
Select the “New Module Level” button opening the New Module Level Modal.
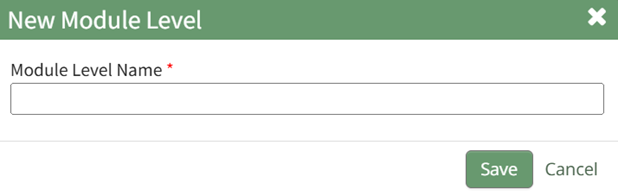
Input the new Module Level Name.
Click “Cancel” to return to the Module Levels Tab on the Communications Page without creating a new module level. Select “Save” and the new module level will show on the Module Level Table.
Users can select which permissions are allowed for a customized module levels. Select the Permissions icon (the bullet point list to the right of the eye) in order to assign the permissions the new Module Level would have within the Inventory Module.

Select “Save” and the permissions are now assigned to the Module Level.
Access levels for all modules can also be managed in the Site Settings Module on the Access Levels Tab.
How To: Delete an Inventory
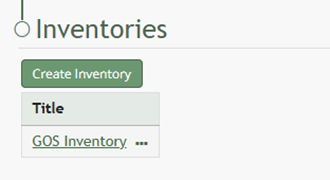
To delete an inventory, open the Home Page of the Inventory Module.
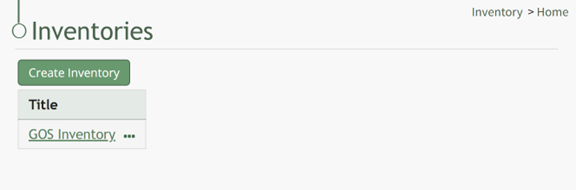
Select the three dot (…) icon to the right of the Inventory Title you wish to delete, opening the Inventory Title Table context menu.
Select “Delete Inventory” from the context menu, opening the Delete Inventory Confirmation Modal. The modal states, “Are you sure you want to delete this inventory?"
This will only delete the inventory. The underlying databases/forms with the stock will not be deleted.
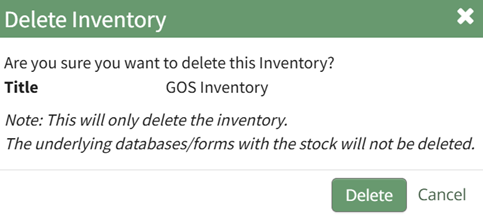
Select the “Delete” button to confirm the inventory deletion and return to the Inventory Module homepage. Click “Cancel” to return to the Home Page without deletion.
How To: Edit an Inventory
To make edits to an existing inventory, go to the Home Page of the Inventory Module.
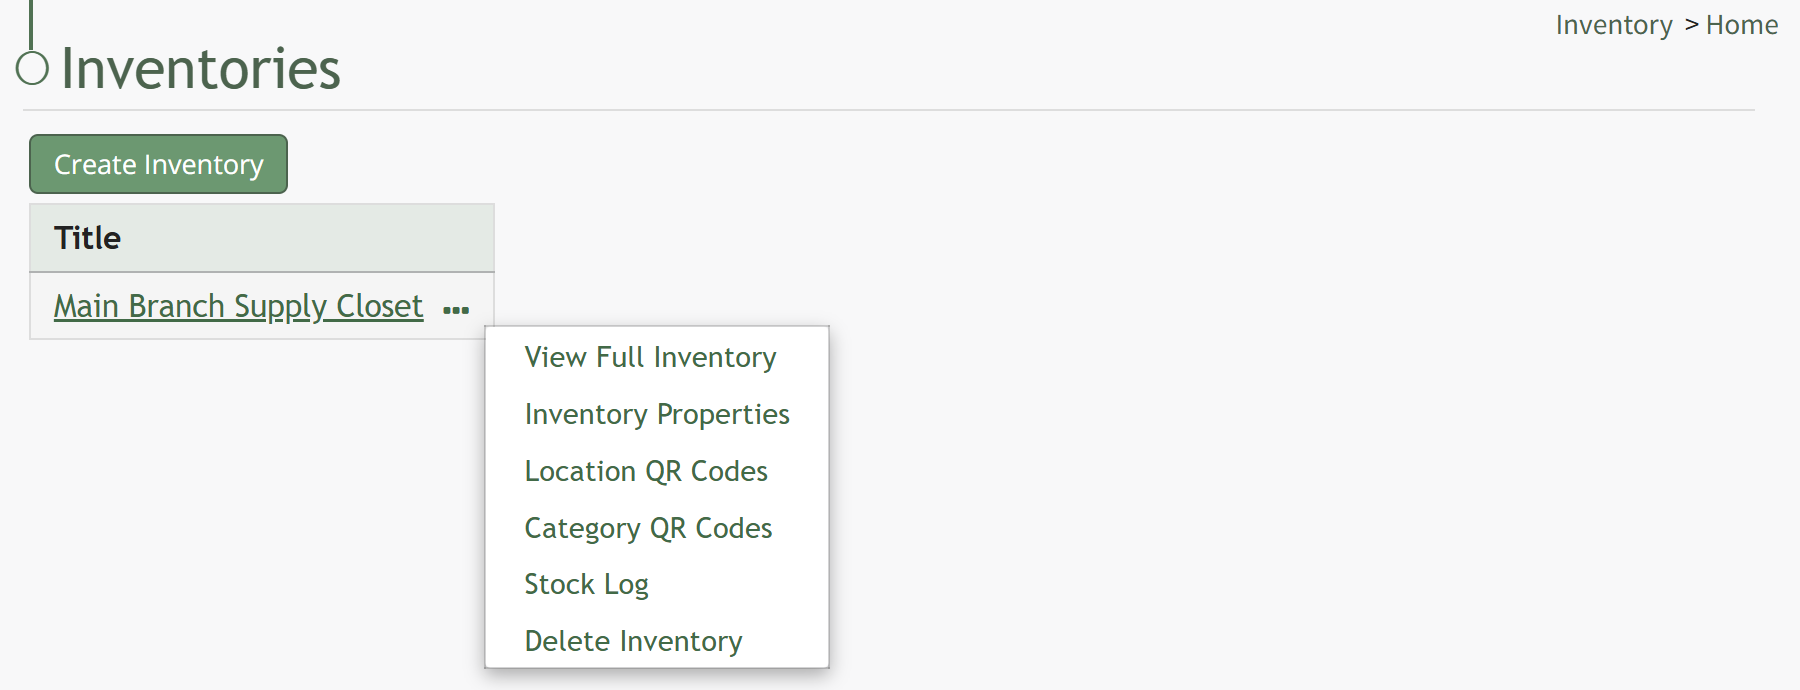
You can access a specific inventory by clicking the inventory title or by clicking the three dot (…) icon to the right of the inventory title and selecting “Inventory Properties”.
This opens the Inventory Properties Modal.
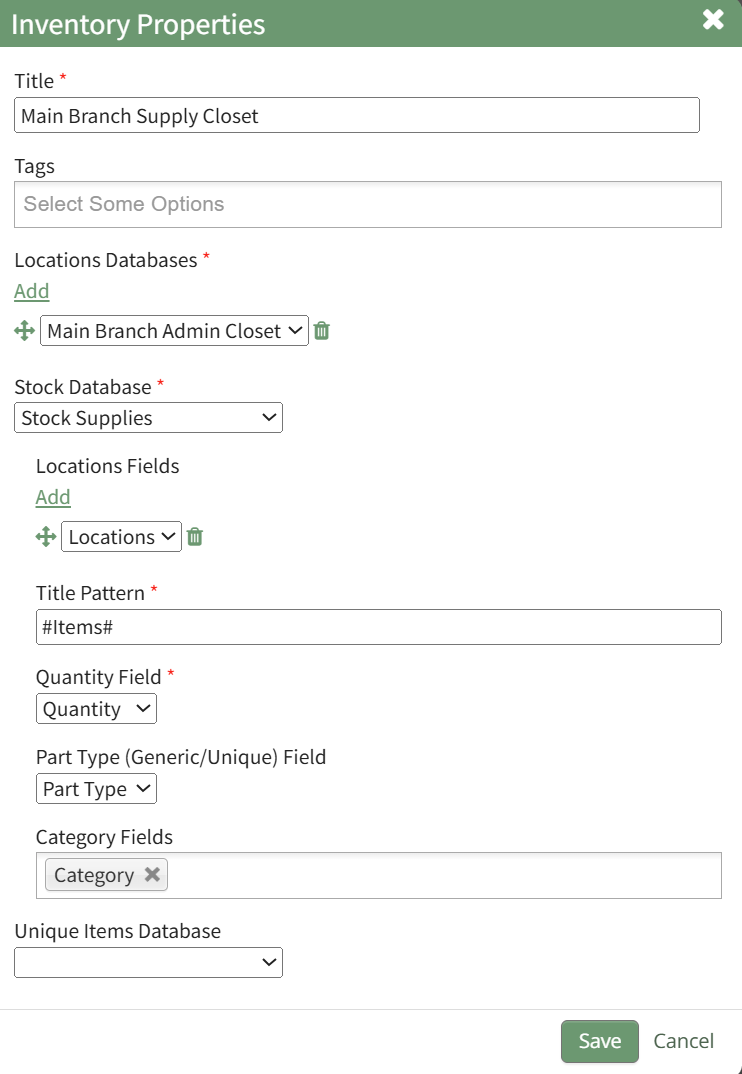
From this modal, the title, tags, integrated databases selected, and the formatting for the way inventory items are displayed in an inventory can be altered. Make your desired changes to the inventory properties.
Click “Cancel” to return to the full inventory without changes being saved. Select the “Save” button to record the changes to the inventory properties and return to the Inventory Page.
How To: Integrate a Database with the Inventory Module
To integrate an existing database with the inventory module, go to the Database Module Home Page. Click the three-dot icon to the right of the database you wish to integrate opening the context menu.
Select “Database Properties” opening the Database Properties Modal.
Under Additional Database Specific Permissions is a dropdown menu field labeled “Allow integration with”. Click to open the dropdown menu and select “Inventory: Integrate with the Inventory Module”.
Select “Save” and the database will now be visible in the Inventory Module.
How To: Return a Unique Item to the Inventory
To return a unique item to the inventory, go to the Inventory Module Home Page.

Click on the name of the inventory you want to return a unique item into.

Click the three-dot icon to the right of the inventory name header opening the inventory context menu.

Select “Return Unique Item to Inventory” opening the Return to (InventoryName) Modal.
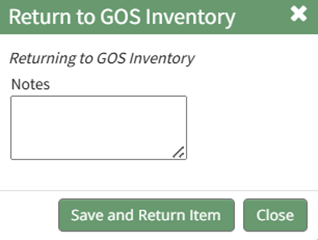
The data fields requested by this modal to return a unique item will vary based on the way the inventory was setup.
Select the “Save and Return Item” button for the unique item to be returned to the inventory.
No comments to display
No comments to display