Understanding Task Trigger Settings
Each task on an asset's Task Schedule has its own customizable trigger. The trigger is what sets the task's schedule and its status changes. Tasks are not required to have a trigger and can also have more than one.
Tasks that do not have a trigger will always remain current with a green status, allowing a user to track task completion, faults, and meter readings.
To customize triggers from the New Task Modal or Edit Task Modal, you select the Task Type and Trigger Behavior from the two dropdown menus.

Task Type Option Explanation Table | |
Task Type | Explanation |
Regular Task | This is the default task type. |
Corrective Task | Corrective tasks are one-time actions, not reoccurring tasks. Because of this, there is no trigger selection to be made. When a Corrective Task Type is selected, the modal changes, removing the trigger dropdown menu and offering a checkbox selection "Deferred". When the Deferred checkbox is selected, the user will have the ability to defer the corrective task, giving it a blue status in the system. |
Service Bulletin | Both the Service Bulletin and Directive Task Types are subjective. You organization can define and utilize them at your own discretion. They were designed to offer an ability to categorize tasks, but do not differ in functionality than the default, Regular Task. |
Directive | |
Regular Tasks, Service Bulletins and Directives offer an ability to customize the trigger behavior. Trigger behavior defines what is required to trigger a change in task status. The variety trigger behaviors utilized by KAStrack are explained in the table below.
Trigger Behavior Option Explanation Table | |
Trigger | Explanation |
Hits When any Trigger is Met | Allows any parameter, a calendar date or meter usage interval, to fulfill the requirement. |
Hits When All Triggers are Met | Requires all parameters are met to fulfill the requirement (could be multiple calendar dates, multiple meter usage intervals, or some combination of the two). |
Follows Another Task's Schedule | When selected, the parameter used to fulfill the requirement is based on when the original (followed) task’s trigger is altered. This trigger behavior attaches one task to another. |
Copy Another Task's Schedule | When selected, the new/edited trigger will utilize another tasks schedule to define its own, simplifying the setup process. That two task are independent of each other once copied. |
Once a Task Type is selected and the trigger behavior is defined, the frequency of the trigger can be customized by selecting the plus sign icon to the right of the Trigger dropdown menu. Trigger frequency is based on a period designation and parameter definition (time or meter usage). There are a variety of Period options that can be utilized when customizing your task's trigger settings. Each are explained in the table below.
A detailed explanation of how to complete the New or Edit Task Modal for each of the customizable Period / Parameter combinations has been included in the table also.
Trigger Period Option Explanation Table | |
Period | Explanation |
Every | When the trigger is set to "Every" the timer or meter will reset when the task is completed. How To: Customize Trigger Settings with an Every PeriodTriggers with an Every period can have a time or usage parameter. When Every is selected as the period, the timing of the reoccurrence interval resets when the task is completed, regardless of the task's status prior to completion. Every Period with a Time ParameterSelect Every from the Period dropdown menu. There are two options for a time parameter: Date or Mon-Fri. Select Date on the Parameter dropdown menu to create a customized recurrence interval. Input a numerical value for the recurrence interval in the first text box and select the appropriate units (Days, Weeks, Months, or Years).
Select Mon-Fri on the Parameter dropdown menu if the task should only reoccur on Monday – Friday.
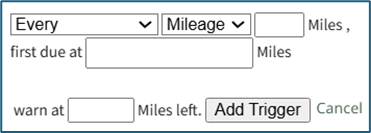
Input a numerical value for the recurrence interval in the first text box and select the appropriate units (Days, Weeks, Months, or Years). Clicking YYYY-MM-DD, opens a calendar modal. Select the date the task is first due on. The task status will switch from green (or yellow if a warning is set) to red when it is past due, one day after the calendar date selected. Input a numerical value for “warn at ____ days left” to set the number of days before the task is due for a reminder. This turns a green current / up-to-date task status to a yellow warning. Click “Add Trigger” to save. Every Period with a Usage ParameterSelect Every from the Period dropdown menu. Select the specific meter the task is associated with on the Parameter dropdown menu.
Input a numerical value for the usage recurrence interval in the first text box. Input a value for the meter that triggers the new task being due in the “first due at” textbox. The task status will switch from green (or yellow if a warning is set) to red after a “Log Asset Data” or “Update Meter Reading” records a usage value greater than the value entered here. Input a numerical value for “warn at ____ left” to set meter reading that activates a reminder that the task is approaching. This turns a green current / up-to-date task status to a yellow warning. Click “Add Trigger” to save. |
Every (strict) | When the trigger is set to "Every (Strict)" the timer or meter will reset on the specified schedule, regardless of the task completion date. If a previous task period was missed, the next upcoming task is the only one due. How To: Customize Trigger Settings with an Every (strict) PeriodTriggers with a Every or Every Strict Period can have time or usage parameter. When a trigger has a Every Strict period, the trigger is scheduled on a specific date or specific meter reading, regardless of when the previous task was actually completed. If a previous task was not completed, the incomplete task is skipped over and the next upcoming task is the only one due. Every (Strict) Period with a Time ParameterSelect Every (Strict) from the Period dropdown menu. Select Date on the Parameter dropdown menu.
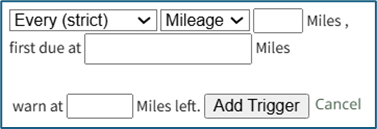
Input a numerical value for the recurrence interval in the first text box and select the appropriate units (Days, Weeks, Months, or Years). Clicking YYYY-MM-DD, opens a calendar modal. Select the date the task is first due on. The task status will switch from green (or yellow if a warning is set) to red when it is past due, one day after the calendar date selected. Input a numerical value for “warn at ____ days left” to set the number of days before the task is due for a reminder. This turns a green current / up-to-date task status to a yellow warning. Click “Add Trigger” to save. Every (Strict) Period with a Usage ParameterSelect Every (Strict) from the Period dropdown menu. Select the specific meter the task is associated with on the Parameter dropdown menu.
Input a numerical value for the usage recurrence interval in the first text box. Input a value for the meter that triggers the new task being due in the “first due at” textbox. The task status will switch from green (or yellow if a warning is set) to red after a “Log Asset Data” or “Update Meter Reading” records a usage value greater than the value entered here. Input a numerical value for “warn at ____ left” to set meter reading that activates a reminder that the task is approaching. This turns a green current / up-to-date task status to a yellow warning. Click “Add Trigger” to save. |
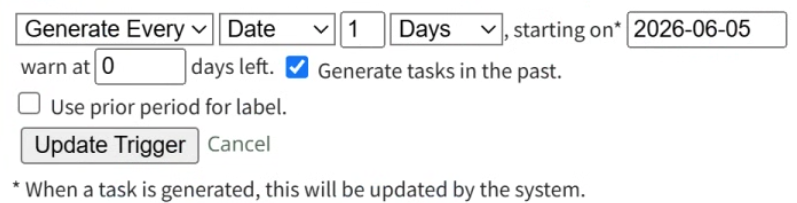
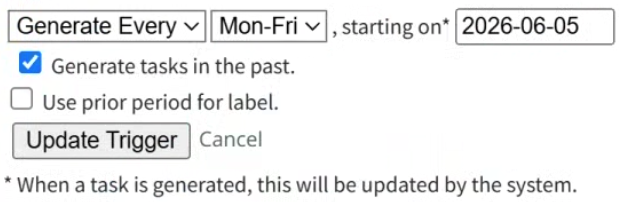
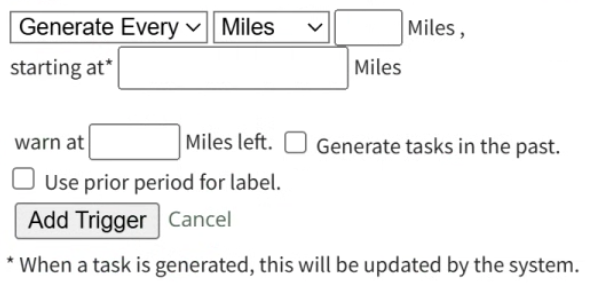
Generate Every | When a task uses a Generate Every Period, the task no longer utilizes a repeating trigger. A new, one-off task will be created (with the same details as the task currently being created) whenever the previous task's parameters are met. How To: Customize Trigger Settings with a Generate Every PeriodGenerate Every is a special case period designation that can have a time or usage parameter. When a task has a Generate Every Period, the task no longer utilizes a repeating trigger. A new, one-off task will be created (with the same details as the task currently being created) whenever the previous task's parameters are met. Generate Every Period with a Time ParameterSelect Generate Every on the Period dropdown menu. There are two options for a time parameter: Date or Mon-Fri. Select Date on the Parameter dropdown menu to create a customized recurrence interval. Input a numerical value for the recurrence interval in the first text box and select the appropriate units (Days, Weeks, Months, or Years).
Select Mon-Fri on the Parameter dropdown menu if the task should reoccur only on Monday – Friday.
Clicking YYYY-MM-DD, opens a calendar modal. Select the date the task is first due on. The task status will switch from green (or yellow if a warning is set) to red when it is past due, one day after the calendar date selected. If the Generate tasks in the past checkbox is selected, the system will recreate any tasks that have been missed or were deleted counting up from the selected date. Use prior period for label checkbox will append a label of the previous period to help clarify the task. An example use of this feature could be for a monthly reconciliation task of your bank account. In November, the task would state "Reconcile Checking Account for 2025-10 (Oct)." Click “Add Trigger” to save. Generate Every Period with a Usage ParameterSelect Generate Every from the Period dropdown menu. Select the specific meter the task is associated with on the Parameter dropdown menu.
Input a numerical value for the usage recurrence interval in the first text box. Input a value for the meter that triggers the new task being due in the “first due at” textbox. The task status will switch from green (or yellow if a warning is set) to red after a “Log Asset Data” or “Update Meter Reading” records a usage value greater than the value entered here. Input a numerical value for “warn at ____ left” to set meter reading that activates a reminder that the task is approaching. This turns a green current / up-to-date task status to a yellow warning. If the Generate tasks in the past checkbox is selected, the system will recreate any tasks that have been missed or were deleted counting up from the selected date. Use prior period for label checkbox will append a label of the previous period to help clarify the task. Click “Add Trigger” to save. |
One Time | When a task has a One Time Period, the trigger does not reoccur. How To: Customize Trigger Settings with a One Time PeriodSelecting “One Time” as the period allows the user to create a Regular Task that only occurs once. Triggers with a “One Time” period can have a time or usage parameters. One Time Period with a Time ParameterSelect One Time on the Period Dropdown menu. Select Date on the Parameter dropdown menu.
The task status will switch from green (or yellow if a warning is set) to red when it is past due, one day after the calendar date selected. Input a numerical value for “warn at ____ days left” to set the number of days before the task is due for a reminder. This turns a green current / up-to-date task status to a yellow warning. Click “Add Trigger” to save. One Time Period with a Usage ParameterSelect One Time on the Period Dropdown menu. Select the specific meter the task is associated with on the Parameter dropdown menu.
Input a value for the meter that triggers the new task being due in the “first due at” textbox. The task status will switch from green (or yellow if a warning is set) to red after a “Log Asset Data” or “Update Meter Reading” records a usage value greater than the value entered here. Input a numerical value for “warn at ____ left” to set meter reading that activates a reminder that the task is approaching. This turns a green current / up-to-date task status to a yellow warning. Click “Add Trigger” to save. |
Before Task | A "Before Task" trigger requires this task to be completed before the task identified by a drop down menu. The task selected in the drop down menu will be locked out until this task is completed. How To: Customize Trigger Settings Based on Pre-Existing TasksIt is possible for a task’s trigger to be based on the schedule of another pre-existing task within the same asset tree. It is not possible to follow or copy another task’s schedule if the original task has an “on expiry” trigger. Trigger Behavior: Follow Another Task’s ScheduleWhen a trigger’s behavior is set to “Follow another task’s schedule,” the original task and new task are now linked.
If the trigger for the task selected is altered, the trigger for the task following it will be altered as well. Trigger Behavior: Copy Another Task’s ScheduleWhen a trigger’s behavior is set to “Copy another task’s schedule,” the two tasks function independently of each other.
If the schedule for the copied trigger is altered, it has no impact on the task schedule just created. This option allows the user to efficiently duplicate task schedules with ease. |
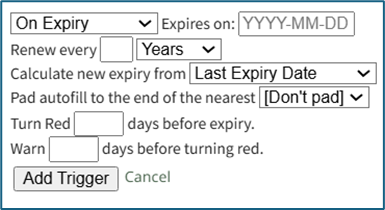
On Expiry | An on-expiry trigger gives the user the ability to input the next due date (vs auto-calculating it like the other triggers based on task completion) when completing the task. How To: Customize Trigger Settings Based on an On Expiry PeriodTriggers with an On Expiry period can only have a time parameter. An on-expiry trigger gives the user the ability to input the next due date (vs auto-calculating it like the other triggers based on task completion) when completing the task. Select On Expiry from the Period dropdown menu. Clicking YYYY-MM-DD opens a calendar modal. Select the date the task expires on. The task status will switch from green (or yellow if a warning is set) to red when it is past due, one day after the calendar date selected.
Input a numerical value for the task to renew and select the appropriate units (Days, Weeks, Months, or Years). Use the dropdown menu to establish if the new expiry is calculated from the Last Expiry Date or Task Performed Date. The user can select to pad the autofill to the end of the nearest Month, Quarter, 6 Months, Year, or to not pad the autofill. Enter a numerical value to Turn Red ___ days before expiry. Enter a numerical value to Warn ___ days before turning red. Click “Add Trigger” to save. |


No comments to display
No comments to display