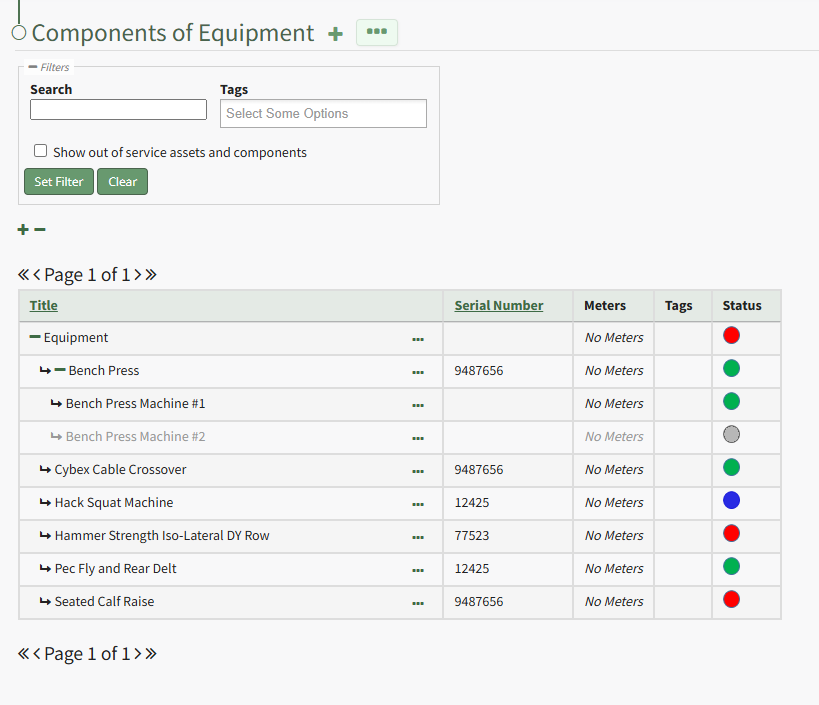
An Asset's Components Page
Each asset created in KAStrack will have its own Components Page and Manage Components Page that displays the hierarchal structure of an asset and its components.
Users with appropriate module level permissions will also have access to a Manage Components Page with more options for asset management. The context menu options visible to users will vary based on their individual module level permissions.
Clicking the plus sign icon to the right of the page header opens the New Component Modal, allowing you to add a new component beneath a parent asset.
How To: Add Components to a Parent Asset
To add components to an asset, open the Manage Assets Page in the Assets Module from the Main Menu.
In order to create components, the parent asset must have already been created.
How To: Create a New Asset
To create a new asset, open the Manage Assets Page in the Asset Module and click the plus sign (+) icon to open the New Asset modal.
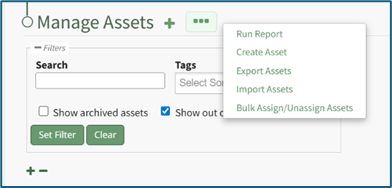
You can also access the New Asset Modal by clicking the three dot (…) icon and selecting “Create Asset” from the context menu.
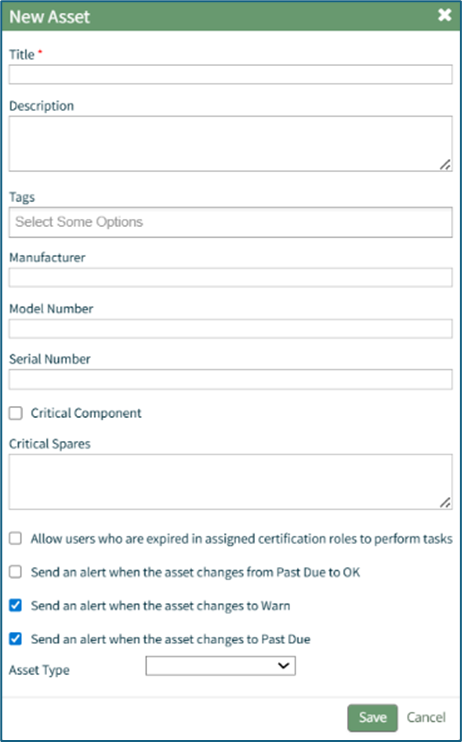
The New Asset Modal requires the entry of an Asset Title. Optional fields include an asset description, tags, manufacturer, model number, serial number, and critical spares.
Select the "Critical Component" checkbox to designate this asset as a critical component. This term is subjective for your organization to define. Designating an asset as a critical component will result in a hazard symbol being used as a visual indicator.

Critical items are prioritized and show separately on the Assets Module Summary.
An entire asset is designated as a critical. All components and associated tasks will also have a critical component designation.
KAStrack’s default setting prevents users with an expired certification role from performing tasks (such as completing tasks, recording faults, and updating meter readings. Select the “Allow users who are expired in assigned certification roles to perform tasks” checkbox to allow a user to perform tasks regardless of their assigned certification role status.
The remaining three checkbox options all relate to asset status alert preferences.
The “Send an alert when the asset changes from Past Due to OK” checkbox will send an alert via email to the assigned users when the task status changes from past due (red) to current/up to date (green).
The “Send an alert when the asset changes to Warn” checkbox will send an alert via email to all users assigned to the asset when the task status changes from current/up to date (green) to warn (yellow).
The “Send an alert when the asset changes to Past Due” checkbox will send an alert via email to all users assigned to the asset when the task status changes to past due (red).
Asset Types are customizable to your company and are created on the Settings Page of the Asset Module. Once an asset type has been created, you can select one from the dropdown menu in the New Asset Modal to enable additional filtering capabilities.
Asset Types allows your organization to add customizable fields unique to individual assets.
How To: Create a New Asset Type
To create a new asset type, open the Asset Types Tab on the Settings Page of the Assets Module.
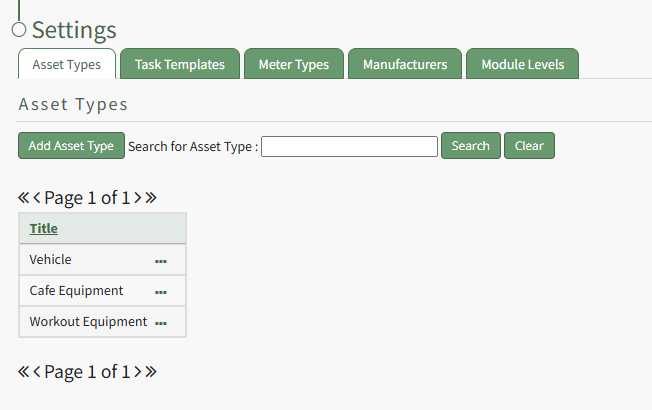
Selecting the “Add Asset Type” button opens the New Asset Type modal.
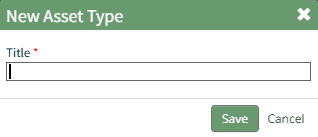
Input the title of the New Asset Type and click “Save”.
The newly created Asset Type will now show in the table on the Asset Type tab on the Settings page and is ready for you to add fields to.
How To: Add Fields to an Asset Type
{{@496}}
Select the “Save” button at the bottom of the New Asset Modal to create the new asset or click “Cancel” to close the modal without saving and return to the Manage Assets Page.
After an asset is created, it will appear in the Manage Asset Table where it can be managed.
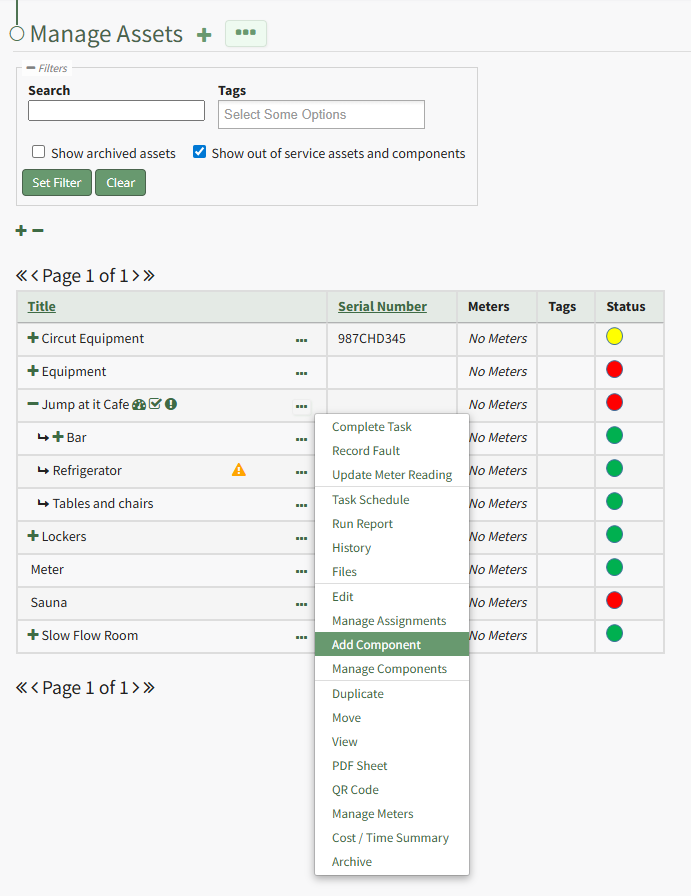
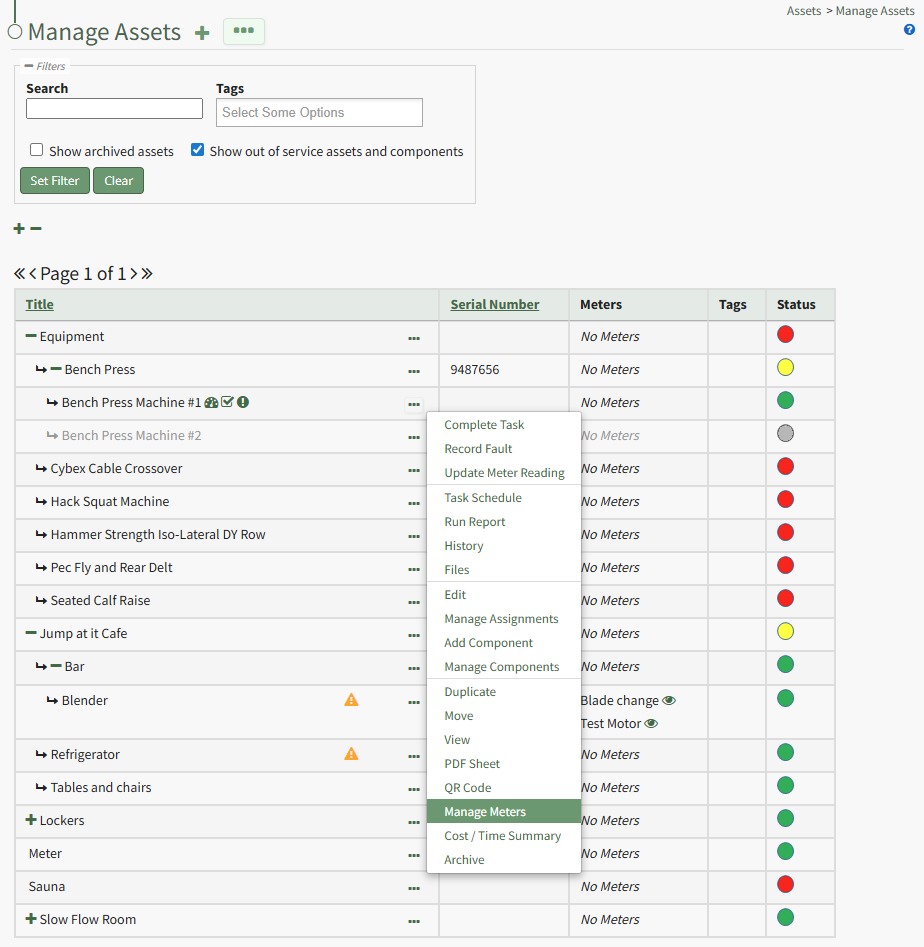
Identify the pre-existing asset (or component) that you would like to place this new component under, and click the three dot (…) icon to the right of the asset name in the Manage Assets table opening the Manage Asset Context Menu. Select "Add Component" opening the New Component Modal.
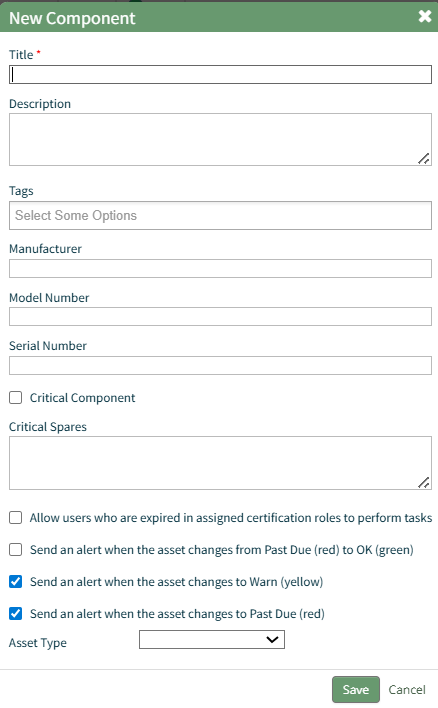
The fields on the New Component modal ask for the same information on the New Asset Modal. For a detailed description of the fields, refer to the How To Create a New Asset page.
Select the “Save” button and the component will appear underneath its asset in the Manage Asset table (if the view is expanded) where it can be managed. Subcomponents/additional child components can also be created for components if desired.
Select the three dot (…) menu to the right of the component you would like to add an additional subcomponent in the asset’s hierarchal structure.
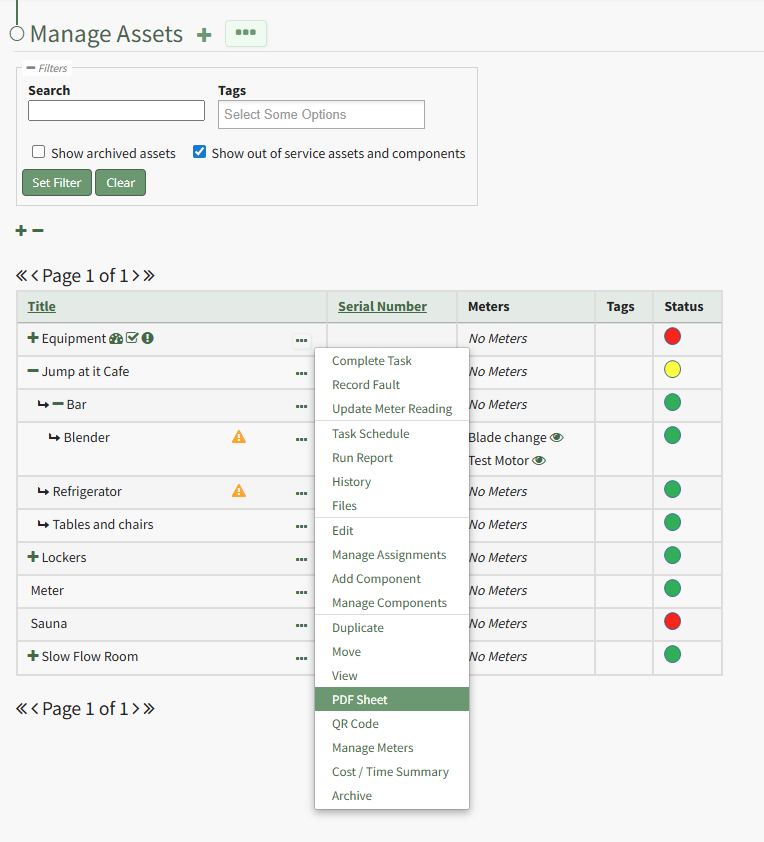
The three-dot icon to the right of the header opens the Components Page Context Menu with options for asset/component management. The Components Page Context Menu options are explained in the table below.
Components Page Context Menu Option Explanations | |||||||||||||||||||||||||||||||||||||||
Option | Explanation | ||||||||||||||||||||||||||||||||||||||
Create Component | Selecting “Create Component” from the context menu opens the New Component Modal. The plus sign icon to the right of the page header opens the same modal. How To: Add Components to a Parent AssetTo add components to an asset, open the Manage Assets Page in the Assets Module from the Main Menu. In order to create components, the parent asset must have already been created. How To: Create a New AssetTo create a new asset, open the Manage Assets Page in the Asset Module and click the plus sign (+) icon to open the New Asset modal.
You can also access the New Asset Modal by clicking the three dot (…) icon and selecting “Create Asset” from the context menu.
The New Asset Modal requires the entry of an Asset Title. Optional fields include an asset description, tags, manufacturer, model number, serial number, and critical spares. Select the "Critical Component" checkbox to designate this asset as a critical component. This term is subjective for your organization to define. Designating an asset as a critical component will result in a hazard symbol being used as a visual indicator.
Critical items are prioritized and show separately on the Assets Module Summary. An entire asset is designated as a critical. All components and associated tasks will also have a critical component designation. KAStrack’s default setting prevents users with an expired certification role from performing tasks (such as completing tasks, recording faults, and updating meter readings. Select the “Allow users who are expired in assigned certification roles to perform tasks” checkbox to allow a user to perform tasks regardless of their assigned certification role status. The remaining three checkbox options all relate to asset status alert preferences. The “Send an alert when the asset changes from Past Due to OK” checkbox will send an alert via email to the assigned users when the task status changes from past due (red) to current/up to date (green). The “Send an alert when the asset changes to Warn” checkbox will send an alert via email to all users assigned to the asset when the task status changes from current/up to date (green) to warn (yellow). The “Send an alert when the asset changes to Past Due” checkbox will send an alert via email to all users assigned to the asset when the task status changes to past due (red). Asset Types are customizable to your company and are created on the Settings Page of the Asset Module. Once an asset type has been created, you can select one from the dropdown menu in the New Asset Modal to enable additional filtering capabilities. Asset Types allows your organization to add customizable fields unique to individual assets. How To: Create a New Asset TypeTo create a new asset type, open the Asset Types Tab on the Settings Page of the Assets Module.
Selecting the “Add Asset Type” button opens the New Asset Type modal.
Input the title of the New Asset Type and click “Save”. The newly created Asset Type will now show in the table on the Asset Type tab on the Settings page and is ready for you to add fields to. How To: Add Fields to an Asset Type{{@496}} Select the “Save” button at the bottom of the New Asset Modal to create the new asset or click “Cancel” to close the modal without saving and return to the Manage Assets Page. After an asset is created, it will appear in the Manage Asset Table where it can be managed.
Identify the pre-existing asset (or component) that you would like to place this new component under, and click the three dot (…) icon to the right of the asset name in the Manage Assets table opening the Manage Asset Context Menu. Select "Add Component" opening the New Component Modal.
The fields on the New Component modal ask for the same information on the New Asset Modal. For a detailed description of the fields, refer to the How To Create a New Asset page. Select the “Save” button and the component will appear underneath its asset in the Manage Asset table (if the view is expanded) where it can be managed. Subcomponents/additional child components can also be created for components if desired. Select the three dot (…) menu to the right of the component you would like to add an additional subcomponent in the asset’s hierarchal structure.
| ||||||||||||||||||||||||||||||||||||||
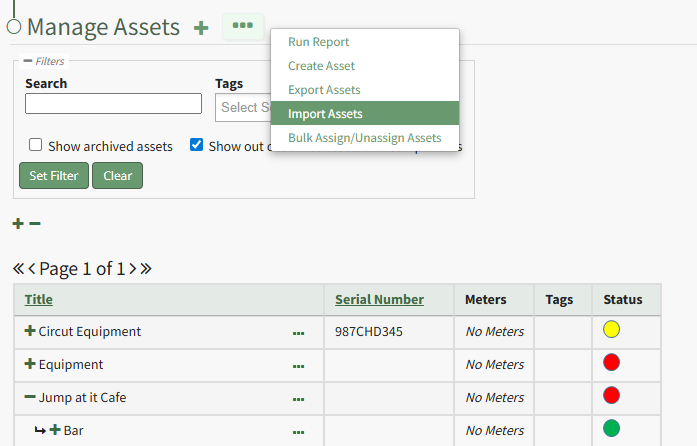
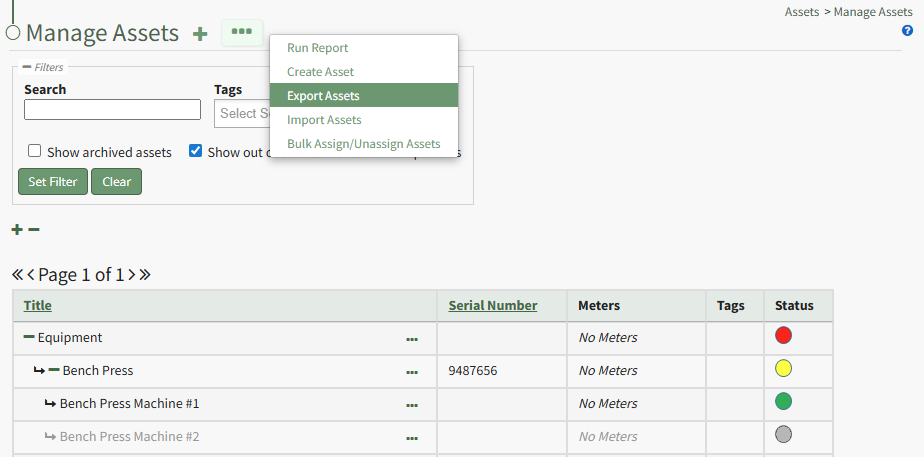
Export | Selecting "Export" from the context menu opens the Export Asset Modal that allows you to select all assets/components or specific asset types. There is a checkbox that when selected, will include all asset type fields in the export. How To: Export Asset InformationTo bulk import asset information using a CSV file, open the Manage Assets Page from the Main Menu in the Assets Module and click the three dot (…) icon to the right of the page header to open the Manage Assets Page Context Menu.
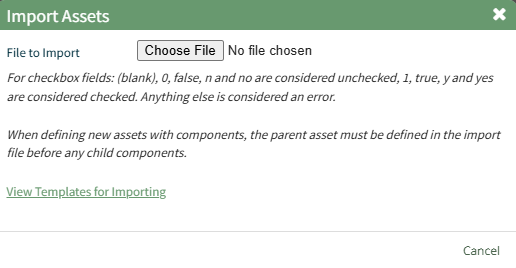
Click “Import Assets” from the context menu to open the Import Assets Modal
A template for importing assets in bulk has been provided and can be downloaded to your personal device by clicking “View Templates for Importing.” Each of the columns in the downloaded CSV are specific to the asset type and are listed in the order as they are defined.
When your CSV file with new account information is complete, ensure it is saved with the CSV format UTF-8. Click “Choose File” and select the correct CSV file from your computer. Click the “Next >” button opening the Import Assets Page.
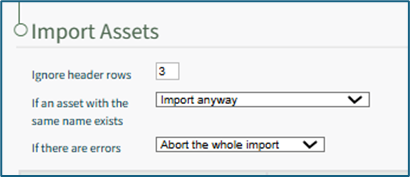
Input the number of header rows in your file that are to be ignored by KAStrack in the import. Specify your preference on how the system should respond if an asset with the same name already exists from a dropdown menu. Options include Import anyway, Import if the duplicate is elsewhere, Do not import the asset, and Abort the whole import. Specify your preference on how the system should respond if if there are errors with the import from a dropdown menu. Options include Abort the whole import or Import rows without headers. If you downloaded a CSV template, the columns labels should already match the system requirements. If you created your own CSV headers, select the correct column header to be associated with each asset field.
To abandon the import, select the “Cancel” button at the bottom of the screen. To complete the import, select the “Import” button at the bottom of the screen. The system will confirm the import was successful.
| ||||||||||||||||||||||||||||||||||||||
Import | Selecting “Import” on the context menu opens the Import Components Modal that allows you to upload a .csv file for bulk importation of asset information. How To: Import Asset InformationTo bulk export asset information as a .csv file, select the Manage Assets Page from the Main Menu in the Assets Module and click the three dot (…) icon to the right of the page header opening the Manage Assets Page Context Menu.
Select “Export Assets” from the context menu to open the Export Assets Modal.
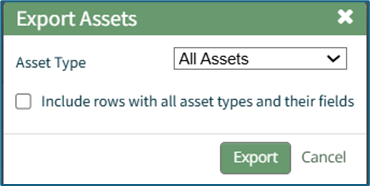
The Asset Type dropdown menu offers the option to export “All Assets,” “No Asset Type,” or individual asset types. Asset types and unique fields created for specific asset types can be included in the export by selecting the “Include rows with all asset types and their fields” checkbox. Select the “Export” button to export asset information as a CSV file to your personal device’s downloads folder.
| ||||||||||||||||||||||||||||||||||||||

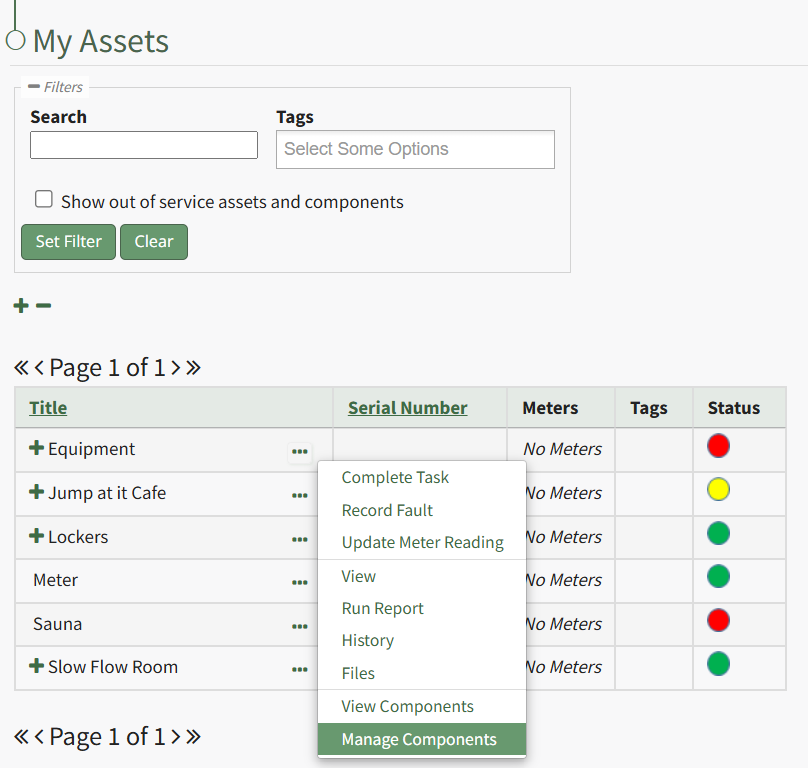
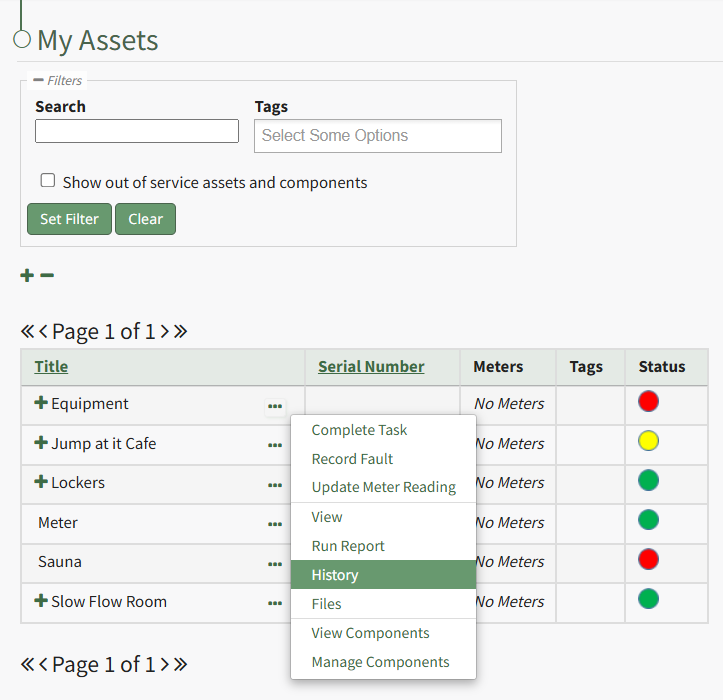
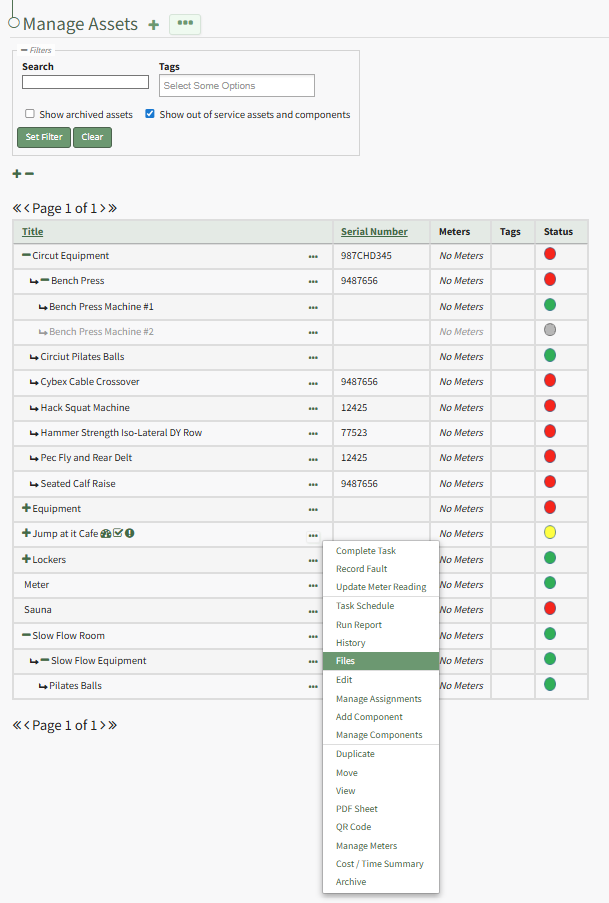
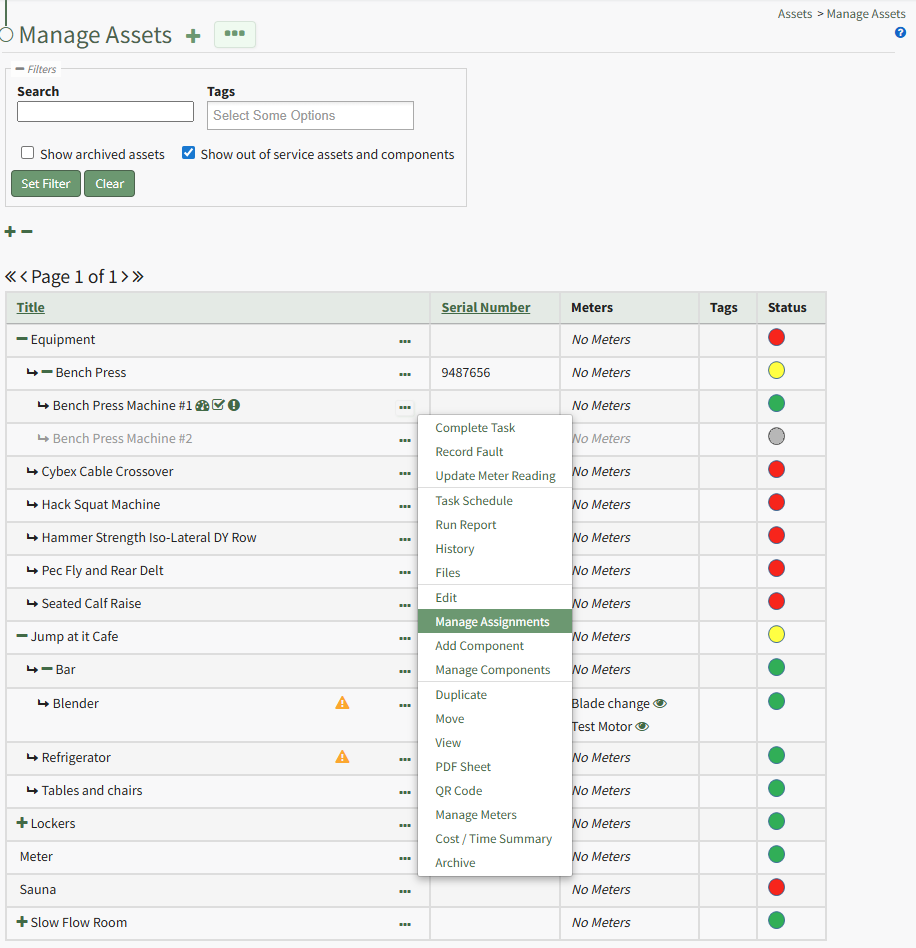
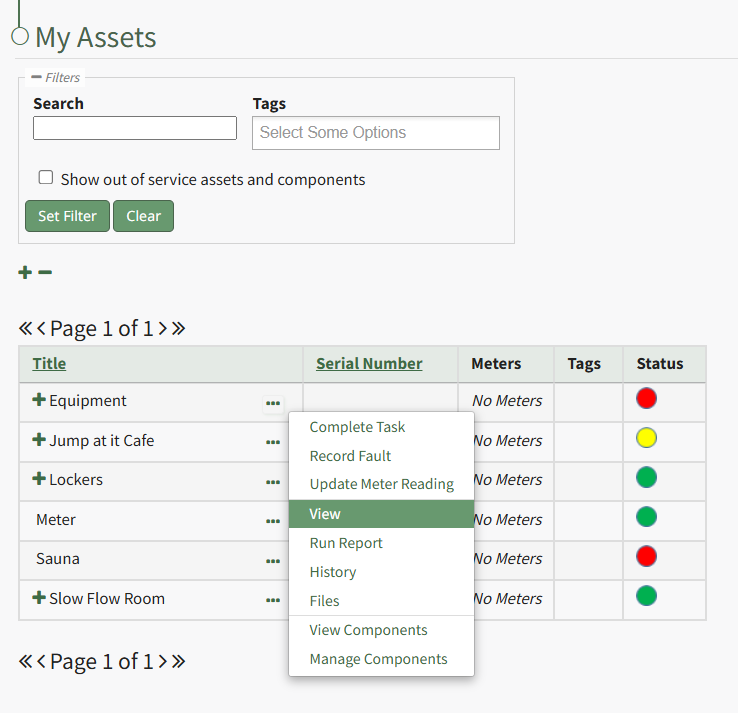
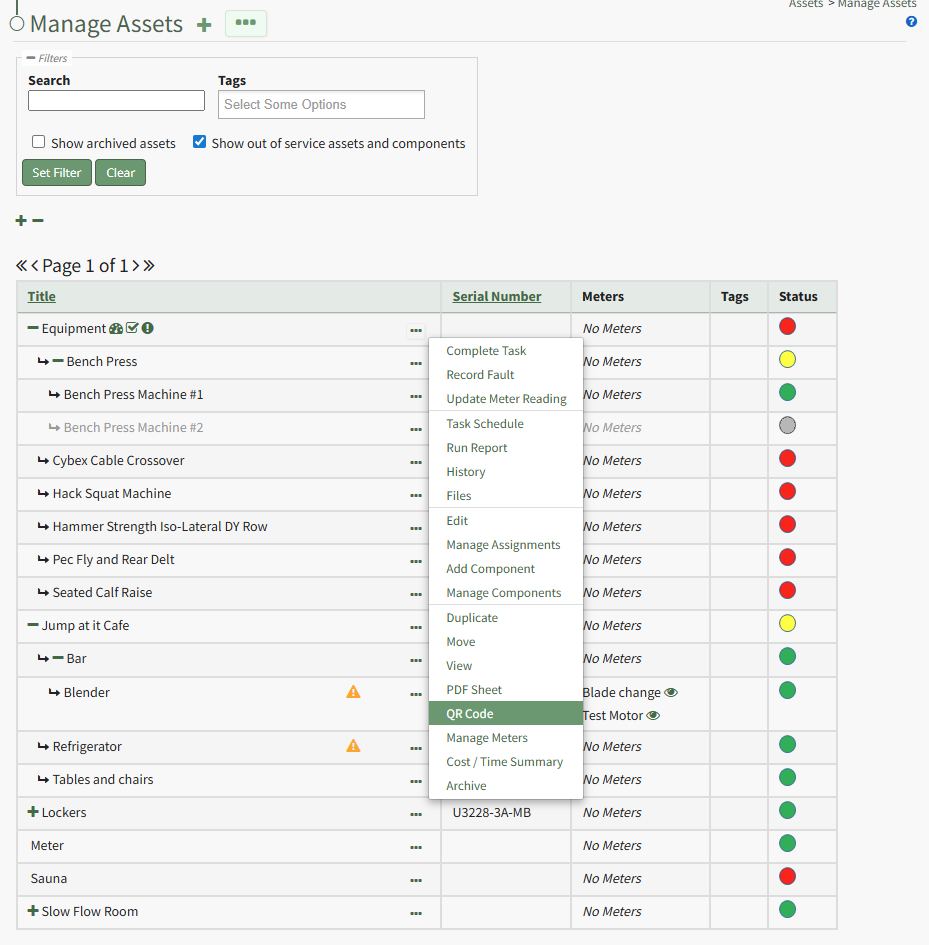
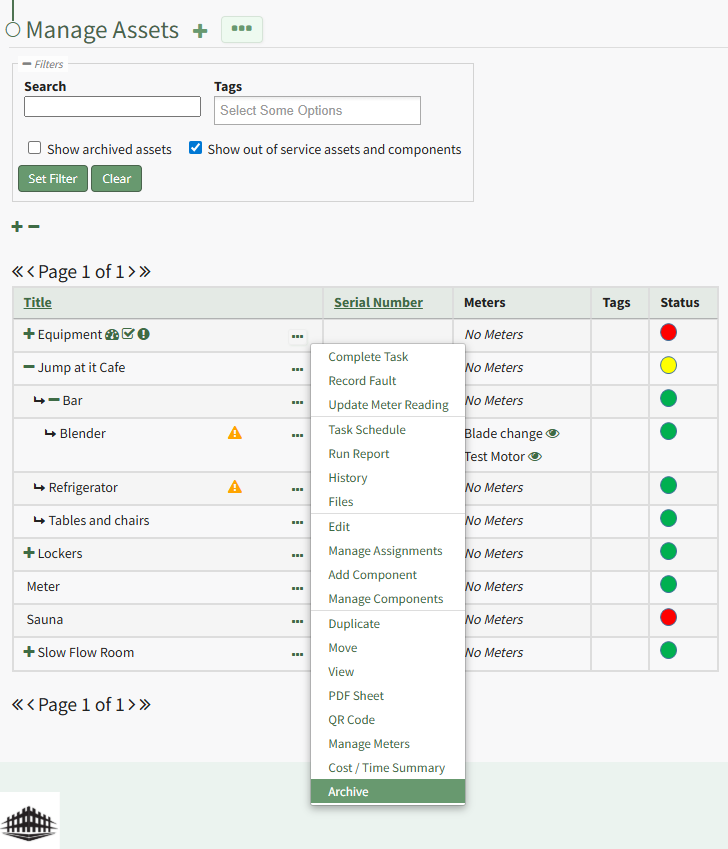
The Asset Component Table displays the asset/component title, serial number, associated meters and tags, as well as the asset status. To the right of the asset/component title in the table is a three-dot icon that opens the Component Context Menu.
Components Context Menu Option Explanations | |||||||||||||||||||||||||
Option | Explanation | ||||||||||||||||||||||||
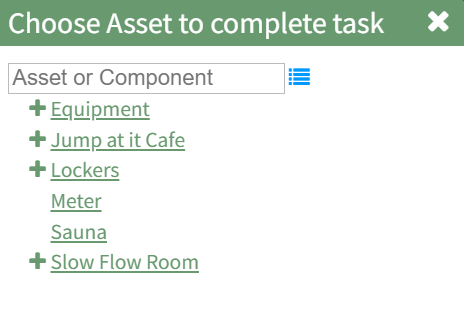
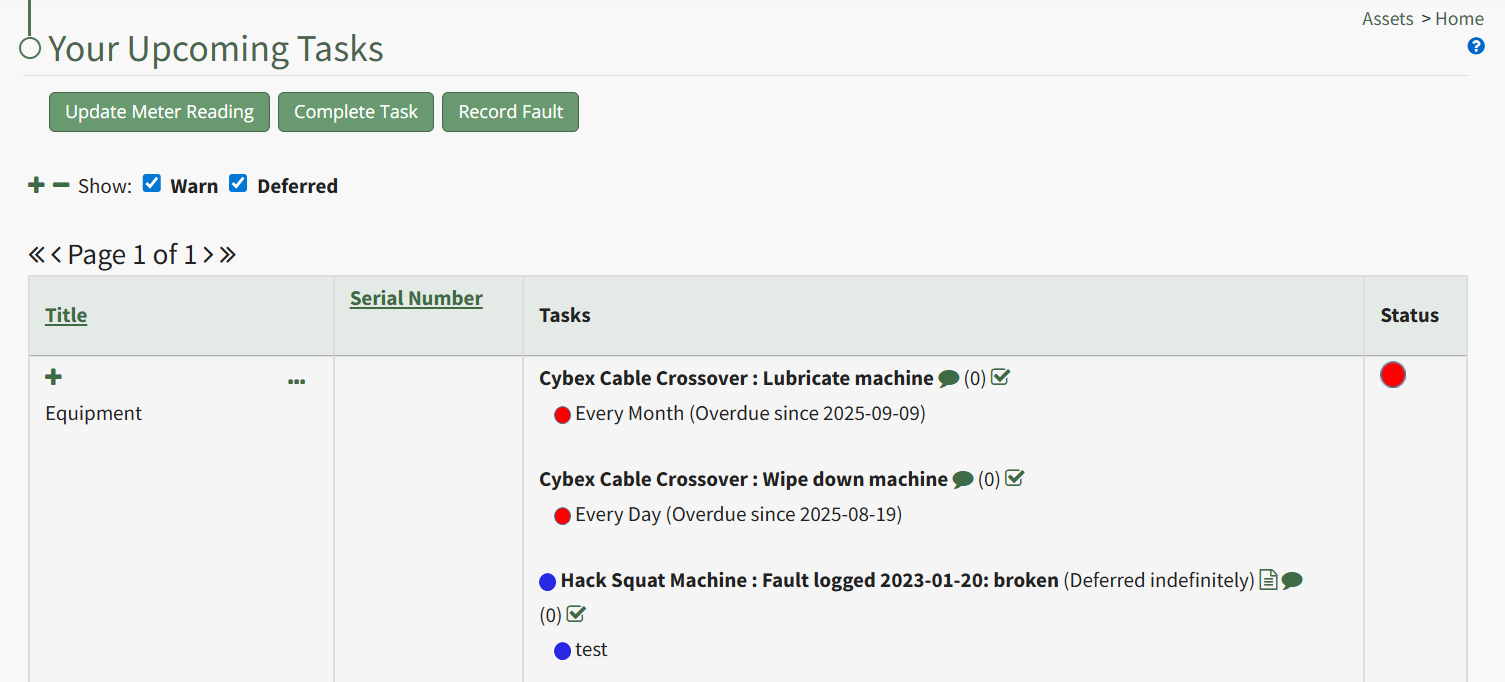
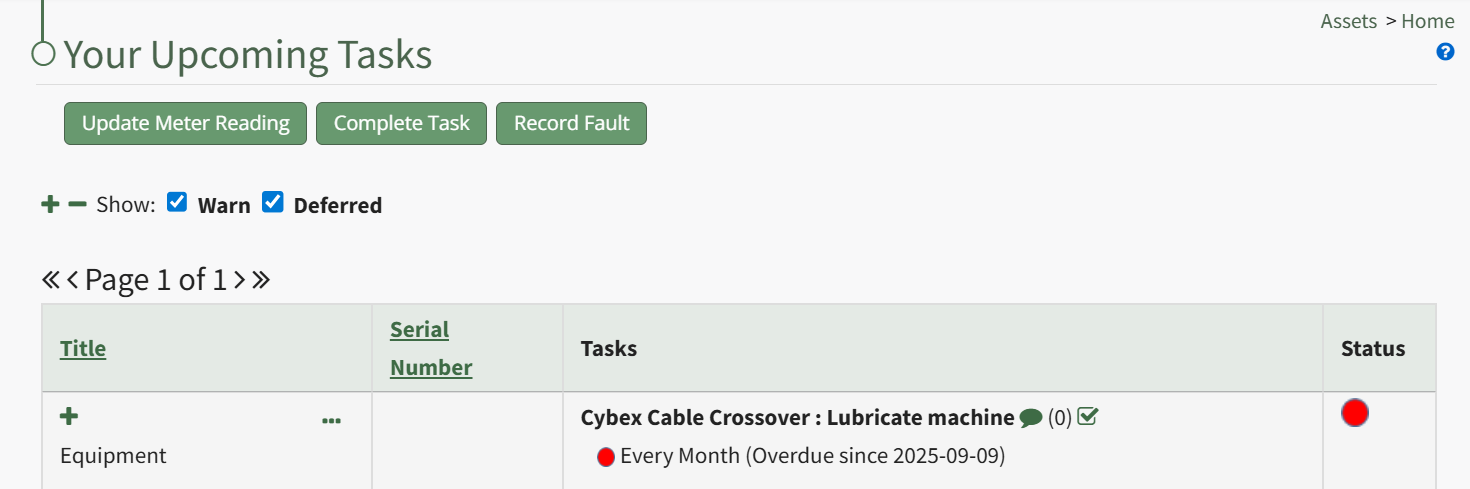
Complete Task | Selecting “Complete Task” on the context menu opens the Complete Task Modal, allowing a user to record necessary details and mark the task as complete. How To: Log a Task has been CompletedIn order to log that a task has been completed and is current/up to date (a green task status), go to the Upcoming Task Table on the Home Page of the Assets Module. Select the “Complete Task” button from the top of the Your Upcoming Tasks Page.
The Choose Asset Modal will prompt you to identify which asset you want to log data for. Click the bulleted list icon to access your assets. Selecting the plus sign “+” icon will expand the components under the asset. Selecting “Complete Task” from the three dot (…) context menu to the right of the asset / component title will open the same modal for the specified asset.
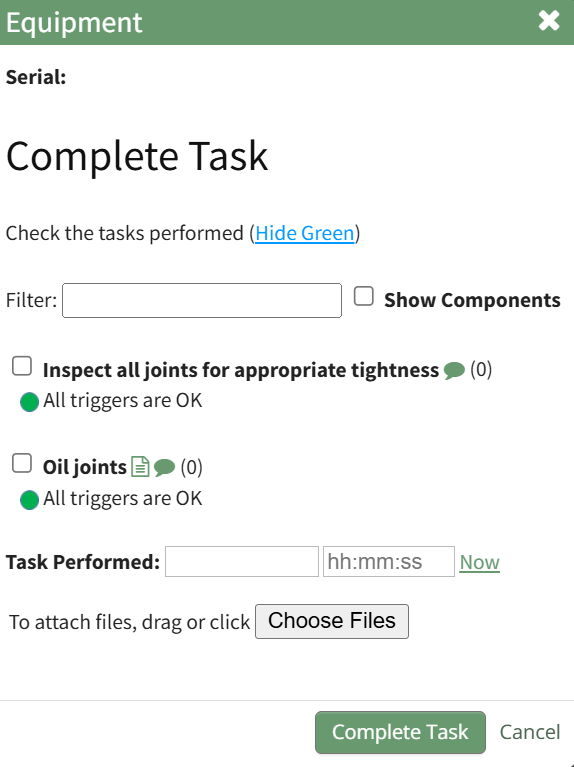
Select the appropriate asset, opening the asset's Complete Task Modal. Click the green View All clickable link to list all tasks associated with the selected asset, including tasks that are current / up to date (green status).
Serial numbers and the asset description will show at the top of the modal. Clicking the “Show Subcomponents” checkbox shows any subcomponent tasks associated with the asset, expanding the modal when selected. Beneath the task in bold is a note that indicates the parameters for the task, referred to as a trigger in KAStrack. Triggers refer to the task behavior, frequency or usage standards that KAStrack will applies to tasks to determine their schedule for completion. To log the task, select the checkbox of the completed task. You can manually enter the date (MM/DD/YYYY format) and time (hh:mm:ss format) that the task was completed, or select “Now” in order to input the current date and time. Click the “Complete Task” button to save the changes and complete the task. Click cancel to return to the Assets Module Homepage. | ||||||||||||||||||||||||
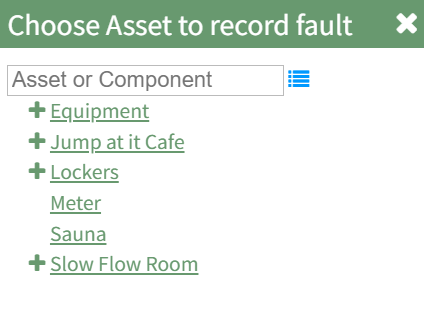
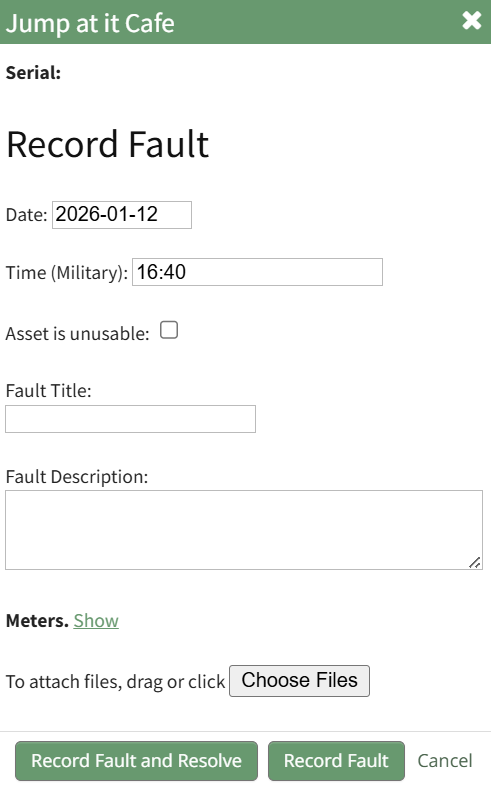
Record Fault | Selecting “Record Fault” on the context menu opens the Record Fault Modal, allowing a user to record any necessary details about a fault. How To: Record a FaultLogging faults allows your company to track trending data in KAStrack by recording incidents and any data associated with this issue/failure. In order to record fault with an equipment issue/failure, go to the Upcoming Task Table on the Asset Module Homepage and select the "Record Fault" button beneath the page header.
The Choose Asset Modal will prompt you to identify which asset you want to log data for. Click the bulleted list icon to access your assets. Selecting the plus sign “+” icon will expand the components within the Asset. Selecting “Record Fault” from the three dot (…) context menu will open the same modal for the specified asset.
Select the appropriate asset, opening the Record Fault Modal.
Select the “Log Fault” button to record the incident. Select the “Log Fault and Resolve” button to complete two actions in one step: log the issue and indicate that it has been addressed. Click cancel to return to the Assets Module Homepage. | ||||||||||||||||||||||||
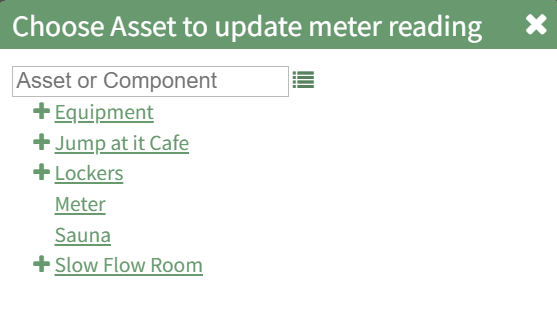
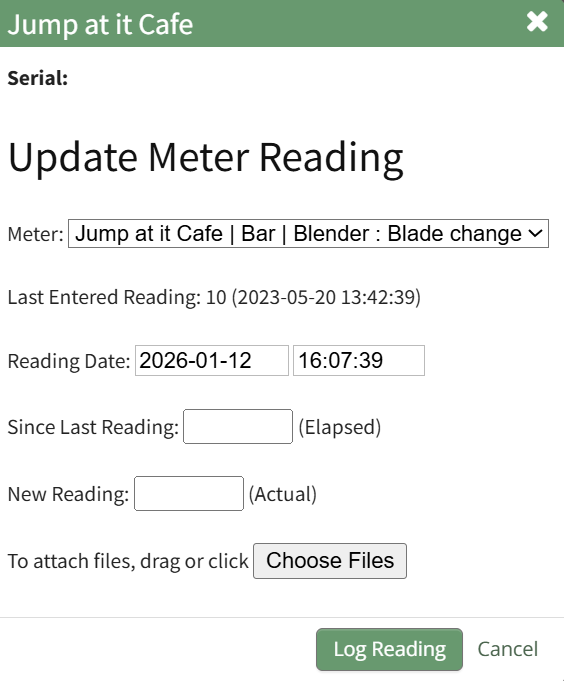
Update Meter Reading | Selecting “Update Meter Reading” on the context menu opens the Update Meter Reading Modal, allowing a user to record details regarding a meter reading. How To: Update a Meter ReadingIn order to update an asset's meter reading, go to the Assets Module Home Page opening the Upcoming Tasks Table. Click the “Update Meter Reading" button from the Asset Module Homepage.
The Choose Asset Modal will prompt you to identify which asset you want to log data for. Click the bulleted list icon to access your assets. Selecting the plus sign “+” icon will expand the components within the Asset. Selecting “Update Meter Reading” from the Upcoming Task Table Context Menu will open the same modal for the specified asset.
Select the appropriate asset, opening the Update Meter Reading Modal.
The meters associated with the asset/component selected show in a dropdown menu. Select the meter whose meter data you wish to record. The most recent meter reading shows in the Update Meter Reading Modal as the “Last Entered Reading.” KAStrack automatically inputs the current date and time. The user can enter an elapsed value (if preferred) and KAStrack will input the new actual, or the user can input the new meter reading and the elapsed value will be automatically input. Attach any files (if there are checklists, forms, etc.) associated with the meter reading. Select the “Log Reading” button to update the meter usage. Click cancel to return to the Assets Module Homepage. | ||||||||||||||||||||||||
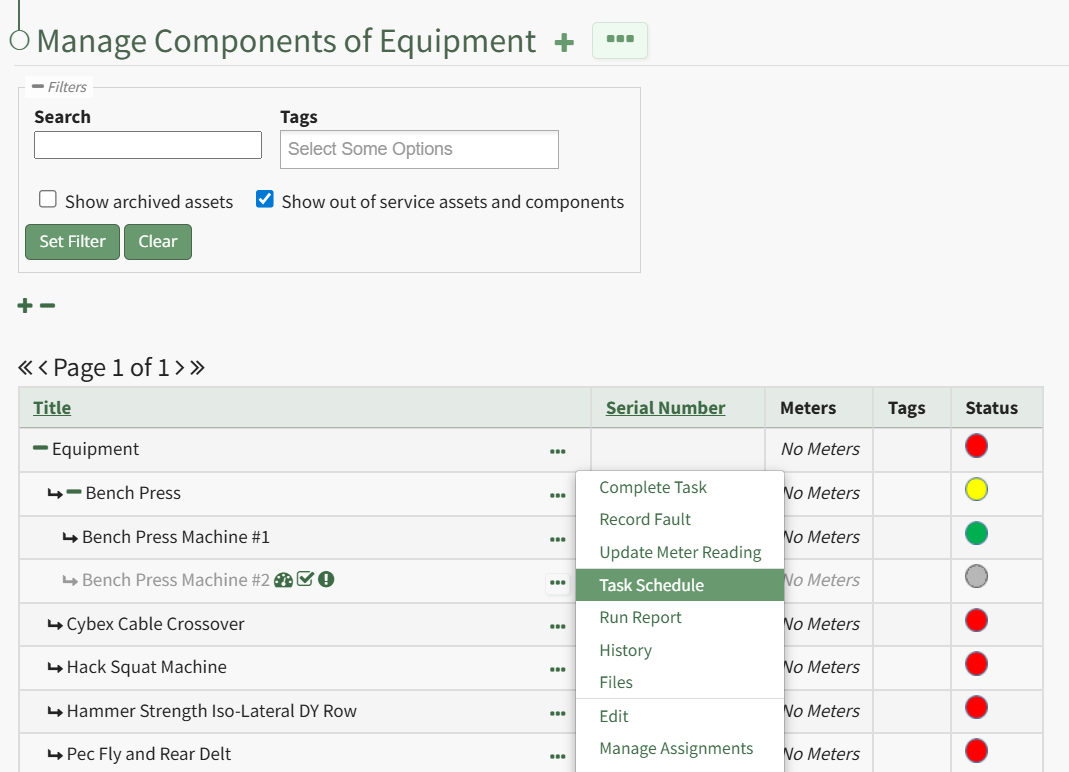
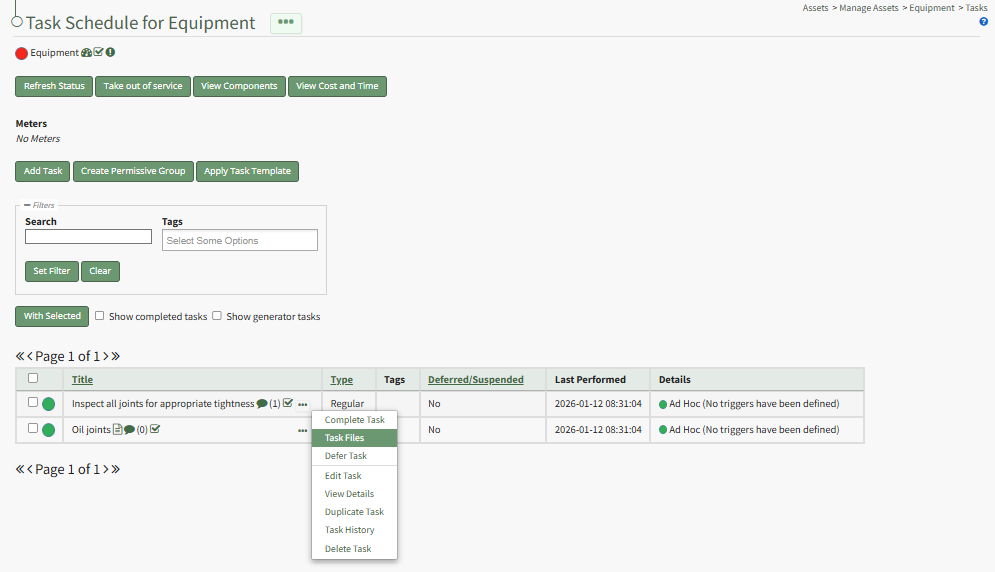
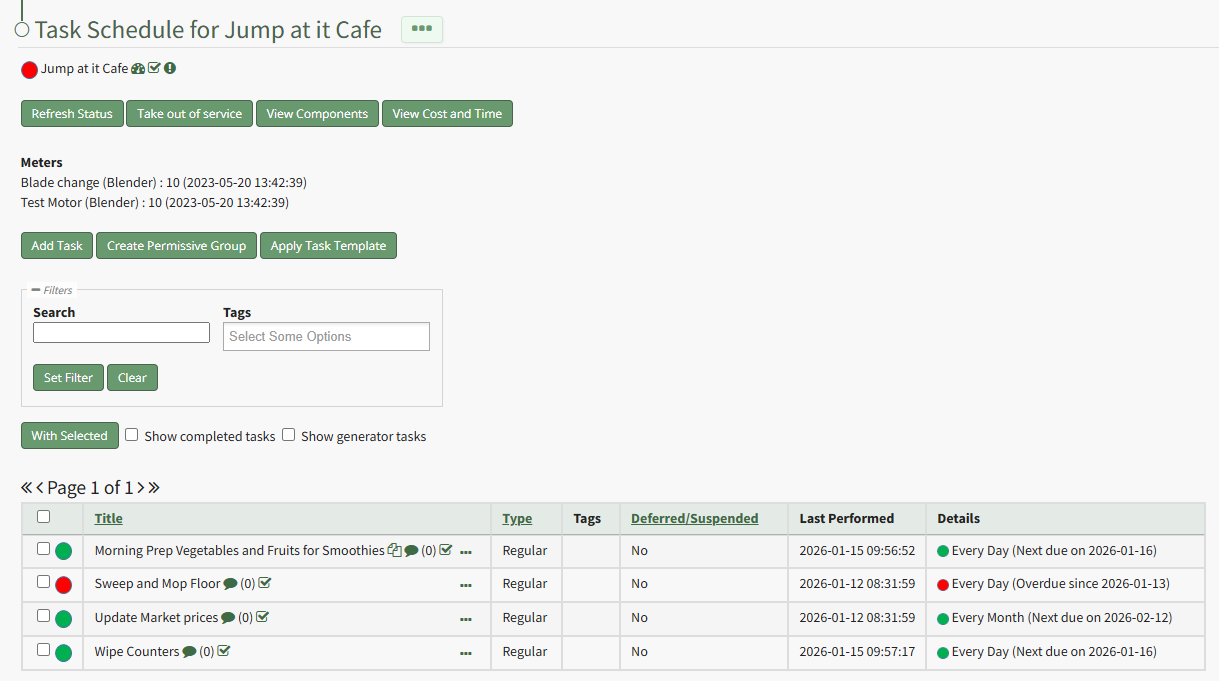
Task Schedule | Selecting "Task Schedule" on the context menu opens an asset's Task Schedule, where new tasks can be added and existing tasks can be managed. How To: View an Asset's Task ScheduleTo view an asset's task schedule, open the Manage Assets Page in the Assets Module on the Main Menu. Use filters as needed and identify the asset/component whose task schedule you wish to view. Click the three-dot icon to the right of the asset title opening the Asset Management Context Menu.
Select the "Manage Components" option, opening the Manage Asset Components Page. Select the three-dot icon to the right of the asset/component you wish to add interim notes to and select Task Schedule from the context menu.
This opens the asset's Task Schedule Page.
| ||||||||||||||||||||||||
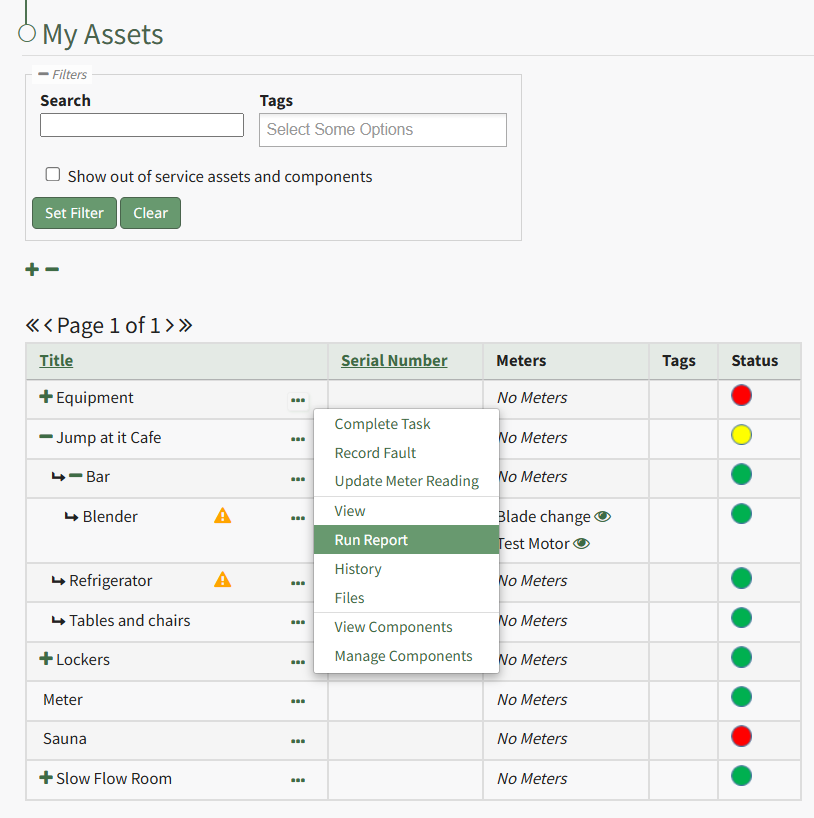
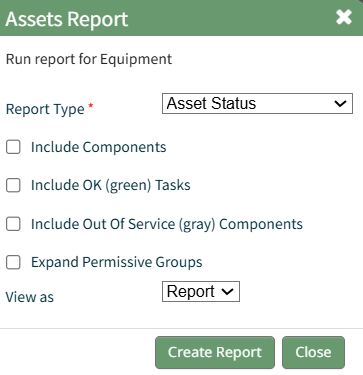
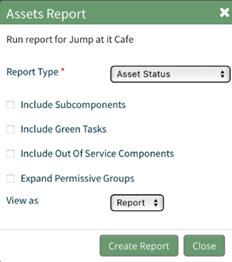
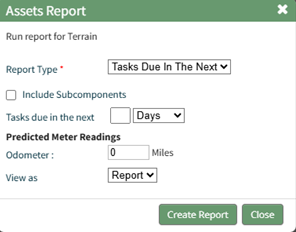
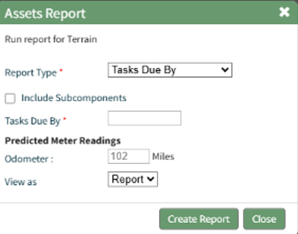
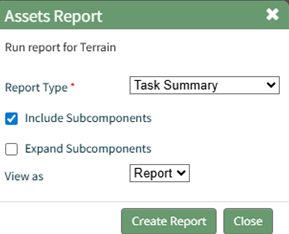
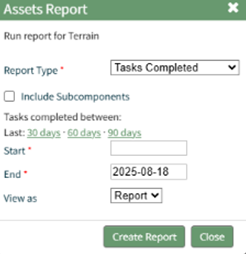
Run Report | Selecting “Run Report” from the context menu open the Assets Report Modal, allowing the user to select between five customizable Asset Reports. How To: Run an Asset ReportTo run an asset report, open the My Asset Page in the Assets Module on the Main Menu. Use filters as needed and identify the asset/component you want to run a report on. Click the three-dot icon to the right of the asset title opening a context menu.
Select "Run Report" from the context menu opening the Assets Report Modal with options for running various types of reports.
Reports can be run for an asset in its entirety, specific components or subcomponents. They type of report can be selected from a dropdown menu on the Assets Report Modal. An explanation of report types is included in the table below.
Select the "Create Report" button after completing the inputs on the Assets Report Modal and the system will generate your report in the viewing preference you selected. | ||||||||||||||||||||||||
History | Selecting “History” from the context menu opens the Asset History Page with historical entries for the components/sub-components that were selected. The Asset History Page contains four historical logs - tasks completed, tasks deferred, as well meter and fault logs. How To: View an Asset's Historical LogsAn asset's historical data can be accessed from an asset's History Page. To access an asset's history, go to the My Assets Page in the Assets Module on the Main Menu. Use the filters as needed to identify the access whose history you wish to view, and click the three-dot icon to the right of the asset name. This opens a context menu.
Select "History" from the context menu opening the Asset History Page. | ||||||||||||||||||||||||
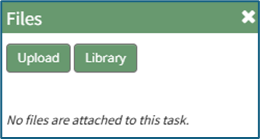
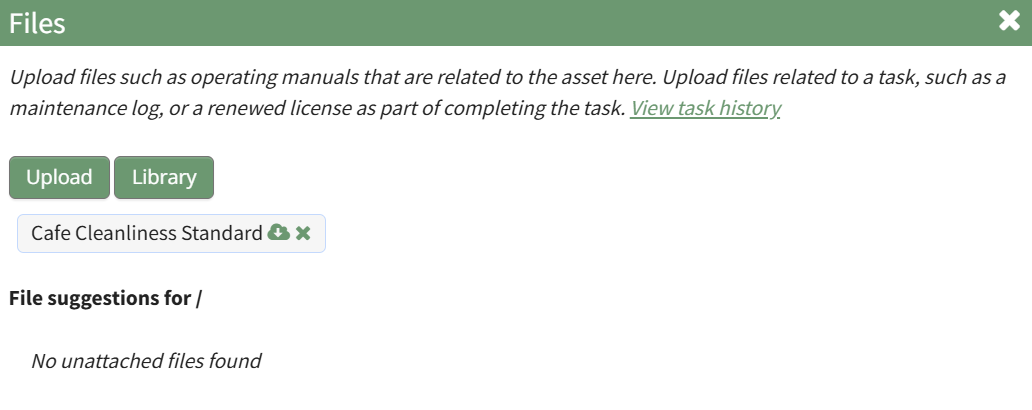
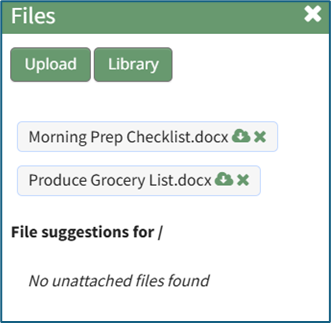
Files | Selecting “Files” from the context menu will open the Files Modal and display any files attached to the asset or component. Only users with appropriate permissions will be able to access files associated with an asset or task. How To: Upload a Task FileTo upload a file to a task, open the Manage Assets Page in the Assets Module on the Main Menu. Use filters as needed and identify the asset/component with the task you want to upload a file to. Click the three-dot icon to the right of the asset title opening the Asset Management Context Menu.
Select the "Manage Components" option, opening the Manage Asset Components Page. Select the three-dot icon to the right of the asset/component you wish to add interim notes to and select Task Schedule from the context menu.
This opens the asset's Task Schedule.
To upload a task file, click the three dot (…) icon next to the task title on the Task Schedule Table opening the context menu.
Select “Task Files” on context menu, opening the Files modal.
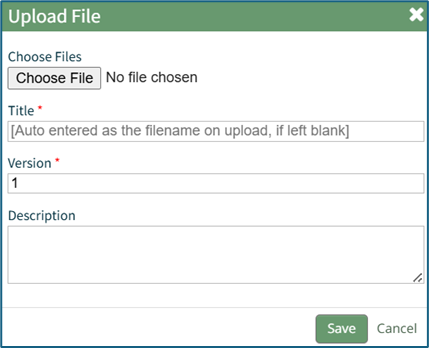
Select “Upload” to open the Upload File Modal. Select the “Choose File” button to select the desired file from your computer. Add a file title, or KAStrack will use the name already attached to the file. Input a version number for the file and a description. KAStrack recommends PDFs as the preferred file type. Select “Save” to upload the file to the task or “Cancel” to close the modal and return to the Task Schedule Page. How To: View File's Associated with an Asset/ComponentTo view the files associated with an asset and its components, open the Manage Assets Page in the Assets Module on the Main Menu. Use filters as needed and identify the asset/component whose files you wish to view. Click the three-dot icon to the right of the asset title opening the Asset Management Context Menu.
Select "Files" from the context menu opening the Asset Files Modal.
Upload files such as operating manuals that are related to the asset here. Upload files related to a task, such as a maintenance log, or a renewed license as part of completing the task. You are now able to view all files associated with the asset. How To: View a File Attached to a TaskTo view a file associated with a specific task, open the Task Schedule Page for the asset of interest. How To: View an Asset's Task ScheduleAn asset's historical data can be accessed from an asset's History Page. To access an asset's history, go to the My Assets Page in the Assets Module on the Main Menu. Use the filters as needed to identify the access whose history you wish to view, and click the three-dot icon to the right of the asset name. This opens a context menu.
Select "History" from the context menu opening the Asset History Page.
Click the three dot (…) icon next to the right of title whose files you wish to view on the Task Schedule Table opening the context menu. Select “Task Files” opening the Files modal.
Any files associated with the task are shown on the Files modal. | ||||||||||||||||||||||||
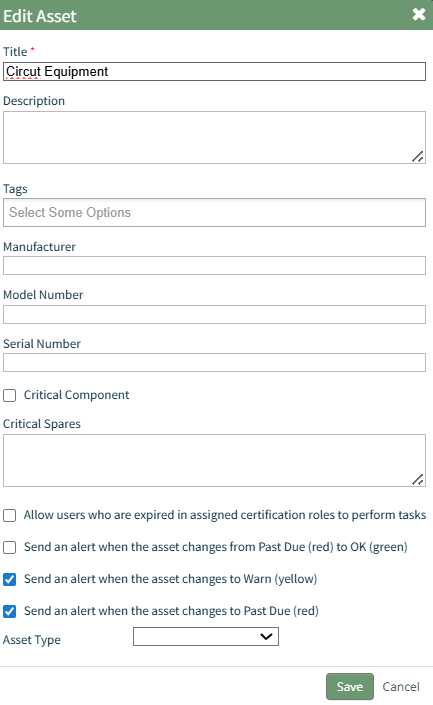
Edit | Selecting "Edit" on the context menu opens the Edit Component Modal, which is used to alter asset details. How To: Edit an AssetTo edit an asset, open the Manage Assets Page in the Assets Module on the Main Menu. Use filters as needed and identify the asset/component whose details you want to edit. Click the three-dot icon to the right of the asset title opening the Asset Management Context Menu. 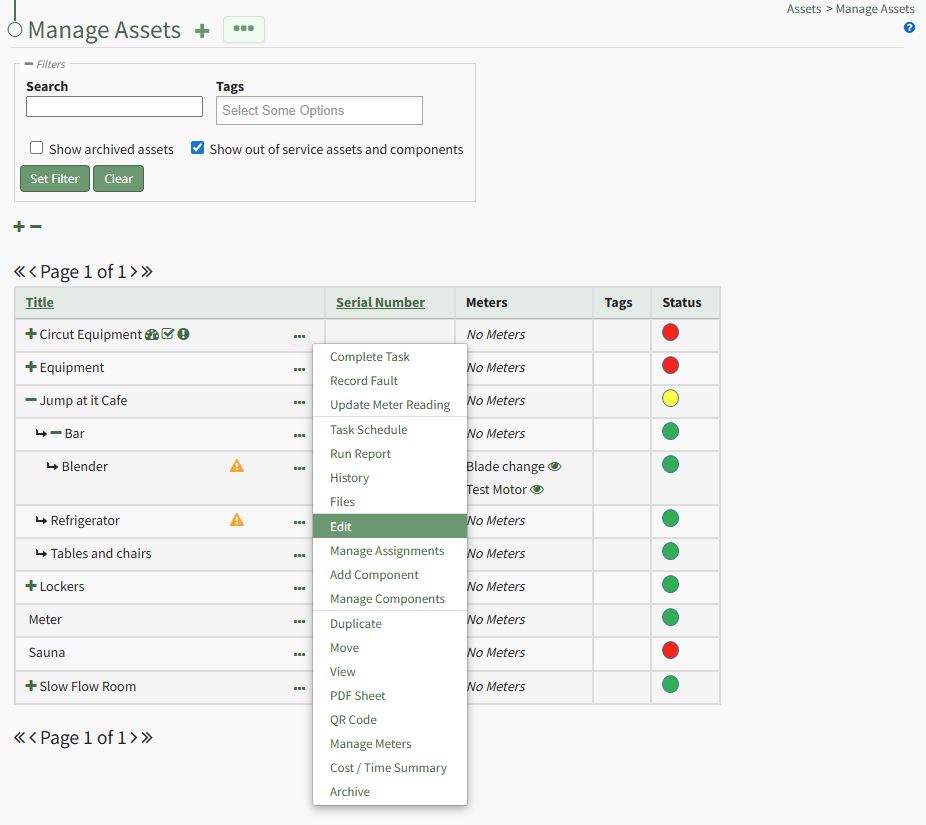
Select "Edit" from the context menu opening the Edit Asset Modal.
Key details about the asset can be added directly from this modal, an asset type can be assigned, and alert preferences can be altered as desired. Click the "Save" after making the desired changes.
A popup confirms that the asset edits have been saved. | ||||||||||||||||||||||||
Manage Assignments | Selecting "Manage Assignments" on the context menu opens the Asset Assignments Modal which allows individual users and certification roles to be assigned to an asset. How To: Assign / Unassign Users and Certification Roles to an AssetTo assign or unassign users and certification roles for a specific asset, open the Manage Asset Pages in the Assets Module on the Main Menu. Use filters as needed and identify the asset/component you want to assign/unassign users and roles to. Click the three-dot icon to the right of the asset title opening a context menu.
Select "Manage Assignments" from the context menu opening the Asset Assignments Modal.
Click in the textbox beneath Assignments and a dropdown menu will allow you to assign the asset to multiple individuals or certification roles.
To unassign an individual, click the X icon to the right of the user name or certification role. When done, select the "Save Assignments" button.
A popup confirms that the asset assignments were saved. | ||||||||||||||||||||||||
Add Component | Selecting "Add Component" on the context menu opens the New Component Modal, which allows new components to be added to an asset. How To: Add Components to a Parent AssetTo add components to an asset, open the Manage Assets Page in the Assets Module from the Main Menu. In order to create components, the parent asset must have already been created. How To: Create a New AssetTo create a new asset, open the Manage Assets Page in the Asset Module and click the plus sign (+) icon to open the New Asset modal.
You can also access the New Asset Modal by clicking the three dot (…) icon and selecting “Create Asset” from the context menu.
The New Asset Modal requires the entry of an Asset Title. Optional fields include an asset description, tags, manufacturer, model number, serial number, and critical spares. Select the "Critical Component" checkbox to designate this asset as a critical component. This term is subjective for your organization to define. Designating an asset as a critical component will result in a hazard symbol being used as a visual indicator.
Critical items are prioritized and show separately on the Assets Module Summary. An entire asset is designated as a critical. All components and associated tasks will also have a critical component designation. KAStrack’s default setting prevents users with an expired certification role from performing tasks (such as completing tasks, recording faults, and updating meter readings. Select the “Allow users who are expired in assigned certification roles to perform tasks” checkbox to allow a user to perform tasks regardless of their assigned certification role status. The remaining three checkbox options all relate to asset status alert preferences. The “Send an alert when the asset changes from Past Due to OK” checkbox will send an alert via email to the assigned users when the task status changes from past due (red) to current/up to date (green). The “Send an alert when the asset changes to Warn” checkbox will send an alert via email to all users assigned to the asset when the task status changes from current/up to date (green) to warn (yellow). The “Send an alert when the asset changes to Past Due” checkbox will send an alert via email to all users assigned to the asset when the task status changes to past due (red). Asset Types are customizable to your company and are created on the Settings Page of the Asset Module. Once an asset type has been created, you can select one from the dropdown menu in the New Asset Modal to enable additional filtering capabilities. Asset Types allows your organization to add customizable fields unique to individual assets. How To: Create a New Asset TypeTo create a new asset type, open the Asset Types Tab on the Settings Page of the Assets Module.
Selecting the “Add Asset Type” button opens the New Asset Type modal.
Input the title of the New Asset Type and click “Save”. The newly created Asset Type will now show in the table on the Asset Type tab on the Settings page and is ready for you to add fields to. How To: Add Fields to an Asset Type{{@496}} Select the “Save” button at the bottom of the New Asset Modal to create the new asset or click “Cancel” to close the modal without saving and return to the Manage Assets Page. After an asset is created, it will appear in the Manage Asset Table where it can be managed.
Identify the pre-existing asset (or component) that you would like to place this new component under, and click the three dot (…) icon to the right of the asset name in the Manage Assets table opening the Manage Asset Context Menu. Select "Add Component" opening the New Component Modal.
The fields on the New Component modal ask for the same information on the New Asset Modal. For a detailed description of the fields, refer to the How To Create a New Asset page. Select the “Save” button and the component will appear underneath its asset in the Manage Asset table (if the view is expanded) where it can be managed. Subcomponents/additional child components can also be created for components if desired. Select the three dot (…) menu to the right of the component you would like to add an additional subcomponent in the asset’s hierarchal structure. | ||||||||||||||||||||||||
Manage Components | Selecting “Manage Components” from the context menu will open the Manage Asset Components Page where assets and their components can be managed. Only users with appropriate permissions will have access to this page. | ||||||||||||||||||||||||
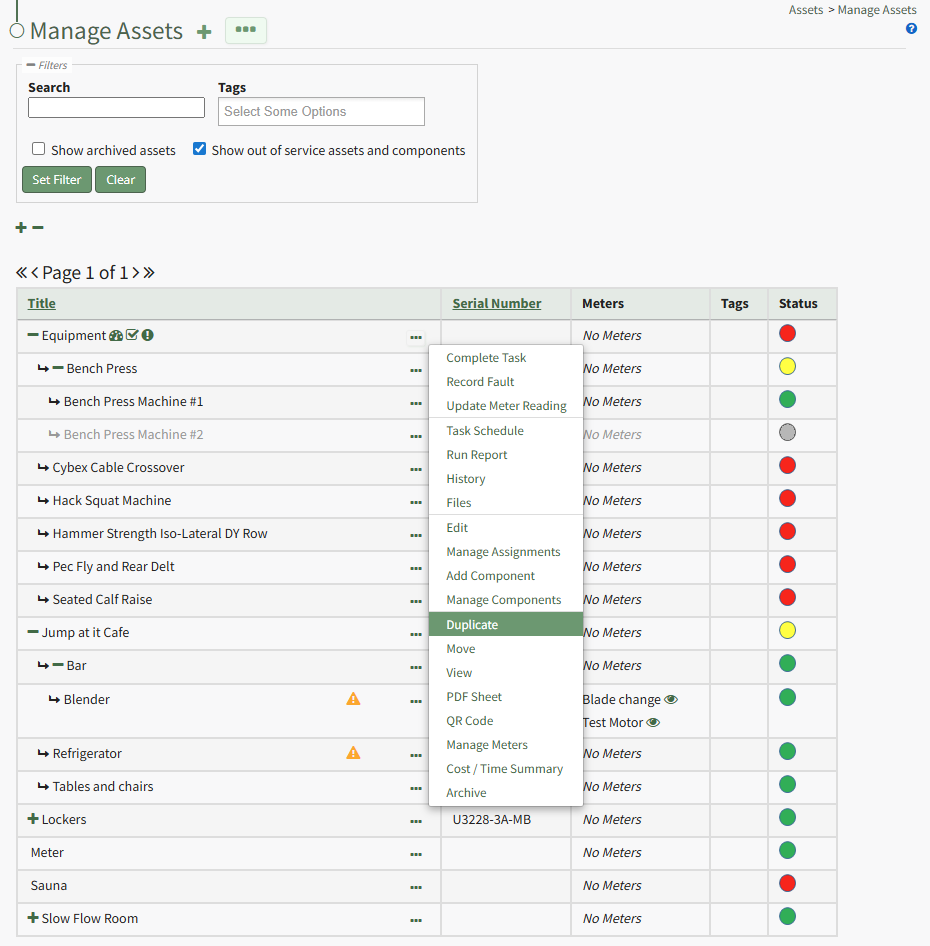
Duplicate | Selecting "Duplicate" on the context menu opens the Copy Asset Modal that allows you to rename the asset before copying. How To: Copy and Rename an AssetTo copy and rename an asset, select Manage Assets from the Main Menu under the Asset Module. Use filters as needed and identify the asset/component you want to copy. Click the three-dot icon to the right of the asset title opening a context menu.
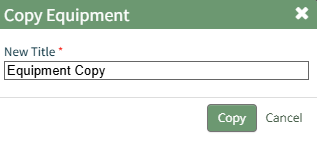
Select "Duplicate" from the context menu opening the Copy Asset Modal.
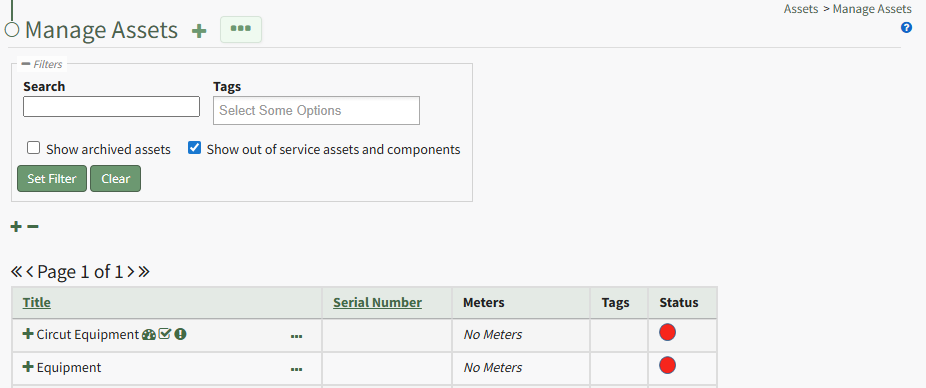
Edit the new title of the copied asset. When done, click the "Copy" button and the renamed copied asset will now show on the Manage Assets Page.
| ||||||||||||||||||||||||
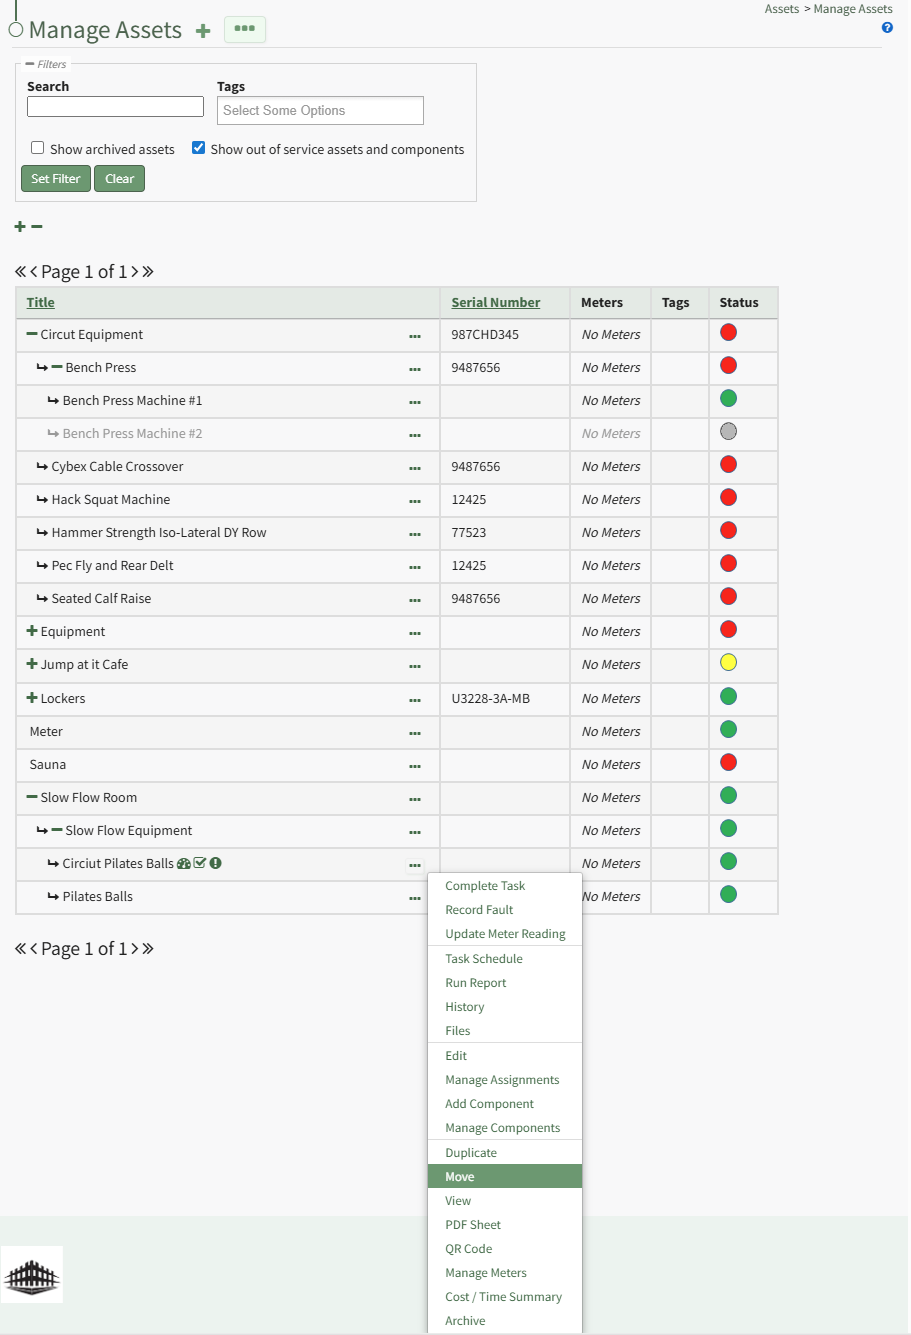
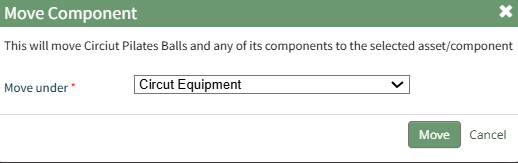
Move | Selecting "Move" on the context menu opens the Move Asset Modal, allowing you to move an asset/component under another asset/component. How To: Move an Asset/Component to Another Asset/ComponentTo move an existing asset to a new hierarchal position, under another asset/component, open the Manage Assets Page in the Assets Module on the Main Menu. Use filters as needed and identify the asset/component you want to move. Click the three-dot icon to the right of the asset title opening the Asset Management Context Menu.
Select "Move" opening the Move Component Modal.
Click the "Move" button and a popup confirms the move was successful.
| ||||||||||||||||||||||||
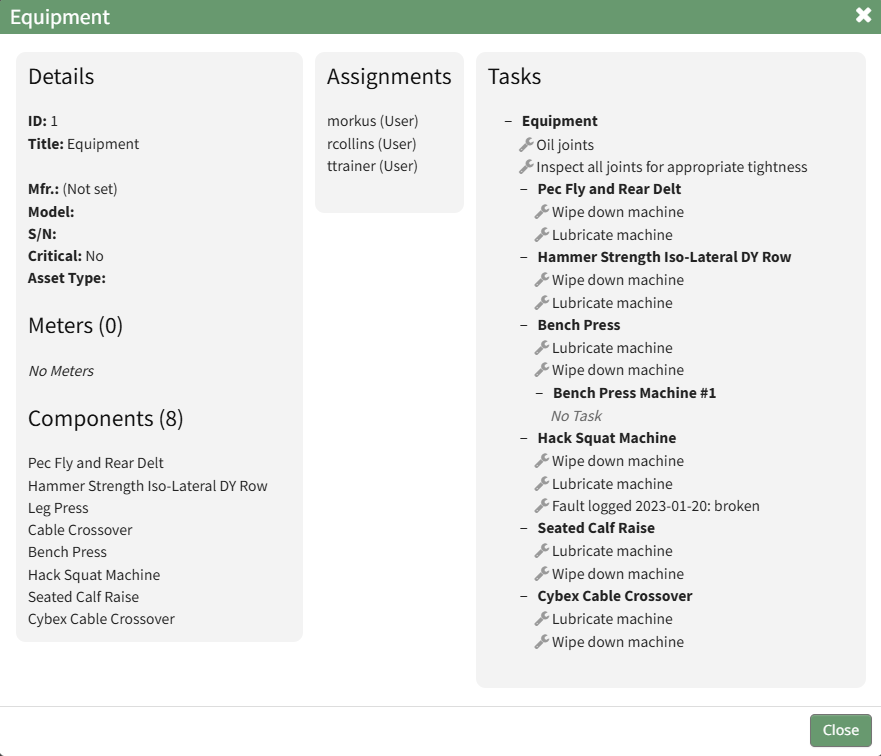
View | Selecting “View” from the context menu opens an Asset Summary Modal with a summary of the asset/component information. The read-only modal displays details, any associated meters, subcomponents, assignments, and tasks associated with an asset. How To: View an Asset Summary ModalTo view an asset's summary modal that lists all relevant information regarding an asset, go to the My Assets Page under the Assets Module on the Main Menu. Use filters as needs to pull up the asset you wish to view. Click the three-dot icon to the right of the asset/component title opening the context menu and select "View".
This opens the Asset Summary Modal. The read-only modal shows the asset details, meters associated with the asset, lists the components of the asset, the users assigned to the asset, and any tasks on the asset's task schedule.
Click the close button to return to the My Assets Page. | ||||||||||||||||||||||||
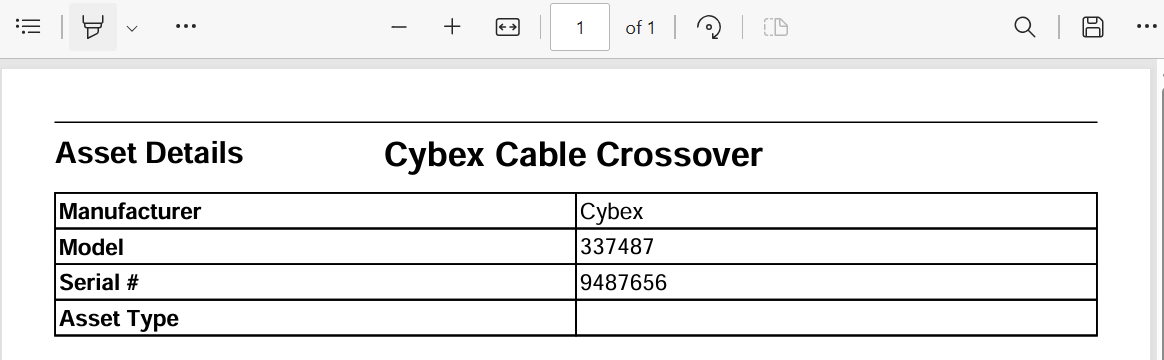
PDF Sheet | Selecting "PDF Sheet" on the context menu opens a PDF Copy of an Asset Data Sheet in a new widow. How To: Access an Asset's PDF Data SheetTo access an asset's PDF data sheet, open the Manage Asset Page in the Assets Module on the Main Menu. Use filters as needed and identify the asset/component you want to run a report on. Click the three-dot icon to the right of the asset title opening the Asset Management context menu.
Select "PDF Sheet" from the context menu. This opens a PDF of the asset/component data sheet in the existing tab.
Select the back button on your browser to return to the My Assets Page. | ||||||||||||||||||||||||
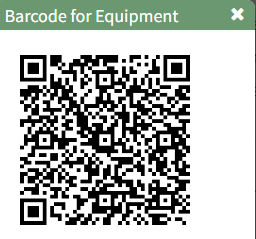
QR Code | Selecting "QR Code" on the context menu opens the Asset QR Code modal, which displays the QR Code associated with the Asset that when scanned will link a user to asset details. How To: Access an Asset's QR CodeTo access an asset's QR Code, open the Manage Asset Page in the Assets Module on the Main Menu. Use filters as needed and identify the asset/component whose QR Code you want to access. Click the three-dot icon to the right of the asset title opening the Asset Management context menu.
Select "QR Code" from the context menu. This opens the Asset Barcode Modal that displays an asset/component's QR Code that can be used for quick access to an asset.
Close the modal when done to return to the Manage Assets Page. | ||||||||||||||||||||||||
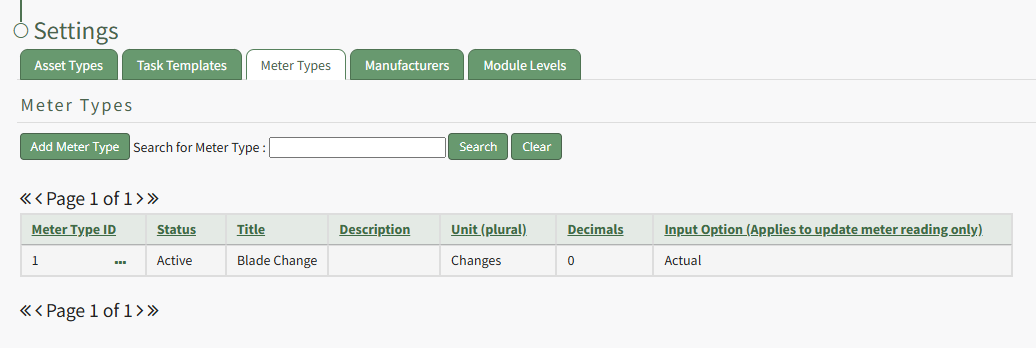
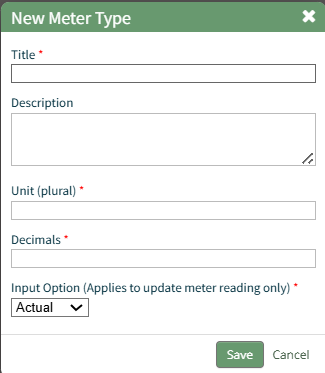
Manage Meters | Selecting "Manage Meters" on the context menu opens the Asset Meter Modal which lists all meters associated with the asset and allows for new meters to be created. How To: Add a Meter to an AssetTo add a meter to an asset, the Meter Type must already be created through the Assets Settings Page. How To: Create a Meter TypeTo create a new meter type, open the Meter Types Tab on the Settings Page of the Assets Module.
Select “Add Meter” opening the New Meter Type Modal. This opens the New Meter Type modal.
Input the desired meter type title and description. Include the units associated with this meter type. Meter units should always be entered in plural form. Input an integer to determine the number of place values after the decimals you would like recorder. Input 0 if you do not want to see any values after the decimal. The Input Option dropdown menu has three options: Actual, Elapsed, Both. If you select both, a user can input the actual reading and elapsed value will be calculated. A user can also input the elapsed reading and the actual will be calculated. Select the “Save” button and the New Meter Type will be created and now shows on the Meters Tab on the Settings Page of the Assets Module. To add a meter to an asset, select the Manage Assets Page from the Main Menu in the Assets Module. Use filters as needed and identify the asset/component you want to add a meter to. Click the three dot (…) icon next to the Asset/Component Title to open the Asset Management Context Menu.
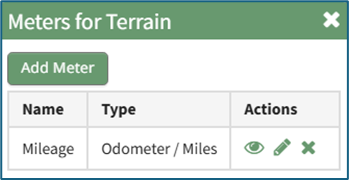
Selecting “Manage Meters” from the context menu opens the Asset Meters Modal.
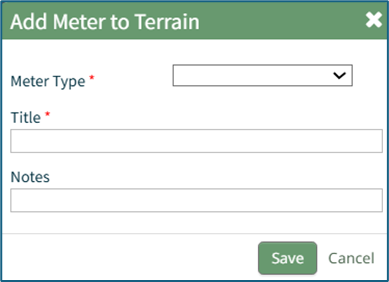
To add a new meter, select the “Add Meter” button opening the Add Meter to (Asset Name) Modal.
Select the Meter Type from the dropdown menu. Input a title for the new Meter. Include any notes about the meter. Select the “Save” button and the new meter is now shown when you select “Manage Meters” from the context menu. | ||||||||||||||||||||||||
Cost / Time Summary | Selecting "Cost / Time Summary" on the context menu opens the Cost and Time Summary Modal. How To: View an Asset's Cost / Time SummaryTo view the Cost/Time Summary associated with the asset's tasks, open the Manage Assets Page in the Assets Module on the Main Menu. Use filters as needed and identify the asset/component with the task whose task's cost/time summary you want to view. Click the three-dot icon to the right of the asset title opening the Asset Management Context Menu.
Select the "Manage Components" option, opening the Manage Asset Components Page. Select the three-dot icon to the right of the asset/component you wish to add interim notes to and select Task Schedule from the context menu.
This opens the asset's Task Schedule.
Click the "View Cost and Time" button to open the Cost/Time Summary Modal for that Task Schedule. | ||||||||||||||||||||||||
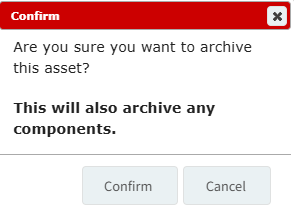
Archive | Selecting "Archive" on the context menu opens the Archive Confirmation Modal which states, "Are you sure you want to archive this asset? This will also archive any components."
How To: Archive an Asset or ComponentTo archive an asset or component, go to the Manage Assets Page of the Assets Module on the main menu. Use filters as needed to identify the asset or component you want to archive and click the three-dot icon to the right of the asset title opening the Manage Asset Context Menu.
Select "Archive" from the context menu opening the Archive Asset Confirmation Modal which states, "Are you sure you want to archive this asset? This will also archive any components."
Click the "Confirm" button and the asset will not be assigned an archive status. | ||||||||||||||||||||||||


No comments to display
No comments to display