Users Page
The Users Page is not visible on the Main Menu to employees or observer accounts.
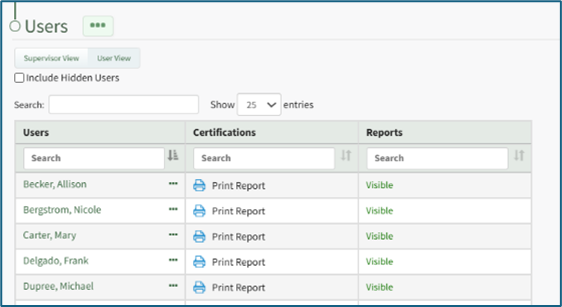
The Users Page in the People Module functions as the module homepage, allowing the review of certifications for any user. The table has two views for display, a Supervisor View and a User View, which can be selected by the buttons beneath the Users page header. The Supervisor View shows the organization’s hierarchal structure, indenting the users’ names beneath each level of management. The User View will list users alphabetically by their last name.
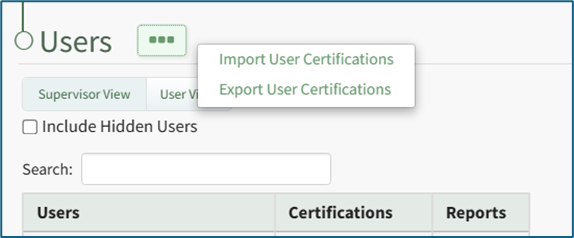
Selecting the three-dot icon to the right of the Users header opens the User Page Context Menu. An explanation of each of the context menu options have been included in the table below.
Users Page Context Menu Option Explanations | |
Option | Explanation |
Import User Certifications | Selecting Import User Certifications from the User Page Context Menu opens the Import User Certifications Page, which provides a downloadable template with current user certifications for convenience. How To: Import Bulk User CertificationsThe KAStrack team is currently writing a new How To for you. Update coming soon! |
Export User Certifications | Selecting Export User Certifications from the User Page Context Menu opens the Export User Certifications Confirmation Modal where you can select to download all user certification completion and expiration data. How To: Export Bulk User CertificationsThe KAStrack team is currently writing a new How To for you. Update coming soon! |
You can use the search box above the table to search across all columns, or in the search box above each column for column-specific filtering. You can change the number of users shown in the table by clicking the dropdown next to the table search box, in between “Show [value] Entries”. If not all entries are shown in the table, you can control which page of the table you see using the pagination controls beneath the table.

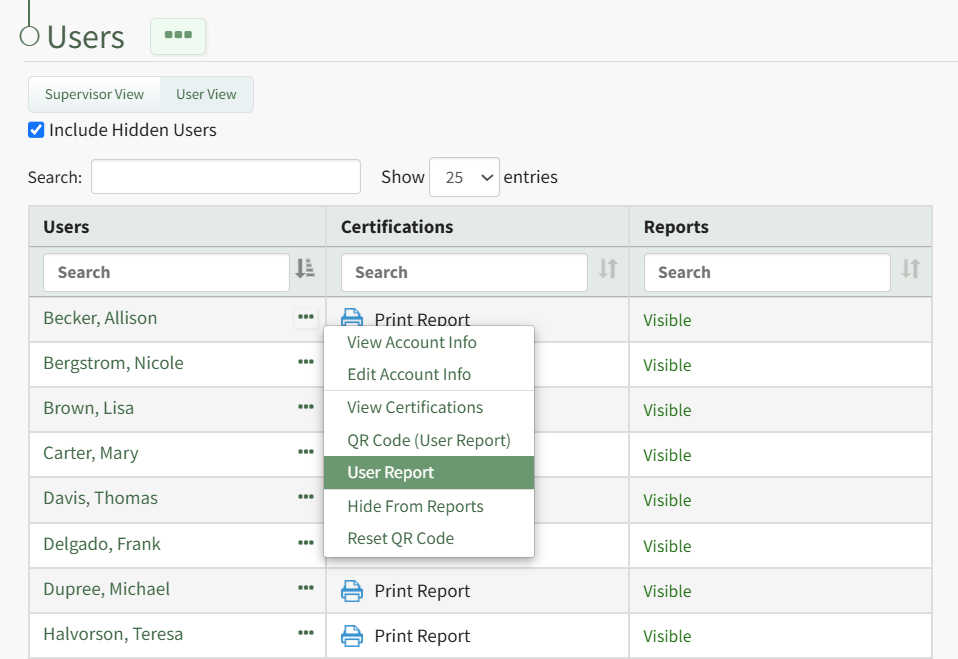
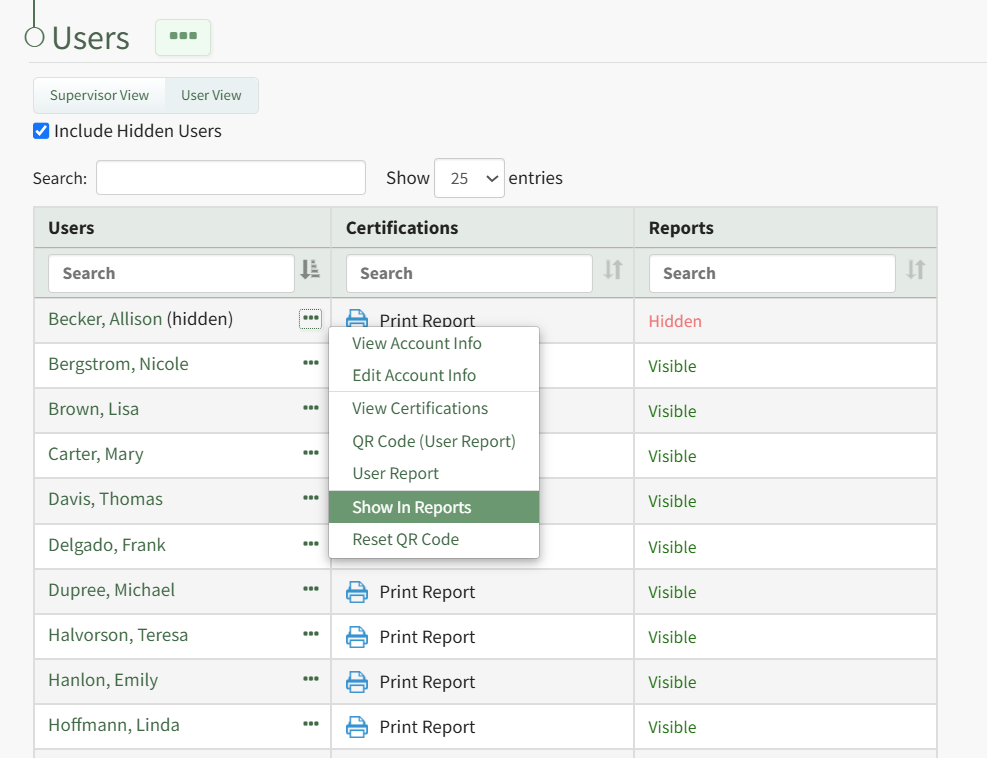
Selecting the Include Hidden Users checkbox will show any individuals designated as a hidden user in the Users Table; however, their user certification report is not visible in the Reports Column of the user table (their status is shown as hidden).

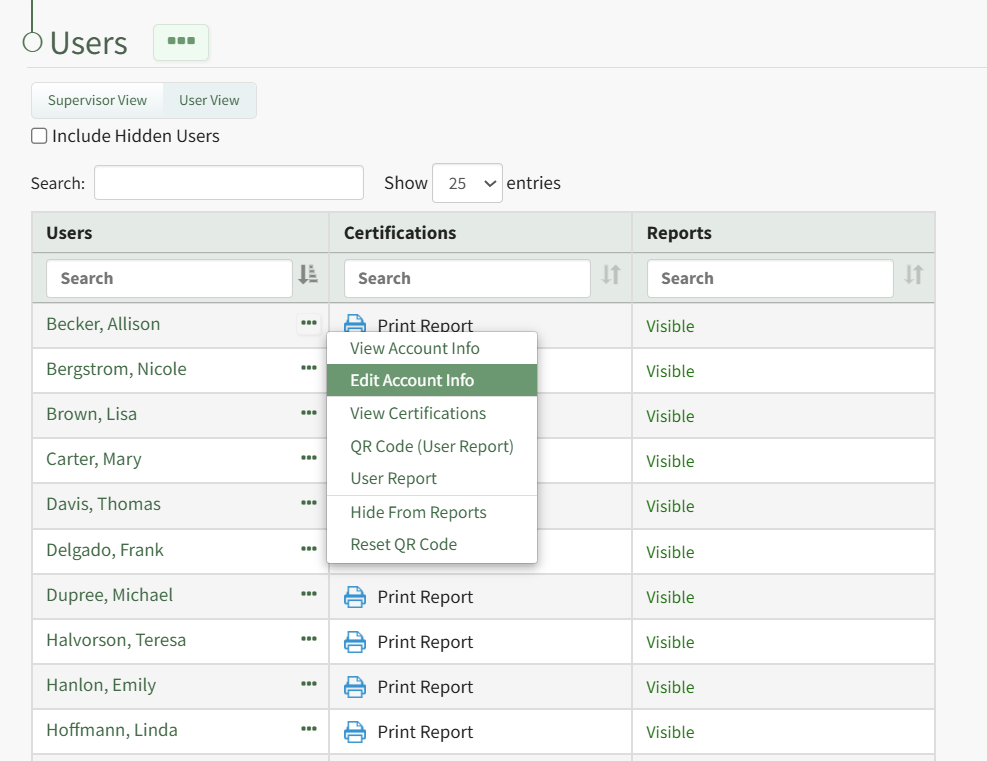
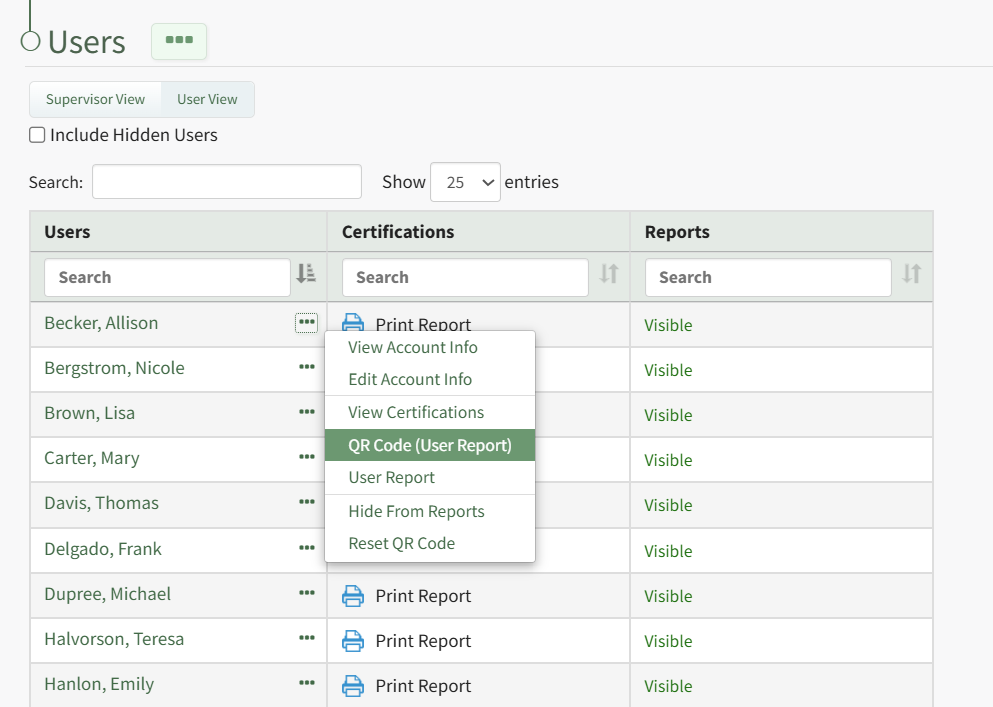
Selecting the three-dot icon to the right of a user's name in the Users Table opens the Users Table Context Menu. The options available on the User Table Context Menu are explained in the table below.
Users Table Context Menu Option Explanations | |
Option | Explanation |
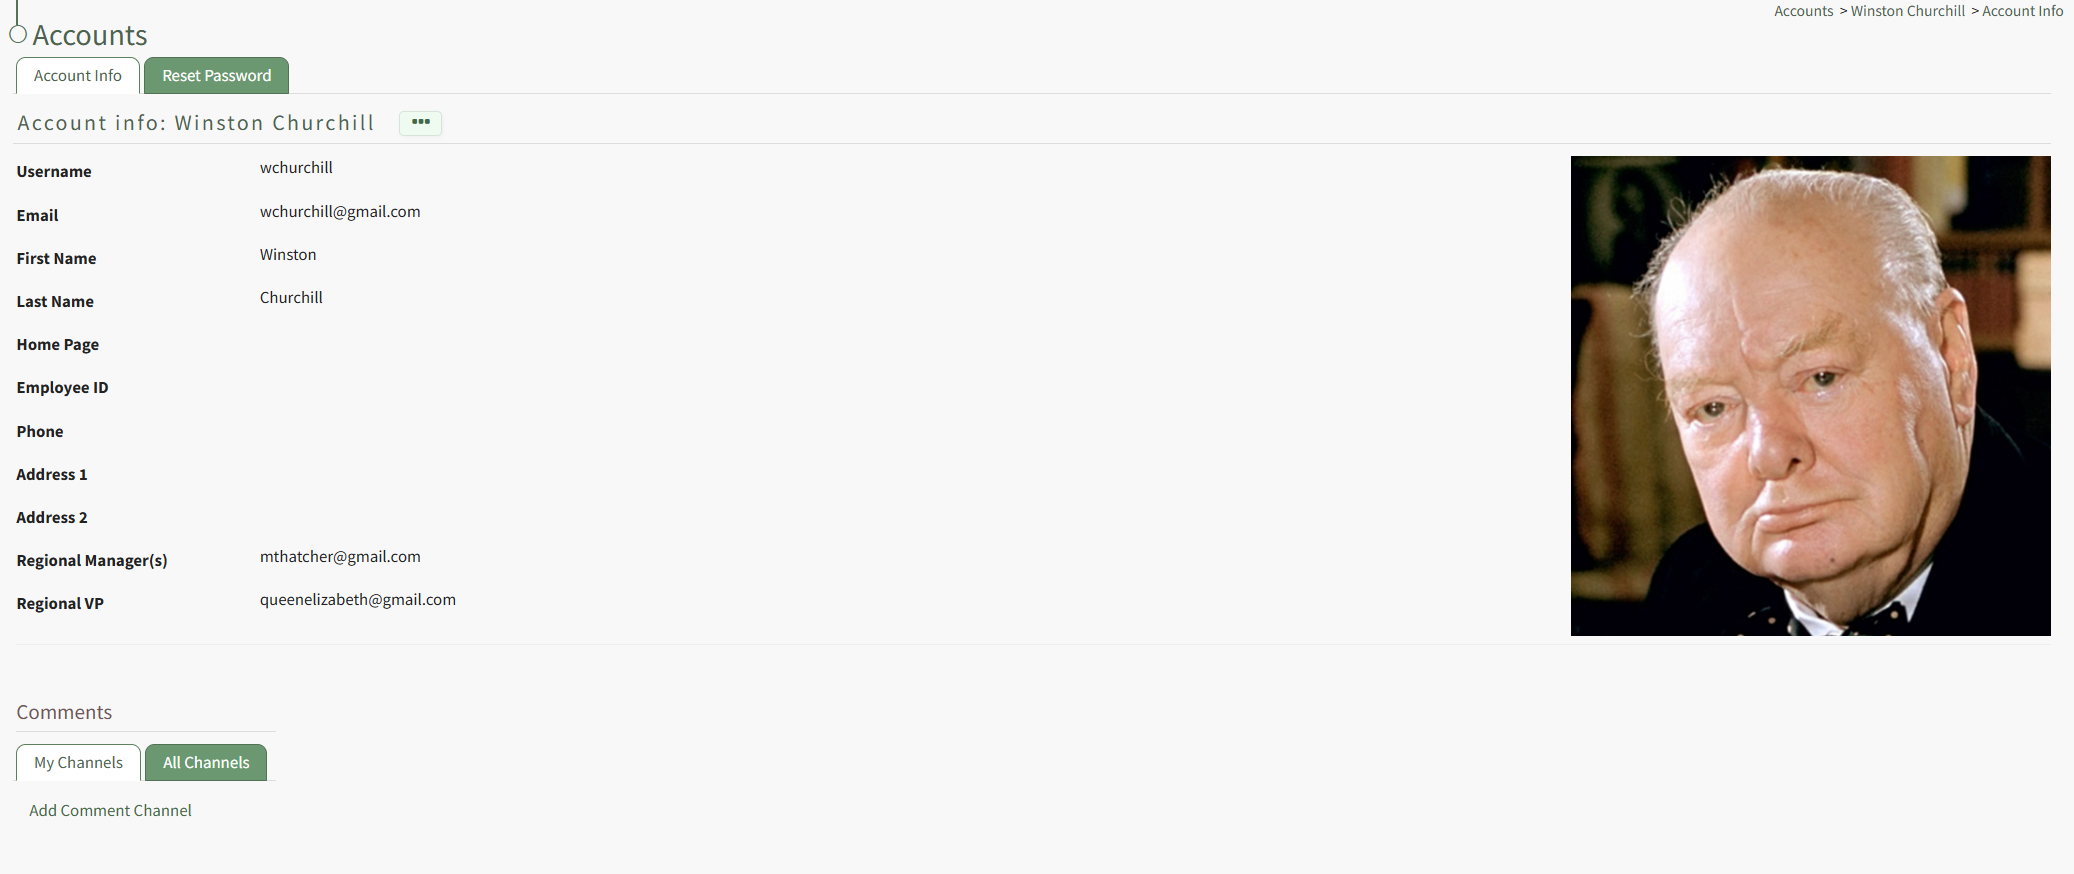
View Account Info | Selecting View Account Info from the Users Table Context Menu opens the specified individual's Account Info Page in the Accounts Module where the individual's account information can be viewed. |
Edit Account Info | Selecting Edit Account Info from the Users Table Context Menu opens the Edit Account Info Page in the Accounts Module where the individual's account information can be edited. How To: Edit a Supervised User's Account InformationTo edit a supervised user's account information from within the People Module, open the Users Page in the People Module on the Main Menu. Click the three-dot icon to the right of the specific user whose account information you wish to edit, opening the Users Table Context Menu.
Select "Edit Account Info" from the context menu opening the Edit Account Info Page in the Accounts Module.
Make the desired changes to the user's account information and select the "Save" button when done.
The updated information now shows on the user's Account Info Page. |
View Certifications | Selecting View Certifications from the Users Table Context Menu opens the specified individual's User Page. |
QR Code (User Report) | Selecting QR Code (User Report) from the Users Context Menu opens the QR Code for the specified individual that can be used to access both the individual's roles and certification report. How To: Access a User's Roles and Certifications Report QR CodeTo access a user's roles and certifications report QR Code, open the Users Page in the People Module on the Main Menu. Click the three-dot icon to the right of the specific user's name in the User Table opening the User Table Context Menu.
Select "QR Code (User Report)" from the main menu opening the User Report QR Code Modal. 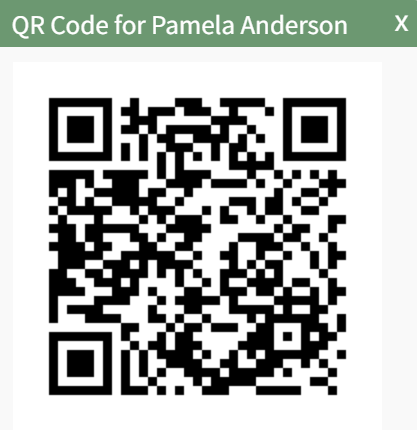
Close the modal to return to the Users Page. |
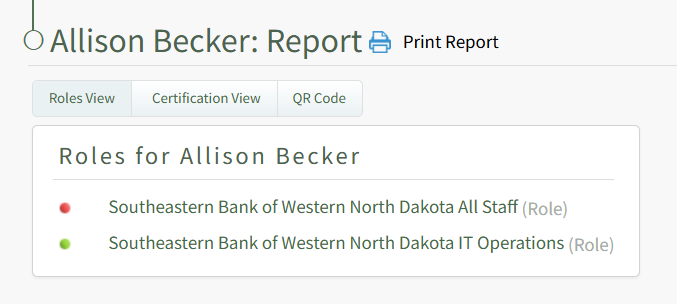
User Report | Selecting User Report from the Users Table Context Menu opens an individual user's Role and Certifications Report. How To: View a User's Roles and Certifications ReportTo view a User's Roles and Certifications Report, open the Users Page in the People Module from the Main Menu. Click the three-dot icon to the right of the user whose roles and certifications report you wish to view.
Select "User Report" from the context menu opening the individuals User Report.
The User Report displays the user's roles and certifications, as well as the QR Code that can be used to access this specific user report. |
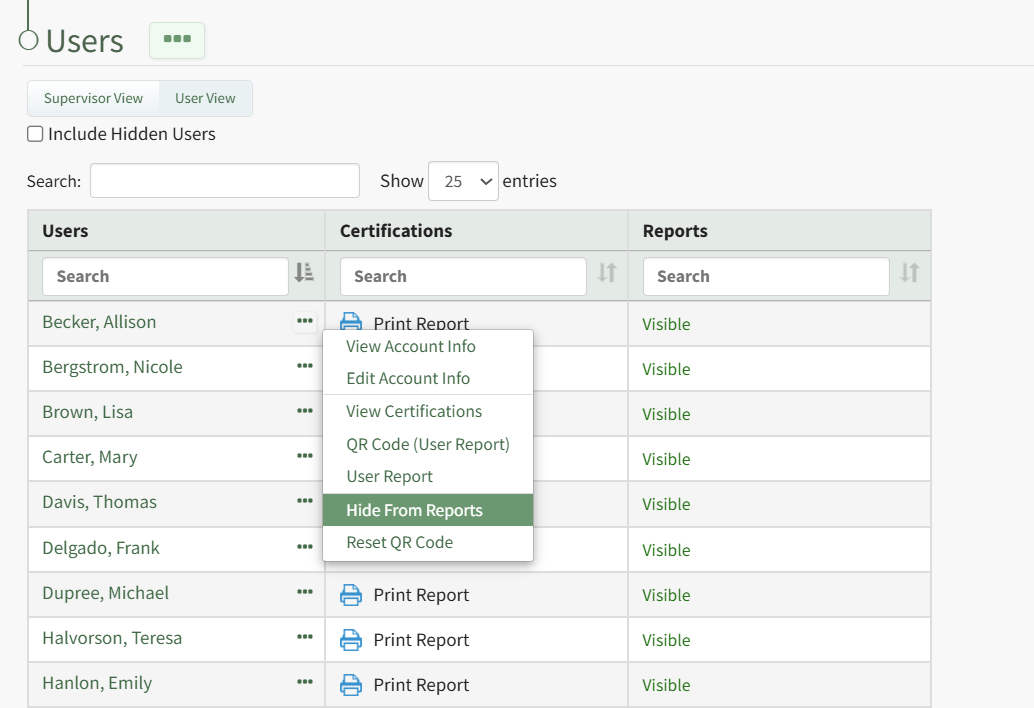
Hide from Report | Selecting Hide from Report on the Users Table Context Menu changes an individual's certification report status to hidden. The individual will only be visible when the "Include Hidden Users" checkbox has been selected. How To: Designate an Individual a Hidden User on the Users TableDesignating an individual as a hidden user hides their User Roles and Certifications Report within the People Module. When reports are run on all users in the Reports Module, hidden users will be included in the report. To designate an individual as a hidden user on the user table, open the Users Page in the People Module on the Main Menu. Click the three-dot icon to the right of the user you wish to designate as hidden opening the Users Table Context Menu.
Select "Hide from Reports" from the context menu and the user is no longer visible on the Users Table unless the Include Hidden Users checkbox has been selected. |
Show in Reports | This option is only visible on the context menu of a hidden user. Selecting Show in Reports on the Users Table Context Menu reverts a hidden user back to a visible user. How To: Make a Hidden User a Visible User on the Users Table
Click the three-dot icon to the right of the user's name who you wish to make visible opening the User Table Context Menu. Select "Show in Reports" from the context menu and the user is no longer hidden.
The individual and their user role and certifications report are now visible within the People Module. |
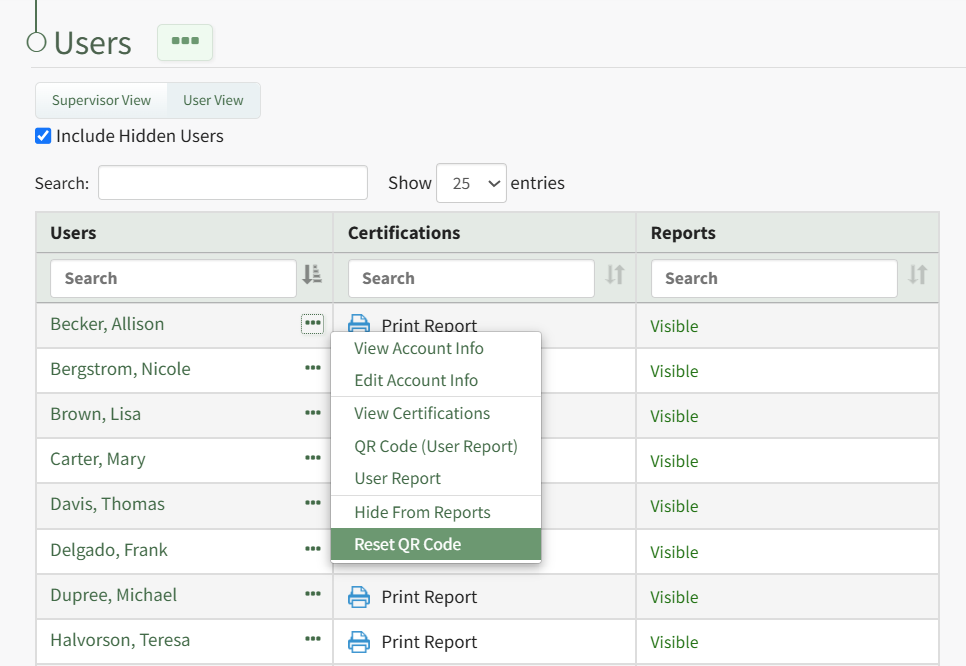
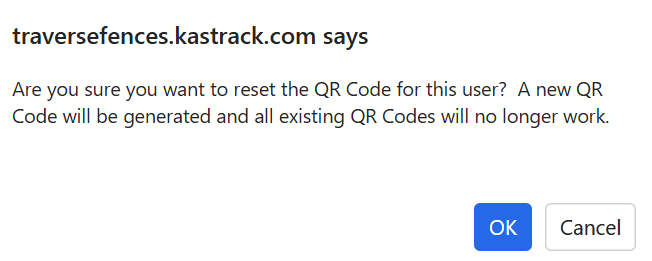
Reset QR Code | Selecting Reset QR Code on the Users Table Context Menu opens the Reset QR Code Confirmation Modal which reminds that when a new QR Code is generated, any existing QR Codes will no longer work. How To: Reset a User's Roles and Certifications Report QR CodeTo reset a user's Roles and Certifications Report QR Code, open the Users Page in the People Module from the Main Menu. Click the three-dot icon to the right of the user's name whose QR Code you want to reset opening the User Table Context Menu.
Select "Reset QR Code" from the context menu opening the QR Code Reset Confirmation Modal.
The modal states, "Are you sure you want to reset the QR Code for this user? A new QR Code will be generated and all existing QR Codes will no longer work." Select "OK".
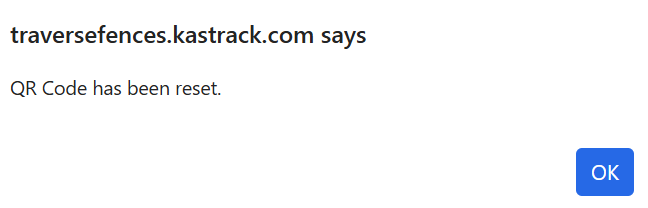
The confirmation modal now states, "QR Code has been reset." Select "OK" to return to the Users Page in the People Module. |

The icons used in the Users Table have been explained in the Users Page Icon Explanations Table below.
Users Page Icon Explanations | |
Icon | Explanation |
| The plus sign icon to the left of a name indicates that the hierarchy structure is collapsed, and the supervised users of the individual are hidden from view. |
| The minus sign icon to the left of a name indicates that the hierarchy structure is expanded and the supervised users of the individual are shown. |
| The Print Report icon opens a User Certification Summary with the certification name, expiration date, required status, attachments and notes in printable format. |
| Clicking the icon to the right of the column-specific search box changes the table to sort by that column. Clicking it multiple times can change the sort order between ascending and descending. |
No comments to display
No comments to display