Understanding an Individual Asset
- An Asset's Task Schedule Page
- An Asset's Components Page
- An Asset's History Page
- Understanding Task Trigger Settings
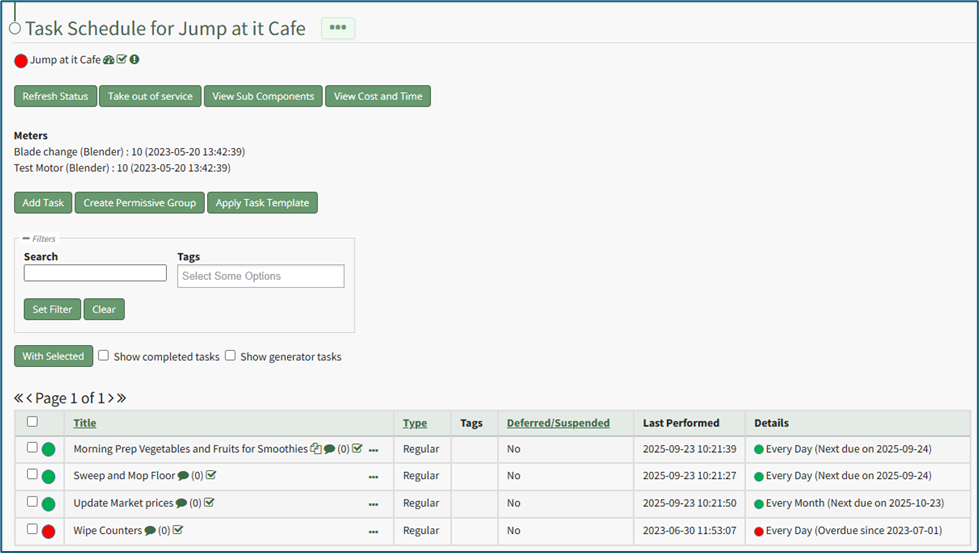
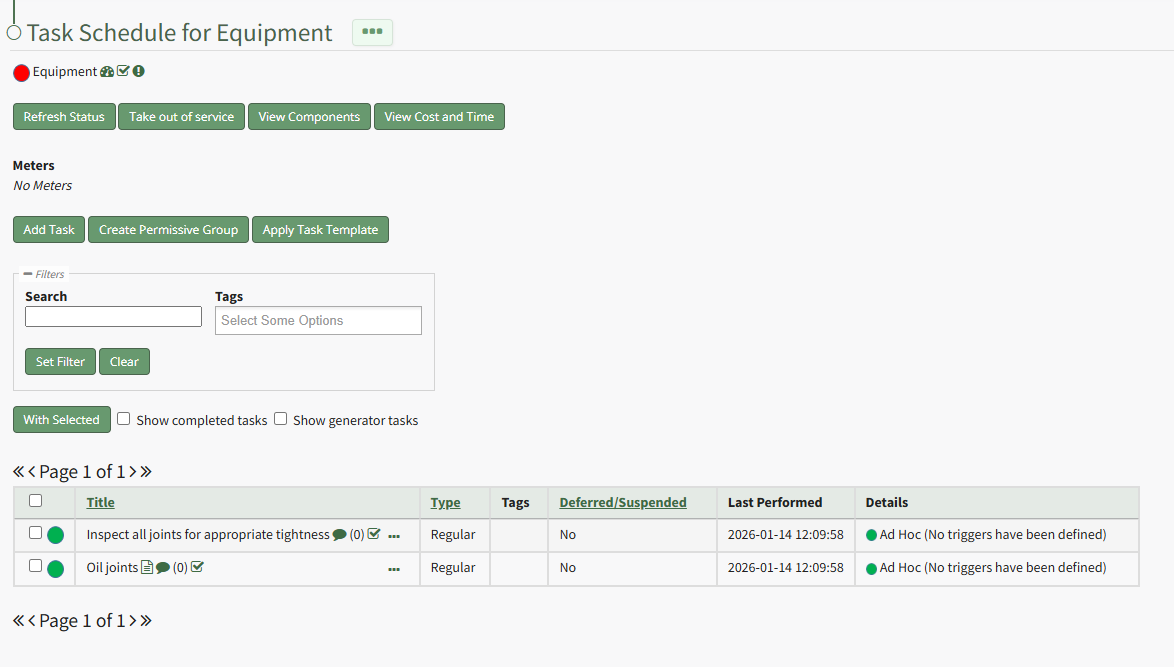
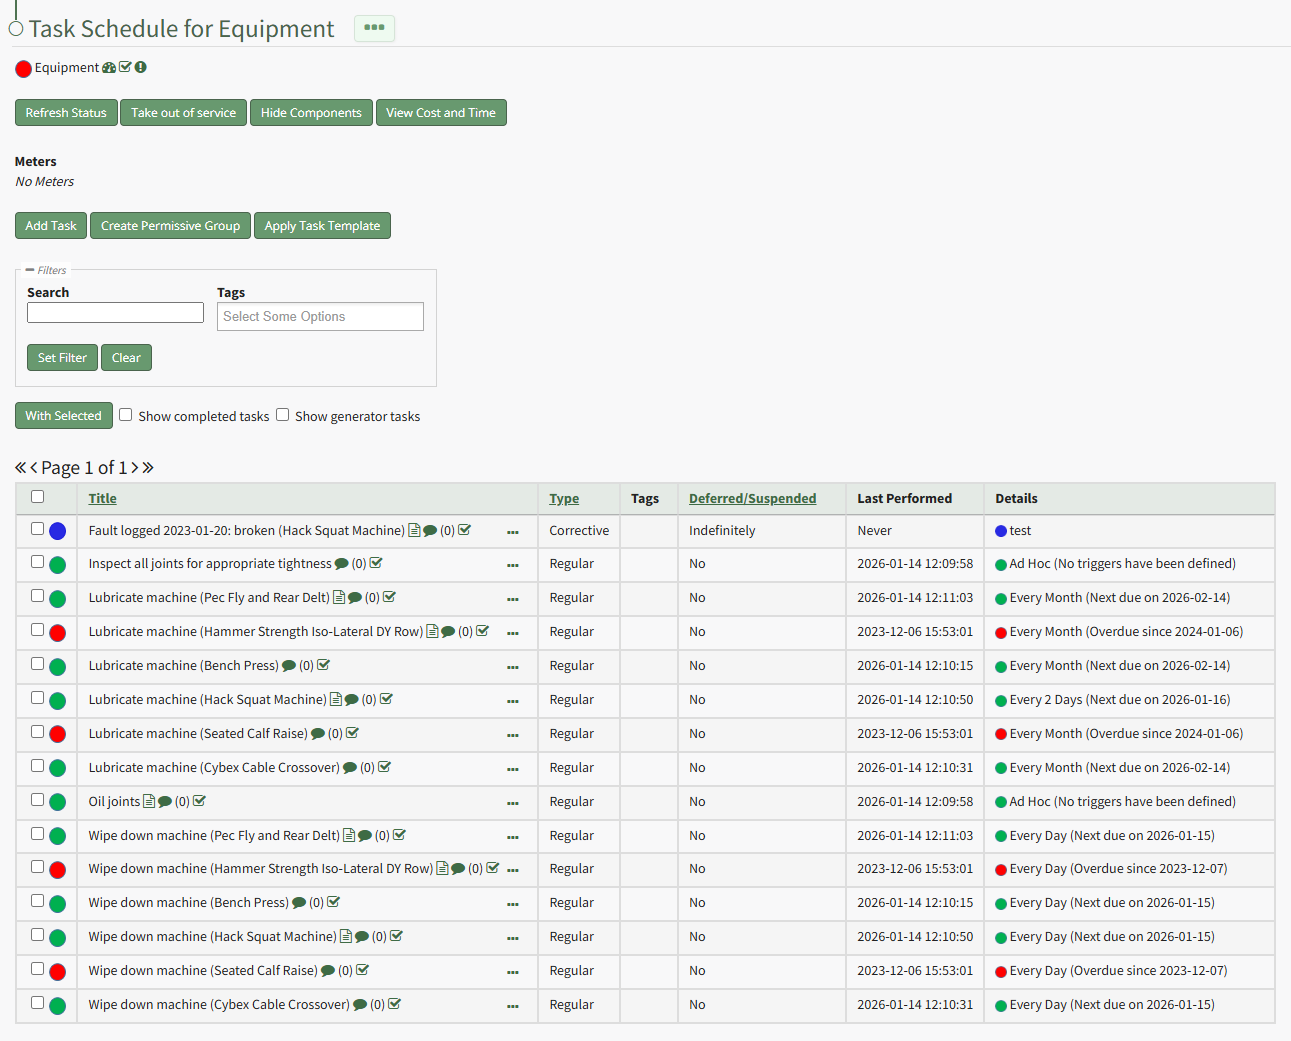
An Asset's Task Schedule Page
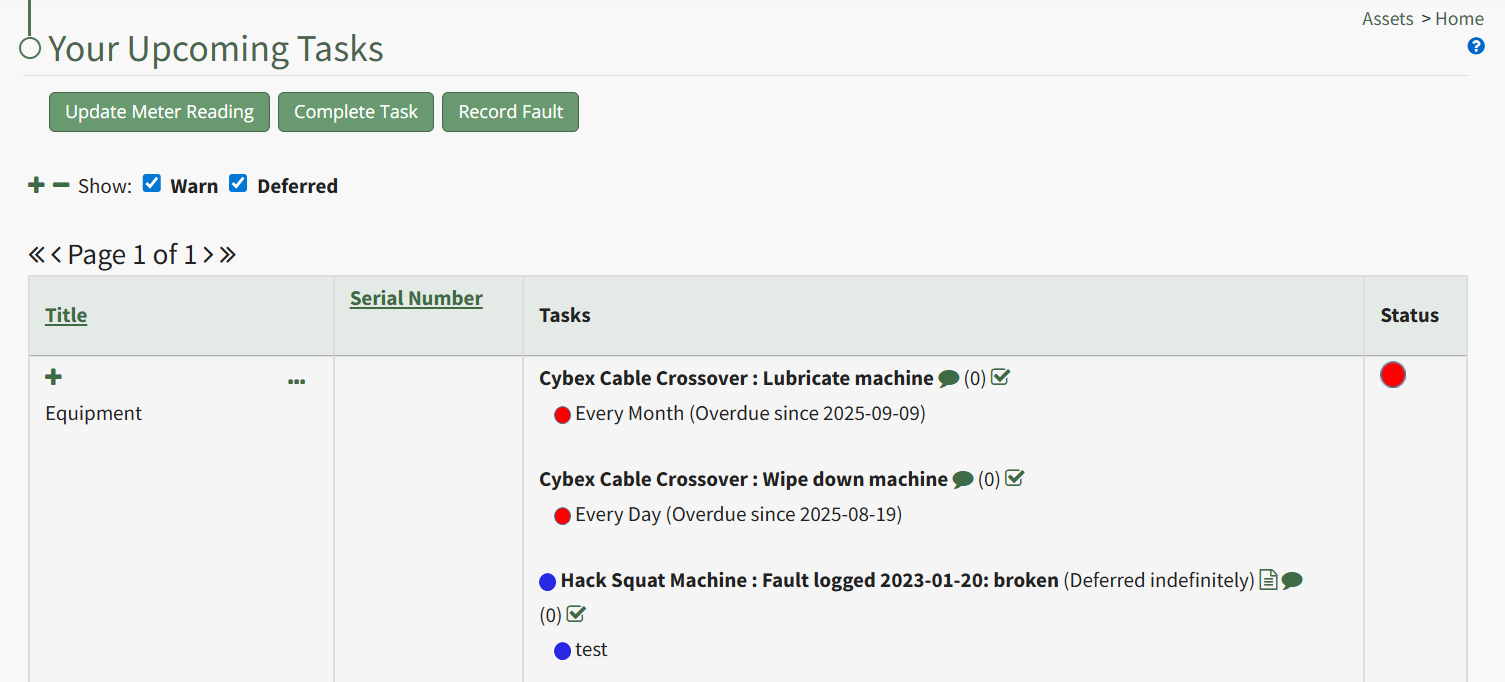
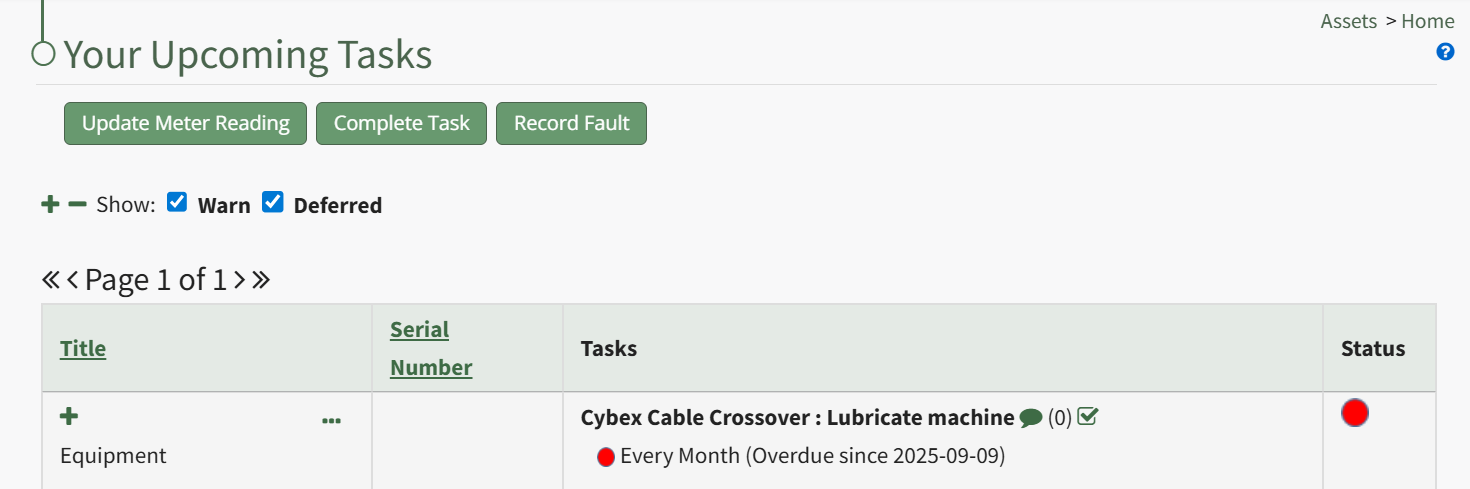
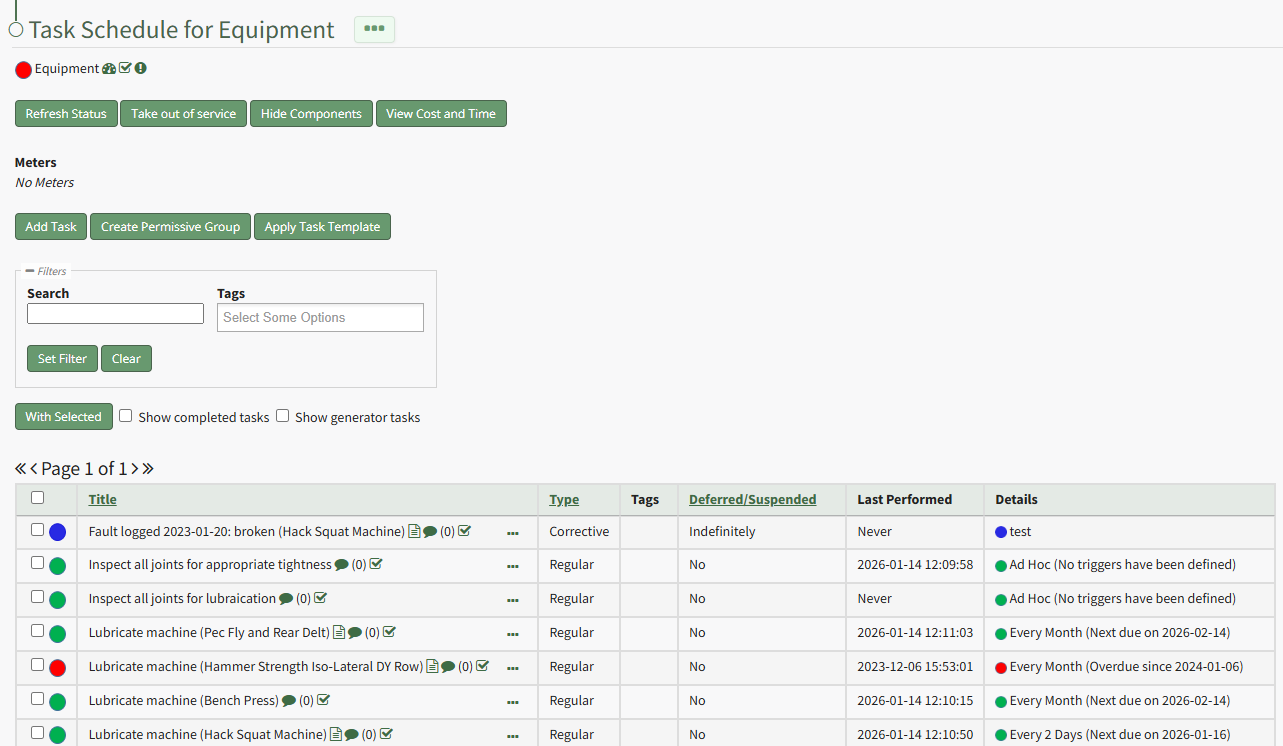
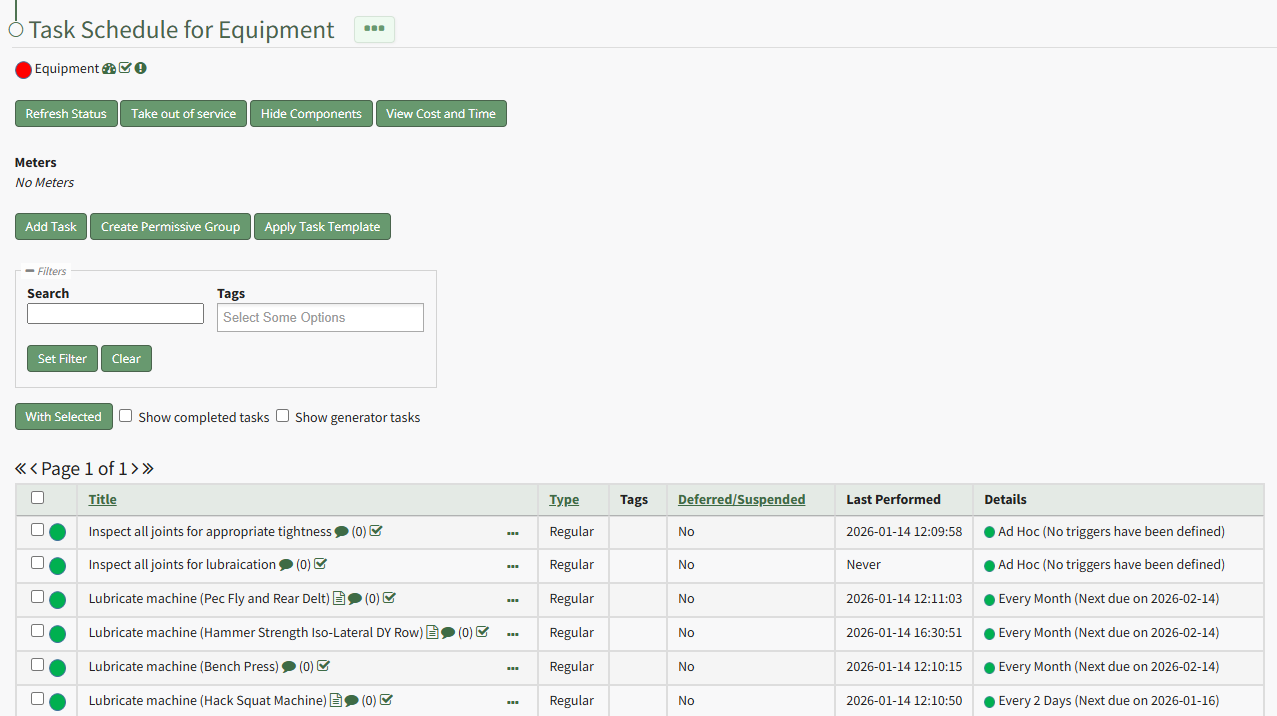
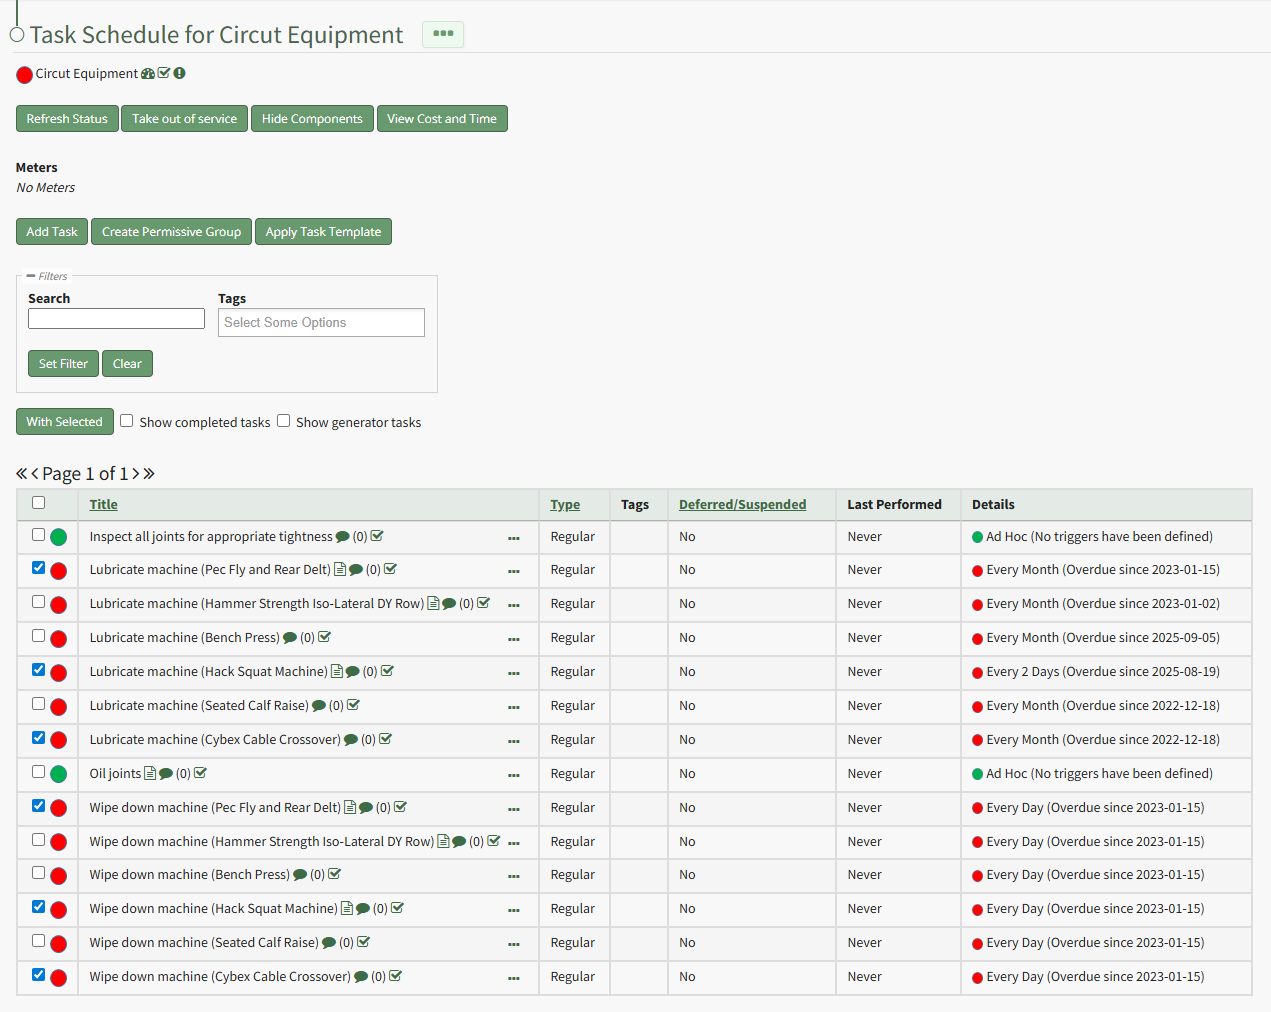
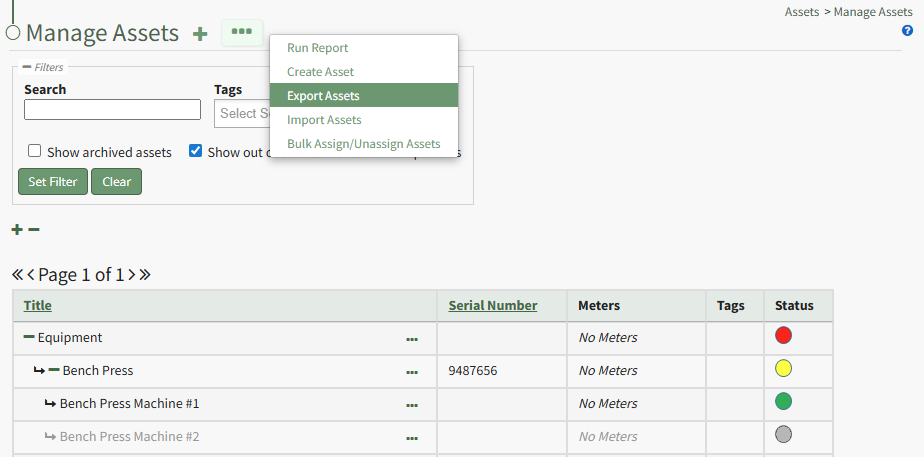
Each asset created in KAStrack will have its own Task Schedule Page which displays an asset's Task Schedule in tabular format. Tasks are added to an asset and managed from this page.

To the right of the Task Schedule Page header is three-dot icon that when clicked, opens the Task Schedule Page Context Menu with options for quick actions. Each of the possible Task Schedule Page Context Menu options are explained in the table below.
Task Schedule Page Context Menu Option Explanations | |||||||||||||||||||||||||
Option | Explanation | ||||||||||||||||||||||||
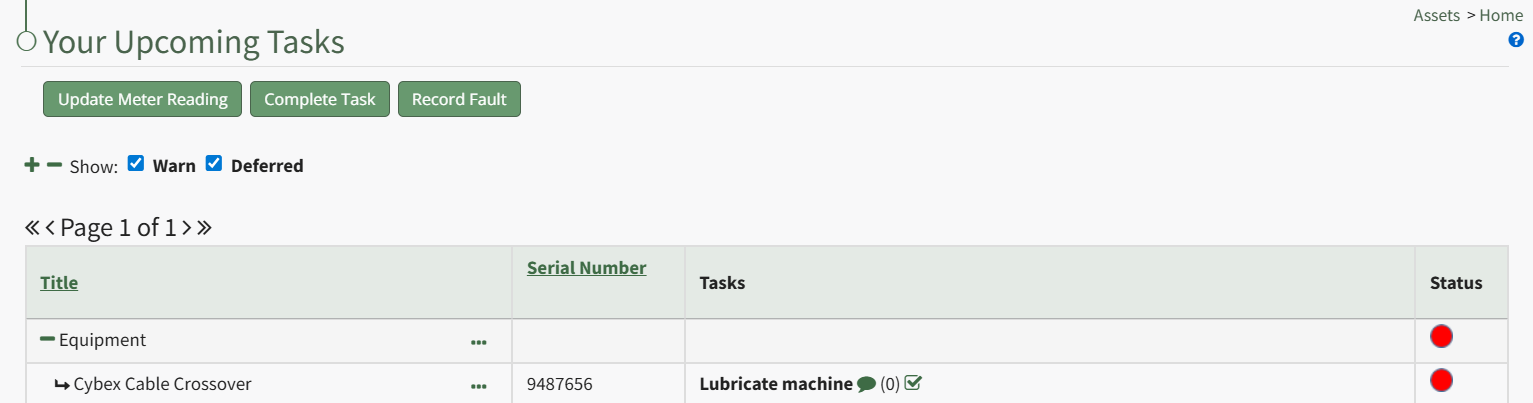
Complete Task | Selecting “Complete Task” on the context menu opens the Complete Task Modal, allowing a user to record necessary details and mark the task as complete. How To: Log a Task Has Been CompletedIn order to log that a task has been completed and is current/up to date (a green task status), go to the Upcoming Task Table on the Home Page of the Assets Module. Select the “Complete Task” button from the top of the Your Upcoming Tasks Page.
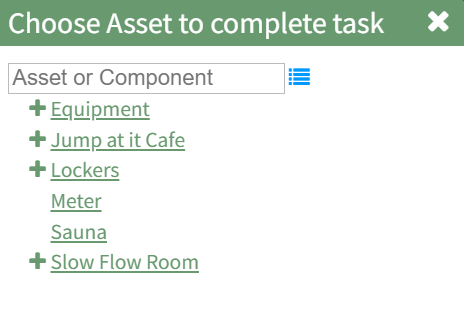
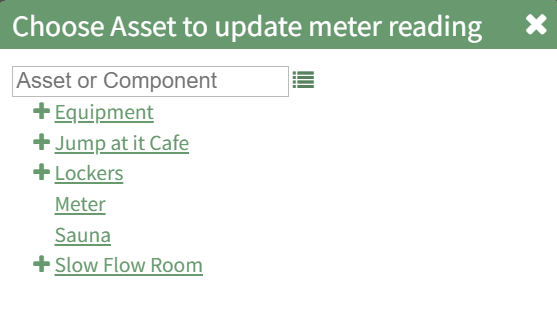
The Choose Asset Modal will prompt you to identify which asset you want to log data for. Click the bulleted list icon to access your assets. Selecting the plus sign “+” icon will expand the components under the asset. Selecting “Complete Task” from the three dot (…) context menu to the right of the asset / component title will open the same modal for the specified asset.
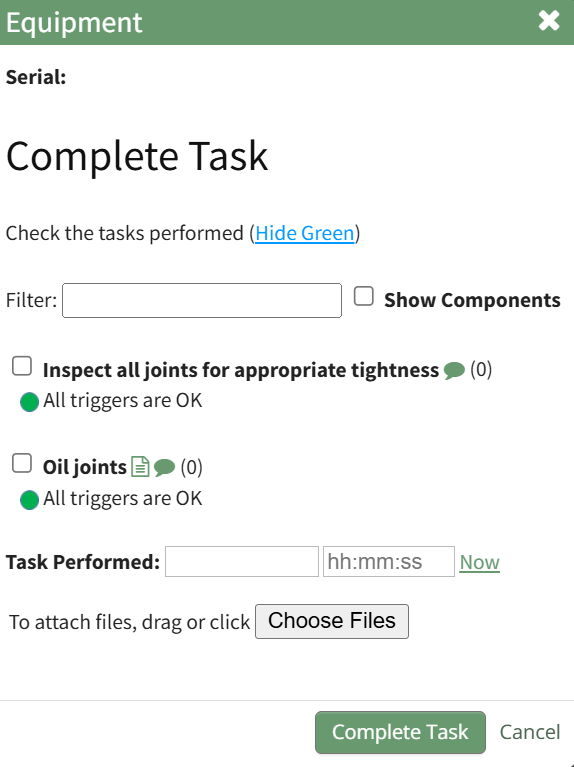
Select the appropriate asset, opening the asset's Complete Task Modal. Click the green View All clickable link to list all tasks associated with the selected asset, including tasks that are current / up to date (green status).
Serial numbers and the asset description will show at the top of the modal. Clicking the “Show Subcomponents” checkbox shows any subcomponent tasks associated with the asset, expanding the modal when selected. Beneath the task in bold is a note that indicates the parameters for the task, referred to as a trigger in KAStrack. Triggers refer to the task behavior, frequency or usage standards that KAStrack will applies to tasks to determine their schedule for completion. To log the task, select the checkbox of the completed task. You can manually enter the date (MM/DD/YYYY format) and time (hh:mm:ss format) that the task was completed, or select “Now” in order to input the current date and time. Click the “Complete Task” button to save the changes and complete the task. Click cancel to return to the Assets Module Homepage. | ||||||||||||||||||||||||
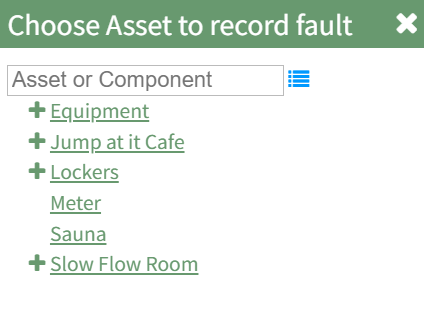
Record Fault | Selecting “Record Fault” on the context menu opens the Record Fault Modal, allowing a user to record any necessary details about a fault. How To: Record a FaultLogging faults allows your company to track trending data in KAStrack by recording incidents and any data associated with this issue/failure. In order to record fault with an equipment issue/failure, go to the Upcoming Task Table on the Asset Module Homepage and select the "Record Fault" button beneath the page header.
The Choose Asset Modal will prompt you to identify which asset you want to log data for. Click the bulleted list icon to access your assets. Selecting the plus sign “+” icon will expand the components within the Asset. Selecting “Record Fault” from the three dot (…) context menu will open the same modal for the specified asset.
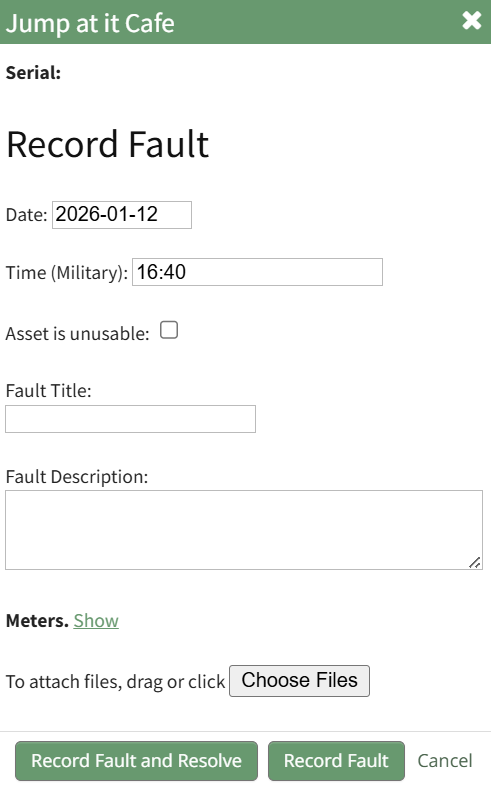
Select the appropriate asset, opening the Record Fault Modal.
Select the “Log Fault” button to record the incident. Select the “Log Fault and Resolve” button to complete two actions in one step: log the issue and indicate that it has been addressed. Click cancel to return to the Assets Module Homepage. | ||||||||||||||||||||||||
Update Meter Reading | Selecting “Update Meter Reading” on the context menu opens the Update Meter Reading Modal, allowing a user to record details regarding a meter reading. How To: Update a Meter ReadingIn order to update an asset's meter reading, go to the Assets Module Home Page opening the Upcoming Tasks Table. Click the “Update Meter Reading" button from the Asset Module Homepage.
The Choose Asset Modal will prompt you to identify which asset you want to log data for. Click the bulleted list icon to access your assets. Selecting the plus sign “+” icon will expand the components within the Asset. Selecting “Update Meter Reading” from the Upcoming Task Table Context Menu will open the same modal for the specified asset.
Select the appropriate asset, opening the Update Meter Reading Modal.
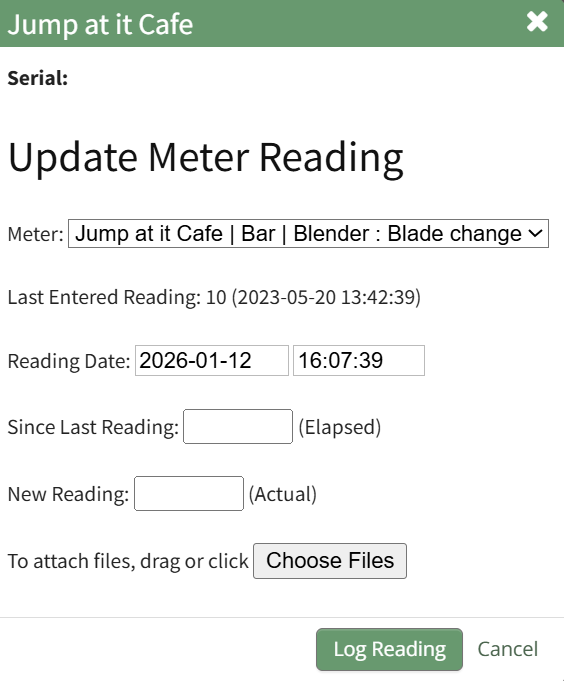
The meters associated with the asset/component selected show in a dropdown menu. Select the meter whose meter data you wish to record. The most recent meter reading shows in the Update Meter Reading Modal as the “Last Entered Reading.” KAStrack automatically inputs the current date and time. The user can enter an elapsed value (if preferred) and KAStrack will input the new actual, or the user can input the new meter reading and the elapsed value will be automatically input. Attach any files (if there are checklists, forms, etc.) associated with the meter reading. Select the “Log Reading” button to update the meter usage. Click cancel to return to the Assets Module Homepage. | ||||||||||||||||||||||||
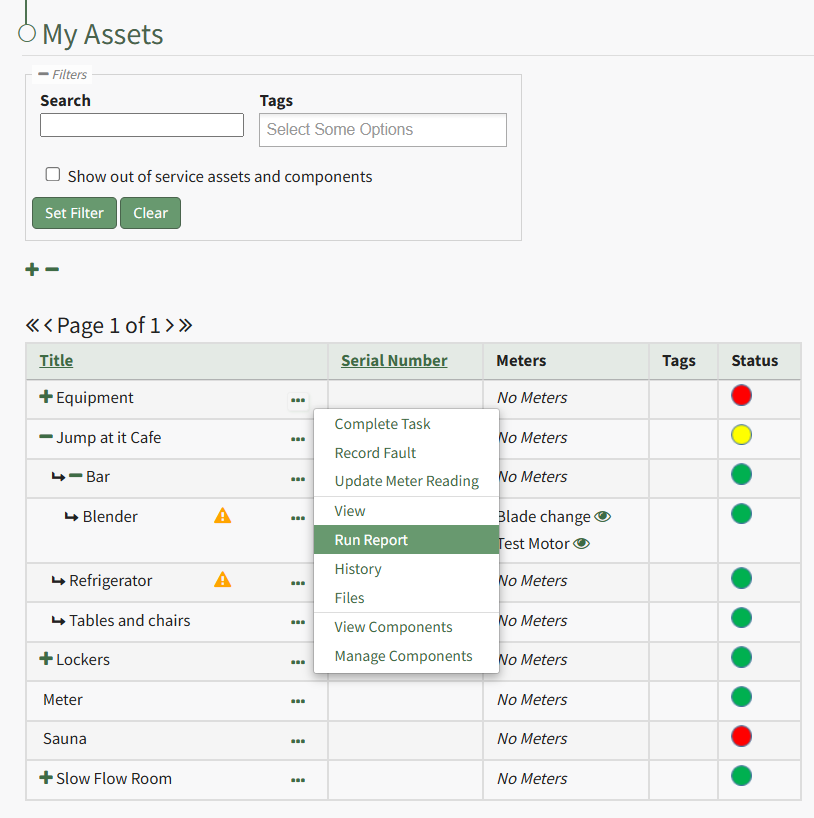
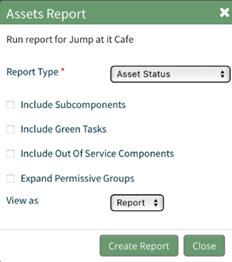
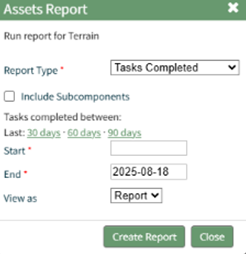
Run Report | Selecting “Run Report” from the context menu open the Assets Report Modal, allowing the user to select between five customizable Asset Reports. How To: Run an Asset ReportTo run an asset report, open the My Asset Page in the Assets Module on the Main Menu. Use filters as needed and identify the asset/component you want to run a report on. Click the three-dot icon to the right of the asset title opening a context menu.
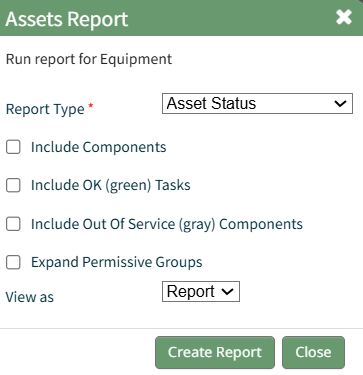
Select "Run Report" from the context menu opening the Assets Report Modal with options for running various types of reports.
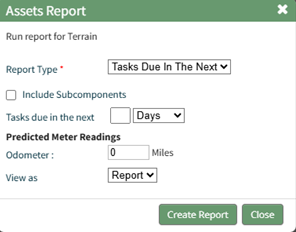
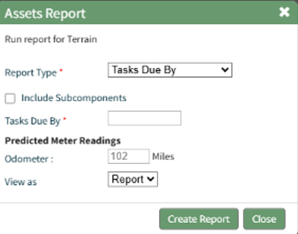
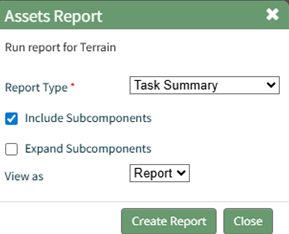
Reports can be run for an asset in its entirety, specific components or subcomponents. They type of report can be selected from a dropdown menu on the Assets Report Modal. An explanation of report types is included in the table below.
Select the "Create Report" button after completing the inputs on the Assets Report Modal and the system will generate your report in the viewing preference you selected. | ||||||||||||||||||||||||
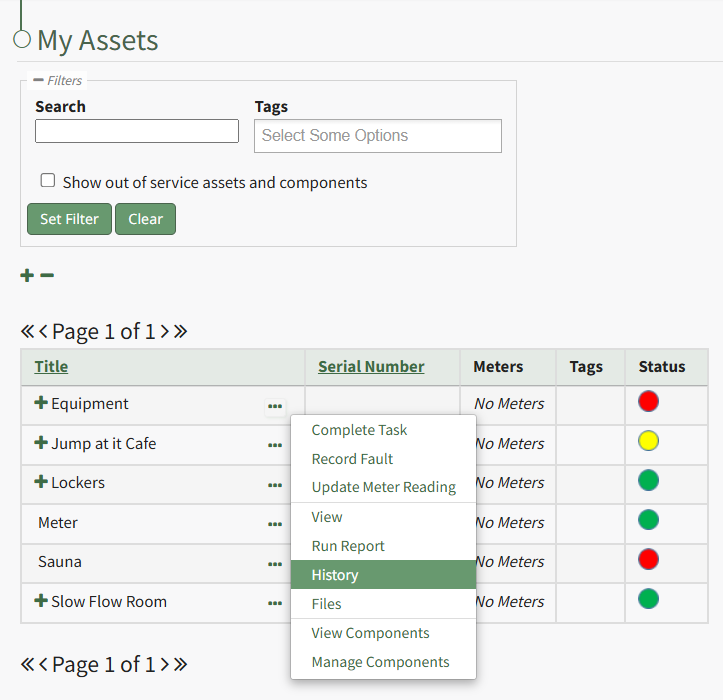
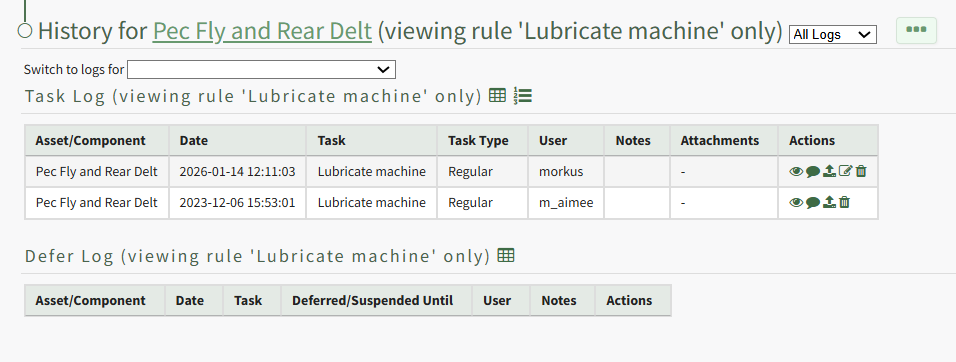
History | Selecting “History” from the context menu opens the Asset History Page with historical entries for the components/sub-components that were selected. The Asset History Page contains four historical logs - tasks completed, tasks deferred, as well meter and fault logs. How To: View an Asset's Historical TasksAn asset's historical data can be accessed from an asset's History Page. To access an asset's history, go to the My Assets Page in the Assets Module on the Main Menu. Use the filters as needed to identify the access whose history you wish to view, and click the three-dot icon to the right of the asset name. This opens a context menu.
Select "History" from the context menu opening the Asset History Page. | ||||||||||||||||||||||||
Edit | Selecting "Edit" on the context menu opens the Edit Asset Modal, which is used to alter asset details. How To: Edit an AssetTo edit a task associated with an asset, open the Task Schedule Page for the asset whose task you wish to edit. How To: View an Asset's Task ScheduleTo view an asset's task schedule, open the Manage Assets Page in the Assets Module on the Main Menu. Use filters as needed and identify the asset/component whose task schedule you wish to view. Click the three-dot icon to the right of the asset title opening the Asset Management Context Menu.
Select the "Manage Components" option, opening the Manage Asset Components Page. Select the three-dot icon to the right of the asset/component you wish to add interim notes to and select Task Schedule from the context menu.
This opens the asset's Task Schedule Page.
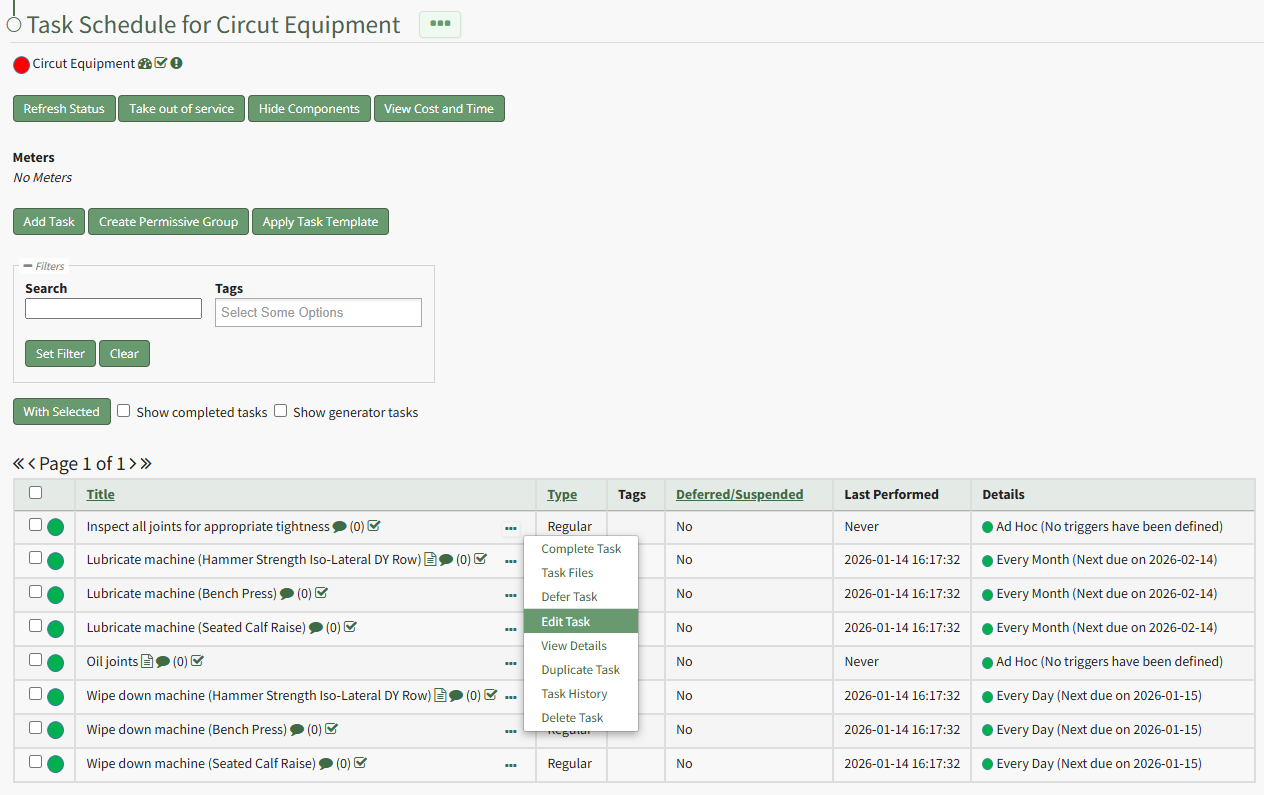
Click the three-dot icon to the right of the task you wish to edit opening the Task Management Context Menu. Select "Edit Task" opening the Edit Task Modal.
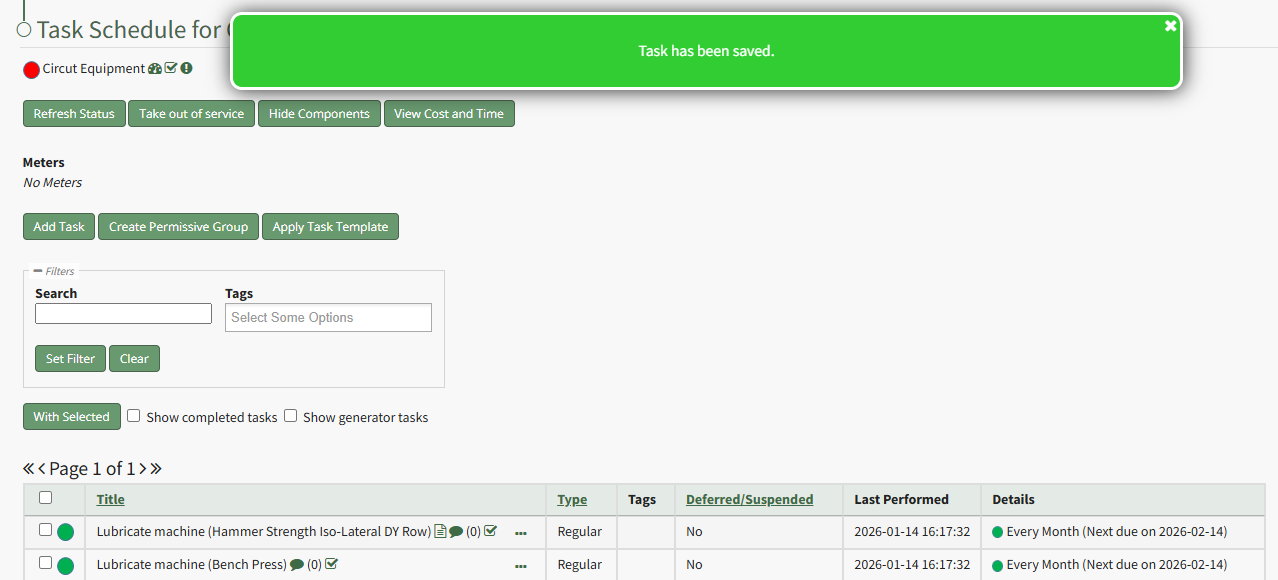
The Edit Task Modal allows you to alter the task name, add tags, change the task type and task trigger, alter who can perming the task, and other pertinent information. Select the "Save" button after making your desired changes and a popup confirms that the task edits were saved.
| ||||||||||||||||||||||||
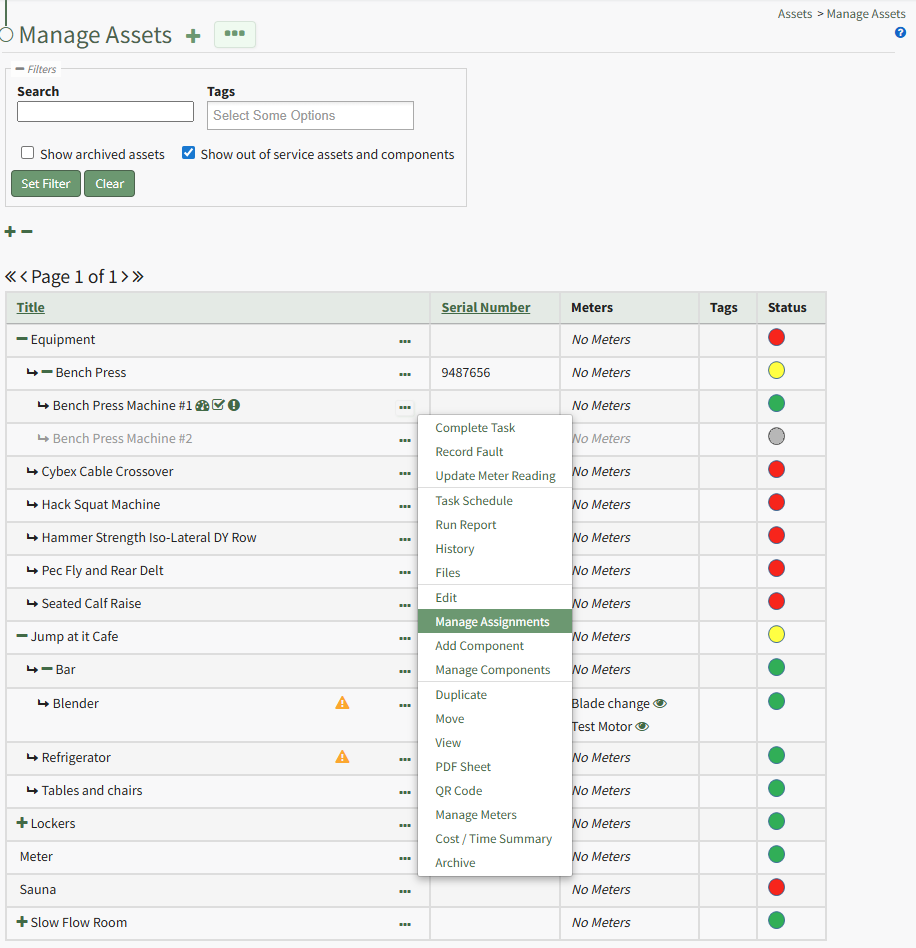
Manage Assignments | Selecting "Manage Assignments" on the context menu opens the Asset Assignments Modal which allows individual users and certification roles to be assigned to an asset. How To: Assign / Unassign Users and Certification Roles to an AssetTo assign or unassign users and certification roles for a specific asset, open the Manage Asset Pages in the Assets Module on the Main Menu. Use filters as needed and identify the asset/component you want to assign/unassign users and roles to. Click the three-dot icon to the right of the asset title opening a context menu.
Select "Manage Assignments" from the context menu opening the Asset Assignments Modal.
Click in the textbox beneath Assignments and a dropdown menu will allow you to assign the asset to multiple individuals or certification roles.
To unassign an individual, click the X icon to the right of the user name or certification role. When done, select the "Save Assignments" button.
A popup confirms that the asset assignments were saved. | ||||||||||||||||||||||||
Add Component | Selecting "Add Component" on the context menu opens the New Component Modal, which allows new components to be added to an asset. How To: Add Components to a Parent AssetTo add components to an asset, open the Manage Assets Page in the Assets Module from the Main Menu. In order to create components, the parent asset must have already been created. How To: Create a New AssetTo create a new asset, open the Manage Assets Page in the Asset Module and click the plus sign (+) icon to open the New Asset modal.
You can also access the New Asset Modal by clicking the three dot (…) icon and selecting “Create Asset” from the context menu.
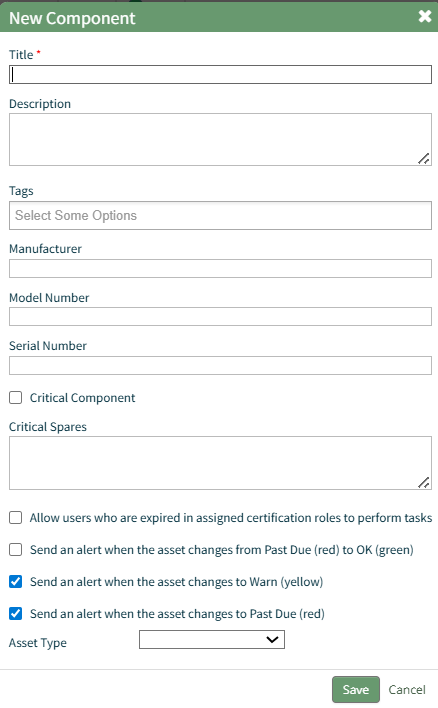
The New Asset Modal requires the entry of an Asset Title. Optional fields include an asset description, tags, manufacturer, model number, serial number, and critical spares. Select the "Critical Component" checkbox to designate this asset as a critical component. This term is subjective for your organization to define. Designating an asset as a critical component will result in a hazard symbol being used as a visual indicator.
Critical items are prioritized and show separately on the Assets Module Summary. An entire asset is designated as a critical. All components and associated tasks will also have a critical component designation. KAStrack’s default setting prevents users with an expired certification role from performing tasks (such as completing tasks, recording faults, and updating meter readings. Select the “Allow users who are expired in assigned certification roles to perform tasks” checkbox to allow a user to perform tasks regardless of their assigned certification role status. The remaining three checkbox options all relate to asset status alert preferences. The “Send an alert when the asset changes from Past Due to OK” checkbox will send an alert via email to the assigned users when the task status changes from past due (red) to current/up to date (green). The “Send an alert when the asset changes to Warn” checkbox will send an alert via email to all users assigned to the asset when the task status changes from current/up to date (green) to warn (yellow). The “Send an alert when the asset changes to Past Due” checkbox will send an alert via email to all users assigned to the asset when the task status changes to past due (red). Asset Types are customizable to your company and are created on the Settings Page of the Asset Module. Once an asset type has been created, you can select one from the dropdown menu in the New Asset Modal to enable additional filtering capabilities. Asset Types allows your organization to add customizable fields unique to individual assets. How To: Create a New Asset TypeTo create a new asset type, open the Asset Types Tab on the Settings Page of the Assets Module.
Selecting the “Add Asset Type” button opens the New Asset Type modal.
Input the title of the New Asset Type and click “Save”. The newly created Asset Type will now show in the table on the Asset Type tab on the Settings page and is ready for you to add fields to. How To: Add Fields to an Asset Type{{@496}} Select the “Save” button at the bottom of the New Asset Modal to create the new asset or click “Cancel” to close the modal without saving and return to the Manage Assets Page. After an asset is created, it will appear in the Manage Asset Table where it can be managed.
Identify the pre-existing asset (or component) that you would like to place this new component under, and click the three dot (…) icon to the right of the asset name in the Manage Assets table opening the Manage Asset Context Menu. Select "Add Component" opening the New Component Modal.
The fields on the New Component modal ask for the same information on the New Asset Modal. For a detailed description of the fields, refer to the How To Create a New Asset page. Select the “Save” button and the component will appear underneath its asset in the Manage Asset table (if the view is expanded) where it can be managed. Subcomponents/additional child components can also be created for components if desired. Select the three dot (…) menu to the right of the component you would like to add an additional subcomponent in the asset’s hierarchal structure. | ||||||||||||||||||||||||
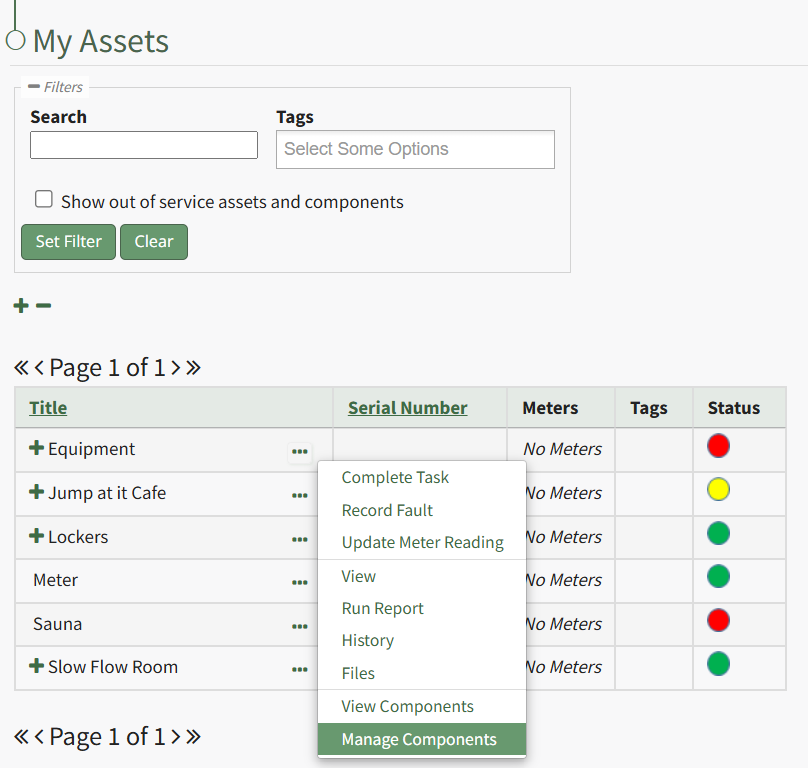
Manage Components | Selecting “Manage Components” from the context menu will open the Manage Asset Components Page where assets and their components can be managed. Only users with appropriate permissions will have access to this page. | ||||||||||||||||||||||||


In addition to the search and tag filters, checkboxes allow you to customize your Task Schedule view allowing you to include/exclude completed tasks and generator tasks. The Task Schedule Page has several icons. The actions associated with each icon are explained in the Task Schedule Icon Explanation Table below.
Task Schedule Page Icon Explanation Table | |
Icon | Meaning |
| Clicking the odometer icon opens the Update Meter Reading Modal. This icon initiates the same action as the "Update Meter Reading" option on the Task Schedule Page Context Menu. How To: Update a Meter ReadingIn order to update an asset's meter reading, go to the Assets Module Home Page opening the Upcoming Tasks Table. Click the “Update Meter Reading" button from the Asset Module Homepage.
The Choose Asset Modal will prompt you to identify which asset you want to log data for. Click the bulleted list icon to access your assets. Selecting the plus sign “+” icon will expand the components within the Asset. Selecting “Update Meter Reading” from the Upcoming Task Table Context Menu will open the same modal for the specified asset.
Select the appropriate asset, opening the Update Meter Reading Modal.
The meters associated with the asset/component selected show in a dropdown menu. Select the meter whose meter data you wish to record. The most recent meter reading shows in the Update Meter Reading Modal as the “Last Entered Reading.” KAStrack automatically inputs the current date and time. The user can enter an elapsed value (if preferred) and KAStrack will input the new actual, or the user can input the new meter reading and the elapsed value will be automatically input. Attach any files (if there are checklists, forms, etc.) associated with the meter reading. Select the “Log Reading” button to update the meter usage. Click cancel to return to the Assets Module Homepage. |
| Clicking the checkbox icon is a quick link that opens the Complete Task Modal that is used to mark a task as completed and up to date. This icon initiates the same action as the "Complete Task" open on the Task Schedule Page Context Menu. How To: Log a Task Has Been CompletedIn order to log that a task has been completed and is current/up to date (a green task status), go to the Upcoming Task Table on the Home Page of the Assets Module. Select the “Complete Task” button from the top of the Your Upcoming Tasks Page.
The Choose Asset Modal will prompt you to identify which asset you want to log data for. Click the bulleted list icon to access your assets. Selecting the plus sign “+” icon will expand the components under the asset. Selecting “Complete Task” from the three dot (…) context menu to the right of the asset / component title will open the same modal for the specified asset.
Select the appropriate asset, opening the asset's Complete Task Modal. Click the green View All clickable link to list all tasks associated with the selected asset, including tasks that are current / up to date (green status).
Serial numbers and the asset description will show at the top of the modal. Clicking the “Show Subcomponents” checkbox shows any subcomponent tasks associated with the asset, expanding the modal when selected. Beneath the task in bold is a note that indicates the parameters for the task, referred to as a trigger in KAStrack. Triggers refer to the task behavior, frequency or usage standards that KAStrack will applies to tasks to determine their schedule for completion. To log the task, select the checkbox of the completed task. You can manually enter the date (MM/DD/YYYY format) and time (hh:mm:ss format) that the task was completed, or select “Now” in order to input the current date and time. Click the “Complete Task” button to save the changes and complete the task. Click cancel to return to the Assets Module Homepage. |
| Clicking the exclamation point icon opens the Record Fault Modal that is used to indicate an issue with an asset. This icon indicates the same action as the "Record Fault" option on the Task Schedule Page Context Menu. How To: Record a FaultLogging faults allows your company to track trending data in KAStrack by recording incidents and any data associated with this issue/failure. In order to record fault with an equipment issue/failure, go to the Upcoming Task Table on the Asset Module Homepage and select the "Record Fault" button beneath the page header.
The Choose Asset Modal will prompt you to identify which asset you want to log data for. Click the bulleted list icon to access your assets. Selecting the plus sign “+” icon will expand the components within the Asset. Selecting “Record Fault” from the three dot (…) context menu will open the same modal for the specified asset.
Select the appropriate asset, opening the Record Fault Modal.
Select the “Log Fault” button to record the incident. Select the “Log Fault and Resolve” button to complete two actions in one step: log the issue and indicate that it has been addressed. Click cancel to return to the Assets Module Homepage. |
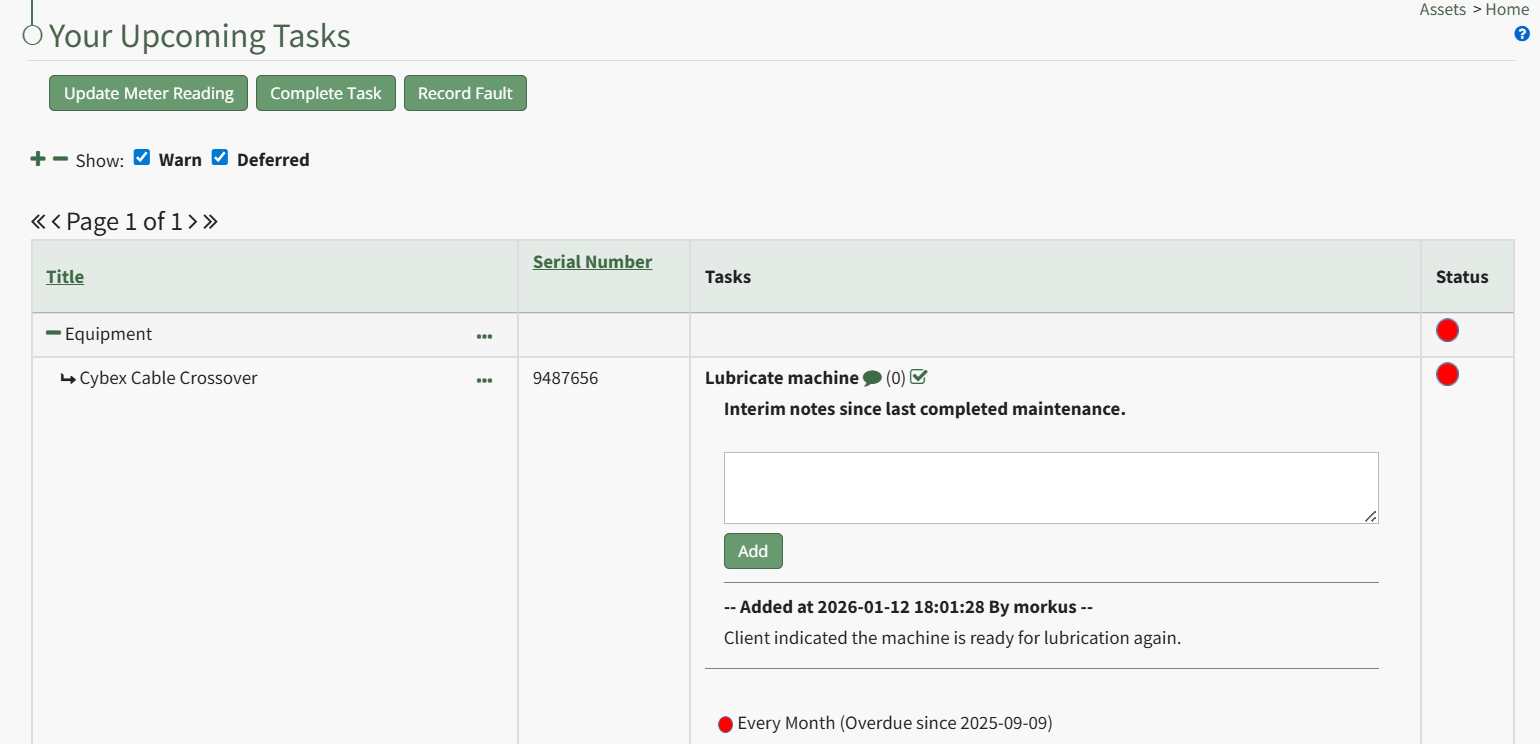
| When the page icon is visible in the Task Schedule Table, it is indicating that there is additional information available regarding the task. When the icon is clicked, an Additional Information Sections with notes appears. How To: View Additional Notes Associated with a TaskAdditional notes associated with a task can be viewed on the Assets Home Page (for upcoming tasks only) and on an asset's task schedule page. If additional information exists for a task, a page icon will be present to the right of the task title.
Clicking the Page Icon to the right of an asset task in the Upcoming Task Table or an assets Task Schedule Page expands the table
Click the Page Icon a second time to collapse the table and remove the notes from visibility. |
| Clicking the task note icon opens a text box that allows a user to add interim notes to a task without completing the task . Any previously added interim notes for this task will show when the dialogue icon is clicked. How To: Add Interim Notes to a Task without Task CompletionTo add interim notes to a task without completing the task, you will need to pull up the specific task you wish to add a note to. This could be done from the Upcoming Task Table or from an Asset's Task Schedule. To Add Interim Notes from the Upcoming Task TableTo add interim notes to a task from the Upcoming Task Table, open the Assets Module Home Page from the Main Menu.
Click the dialogue icon to the right of the specific task title, which expands the Upcoming Task Table with a textbox for interim notes since the task was last completed. Input the interim notes and click the "Add" button.
Any previously added notes will show beneath the text box, indicating the time, date, and user who made the interim notes. To Add Interim Notes from an Asset's Task ScheduleTo add interim notes to a task that is not visible on the Upcoming Task Table, select the My Assets Page in the Assets Module on the Main Menu. Identify the asset you wish you add interim notes to, and click the three-dot icon to the right of the asset/sub-component name opening the My Assets Context Menu.
Select the "Manage Components" option, opening the Manage Asset Components Page.
Select the three-dot icon to the right of the asset/component you wish to add interim notes to and select Task Schedule from the context menu.
This opens the asset's Task Schedule Page. Select the dialogue icon to the right of the task you wish to add a note to, expanding the task table to show a textbox for interim notes between maintenance.
Input the desired notes and select the "Add" button.
The note will now show beneath the textbox. The system automatically includes a time/date stamp and the User ID of the individual that added the note. |
| The number within parenthesis indicates the number of interim notes that have been added to a task since the last completed maintenance. |


The Task Schedule Page contains several buttons that enable efficient task management. An explanation of each button on the Task Schedule Page has been included in the table below.
Task Schedule Buttons Explanation Table | ||||||||
Icon | Meaning | |||||||
Refresh Status | Clicking the Refresh Status button on the Task Schedule Page refreshes the status of the tasks shown on the Task Schedule Table processing any new task information since the page was opening. How To: Refresh the Task Schedule TableTo refresh the task schedule table with any task updates since the Task Schedule Page was opened, select the Refresh Status beneath the Task Schedule Page header.
The system will process any changes and the Task Schedule Table will reflect the most up to date information.
| |||||||
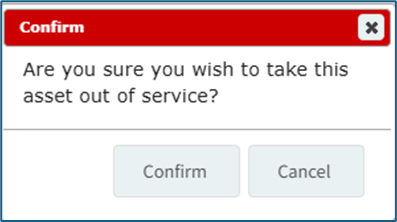
Take Out of Service | Clicking the Take Out of Service button on the Task Schedule Page opens a Status Confirmation Modal which states, "Are you sure you wish to take this asset / component out of service?" How To: Take an Asset Out of ServiceTo take an asset out of service and give it a grey task status, open the Manage Assets Page in the Assets Module.
Click the three dot (…) icon to the right of the asset associated with the task you want to take out of service opening the context menu. Select “Task Schedule” opening the asset's Task Schedule Page.
Select the “Take out of service” button opening a confirmation modal stating, “Are you sure you wish to take this asset out of service?”
Select “Confirm” and the asset will be taken out of service. A modal will confirm that the asset was taken out of service.
The Task Status for the asset will now be gray. | |||||||
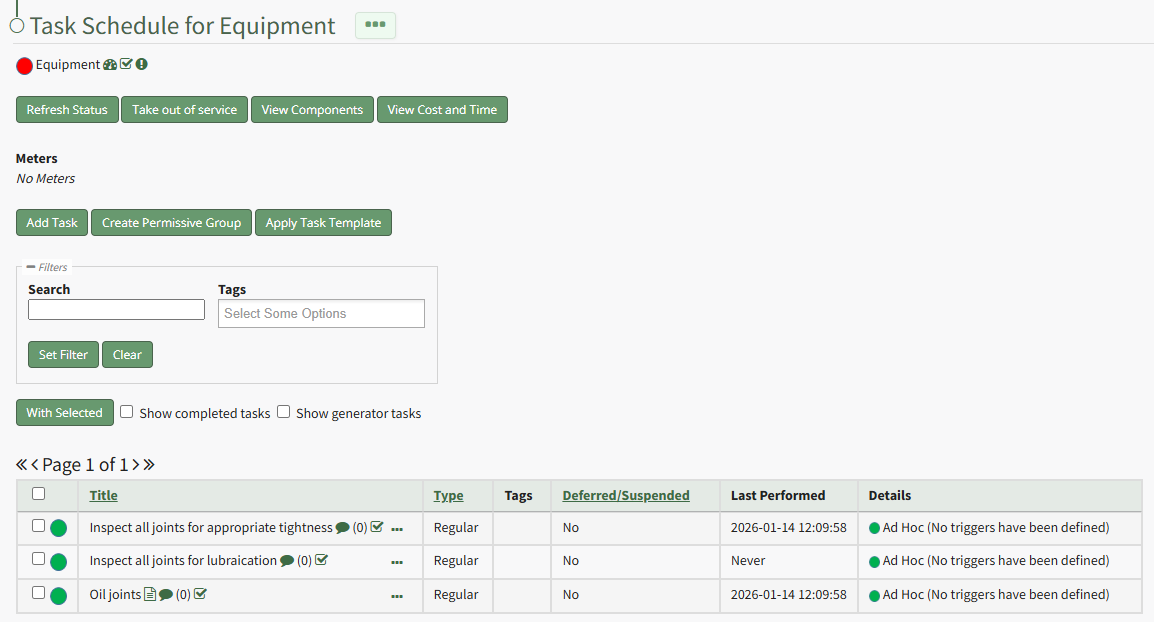
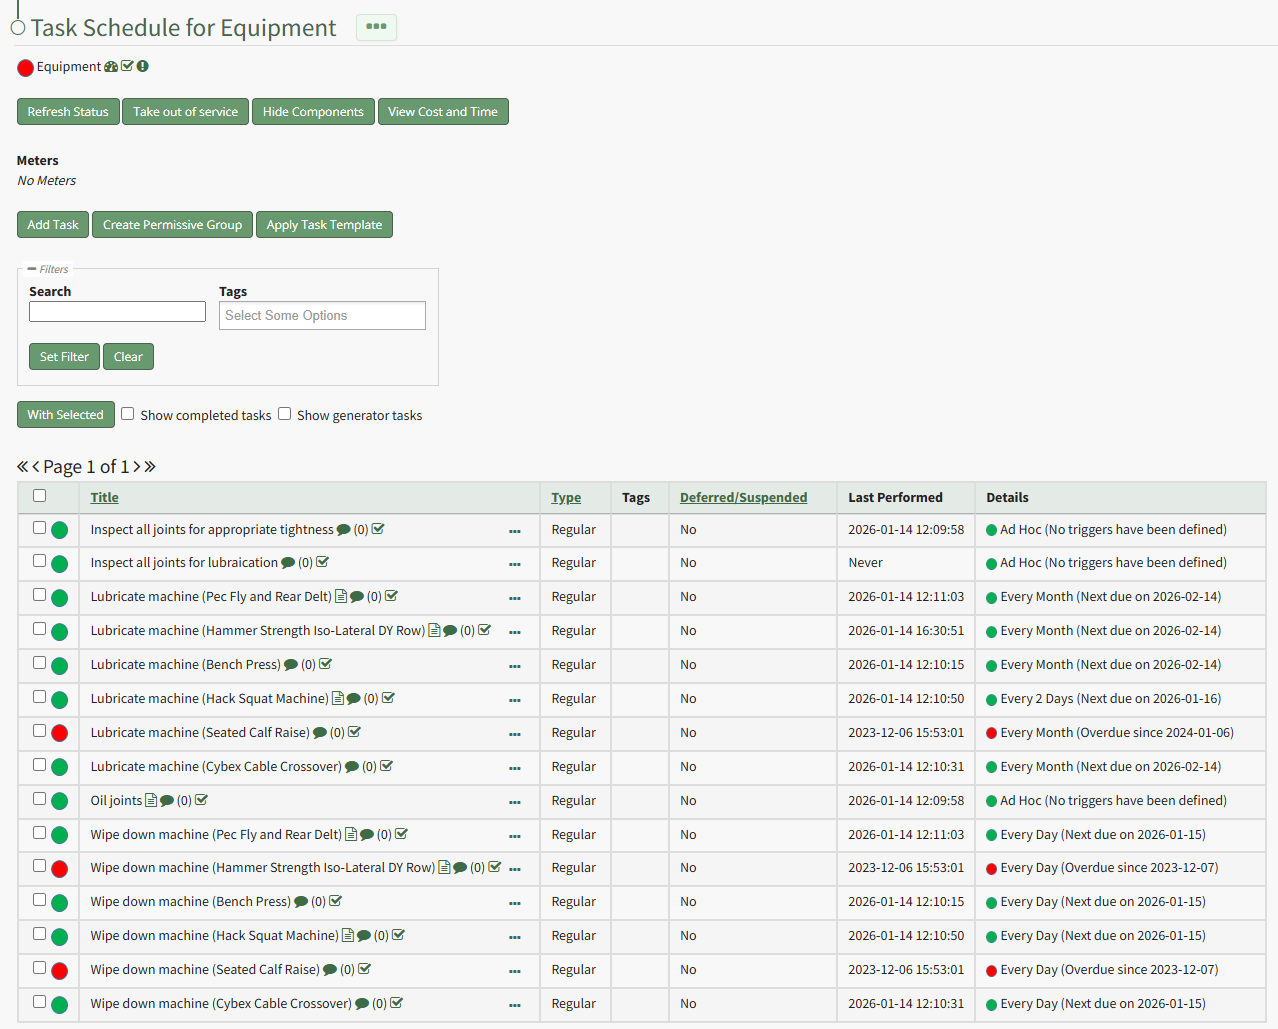
View Components / Hide Components | Clicking the View Components button on the Task Schedule Page will expand the Task Schedule Table to include all tasks associated with a parent asset's components. The View Components button changes to a Hide Components button that will allow you to collapse the task schedule view. How To: View All Components on an Asset's Task Schedule PageTo view all component's tasks on an asset's task schedule page, open the Task Schedule Page of the asset whose components you wish to view. How To: View an Asset's Task ScheduleTo view an asset's task schedule, open the Manage Assets Page in the Assets Module on the Main Menu. Use filters as needed and identify the asset/component whose task schedule you wish to view. Click the three-dot icon to the right of the asset title opening the Asset Management Context Menu.
Select the "Manage Components" option, opening the Manage Asset Components Page. Select the three-dot icon to the right of the asset/component you wish to add interim notes to and select Task Schedule from the context menu.
This opens the asset's Task Schedule Page.
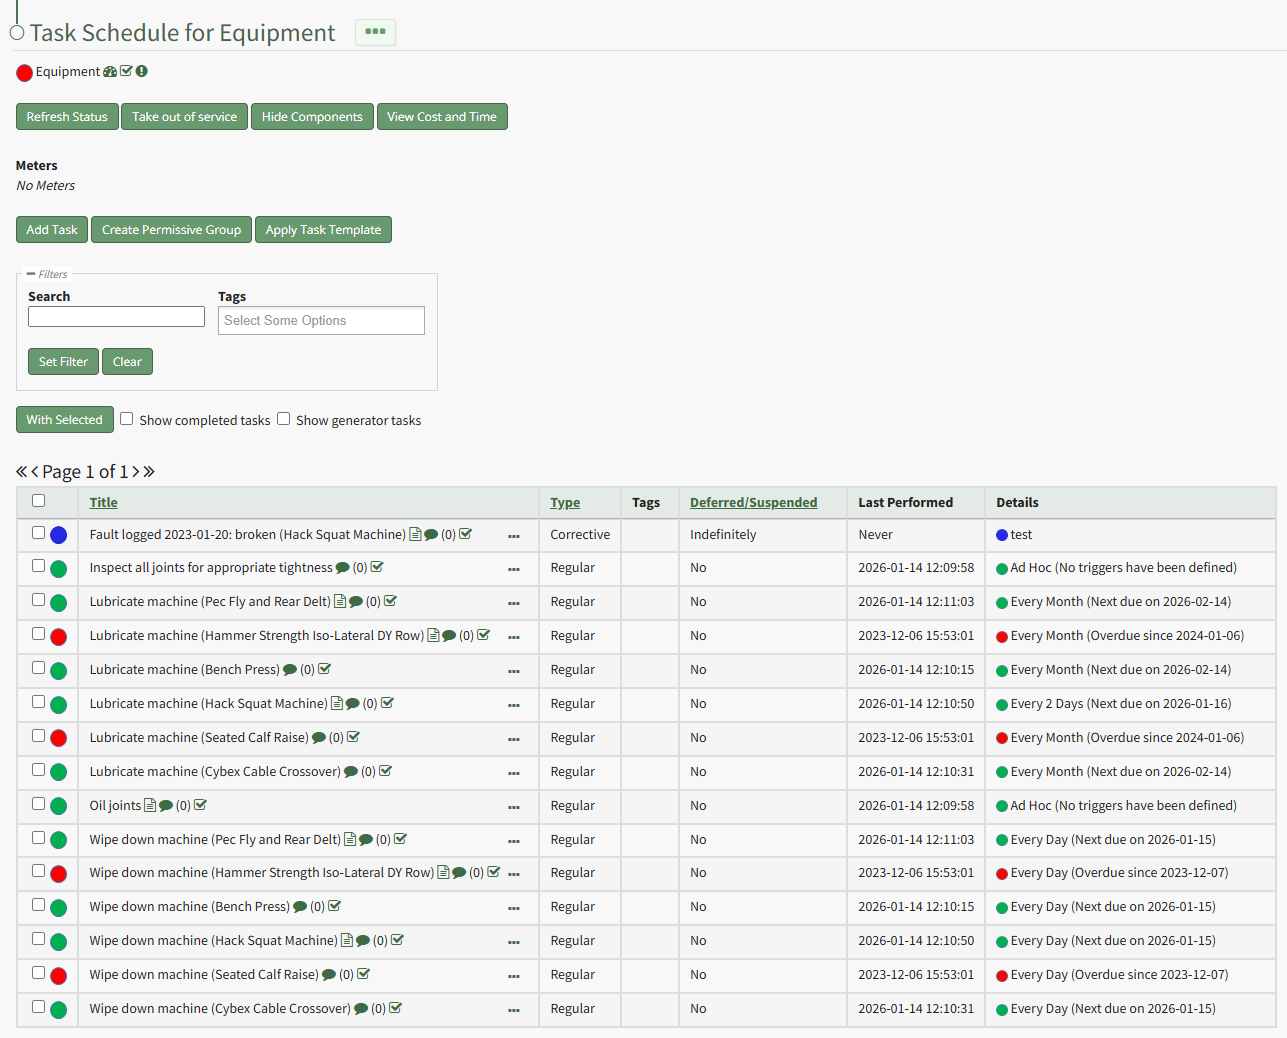
Click the "View Components" button below the page header and the Task Schedule Table will now include any tasks associated with components of the parent asset.
Select the "Hide Components" button beneath the page header to revert back to the Task Schedule strictly for the parent asset. | |||||||
View Cost and Time | Clicking the View Cost and Time button on the Task Schedule Page opens an asset's Cost and Time Summary Modal, displaying the cost and time associated with the asset's tasks. An asset's components can be included in the summary. How To: View an Asset's Cost/Time SummaryTo view the Cost/Time Summary associated with the asset's tasks, open the Manage Assets Page in the Assets Module on the Main Menu. Use filters as needed and identify the asset/component with the task whose task's cost/time summary you want to view. Click the three-dot icon to the right of the asset title opening the Asset Management Context Menu.
Select the "Manage Components" option, opening the Manage Asset Components Page. Select the three-dot icon to the right of the asset/component you wish to add interim notes to and select Task Schedule from the context menu.
This opens the asset's Task Schedule.
Click the "View Cost and Time" button to open the Cost/Time Summary Modal for that Task Schedule. | |||||||
Add Task | Clicking the Add Task button on the Task Schedule Page opens the New Task Modal. How To: Add a Task to an Asset/ComponentTo create a new task for a specific asset, open the Task Schedule Page of the relevant asset. How To: View an Asset's Task ScheduleTo view an asset's task schedule, open the Manage Assets Page in the Assets Module on the Main Menu. Use filters as needed and identify the asset/component whose task schedule you wish to view. Click the three-dot icon to the right of the asset title opening the Asset Management Context Menu.
Select the "Manage Components" option, opening the Manage Asset Components Page. Select the three-dot icon to the right of the asset/component you wish to add interim notes to and select Task Schedule from the context menu.
This opens the asset's Task Schedule Page.
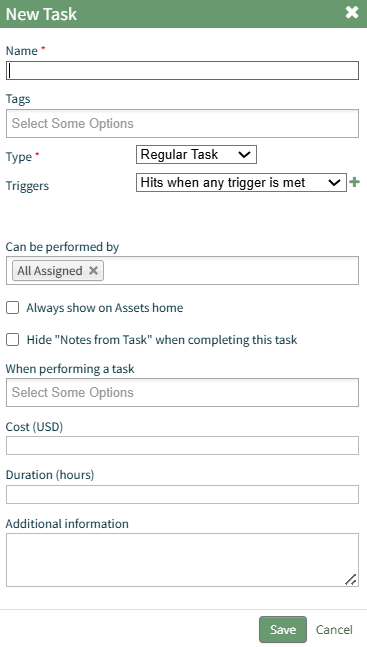
Select the "Add Task" button opening the New Task Modal.
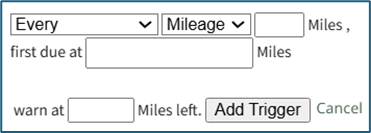
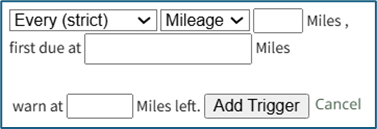
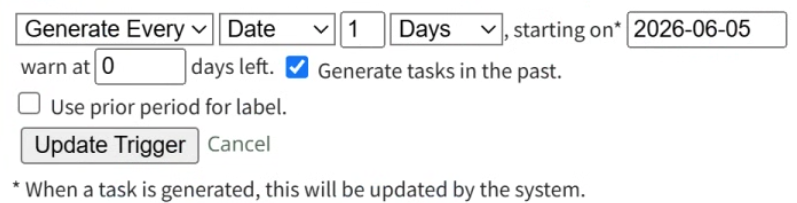
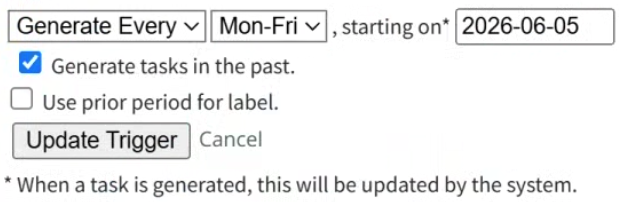
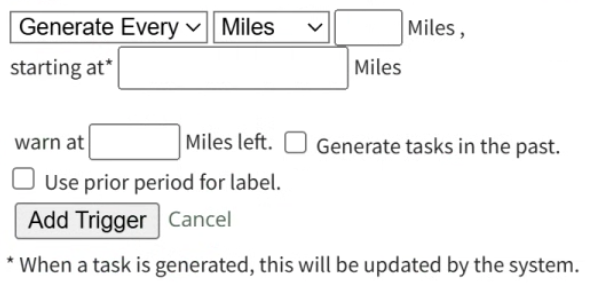
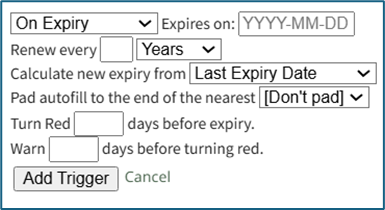
Input the Task Name and any tags you want to be associated with the task. Select the Task Type and the Trigger Behavior from the dropdown menu. A detailed explanation of Task Trigger Settings has been included in the user manual. Use the Customized Trigger Settings How To Links in the table below for ease in completing this modal when you select the plus sign icon to the right of the Trigger Behaviors dropdown menu.
Clicking the field beneath "Can be Performed by" opens a dropdown menu. The option "All assigned" allows any user assigned the asset the ability to complete the specific task. Individual users assigned the asset can be individually assigned to the new task. Click the "Always show on Assets Home" checkbox if you would like this task to show on the Upcoming Task Table, regardless of the status. Click the "Hide 'Notes from Task' when completing this task" checkbox if you want to hide notes regarding this task when logging the task as complete. Clicking the field beneath "When performing a task" opens a dropdown menu with options to require a file upload when a task is completed and/or require a meter reading when a task is completed. All meters associated with the asset will be listed individually on the dropdown menu. Inputting a Cost and Duration (time in hours) associated with a task allows the system to generate Cost/Time Summaries for an asset and its components. Additional information regarding the task can be included in the final textbox. Select "Save" after inputting the task details.
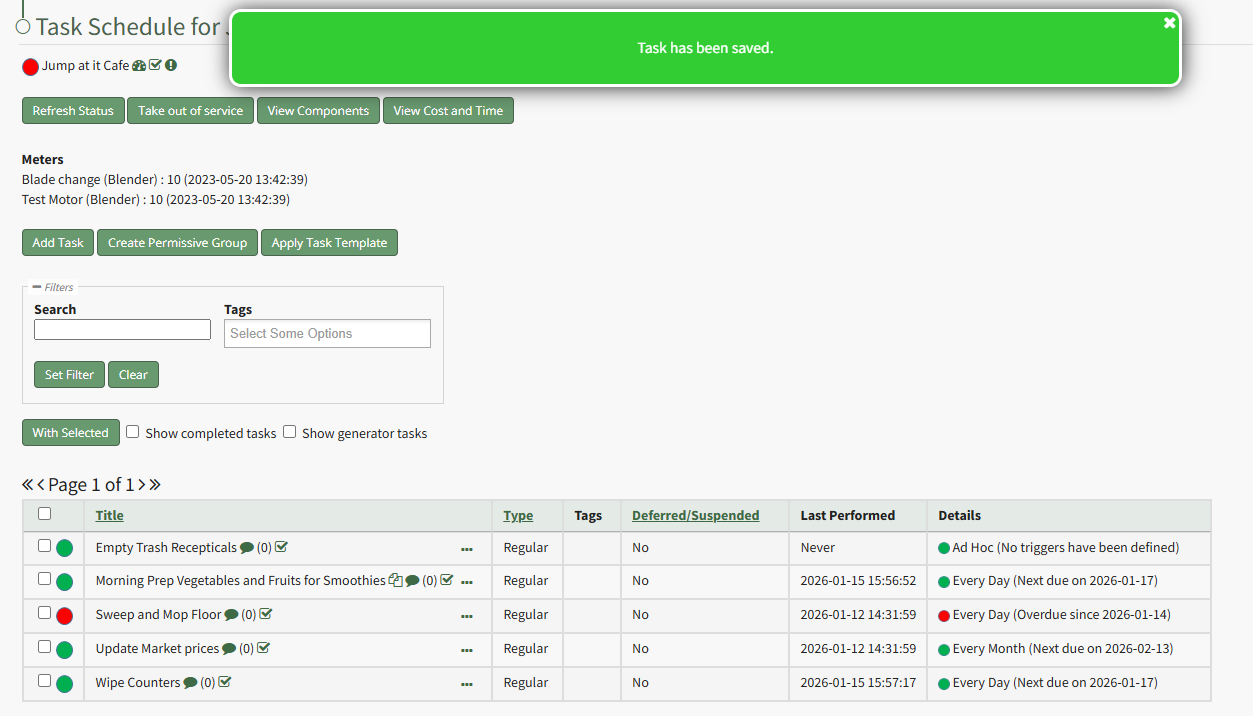
A popup confirms that the task has been saved. It now shows on the asset's Task Schedule Table. | |||||||
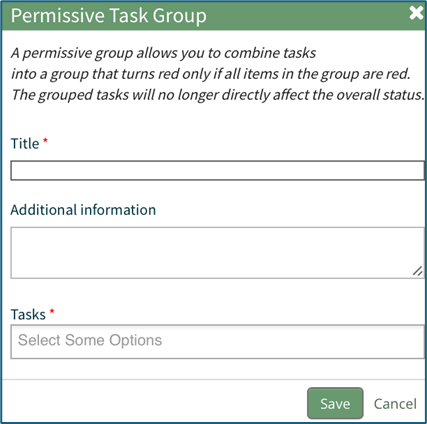
Create Permissive Group | Clicking the Create Permissive Group Button on the Task Schedule Page opens the Permissive Task Group Modal. Permissive groups allow a user to combine tasks into a group. When tasks are grouped together, the group status will only turn red if ALL of the tasks in the group become red. The status of the grouped tasks will not affect the status of the larger asset. How To: Create a Permissive Task GroupCreating permissive groups allows a user to combine tasks into a group. When tasks are grouped together, the group status will only turn red if all of the tasks in the group become red. The status of the grouped tasks will not affect the status of the larger asset. To create a permissive task group, open the Task Schedule of the specific asset you wish to create permissive task groups in. Select Task Schedule from any context menu to open the asset's Task Schedule Page.
Select the “Create Permissive Group” button to open the Permissive Task Group modal.
The permissive group must be given a title. Any descriptive information regarding the Permissive Group can be included in the Additional Information text box. The tasks to be grouped are selected from a dropdown menu. Select “Save” for the permissive group to be created or click “Cancel” to return to the Task Schedule Page. | |||||||
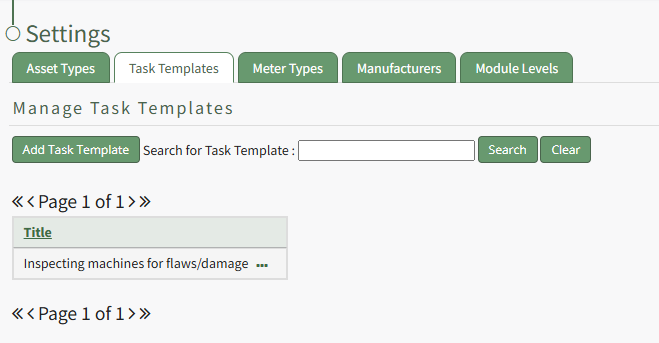
Apply Task Template | Clicking the Apply Task Template Button on the Task Schedule Page will open the Apply Task Template Modal. How To: Create a New Task Schedule TemplateTo create a new task schedule template, open the Task Template Tab on the Settings Page in the Assets Module.
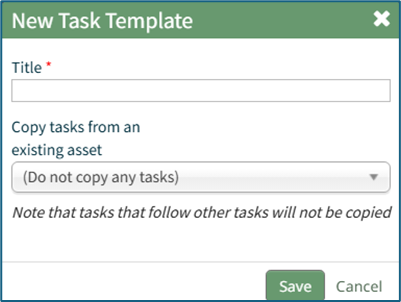
Click the “Add Task Template” button, opening the New Task Template modal.
Input the desired Title for the new task template. Select which asset or component whose task schedule you want to create the template from. Click “Save” and the new task template will show in the Task Template Table. Tasks that follow other tasks will not be copied into the Task Template. How To: Apply a Task Template to the Task ScheduleTo apply a task template to the task schedule for bulk task creation, open the Task Schedule Page of the asset you want to apply a task template to. How To: Apply a Task Template to the Task ScheduleTo apply a task template to the task schedule for bulk task creation, open the Task Schedule Page of the asset you want to apply a task template to. How To: Apply a Task Template to the Task ScheduleTo apply a task template to the task schedule for bulk task creation, open the Task Schedule Page of the asset you want to apply a task template to. How To: Apply a Task Template to the Task Schedule{{@497}}
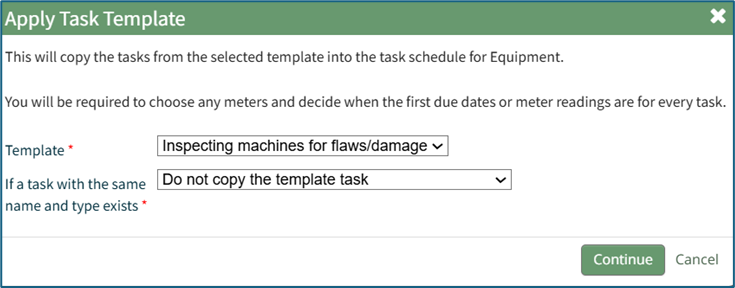
Selecting the “Apply Task Template” button opens the Apply Task Template Modal that allows the user to copy tasks from a template into the task schedule for an asset or its components. This feature allows a user to utilize bulk task schedule creation if they have to track several assets that share identical task schedules. A user will still be required to establish meters, due dates, and meter readings for each individual task in the task template.
Select the template from the dropdown list that you with to utilize. New Task Templates can be created on the Task Template Tab on the Settings Page of the Assets Module. How To: Create a New Task Schedule Template{{@471}} Select the “Continue” button, opening the Configure Template Page.
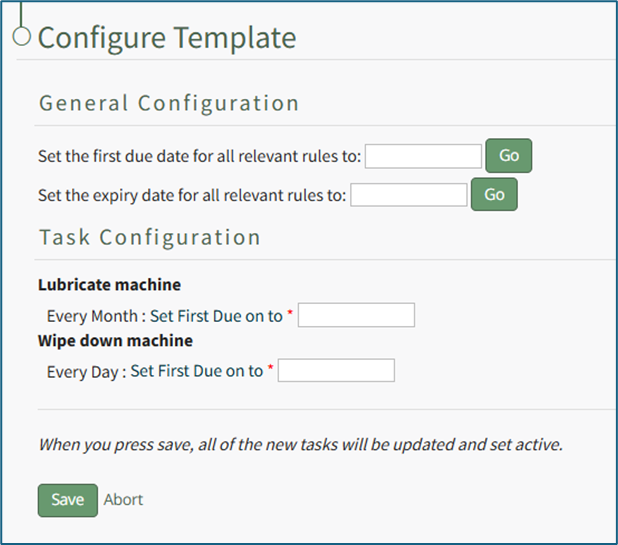
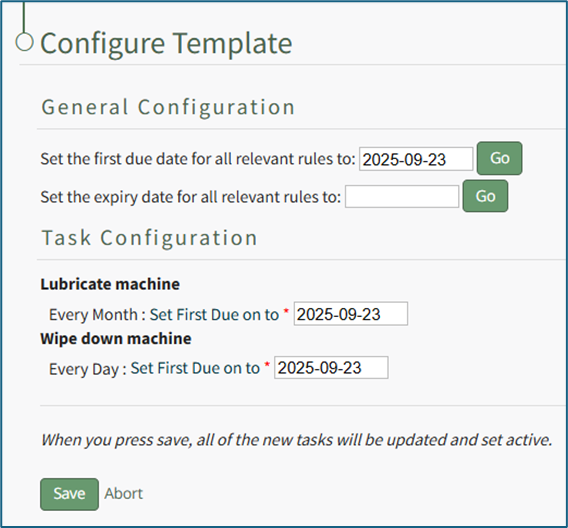
Input the first due date for all relevant rules under General Confirguration. Select the "Go" button to the right. The system will automatically input the dates for the Task Configuration.
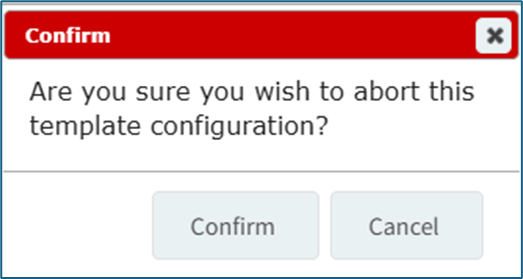
Once the task template has been configured, select “Save” and all of the new tasks will be updated and set active. Select “Abort” and a Confirmation Modal opens, stating, “Are you sure you wish to abort this template configuration?”
Select “Confirm” to return to the asset's Task Schedule Page without any changes made.
Selecting the “Apply Task Template” button opens the Apply Task Template Modal that allows the user to copy tasks from a template into the task schedule for an asset or its components. This feature allows a user to utilize bulk task schedule creation if they have to track several assets that share identical task schedules. A user will still be required to establish meters, due dates, and meter readings for each individual task in the task template.
Select the template from the dropdown list that you with to utilize. New Task Templates can be created on the Task Template Tab on the Settings Page of the Assets Module. How To: Create a New Task Schedule TemplateTo create a new task schedule template, open the Task Template Tab on the Settings Page in the Assets Module.
Click the “Add Task Template” button, opening the New Task Template modal.
Input the desired Title for the new task template. Select which asset or component whose task schedule you want to create the template from. Click “Save” and the new task template will show in the Task Template Table. Tasks that follow other tasks will not be copied into the Task Template. Select the “Continue” button, opening the Configure Template Page.
Input the first due date for all relevant rules under General Confirguration. Select the "Go" button to the right. The system will automatically input the dates for the Task Configuration.
Once the task template has been configured, select “Save” and all of the new tasks will be updated and set active. Select “Abort” and a Confirmation Modal opens, stating, “Are you sure you wish to abort this template configuration?”
Select “Confirm” to return to the asset's Task Schedule Page without any changes made.
| |||||||
With Selected | Clicking the With Selected button on the Task Schedule Page enables a user to complete or delete multiple tasks simultaneously. How To: Delete Multiple Tasks Simultaneously on the Task ScheduleTo delete multiple tasks on a task schedule at the same time, open the Task Schedule you wish to edit in the Assets Module. How To: View an Asset's Task ScheduleTo view an asset's task schedule, open the Manage Assets Page in the Assets Module on the Main Menu. Use filters as needed and identify the asset/component whose task schedule you wish to view. Click the three-dot icon to the right of the asset title opening the Asset Management Context Menu.
Select the "Manage Components" option, opening the Manage Asset Components Page. Select the three-dot icon to the right of the asset/component you wish to add interim notes to and select Task Schedule from the context menu.
This opens the asset's Task Schedule Page.
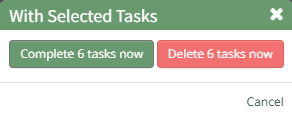
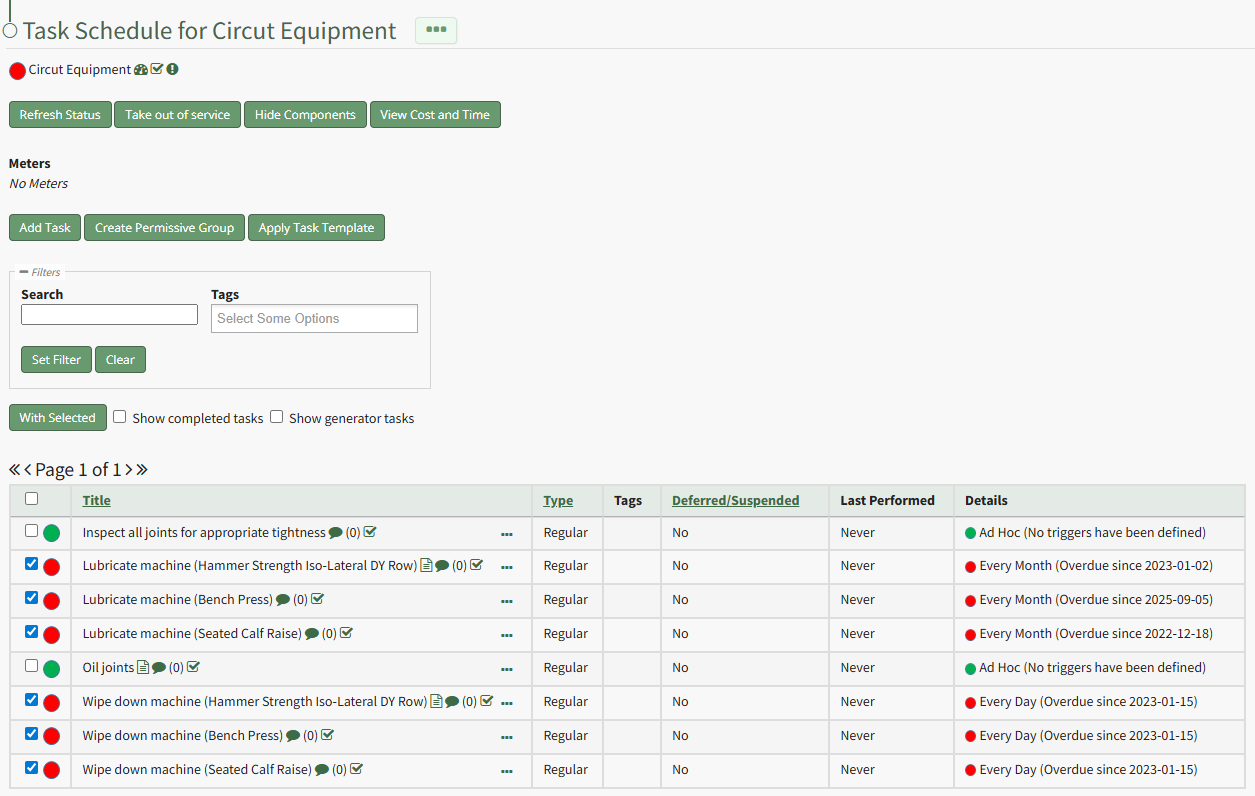
Select the checkboxes for all tasks you wish to delete from the task schedule and click the "With Selected" button above the Task Schedule Table opening the With Selected Tasks Modal.
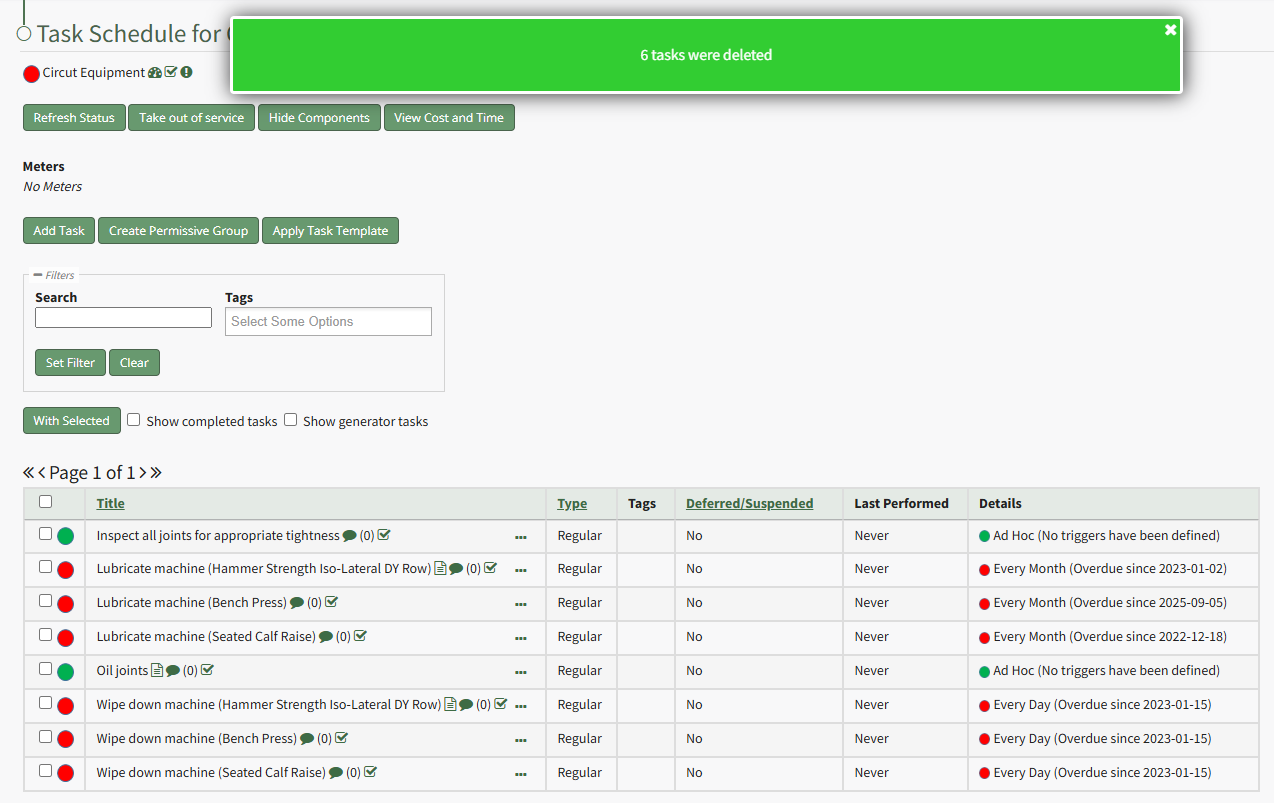
Click the "Delete # Tasks Now" button opening a confirmation modal which states, "Are you sure you wish to delete these tasks?"
Click the "OK" button and a popup confirms the number of tasks deleted.
The deleted tasks no longer show in the Task Schedule table. How To: Mark Multiple Tasks as Complete on the Task ScheduleTo mark multiple tasks as complete on a task schedule at the same time, open the Task Schedule you wish to edit in the Assets Module. How To: View an Asset's Task ScheduleTo view an asset's task schedule, open the Manage Assets Page in the Assets Module on the Main Menu. Use filters as needed and identify the asset/component whose task schedule you wish to view. Click the three-dot icon to the right of the asset title opening the Asset Management Context Menu.
Select the "Manage Components" option, opening the Manage Asset Components Page. Select the three-dot icon to the right of the asset/component you wish to add interim notes to and select Task Schedule from the context menu.
This opens the asset's Task Schedule Page.
Select the checkboxes for all tasks you wish to mark as completed and click the "With Selected" button above the Task Schedule Table opening the With Selected Tasks Modal.
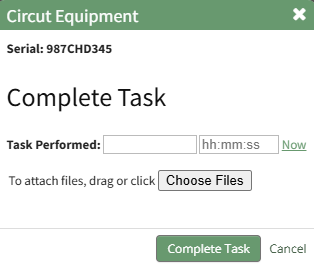
Click the "Complete # Tasks Now" button opening the Complete Task Modal.
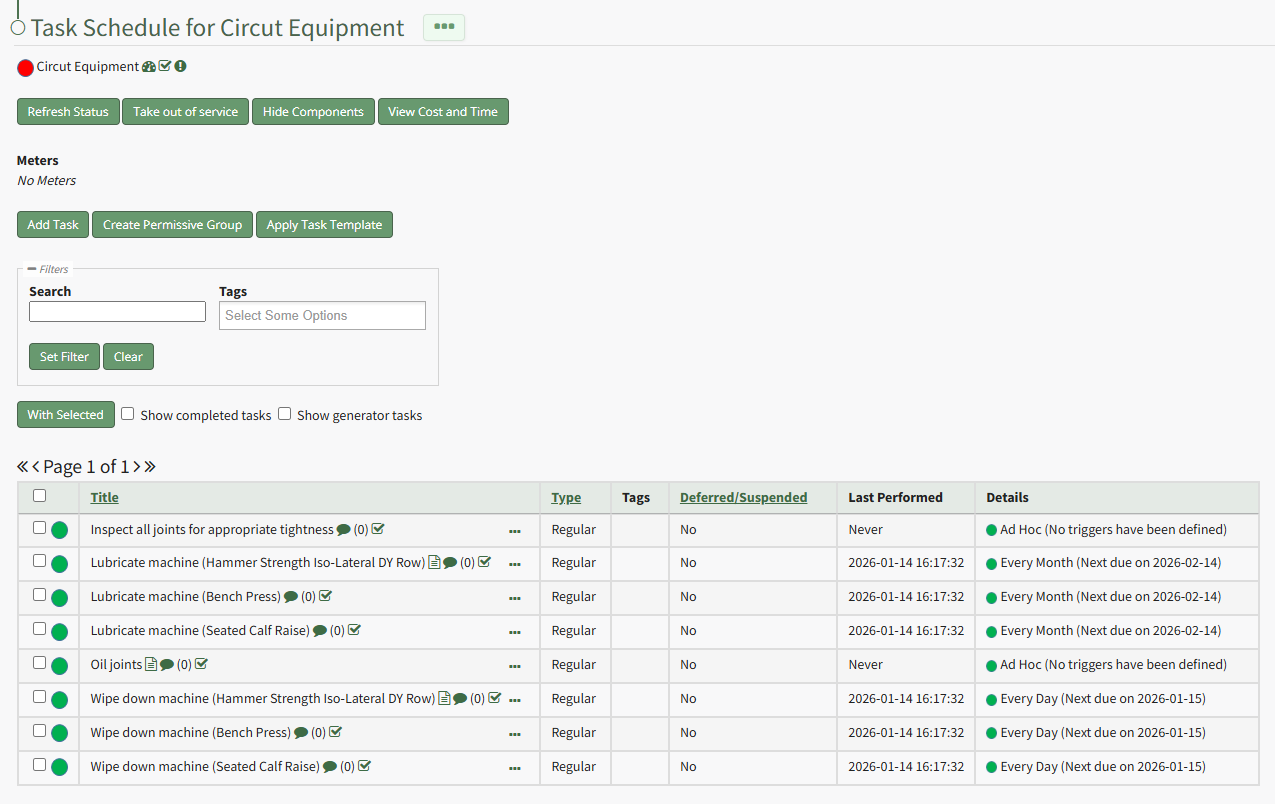
Input the date and time to be noted for task completion and upload any desired files. Click the "Complete Task" button on the modal and the Task Schedule automatically updates the new task status.
| |||||||


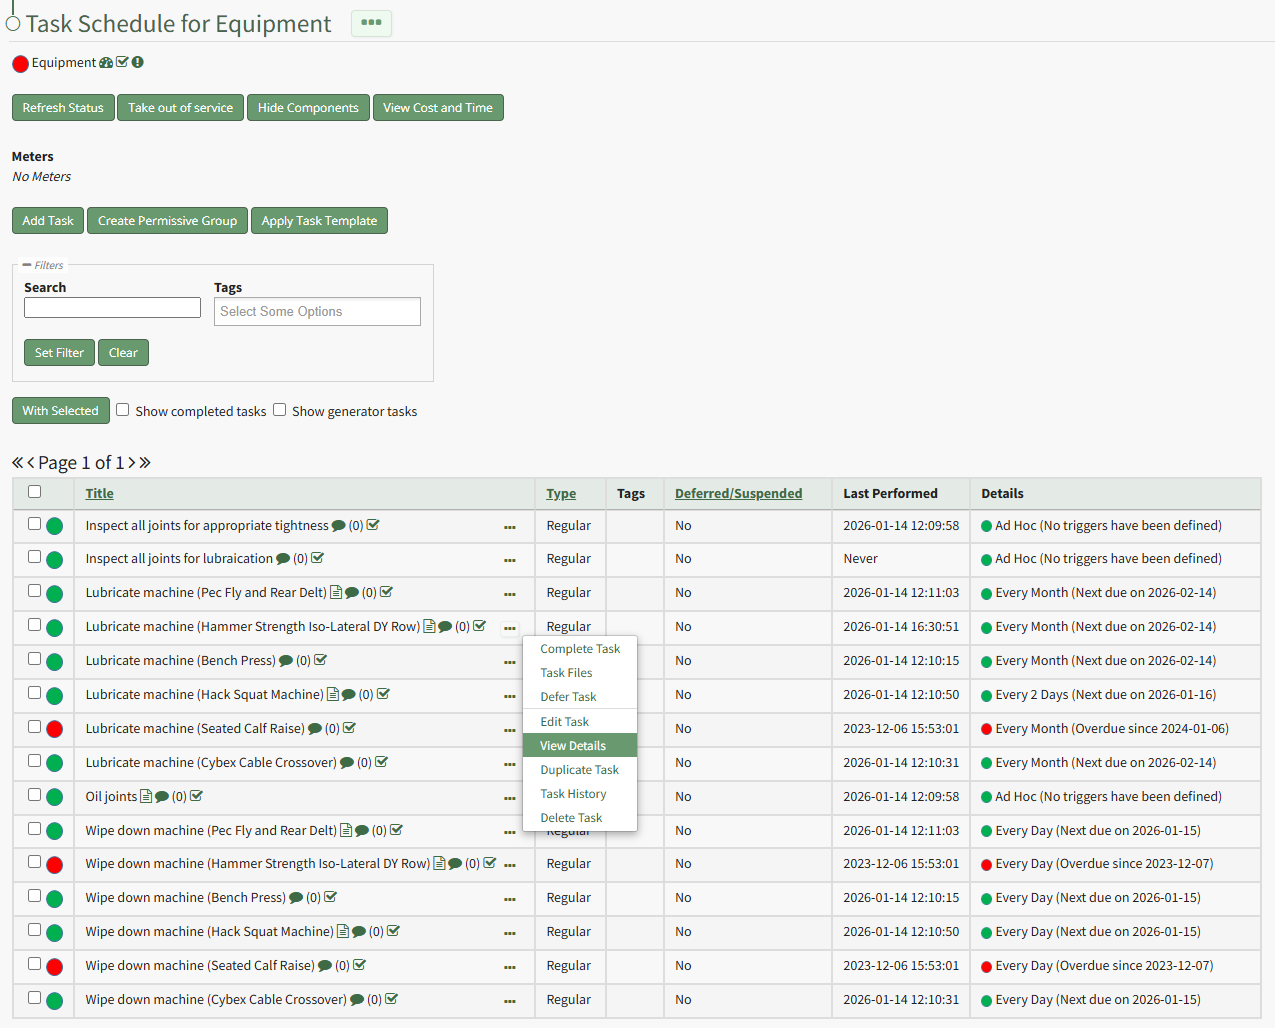
To the right of each task on the Task Schedule Table is three-dot icon that opens the Task Management Context Menu. The options available on that menu are explained in the table below.
Task Schedule Table Context Menu Option Explanation Table | |
Option | Associated Action |
Complete Task | Selecting Complete Task from the task schedule context menu opens the Complete Task Modal. How To: Log a Task has been CompletedIn order to log that a task has been completed and is current/up to date (a green task status), go to the Upcoming Task Table on the Home Page of the Assets Module. Select the “Complete Task” button from the top of the Your Upcoming Tasks Page.
The Choose Asset Modal will prompt you to identify which asset you want to log data for. Click the bulleted list icon to access your assets. Selecting the plus sign “+” icon will expand the components under the asset. Selecting “Complete Task” from the three dot (…) context menu to the right of the asset / component title will open the same modal for the specified asset.
Select the appropriate asset, opening the asset's Complete Task Modal. Click the green View All clickable link to list all tasks associated with the selected asset, including tasks that are current / up to date (green status).
Serial numbers and the asset description will show at the top of the modal. Clicking the “Show Subcomponents” checkbox shows any subcomponent tasks associated with the asset, expanding the modal when selected. Beneath the task in bold is a note that indicates the parameters for the task, referred to as a trigger in KAStrack. Triggers refer to the task behavior, frequency or usage standards that KAStrack will applies to tasks to determine their schedule for completion. To log the task, select the checkbox of the completed task. You can manually enter the date (MM/DD/YYYY format) and time (hh:mm:ss format) that the task was completed, or select “Now” in order to input the current date and time. Click the “Complete Task” button to save the changes and complete the task. Click cancel to return to the Assets Module Homepage. |
Task Files | Selecting Task Files from the task schedule context menu opens the Task Files Modal which displays files already attached to the task and can be used to upload new files or access files in the Asset Library. |
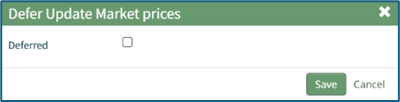
Defer Task | Selecting Defer Task from the task schedule context menu opens the Defer Task Modal, where a checkbox is utilized to mark a task as deferred. How To: Defer a TaskTo defer/postpone a task for completion at a future time, open the Task Schedule Page for the Asset of interest. How To: View an Asset's Task ScheduleTo view an asset's task schedule, open the Manage Assets Page in the Assets Module on the Main Menu. Use filters as needed and identify the asset/component whose task schedule you wish to view. Click the three-dot icon to the right of the asset title opening the Asset Management Context Menu.
Select the "Manage Components" option, opening the Manage Asset Components Page. Select the three-dot icon to the right of the asset/component you wish to add interim notes to and select Task Schedule from the context menu.
This opens the asset's Task Schedule Page.
Click the three-dot icon to the right of the task you wish to defer opening the Task Schedule Table Context Menu. Select “Defer Tasks” from the context menu opening the Defer Task Modal.
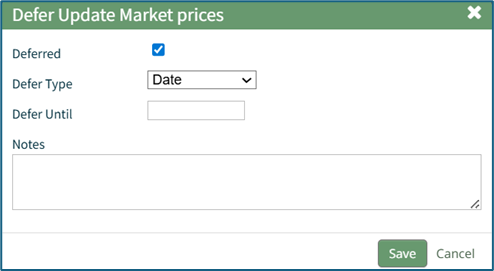
When the user selects the Deferred checkbox, the Defer Task Modal expands.
A Date deferment allows the user to select a date that the task will be deferred until. Add any desired notes and select “Save” to record the deferment. If an individual meter is selected as the deferment type, the Defer Task modal will display the current meter reading and allow the user to input a new meter reading. The task will be postponed until the newly input meter reading is hit. Add any desired notes and select the “Save” button to record the deferment. |
Edit Task | Selecting Edit Task from the task schedule context menu opens the Edit Task Modal, where key information regarding the task can be altered. How To: Edit a TaskTo edit a task associated with an asset, open the Task Schedule Page for the asset whose task you wish to edit. How To: View an Asset's Task ScheduleTo view an asset's task schedule, open the Manage Assets Page in the Assets Module on the Main Menu. Use filters as needed and identify the asset/component whose task schedule you wish to view. Click the three-dot icon to the right of the asset title opening the Asset Management Context Menu.
Select the "Manage Components" option, opening the Manage Asset Components Page. Select the three-dot icon to the right of the asset/component you wish to add interim notes to and select Task Schedule from the context menu.
This opens the asset's Task Schedule Page.
Click the three-dot icon to the right of the task you wish to edit opening the Task Management Context Menu. Select "Edit Task" opening the Edit Task Modal.
The Edit Task Modal allows you to alter the task name, add tags, change the task type and task trigger, alter who can perming the task, and other pertinent information. Select the "Save" button after making your desired changes and a popup confirms that the task edits were saved.
|
View Details | Selecting View Details from the task schedule context menu opens the read-only Task Details Modal. How To: View Task DetailsTo view the details of a specific asset task, open the Task Schedule Page for the asset that contains the task you wish to view. How To: View an Asset's Task ScheduleTo view an asset's task schedule, open the Manage Assets Page in the Assets Module on the Main Menu. Use filters as needed and identify the asset/component whose task schedule you wish to view. Click the three-dot icon to the right of the asset title opening the Asset Management Context Menu.
Select the "Manage Components" option, opening the Manage Asset Components Page. Select the three-dot icon to the right of the asset/component you wish to add interim notes to and select Task Schedule from the context menu.
This opens the asset's Task Schedule Page.
Select the three-dot icon to the right of the task whose details you wish to view opening the Task Management Context Menu. Select "View Details" from the context menu opening the View Task Modal.
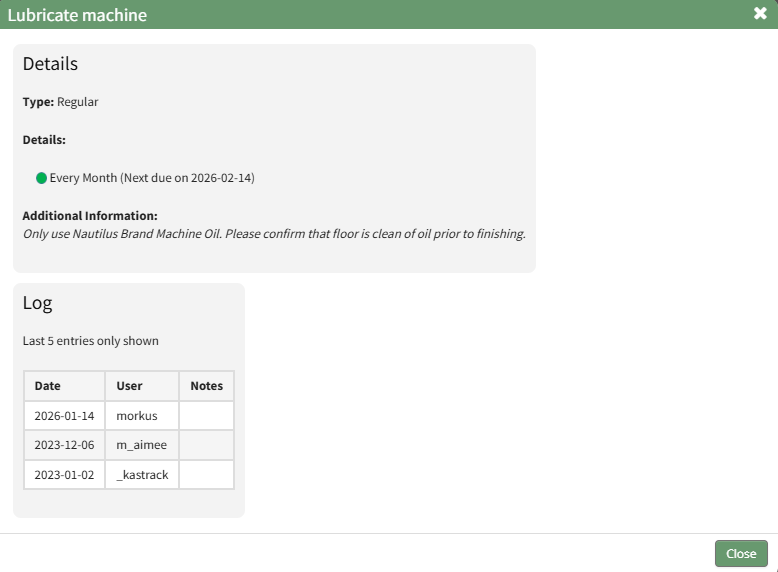
This read-only modal displays the task type, trigger details, additional information, and a log of the last five entries. Select the "Close" button at the bottom of the modal to return to the asset's Task Schedule Page. |
Duplicate Task | Selecting Duplicate Task from the task schedule context menu opens the Copy Task Modal which allows you to rename the copied task before its creation. How To: Copy and Rename a TaskTo copy a task, open the Task Schedule Page for the asset that contains the task you wish to copy. How To: View an Asset's Task ScheduleTo view an asset's task schedule, open the Manage Assets Page in the Assets Module on the Main Menu. Use filters as needed and identify the asset/component whose task schedule you wish to view. Click the three-dot icon to the right of the asset title opening the Asset Management Context Menu.
Select the "Manage Components" option, opening the Manage Asset Components Page. Select the three-dot icon to the right of the asset/component you wish to add interim notes to and select Task Schedule from the context menu.
This opens the asset's Task Schedule Page.
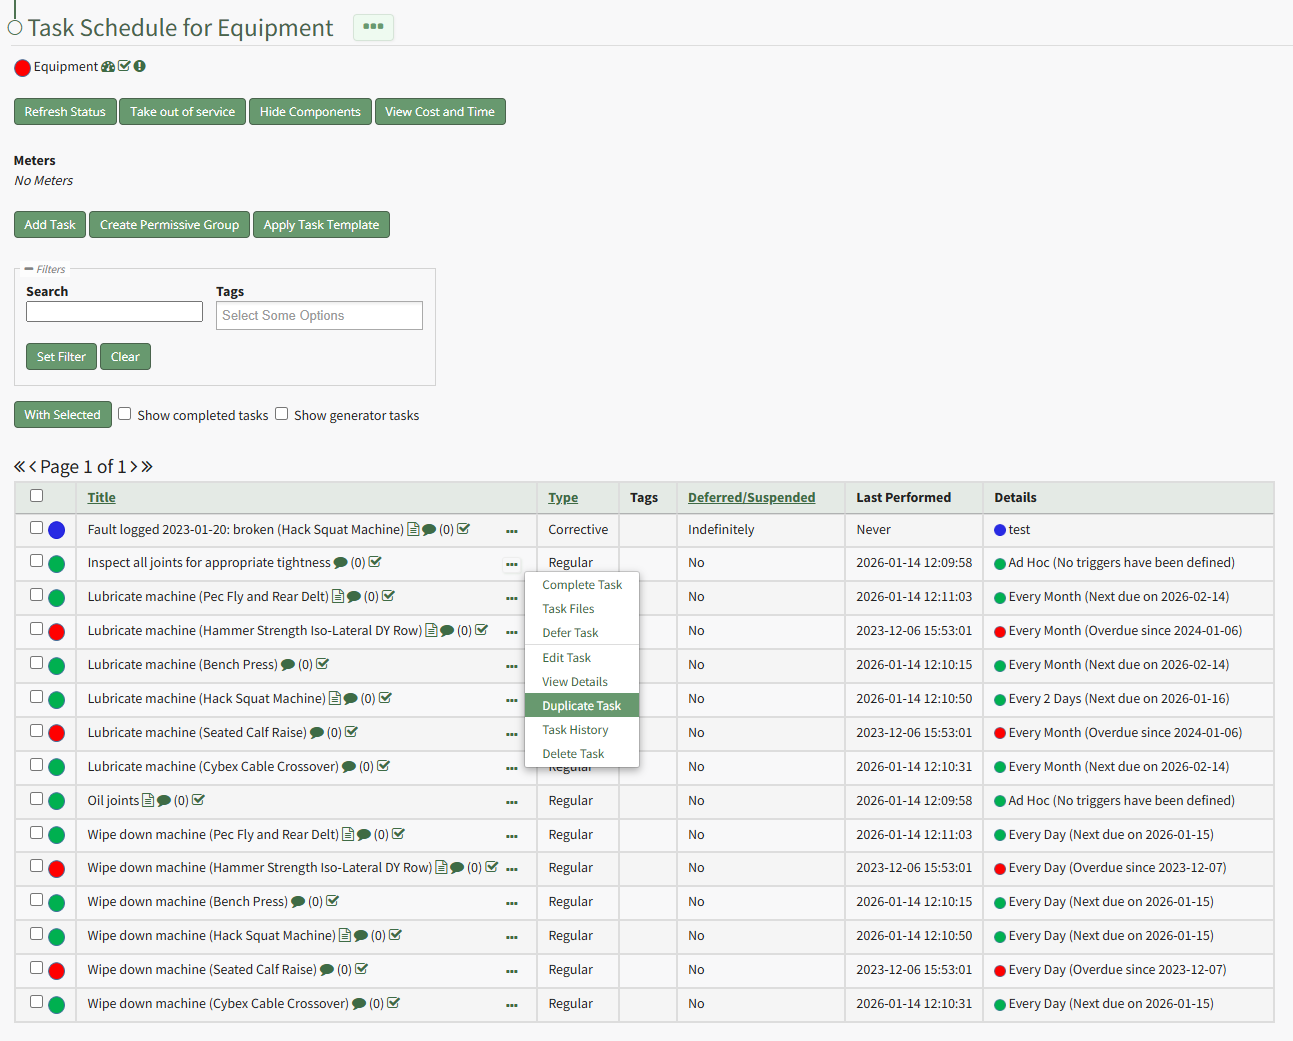
Click the three-dot icon to the right of the task you wish to copy opening the Task Management Context Menu.
Select "Duplicate Task" opening the Copy Task Modal.
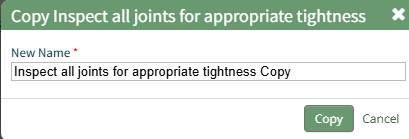
Edit the title of the task being copied and select the "Copy" button. The newly copied task now shows on the asset's task schedule. |
Task History | Selecting Task History from the task schedule context menu opens open's the Asset History Page displaying the historical logs associated with that specific task. How To: View Historical Logs for a Specified TaskTo view the historical logs associated with a specific task, open the Task Schedule Page for the asset whose task logs you wish to view. How To: View an Asset's Task ScheduleTo view an asset's task schedule, open the Manage Assets Page in the Assets Module on the Main Menu. Use filters as needed and identify the asset/component whose task schedule you wish to view. Click the three-dot icon to the right of the asset title opening the Asset Management Context Menu.
Select the "Manage Components" option, opening the Manage Asset Components Page. Select the three-dot icon to the right of the asset/component you wish to add interim notes to and select Task Schedule from the context menu.
This opens the asset's Task Schedule Page.
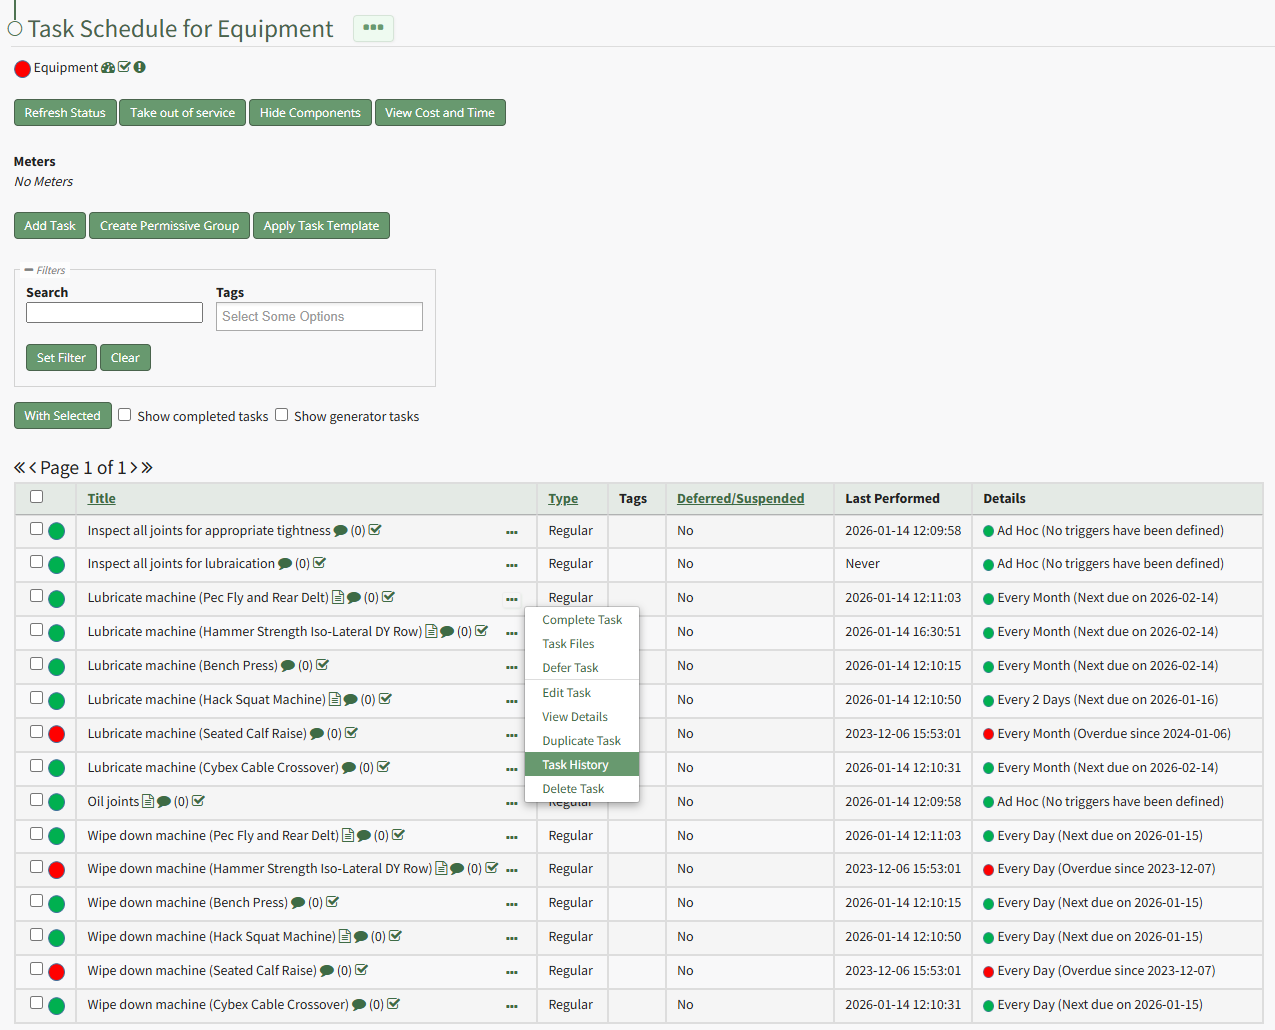
Click the three-dot icon to the right of the task whose historical logs you wish to view opening the Task Management Context Menu. Select "Task History" opening the asset's history page.
The historical logs for that specific task are displayed on the asset's History Page.
|
Delete Task | Selecting Delete Task from the task schedule context menu opens the Delete Task Confirmation Modal which states, "Please confirm you wish to delete this maintenance." How To: Delete a TaskTo delete a task, open the Task Schedule for the asset whose task you wish to delete. How To: View an Asset's Task ScheduleTo view an asset's task schedule, open the Manage Assets Page in the Assets Module on the Main Menu. Use filters as needed and identify the asset/component whose task schedule you wish to view. Click the three-dot icon to the right of the asset title opening the Asset Management Context Menu.
Select the "Manage Components" option, opening the Manage Asset Components Page. Select the three-dot icon to the right of the asset/component you wish to add interim notes to and select Task Schedule from the context menu.
This opens the asset's Task Schedule Page.
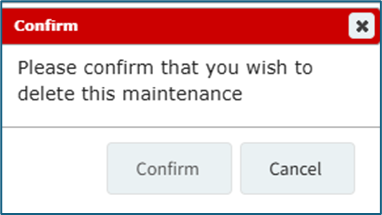
Click the three dot (…) icon to the right of the task you want to delete in the Task Schedule Table opening the Task Management Context Menu. Select “Delete Task” from the context menu opening a Confirmation Modal stating, “Please confirm that you wish to delete this maintenance.”
Select “Confirm” to delete the task from the schedule. |
An Asset's Components Page
Each asset created in KAStrack will have its own Components Page and Manage Components Page that displays the hierarchal structure of an asset and its components.
Users with appropriate module level permissions will also have access to a Manage Components Page with more options for asset management. The context menu options visible to users will vary based on their individual module level permissions.
Clicking the plus sign icon to the right of the page header opens the New Component Modal, allowing you to add a new component beneath a parent asset.
How To: Add Components to a Parent Asset
To add components to an asset, open the Manage Assets Page in the Assets Module from the Main Menu.
In order to create components, the parent asset must have already been created.
How To: Create a New Asset
To create a new asset, open the Manage Assets Page in the Asset Module and click the plus sign (+) icon to open the New Asset modal.
You can also access the New Asset Modal by clicking the three dot (…) icon and selecting “Create Asset” from the context menu.
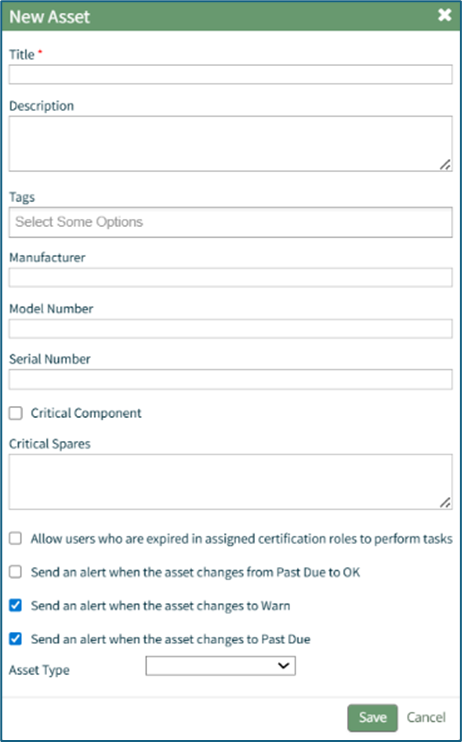
The New Asset Modal requires the entry of an Asset Title. Optional fields include an asset description, tags, manufacturer, model number, serial number, and critical spares.
Select the "Critical Component" checkbox to designate this asset as a critical component. This term is subjective for your organization to define. Designating an asset as a critical component will result in a hazard symbol being used as a visual indicator.

Critical items are prioritized and show separately on the Assets Module Summary.
An entire asset is designated as a critical. All components and associated tasks will also have a critical component designation.
KAStrack’s default setting prevents users with an expired certification role from performing tasks (such as completing tasks, recording faults, and updating meter readings. Select the “Allow users who are expired in assigned certification roles to perform tasks” checkbox to allow a user to perform tasks regardless of their assigned certification role status.
The remaining three checkbox options all relate to asset status alert preferences.
The “Send an alert when the asset changes from Past Due to OK” checkbox will send an alert via email to the assigned users when the task status changes from past due (red) to current/up to date (green).
The “Send an alert when the asset changes to Warn” checkbox will send an alert via email to all users assigned to the asset when the task status changes from current/up to date (green) to warn (yellow).
The “Send an alert when the asset changes to Past Due” checkbox will send an alert via email to all users assigned to the asset when the task status changes to past due (red).
Asset Types are customizable to your company and are created on the Settings Page of the Asset Module. Once an asset type has been created, you can select one from the dropdown menu in the New Asset Modal to enable additional filtering capabilities.
Asset Types allows your organization to add customizable fields unique to individual assets.
How To: Create a New Asset Type
To create a new asset type, open the Asset Types Tab on the Settings Page of the Assets Module.
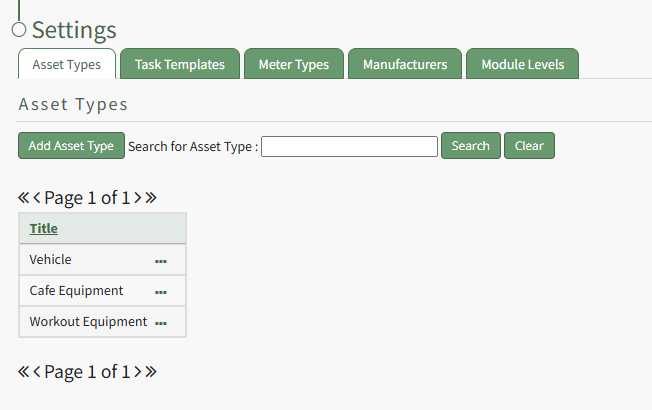
Selecting the “Add Asset Type” button opens the New Asset Type modal.
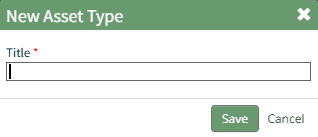
Input the title of the New Asset Type and click “Save”.
The newly created Asset Type will now show in the table on the Asset Type tab on the Settings page and is ready for you to add fields to.
How To: Add Fields to an Asset Type
{{@496}}
Select the “Save” button at the bottom of the New Asset Modal to create the new asset or click “Cancel” to close the modal without saving and return to the Manage Assets Page.
After an asset is created, it will appear in the Manage Asset Table where it can be managed.

Identify the pre-existing asset (or component) that you would like to place this new component under, and click the three dot (…) icon to the right of the asset name in the Manage Assets table opening the Manage Asset Context Menu. Select "Add Component" opening the New Component Modal.
The fields on the New Component modal ask for the same information on the New Asset Modal. For a detailed description of the fields, refer to the How To Create a New Asset page.
Select the “Save” button and the component will appear underneath its asset in the Manage Asset table (if the view is expanded) where it can be managed. Subcomponents/additional child components can also be created for components if desired.
Select the three dot (…) menu to the right of the component you would like to add an additional subcomponent in the asset’s hierarchal structure.
The three-dot icon to the right of the header opens the Components Page Context Menu with options for asset/component management. The Components Page Context Menu options are explained in the table below.
Components Page Context Menu Option Explanations | |||||||||||||||||||||||||||||||||||||||
Option | Explanation | ||||||||||||||||||||||||||||||||||||||
Create Component | Selecting “Create Component” from the context menu opens the New Component Modal. The plus sign icon to the right of the page header opens the same modal. How To: Add Components to a Parent AssetTo add components to an asset, open the Manage Assets Page in the Assets Module from the Main Menu. In order to create components, the parent asset must have already been created. How To: Create a New AssetTo create a new asset, open the Manage Assets Page in the Asset Module and click the plus sign (+) icon to open the New Asset modal.
You can also access the New Asset Modal by clicking the three dot (…) icon and selecting “Create Asset” from the context menu.
The New Asset Modal requires the entry of an Asset Title. Optional fields include an asset description, tags, manufacturer, model number, serial number, and critical spares. Select the "Critical Component" checkbox to designate this asset as a critical component. This term is subjective for your organization to define. Designating an asset as a critical component will result in a hazard symbol being used as a visual indicator.
Critical items are prioritized and show separately on the Assets Module Summary. An entire asset is designated as a critical. All components and associated tasks will also have a critical component designation. KAStrack’s default setting prevents users with an expired certification role from performing tasks (such as completing tasks, recording faults, and updating meter readings. Select the “Allow users who are expired in assigned certification roles to perform tasks” checkbox to allow a user to perform tasks regardless of their assigned certification role status. The remaining three checkbox options all relate to asset status alert preferences. The “Send an alert when the asset changes from Past Due to OK” checkbox will send an alert via email to the assigned users when the task status changes from past due (red) to current/up to date (green). The “Send an alert when the asset changes to Warn” checkbox will send an alert via email to all users assigned to the asset when the task status changes from current/up to date (green) to warn (yellow). The “Send an alert when the asset changes to Past Due” checkbox will send an alert via email to all users assigned to the asset when the task status changes to past due (red). Asset Types are customizable to your company and are created on the Settings Page of the Asset Module. Once an asset type has been created, you can select one from the dropdown menu in the New Asset Modal to enable additional filtering capabilities. Asset Types allows your organization to add customizable fields unique to individual assets. How To: Create a New Asset TypeTo create a new asset type, open the Asset Types Tab on the Settings Page of the Assets Module.
Selecting the “Add Asset Type” button opens the New Asset Type modal.
Input the title of the New Asset Type and click “Save”. The newly created Asset Type will now show in the table on the Asset Type tab on the Settings page and is ready for you to add fields to. How To: Add Fields to an Asset Type{{@496}} Select the “Save” button at the bottom of the New Asset Modal to create the new asset or click “Cancel” to close the modal without saving and return to the Manage Assets Page. After an asset is created, it will appear in the Manage Asset Table where it can be managed.
Identify the pre-existing asset (or component) that you would like to place this new component under, and click the three dot (…) icon to the right of the asset name in the Manage Assets table opening the Manage Asset Context Menu. Select "Add Component" opening the New Component Modal.
The fields on the New Component modal ask for the same information on the New Asset Modal. For a detailed description of the fields, refer to the How To Create a New Asset page. Select the “Save” button and the component will appear underneath its asset in the Manage Asset table (if the view is expanded) where it can be managed. Subcomponents/additional child components can also be created for components if desired. Select the three dot (…) menu to the right of the component you would like to add an additional subcomponent in the asset’s hierarchal structure.
| ||||||||||||||||||||||||||||||||||||||
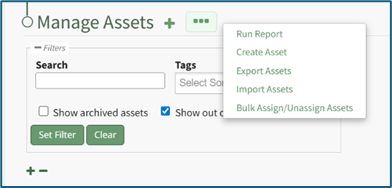
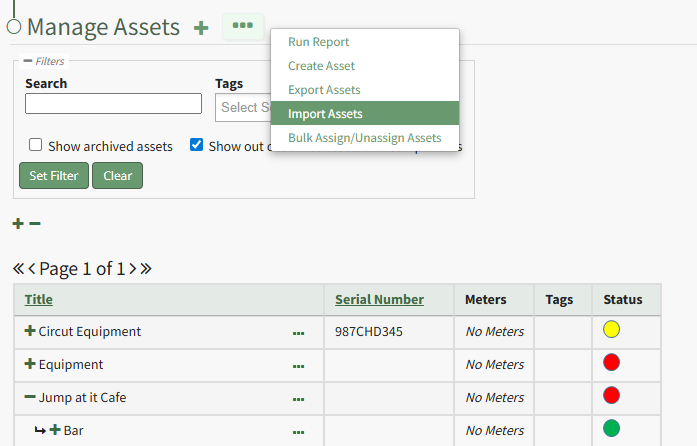
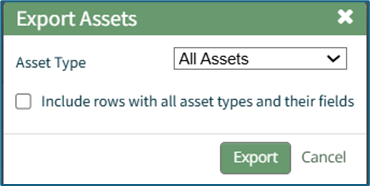
Export | Selecting "Export" from the context menu opens the Export Asset Modal that allows you to select all assets/components or specific asset types. There is a checkbox that when selected, will include all asset type fields in the export. How To: Export Asset InformationTo bulk import asset information using a CSV file, open the Manage Assets Page from the Main Menu in the Assets Module and click the three dot (…) icon to the right of the page header to open the Manage Assets Page Context Menu.
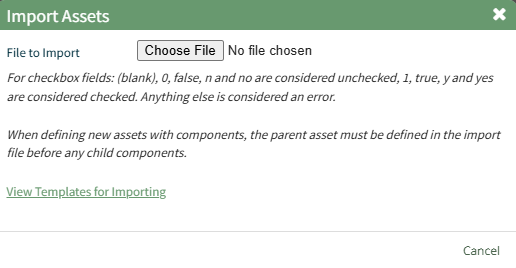
Click “Import Assets” from the context menu to open the Import Assets Modal
A template for importing assets in bulk has been provided and can be downloaded to your personal device by clicking “View Templates for Importing.” Each of the columns in the downloaded CSV are specific to the asset type and are listed in the order as they are defined.
When your CSV file with new account information is complete, ensure it is saved with the CSV format UTF-8. Click “Choose File” and select the correct CSV file from your computer. Click the “Next >” button opening the Import Assets Page.
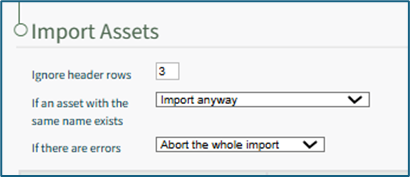
Input the number of header rows in your file that are to be ignored by KAStrack in the import. Specify your preference on how the system should respond if an asset with the same name already exists from a dropdown menu. Options include Import anyway, Import if the duplicate is elsewhere, Do not import the asset, and Abort the whole import. Specify your preference on how the system should respond if if there are errors with the import from a dropdown menu. Options include Abort the whole import or Import rows without headers. If you downloaded a CSV template, the columns labels should already match the system requirements. If you created your own CSV headers, select the correct column header to be associated with each asset field.
To abandon the import, select the “Cancel” button at the bottom of the screen. To complete the import, select the “Import” button at the bottom of the screen. The system will confirm the import was successful.
| ||||||||||||||||||||||||||||||||||||||
Import | Selecting “Import” on the context menu opens the Import Components Modal that allows you to upload a .csv file for bulk importation of asset information. How To: Import Asset InformationTo bulk export asset information as a .csv file, select the Manage Assets Page from the Main Menu in the Assets Module and click the three dot (…) icon to the right of the page header opening the Manage Assets Page Context Menu.
Select “Export Assets” from the context menu to open the Export Assets Modal.
The Asset Type dropdown menu offers the option to export “All Assets,” “No Asset Type,” or individual asset types. Asset types and unique fields created for specific asset types can be included in the export by selecting the “Include rows with all asset types and their fields” checkbox. Select the “Export” button to export asset information as a CSV file to your personal device’s downloads folder.
| ||||||||||||||||||||||||||||||||||||||

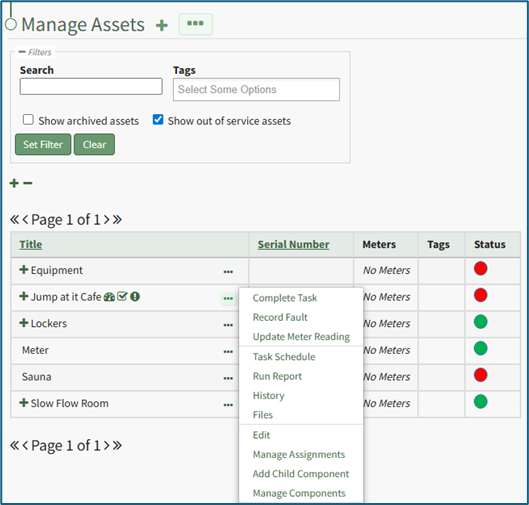
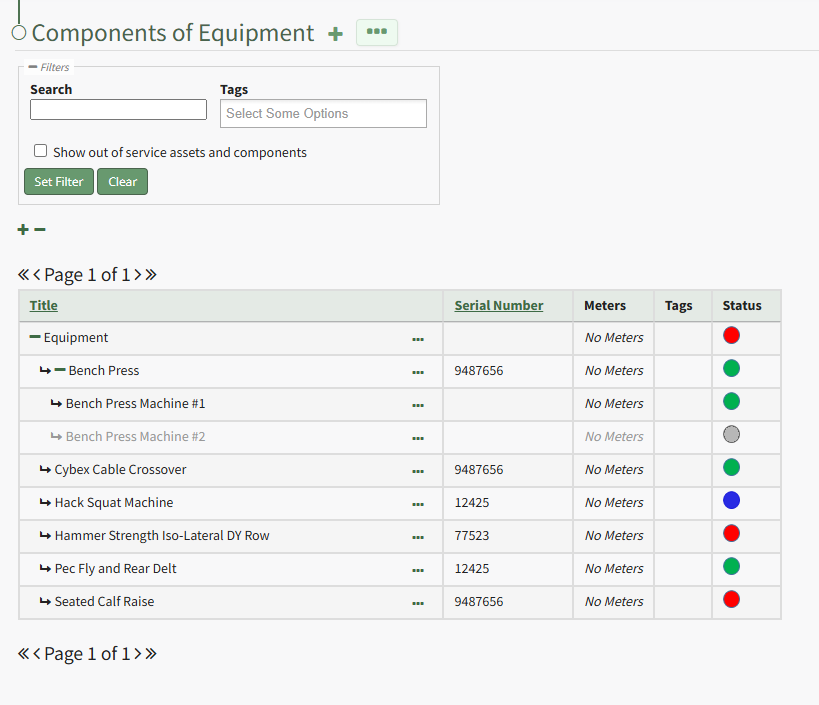
The Asset Component Table displays the asset/component title, serial number, associated meters and tags, as well as the asset status. To the right of the asset/component title in the table is a three-dot icon that opens the Component Context Menu.
Components Context Menu Option Explanations | |||||||||||||||||||||||||
Option | Explanation | ||||||||||||||||||||||||
Complete Task | Selecting “Complete Task” on the context menu opens the Complete Task Modal, allowing a user to record necessary details and mark the task as complete. How To: Log a Task has been CompletedIn order to log that a task has been completed and is current/up to date (a green task status), go to the Upcoming Task Table on the Home Page of the Assets Module. Select the “Complete Task” button from the top of the Your Upcoming Tasks Page.
The Choose Asset Modal will prompt you to identify which asset you want to log data for. Click the bulleted list icon to access your assets. Selecting the plus sign “+” icon will expand the components under the asset. Selecting “Complete Task” from the three dot (…) context menu to the right of the asset / component title will open the same modal for the specified asset.
Select the appropriate asset, opening the asset's Complete Task Modal. Click the green View All clickable link to list all tasks associated with the selected asset, including tasks that are current / up to date (green status).
Serial numbers and the asset description will show at the top of the modal. Clicking the “Show Subcomponents” checkbox shows any subcomponent tasks associated with the asset, expanding the modal when selected. Beneath the task in bold is a note that indicates the parameters for the task, referred to as a trigger in KAStrack. Triggers refer to the task behavior, frequency or usage standards that KAStrack will applies to tasks to determine their schedule for completion. To log the task, select the checkbox of the completed task. You can manually enter the date (MM/DD/YYYY format) and time (hh:mm:ss format) that the task was completed, or select “Now” in order to input the current date and time. Click the “Complete Task” button to save the changes and complete the task. Click cancel to return to the Assets Module Homepage. | ||||||||||||||||||||||||
Record Fault | Selecting “Record Fault” on the context menu opens the Record Fault Modal, allowing a user to record any necessary details about a fault. How To: Record a FaultLogging faults allows your company to track trending data in KAStrack by recording incidents and any data associated with this issue/failure. In order to record fault with an equipment issue/failure, go to the Upcoming Task Table on the Asset Module Homepage and select the "Record Fault" button beneath the page header.
The Choose Asset Modal will prompt you to identify which asset you want to log data for. Click the bulleted list icon to access your assets. Selecting the plus sign “+” icon will expand the components within the Asset. Selecting “Record Fault” from the three dot (…) context menu will open the same modal for the specified asset.
Select the appropriate asset, opening the Record Fault Modal.
Select the “Log Fault” button to record the incident. Select the “Log Fault and Resolve” button to complete two actions in one step: log the issue and indicate that it has been addressed. Click cancel to return to the Assets Module Homepage. | ||||||||||||||||||||||||
Update Meter Reading | Selecting “Update Meter Reading” on the context menu opens the Update Meter Reading Modal, allowing a user to record details regarding a meter reading. How To: Update a Meter ReadingIn order to update an asset's meter reading, go to the Assets Module Home Page opening the Upcoming Tasks Table. Click the “Update Meter Reading" button from the Asset Module Homepage.
The Choose Asset Modal will prompt you to identify which asset you want to log data for. Click the bulleted list icon to access your assets. Selecting the plus sign “+” icon will expand the components within the Asset. Selecting “Update Meter Reading” from the Upcoming Task Table Context Menu will open the same modal for the specified asset.
Select the appropriate asset, opening the Update Meter Reading Modal.
The meters associated with the asset/component selected show in a dropdown menu. Select the meter whose meter data you wish to record. The most recent meter reading shows in the Update Meter Reading Modal as the “Last Entered Reading.” KAStrack automatically inputs the current date and time. The user can enter an elapsed value (if preferred) and KAStrack will input the new actual, or the user can input the new meter reading and the elapsed value will be automatically input. Attach any files (if there are checklists, forms, etc.) associated with the meter reading. Select the “Log Reading” button to update the meter usage. Click cancel to return to the Assets Module Homepage. | ||||||||||||||||||||||||
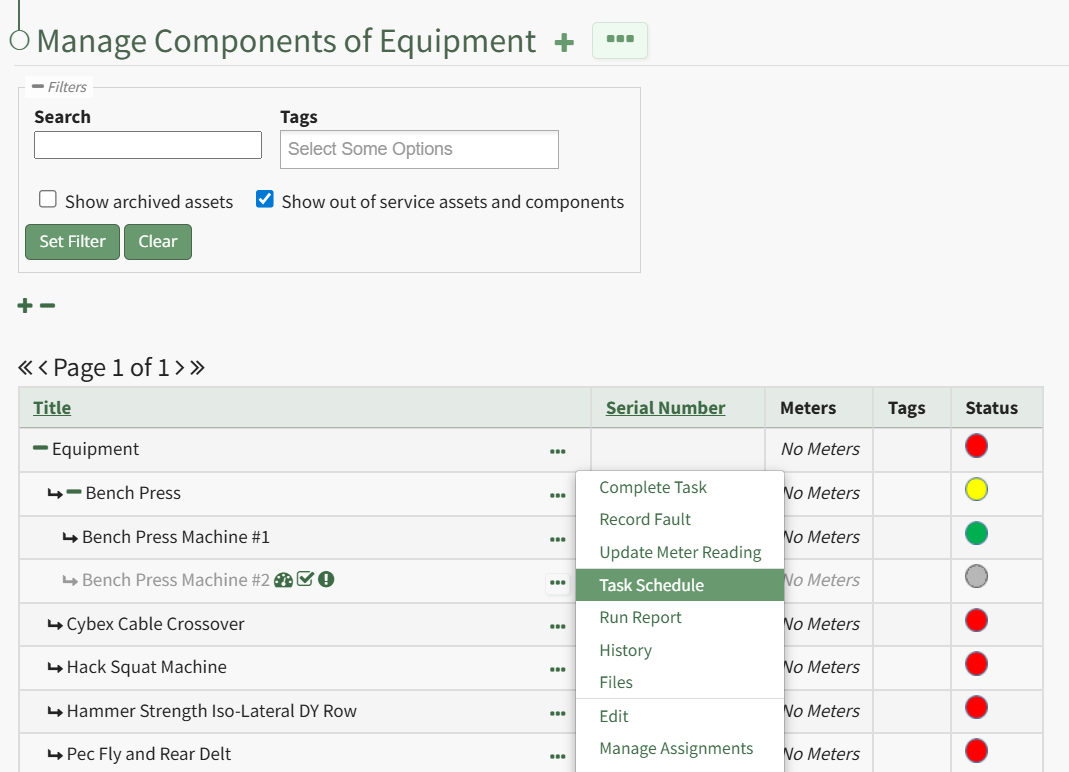
Task Schedule | Selecting "Task Schedule" on the context menu opens an asset's Task Schedule, where new tasks can be added and existing tasks can be managed. How To: View an Asset's Task ScheduleTo view an asset's task schedule, open the Manage Assets Page in the Assets Module on the Main Menu. Use filters as needed and identify the asset/component whose task schedule you wish to view. Click the three-dot icon to the right of the asset title opening the Asset Management Context Menu.
Select the "Manage Components" option, opening the Manage Asset Components Page. Select the three-dot icon to the right of the asset/component you wish to add interim notes to and select Task Schedule from the context menu.
This opens the asset's Task Schedule Page.
| ||||||||||||||||||||||||
Run Report | Selecting “Run Report” from the context menu open the Assets Report Modal, allowing the user to select between five customizable Asset Reports. How To: Run an Asset ReportTo run an asset report, open the My Asset Page in the Assets Module on the Main Menu. Use filters as needed and identify the asset/component you want to run a report on. Click the three-dot icon to the right of the asset title opening a context menu.
Select "Run Report" from the context menu opening the Assets Report Modal with options for running various types of reports.
Reports can be run for an asset in its entirety, specific components or subcomponents. They type of report can be selected from a dropdown menu on the Assets Report Modal. An explanation of report types is included in the table below.
Select the "Create Report" button after completing the inputs on the Assets Report Modal and the system will generate your report in the viewing preference you selected. | ||||||||||||||||||||||||
History | Selecting “History” from the context menu opens the Asset History Page with historical entries for the components/sub-components that were selected. The Asset History Page contains four historical logs - tasks completed, tasks deferred, as well meter and fault logs. How To: View an Asset's Historical LogsAn asset's historical data can be accessed from an asset's History Page. To access an asset's history, go to the My Assets Page in the Assets Module on the Main Menu. Use the filters as needed to identify the access whose history you wish to view, and click the three-dot icon to the right of the asset name. This opens a context menu.
Select "History" from the context menu opening the Asset History Page. | ||||||||||||||||||||||||
Files | Selecting “Files” from the context menu will open the Files Modal and display any files attached to the asset or component. Only users with appropriate permissions will be able to access files associated with an asset or task. How To: Upload a Task FileTo upload a file to a task, open the Manage Assets Page in the Assets Module on the Main Menu. Use filters as needed and identify the asset/component with the task you want to upload a file to. Click the three-dot icon to the right of the asset title opening the Asset Management Context Menu.
Select the "Manage Components" option, opening the Manage Asset Components Page. Select the three-dot icon to the right of the asset/component you wish to add interim notes to and select Task Schedule from the context menu.
This opens the asset's Task Schedule.
To upload a task file, click the three dot (…) icon next to the task title on the Task Schedule Table opening the context menu.
Select “Task Files” on context menu, opening the Files modal.
Select “Upload” to open the Upload File Modal. Select the “Choose File” button to select the desired file from your computer. Add a file title, or KAStrack will use the name already attached to the file. Input a version number for the file and a description. KAStrack recommends PDFs as the preferred file type. Select “Save” to upload the file to the task or “Cancel” to close the modal and return to the Task Schedule Page. How To: View File's Associated with an Asset/ComponentTo view the files associated with an asset and its components, open the Manage Assets Page in the Assets Module on the Main Menu. Use filters as needed and identify the asset/component whose files you wish to view. Click the three-dot icon to the right of the asset title opening the Asset Management Context Menu.
Select "Files" from the context menu opening the Asset Files Modal.
Upload files such as operating manuals that are related to the asset here. Upload files related to a task, such as a maintenance log, or a renewed license as part of completing the task. You are now able to view all files associated with the asset. How To: View a File Attached to a TaskTo view a file associated with a specific task, open the Task Schedule Page for the asset of interest. How To: View an Asset's Task ScheduleAn asset's historical data can be accessed from an asset's History Page. To access an asset's history, go to the My Assets Page in the Assets Module on the Main Menu. Use the filters as needed to identify the access whose history you wish to view, and click the three-dot icon to the right of the asset name. This opens a context menu.
Select "History" from the context menu opening the Asset History Page.
Click the three dot (…) icon next to the right of title whose files you wish to view on the Task Schedule Table opening the context menu. Select “Task Files” opening the Files modal.
Any files associated with the task are shown on the Files modal. | ||||||||||||||||||||||||
Edit | Selecting "Edit" on the context menu opens the Edit Component Modal, which is used to alter asset details. How To: Edit an AssetTo edit an asset, open the Manage Assets Page in the Assets Module on the Main Menu. Use filters as needed and identify the asset/component whose details you want to edit. Click the three-dot icon to the right of the asset title opening the Asset Management Context Menu. 
Select "Edit" from the context menu opening the Edit Asset Modal.
Key details about the asset can be added directly from this modal, an asset type can be assigned, and alert preferences can be altered as desired. Click the "Save" after making the desired changes.
A popup confirms that the asset edits have been saved. | ||||||||||||||||||||||||
Manage Assignments | Selecting "Manage Assignments" on the context menu opens the Asset Assignments Modal which allows individual users and certification roles to be assigned to an asset. How To: Assign / Unassign Users and Certification Roles to an AssetTo assign or unassign users and certification roles for a specific asset, open the Manage Asset Pages in the Assets Module on the Main Menu. Use filters as needed and identify the asset/component you want to assign/unassign users and roles to. Click the three-dot icon to the right of the asset title opening a context menu.
Select "Manage Assignments" from the context menu opening the Asset Assignments Modal.
Click in the textbox beneath Assignments and a dropdown menu will allow you to assign the asset to multiple individuals or certification roles.
To unassign an individual, click the X icon to the right of the user name or certification role. When done, select the "Save Assignments" button.
A popup confirms that the asset assignments were saved. | ||||||||||||||||||||||||
Add Component | Selecting "Add Component" on the context menu opens the New Component Modal, which allows new components to be added to an asset. How To: Add Components to a Parent AssetTo add components to an asset, open the Manage Assets Page in the Assets Module from the Main Menu. In order to create components, the parent asset must have already been created. How To: Create a New AssetTo create a new asset, open the Manage Assets Page in the Asset Module and click the plus sign (+) icon to open the New Asset modal.
You can also access the New Asset Modal by clicking the three dot (…) icon and selecting “Create Asset” from the context menu.
The New Asset Modal requires the entry of an Asset Title. Optional fields include an asset description, tags, manufacturer, model number, serial number, and critical spares. Select the "Critical Component" checkbox to designate this asset as a critical component. This term is subjective for your organization to define. Designating an asset as a critical component will result in a hazard symbol being used as a visual indicator.
Critical items are prioritized and show separately on the Assets Module Summary. An entire asset is designated as a critical. All components and associated tasks will also have a critical component designation. KAStrack’s default setting prevents users with an expired certification role from performing tasks (such as completing tasks, recording faults, and updating meter readings. Select the “Allow users who are expired in assigned certification roles to perform tasks” checkbox to allow a user to perform tasks regardless of their assigned certification role status. The remaining three checkbox options all relate to asset status alert preferences. The “Send an alert when the asset changes from Past Due to OK” checkbox will send an alert via email to the assigned users when the task status changes from past due (red) to current/up to date (green). The “Send an alert when the asset changes to Warn” checkbox will send an alert via email to all users assigned to the asset when the task status changes from current/up to date (green) to warn (yellow). The “Send an alert when the asset changes to Past Due” checkbox will send an alert via email to all users assigned to the asset when the task status changes to past due (red). Asset Types are customizable to your company and are created on the Settings Page of the Asset Module. Once an asset type has been created, you can select one from the dropdown menu in the New Asset Modal to enable additional filtering capabilities. Asset Types allows your organization to add customizable fields unique to individual assets. How To: Create a New Asset TypeTo create a new asset type, open the Asset Types Tab on the Settings Page of the Assets Module.
Selecting the “Add Asset Type” button opens the New Asset Type modal.
Input the title of the New Asset Type and click “Save”. The newly created Asset Type will now show in the table on the Asset Type tab on the Settings page and is ready for you to add fields to. How To: Add Fields to an Asset Type{{@496}} Select the “Save” button at the bottom of the New Asset Modal to create the new asset or click “Cancel” to close the modal without saving and return to the Manage Assets Page. After an asset is created, it will appear in the Manage Asset Table where it can be managed.
Identify the pre-existing asset (or component) that you would like to place this new component under, and click the three dot (…) icon to the right of the asset name in the Manage Assets table opening the Manage Asset Context Menu. Select "Add Component" opening the New Component Modal.
The fields on the New Component modal ask for the same information on the New Asset Modal. For a detailed description of the fields, refer to the How To Create a New Asset page. Select the “Save” button and the component will appear underneath its asset in the Manage Asset table (if the view is expanded) where it can be managed. Subcomponents/additional child components can also be created for components if desired. Select the three dot (…) menu to the right of the component you would like to add an additional subcomponent in the asset’s hierarchal structure. | ||||||||||||||||||||||||
Manage Components | Selecting “Manage Components” from the context menu will open the Manage Asset Components Page where assets and their components can be managed. Only users with appropriate permissions will have access to this page. | ||||||||||||||||||||||||
Duplicate | Selecting "Duplicate" on the context menu opens the Copy Asset Modal that allows you to rename the asset before copying. How To: Copy and Rename an AssetTo copy and rename an asset, select Manage Assets from the Main Menu under the Asset Module. Use filters as needed and identify the asset/component you want to copy. Click the three-dot icon to the right of the asset title opening a context menu.
Select "Duplicate" from the context menu opening the Copy Asset Modal.
Edit the new title of the copied asset. When done, click the "Copy" button and the renamed copied asset will now show on the Manage Assets Page.
| ||||||||||||||||||||||||
Move | Selecting "Move" on the context menu opens the Move Asset Modal, allowing you to move an asset/component under another asset/component. How To: Move an Asset/Component to Another Asset/ComponentTo move an existing asset to a new hierarchal position, under another asset/component, open the Manage Assets Page in the Assets Module on the Main Menu. Use filters as needed and identify the asset/component you want to move. Click the three-dot icon to the right of the asset title opening the Asset Management Context Menu.
Select "Move" opening the Move Component Modal.
Click the "Move" button and a popup confirms the move was successful.
| ||||||||||||||||||||||||
View | Selecting “View” from the context menu opens an Asset Summary Modal with a summary of the asset/component information. The read-only modal displays details, any associated meters, subcomponents, assignments, and tasks associated with an asset. How To: View an Asset Summary ModalTo view an asset's summary modal that lists all relevant information regarding an asset, go to the My Assets Page under the Assets Module on the Main Menu. Use filters as needs to pull up the asset you wish to view. Click the three-dot icon to the right of the asset/component title opening the context menu and select "View".
This opens the Asset Summary Modal. The read-only modal shows the asset details, meters associated with the asset, lists the components of the asset, the users assigned to the asset, and any tasks on the asset's task schedule.
Click the close button to return to the My Assets Page. | ||||||||||||||||||||||||
PDF Sheet | Selecting "PDF Sheet" on the context menu opens a PDF Copy of an Asset Data Sheet in a new widow. How To: Access an Asset's PDF Data SheetTo access an asset's PDF data sheet, open the Manage Asset Page in the Assets Module on the Main Menu. Use filters as needed and identify the asset/component you want to run a report on. Click the three-dot icon to the right of the asset title opening the Asset Management context menu.
Select "PDF Sheet" from the context menu. This opens a PDF of the asset/component data sheet in the existing tab.
Select the back button on your browser to return to the My Assets Page. | ||||||||||||||||||||||||
QR Code | Selecting "QR Code" on the context menu opens the Asset QR Code modal, which displays the QR Code associated with the Asset that when scanned will link a user to asset details. How To: Access an Asset's QR CodeTo access an asset's QR Code, open the Manage Asset Page in the Assets Module on the Main Menu. Use filters as needed and identify the asset/component whose QR Code you want to access. Click the three-dot icon to the right of the asset title opening the Asset Management context menu.
Select "QR Code" from the context menu. This opens the Asset Barcode Modal that displays an asset/component's QR Code that can be used for quick access to an asset.
Close the modal when done to return to the Manage Assets Page. | ||||||||||||||||||||||||
Manage Meters | Selecting "Manage Meters" on the context menu opens the Asset Meter Modal which lists all meters associated with the asset and allows for new meters to be created. How To: Add a Meter to an AssetTo add a meter to an asset, the Meter Type must already be created through the Assets Settings Page. How To: Create a Meter TypeTo create a new meter type, open the Meter Types Tab on the Settings Page of the Assets Module.
Select “Add Meter” opening the New Meter Type Modal. This opens the New Meter Type modal.
Input the desired meter type title and description. Include the units associated with this meter type. Meter units should always be entered in plural form. Input an integer to determine the number of place values after the decimals you would like recorder. Input 0 if you do not want to see any values after the decimal. The Input Option dropdown menu has three options: Actual, Elapsed, Both. If you select both, a user can input the actual reading and elapsed value will be calculated. A user can also input the elapsed reading and the actual will be calculated. Select the “Save” button and the New Meter Type will be created and now shows on the Meters Tab on the Settings Page of the Assets Module. To add a meter to an asset, select the Manage Assets Page from the Main Menu in the Assets Module. Use filters as needed and identify the asset/component you want to add a meter to. Click the three dot (…) icon next to the Asset/Component Title to open the Asset Management Context Menu.
Selecting “Manage Meters” from the context menu opens the Asset Meters Modal.
To add a new meter, select the “Add Meter” button opening the Add Meter to (Asset Name) Modal.
Select the Meter Type from the dropdown menu. Input a title for the new Meter. Include any notes about the meter. Select the “Save” button and the new meter is now shown when you select “Manage Meters” from the context menu. | ||||||||||||||||||||||||
Cost / Time Summary | Selecting "Cost / Time Summary" on the context menu opens the Cost and Time Summary Modal. How To: View an Asset's Cost / Time SummaryTo view the Cost/Time Summary associated with the asset's tasks, open the Manage Assets Page in the Assets Module on the Main Menu. Use filters as needed and identify the asset/component with the task whose task's cost/time summary you want to view. Click the three-dot icon to the right of the asset title opening the Asset Management Context Menu.
Select the "Manage Components" option, opening the Manage Asset Components Page. Select the three-dot icon to the right of the asset/component you wish to add interim notes to and select Task Schedule from the context menu.
This opens the asset's Task Schedule.
Click the "View Cost and Time" button to open the Cost/Time Summary Modal for that Task Schedule. | ||||||||||||||||||||||||
Archive | Selecting "Archive" on the context menu opens the Archive Confirmation Modal which states, "Are you sure you want to archive this asset? This will also archive any components."
How To: Archive an Asset or ComponentTo archive an asset or component, go to the Manage Assets Page of the Assets Module on the main menu. Use filters as needed to identify the asset or component you want to archive and click the three-dot icon to the right of the asset title opening the Manage Asset Context Menu.
Select "Archive" from the context menu opening the Archive Asset Confirmation Modal which states, "Are you sure you want to archive this asset? This will also archive any components."
Click the "Confirm" button and the asset will not be assigned an archive status. | ||||||||||||||||||||||||
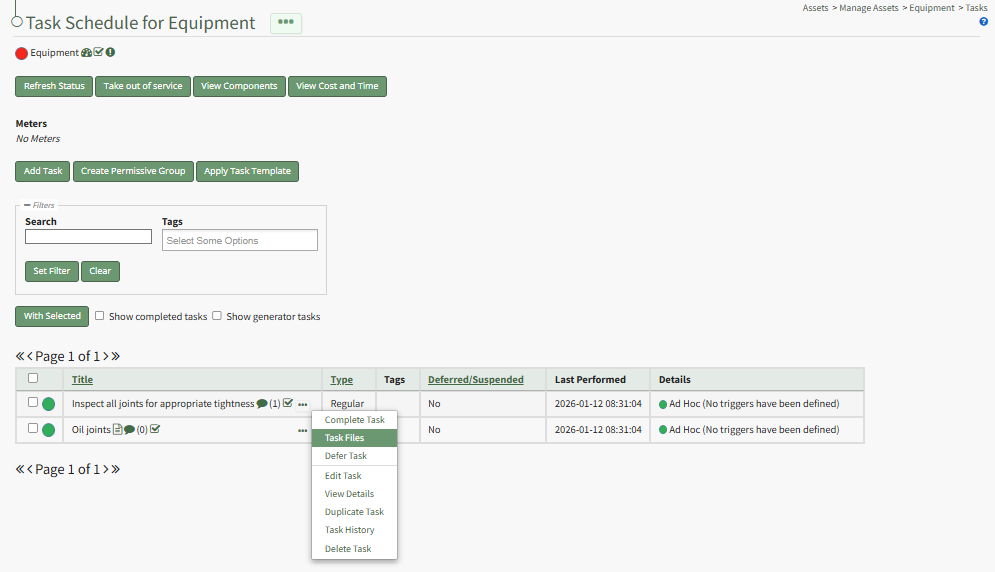
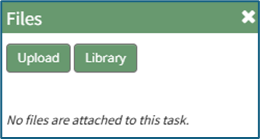
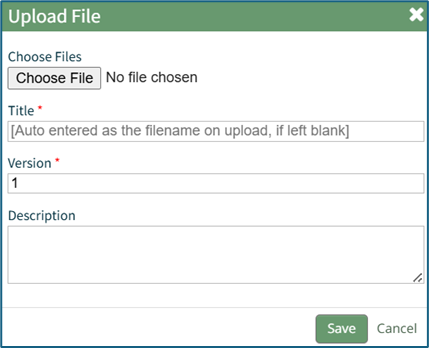
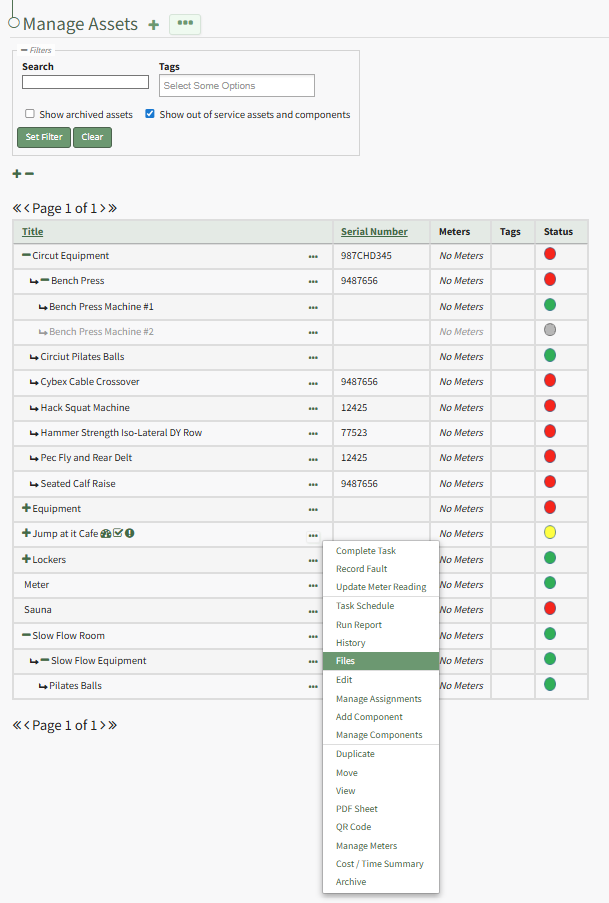
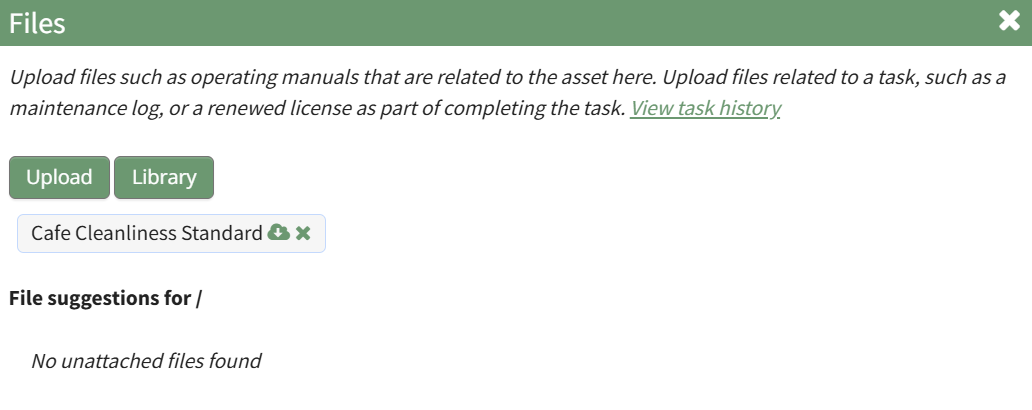
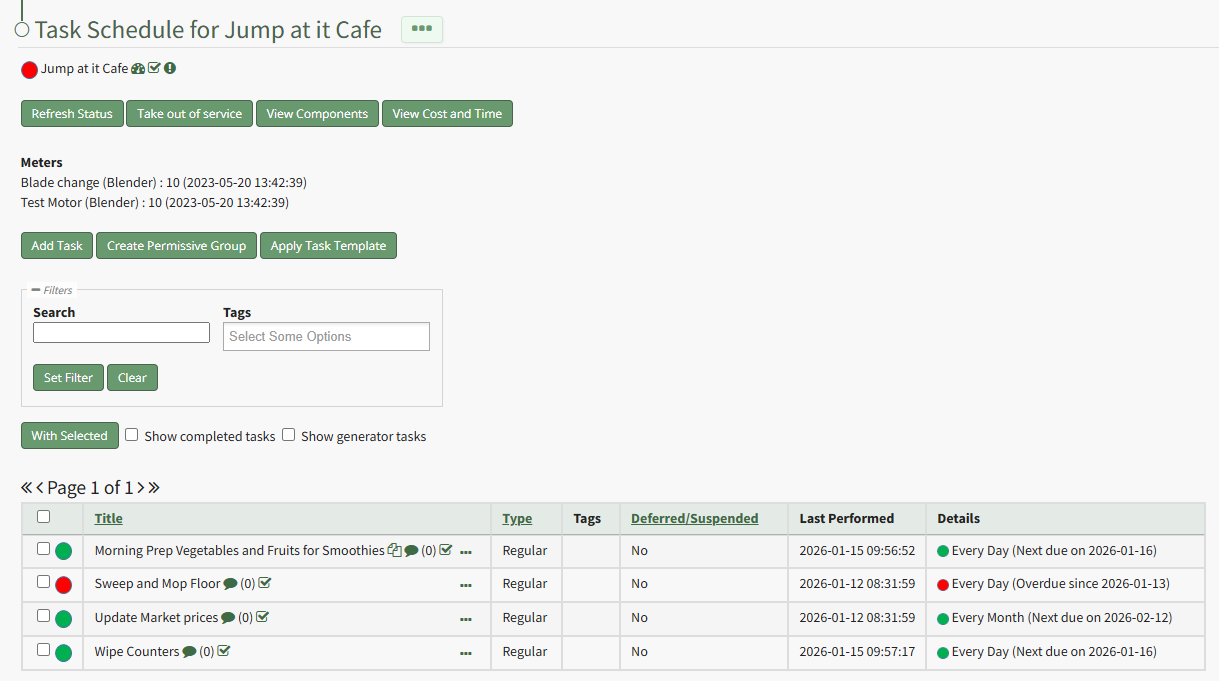
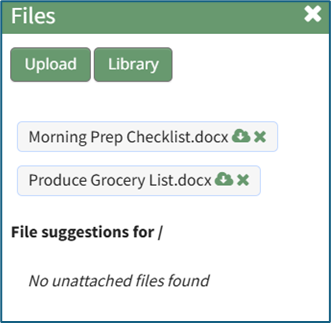
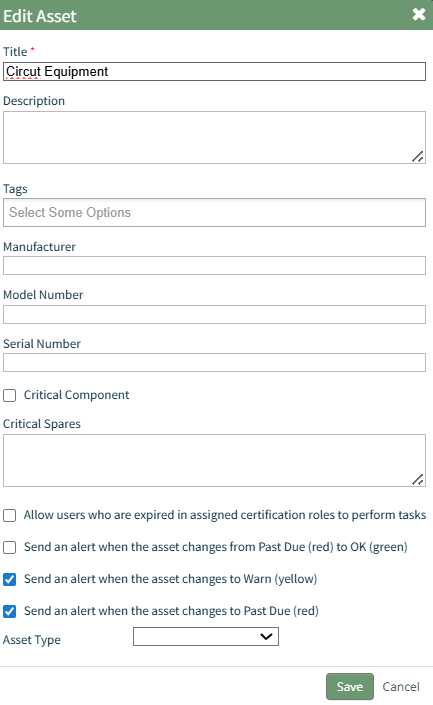

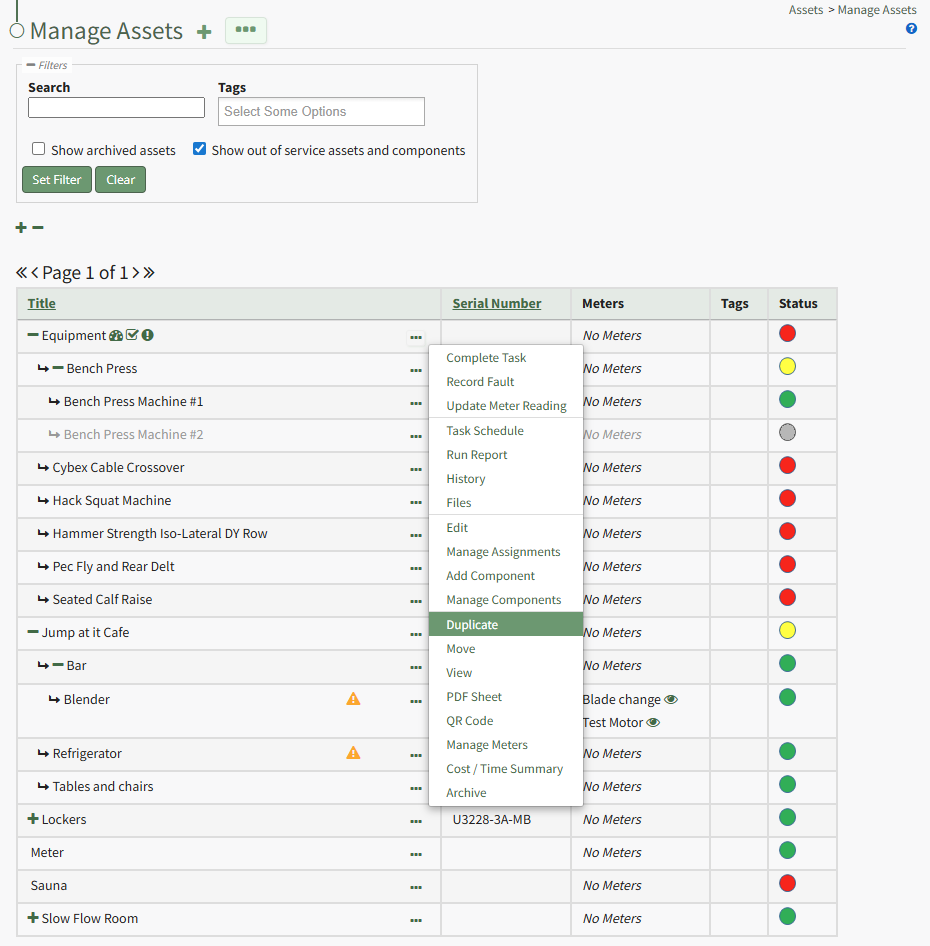
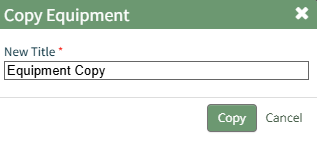
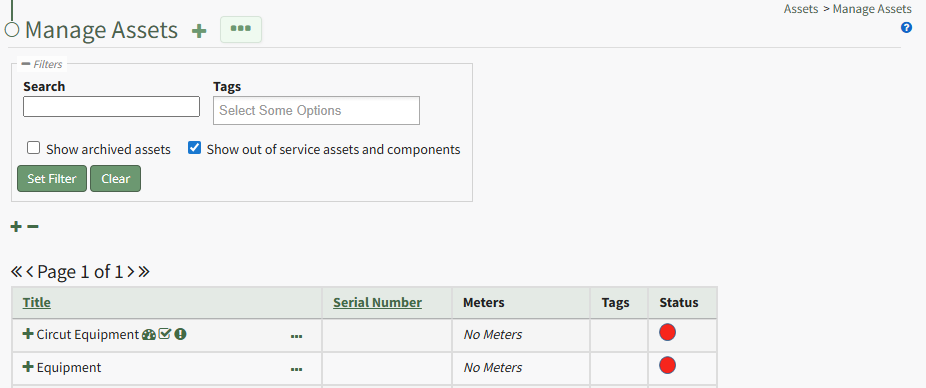
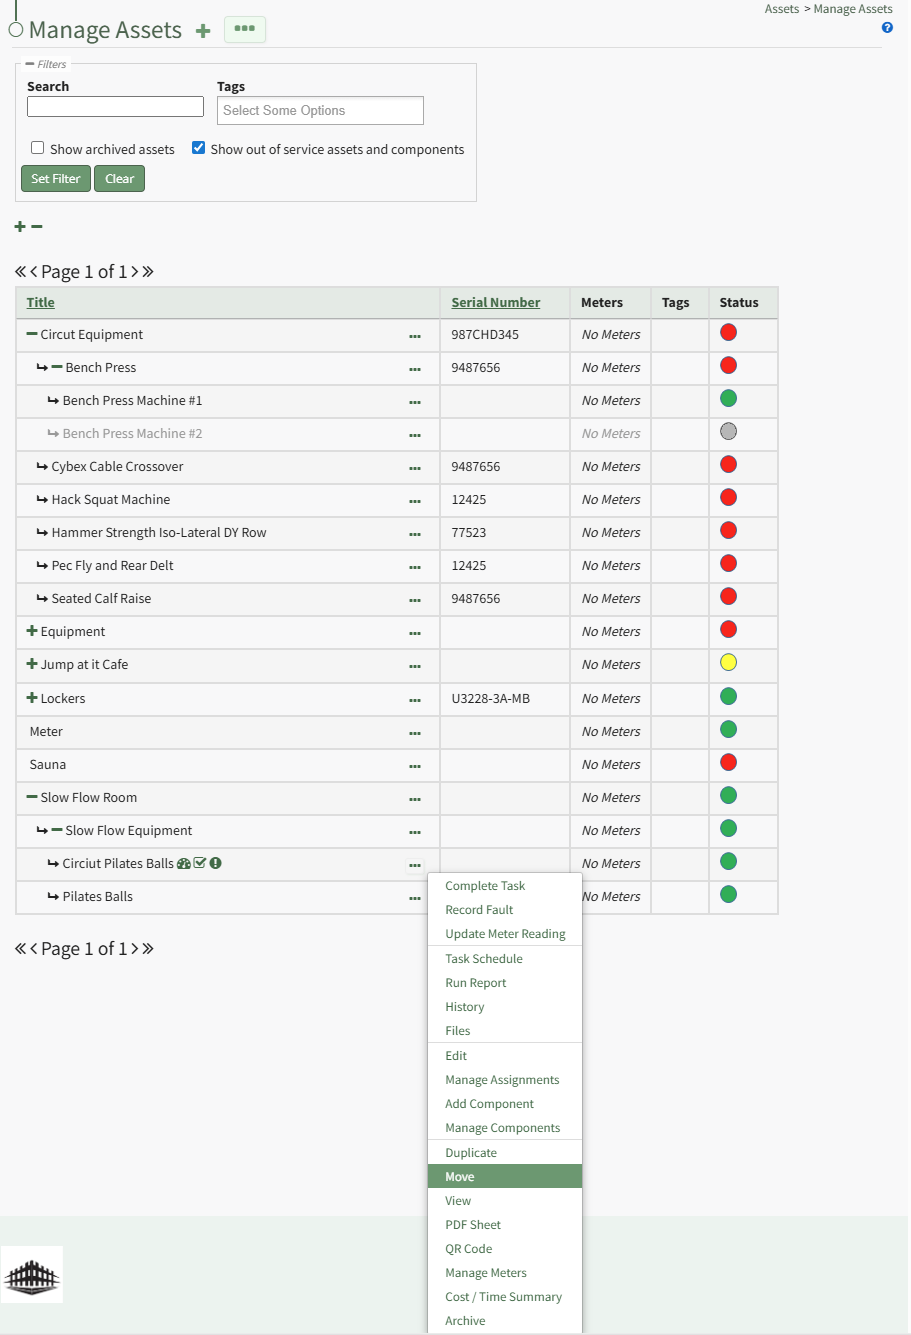
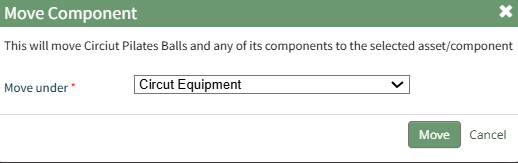

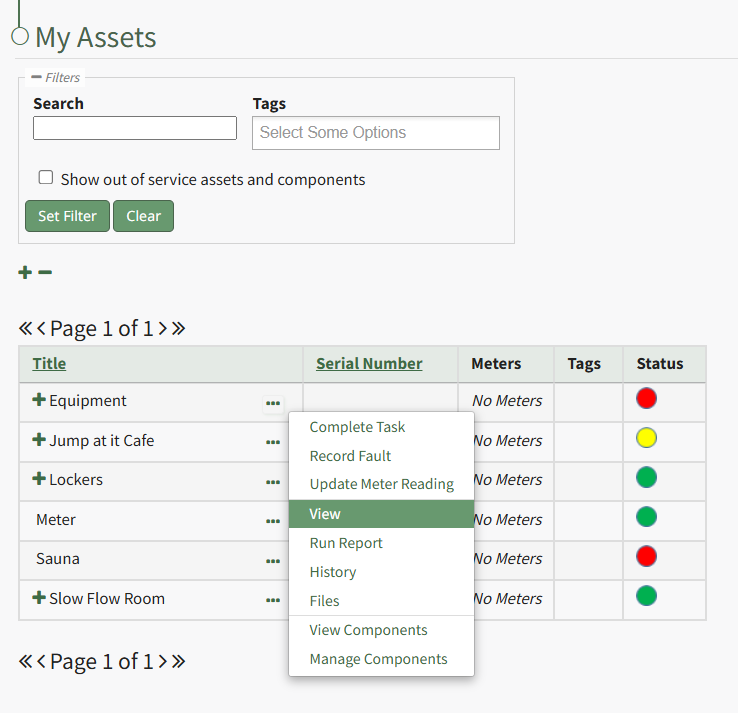
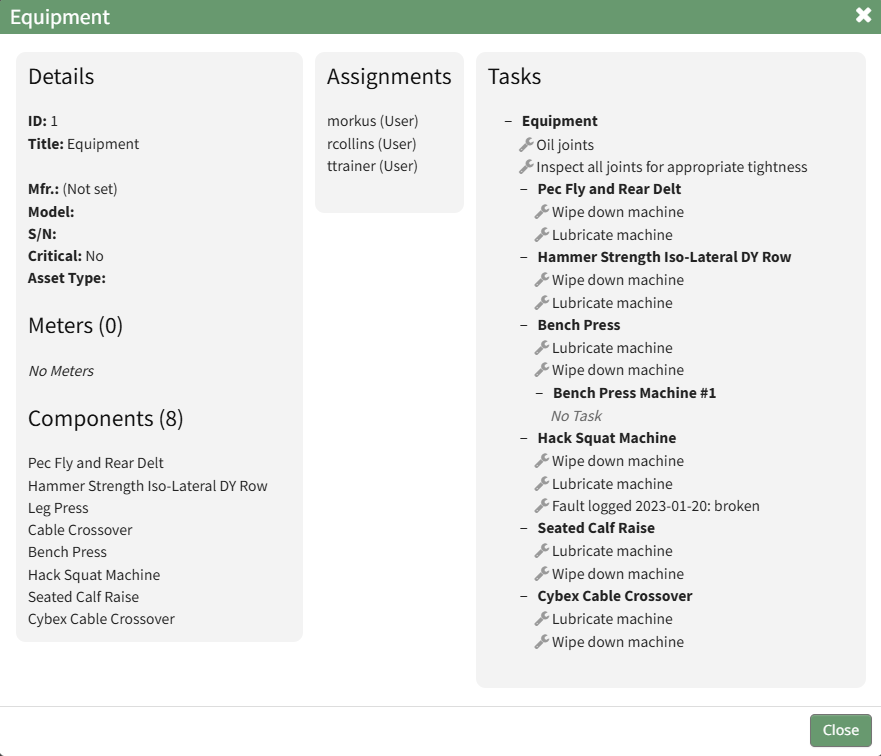
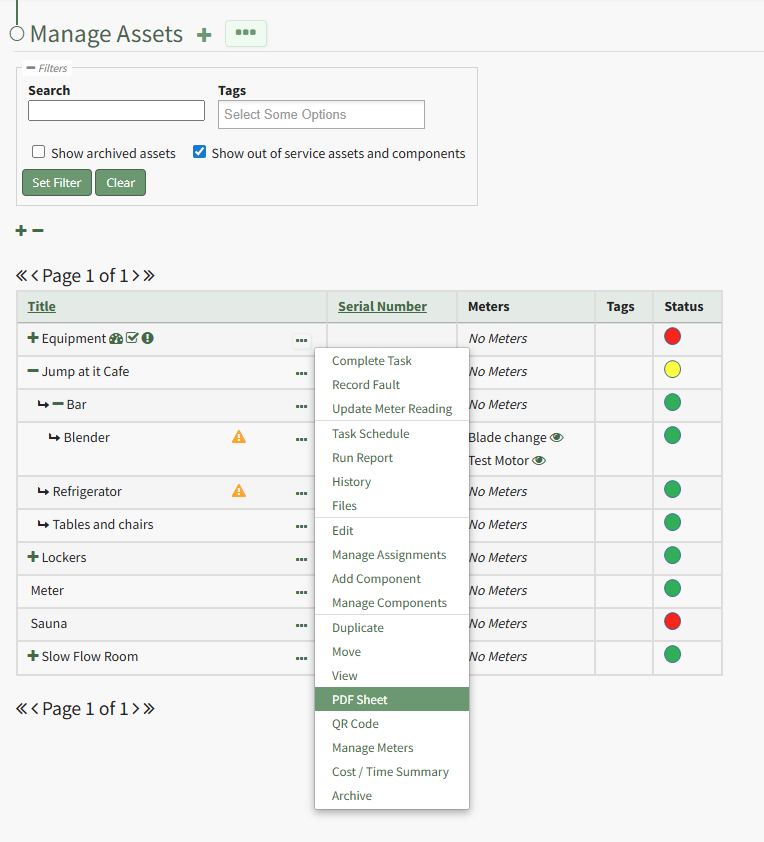
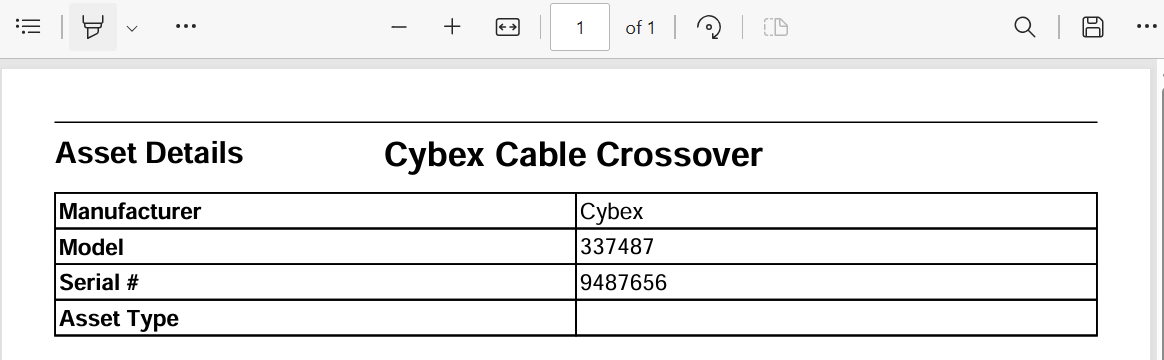
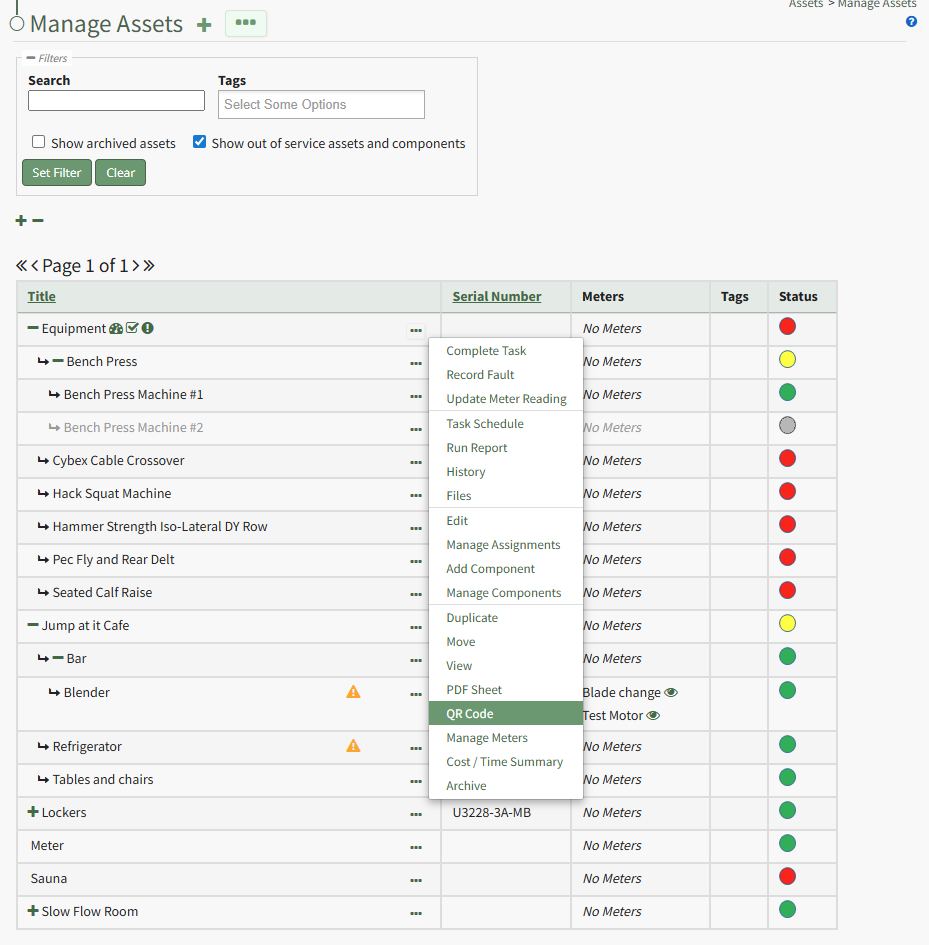
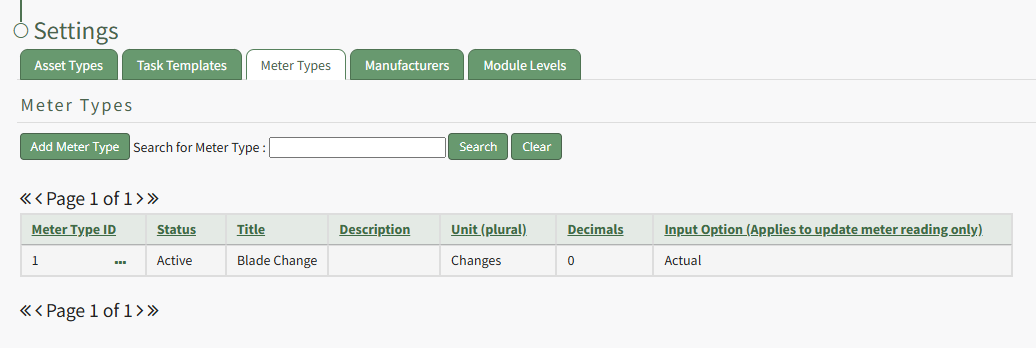
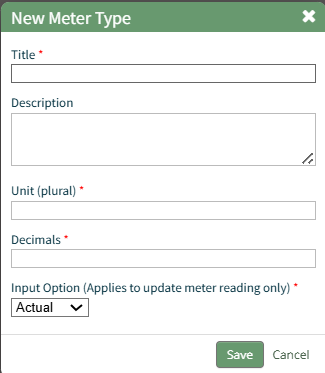
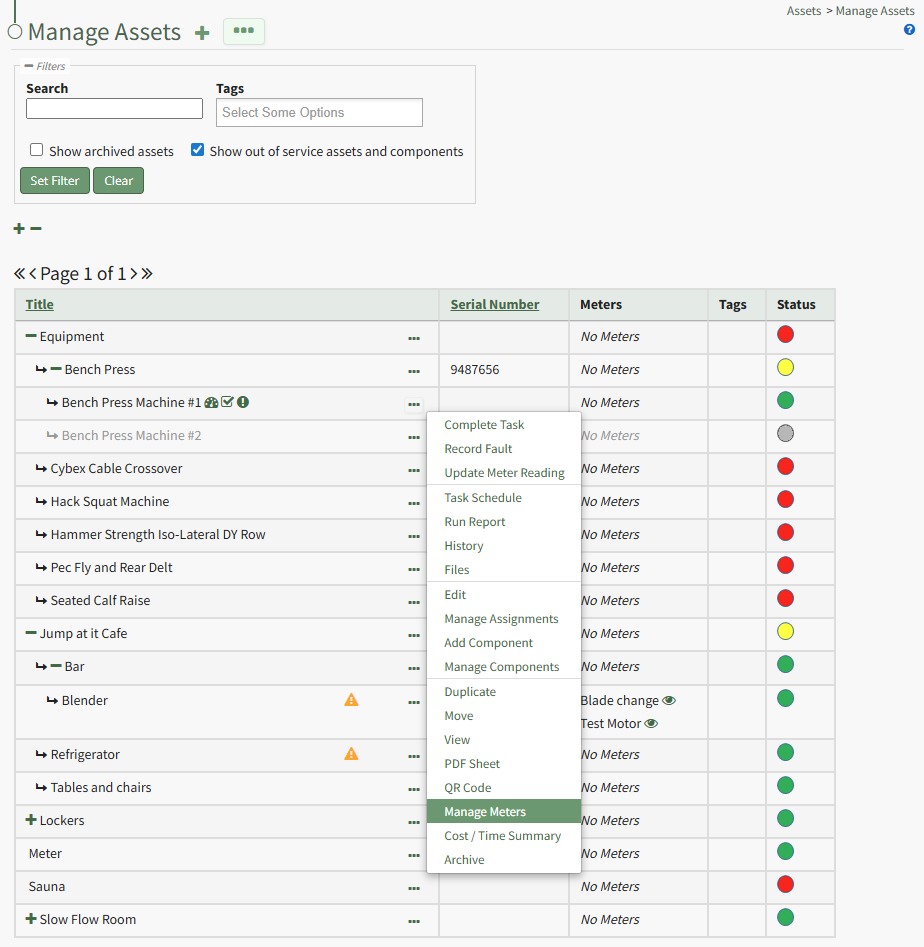
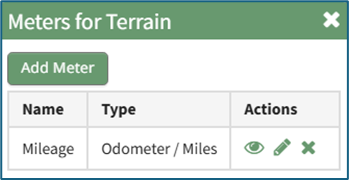
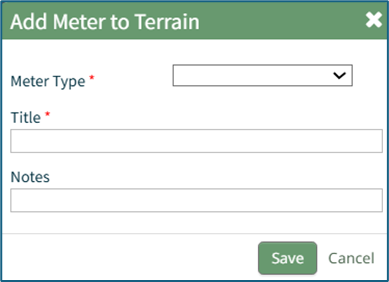
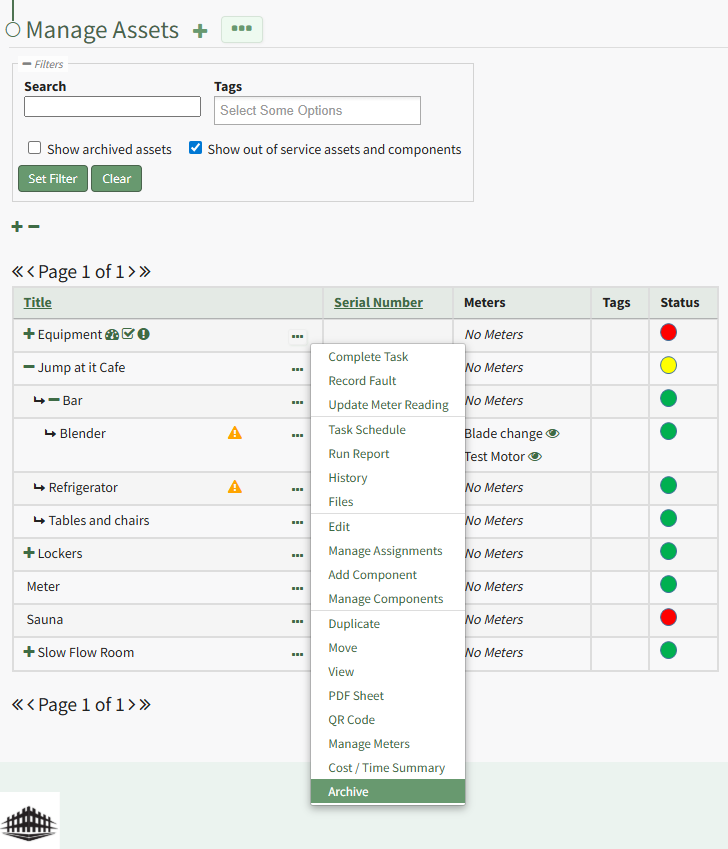
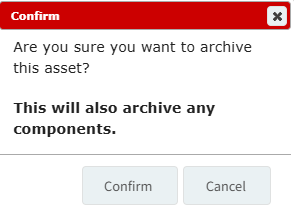
An Asset's History Page
Each asset created in KAStrack will have it's own Asset History Page that contains a task log, defer log, meter log and fault log which can be used to track, access, and manage historical data gained through the use of KAStrack's Asset Module.
To access the Asset History Page, click the three-dot icon to the right of the asset title whose history you want to view opening the Asset Management Context Menu and select History.
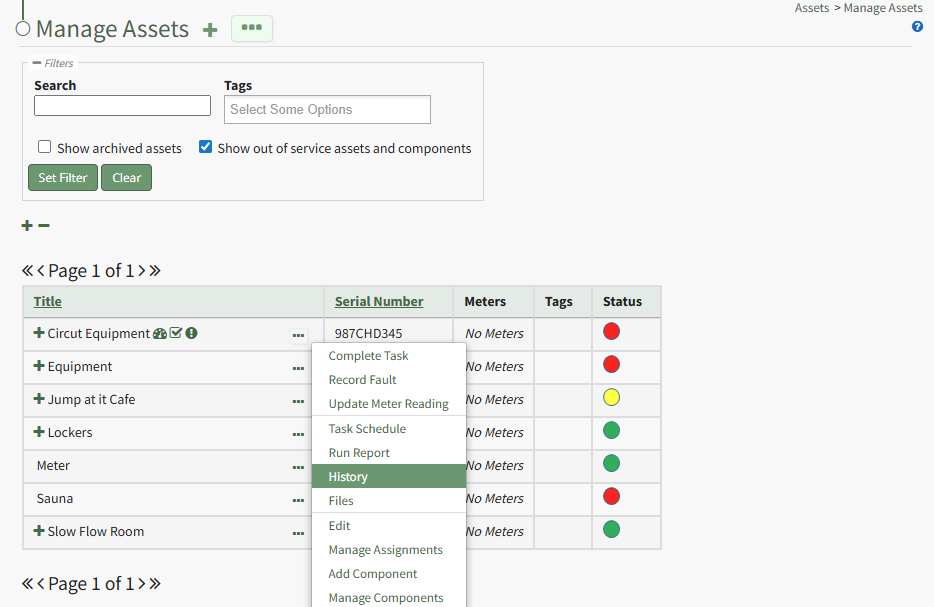
The asset title in the History Page is a clickable link that, when selected, will review back to the Manage Assets Table showing just the specified asset and its components.

Historical logs for specific components of the asset can be selected on the "Switch to logs for" dropdown menu. The dropdown menu below shown below allows the user to toggle the view between any of the asset’s components and subcomponents.

The three-dot icon to the right of the log view filter opens the History Page Context Menu with options for quick actions. Those options are explained in the table below.
History Page Context Menu Option Explanation Table | |||||||||||||||||||||||||
Option | Explanation | ||||||||||||||||||||||||
Complete Task | Selecting Complete from the context menu will open a modal that prompts you to select the asset the task is associated with. The completed task(s) can be selected via checkbox on the Complete Task Modal. How To: Log a Task has been CompletedIn order to log that a task has been completed and is current/up to date (a green task status), go to the Upcoming Task Table on the Home Page of the Assets Module. Select the “Complete Task” button from the top of the Your Upcoming Tasks Page.
The Choose Asset Modal will prompt you to identify which asset you want to log data for. Click the bulleted list icon to access your assets. Selecting the plus sign “+” icon will expand the components under the asset. Selecting “Complete Task” from the three dot (…) context menu to the right of the asset / component title will open the same modal for the specified asset.
Select the appropriate asset, opening the asset's Complete Task Modal. Click the green View All clickable link to list all tasks associated with the selected asset, including tasks that are current / up to date (green status).
Serial numbers and the asset description will show at the top of the modal. Clicking the “Show Subcomponents” checkbox shows any subcomponent tasks associated with the asset, expanding the modal when selected. Beneath the task in bold is a note that indicates the parameters for the task, referred to as a trigger in KAStrack. Triggers refer to the task behavior, frequency or usage standards that KAStrack will applies to tasks to determine their schedule for completion. To log the task, select the checkbox of the completed task. You can manually enter the date (MM/DD/YYYY format) and time (hh:mm:ss format) that the task was completed, or select “Now” in order to input the current date and time. Click the “Complete Task” button to save the changes and complete the task. Click cancel to return to the Assets Module Homepage. | ||||||||||||||||||||||||
Record Fault | Selecting Record Fault from the context menu will open a modal that prompts you to select the asset the fault is associated with. The fault can then be recorded through the Record Fault Modal. How To: Record a FaultLogging faults allows your company to track trending data in KAStrack by recording incidents and any data associated with this issue/failure. In order to record fault with an equipment issue/failure, go to the Upcoming Task Table on the Asset Module Homepage and select the "Record Fault" button beneath the page header.
The Choose Asset Modal will prompt you to identify which asset you want to log data for. Click the bulleted list icon to access your assets. Selecting the plus sign “+” icon will expand the components within the Asset. Selecting “Record Fault” from the three dot (…) context menu will open the same modal for the specified asset.
Select the appropriate asset, opening the Record Fault Modal.
Select the “Log Fault” button to record the incident. Select the “Log Fault and Resolve” button to complete two actions in one step: log the issue and indicate that it has been addressed. Click cancel to return to the Assets Module Homepage. | ||||||||||||||||||||||||
Update Meter Reading | Selecting Update Meter Reading from the context menu will open a modal that prompts you to select the asset the meter is associated with. The appropriate meter can then be selected from the Update Meter Reading Modal. How To: Update a Meter ReadingIn order to update an asset's meter reading, go to the Assets Module Home Page opening the Upcoming Tasks Table. Click the “Update Meter Reading" button from the Asset Module Homepage.
The Choose Asset Modal will prompt you to identify which asset you want to log data for. Click the bulleted list icon to access your assets. Selecting the plus sign “+” icon will expand the components within the Asset. Selecting “Update Meter Reading” from the Upcoming Task Table Context Menu will open the same modal for the specified asset.
Select the appropriate asset, opening the Update Meter Reading Modal.
The meters associated with the asset/component selected show in a dropdown menu. Select the meter whose meter data you wish to record. The most recent meter reading shows in the Update Meter Reading Modal as the “Last Entered Reading.” KAStrack automatically inputs the current date and time. The user can enter an elapsed value (if preferred) and KAStrack will input the new actual, or the user can input the new meter reading and the elapsed value will be automatically input. Attach any files (if there are checklists, forms, etc.) associated with the meter reading. Select the “Log Reading” button to update the meter usage. Click cancel to return to the Assets Module Homepage. | ||||||||||||||||||||||||
Task Schedule |
Selecting "Task Schedule" on the context menu opens an asset's Task Schedule, where new tasks can be added and existing tasks can be managed. How To: View an Asset's Task ScheduleTo view an asset's task schedule, open the Manage Assets Page in the Assets Module on the Main Menu. Use filters as needed and identify the asset/component whose task schedule you wish to view. Click the three-dot icon to the right of the asset title opening the Asset Management Context Menu.
Select the "Manage Components" option, opening the Manage Asset Components Page. Select the three-dot icon to the right of the asset/component you wish to add interim notes to and select Task Schedule from the context menu.
This opens the asset's Task Schedule Page.
| ||||||||||||||||||||||||
Run Report | Selecting “Run Report” from the context menu open the Assets Report Modal, allowing the user to select between five customizable Asset Reports. How To: Run an Asset ReportTo run an asset report, open the My Asset Page in the Assets Module on the Main Menu. Use filters as needed and identify the asset/component you want to run a report on. Click the three-dot icon to the right of the asset title opening a context menu.
Select "Run Report" from the context menu opening the Assets Report Modal with options for running various types of reports.
Reports can be run for an asset in its entirety, specific components or subcomponents. They type of report can be selected from a dropdown menu on the Assets Report Modal. An explanation of report types is included in the table below.
Select the "Create Report" button after completing the inputs on the Assets Report Modal and the system will generate your report in the viewing preference you selected. | ||||||||||||||||||||||||
Edit | Select "Edit” from the to open the Edit Asset modal, which allows the user to edit the key information regarding the asset and an asset's alert preferences. How To: Edit an AssetTo edit an asset, open the Manage Assets Page in the Assets Module on the Main Menu. Use filters as needed and identify the asset/component whose details you want to edit. Click the three-dot icon to the right of the asset title opening the Asset Management Context Menu.
Select "Edit" from the context menu opening the Edit Asset Modal.
Key details about the asset can be added directly from this modal, an asset type can be assigned, and alert preferences can be altered as desired. Click the "Save" after making the desired changes.
A popup confirms that the asset edits have been saved. | ||||||||||||||||||||||||
Manage Assignments | Selecting "Manage Assignments" on the context menu opens the Asset Assignments Modal which allows individual users and certification roles to be assigned to an asset. How To: Assign / Unassign Users and Certification Roles to an AssetTo assign or unassign users and certification roles for a specific asset, open the Manage Asset Pages in the Assets Module on the Main Menu. Use filters as needed and identify the asset/component you want to assign/unassign users and roles to. Click the three-dot icon to the right of the asset title opening a context menu.
Select "Manage Assignments" from the context menu opening the Asset Assignments Modal.
Click in the textbox beneath Assignments and a dropdown menu will allow you to assign the asset to multiple individuals or certification roles.
To unassign an individual, click the X icon to the right of the user name or certification role. When done, select the "Save Assignments" button.
A popup confirms that the asset assignments were saved. | ||||||||||||||||||||||||
Add Component | Selecting "Add Component" on the context menu opens the New Component Modal, which allows new components to be added to an asset. How To: Add Components to a Parent AssetTo add components to an asset, open the Manage Assets Page in the Assets Module from the Main Menu. In order to create components, the parent asset must have already been created. How To: Create a New AssetTo create a new asset, open the Manage Assets Page in the Asset Module and click the plus sign (+) icon to open the New Asset modal.
You can also access the New Asset Modal by clicking the three dot (…) icon and selecting “Create Asset” from the context menu.
The New Asset Modal requires the entry of an Asset Title. Optional fields include an asset description, tags, manufacturer, model number, serial number, and critical spares. Select the "Critical Component" checkbox to designate this asset as a critical component. This term is subjective for your organization to define. Designating an asset as a critical component will result in a hazard symbol being used as a visual indicator.
Critical items are prioritized and show separately on the Assets Module Summary. An entire asset is designated as a critical. All components and associated tasks will also have a critical component designation. KAStrack’s default setting prevents users with an expired certification role from performing tasks (such as completing tasks, recording faults, and updating meter readings. Select the “Allow users who are expired in assigned certification roles to perform tasks” checkbox to allow a user to perform tasks regardless of their assigned certification role status. The remaining three checkbox options all relate to asset status alert preferences. The “Send an alert when the asset changes from Past Due to OK” checkbox will send an alert via email to the assigned users when the task status changes from past due (red) to current/up to date (green). The “Send an alert when the asset changes to Warn” checkbox will send an alert via email to all users assigned to the asset when the task status changes from current/up to date (green) to warn (yellow). The “Send an alert when the asset changes to Past Due” checkbox will send an alert via email to all users assigned to the asset when the task status changes to past due (red). Asset Types are customizable to your company and are created on the Settings Page of the Asset Module. Once an asset type has been created, you can select one from the dropdown menu in the New Asset Modal to enable additional filtering capabilities. Asset Types allows your organization to add customizable fields unique to individual assets. How To: Create a New Asset TypeTo create a new asset type, open the Asset Types Tab on the Settings Page of the Assets Module.
Selecting the “Add Asset Type” button opens the New Asset Type modal.
Input the title of the New Asset Type and click “Save”. The newly created Asset Type will now show in the table on the Asset Type tab on the Settings page and is ready for you to add fields to. How To: Add Fields to an Asset Type{{@496}} Select the “Save” button at the bottom of the New Asset Modal to create the new asset or click “Cancel” to close the modal without saving and return to the Manage Assets Page. After an asset is created, it will appear in the Manage Asset Table where it can be managed.
Identify the pre-existing asset (or component) that you would like to place this new component under, and click the three dot (…) icon to the right of the asset name in the Manage Assets table opening the Manage Asset Context Menu. Select "Add Component" opening the New Component Modal.
The fields on the New Component modal ask for the same information on the New Asset Modal. For a detailed description of the fields, refer to the How To Create a New Asset page. Select the “Save” button and the component will appear underneath its asset in the Manage Asset table (if the view is expanded) where it can be managed. Subcomponents/additional child components can also be created for components if desired. Select the three dot (…) menu to the right of the component you would like to add an additional subcomponent in the asset’s hierarchal structure.
| ||||||||||||||||||||||||
Manage Components | Selecting “Manage Components” from the context menu will open the Manage Asset Components Page where assets and their components can be managed. Only users with appropriate permissions will have access to this page. | ||||||||||||||||||||||||
The actions associated with the icons used on the History Page of the Assets Module are explained on the table below.
Asset History Page Icon Explanation Table | |
Icon | Associated Action |
| Clicking the spreadsheet icon on the History Page will convert the selected table on the History Page to a datatable. Datatables enable you to sort information by column header. Refreshing the browser will revert back to the original tabular view. |
| Clicking the numbered list icon to the right of the Task Log header on the History Page will open a Task Reports Modal that allows you to run a report on the asset tasks. Form data must be present within the table in order for KAStrack to be able to generate a report. How To: Run Reports on Historical Task DataTo run reports on historical task records, open the relevant asset's Asset History Page. How To: View an Asset's Historical LogsAn asset's historical data can be accessed from an asset's History Page. To access an asset's history, go to the My Assets Page in the Assets Module on the Main Menu. Use the filters as needed to identify the access whose history you wish to view, and click the three-dot icon to the right of the asset name. This opens a context menu.
Select "History" from the context menu opening the Asset History Page.
Click the numbered list icon to the right of the Task Log header opening the Tasks Reports Modal.
|
| Clicking the download icon in the Attachments Column of a Log Tab will open the Downloading Attachments Modal, which generates a clickable link when the one-time download is ready. Clicking the download link downloads the attachment associated with a historical log to your personal device. How To: Download Historical Task AttachmentsTo download attachments associated with historical tasks, open the History Page of the relevant asset. How To: View an Asset's Historical LogsAn asset's historical data can be accessed from an asset's History Page. To access an asset's history, go to the My Assets Page in the Assets Module on the Main Menu. Use the filters as needed to identify the access whose history you wish to view, and click the three-dot icon to the right of the asset name. This opens a context menu.
Select "History" from the context menu opening the Asset History Page.
Select the download icon in the Attachments Column of the Log Table opening a Download Attachments Modal that generates a clickable link.
Click the link and the task record's attachment will be downloaded to your personal device. |
| Clicking the eyeball icon in the Actions Column of a Log Table will open the Task Details Module which displays recorded meter readings and files associated with the task. |
| Clicking the dialogue icon opens the Interim Notes Modal which shows all interim notes associated with the historical record.
How To: View Interim Notes Associated with Historical TasksTo view interim notes associated with historical tasks, open the relevant asset's History Page. How To: View an Asset's Historical LogsAn asset's historical data can be accessed from an asset's History Page. To access an asset's history, go to the My Assets Page in the Assets Module on the Main Menu. Use the filters as needed to identify the access whose history you wish to view, and click the three-dot icon to the right of the asset name. This opens a context menu.
Select "History" from the context menu opening the Asset History Page.
Click the Dialogue Icon in the Actions Column to the right of the task whose interim notes you wish to view opening the Interim Notes Modal which displays any interim notes made on the historical task record.
If no interim notes were made on the task, the modal will indicate that no interim notes were found.
|
| Clicking the upload icon in the Actions Column of the Log Table will open the Upload Files Modal, allowing you to upload files to a logged task after the fact. How To: Upload Files to a Task after a Task has been CompletedTo upload files to a task after a task has been completed, open the relevant asset's History Page. How To: View an Asset's Historical LogsAn asset's historical data can be accessed from an asset's History Page. To access an asset's history, go to the My Assets Page in the Assets Module on the Main Menu. Use the filters as needed to identify the access whose history you wish to view, and click the three-dot icon to the right of the asset name. This opens a context menu.
Select "History" from the context menu opening the Asset History Page.
Click the upload icon in the Actions Column to the right of the task record you wish to upload a file to opening the Upload File Modal.
Click the Choose Files button and select the file you wish to upload from your personal device.
Click "Save" after selecting your file.
The file now shows in the Attachments Column of the Log Table. |
| Clicking the Pencil/Page Icon opens the Edit Log Entry Modal which allows you to change the date and time of task completion and include any notes. How To: Edit the Date / Time of Task Completion for Historical TasksTo edit the date/time of task completion for historical task records, open the relevant asset's History Page.
Select the paper pencil icon in the Actions Column to the right of the historical task record you wish to edit.
This opens the Edit Log Entry Modal where the date and time can be edited and additional notes can be included. Select "Save" and the system returns you to the asset's History Page. |
| Clicking the trashcan icon opens the Delete Record Confirmation modal which states, "Are you sure you wish to delete this record?" How To: Delete Historical Task RecordsTo delete the historical records associated with an asset task, open the asset's History Page. How To: View an Asset's Historical LogsAn asset's historical data can be accessed from an asset's History Page. To access an asset's history, go to the My Assets Page in the Assets Module on the Main Menu. Use the filters as needed to identify the access whose history you wish to view, and click the three-dot icon to the right of the asset name. This opens a context menu.
Select "History" from the context menu opening the Asset History Page.
Click the trashcan icon in the Actions Column of the Log Table for the task record you wish to delete open the Delete Task Record Confirmation Modal.
Select "Confirm" and a popup confirms the record has been removed.
It is no longer visible in the log table. |
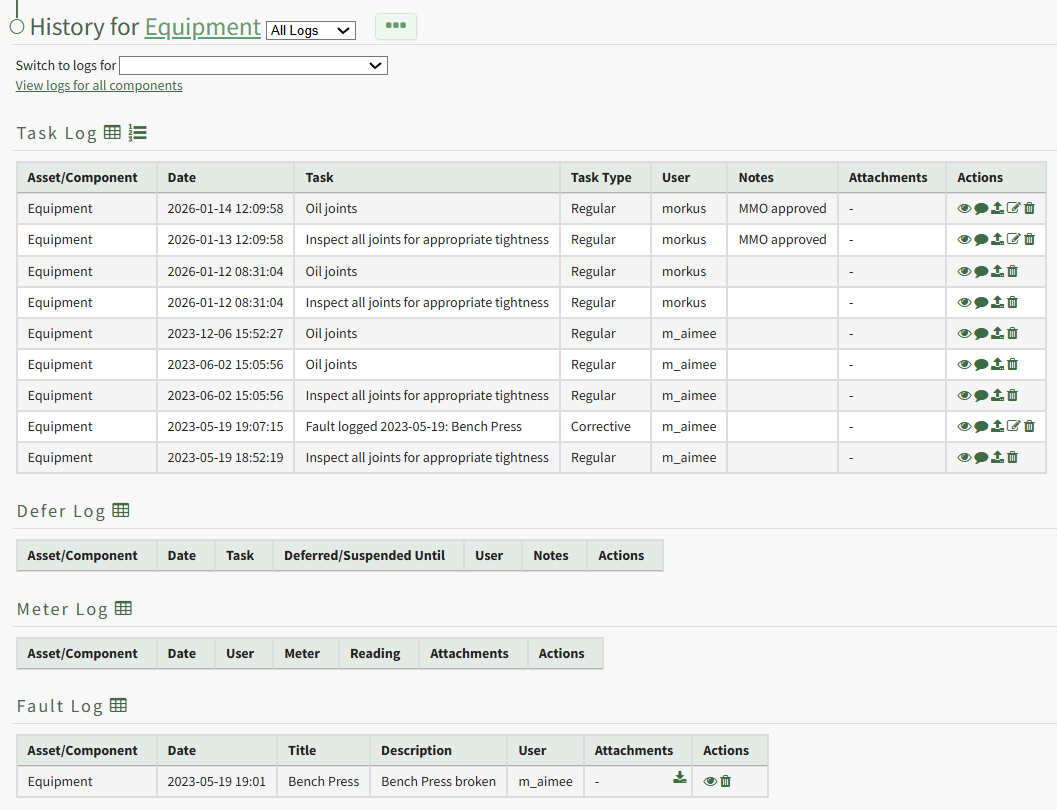
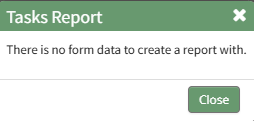

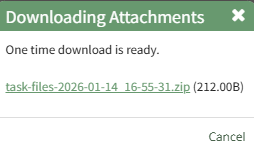
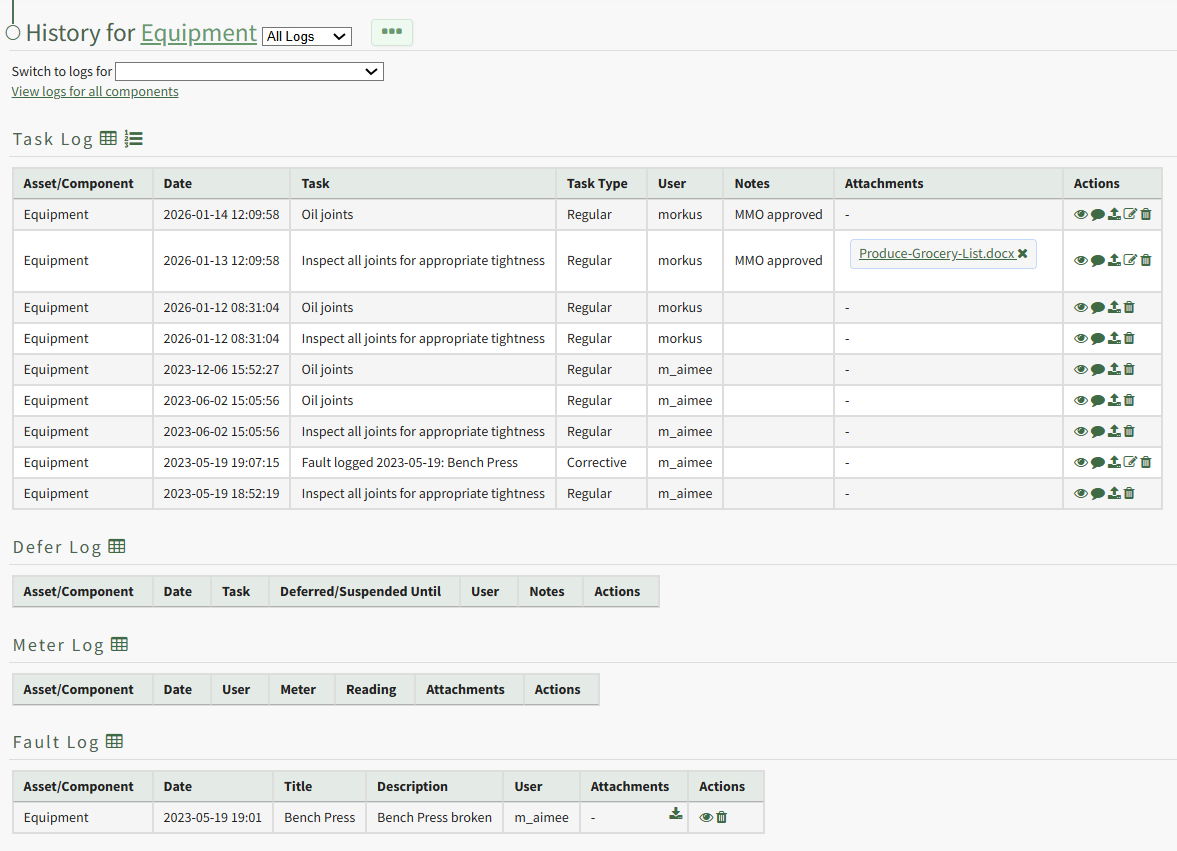
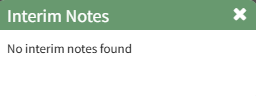
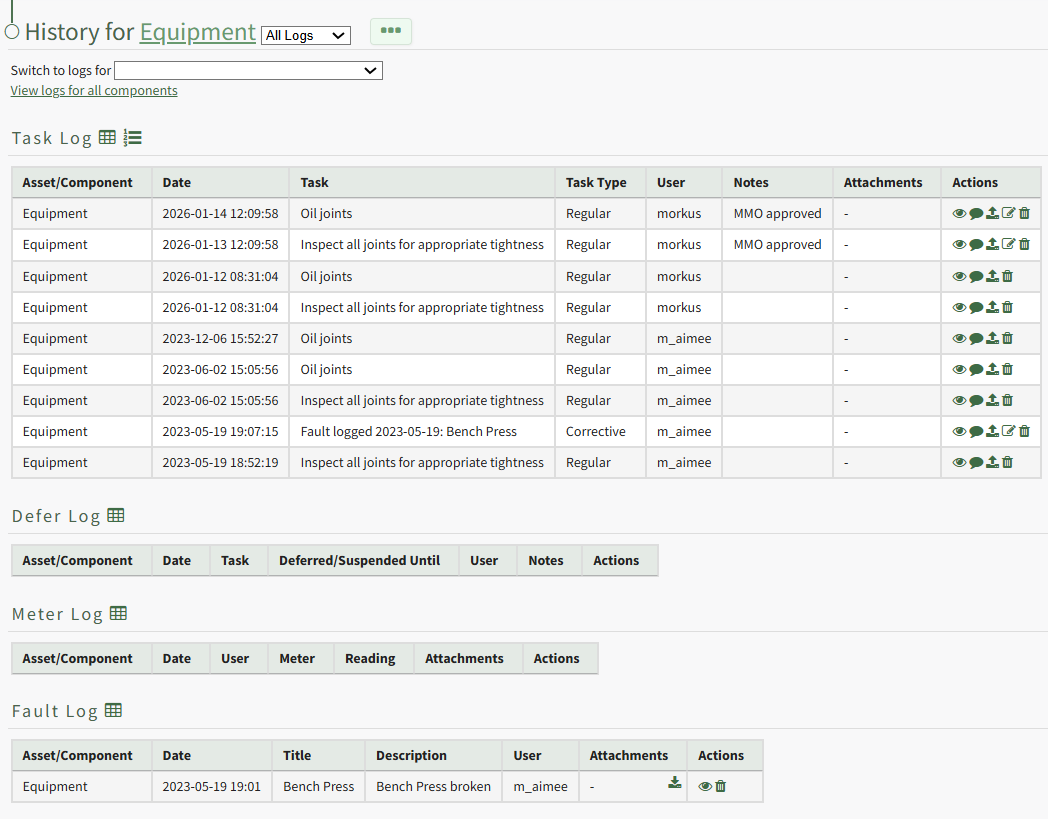
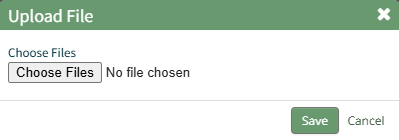
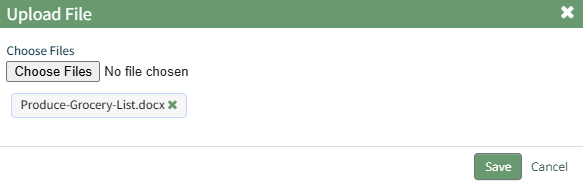

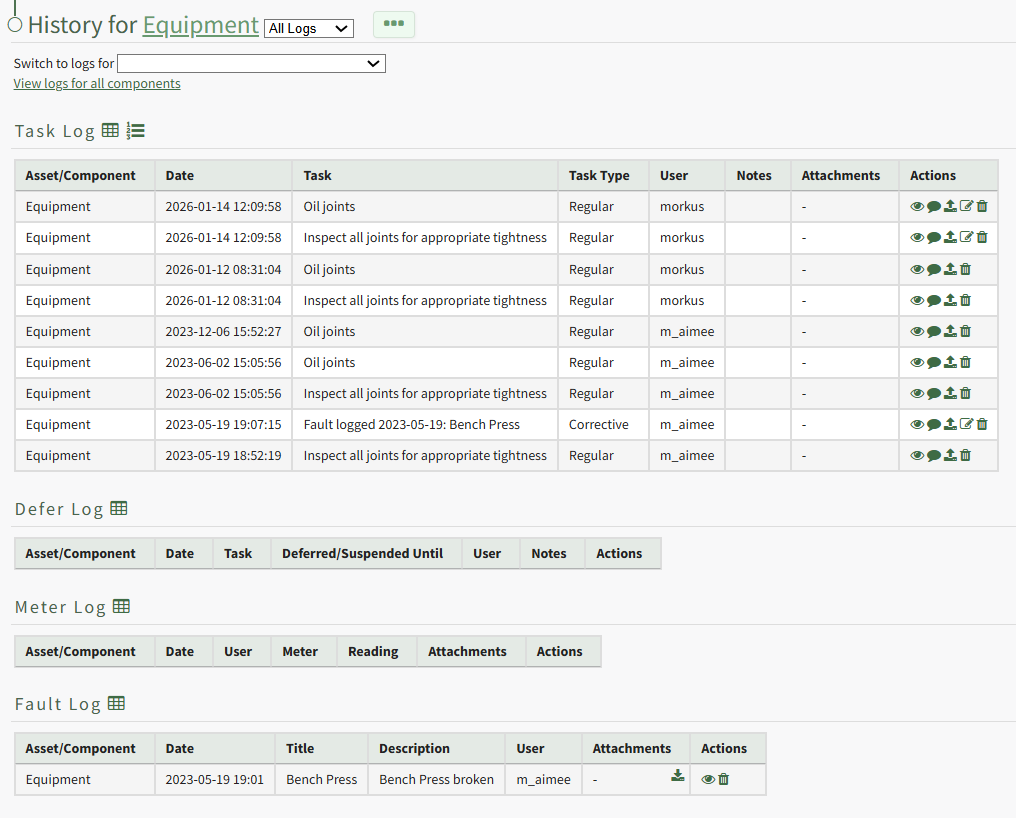

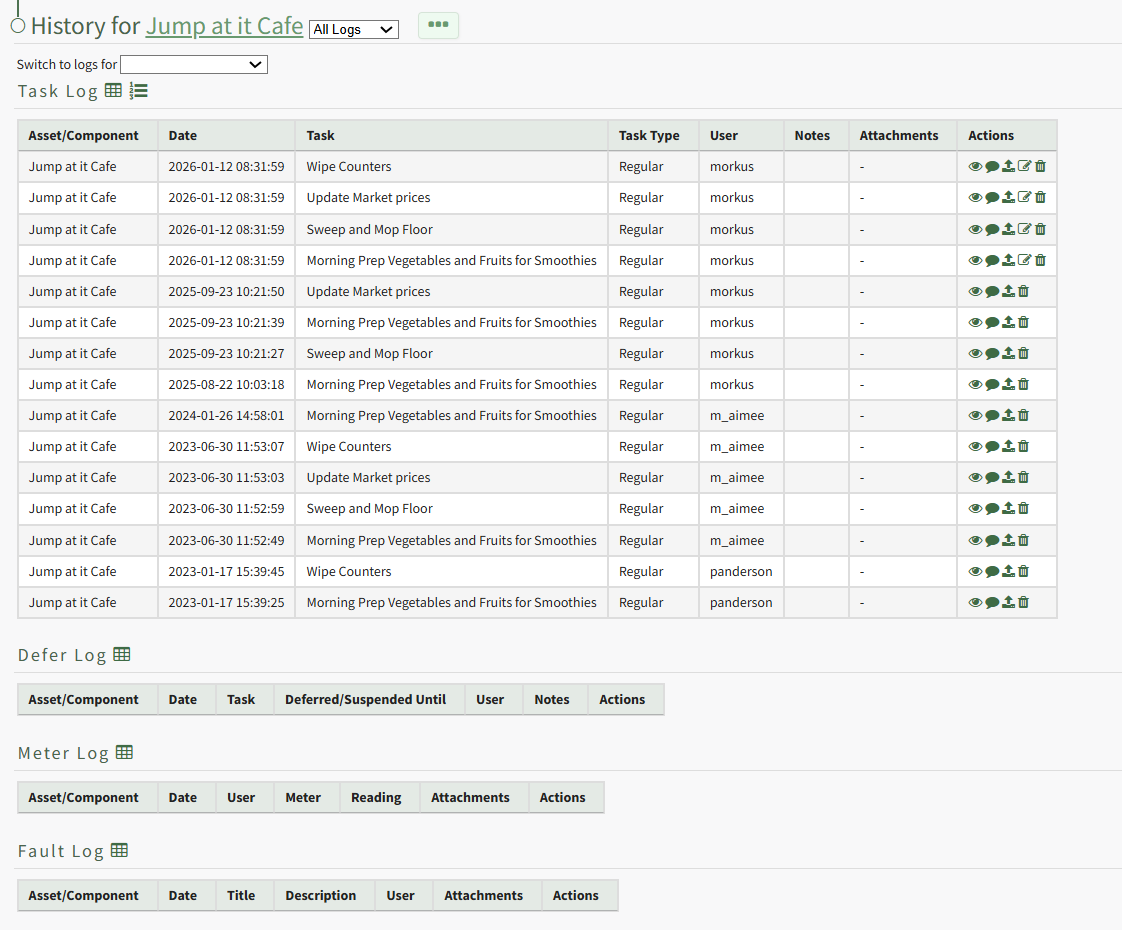
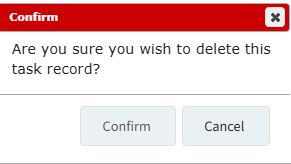

Understanding Task Trigger Settings
Each task on an asset's Task Schedule has its own customizable trigger. The trigger is what sets the task's schedule and its status changes. Tasks are not required to have a trigger and can also have more than one.
Tasks that do not have a trigger will always remain current with a green status, allowing a user to track task completion, faults, and meter readings.
To customize triggers from the New Task Modal or Edit Task Modal, you select the Task Type and Trigger Behavior from the two dropdown menus.

Task Type Option Explanation Table | |
Task Type | Explanation |
Regular Task | This is the default task type. |
Corrective Task | Corrective tasks are one-time actions, not reoccurring tasks. Because of this, there is no trigger selection to be made. When a Corrective Task Type is selected, the modal changes, removing the trigger dropdown menu and offering a checkbox selection "Deferred". When the Deferred checkbox is selected, the user will have the ability to defer the corrective task, giving it a blue status in the system. |
Service Bulletin | Both the Service Bulletin and Directive Task Types are subjective. You organization can define and utilize them at your own discretion. They were designed to offer an ability to categorize tasks, but do not differ in functionality than the default, Regular Task. |
Directive | |
Regular Tasks, Service Bulletins and Directives offer an ability to customize the trigger behavior. Trigger behavior defines what is required to trigger a change in task status. The variety trigger behaviors utilized by KAStrack are explained in the table below.
Trigger Behavior Option Explanation Table | |
Trigger | Explanation |
Hits When any Trigger is Met | Allows any parameter, a calendar date or meter usage interval, to fulfill the requirement. |
Hits When All Triggers are Met | Requires all parameters are met to fulfill the requirement (could be multiple calendar dates, multiple meter usage intervals, or some combination of the two). |
Follows Another Task's Schedule | When selected, the parameter used to fulfill the requirement is based on when the original (followed) task’s trigger is altered. This trigger behavior attaches one task to another. |
Copy Another Task's Schedule | When selected, the new/edited trigger will utilize another tasks schedule to define its own, simplifying the setup process. That two task are independent of each other once copied. |
Once a Task Type is selected and the trigger behavior is defined, the frequency of the trigger can be customized by selecting the plus sign icon to the right of the Trigger dropdown menu. Trigger frequency is based on a period designation and parameter definition (time or meter usage). There are a variety of Period options that can be utilized when customizing your task's trigger settings. Each are explained in the table below.
A detailed explanation of how to complete the New or Edit Task Modal for each of the customizable Period / Parameter combinations has been included in the table also.
Trigger Period Option Explanation Table | |
Period | Explanation |
Every | When the trigger is set to "Every" the timer or meter will reset when the task is completed. How To: Customize Trigger Settings with an Every PeriodTriggers with an Every period can have a time or usage parameter. When Every is selected as the period, the timing of the reoccurrence interval resets when the task is completed, regardless of the task's status prior to completion. Every Period with a Time ParameterSelect Every from the Period dropdown menu. There are two options for a time parameter: Date or Mon-Fri. Select Date on the Parameter dropdown menu to create a customized recurrence interval. Input a numerical value for the recurrence interval in the first text box and select the appropriate units (Days, Weeks, Months, or Years).
Select Mon-Fri on the Parameter dropdown menu if the task should only reoccur on Monday – Friday.
Input a numerical value for the recurrence interval in the first text box and select the appropriate units (Days, Weeks, Months, or Years). Clicking YYYY-MM-DD, opens a calendar modal. Select the date the task is first due on. The task status will switch from green (or yellow if a warning is set) to red when it is past due, one day after the calendar date selected. Input a numerical value for “warn at ____ days left” to set the number of days before the task is due for a reminder. This turns a green current / up-to-date task status to a yellow warning. Click “Add Trigger” to save. Every Period with a Usage ParameterSelect Every from the Period dropdown menu. Select the specific meter the task is associated with on the Parameter dropdown menu.
Input a numerical value for the usage recurrence interval in the first text box. Input a value for the meter that triggers the new task being due in the “first due at” textbox. The task status will switch from green (or yellow if a warning is set) to red after a “Log Asset Data” or “Update Meter Reading” records a usage value greater than the value entered here. Input a numerical value for “warn at ____ left” to set meter reading that activates a reminder that the task is approaching. This turns a green current / up-to-date task status to a yellow warning. Click “Add Trigger” to save. |
Every (strict) | When the trigger is set to "Every (Strict)" the timer or meter will reset on the specified schedule, regardless of the task completion date. If a previous task period was missed, the next upcoming task is the only one due. How To: Customize Trigger Settings with an Every (strict) PeriodTriggers with a Every or Every Strict Period can have time or usage parameter. When a trigger has a Every Strict period, the trigger is scheduled on a specific date or specific meter reading, regardless of when the previous task was actually completed. If a previous task was not completed, the incomplete task is skipped over and the next upcoming task is the only one due. Every (Strict) Period with a Time ParameterSelect Every (Strict) from the Period dropdown menu. Select Date on the Parameter dropdown menu.
Input a numerical value for the recurrence interval in the first text box and select the appropriate units (Days, Weeks, Months, or Years). Clicking YYYY-MM-DD, opens a calendar modal. Select the date the task is first due on. The task status will switch from green (or yellow if a warning is set) to red when it is past due, one day after the calendar date selected. Input a numerical value for “warn at ____ days left” to set the number of days before the task is due for a reminder. This turns a green current / up-to-date task status to a yellow warning. Click “Add Trigger” to save. Every (Strict) Period with a Usage ParameterSelect Every (Strict) from the Period dropdown menu. Select the specific meter the task is associated with on the Parameter dropdown menu.
Input a numerical value for the usage recurrence interval in the first text box. Input a value for the meter that triggers the new task being due in the “first due at” textbox. The task status will switch from green (or yellow if a warning is set) to red after a “Log Asset Data” or “Update Meter Reading” records a usage value greater than the value entered here. Input a numerical value for “warn at ____ left” to set meter reading that activates a reminder that the task is approaching. This turns a green current / up-to-date task status to a yellow warning. Click “Add Trigger” to save. |
Generate Every | When a task uses a Generate Every Period, the task no longer utilizes a repeating trigger. A new, one-off task will be created (with the same details as the task currently being created) whenever the previous task's parameters are met. How To: Customize Trigger Settings with a Generate Every PeriodGenerate Every is a special case period designation that can have a time or usage parameter. When a task has a Generate Every Period, the task no longer utilizes a repeating trigger. A new, one-off task will be created (with the same details as the task currently being created) whenever the previous task's parameters are met. Generate Every Period with a Time ParameterSelect Generate Every on the Period dropdown menu. There are two options for a time parameter: Date or Mon-Fri. Select Date on the Parameter dropdown menu to create a customized recurrence interval. Input a numerical value for the recurrence interval in the first text box and select the appropriate units (Days, Weeks, Months, or Years).
Select Mon-Fri on the Parameter dropdown menu if the task should reoccur only on Monday – Friday.
Clicking YYYY-MM-DD, opens a calendar modal. Select the date the task is first due on. The task status will switch from green (or yellow if a warning is set) to red when it is past due, one day after the calendar date selected. If the Generate tasks in the past checkbox is selected, the system will recreate any tasks that have been missed or were deleted counting up from the selected date. Use prior period for label checkbox will append a label of the previous period to help clarify the task. An example use of this feature could be for a monthly reconciliation task of your bank account. In November, the task would state "Reconcile Checking Account for 2025-10 (Oct)." Click “Add Trigger” to save. Generate Every Period with a Usage ParameterSelect Generate Every from the Period dropdown menu. Select the specific meter the task is associated with on the Parameter dropdown menu.
Input a numerical value for the usage recurrence interval in the first text box. Input a value for the meter that triggers the new task being due in the “first due at” textbox. The task status will switch from green (or yellow if a warning is set) to red after a “Log Asset Data” or “Update Meter Reading” records a usage value greater than the value entered here. Input a numerical value for “warn at ____ left” to set meter reading that activates a reminder that the task is approaching. This turns a green current / up-to-date task status to a yellow warning. If the Generate tasks in the past checkbox is selected, the system will recreate any tasks that have been missed or were deleted counting up from the selected date. Use prior period for label checkbox will append a label of the previous period to help clarify the task. Click “Add Trigger” to save. |
One Time | When a task has a One Time Period, the trigger does not reoccur. How To: Customize Trigger Settings with a One Time PeriodSelecting “One Time” as the period allows the user to create a Regular Task that only occurs once. Triggers with a “One Time” period can have a time or usage parameters. One Time Period with a Time ParameterSelect One Time on the Period Dropdown menu. Select Date on the Parameter dropdown menu.
The task status will switch from green (or yellow if a warning is set) to red when it is past due, one day after the calendar date selected. Input a numerical value for “warn at ____ days left” to set the number of days before the task is due for a reminder. This turns a green current / up-to-date task status to a yellow warning. Click “Add Trigger” to save. One Time Period with a Usage ParameterSelect One Time on the Period Dropdown menu. Select the specific meter the task is associated with on the Parameter dropdown menu.
Input a value for the meter that triggers the new task being due in the “first due at” textbox. The task status will switch from green (or yellow if a warning is set) to red after a “Log Asset Data” or “Update Meter Reading” records a usage value greater than the value entered here. Input a numerical value for “warn at ____ left” to set meter reading that activates a reminder that the task is approaching. This turns a green current / up-to-date task status to a yellow warning. Click “Add Trigger” to save. |
Before Task | A "Before Task" trigger requires this task to be completed before the task identified by a drop down menu. The task selected in the drop down menu will be locked out until this task is completed. How To: Customize Trigger Settings Based on Pre-Existing TasksIt is possible for a task’s trigger to be based on the schedule of another pre-existing task within the same asset tree. It is not possible to follow or copy another task’s schedule if the original task has an “on expiry” trigger. Trigger Behavior: Follow Another Task’s ScheduleWhen a trigger’s behavior is set to “Follow another task’s schedule,” the original task and new task are now linked.
If the trigger for the task selected is altered, the trigger for the task following it will be altered as well. Trigger Behavior: Copy Another Task’s ScheduleWhen a trigger’s behavior is set to “Copy another task’s schedule,” the two tasks function independently of each other.
If the schedule for the copied trigger is altered, it has no impact on the task schedule just created. This option allows the user to efficiently duplicate task schedules with ease. |
On Expiry | An on-expiry trigger gives the user the ability to input the next due date (vs auto-calculating it like the other triggers based on task completion) when completing the task. How To: Customize Trigger Settings Based on an On Expiry PeriodTriggers with an On Expiry period can only have a time parameter. An on-expiry trigger gives the user the ability to input the next due date (vs auto-calculating it like the other triggers based on task completion) when completing the task. Select On Expiry from the Period dropdown menu. Clicking YYYY-MM-DD opens a calendar modal. Select the date the task expires on. The task status will switch from green (or yellow if a warning is set) to red when it is past due, one day after the calendar date selected.
Input a numerical value for the task to renew and select the appropriate units (Days, Weeks, Months, or Years). Use the dropdown menu to establish if the new expiry is calculated from the Last Expiry Date or Task Performed Date. The user can select to pad the autofill to the end of the nearest Month, Quarter, 6 Months, Year, or to not pad the autofill. Enter a numerical value to Turn Red ___ days before expiry. Enter a numerical value to Warn ___ days before turning red. Click “Add Trigger” to save. |