Registrations Tab
The Registration Tab on the Site Settings Page is used to create Registration Profiles. Registration Profiles serve as templates for the efficient generation of new user accounts and can allow existing accounts to update account configurations.
Each registration profile has a customizable URL link that can be sent to individuals for new account registrations. A registration profile will specify the new user’s access level(s), certification role(s), supervisor(s), and notification template, as well as who should be notified about the new account, who will approve the new account, if email verification of the new account is required, and whether a welcome email should be sent. There is also an ability to leave a customized note for new registrations and a different message for an existing user.
If an existing user logs in from a Registration Profile link, the access level(s), certification role(s), and supervisor(s) listed on the Registration Profile will be added to the user’s account. Any existing access levels, certification roles, and supervisors on their account remain unchanged.

Selecting the plus icon to the right of the Registration Profile header is a quick link to the Create New Registration Profile Page. Selecting the three dot (…) icon opens a context menu with three options: Create, Import, and Export.
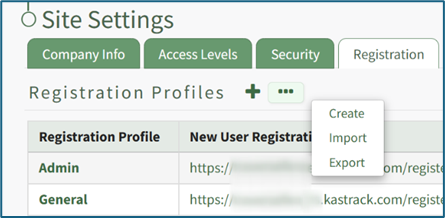
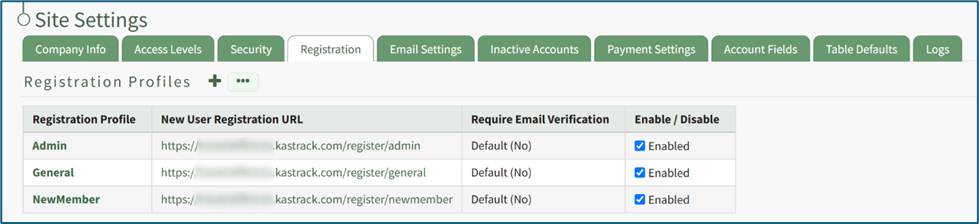
Registration profiles can be enabled/disabled via a checkbox in the rightmost column of the Registration Profile Table so that your organization has control of when this link is activated.
How To: Create Registration Profiles
To create a new registration profile, go to the Registration Tab in the Site Settings Module.

Click the plus icon next to the Registration Profiles header or select “Create” from the three dot (…) icon context menu. This will open the Create Registration Profile Page.
The fields used in a Registration Profile are optional. You are not required to make selections for all when generating a new profile.
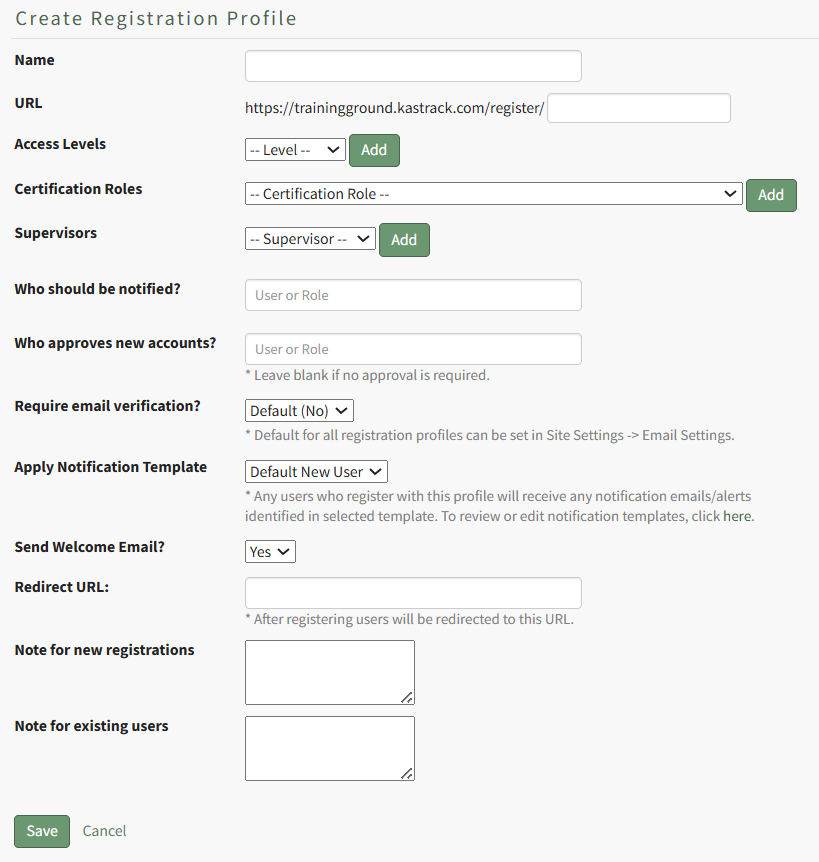
Input a name for the new registration profile, which will automatically fill in the URL link textbox.

Select any desired access level(s) for this registration profile from the dropdown menu list and click “Add”. Multiple Access Levels can be selected. The X icon to the left of the access level will remove the selection if it was made in error.
It is recommended to include at least one access level if this Registration Profile will be used to register new user accounts, as they must have an access level to see anything in KAStrack.

Select any desired Certification Role(s) for this registration profile from the dropdown menu list and click “Add”. Multiple Certification Roles can be selected. The X icon to the left of the Certification Roles will remove the selection if it was made in error.

Select any desired supervisor(s) that are to be assigned to the new accounts that register with this profile from the dropdown menu list and click “Add”. Multiple supervisors can be selected. The X icon to the left of the supervisor will remove the selection if it was made in error.

If desired, you can specify individual users and/or certification roles that are to receive notification of the new user account’s registration. When you type into the textbox, users and certification roles will show on a dropdown menu for selection. Multiple users and/or certification roles can be selected. The X icon to the left of the user / role will remove the selection if it was made in error.
If new registrations require approval, you can specify individual users and/or certification roles that are responsible for approving the new registrations. When you type into the textbox, users and certification roles will show on a dropdown menu for selection. Multiple users and/or certification roles can be selected. The X icon to the left of the user / role will remove the selection if it was made in error. Leave this field blank if no approval is required.
The default is set to not require email verification for new account generation, but you can select Yes or No from a dropdown menu. Users will then receive an email after registration asking them to verify their email address.
The default for all registration profiles can be set on the Email Settings Tab in the Site Settings Module, but the Registration Profile being created will override the default settings.
A default new user notification template is applied for all registration profiles.

Any users who register with this profile will receive notification emails/alerts that have been specified through the new user template. The Default New User Notification Template details are shown on the Notification Templates Tab on the Settings Page of the Communications Module. Clicking the word “here” will redirect the user to the Notification Template Tab where the Default New User Template can be edited or a new notification template can be created for your organization’s preferences.
How To: Edit New User Notification Templates
To edit new user notification templates, go to the Notification Templates Tab on the Settings Page of the Communications Module.
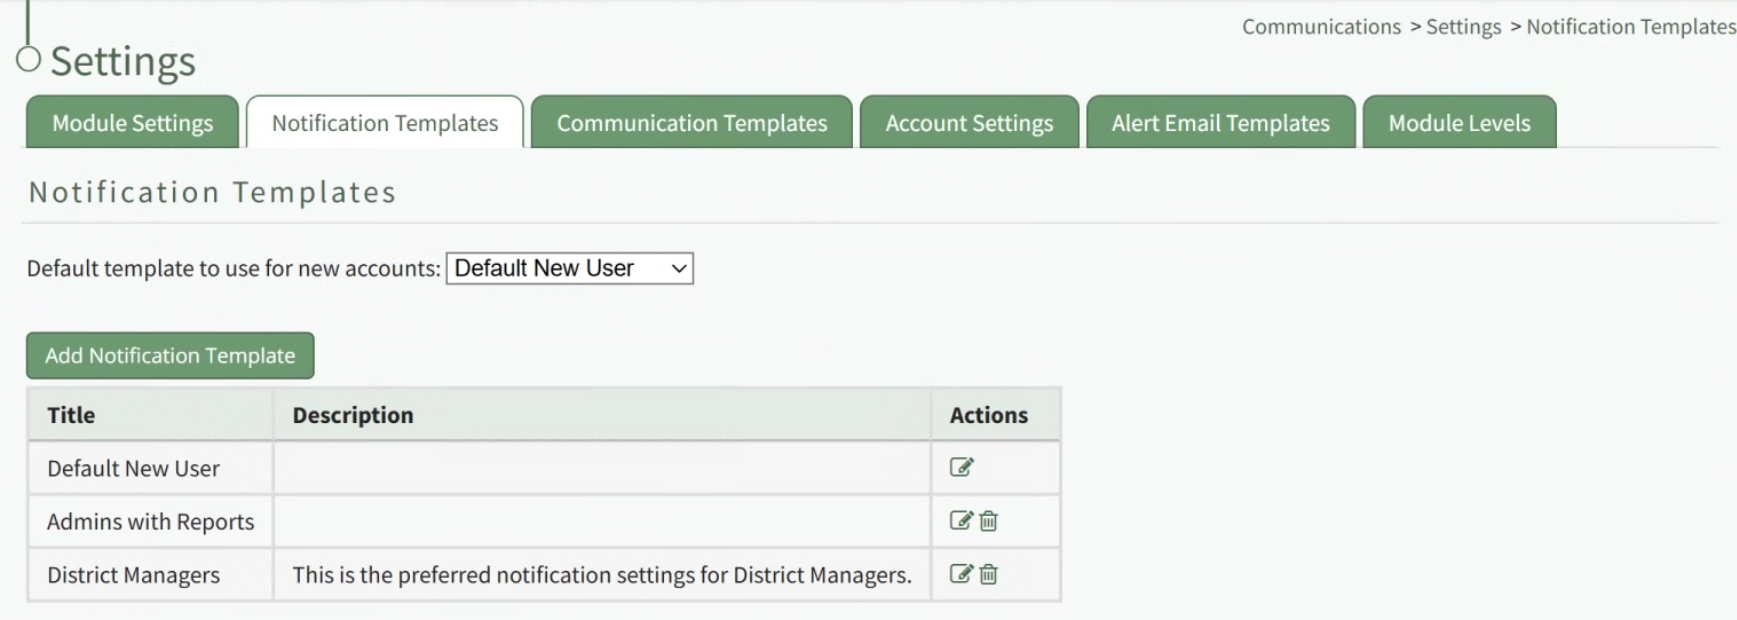
Existing templates will be shown in the Notification Template Table.
Select the edit icon in the action column of the template you wish to edit opening the Edit Notification Template Page.
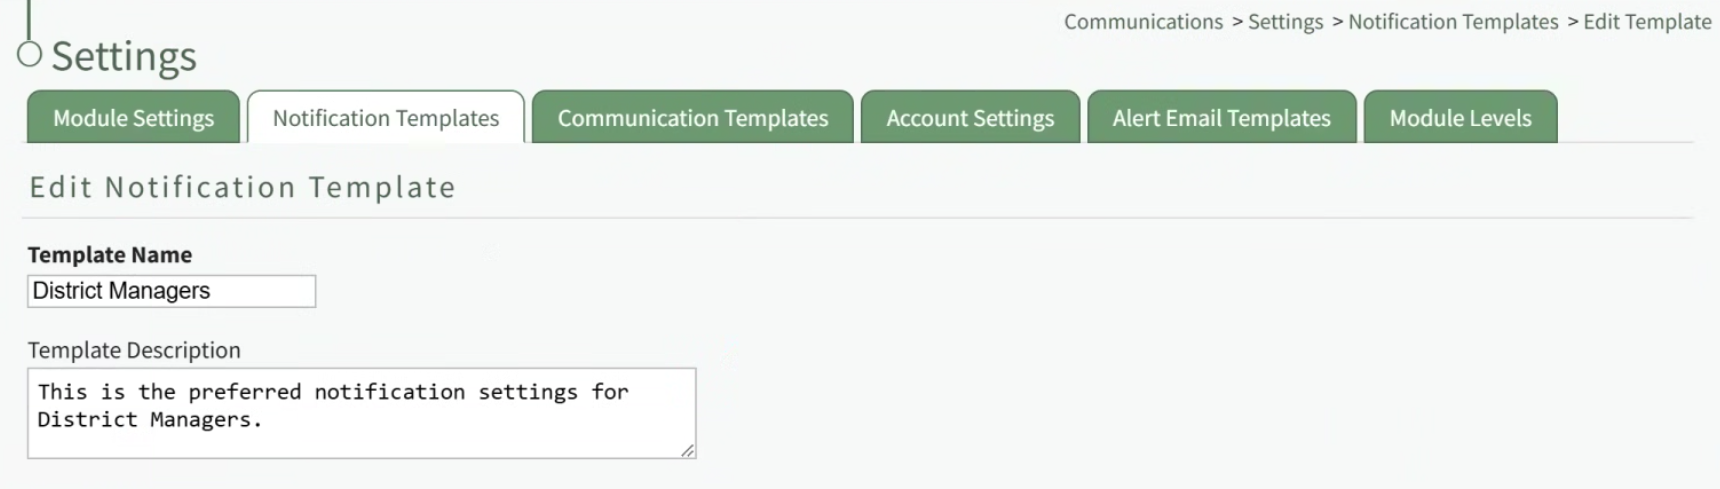
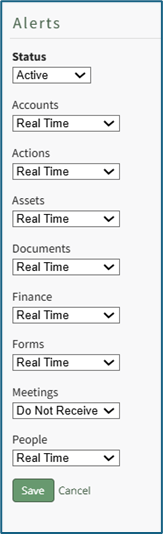
A notification template is comprised of two parts: Reports and Alerts.
Indicate the desired status for email report notifications: Not Active or Active.
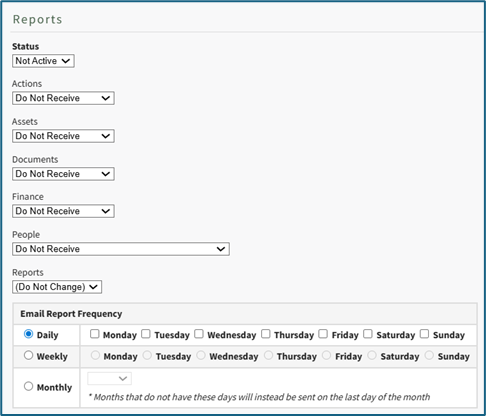
Alter the desired reports selected for each module or leave as “Do Not Receive”.
Email Report Frequency has three options: daily (or on specified days of the week), weekly (on the day of your choosing), or monthly (which requires the user to specify which numerical day of the month from a dropdown menu you wish to receive the report summary).
After setting template preferences for reports, scroll down to set template preferences for email alerts.
Alter email preferences as set by module through a dropdown menu with three options that designate when an email alert should be sent: “Real Time”, “Digest”, and “Do Not Receive”.
After making edits to your preferences for both Email Report and Email Alert Settings, select “Save”, returning you to the Notification Templates Tab on the Settings Page of the Communications Module.
The newly created notification template will now be shown on the Notification Template Table.
If you would like new user accounts that use this registration profile to receive a Welcome Email, select yes from the dropdown menu.
The default for all registration profiles can be set on the Email Settings Tab in the Site Settings Module, but the Registration Profile being created will override the default settings.
A redirect URL can be designated, so that any user registering with this profile will be redirected to the specified URL after registering.

Input a custom message for new registrations and a custom message for existing users if desired.
If an existing user logs in from a Registration Profile link, the access level(s), certification role(s), and supervisor(s) listed on the Registration Profile will be added to the user’s account. Any existing access levels, certification roles, and supervisors on their account are not removed.
Select “Cancel” at any time to return to the Registration Profile Tab in the Site Settings Module without saving the profile. Select the “Save” button and the new registration profile now shows on the Registration Tab in the Registration Profile Table.
Registration profiles can be enabled/disabled via a checkbox in the Registration Profile Table so that your organization has control of when this link is activated.
How To: Import Registration Profiles
To import a CSV spreadsheet of existing registration profiles, go to the Registration Tab of the Site Settings Module.

Click the three dot (…) icon to open a context menu. Select “Import” opening the Import Registration Profiles Modal.

Select the “Download Template” button to download a CSV file with 13 pre-labeled columns.
Helpful Tips for Filing out the Registration Profile Template CSV File | |
Registration Profile ID | This is left blank for new registration profiles. Export a CSV to get the registration profile ID for existing profiles that need editing. |
Name | Input a name for the registration profile name. |
URL | https://SiteName.kastrack.com/register/RegistrationProfileName Specify your organization’s site name and the registration profile name selected above |
Access Level | Separate multiple Access Levels with a semi-colon |
Certification Role | List the Company Name (from the Companies Page of the People Module) before the Certification Role Name with a space in-between the two; Separate multiple Certification Roles with a semi-colon Example: Company Name Certification Role |
Supervisor | Separate multiple Supervisors with a semi-colon |
Who Should be Notified | Separate multiple users or certification roles with a semi-colon |
Who approves new accounts | Separate multiple users or certification roles with a semi-colon; Leave blank if no approval is required |
Require email verification | Select “Yes” or “No” |
Apply Notification Template | Input “Default New User” unless you have created a customized Notification Template (in the Communications Module) that you would prefer to use instead. |
Send Welcome Email | Input “Yes” or “No” |
Registration Note | Input a custom note to be included for new registrations. |
Login Note | Input a custom note to be included for existing system users. |
When all information has been included in the CSV file, save it with the CSV format UTF-8. Click the “Choose File” button or drag the CSV file into the Import Registration Profiles Modal.
The Import Registration Profile Modal expands.

After selecting your CSV, KAStrack will scan the first row for matching column headers and attempt to map those column headers to the names of the Registration Profile settings fields. The dropdown next to each field will automatically be set to any matching column headings from the CSV.
If a matching column couldn't be found, or if your import file uses column headers with different names than the Registration Profile settings fields, you can manually choose which column should map to those settings by choosing an option from the dropdown.
Select the “Import Profiles” button. If there are no issues with the imported CSV file, the new registration profiles will now show in the Registration Profiles Table.
If there were any issues during importing, the error will be explained in the Import Registration Profile Modal. Make the necessary changes and select the “Start Over” button to resubmit the corrected CSV file.
How To: Export Registration Profiles
To export a CSV spreadsheet of existing registration profiles, go to the Registration Tab of the Site Settings Module.
Click the three dot (…) icon to open a context menu. Select “Export”.
The CSV file will automatically be downloaded to your personal device.
No comments to display
No comments to display