People: Introduction
People Module Summary
The People Module is where individual certifications can be managed. The term “certifications” pertains to the types of qualification/training/licenses/policies/credentials, etc. that can be tracked by KAStrack. The People Module also allows for creation of Companies and Certification Roles that can be designed to help organize users on the site into groups, e.g. organizing users based on their job title or department.
Individuals with Admin/Supervisor Module Levels for the People Module will have access to pages that other module levels do not. Separate chapters have been created in BookStack so that users can view information about the People Account consistent with what their module level allows them to access.
People Module Page Summary Table | |
Page | Explanation |
The Users Page in the People Module allows a user to review KAStrack user certifications in table form. | |
The Submissions Page allows the user to manage certification submissions. The Submissions Page has three tabs that can be accessed from the Main Menu, the Pending Approvals Tab, Attachment Inbox Tab, and Batch Submit Certifications Tab. | |
The Reports Page permits the viewing/generation of various reports on certification status for users. The Reports Page has three tabs that can be accessed from the Main Menu, the Supervisor Report Tab, Shared Reports Tab, and Create Shared Report Tab. The Reports Page is specific to this module and is separate from the features within the Reports Module | |
The Matrix Page allows quick visualization of all user certifications in a filterable grid format. | |
The Roles Page allows creation and management of certification roles used to organize/group user accounts. | |
The Certifications Page allows creation and management of certifications/qualifications/trainings. | |
The Companies Page allows creation and management of companies within KAStrack for streamlined user organization. Various companies can be added to customize for your organizational needs. | |
The My Account Page allows the user to view their individual user account’s certifications and take any necessary actions to maintain compliance. The My Accounts Page has three tabs that can be accessed from the Main Menu, the My Certifications Tab, Submit Certifications Tab, and Certification Roles Tab. | |
The Settings Page allows admins to establish parameters for KAStrack notifications, modify module levels, and adjust other module-specific settings. The Settings Page has two tabs that can be accessed from the Main Menu, the Module Settings Tab and Module Levels Tab. | |
Certification & Competency Legend
Cells underneath the certification columns are colored according to the Certification Legend.

Green indicates that a certification is currently valid, blue indicates that a certification is due soon, yellow indicates that a certification is expiring soon (overdue), red indicates that a certification is expired (or is required with no prior completion on file), and white that a certification is not currently required.
The letters INH indicate that the due date associated with the credential is “Inherited from parent”, signaling the certification is tied to another certification’s due date.
The lock symbol indicates that a certification has Privacy Restrictions for the user in question.
If there is no information submitted for that Certification for the specified user, then the associated cell states “Nothing on file.”
If the certification does not apply to a particular user, that cell will not have any highlighting and contain a blue oval with the letters “NA” in white font.
When a user is in training, a blue circle containing a white number within it will indicate the number of days a credential has been deferred or the remaining number of days a user is in training.
Customizable Tables in the People Module
There are three tables in the People Module than can be customized for your organization's specific needs.
The Users Table (on the Users Page of the People Module), the Users Assigned to a Role Table (on the Assigned Users Tab of a certification role's Details Page), and the Users Associated with a Certification Table (on the Associated Users Tab of a certification's Details Page) are all customizable.
How To: Edit the People Module Users Table
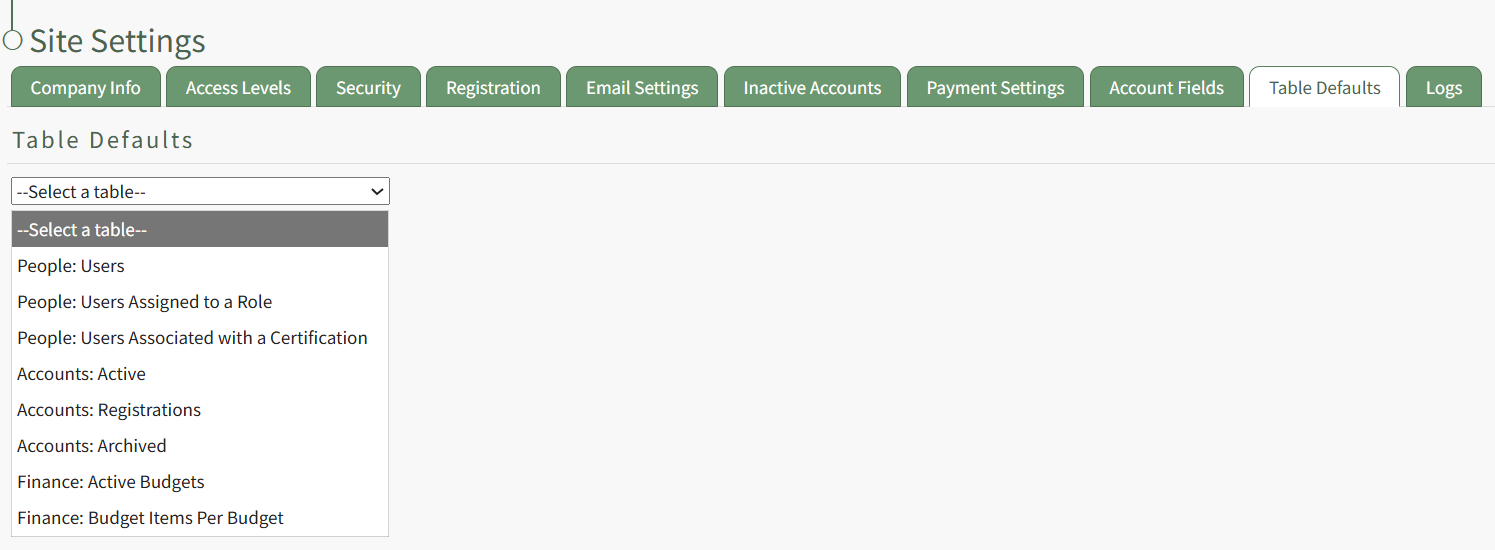
To edit the Users Table in the People Module, go to the Table Defaults Tab in the Site Settings Module.
Select “People: Users” from the dropdown menu.
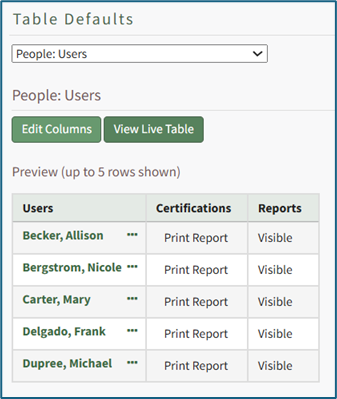
Select the “Edit Columns” button, opening the Choose Columns Modal. The default column choices include users, certifications, reports, username, email, first name, last name, employee ID, phone, Address 1, and Address 2.
Customizable account information fields can be created on the Account Fields Tab of the Site Settings Module.
How To: Add a Custom/Additional User Account Information Field
To add a user account information field, open the Account Fields Tab in the Site Settings Module from the Main Menu.
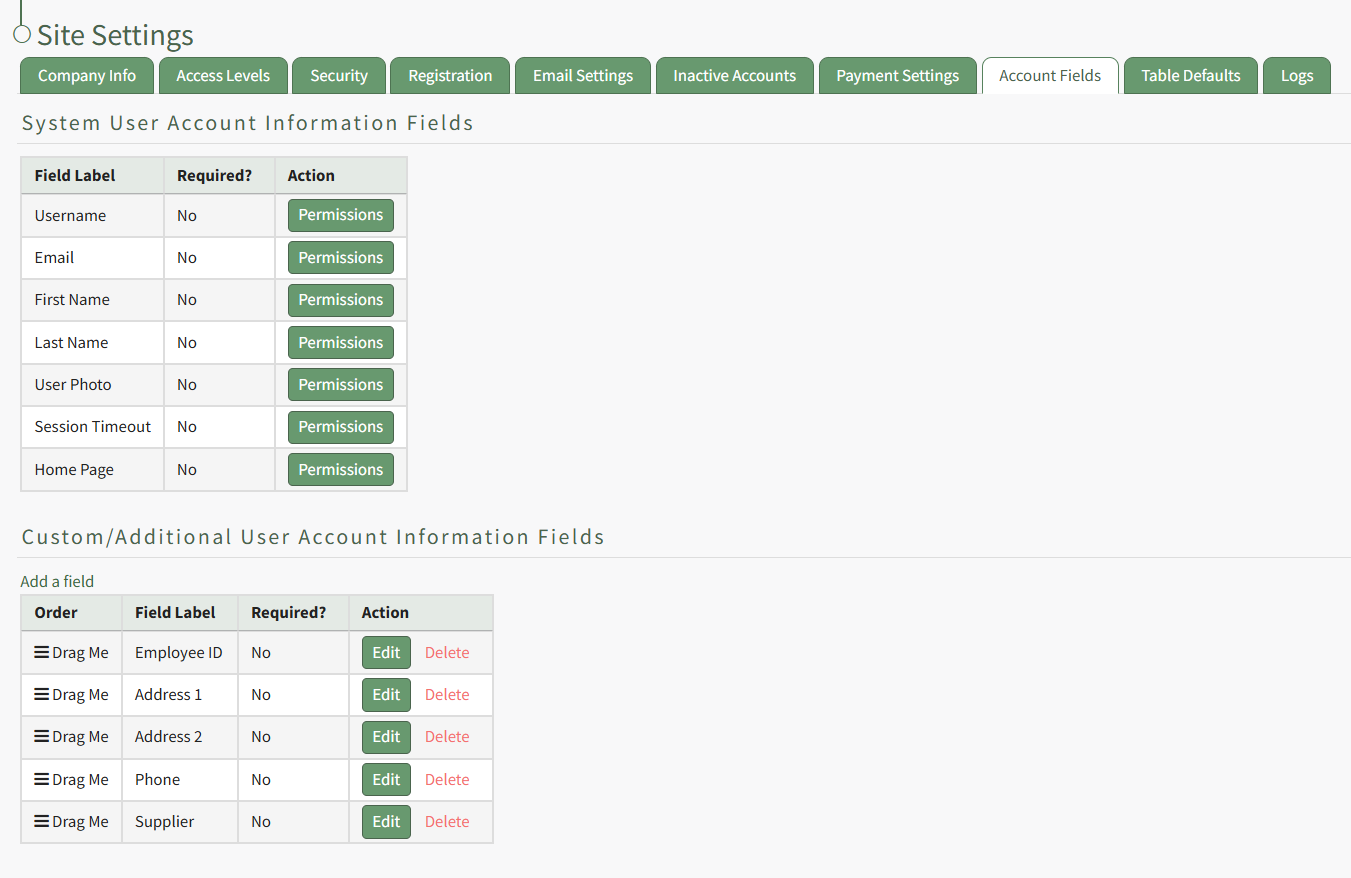
Click the "Add a Field" clickable link above the Custom / Additional User Account Information Fields opening the Add Field Modal.
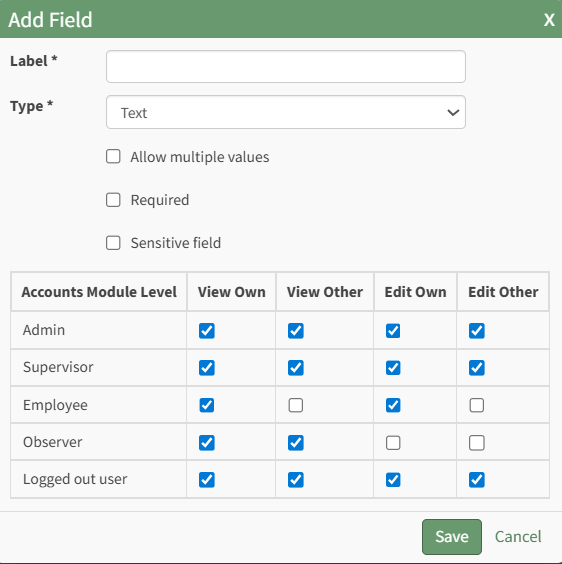
Input the label for the field.
Select the field type (text or email) from the dropdown menu.
Selecting the checkbox enables customization to "Allow multiple values," make the field "Required," or make it a "Sensitive Field."
Designating the field as a "Sensitive Field" allows an extra step in form security when integrating these fields within the Form module. The Form Designer must explicitly choose when they wish to use a sensitive field.
The Permissions Table determines who can view / edit their own and other user's fields. Selecting the checkbox gives the individual the specified permission. Deselecting the checkbox removed the permission.
Select the "Save" button and the custom field now shows in the table.
Use the Drag Me icon to drag and drop the field into your desired position of choice.
The bars icon allows the columns to be positioned in the order of your choosing.
Click “Cancel” to return to the Table Defaults Tab without making any changes.
Select the “Save” button to make the desired changes and return to the Table Defaults Tab. A preview of the first five rows of the table is shown. Select the “View Live Table” button to be directed to the live table in the People Module.
How To: Edit the People Module Users Assigned to a Role Table
To edit the Users Assigned to a Role Table in the People Module, go to the Table Defaults Tab in the Site Settings Module.
Select “People: Users Assigned to a Role” from the dropdown menu.
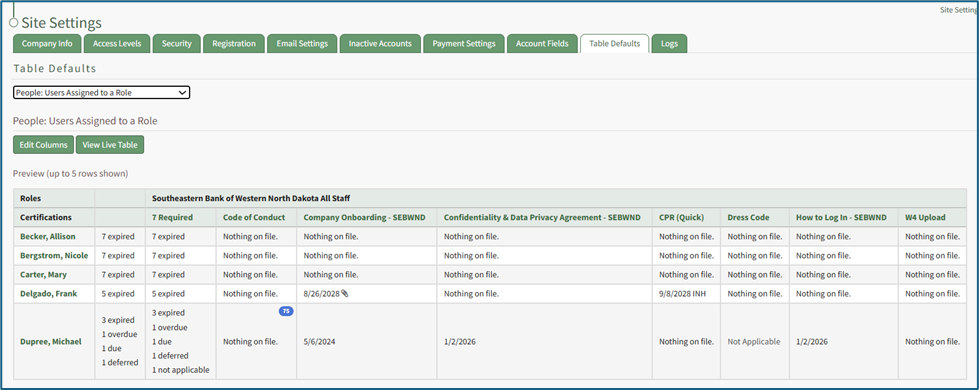
Select the “Edit Columns” button, opening the Choose Columns Modal. The default column choices include name, username, email, first name, last name, employee ID, phone, Address 1, and Address 2.
Customizable account information fields can be created on the Account Fields Tab of the Site Settings Module.
How To: Add a Custom/Additional User Account Information Field
To add a user account information field, open the Account Fields Tab in the Site Settings Module from the Main Menu.
Click the "Add a Field" clickable link above the Custom / Additional User Account Information Fields opening the Add Field Modal.
Input the label for the field.
Select the field type (text or email) from the dropdown menu.
Selecting the checkbox enables customization to "Allow multiple values," make the field "Required," or make it a "Sensitive Field."
Designating the field as a "Sensitive Field" allows an extra step in form security when integrating these fields within the Form module. The Form Designer must explicitly choose when they wish to use a sensitive field.
The Permissions Table determines who can view / edit their own and other user's fields. Selecting the checkbox gives the individual the specified permission. Deselecting the checkbox removed the permission.
Select the "Save" button and the custom field now shows in the table.
Use the Drag Me icon to drag and drop the field into your desired position of choice.
The bars icon allows the columns to be positioned in the order of your choosing.
Click “Cancel” to return to the Table Defaults Tab without making any changes.
Select the “Save” button to make the desired changes and return to the Table Defaults Tab. A preview of the first five rows of the table is shown. Select the “View Live Table” button to be directed to the live table in the People Module.
How To: Edit the People Module Users Associated with a Certification Table
To edit the Users Associated with a Certification Table in the People Module, go to the Table Defaults Tab in the Site Settings Module.
Select “People: Users Associated with a Certification” from the dropdown menu.

Select the “Edit Columns” button, opening the Choose Columns Modal. The default column choices include: name, username, certification expiration date, attachment(s), time until expiration, required, other required certification, email, first name, last name, employee ID, phone, Address 1, and Address 2.
Customizable account information fields can be created on the Account Fields Tab of the Site Settings Module.
How To: Add a Custom/Additional User Account Information Field
To add a user account information field, open the Account Fields Tab in the Site Settings Module from the Main Menu.
Click the "Add a Field" clickable link above the Custom / Additional User Account Information Fields opening the Add Field Modal.
Input the label for the field.
Select the field type (text or email) from the dropdown menu.
Selecting the checkbox enables customization to "Allow multiple values," make the field "Required," or make it a "Sensitive Field."
Designating the field as a "Sensitive Field" allows an extra step in form security when integrating these fields within the Form module. The Form Designer must explicitly choose when they wish to use a sensitive field.
The Permissions Table determines who can view / edit their own and other user's fields. Selecting the checkbox gives the individual the specified permission. Deselecting the checkbox removed the permission.
Select the "Save" button and the custom field now shows in the table.
Use the Drag Me icon to drag and drop the field into your desired position of choice.
The bars icon allows the columns to be positioned in the order of your choosing.
Click “Cancel” to return to the Table Defaults Tab without making any changes.
Select the “Save” button to make the desired changes and return to the Table Defaults Tab. A preview of the first five rows of the table is shown. Select the “View Live Table” button to be directed to the live table in the People Module.
Customizable user account information fields can be created and utilized in the tables as needed.
How To: Add a Custom / Additional User Account Information Field
To add a user account information field, open the Account Fields Tab in the Site Settings Module from the Main Menu.
Click the "Add a Field" clickable link above the Custom / Additional User Account Information Fields opening the Add Field Modal.
Input the label for the field.
Select the field type (text or email) from the dropdown menu.
Selecting the checkbox enables customization to "Allow multiple values," make the field "Required," or make it a "Sensitive Field."
Designating the field as a "Sensitive Field" allows an extra step in form security when integrating these fields within the Form module. The Form Designer must explicitly choose when they wish to use a sensitive field.
The Permissions Table determines who can view / edit their own and other user's fields. Selecting the checkbox gives the individual the specified permission. Deselecting the checkbox removed the permission.
Select the "Save" button and the custom field now shows in the table.
Use the Drag Me icon to drag and drop the field into your desired position of choice.