Understanding Budgets and Budget Items
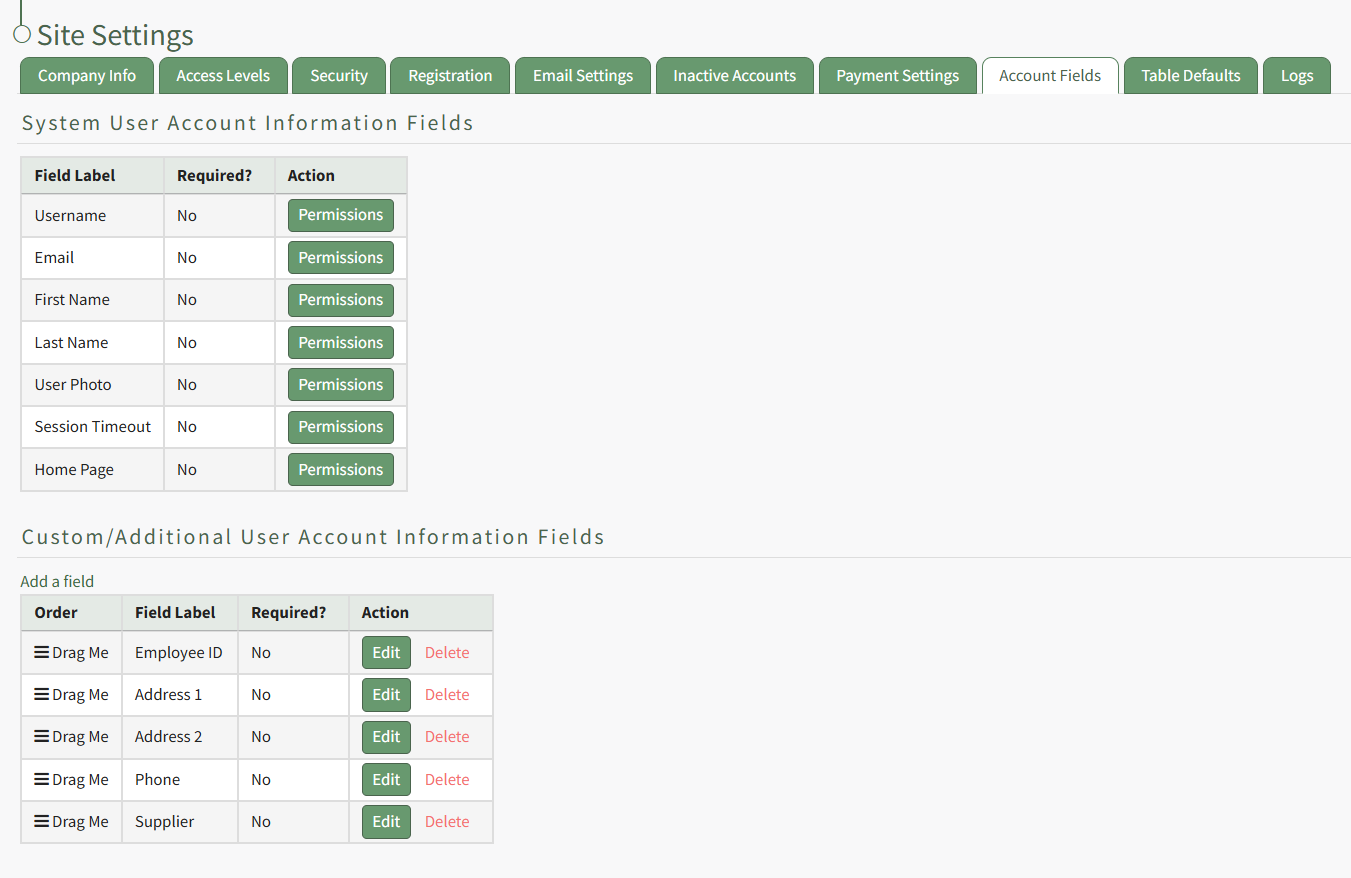
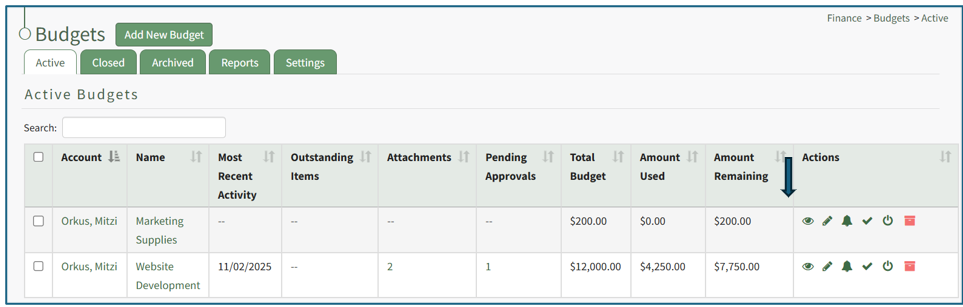
The Active Budgets Table shows summary information regarding all active budgets on the Active Tab of the Budgets Page in the Finance Module. Closed and archived budgets utilize the same page, but they are housed separately on the Closed and Archived Tabs of the Budgets Page.
Within the budget table, account information fields are used as the column headers. The default columns are Account, Name, Most Recent Activity, Outstanding Items, Attachments, Pending Approvals, Total Budget, Amount Used, Amount Remaining, and Actions. However, any desired field can be created by an administrator.
How To: Add a Custom/Additional User Account Information Field
To add a user account information field, open the Account Fields Tab in the Site Settings Module from the Main Menu.
Click the "Add a Field" clickable link above the Custom / Additional User Account Information Fields opening the Add Field Modal.
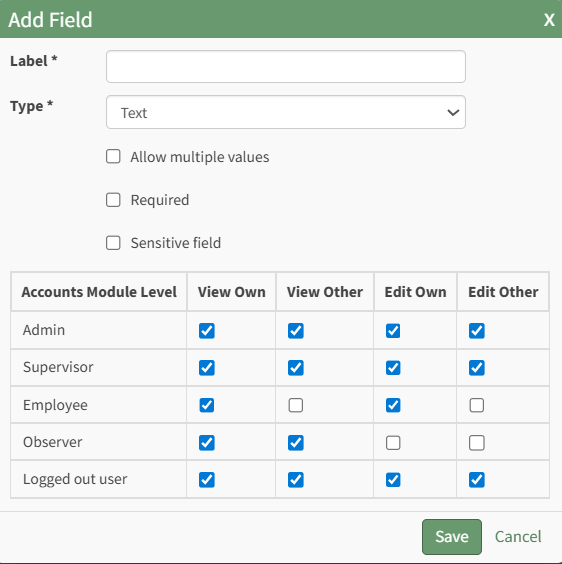
Input the label for the field.
Select the field type (text or email) from the dropdown menu.
Selecting the checkbox enables customization to "Allow multiple values," make the field "Required," or make it a "Sensitive Field."
Designating the field as a "Sensitive Field" allows an extra step in form security when integrating these fields within the Form module. The Form Designer must explicitly choose when they wish to use a sensitive field.
The Permissions Table determines who can view / edit their own and other user's fields. Selecting the checkbox gives the individual the specified permission. Deselecting the checkbox removed the permission.
Select the "Save" button and the custom field now shows in the table.
Use the Drag Me icon to drag and drop the field into your desired position of choice.
The Active Budgets Table can be customized on the Table Defaults Tab of the Site Settings Module.
How To: Edit the Finance Module Active Budgets Table
To edit the Active Budgets Table in the Finance Module, go to the Table Defaults Tab in the Site Settings Module.
Select “Finance: Active Budget” from the dropdown menu.
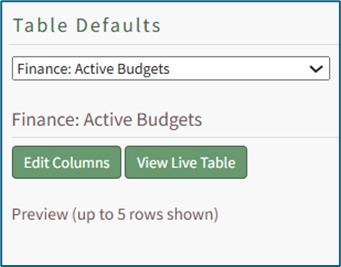
Select the “Edit Columns” button, opening the Choose Columns Modal. The default column choices include: account, name, most recent activity, outstanding items, attachments, pending approvals, total budget, amount used, amount remaining, actions, description, system notes, username, email, first name, last name, phone, Address 1, and Address 2, employee ID and any customized account fields.
How To: Add a Custom/Additional User Account Information Field
To add a user account information field, open the Account Fields Tab in the Site Settings Module from the Main Menu.
Click the "Add a Field" clickable link above the Custom / Additional User Account Information Fields opening the Add Field Modal.
Input the label for the field.
Select the field type (text or email) from the dropdown menu.
Selecting the checkbox enables customization to "Allow multiple values," make the field "Required," or make it a "Sensitive Field."
Designating the field as a "Sensitive Field" allows an extra step in form security when integrating these fields within the Form module. The Form Designer must explicitly choose when they wish to use a sensitive field.
The Permissions Table determines who can view / edit their own and other user's fields. Selecting the checkbox gives the individual the specified permission. Deselecting the checkbox removed the permission.
Select the "Save" button and the custom field now shows in the table.
Use the Drag Me icon to drag and drop the field into your desired position of choice.
The bars icon allows the columns to be positioned in the order of your choosing.
Click “Cancel” to return to the Table Defaults Tab without making any changes.
Select the “Save” button to make the desired changes and return to the Table Defaults Tab. A preview of the first five rows of the table is shown. Select the “View Live Table” button to be directed to the live table in the Finance Module.
This would include any additional fields created as discussed above as well as other existing account fields.

The “Add New Budget” button is available from any tab on the Budget Page.
Within the Finance Module, Account refers to the individual whose account is linked to the budget as its owner. If the account that created the budget is archived or deleted, it can impact the budget status depending on the budget settings selected.
A variety of icons are used to navigate the budget table and actions associated with it. They are explained in the Budget Icon Explanations Table Below.
Budget Icon Explanations | |
Icon | Explanation |
| This sort ascending and sort descending icons indicate that the column that is being used to sort the table. The stair step to the right of the arrow indicates if the information is ascending or descending (alphabetically or numerical value). |
| The down and up arrow icon indicates that this column is currently not being used for sorting. Clicking this icon will result in the table being sorted by these entries, and the icon will change to the ascending icon shown above. |
| This icon is present if the tabular information does not fit entirely on your screen. Selecting it will expand the information below the entry row so that all information for the entry can be visible at once. |
| The eyeball icon is used to view a budget and opens the Budget Items Per Budget Table. |
| The pencil icon is used to edit a budget and opens the Edit Budget Modal. |
| The bell icon is used to Add a budget alert and opens the Add Alert Modal. This alert allows individuals or those with a specific certification role to receive notification what a budget fall below a specified percent or amount of funds remaining. |
| The checkmark icon is used to edit approvers and opens the Edit Approvers Modal where individual accounts or certification roles are identified as an approver and notification settings for budget approval and / or rejection are established. |
| The power icon is used to close an active budget. |
| The file box icon is used to archive a budget that is active or closed. |
| The restore icon is used to open a budget that has been closed or archived. |
| The trash can icon is used to delete a budget. To delete a budget, it must first be archived. |


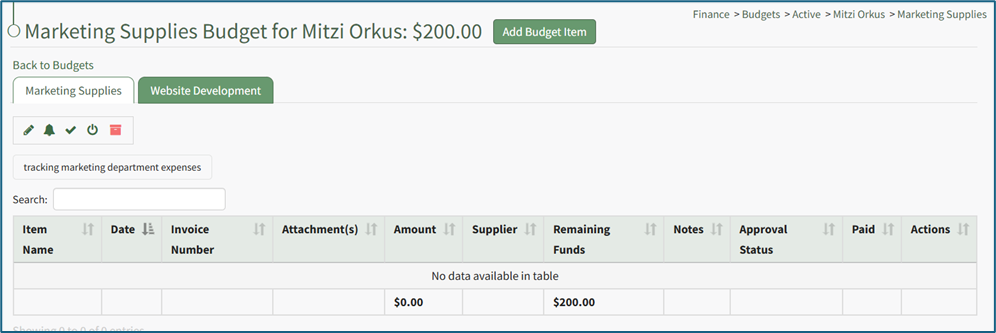
When an individual elects to view a budget, it opens the Budget Items Per Budget Table which shows detailed information about each individual budget item. Like the active budget table, this is also customizable. Account Information fields are used as the column headers. The default columns are Item Name, Date, Invoice Number, Attachment (s), Amount, Remaining Funds, Notes, Approval Status, Approve/Reject, Paid, and Actions. However, any desired field can be created by an administrator.
How To: Add a Custom/Additional User Account Information Field
To add a user account information field, open the Account Fields Tab in the Site Settings Module from the Main Menu.
Click the "Add a Field" clickable link above the Custom / Additional User Account Information Fields opening the Add Field Modal.
Input the label for the field.
Select the field type (text or email) from the dropdown menu.
Selecting the checkbox enables customization to "Allow multiple values," make the field "Required," or make it a "Sensitive Field."
Designating the field as a "Sensitive Field" allows an extra step in form security when integrating these fields within the Form module. The Form Designer must explicitly choose when they wish to use a sensitive field.
The Permissions Table determines who can view / edit their own and other user's fields. Selecting the checkbox gives the individual the specified permission. Deselecting the checkbox removed the permission.
Select the "Save" button and the custom field now shows in the table.
Use the Drag Me icon to drag and drop the field into your desired position of choice.
The Active Budgets Table can be customized on the Table Defaults Tab of the Site Settings Module.
How To: Edit the Finance Module Budget Items Per Budget Table
To edit the Budget Items per Budget Table in the Finance Module, go to the Table Defaults Tab in the Site Settings Module.
Select “Finance: Budget Items Per Budget” from the dropdown menu.

Select the “Edit Columns” button, opening the Choose Columns Modal. The default column choices include: item name, date, invoice number, attachment(s), amount, remaining funds, notes, approval status, approve / reject, paid, actions, username, email, first name, last name, employee ID, phone, Address 1 and Address 2 and any customized account fields.
How To: Add a Custom / Additional User Account Information Field
To add a user account information field, open the Account Fields Tab in the Site Settings Module from the Main Menu.
Click the "Add a Field" clickable link above the Custom / Additional User Account Information Fields opening the Add Field Modal.
Input the label for the field.
Select the field type (text or email) from the dropdown menu.
Selecting the checkbox enables customization to "Allow multiple values," make the field "Required," or make it a "Sensitive Field."
Designating the field as a "Sensitive Field" allows an extra step in form security when integrating these fields within the Form module. The Form Designer must explicitly choose when they wish to use a sensitive field.
The Permissions Table determines who can view / edit their own and other user's fields. Selecting the checkbox gives the individual the specified permission. Deselecting the checkbox removed the permission.
Select the "Save" button and the custom field now shows in the table.
Use the Drag Me icon to drag and drop the field into your desired position of choice.
The bars icon allows the columns to be positioned in the order of your choosing.
Click “Cancel” to return to the Table Defaults Tab without making any changes.
Select the “Save” button to make the desired changes and return to the Table Defaults Tab. A preview of the first five rows of the table is shown. Select the “View Live Table” button to be directed to the live table in the Finance Module.
This would include any additional fields created as discussed above as well as other existing account fields.
When viewing a specific budget, the “Add Budget Item” button is available to the right of the page header.
How To: Add a Budget Item
To add a budget item to a specific budget, go to the Active Tab of the Budgets Page in the Finance Module. Open the specific budget either by clicking the name of the budget or the eyeball icon in the action column of the desired budget.
The icon opens the specific budget, showing the Budget Item Per Budget Table.
Select the “Add Budget Item” button to the right of the budget header opening the Add Budget Item Modal.
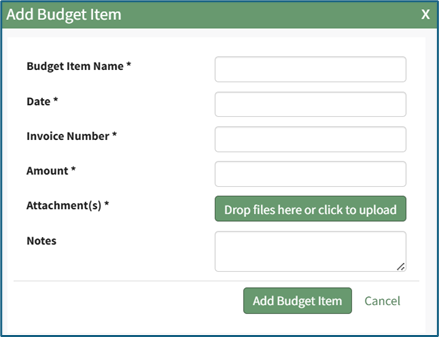
Include the Budget Item Name and the Date. Include the invoice number, amount, and associated attachments. Multiple attachments can be included, but at least one is required. All fields, with the exception of notes, are required by the modal.
Select “Add Budget Item” from the bottom of the modal, and the budget item will now appear in the budget specific Budget Item Per Budget Table and can be submitted for approval (if approval is enabled).
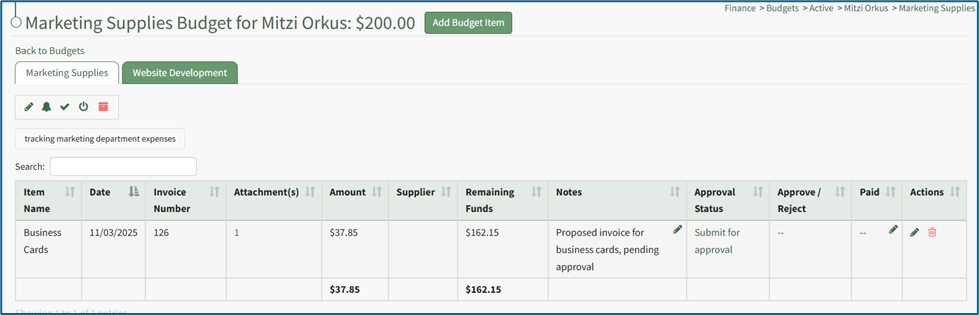
How To: Submit a Budget Item for Approval
Budget items can only be submitted for active budgets. To submit a budget item for approval, go to the Active Tab of the Budgets Page in the Finance Module. Open the specific budget with the budget item that needs to be submitted for approval either by clicking the name of the budget or the eyeball icon in the action column of the desired budget.

This opens the budget, showing the Budget Item per Budget Table.

To submit the budget item for approval, select the clickable link “Submit for Approval” in the Approval Status column.

The approval status now shows how many of the required approvals have been granted. The comment icon shows the date and time the budget item was submitted for approval.

Each budget will show as an individual tab allowing for more efficient access. The clickable link “Back to Budgets” will take an individual to the Active Tab of the Budgets Page. Action icons show above a filter that allows an individual to search for specific budget items within a singular budget.

No comments to display
No comments to display