Forms Home Page
The Home Page of the Forms Module contains the Forms Table, where all existing forms built within your organization’s subdomain are stored and can be accessed.
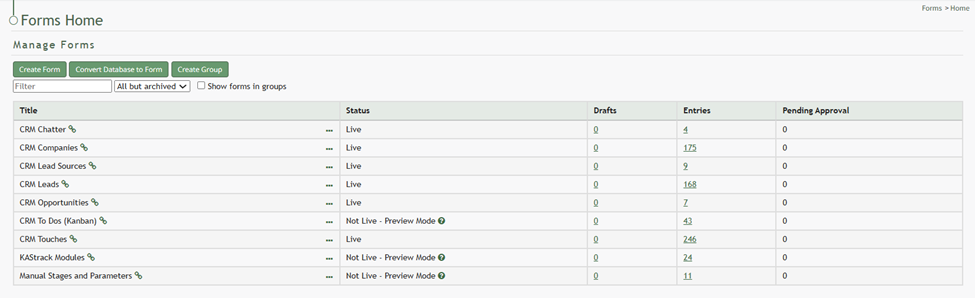
A “Show forms in groups” checkbox allows a user to customize their view of the Forms Home Page for efficient use.

When Forms are displayed in groups, quick links allow you to collapse and expand all groups as well as hide empty groups that do not currently contain Forms.
Forms can be filtered by all but archived, preview mode, live, closed, and archived.
If there are existing form entries that require your approval, they will show in a table at the top of the Forms Home Page. In order for form entry approval to be required, you must establish a Form Rule.
How To: Require Form Entry Approval
{{@406}}

How To: Approve a Form Entry Pending Approval
{{@379}}
How To: Reject a Form Entry Pending Approval
{{@405}}
Forms Table Context Menu Option Explanations | |
Option | Explanation |
Overview | Selecting Overview from the context menu will open the Overview Tab related to the specific Form. The Overview Tab includes Form Stats (# of drafts, # of entries, # of pending approvals), the form status, form access (URL Link and QR Code) as well as a URL link for PDF submission info. |
Webform (popup) | Selecting Webform (popup) from the context menu will open a modal allowing an individual to input another form entry. If the form is not live, the modal will state so in bold under the header. Any submissions made before a form is live can be deleted. This modal will vary, as it opens the a unique form. |
Edit Form | Selecting Edit Form from the context menu will open the Edit Form Modal, allowing an individual to make changes to the Form Title and Tags, as well as the Basic / Advanced Settings and Form Styling established when the form was created. How To: Edit a Form{{@394}} |
Copy Form | Selecting Copy Form from the context menu will open the Copy Form Modal, which allows an indivual to give a new title to the copied form. If there are any PDF versions of a copied form, they will need to be updated with the new submission URL and uploaded to the copied form. Entries will not be copied. How To: Copy a Form{{@385}} |
Close Form | Selecting Close Form from the context menu is an option if the form is live and will open a confirmation modal that states, “Are you sure you wish to close this form? Any draft entries will be deleted, and new entries will only be able to be added via manage entries.” How To: Close a Form{{@383}} |
Archive Form | Selecting Archive Form from the context menu will open the Archive Form Confirmation Modal, which requires confirmation that the closed form is to be archived. How To: Archive a Form{{@380}} |
Fields | Selecting Fields from the context menu will open the Fields Tab for a specific form, where all existing fields are listed and where new fields can be added and managed. If a form is live, a checkbox will have to be selected in order for fields to be edited. How To: Add a Field to a Form{{@373}} |
Rules | Selecting Rules from the context menu will open the Rules Tab for a specific form, where existing field rules are listed and where new rules can be added and managed. If a form is live, a checkbox will have to be selected in order for field rules to be edited. How To: Create a New Form Field Rule{{@388}} |
Upload PDF | Selecting Upload PDF from the context menu will open the Upload PDF Form Modal. How To: Upload a PDF Form after Fields are Created{{@408}} |
Download PDF | Selecting Download PDF from the context menu will download the PDF that have been associated with the form. How To: Download a PDF Form{{@393}} |
Clear PDF Cache | Selecting Clear PDF Cache from the context menu will clear the PDF cache and force the system to recreate the form PDF (in case the system pulled old form data). How To: Clear a PDF Cache{{@382}} |
Drafts | Selecting Drafts from the context menu will open the Form Drafts Page showing the form draft history. |
View Entries | Selecting View Entries from the context menu will open the Form Entries Page displaying all entry responses to date. |
Manage Entries | Selecting Manage Entries from the context menu will open the Manage Form Entries Page which displays the Form Entries Table. Entries can be added, imported, and exported from this page. Bulk edits can also be enabled for efficiency. How To: Edit a Form Entry{{@395}} How To: Delete a Form Entry{{@390}} |
Delete Form | Selecting Delete Form from the context menu will open a confirmation modal that allows you to confirm deletion of the selected form. How To: Delete a Form{{@389}} |
Make Form Live | Selecting Make Form Live is only an option on the context menu when a form is still in preview mode. When selected, the system will automatically change the form from Preview Mode to Live Status. An Update Status Modal will appear, confirming that the form is now live. Once a form is live, bulk entries can no longer be deleted. How To: Make a Form Live{{@404}} |
Delete all Entries | Selecting Delete all Entries is only an option on the context menu when a form is still in preview mode. When selected, a deletion confirmation modal will appear. How To: Delete All Testing Entries{{@392}} |