
Complete List of Courses Module How Tos
How To: Access a Course's Details Page
To access a course's details page, open the Courses Module Home Page from the Main Menu. Click the three-dot icon to the right of the right of the course whose Details Page wish to access, opening the Course Context Menu.
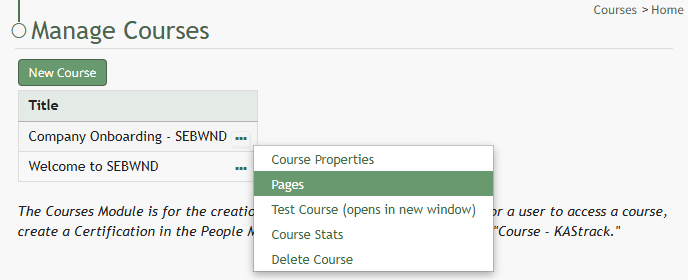
Select "Pages" from the Context Menu.
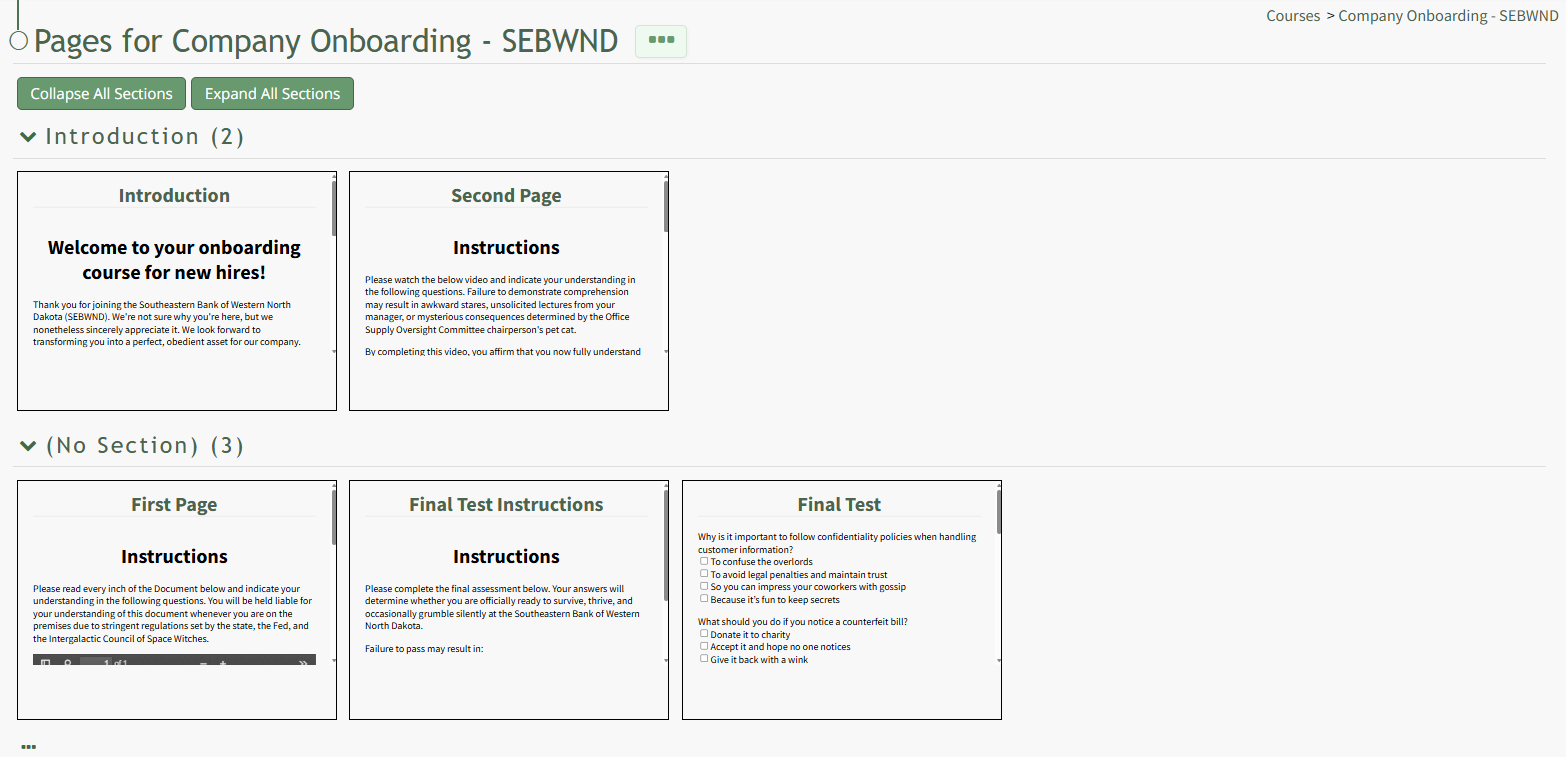
This opens the course's Details Page, displaying each page in the course grouped by sections.
How To: Access a Specific Page in a Course
To access a specific page in a course, open the Courses Module Home Page and click the three-dot icon to the right of the course title to open the Course Context Menu.
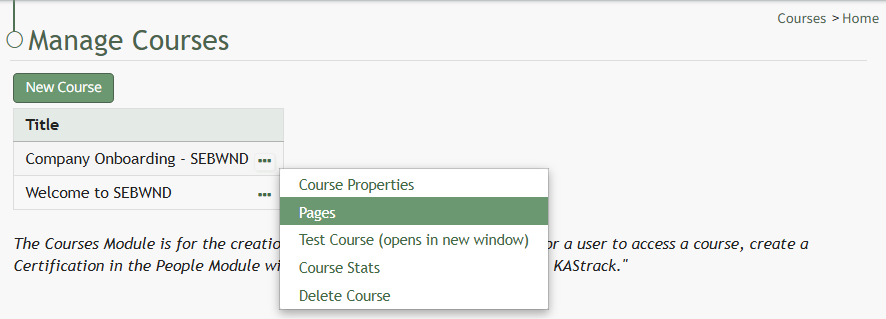
Select Pages from the Context Menu.
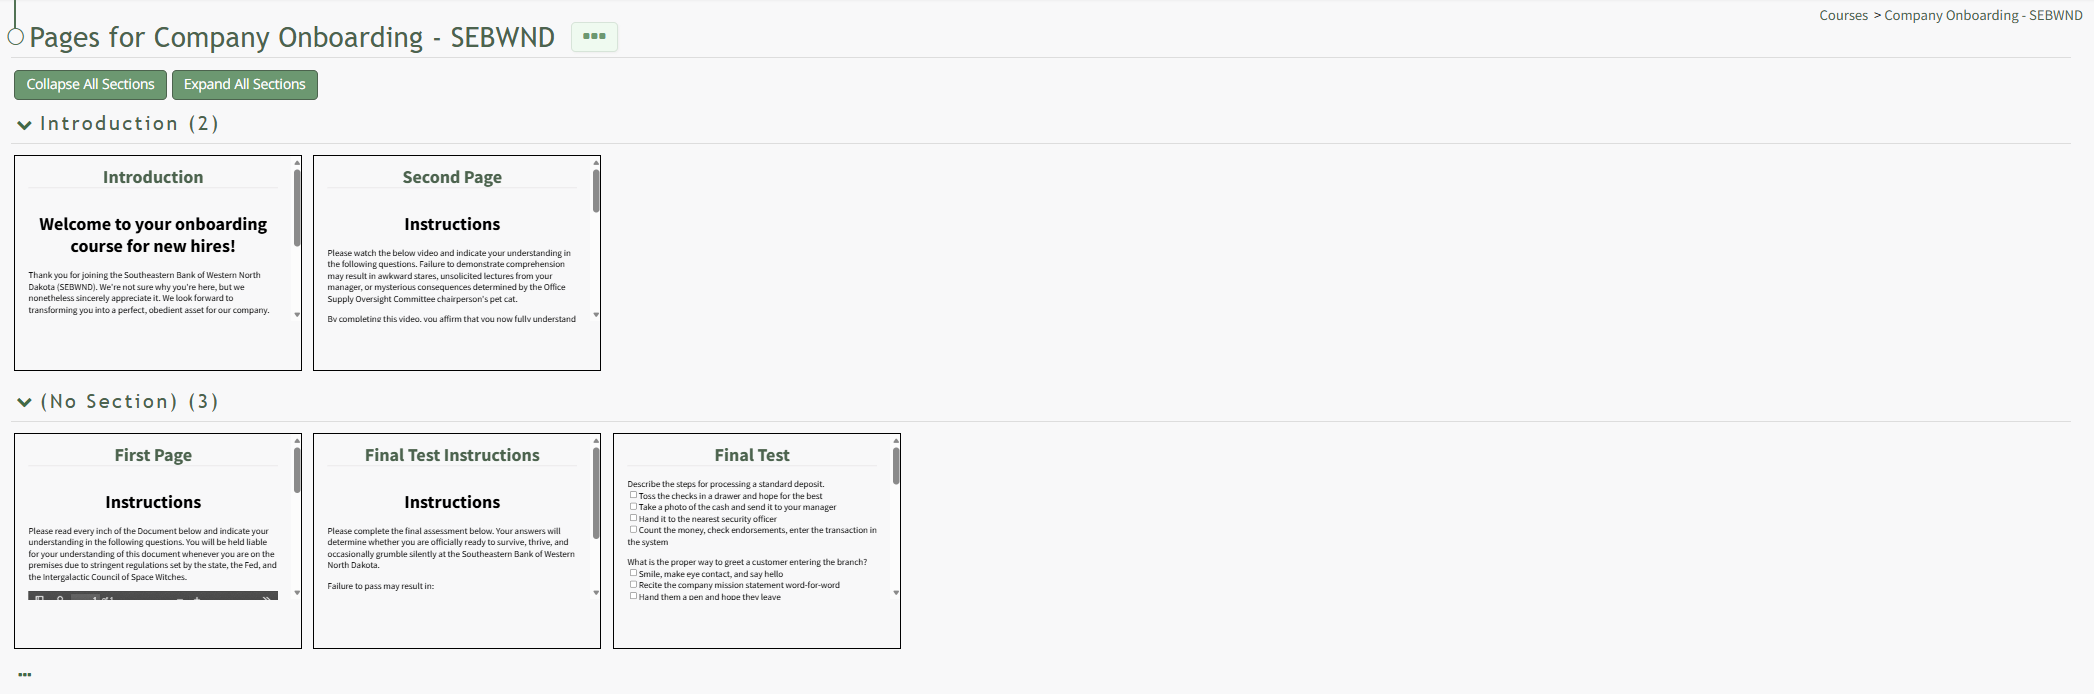
This opens a course's Details Page. Click the page you want to edit to access the page in the course.
How To: Access Course Stats
To access the stats associated with a specific course, open the Courses Module Home Page from the Main Menu. Existing courses are listed alphabetically in the table underneath the “New Course” button according to title.

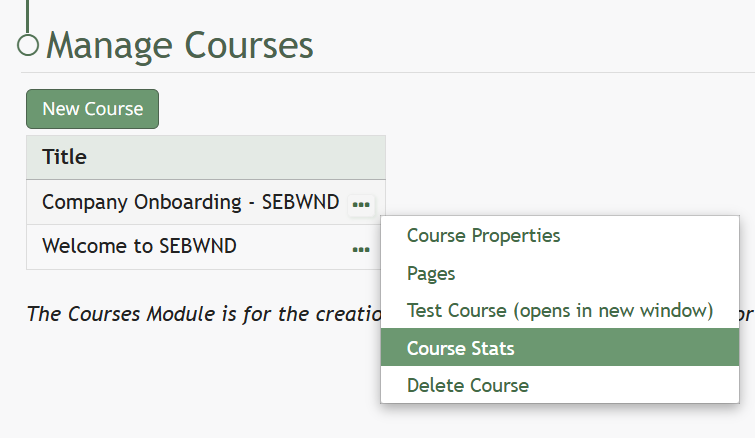
To view a courses stats, select the three dot (…) icon to the right of the title and select "Course Stats" from the context menu.
“Course Stats” opens a page titled Stats for [Name of Course] that displays the records of every user’s test taking attempts.
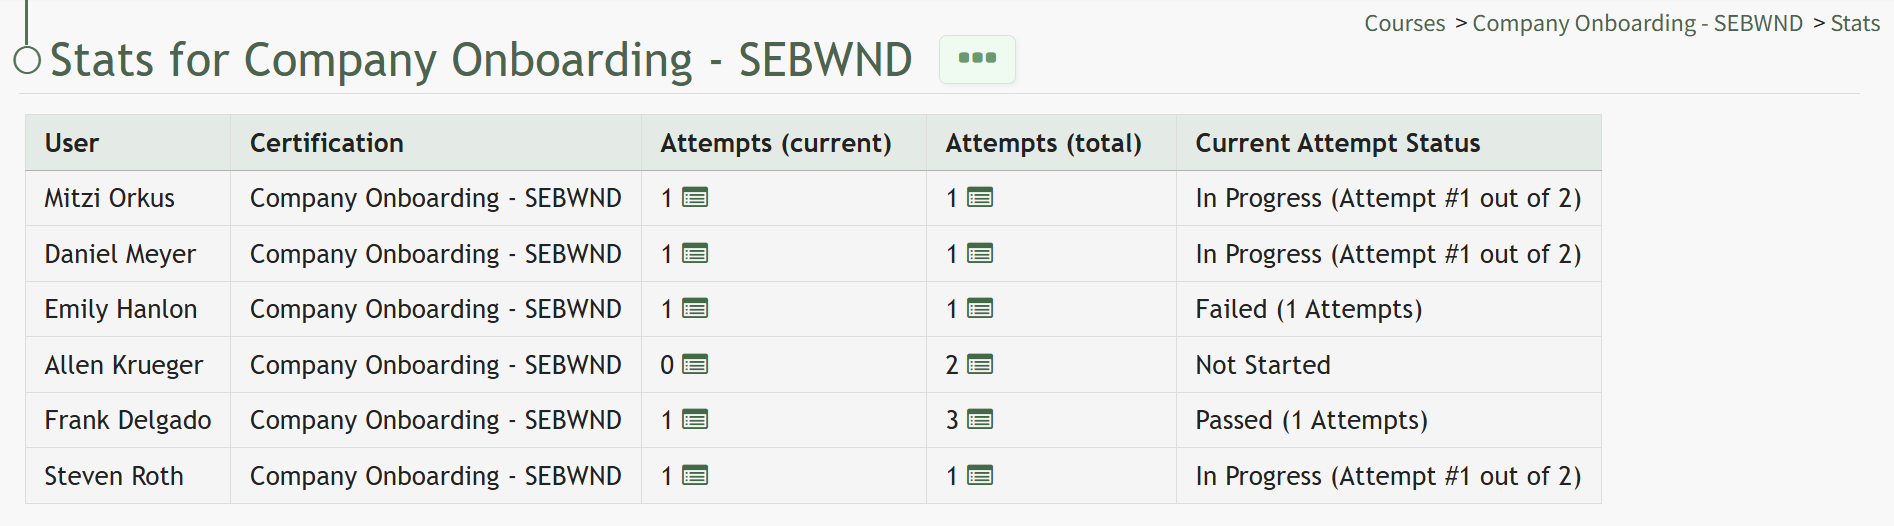
Clicking on the icon in the Attempts (current) Column or the Attempts (total) Column will open the Stats Modal for the selected individual.
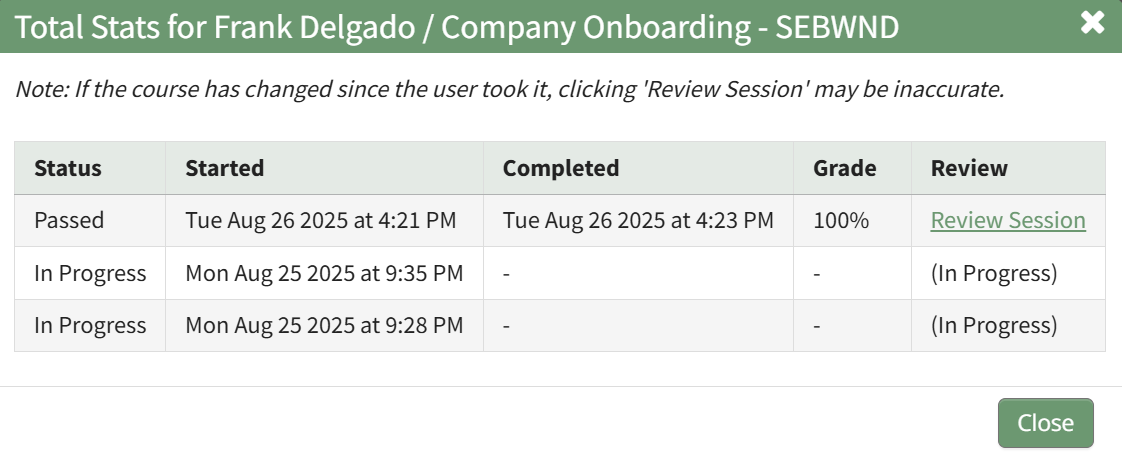
The clickable link in the Review Column opens the individual's Course Review Page, where specific questions and their answers can be reviewed.
How To: Add a Documents/Video to a Course Page
To edit the properties of a specific page in a course, you must be on a page within the course. An explanation of how to access a course page is provided in the How To below.
How To: Access a Specific Page in a Course
To access a specific page in a course, open the Courses Module Home Page and click the three-dot icon to the right of the course title to open the Course Context Menu.
Select Pages from the Context Menu.
This opens a course's Details Page. Click the page you want to edit to access the page in the course.
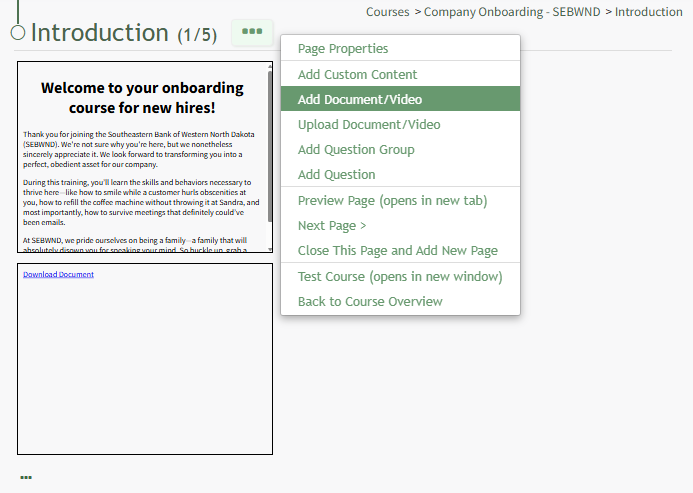
Click the three-dot icon to the right of the page title opening the Page Context Menu and select the "Add Document/Video" option.
This opens the Add Document/Video Modal which allows the user to select a previously uploaded document or video from a dropdown menu that will show all documents or videos in the Documents Module that the user has access to.
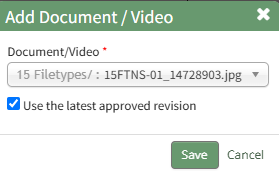
By default, the checkbox is selected telling the system to use the most recently approved version of the file.
Click "Save" and the new document / video now shows on the page.
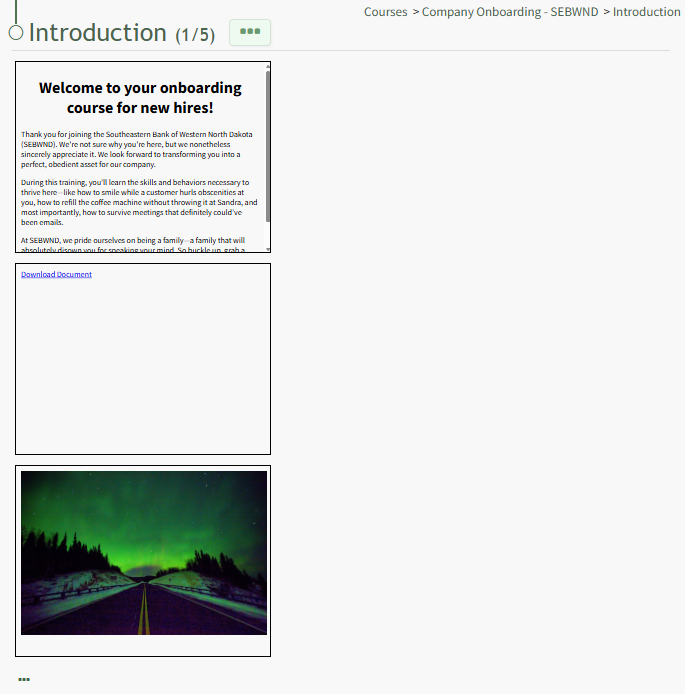
A document/video must be uploaded to KAStrack before it can be added to a course.
How To: Upload a Video/Document in the Courses Module
To upload a video/document to be used in a course, you must be on a page within the course. An explanation of how to access a course page is provided in the How To below.
How To: Access A Specific Page in a Course
{{@944}}
Once you are on the specific page in the course, click the three-dot icon to the right of the page title opening the Page Context Menu.
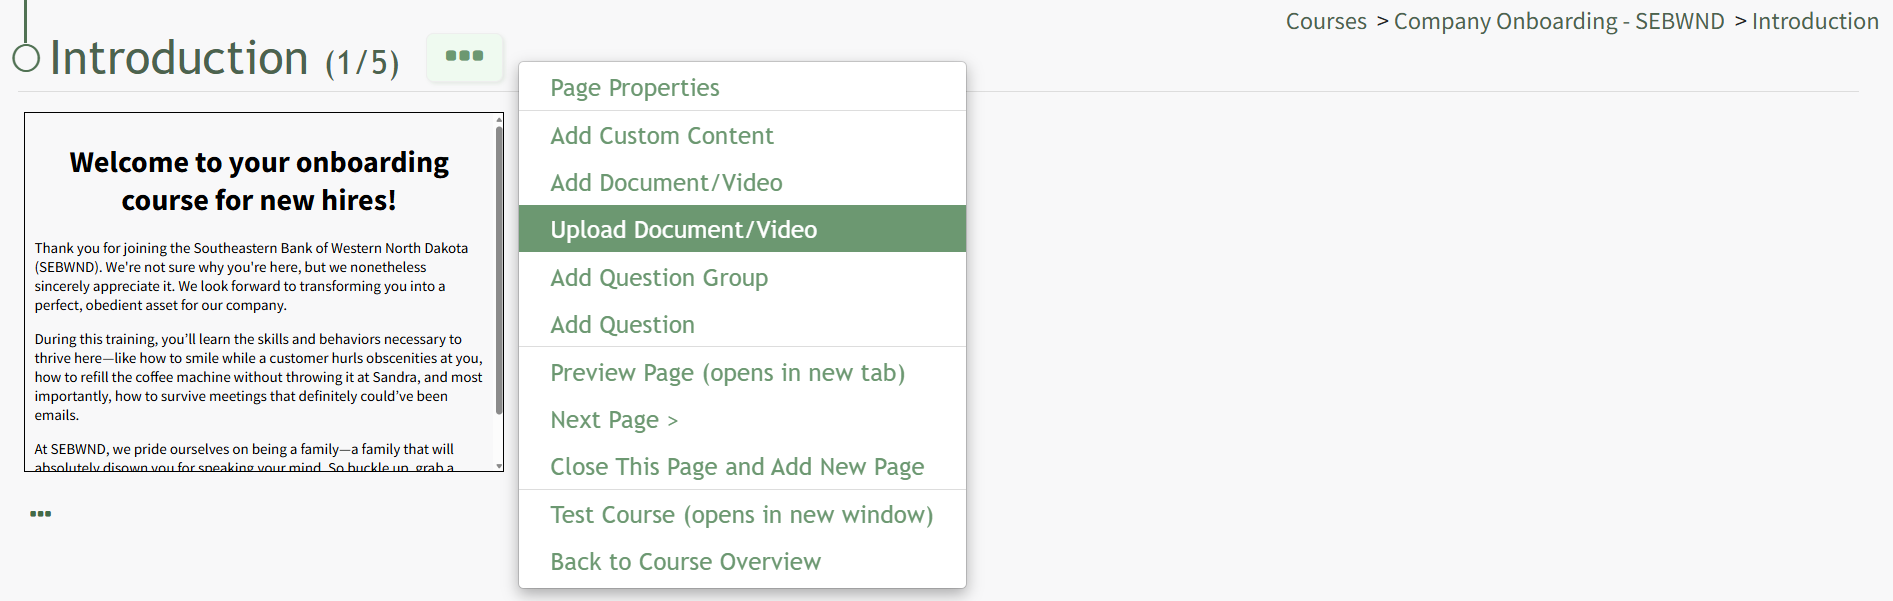
Select the option to "Upload Document/Video," opening the Upload File Modal.
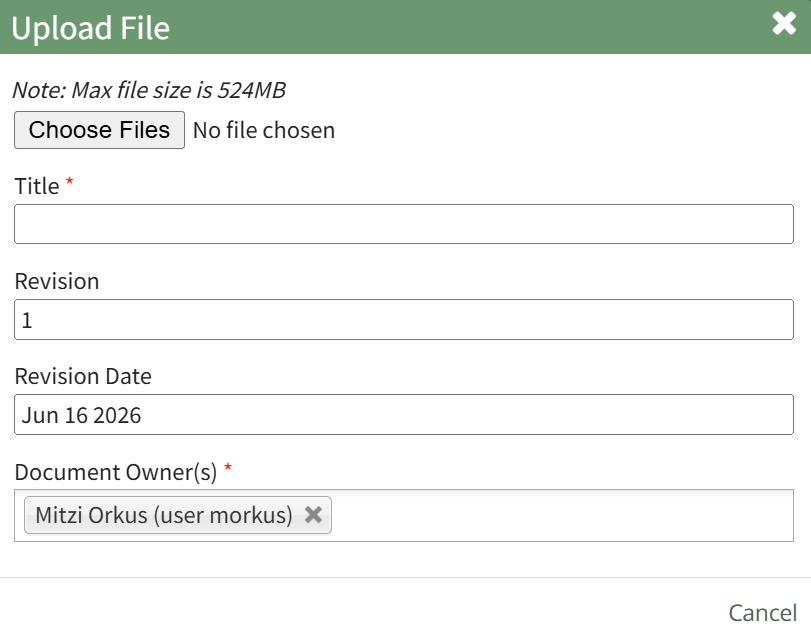 Click the "Choose Files" button.
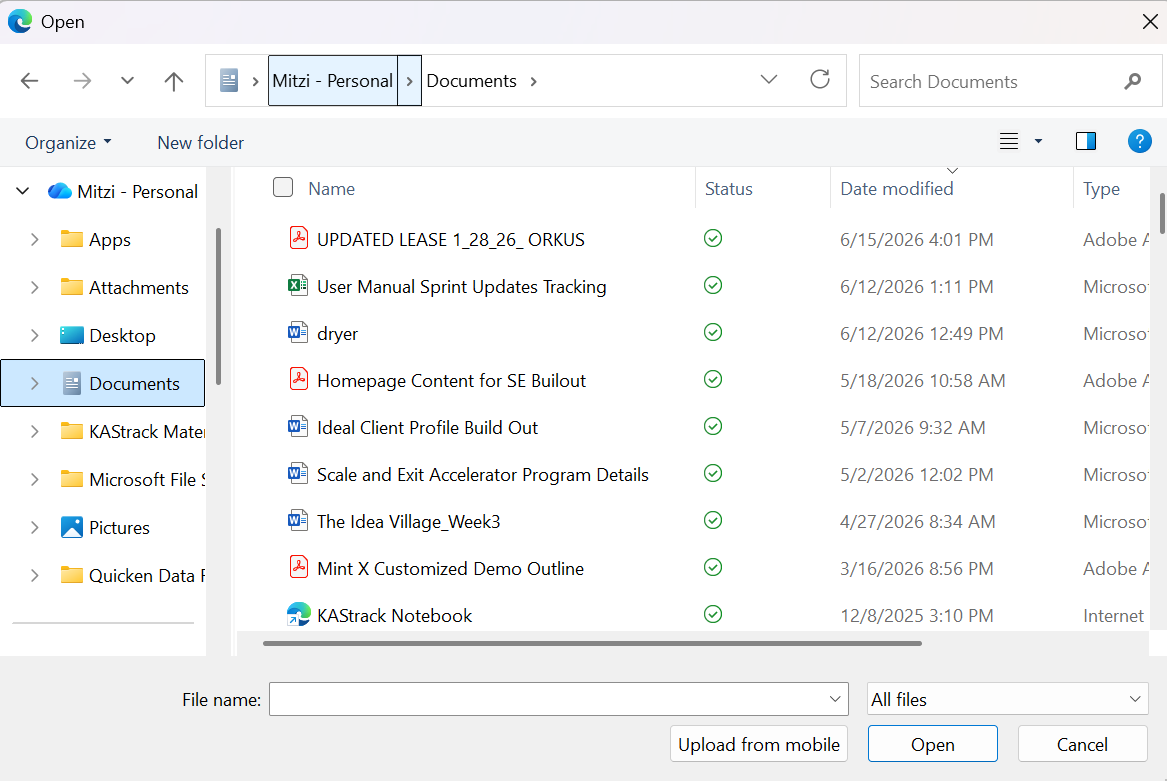
Select the File you want to upload from your personal device. Once it is uploaded, the file selected will show in the Upload File Modal.
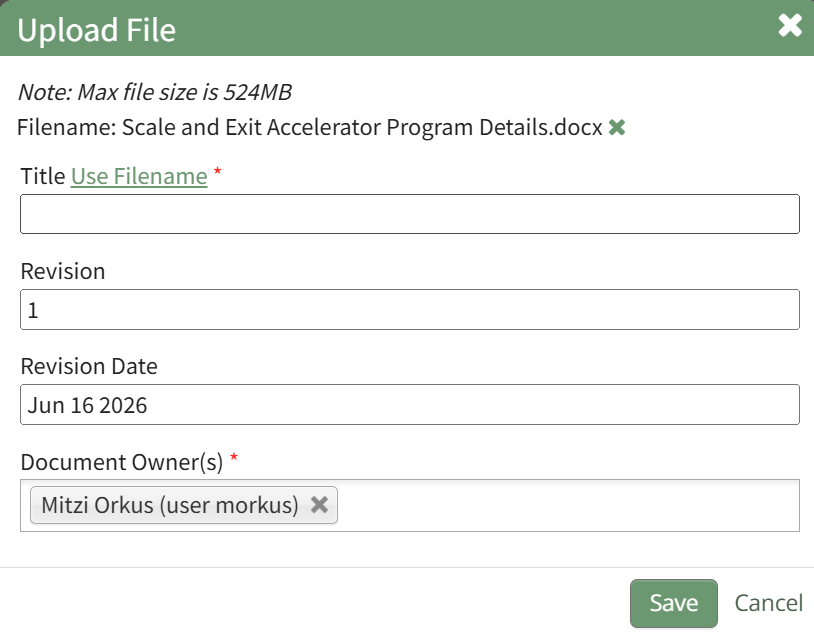
Enter a new title for the file or click the "Use Filename" clickable link for the original filename to be saved.
Indicate the revision number and revision date as well as the Document Owner(s).
Select "Save".
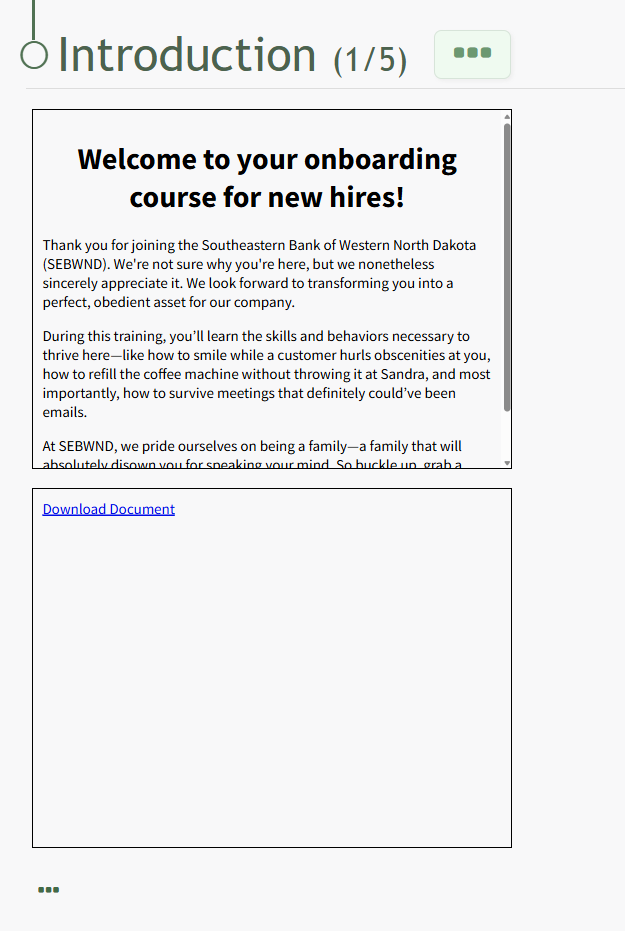
The uploaded file now shows on the page.
How To: Add a Questions to a Course Page
To add a singular question to a page in a course, you must be on a page within the course. An explanation of how to access a course page is provided in the How To below.
How To: Access a Specific Page in a Course
To access a specific page in a course, open the Courses Module Home Page and click the three-dot icon to the right of the course title to open the Course Context Menu.
Select Pages from the Context Menu.
This opens a course's Details Page. Click the page you want to edit to access the page in the course.
Once you are on the page you wish to add a question to, click the three-dot icon to the right of the page title opening the Page Context menu and select the "Add Question" option.
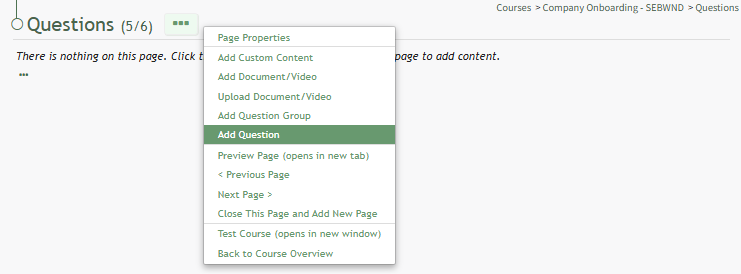
This opens the Add Question Modal. There are three possible types of questions in the Courses Modal. The fields in the Add Question Modal differ based on the question type selected. There are sections with images and an explanation of the unique fields for each question type below..
The checkbox for "This question is counted towards the passing grade." is selected by default for all question types.
Answer Notes can be used to include extra information about an answer is correct or why certain answers are wrong. They are shown to users in the Course Review.
After inputting the necessary information for the new question, select the "Save" button in the bottom right-hand corner of the modal.
True/False Questions
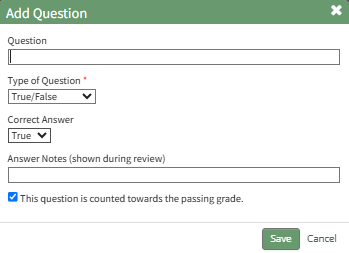
Input your question into the Question Field and select "True/False" as the Type of Question from the dropdown menu.
Indicate the correct answer by selecting True or False from the dropdown menu.
Multiple Choice Questions
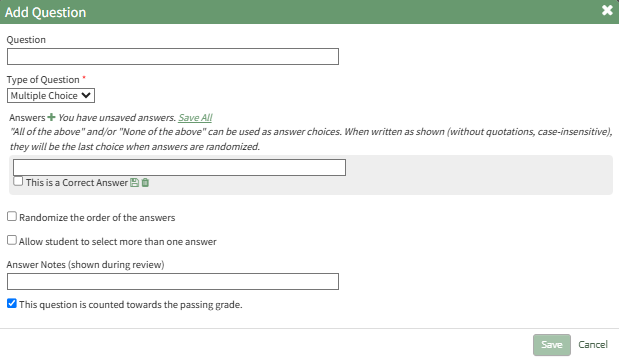
Input your question into the Question Field and select "Multiple Choice" as the Type of Question from the dropdown menu.
Click the plus sign to the right of "Answers" and the modal expands to display a text box. Enter the answer. Repeat the process for each potential answer. Select the "This is a Correct Answer" checkbox when appropriate.

Each answer must be saved on the modal, either individually by clicking the disc icon below the answer or by clicking the "Save All" clickable link to the right of Answers and the plus sign icon. The modal will state if any answers are not saved.
"All of the above" and/or "None of the above" can be used as answer choices. When written as shown (without quotations, case-insensitive), they will be the last choice when answers are randomized.
Select the "Randomize the order of the answers" if you would like the system to randomly list the order of the answers for the multiple-choice questions.
Select the "Allow student to select more than one answer" checkbox if there is more than one correct answer.
Free Text Questions
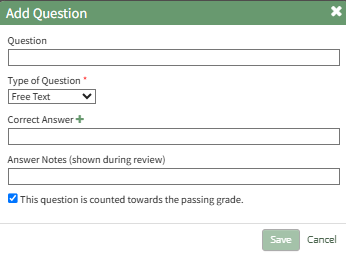
Input your question into the Question Field and select "Free Text" as the Type of question from the dropdown menu.
Select the plus sign icon to the right of Correct Answer if a second correct answer is desired.
Correct answers for free text do not need to be saved.
How To: Add a Section to a Course
To delete a QR Code, open the QR Page in the Communications Module from the Main Menu.
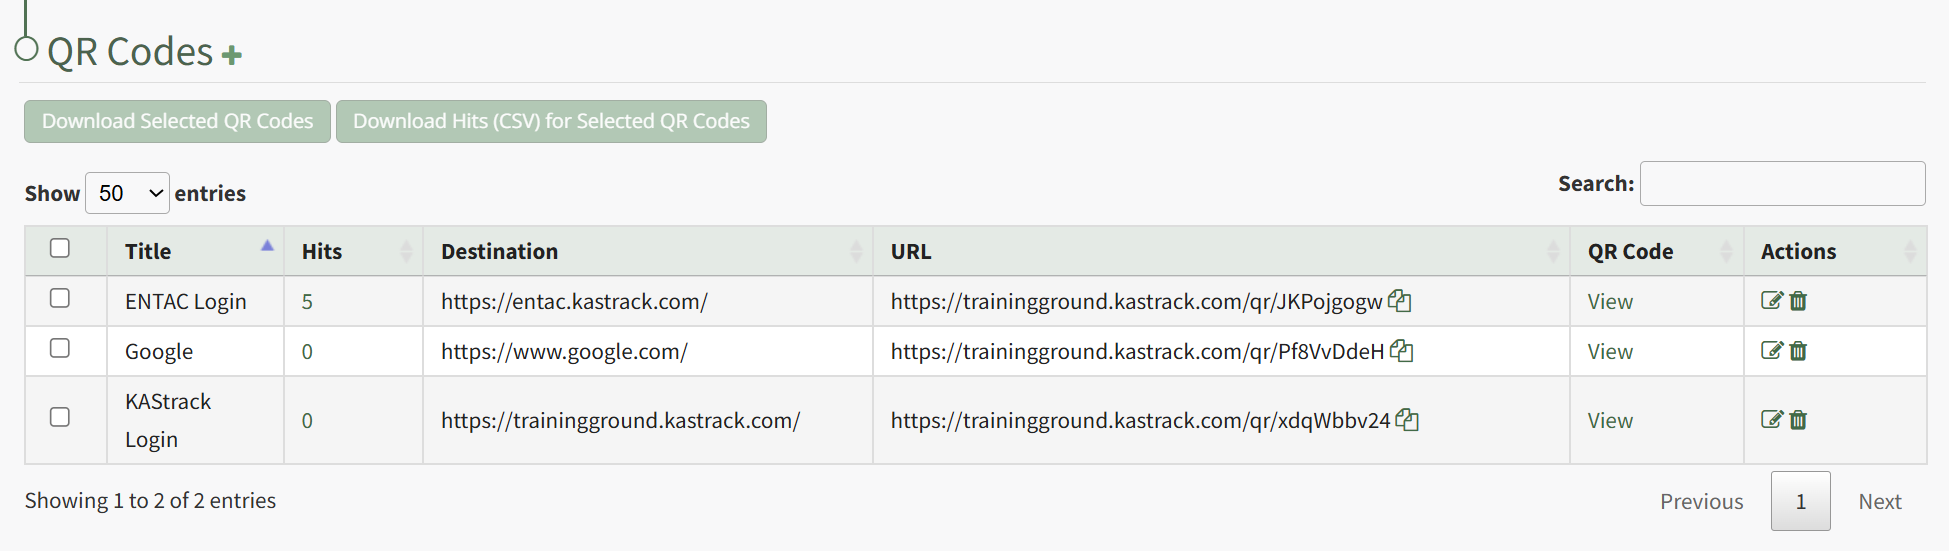
Click the trashcan icon in the Actions Column to the right of the QR Code you wish to delete.
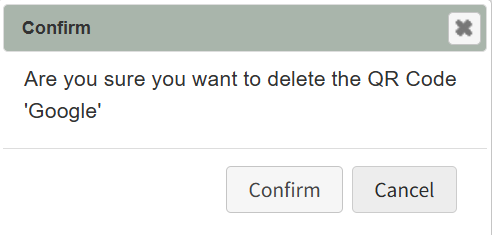
This opens the QR Code Deletion Confirmation Modal, which states "Are you sure you want to delete the QR Code?" Click Confirm.
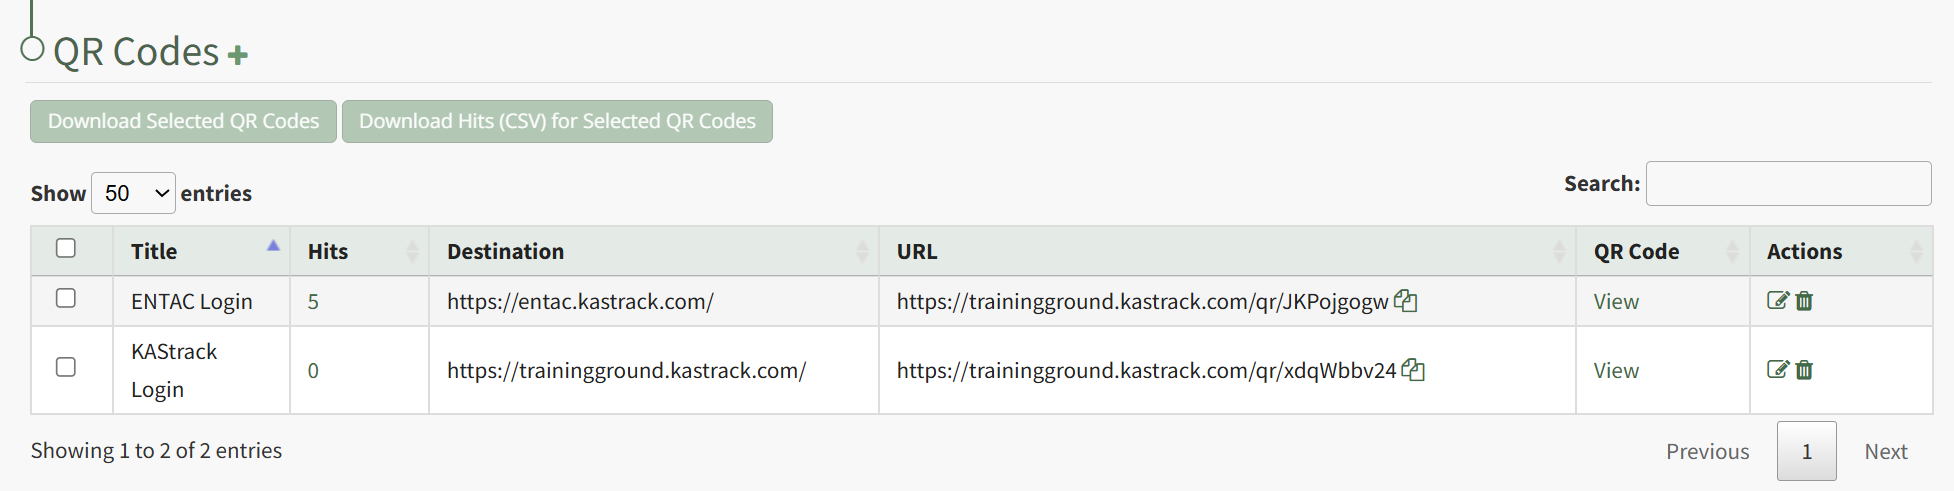
The QR Code is permanently deleted from the QR Code Table.
How To: Add Custom Content
Existing courses are listed alphabetically in the table underneath the “New Course” button according to title on the Courses Module Home Page.

To manage a pre-existing course, select the three dot (…) icon to the right of the title and make a selection from the context menu.
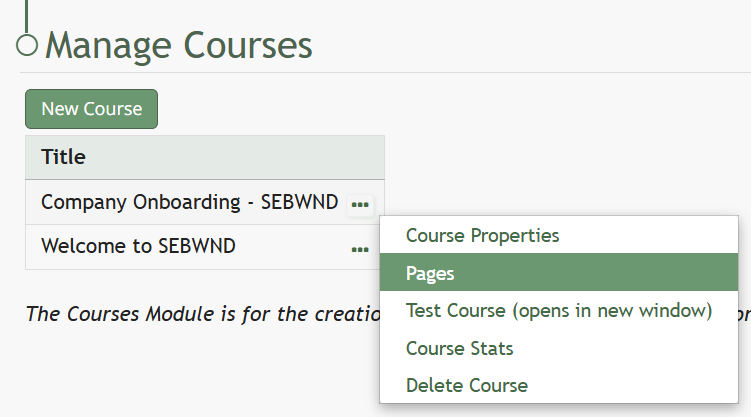
Selecting “Pages” allows the course creator to see and modify the content of the course.

“Pages” brings the course creator to the course homepage, titled Pages for (Name of Course). The three dot (…) to the right of the header and at the bottom of the page are identical and permit the same selections.
How To: Add Pages in a New / Existing Course
To add pages to a course, open the Courses Module Home Page from the Main Menu. Click the three-dot icon to the right of the course you wish to add pages to opening the Course Context Menu and select “Pages”.
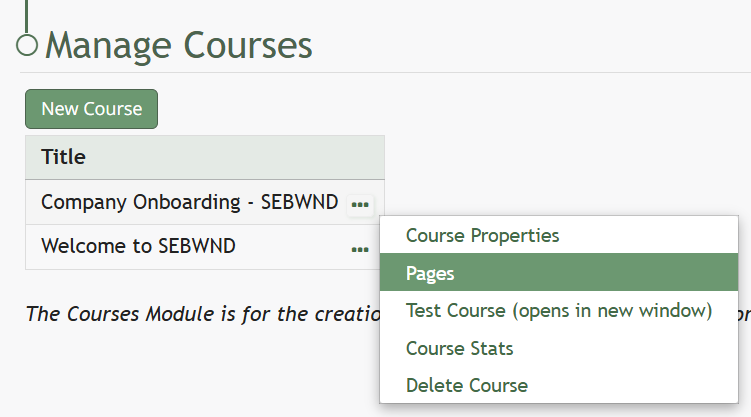
This opens the Course Overview Page Pages for Course Name Page. Selecting the three dot (…) icon to the right of the page header open a context menu. Selecting “Add Page” open the New Page modal.
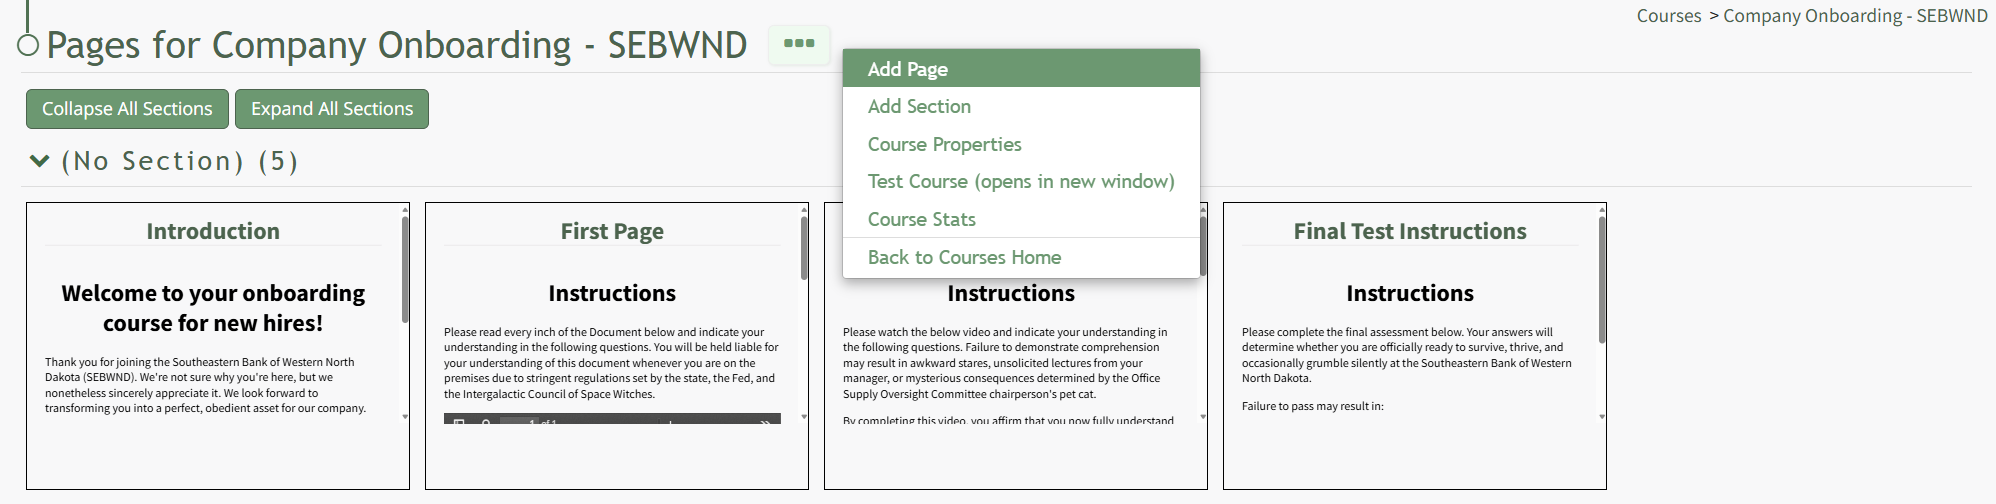
Add a Title for the new page and select the desired navigation options.

If the course properties allow the user to navigate the course freely, in place of the checkbox options you will see “This course allows the user to navigate freely, so there are no per-page navigation options.”
Select the “Save” button.
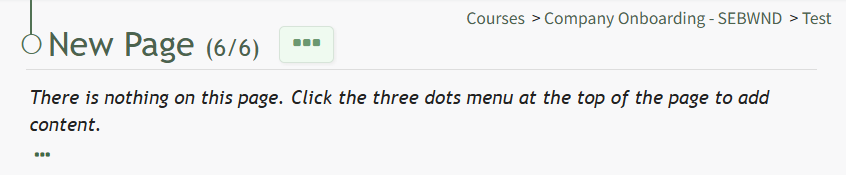
This opens the New Page. Click the three-dot icon to the right of the page header to open the Page Context Menu. For details on how to build out the course page, refer to "How To: Edit a Page in the Course" below.
How To: Edit a Page in a Course
{{@234}}
How To: Edit Existing Pages
To edit a specific page in a course, open the Courses Module Home Page from the Main Menu. Click the three-dot icon to the right of the course whose page you want to edit, opening the Course Context Menu.
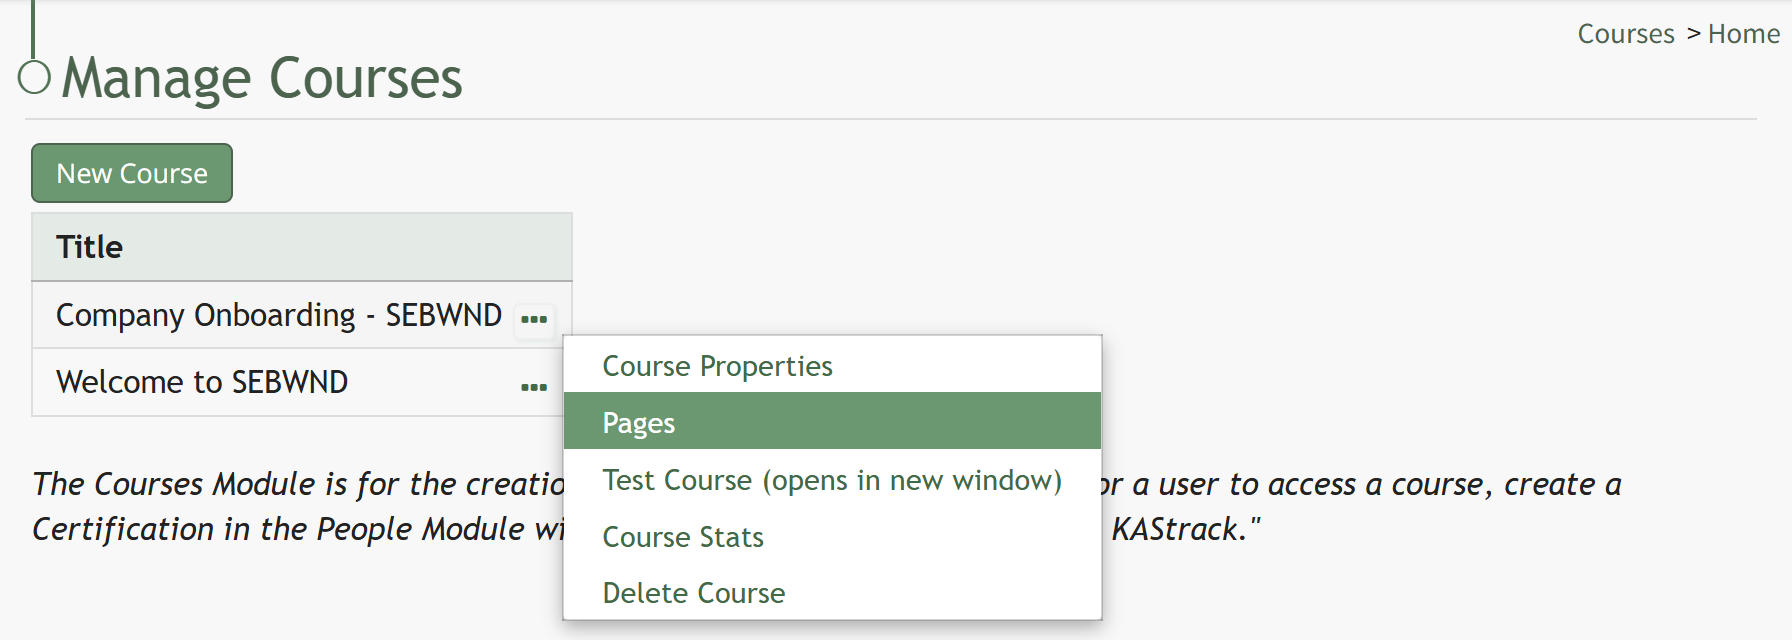
Select Pages, opening the Course Details Page.
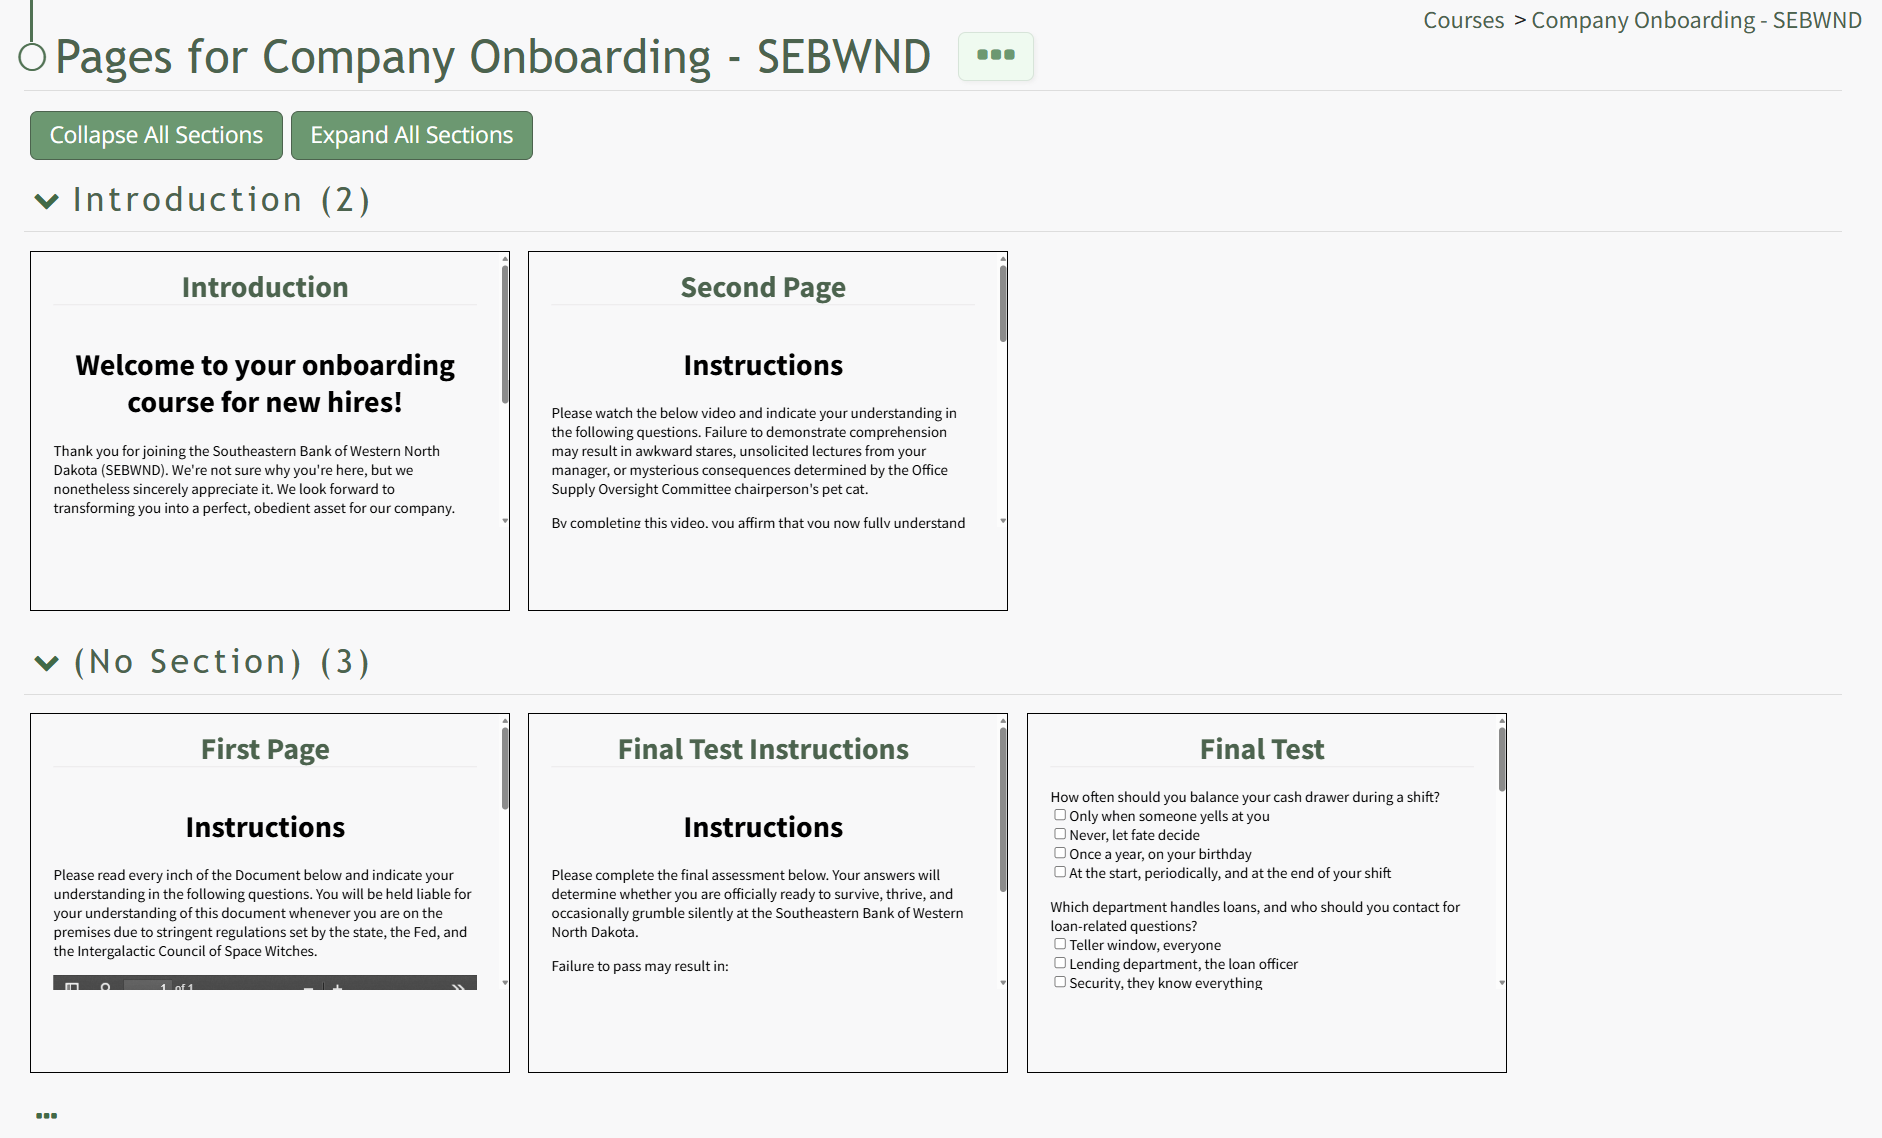
On the Course Details Page, all pages in the course are displayed. Hover the icon over the page you wish to edit to see the icons, then click the pencil and page icon. 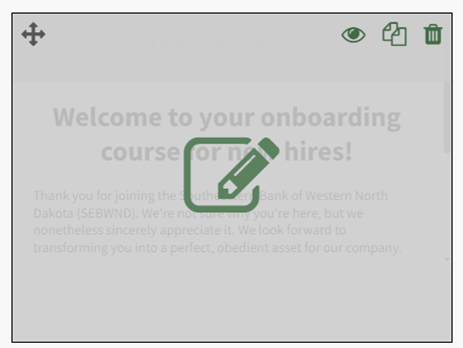
This opens the specific page and enables editing.
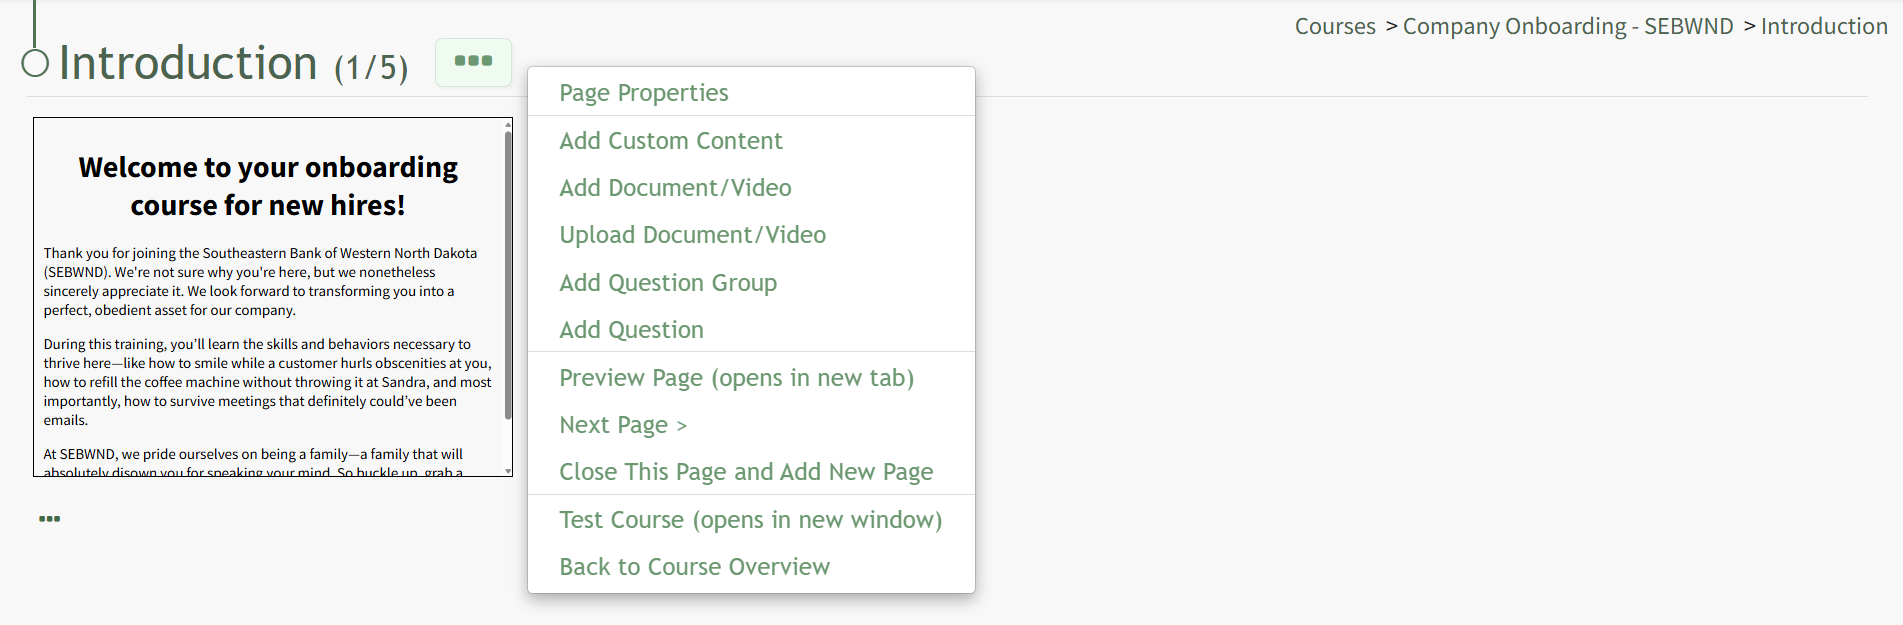
Click the three-dot icon to the right of the Page Title opening the Page Context Menu. Each of the options on the Page Context Menu are explained in the Page Context Menu Option Explanation Table below.
Page Context Menu Option Explanations | |
Page Properties | Selecting "Page Properties" from the Context Menu opens the Page Properties modal where users can edit the page title, section, and navigation options. Edit Page Properties{{@941}} |
Add Custom Content | Selecting "Add Custom Content" from the Context Menu opens the Add Custom Content Modal enabling you to add or edit the custom content on a page in a course. How To: Add Custom Content{{@240}} |
Add Docucment/Video | Selecting "Add Docucment/Video" from the Context Menu opens the Add Document / Video Modal enabling you to select the document / video you would like displayed on the page. To add a document/video to a course, it must be uploaded to KAStrack first. How To: Add Documents/Video to a Course Page{{@942}} |
Upload Document/Video | Selecting "Upload Document/Video" from the Context Menu opens the Upload File Modal. How To: Upload a Video/Document in the Courses Module{{@245}} |
Add Question Group | Selecting "Add Question Group" from the Context Menu opens the Add Question Group Modal. Question Groups must be created to pull a limited number of questions for a larger bank of possible questions or to add multiple questions to a course page. How To: Add Question Groups to a Course Page{{@235}} |
Add Question | Selecting "Add Question" from the Context Menu opens the Add Question Modal, enabling an individual question to be added to a Course Page. How To: Add a Question to a Course Page{{@236}} |
Preview Page | Selecting "Preview Page" from the Context Menu opens an individual page in a course in preview mode. How To: Preview an Individual Page in a Course{{@943}} |
< Previous Page | Selecting "< Previous Page" from the Context Menu allows you to go to the previous page in the course without going back to the course's Details Page. |
Next Page > | Selecting "Next Page >" from the Context Menu allows you to go to the next page in the course without going back to the course's Details Page. |
Close This Page and Add New Page | Selecting "Close This Page and Add New Page" from the Context Menu opens the New Page Modal. |
Test Course | Selecting "Test Course" from the Context Menu opens the course in a new page in Test Mode. Results of the course viewed in Test Mode are not accounted for in the Course Stats. How To: Take a Course in Test Mode{{@241}} |
Back to Course Overview | Selecting "Back to Course Overview" from the Context Menu opens the course's Details Page. |
How To: Add Pages in a Course
To add pages to a course, open the Courses Module Home Page from the Main Menu. Click the three-dot icon to the right of the course you wish to add pages to opening the Course Context Menu and select “Pages”.
This opens the Course Overview Page Pages for Course Name Page. Selecting the three dot (…) icon to the right of the page header open a context menu. Selecting “Add Page” open the New Page modal.
Add a Title for the new page and select the desired navigation options.
If the course properties allow the user to navigate the course freely, in place of the checkbox options you will see “This course allows the user to navigate freely, so there are no per-page navigation options.”
Select the “Save” button.
This opens the New Page. Click the three-dot icon to the right of the page header to open the Page Context Menu. For details on how to build out the course page, refer to "How To: Edit a Page in the Course" below.
How To: Edit a Page in a Course
To edit a specific page in a course, open the Courses Module Home Page from the Main Menu. Click the three-dot icon to the right of the course whose page you want to edit, opening the Course Context Menu.
Select Pages, opening the Course Details Page.
On the Course Details Page, all pages in the course are displayed. Hover the icon over the page you wish to edit to see the icons, then click the pencil and page icon.
This opens the specific page and enables editing.
Click the three-dot icon to the right of the Page Title opening the Page Context Menu. Each of the options on the Page Context Menu are explained in the Page Context Menu Option Explanation Table below.
Page Context Menu Option Explanations | |
Page Properties | Selecting "Page Properties" from the Context Menu opens the Page Properties modal where users can edit the page title, section, and navigation options. Edit Page Properties{{@941}} |
Add Custom Content | Selecting "Add Custom Content" from the Context Menu opens the Add Custom Content Modal enabling you to add or edit the custom content on a page in a course. How To: Add Custom Content{{@240}} |
Add Docucment/Video | Selecting "Add Docucment/Video" from the Context Menu opens the Add Document / Video Modal enabling you to select the document / video you would like displayed on the page. To add a document/video to a course, it must be uploaded to KAStrack first. How To: Add Documents/Video to a Course Page{{@942}} |
Upload Document/Video | Selecting "Upload Document/Video" from the Context Menu opens the Upload File Modal. How To: Upload a Video/Document in the Courses Module{{@245}} |
Add Question Group | Selecting "Add Question Group" from the Context Menu opens the Add Question Group Modal. Question Groups must be created to pull a limited number of questions for a larger bank of possible questions or to add multiple questions to a course page. How To: Add Question Groups to a Course Page{{@235}} |
Add Question | Selecting "Add Question" from the Context Menu opens the Add Question Modal, enabling an individual question to be added to a Course Page. How To: Add a Question to a Course Page{{@236}} |
Preview Page | Selecting "Preview Page" from the Context Menu opens an individual page in a course in preview mode. How To: Preview an Individual Page in a Course{{@943}} |
< Previous Page | Selecting "< Previous Page" from the Context Menu allows you to go to the previous page in the course without going back to the course's Details Page. |
Next Page > | Selecting "Next Page >" from the Context Menu allows you to go to the next page in the course without going back to the course's Details Page. |
Close This Page and Add New Page | Selecting "Close This Page and Add New Page" from the Context Menu opens the New Page Modal. |
Test Course | Selecting "Test Course" from the Context Menu opens the course in a new page in Test Mode. Results of the course viewed in Test Mode are not accounted for in the Course Stats. How To: Take a Course in Test Mode{{@241}} |
Back to Course Overview | Selecting "Back to Course Overview" from the Context Menu opens the course's Details Page. |
How To: Add Pages to a New Section
To add pages to a new section, you must open the course's Details Page.
How To: Access A Course's Details Page
To access a course's details page, open the Courses Module Home Page from the Main Menu. Click the three-dot icon to the right of the right of the course whose Details Page wish to access, opening the Course Context Menu.
Select "Pages" from the Context Menu.
This opens the course's Details Page, displaying each page in the course grouped by sections.
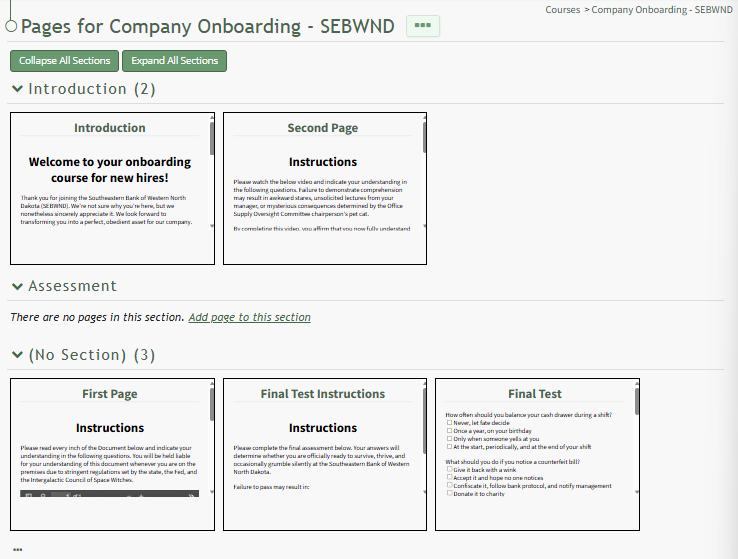
A section without pages in it will state, "There are no pages in this section. Add page to this section."
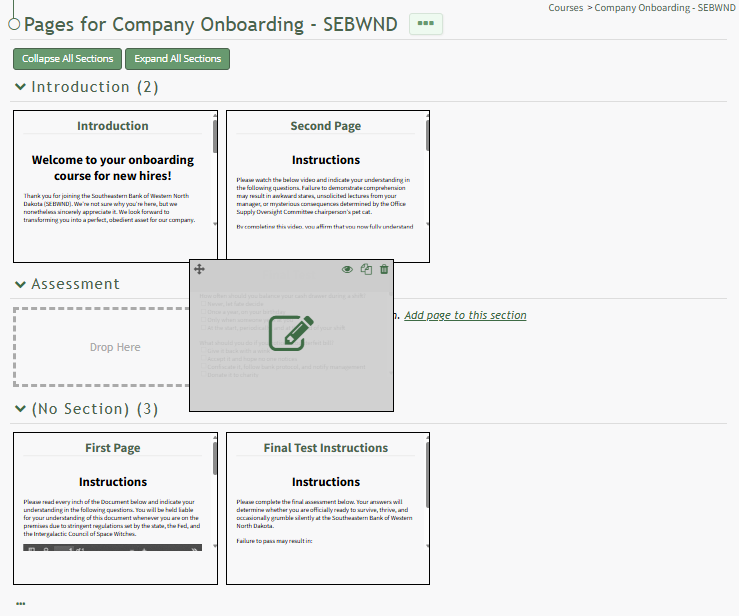
Click the link to Add page to this section to create a new page in the section. You can also drag and drop a page to its desired section.
How To: Add Questions Groups to a Course Page
To add a question group to a page in a course, you must be on a page within the course. An explanation of how to access a course page is provided in the How To below.
How To: Access a Specific Page in a Course
To access a specific page in a course, open the Courses Module Home Page and click the three-dot icon to the right of the course title to open the Course Context Menu.
Select Pages from the Context Menu.
This opens a course's Details Page. Click the page you want to edit to access the page in the course.
Once you are on the page you want to add a question group to, click the three-dot icon to the right of the page title opening the context menu and select the option to "Add Question Group".
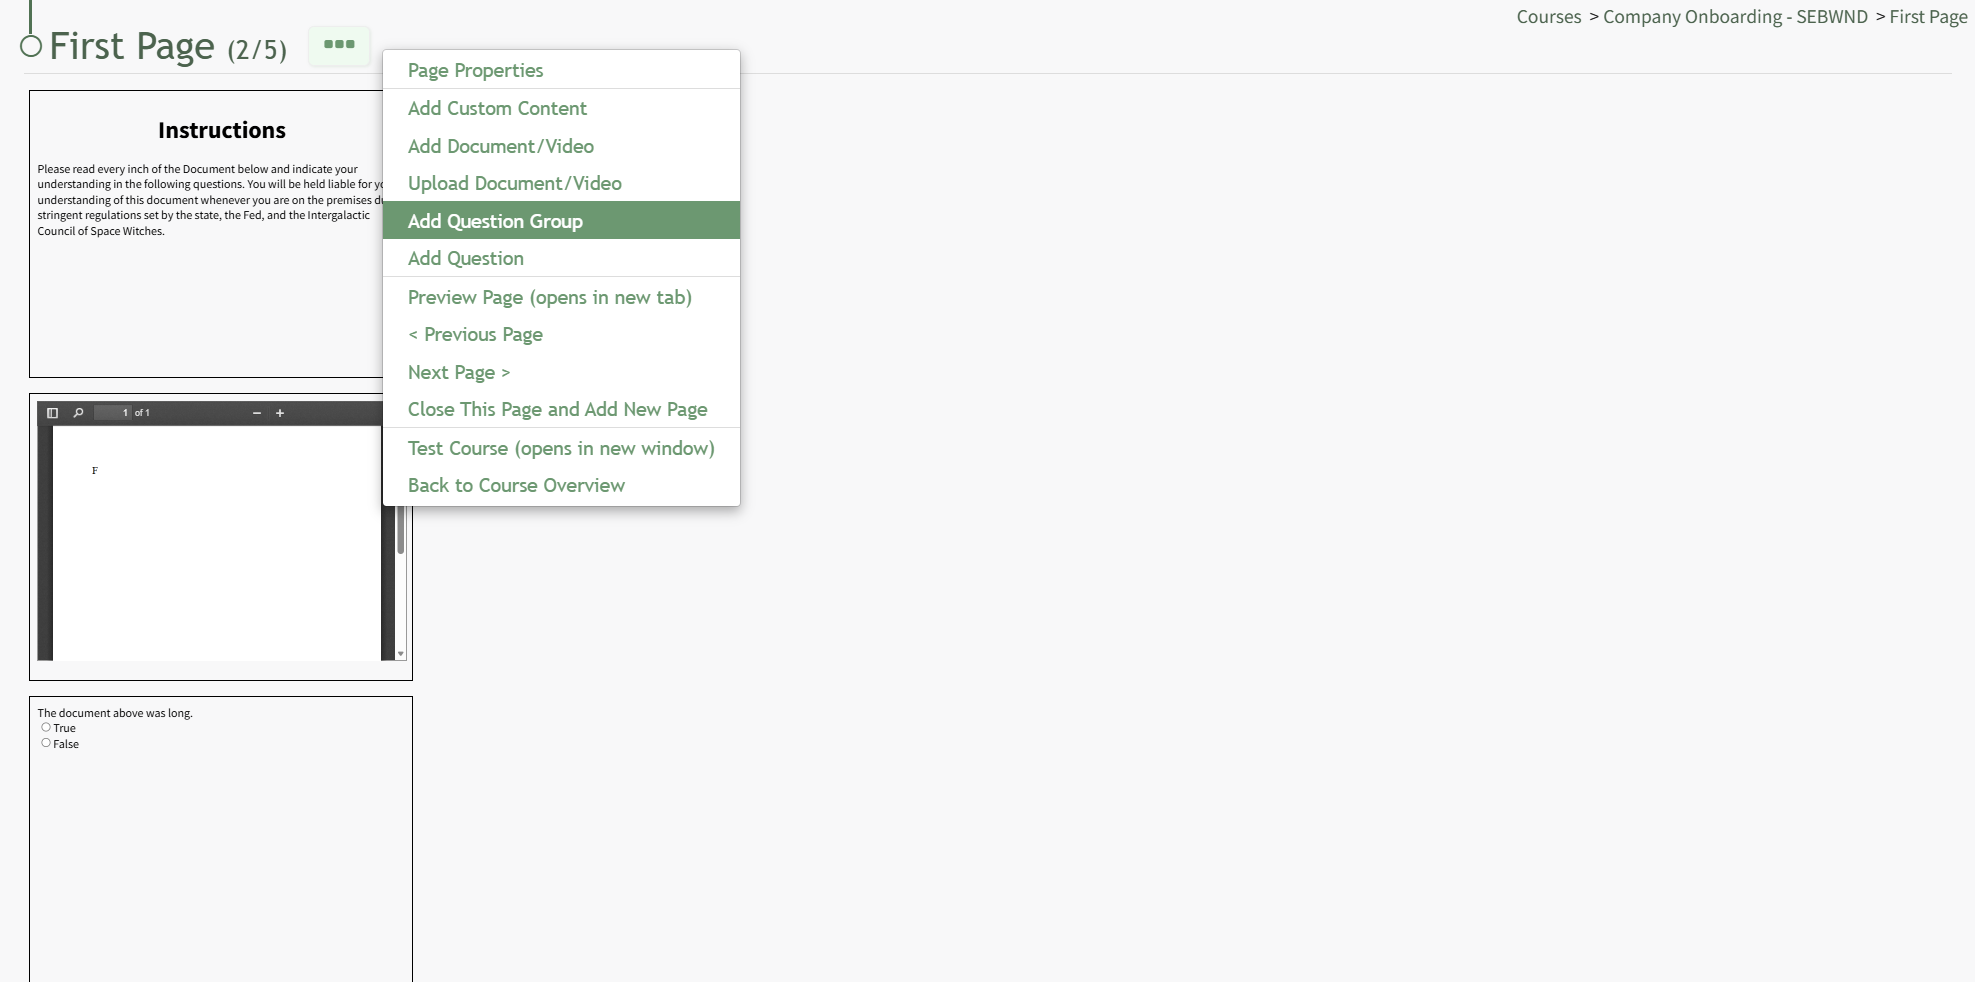
This opens the Add Question Group Modal.
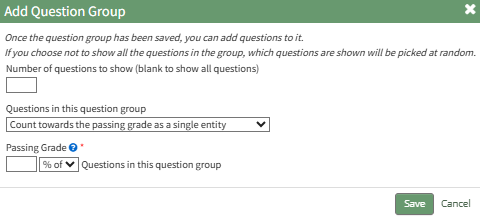
Once the question group has been created and saved, you will be able to add questions to it. If you choose not to show all the questions in the group, the questions that are shown will be picked at random.
Indicate the number of questions to be shown from the question group. Leave this field blank if you would like to show all questions.
From the dropdown menu, select if the questions in this question group "count towards the passing grade as a single entity," "count towards the passing grade as individual questions," or "do not count towards the passing grade".
Click the "Save" button on the modal, which opens the Edit Question Group Modal.
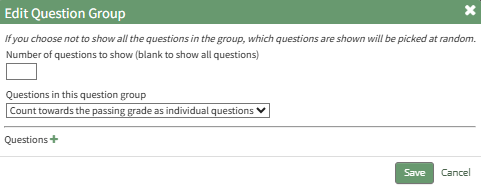
Click the plus sign icon to the right of "Questions", opening the Add Questions Modal. For a detailed explanation on the different types of questions (true/false, multiple choice, and free text) and how to add them refer to the How To below.
How To: Add a Question to a Course Page
To add a singular question to a page in a course, you must be on a page within the course. An explanation of how to access a course page is provided in the How To below.
How To: Access a Specific Page in a Course
{{@944}}
Once you are on the page you wish to add a question to, click the three-dot icon to the right of the page title opening the Page Context menu and select the "Add Question" option.
This opens the Add Question Modal. There are three possible types of questions in the Courses Modal. The fields in the Add Question Modal differ based on the question type selected. There are sections with images and an explanation of the unique fields for each question type below..
The checkbox for "This question is counted towards the passing grade." is selected by default for all question types.
Answer Notes can be used to include extra information about an answer is correct or why certain answers are wrong. They are shown to users in the Course Review.
After inputting the necessary information for the new question, select the "Save" button in the bottom right-hand corner of the modal.
True/False Questions
Input your question into the Question Field and select "True/False" as the Type of Question from the dropdown menu.
Indicate the correct answer by selecting True or False from the dropdown menu.
Multiple Choice Questions
Input your question into the Question Field and select "Multiple Choice" as the Type of Question from the dropdown menu.
Click the plus sign to the right of "Answers" and the modal expands to display a text box. Enter the answer. Repeat the process for each potential answer. Select the "This is a Correct Answer" checkbox when appropriate.
Each answer must be saved on the modal, either individually by clicking the disc icon below the answer or by clicking the "Save All" clickable link to the right of Answers and the plus sign icon. The modal will state if any answers are not saved.
"All of the above" and/or "None of the above" can be used as answer choices. When written as shown (without quotations, case-insensitive), they will be the last choice when answers are randomized.
Select the "Randomize the order of the answers" if you would like the system to randomly list the order of the answers for the multiple-choice questions.
Select the "Allow student to select more than one answer" checkbox if there is more than one correct answer.
Free Text Questions
Input your question into the Question Field and select "Free Text" as the Type of question from the dropdown menu.
Select the plus sign icon to the right of Correct Answer if a second correct answer is desired.
Correct answers for free text do not need to be saved.
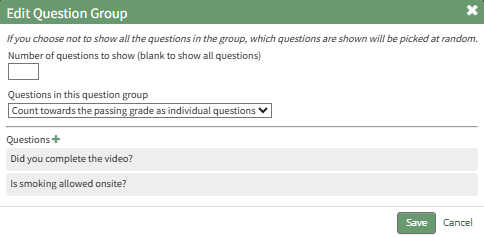
Once all questions have been added to the question group, select Save at the bottom of the modal.
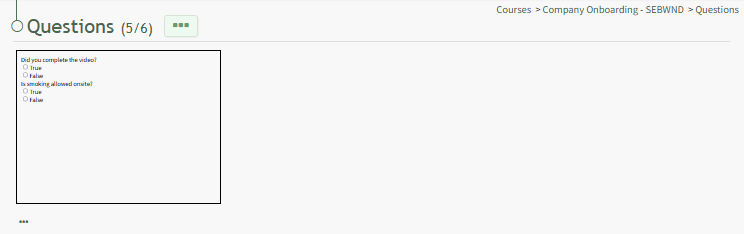
The question group now shows on the Course Page.
How To: Copy a Course Page
To copy a page in a course, you must be on that course's Details Page. An explanation of how to access a course's Detail's Page is provided in the How To below.
How To: Access A Course's Details Page
To access a course's details page, open the Courses Module Home Page from the Main Menu. Click the three-dot icon to the right of the right of the course whose Details Page wish to access, opening the Course Context Menu.
Select "Pages" from the Context Menu.
This opens the course's Details Page, displaying each page in the course grouped by sections.
Once you are on the course's Details Page, hover your cursor over the page you wish to copy.
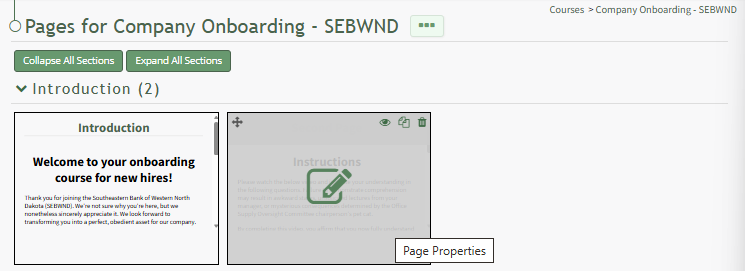
Doing so makes the icons for quick actions visible.
Click the double page icon in the top right corner of the page, opening the Copy Page Modal.
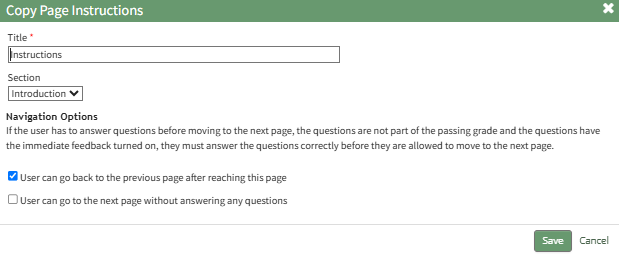
You can edit any page properties before clicking the "Save" button. The system will open the newly copied page.
How To: Create a New Course
To create a new course, open the Courses Module Home Page from the Main Menu.
The Courses Module is for the creation and management of courses only. For a user to access a course, create a Certification in the People Module with a required activity set to "Course - KAStrack".
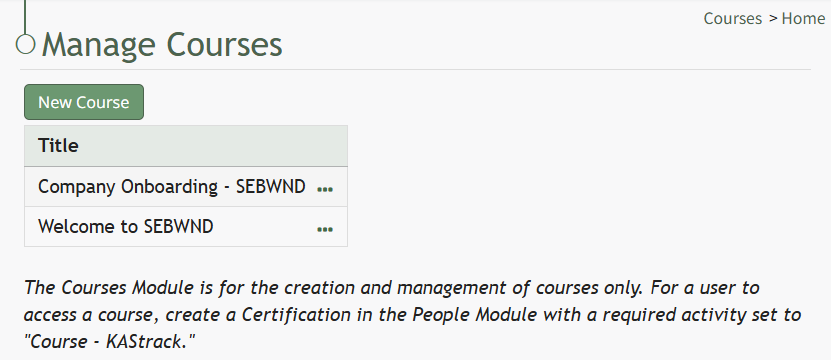
Click the “New Course” button beneath the Manage Courses header opening the New Course modal.
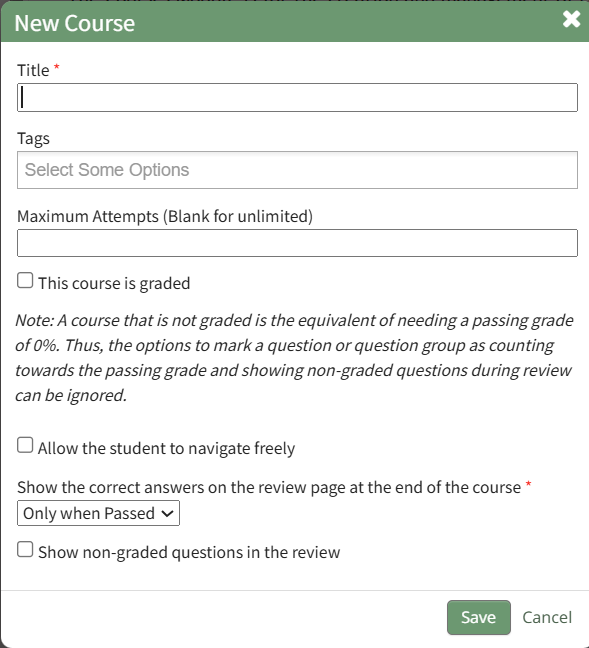
Input the desired course title and add tags for desired permissive/restrictive filters.
Input the maximum number of attempts an individual can take the course. Leave this field blank to allow for unlimited attempts.
A course that is not graded is the equivalent of needing a passing grade of 0%. Thus, options to mark a question or question group as counting towards the passing grade and showing non-graded questions during review can be ignored.
If the new course is to be graded, select the "This course is graded" checkbox. The modal will expand requiring you to input a grade that will qualify as passing the course.
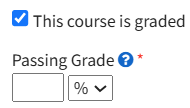
A passing grade can be calculated as the percentage or an absolute number of correctly answered eligible questions or question groups. Each question group has its own passing grade, and can be set to be part of the passing grade.
Select the “Allow the student to navigate freely” checkbox to give permission to navigate the entire course freely.
If you do not select this checkbox, you will have the ability to customize navigation options on each individual page in the course.
Click “Save” at the bottom of the modal to create the new course. The new course is now added to the table on the Course homepage.
How To: Create a New Module Level (Courses Module)
To create a new module level in the Courses Module, open the Module Level Tab on the Settings Page from the Main Menu.
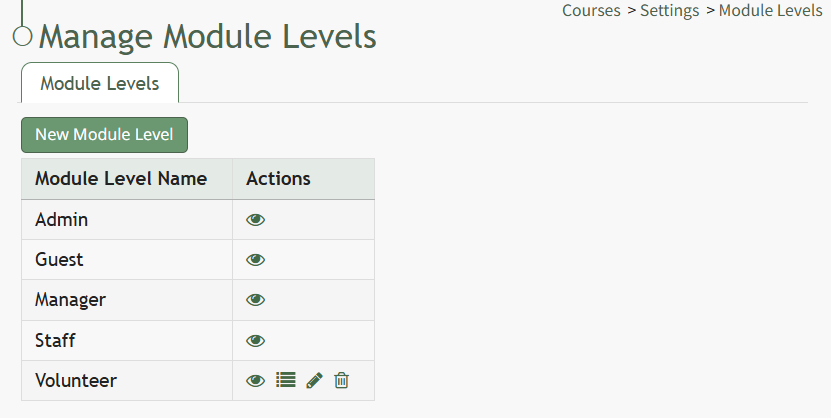
Click the "New Module Level" button.
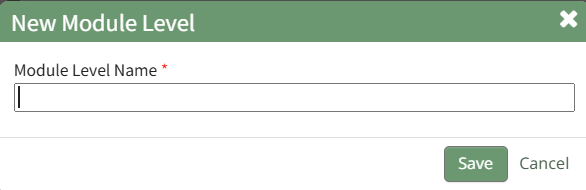
This opens the New Module Level Modal. Input the name of the customized model level and select “Save.” Module levels will be listed alphabetically in the Module Level Table.
Select the bulleted list permissions icon from the Actions Column to the right of the new module level.
Module Level Customization Icons | |
Icon | Explanation |
| The eyeball icon allows you to view users assigned to the module level as well as the permissions assigned to them. |
| The bulleted list icon allows you to assign permissions to customized module levels. |
| The pencil icon opens the Edit Module Level Modal. |
| The trashcan icon opens the Delete Module Level Confirmation Modal. |


This opens the Permissions Modal. Select the desired permissions that you want assigned to the new Module Level.

Click "Save" after selecting the desired permissions.
Access levels for all modules can also be managed in the Site Settings Module under Access Levels.
How To: Delete a Course
To delete a course, go to the Courses Module Home Page on the Main Menu. All courses are listed alphabetically in the Courses Table underneath the “New Course” button according to title.
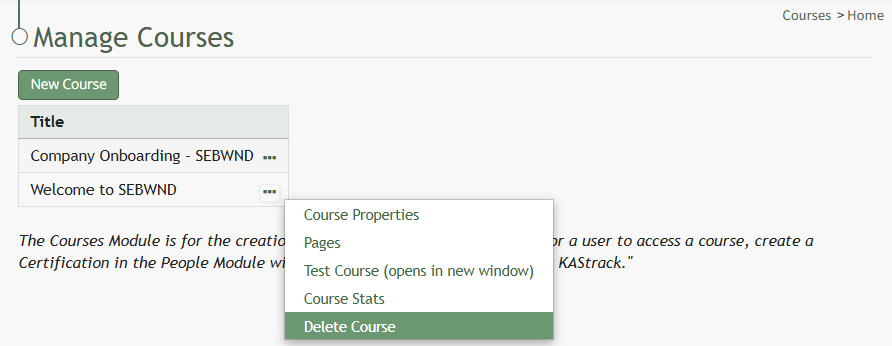
Click the three-dot icon to the right of the course title opening the Course Context Menu and select Delete Course.
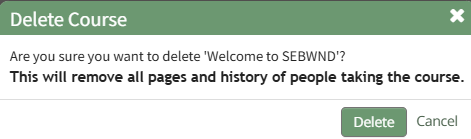
This opens the Delete Course Confirmation Module that states, "Are you sure you want to delete [Course Name]? This will remove all pages and history of people taking the course."
Select "Delete" to delete the course.
Deleting a course deletes the pages of the course and the course stats associated with it.
If the course is a required activity for a certification, it will not be deleted unless certification course requirement is removed from the certificate.
How To: Delete a Page
To delete a page in a course, you must be on that course's Details Page. An explanation of how to access a course's Detail's Page is provided in the How To below.
How To: Access A Course's Details Page
To access a course's details page, open the Courses Module Home Page from the Main Menu. Click the three-dot icon to the right of the right of the course whose Details Page wish to access, opening the Course Context Menu.
Select "Pages" from the Context Menu.
This opens the course's Details Page, displaying each page in the course grouped by sections.
Once you are on the course's Details Page, hover your cursor over the page you wish to delete, making the icons for quick actions visible.
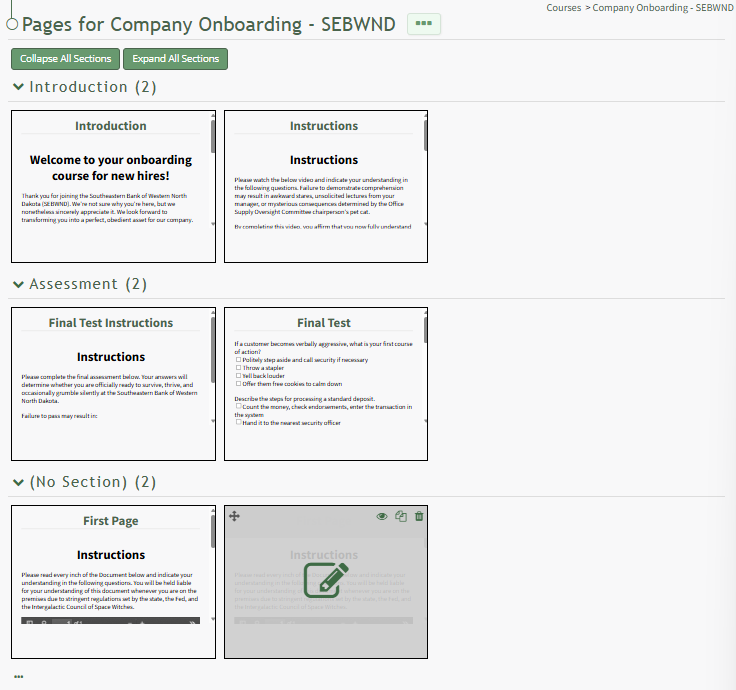
Click the trashcan icon opening the Delete Page Confirmation Modal which states, "Are you sure you want to delete this Page?" The modal identifies the title of the page to be deleted.
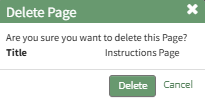
Click the "Delete" button.
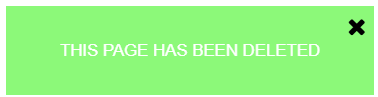
A pop-up confirms the page has been deleted.
How To: Edit a Specific Page in a Course
To edit a specific page in a course, open the Courses Module Home Page from the Main Menu. Click the three-dot icon to the right of the course whose page you want to edit, opening the Course Context Menu.
Select Pages, opening the Course Details Page.
On the Course Details Page, all pages in the course are displayed. Hover the icon over the page you wish to edit to see the icons, then click the pencil and page icon.
This opens the specific page and enables editing.
Click the three-dot icon to the right of the Page Title opening the Page Context Menu. Each of the options on the Page Context Menu are explained in the Page Context Menu Option Explanation Table below.
Page Context Menu Option Explanations | |
Page Properties | Selecting "Page Properties" from the Context Menu opens the Page Properties modal where users can edit the page title, section, and navigation options. Edit Page PropertiesTo edit the properties of a specific page in a course, you must be on a page within the course. An explanation of how to access a course page is provided in the How To below. How To: Access a Course Page{{@944}} Click the three-dot icon to the right of the page title opening the Page Context Menu.
Select "Page Properties" from the context menu, opening the Page Properties Modal.
From this modal, you can edit the page title, change the section, or edit the navigation options. Click "Save" in the bottom right-hand corner on the modal once all desired changes have been made. |
Add Custom Content | Selecting "Add Custom Content" from the Context Menu opens the Add Custom Content Modal enabling you to add or edit the custom content on a page in a course. How To: Add Custom ContentExisting courses are listed alphabetically in the table underneath the “New Course” button according to title on the Courses Module Home Page.
To manage a pre-existing course, select the three dot (…) icon to the right of the title and make a selection from the context menu.
Selecting “Pages” allows the course creator to see and modify the content of the course.
“Pages” brings the course creator to the course homepage, titled Pages for (Name of Course). The three dot (…) to the right of the header and at the bottom of the page are identical and permit the same selections. How To: Add Pages in a New / Existing Course{{@244}} How To: Edit Existing Pages{{@234}} |
Add Docucment/Video | Selecting "Add Docucment/Video" from the Context Menu opens the Add Document / Video Modal enabling you to select the document / video you would like displayed on the page. To add a document/video to a course, it must be uploaded to KAStrack first. How To: Add Documents/Video to a Course PageTo edit the properties of a specific page in a course, you must be on a page within the course. An explanation of how to access a course page is provided in the How To below. How To: Access a Specific Page in a Course{{@944}} Click the three-dot icon to the right of the page title opening the Page Context Menu and select the "Add Document/Video" option.
This opens the Add Document/Video Modal which allows the user to select a previously uploaded document or video from a dropdown menu that will show all documents or videos in the Documents Module that the user has access to.
By default, the checkbox is selected telling the system to use the most recently approved version of the file. Click "Save" and the new document / video now shows on the page.
A document/video must be uploaded to KAStrack before it can be added to a course. How To: Upload a Video/Document in the Courses Module{{@245}} |
Upload Document/Video | Selecting "Upload Document/Video" from the Context Menu opens the Upload File Modal. How To: Upload a Video/Document in the Courses ModuleTo upload a video/document to be used in a course, you must be on a page within the course. An explanation of how to access a course page is provided in the How To below. How To: Access A Specific Page in a Course{{@944}} Once you are on the specific page in the course, click the three-dot icon to the right of the page title opening the Page Context Menu.
Select the option to "Upload Document/Video," opening the Upload File Modal.
Select the File you want to upload from your personal device. Once it is uploaded, the file selected will show in the Upload File Modal.
Enter a new title for the file or click the "Use Filename" clickable link for the original filename to be saved. Indicate the revision number and revision date as well as the Document Owner(s). Select "Save".
The uploaded file now shows on the page. |
Add Question Group | Selecting "Add Question Group" from the Context Menu opens the Add Question Group Modal. Question Groups must be created to pull a limited number of questions for a larger bank of possible questions or to add multiple questions to a course page. How To: Add Question Groups to a Course PageTo add a question group to a page in a course, you must be on a page within the course. An explanation of how to access a course page is provided in the How To below. How To: Access a Specific Page in a Course{{@944}} Once you are on the page you want to add a question group to, click the three-dot icon to the right of the page title opening the context menu and select the option to "Add Question Group".
This opens the Add Question Group Modal.
Once the question group has been created and saved, you will be able to add questions to it. If you choose not to show all the questions in the group, the questions that are shown will be picked at random. Indicate the number of questions to be shown from the question group. Leave this field blank if you would like to show all questions. From the dropdown menu, select if the questions in this question group "count towards the passing grade as a single entity," "count towards the passing grade as individual questions," or "do not count towards the passing grade". Click the "Save" button on the modal, which opens the Edit Question Group Modal.
Click the plus sign icon to the right of "Questions", opening the Add Questions Modal. For a detailed explanation on the different types of questions (true/false, multiple choice, and free text) and how to add them refer to the How To below. How To: Add a Question to a Course Page{{@236}}
Once all questions have been added to the question group, select Save at the bottom of the modal.
The question group now shows on the Course Page. |
Add Question | Selecting "Add Question" from the Context Menu opens the Add Question Modal, enabling an individual question to be added to a Course Page. How To: Add a Question to a Course PageTo add a singular question to a page in a course, you must be on a page within the course. An explanation of how to access a course page is provided in the How To below. How To: Access a Specific Page in a Course{{@944}} Once you are on the page you wish to add a question to, click the three-dot icon to the right of the page title opening the Page Context menu and select the "Add Question" option.
This opens the Add Question Modal. There are three possible types of questions in the Courses Modal. The fields in the Add Question Modal differ based on the question type selected. There are sections with images and an explanation of the unique fields for each question type below.. The checkbox for "This question is counted towards the passing grade." is selected by default for all question types. Answer Notes can be used to include extra information about an answer is correct or why certain answers are wrong. They are shown to users in the Course Review. After inputting the necessary information for the new question, select the "Save" button in the bottom right-hand corner of the modal. True/False Questions
Input your question into the Question Field and select "True/False" as the Type of Question from the dropdown menu. Indicate the correct answer by selecting True or False from the dropdown menu. Multiple Choice Questions
Input your question into the Question Field and select "Multiple Choice" as the Type of Question from the dropdown menu. Click the plus sign to the right of "Answers" and the modal expands to display a text box. Enter the answer. Repeat the process for each potential answer. Select the "This is a Correct Answer" checkbox when appropriate.
Each answer must be saved on the modal, either individually by clicking the disc icon below the answer or by clicking the "Save All" clickable link to the right of Answers and the plus sign icon. The modal will state if any answers are not saved. "All of the above" and/or "None of the above" can be used as answer choices. When written as shown (without quotations, case-insensitive), they will be the last choice when answers are randomized. Select the "Randomize the order of the answers" if you would like the system to randomly list the order of the answers for the multiple-choice questions. Select the "Allow student to select more than one answer" checkbox if there is more than one correct answer. Free Text Questions
Input your question into the Question Field and select "Free Text" as the Type of question from the dropdown menu. Select the plus sign icon to the right of Correct Answer if a second correct answer is desired. Correct answers for free text do not need to be saved. |
Preview Page | Selecting "Preview Page" from the Context Menu opens an individual page in a course in preview mode. How To: Preview an Individual Page in a CourseTo preview an individual page in a course, you must be on the specific page in the course. An explanation of how to access a course page is provided in the How To below. How To: Access a Specific Page in a Course{{@944}} Once you are on the desired course page, click the three-dot icon to the right of the page title opening the Page Context Menu.
Select the "Page Preview" option, opening a preview of the course page in a new window.
All buttons on the page are disabled in Preview Mode. You cannot navigate pages. Clicking the paper and pencil icon in the top right corner will return you to the course page when you can continue editing. |
< Previous Page | Selecting "< Previous Page" from the Context Menu allows you to go to the previous page in the course without going back to the course's Details Page. |
Next Page > | Selecting "Next Page >" from the Context Menu allows you to go to the next page in the course without going back to the course's Details Page. |
Close This Page and Add New Page | Selecting "Close This Page and Add New Page" from the Context Menu opens the New Page Modal. |
Test Course | Selecting "Test Course" from the Context Menu opens the course in a new page in Test Mode. Results of the course viewed in Test Mode are not accounted for in the Course Stats. How To: Take a Course in Test ModeTo take a course in test mode, open the Courses Module Home Page from the Main Menu. Click the three-dot (…) icon to the right of the course title opening the course context menu. Select "Test Course".
The course opens in a new window.
The course is displayed from the user perspective, as if you were actually taking the course. When taking the course in Test Mode, results will not be recorded and will not impact course stats. |
Back to Course Overview | Selecting "Back to Course Overview" from the Context Menu opens the course's Details Page. |
How To: Edit Course Properties
To edit a course, open the Courses Module Home Page from the Main Menu and select the three-dot (…) icon to the right of the course you wish to edit opening the Course Context Menu.
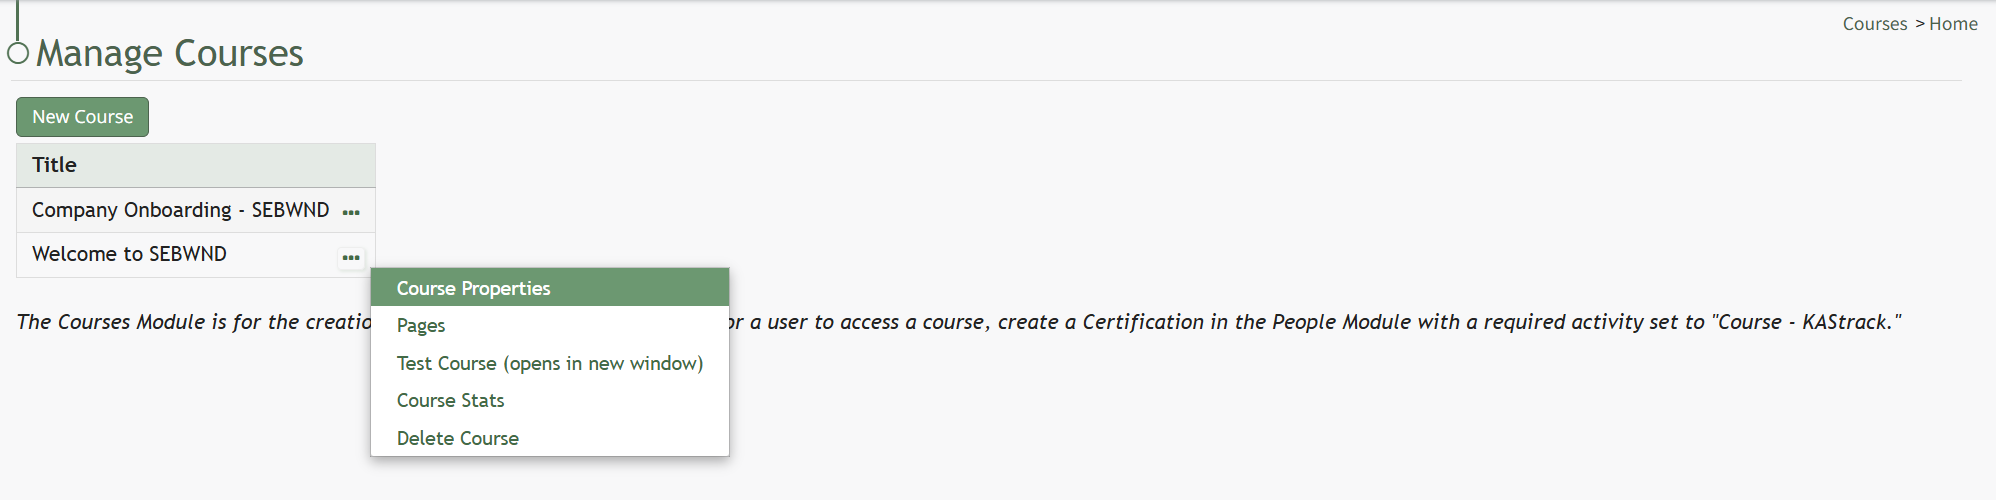
Selecting “Course Properties” from the context menu opens the Course Properties Modal which allows a user to edit the original parameters that were selected when the course was created.
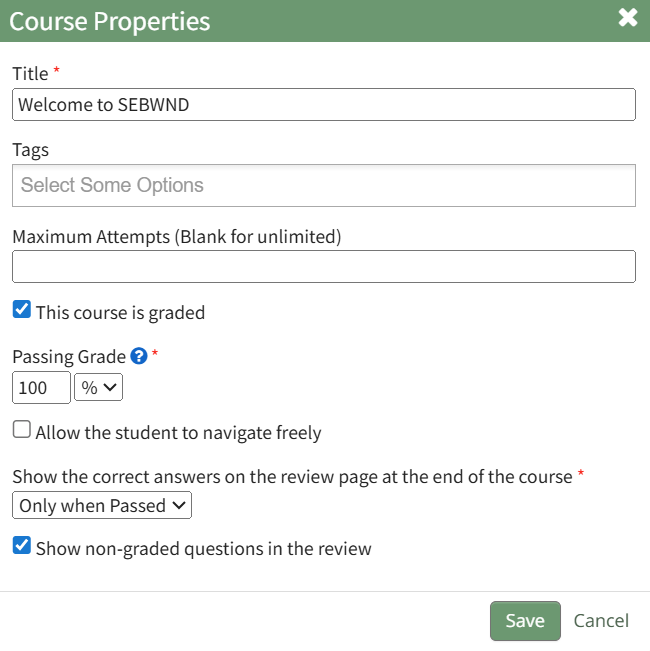
The Course Properties Modal displays the same options as in the New Course Modal which are explained in more details on the How To Create a New Course below.
How To: Create a New Course
To create a new course, open the Courses Module Home Page from the Main Menu.
The Courses Module is for the creation and management of courses only. For a user to access a course, create a Certification in the People Module with a required activity set to "Course - KAStrack".
Click the “New Course” button beneath the Manage Courses header opening the New Course modal.
Input the desired course title and add tags for desired permissive/restrictive filters.
Input the maximum number of attempts an individual can take the course. Leave this field blank to allow for unlimited attempts.
A course that is not graded is the equivalent of needing a passing grade of 0%. Thus, options to mark a question or question group as counting towards the passing grade and showing non-graded questions during review can be ignored.
If the new course is to be graded, select the "This course is graded" checkbox. The modal will expand requiring you to input a grade that will qualify as passing the course.
A passing grade can be calculated as the percentage or an absolute number of correctly answered eligible questions or question groups. Each question group has its own passing grade, and can be set to be part of the passing grade.
Select the “Allow the student to navigate freely” checkbox to give permission to navigate the entire course freely.
If you do not select this checkbox, you will have the ability to customize navigation options on each individual page in the course.
Click “Save” at the bottom of the modal to create the new course. The new course is now added to the table on the Course homepage.
How To: Edit Page Properties
To edit the properties of a specific page in a course, you must be on a page within the course. An explanation of how to access a course page is provided in the How To below.
How To: Access a Course Page
To access a specific page in a course, open the Courses Module Home Page and click the three-dot icon to the right of the course title to open the Course Context Menu.
Select Pages from the Context Menu.
This opens a course's Details Page. Click the page you want to edit to access the page in the course.
Click the three-dot icon to the right of the page title opening the Page Context Menu.
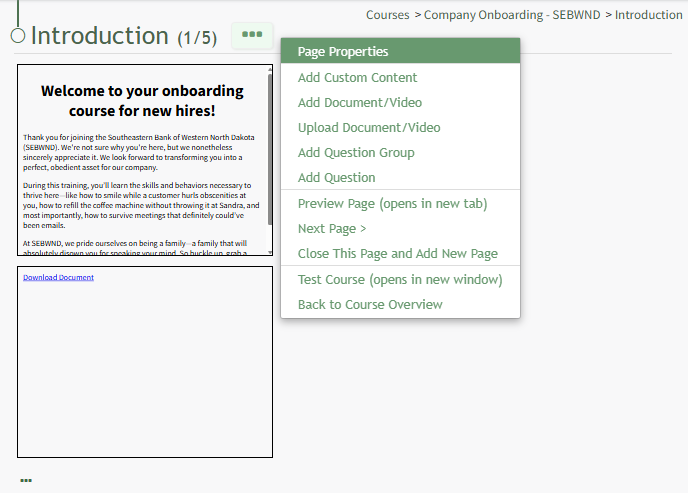
Select "Page Properties" from the context menu, opening the Page Properties Modal.
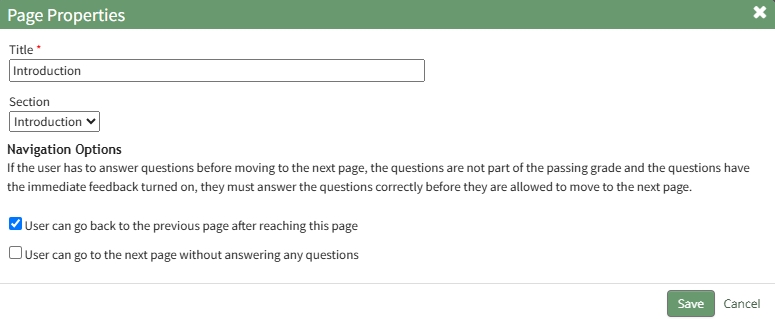
From this modal, you can edit the page title, change the section, or edit the navigation options. Click "Save" in the bottom right-hand corner on the modal once all desired changes have been made.
How To: Edit the Order of Pages in a Course
To edit the order of pages in the course, you must be on the course's Details Page.
How To: Access A Course's Details Page
To access a course's details page, open the Courses Module Home Page from the Main Menu. Click the three-dot icon to the right of the right of the course whose Details Page wish to access, opening the Course Context Menu.
Select "Pages" from the Context Menu.
This opens the course's Details Page, displaying each page in the course grouped by sections.
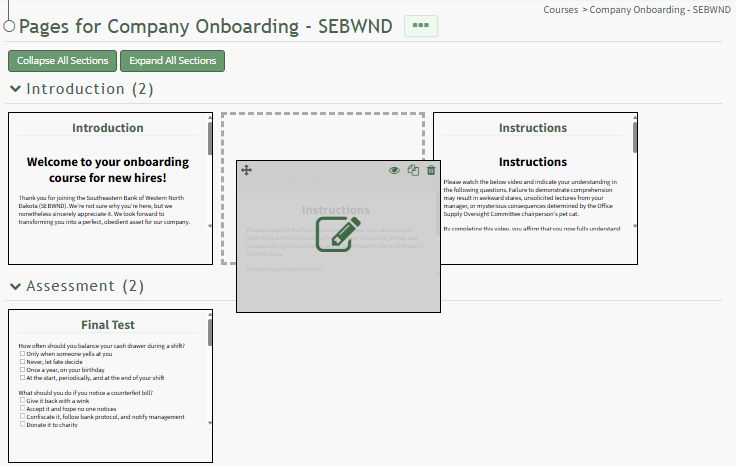
Drag and drop the pages to reposition them as desired.
How To: Preview an Individual Page in a Course
To preview an individual page in a course, you must be on the specific page in the course. An explanation of how to access a course page is provided in the How To below.
How To: Access a Specific Page in a Course
To access a specific page in a course, open the Courses Module Home Page and click the three-dot icon to the right of the course title to open the Course Context Menu.
Select Pages from the Context Menu.
This opens a course's Details Page. Click the page you want to edit to access the page in the course.
Once you are on the desired course page, click the three-dot icon to the right of the page title opening the Page Context Menu.
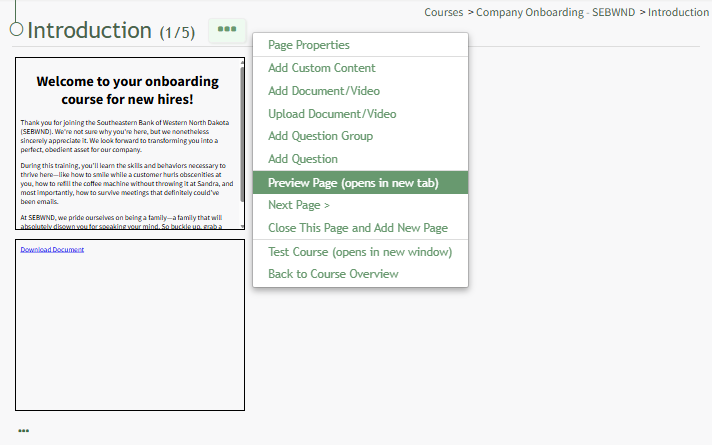
Select the "Page Preview" option, opening a preview of the course page in a new window.
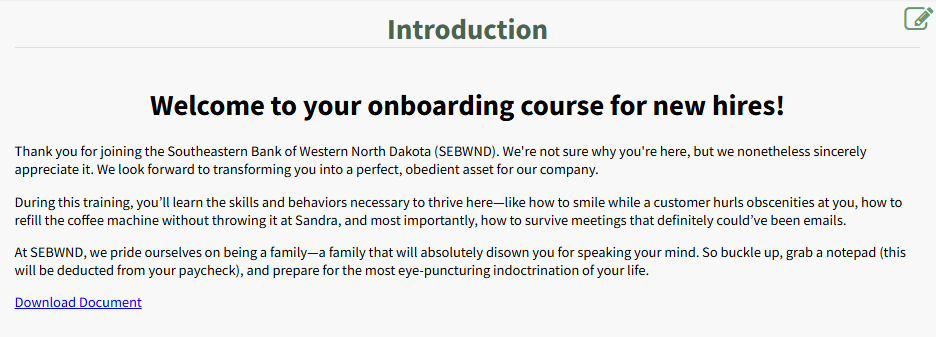
All buttons on the page are disabled in Preview Mode. You cannot navigate pages.
Clicking the paper and pencil icon in the top right corner will return you to the course page when you can continue editing.
How To: Set Up a Course as a Certification
In order for a user to access a course, the course must be set as a required activity in a certification after the course is created in the People Module. This certification must then be assigned to the user.

To do so, select the Certifications page in the People Module. Click the plus-sign (+) button to the right of the Certification header which opens the Add Certification page.

There are five data categories that allow a user to customize preferences: General, Tracking Settings, Activities, Privacy, and Advanced Settings. Detailed information about each can be found in the People Module.

Set up a course as a certification, select “Course – KAStrack” as the Required Activity for the certification from the dropdown menu.
Any courses that have been created in KAStrack show on the Choose a Course dropdown menu. Select the course you want to assign.
How To: Take the Course in Test Mode
To take a course in test mode, open the Courses Module Home Page from the Main Menu. Click the three-dot (…) icon to the right of the course title opening the course context menu. Select "Test Course".
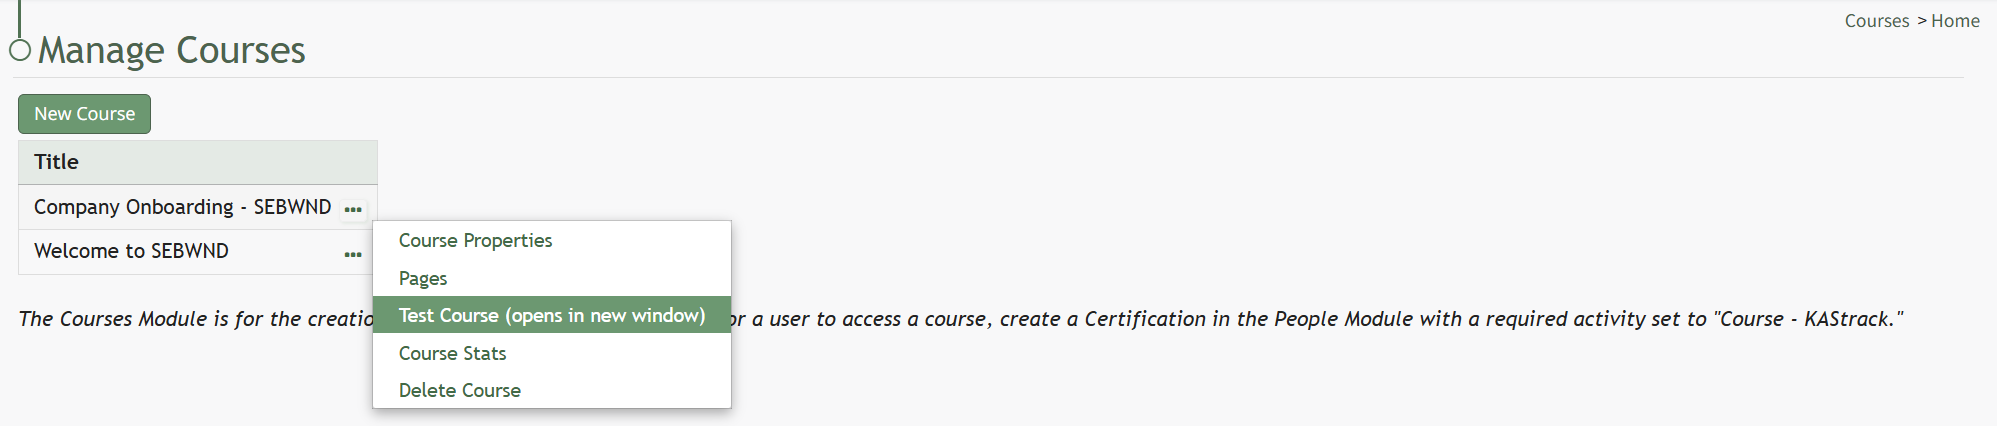
The course opens in a new window.

The course is displayed from the user perspective, as if you were actually taking the course.
When taking the course in Test Mode, results will not be recorded and will not impact course stats.
How To: Upload a Video / Document in a Course
To upload a video/document to be used in a course, you must be on a page within the course. An explanation of how to access a course page is provided in the How To below.
How To: Access A Specific Page in a Course
To access a specific page in a course, open the Courses Module Home Page and click the three-dot icon to the right of the course title to open the Course Context Menu.
Select Pages from the Context Menu.
This opens a course's Details Page. Click the page you want to edit to access the page in the course.
Once you are on the specific page in the course, click the three-dot icon to the right of the page title opening the Page Context Menu.
Select the option to "Upload Document/Video," opening the Upload File Modal.
Click the "Choose Files" button.
Select the File you want to upload from your personal device. Once it is uploaded, the file selected will show in the Upload File Modal.
Enter a new title for the file or click the "Use Filename" clickable link for the original filename to be saved.
Indicate the revision number and revision date as well as the Document Owner(s).
Select "Save".
The uploaded file now shows on the page.
No comments to display
No comments to display