An Asset's History Page
Each asset created in KAStrack will have it's own Asset History Page that contains a task log, defer log, meter log and fault log which can be used to track, access, and manage historical data gained through the use of KAStrack's Asset Module.
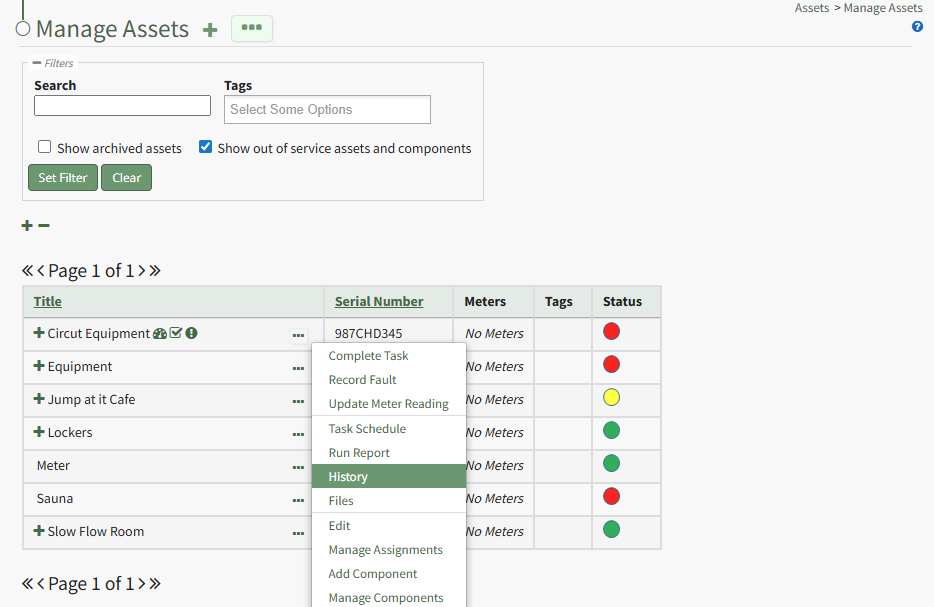
To access the Asset History Page, click the three-dot icon to the right of the asset title whose history you want to view opening the Asset Management Context Menu and select History.

The asset title in the History Page is a clickable link that, when selected, will review back to the Manage Assets Table showing just the specified asset and its components. A dropdown menu allows you to filter between individual or all log views. Historical logs for specific components of the asset can be selected on the "Switch to logs for" dropdown menu.

The three-dot icon to the right of the log view filter opens the History Page Context Menu with options for quick actions. Those options are explained in the table below.
History Page Context Menu Option Explanation Table |
Option | Explanation |
Complete Task | ViewSelecting Complete from the context menu will open a modal that prompts you to select the asset the task is associated with. The completed task(s) can be selected via checkbox on the Complete Task Modal. WIKI LINK HOW TO: LOG A TASK HAS BEEN COMPLETED
|
Record Fault | Selecting Record Fault from the context menu will open a modal that prompts you to select the asset the fault is associated with. The fault can then be recorded through the Record Fault Modal. WIKI LINK HOW TO: LOG FAULT |
Update Meter Reading | Selecting Update Meter Reading from the context menu will open a modal that prompts you to select the asset the meter is associated with. The appropriate meter can then be selected from the Update Meter Reading Modal. WIKI LINK HOW TO: UPDATE A METER READING |
Task Schedule | SelectSelecting “View”"Task fromSchedule" on the context menu toopens openan the View Modal that shows the title of theasset's Task Template.Schedule, where new tasks can be added and existing tasks can be managed.
WIKI LINK HOW TO VIEW AN ASSET'S TASK SCHEDULE |
MetersRun Report
| SelectSelecting “Meters”Run Report” from the context menu to open the MetersAssets forReport (NameModal, of Task Template) modal. The modal provides a list of all meters associated with the Task Template and includes an “Add Meter” button that allowsallowing the user to addselect additionalbetween metersfive tocustomizable theAsset TaskReports. Template.
WIKI LINK HOW TO: ADD METERS TO ARUN TASKAN TEMPLATEASSET REPORT |
Edit | Select “"Edit” from the to open the Edit Task TemplateAsset modal, which allows the user to changeedit the taskkey templateinformation name.regarding the asset and an asset's alert preferences. WIKI LINK HOW TO:TO CHANGEEDIT AAN TASK TEMPLATE NAMEASSET |
CopyManage Assignments
| Selecting "Manage Assignments" on the context menu opens the Asset Assignments Modal which allows individual users and certification roles to be assigned to an asset. SelectWIKI LINK HOW TO ASSIGN / UNASSIGN USERS AND CERTIFICATION ROLES TO AN ASSET
|
Add Component | Selecting "Add Component" on the context menu opens the New Component Modal, which allows new components to be added to an asset. WIKI LINK HOW TO CREATE ASSET COMPONENTS/SUBCOMPONENTS |
Manage Components | Selecting “Copy”Manage Components” from the context menu towill open the CopyManage (NameAsset ofComponents TaskPage Template)where Modal in order to make a copy of the task template from a pre-existing task template. WIKI LINK HOW TO: COPY AND RENAME A TASK TEMPLATE
|
Tasks
| Select “Tasks” from the context menu to open the Task Schedule for the Task Template Page. Additional tasksassets and permissivetheir groupscomponents can be addedmanaged.
Only users with appropriate permissions will have access to thethis task template here. WIKI LINK HOW TO: ADD TASKS TO A TASK TEMPLATE page.
|
The actions associated with the icons used on the History Page of the Assets Module are explained on the table below.
Asset History Page Icon Explanation Table |
Icon | MeaningAssociated Action
|

| Clicking the spreadsheet icon on the History Page will convert the selected table on the History Page to a datatable. Datatables enable you to sort information by column header. Refresh the browser to revert back to the original tabular view. |

|
Clicking the numbered list icon to the right of the Task Log header on the History Page will open a Task Reports Modal that allows you to run a report on the asset tasks.
WIKI LINK HOW TO RUN REPORTS ON HISTORICAL TASK DATA |
 
| TheClicking pagethe download icon indicatesin thatthe thereAttachments Column of a Log Tab will open the Downloading Attachments Modal, which generates a clickable link when the one-time download is aready. dialogueClicking boxthe download link downloads the attachment associated with additionala informationhistorical regardinglog.
WIKI theLINK task.HOW WhenTO clicked,DOWNLOAD anHISTORICAL AdditionalTASK Information Sections with notes appears.ATTACHMENTS |
 
| The double page icon (I don't see this onClicking the upcomingeyeball tasks page anywhere) indicates that a document has been uploadedicon in the AssetsActions Column of a Log Table will open the Task Details Module forwhich review.displays
Filesrecorded inmeter readings and files associated with the Asset Module are saved independently from the Documents Module.task.
|

| TheClicking taskthe notedialogue icon opens a text box that allows a user to add notes without completing the taskInterim sinceNotes theModal lastwhich completedshows maintenance. Any notes previously addedall interim notes forassociated this task will show underwith the texthistorical box.
|

| Therecord. number within parenthesis indicates the number of comments that have been made since the last completed maintenance.
|

| The checkbox icon is a quick link that opens the Complete Task Modal that is used to mark a task as completed and up to date.
WIKI LINK HOW TO:TO LOGVIEW INTERIM NOTES ASSOCIATED WITH HISTORICAL TASKS |

| Clicking the upload icon in the Actions Column of the Log Table will open the Upload Files Modal, allowing you to upload files to a logged task after the fact. WIKI LINK HOW TO UPLOAD FILES TO A TASK AFTER A TASK HAS BEEN COMPLETED |

| Clicking the Pencil/Page Icon opens the Edit Log Entry Modal which allows you to change the date and time of task completion and include any notes. WIKI LINK HOW TO EDIT THE DAY/TIME OF TASK COMPLETION FOR HISTORICAL TASKS |

| Clicking the trashcan icon opens the Delete Record Confirmation modal which states, "Are you sure you wish to delete this record?" WIKI LINK HOW TO DELETE HISTORICAL TASK RECORDS |