Create a Form
To create a new form, open the Home Page in the Forms Module from the Main Menu and select the Create Form button beneath the page header.

This will open the New Form Modal.

Input the Form Title (a required field), form notes, and any open/permissive/restrictive tags to be associated with the form.
There are three additional sections to the New Form Modal that expand when clicked with additional options for customization. Modal images and explanations of each input are included below.
Basic Settings Section
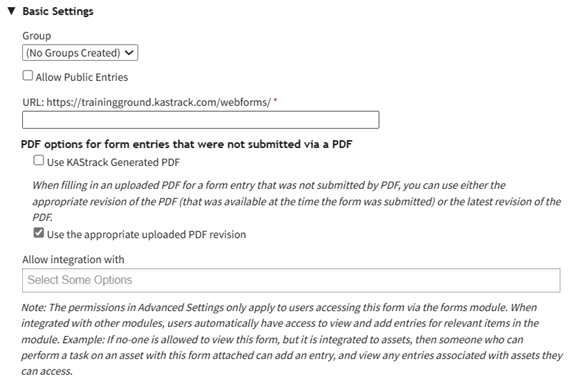
New Form Modal: Basic Settings Section Explanation | ||
Modal Input | Explanation | |
Group | A dropdown menu will list all existing form groups. The form will automatically be placed in the group selected. | |
Allow Public Entries Checkbox | If the checkbox is selected, public entries (individuals not registered with KAStrack) will be allowed to submit form entries. | |
URL Link | A URL Link is used to share the form publically. KAStrack will autofill the URL Link with the form title, but this can be customized if desired. You cannot use spaces or symbols in the URL link. They will replaced with a hypen if used. | |
The next two checkboxes are specific to the PDF options for form entries that are not submitted via a PDF. To understand which option is better for this specific form, be sure to read about the relationship between PDFs and Forms. | ||
Use KAStrack Generated PDF | If you have a PDF entry on file but do not want the downloaded form entry to utilize the customized PDF form, select this checkbox and KAStrack will use the generic PDF format. | |
Use the Appropriate Uploaded PDF Revision | If you have a PDF entry on file and want the downloaded form entry to utilize the customized PDF form, select this checkbox and KAStrack will use the most recent version of the PDF submitted. | |
Allow Integration With | Allow integrations with is a dropdown menu that lists all modules you can use a form for. Selecting a module here will enable this form to be visible in the modules selected. Possible uses are listed below. | |
Module | Purpose | |
Assets | Attach to Task | |
Attendance | Integrate with the Attendance Log Module | |
Datbase | Reference from Database | |
Dispatch | Include in a Dispatch | |
Documents | Add to Photo | |
Forms | Reference from a Form | |
Grid | Integrate with the Grid Module | |
Kanban | Integrate with the Kanban Module | |
People | Use as activity for certification | |
Advanced Settings Section
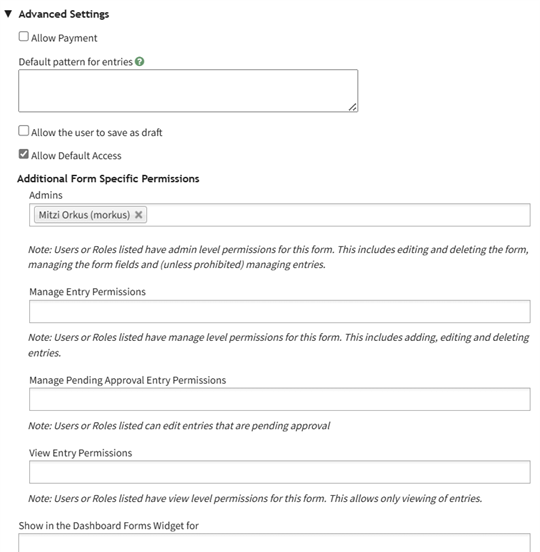
New Form Modal: Advanced Settings Section Explanation | ||
Modal Inputs | Explanation | |
Allow Payment Checbox (Expands when selected) | Payment Profile | Select “All Enabled Configurations” from the dropdown menu for payments to be allowed. |
Payment Description | This description is what will show on a payment receipt. | |
Default Pattern for Entries | This textbox uses mail merge fields. | |
Allow the User to Save AS Draft Checkbox (Expands when selected) | Allow Logged Out User to Save as a Draft | Selecting this checkbox will allow logged out users and public entries to save their response as a draft and come back to the form (on the same device). |
Validate Fields when Saving as Draft | Fields with validation don’t validate on a draft, so inputting fields here tells the system to validate fields when the draft is saved. | |
Save Draft Button Text | The form creator can customize the text on the Save button. | |
Auto Save | When auto-save is enabled, any edits made to a field will automatically be saved. When auto-save is disabled, the information will only be saved when the save draft button is clicked. | |
Allow Default Access Checkbox | When Selected | The form will follow module level permissions in regards to what access an individual will have. |
If allow default access is not selected, the additional form specific permissions are now required. The system will ignore module level distinctions for this form and will be guided by the form specific permissions listed below. | ||
Admins | A checkbox allows for admins to be prohibited from viewing entries. Users or roles listed here will have admin level permissions for this form. This includes editing and deleting the form, managing the form fields and (unless prohibited) managing entries. | |
Manage Entry Permissions | Users or roles listed here have manage level permissions for this form. This includes adding, editing and deleting entries. | |
Manage Pending Approval Entry Permissions | Users or roles listed here can edit entries that are pending approval. | |
Show in the Dashboard Forms Widget | Users and certification roles selected here will show this form in the Dashboard Forms Module Summary Widget. | |
Form Styling Section

New Form Modal: Form Styling Section | ||
Modal Inputs | Explanation | |
Save Button Text | Change the verbiage on the save button by inputting other text here. | |
Cancel Button Text | Change the verbiage on the cancel button by inputting other text here. | |
Submission Message | Change the verbiage on the form submission message by inputting other text here. | |
Show Green Checkmark Checkbox | Selecting the show green checkmark with submission message checkbox will show a green checkmark to the left of the submission message when a form is submitted. | |
Show the Form Title Checkbox | Select the Show the Form Title Checkbox will show the form title for a logged-out entry. This does not impact a system, modal based entry. | |
Apply Whole Form SCSS to | Logged Out Only | Select “Logged Out Only” if the styling doesn’t correspond with a popup modal or the regular form page. This would result is SCSS styling only applies to public entries. |
Logged In Only | Select “Logged In Only” if you only want to apply the SCSS formatting to the logged in, internal users. | |
Always | Selecting “Always” applies the SCSS formatting that has been established in both internal and external forms. | |
SCSS for Whole Form | This is the textbox where scripting language should be input, that allows for greater customization than what is generally available. | |
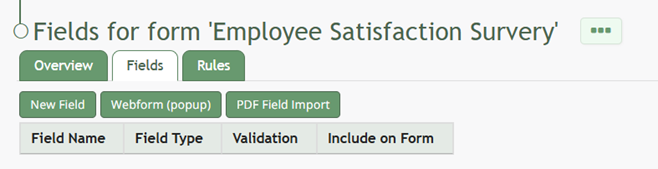
Select the Save button on the New Form Modal after customizing your form and the system will direct you to the form's Fields Tab where you can begin to input Form fields.
How To: Import Fields from a PDF Field Import
{{@400}}
How To: Import Form Fields from a CSV File
{{@402}}
How To: Upload a PDF Form
{{@408}}