Dispatch Details Page
Each dispatch has its own Dispatch Details Page.
Any relevant users, certification roles, documents, assets, actions, reports or forms can be added to an individual dispatch. This information is compiled to generate the read-only Dispatch Order PDF.
The header of the Dispatch Details Page states the Dispatch ID number, title, and status. If approval is pending for the dispatch, it will be indicated here. To the right of the status are icons that serve as action quick links. Any tags associated with the Dispatch are displayed to the right of the icons.
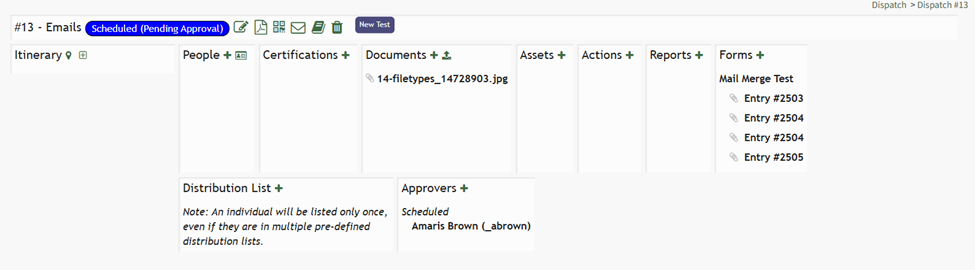
There are ten possible sections that can be utilized on a dispatch. A description of each section is included in the table below.
Dispatch Detail Page Section Explanations | |||||||||||
Section | Explanation | ||||||||||
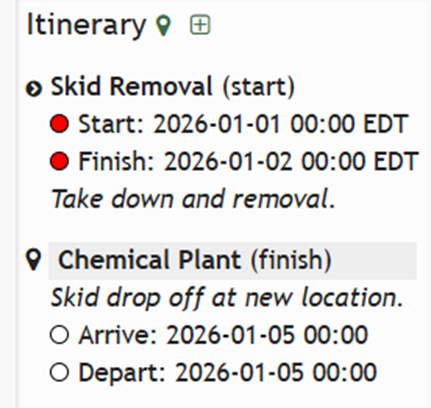
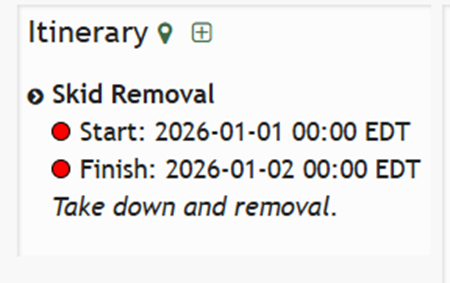
Itinerary | The itinerary section can be added to the dispatch details page, outlining any activity and waypoints associated with the dispatch. How To: Add a Waypoint to an ItineraryTo add a waypoint to a dispatch itinerary, open the specific dispatch whose itinerary you wish to edit by adding a waypoint. Go to the Dispatch Module Home Page and alter the filter view as needed. Click the Dispatch Number or Title to open the specific dispatch page.
This opens the Dispatch Details Page.
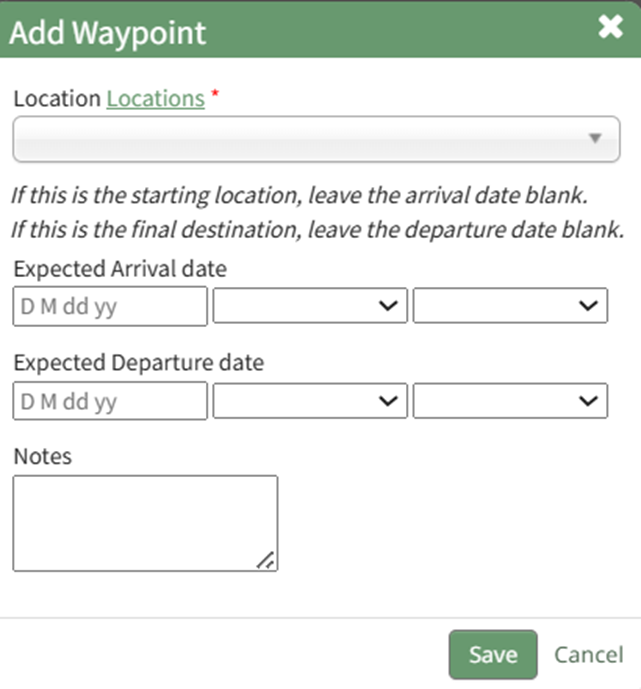
Select the location icon to the right of the Itinerary header, opening the Add Waypoint Modal.
Select a specific location from the Waypoint Location from the dropdown menu or select on-off location if applicable. If one-off is selected, the modal expands so the specific location can input into a textbox. If this waypoint is the starting location or final destination, leave the arrival date / departure date blank. Customized locations can be added to the dropdown menu by clicking the “Locations” clickable link. This opens the Locations Database in the Database Module. WIKI LINK HOW TO ADD DISPATCH LOCATIONS TO THE LOCATIONS DATABASE FORM Include the expected arrival date, departure date, and any notes relevant to the waypoint. Select the “Save” button and the new waypoint now shows on the itinerary.
How To: Add an Activity to a Dispatch ItineraryTo add an activity to the dispatch itinerary, go to the Home Page of the Dispatch Module. Click the ID or Title of the specific dispatch you wish to add an activity to.
This opens the Dispatch Details Page.
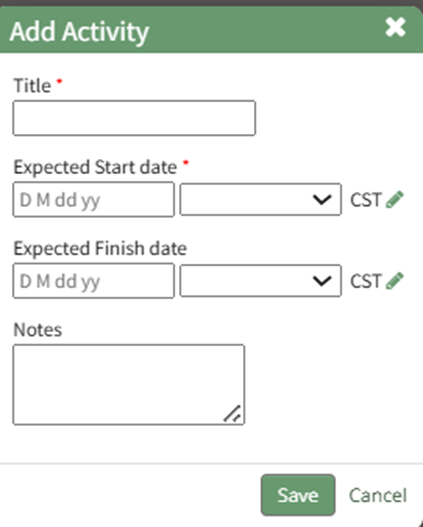
Select the plus sign box icon to the right of the Itinerary header, opening the Add Activity Modal.
Input the new activity title, expected start and finish dates, as well as any relevant activity note. Selecting the pencil icon will allow you to edit time zones as needed. Select “Save” and the Activity now shows on the Dipatch Details Page.
| ||||||||||
People | People can be added to the dispatch details page. How To: Add People to a DispatchTo add people to a dispatch, open the specific dispatch you wish to add people to. Go to the Dispatch Module Home Page and alter the filter view as needed. Click the Dispatch Number or Title to open the specific dispatch details page.
People can be added to a dispatch by selecting the plus sign icon to the right of the People column header or by selecting the identification icon. Selecting the identification icon will allow you to add people through their certification role.
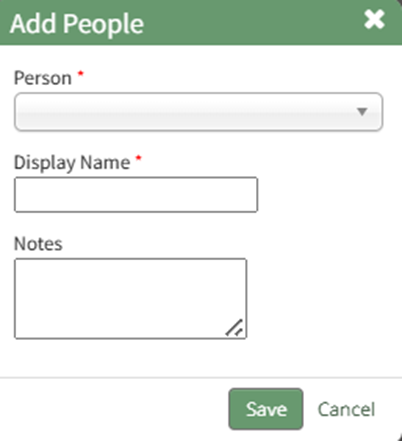
To Add People to a Dispatch through PeopleSelect the plus sign to the right of the People Section header. This opens the Add People Modal.
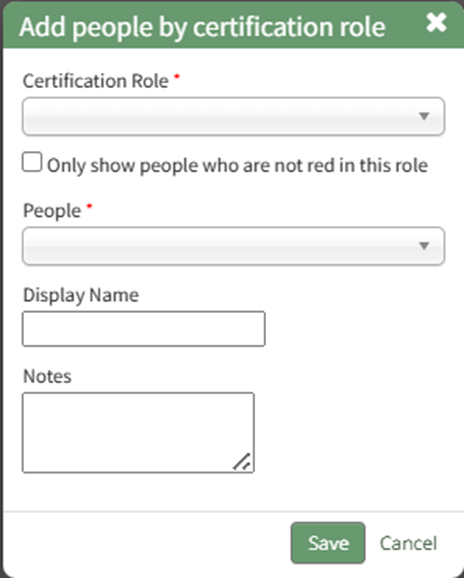
Select the KAStrack user to be added to the dispatch from the dropdown menu. There is an External User option if the individual is a not a KAStrack user. The system will automatically input the First , Last and username as the Display Name. This can be edited. Add any notes regarding the user being added to the dispatch as desired. Select “Save” and the user is added to the dispatch page. To Add People to a Dispatch through their Certification RoleTo add people to a dispatch through a certification role, select the identification card Icon to the right of the plus sign in the People Column. This opens the Add People by Certification Role Modal.
First, select the desired Certification Role from the dropdown menu. Selecting the checkbox will only show people who are not red in this role. The People associated with the selected certification role will now be displayed in the the People dropdown menu. The Display Name will auto populate with the First, Last, and username of the individual. Edit as desired to indicate the display name and add relevant notes. Select “Save” and return to the dispatch page. Once added, hovering your cursor over the displayed name shows icons that open the individual user page, that edit the People attachment, and delete the People attachment from the dispatch details. | ||||||||||
Certifications | Certifications that are added to the dispatch details page shows the compliance status of all people that have been added for that particular dispatch with respect to the certification. How To: Add Certifications to a DispatchTo add certifications to a dispatch, open the specific dispatch you wish to add certifications to. Go to the Dispatch Module Home Page and alter the filter view as needed. Click the Dispatch Number or Title to open the specific dispatch details page.
Certifications can be added to a dispatch by selecting the plus sign icon to the right of the Certifications column header.
This opens the Add Certifications Modal.
Certifications can be selected from the dropdown menu. Edit the display name as desired, and add any notes relevant to the certification. Select “Save” and the certification now shows on the dispatch. | ||||||||||
Documents | Documents can be added to the dispatch details page. How To: Add KAStrack Documents Module Files to a DispatchTo add documents to a dispatch, open the specific dispatch you wish to add documents to. Go to the Dispatch Module Home Page and alter the filter view as needed. Click the Dispatch Number or Title to open the specific dispatch details page.
Documents can be added to a dispatch by selecting the plus sign icon to the right of the Documents column header.
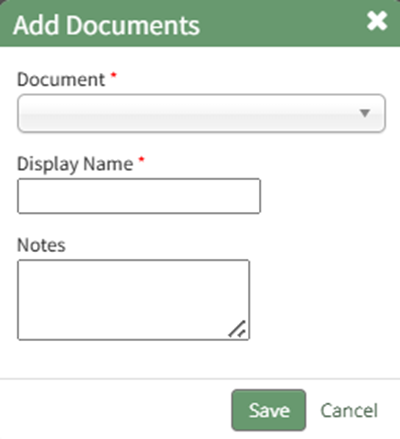
This opens the Add Documents Modal.
Select the appropriate document to be added to the dispatch from the drop-down menu. Only the documents the user has permissions to view and access will be displayed. Edit the display name as desired and input any notes regarding the document. Select the “Save” button and the document will be added to the dispatch. Once added, hovering your cursor over the displayed name shows icons that view the attached file, that edit the Documents attachment, and delete the Documents attachment from the dispatch details. | ||||||||||
Assets | Assets can be added to the dispatch details page. WIKI LINK HOW TO ADD ASSETS TO A DISPATCH | ||||||||||
Actions | Actions can be added to the dispatch details page. WIKI LINK HOW TO ADD ACTIONS TO A DISPATCH | ||||||||||
Reports | Reports can be added to the dispatch details page. WIKI LINK HOW TO ADD REPORTS TO A DISPATCH | ||||||||||
Forms | Forms can be added to the dispatch details page. WIKI LINK HOW TO ADD FORMS TO A DISPATCH | ||||||||||
Distribution List | Users and certification roles can be added to the dispatch distribution list. WIKI LINK HOW TO ADD DISTRIBUTION LISTS TO A DISPATCH Pre-defined Distribution Lists can be created on the Settings Page of the Dispatch Module and added to the dispatch. WIKI LINK HOW TO CREATE A PRE-DEFINED DISTRIBUTION LIST | ||||||||||
Approvers | Approvers can be added to a dispatch and approval can be required for any dispatch status change. WIKI LINK HOW TO ADD APPROVERS TO A DISPATCH Once added, hovering your cursor over the displayed name shows icons that edit and delete the approver attachment to the dispatch details. | ||||||||||


An explanation of all icons used on the Dispatch Details Page are included in the table below.
Dispatch Detail Page Icon Explanations | ||
Location | Icon / Option | Explanation |
Header Row |
| Selecting the edit icon from the header row will open the Edit Dispatch Modal where the dispatch title, tags, status, and incident viewing privileges can be edited. WIKI LINK HOW TO EDIT A DISPATCH |
Header Row |
| Selecting the flag icon will open the Update Itinerary Modal, which can be used to mark a waypoint as departed or arrived. WIKI LINK HOW TO UPDATE WAYPOINT ARRIVAL / DEPARTURE IN A DISPATCH |
Header Row |
| Selecting the PDF icon will open a View Document Modal showing the Dispatch Order. The Dispatch Order can be downloaded and printed from this modal. WIKI LINK HOW TO VIEW A DISPATCH ORDER |
Header Row |
| Selecting the QR Code icon will open the QR Code Modal. WIKI LINK HOW TO ACCESS A DISPATCH QR CODE |
Header Row |
| Selecting the envelope icon will open the Send Communications Page in the Communications Module. The individuals in the distribution list have been input into the To: field and the specific Dispatch Orders are attached. WIKI LINK HOW TO SEND A DISPATCH ORDER |
Header Row |
| Selecting the book icon will open the Dispatch Log which provides a record with a date and time stamp for any user activity in the dispatch. WIKI LINK HOW TO ACCESS A DISPATCH LOG |
Header Row |
| Selecting the trashcan icon will open the Dispatch Delete Confirmation Modal, which states the dispatch title as asks for confirmation before permanent deletion. WIKI LINK HOW TO DELETE A DISPATCH |
The following icons are displayed in the individual dispatch details sections. | ||
Itinerary |
| Selecting the Location Icon to the right of the Itinerary Section header opens the Add Waypoint Modal, allowing waypoints to be added to the dispatch itinerary. The location icon to the left of a waypoint title indicates the information pertains to a waypoint and not a dispatch activity. WIKI LINK HOW TO ADD A WAYPOINT TO AN ITINERARY |
Itinerary |
| Selecting the plus sign box icon in the Itinerary Section opens the Add Activity Modal, allowing for an activity to be added to the dispatch itinerary. WIKI LINK HOW TO ADD AN ACTIVITY TO A DISPATCH ITINERARY |
Itinerary |
| The dark right arrow icon to the left of an activity title indicates an incident free dispatch activity. |
Itinerary |
| The yellow right arrow icon to the left of an activity title indicates that there was an incident with a dispatch activity. WIKI LINK HOW TO INDICATE A DISPATCH ACTIVITY |
Itinerary |
| Selecting the clock icon in the to the right of an activity in the Itinerary section open the Edit Activity Status Modal, allowing the expected start and finish date/times to be updated to actual start and finish date/times. Selecting the clock icon to the right of a waypoint in the Itinerary Sections opens the Edit Waypoint modal, allowing expected arrival and departure date/times to be updated with actual arrival and departure date / times. WIKI LINK HOW TO UPDATE ESTIMATED ACTIVITY STATUS WITH ACTUALS WIKI LINK HOW TO INDICATE A DISPATCH INCIDENT |
All Sections |
| To the right of each section header is a plus sign icon. Selecting the plus sign icon opens the Add Modal, allowing additional entries to be added to each section. People, Certifications, Documents, Assets, Actions, Reports, and Forms can all be attached to a dispatch on the Dispatch Details Page. WIKI LINK HOW TO ADD PEOPLE TO A DISPATCH, ADD CERTIFICATIONS TO A DISPATCH, ADD DOCUMENTS TO A DISPATCH, ADD ASSETS TO A DISPATCH, ADD ACTIONS TO A DISPATCH, ADD REPORTS TO A DISPATCH, ADD FORMS TO A DISPATCH The plus sign icon is also used to add distribution lists and approvers to a dispatch. WIKI LINK HOW TO ADD PRE-DEFINED DISTRIBUTION LISTS TO A DISPATCH, ADD APPROVERS TO A DISPATCH |
All Sections |
| Selecting the edit icon to the right of an attachment name will open a modal to edit the specific attachment. WIKI LINK HOW TO EDIT A DISPATCH ATTACHMENT |
All Sections |
| Selecting the trashcan icon to the right of an attachment name will open a modal to delete that specific attachment. WIKI LINK HOW TO DELETE A DISPATCH ATTACHMENT |
All Sections |
| The light gray paperclip icon indicates that the document attached to the dispatch details page will be included via a QR code in the Dispatch Orders. |
All Sections |
| The dark paperclip icon indicates that the document attached to the dispatch details page will be appended at the end of the Dispatch Orders. WIKI LINK HOW TO INCLUDE DOCUMENT ATTACHMENTS IN DISPATCH ORDERS This can cause the dispatch order page length to increase significantly |
All Sections |
| The information icon indicates that there is additional information available. Click on the icon to see the additional message. |
People Section |
| The identification icon opens the Add People by Certification Role Modal, allowing for an additional method to add individuals to a dispatch. WIKI LINK HOW TO ADD PEOPLE TO A DISPATCH |
People Section |
| Selecting the people icon will open the user page (in the People Module) of the individual attached to the dispatch details page. |
Certifications Section |
| Selecting the eyeball icon in the Certifications Section will open the Certification Status modal, which uses the People Module Certification and Competency Legend to designate the certification status. WIKI LINK PEOPLE MODULE CERTIFICATION STATUS LEGEND |
Documents Section |
| Selecting the upload icon in the Documents section will open the Add New File Modal so that the file can be attached to the dispatch. WIKI LINK HOW TO UPLOAD A FILE AS A DISPATCH DOCUMENT |
Documents Section |
| Selecting the eyeball icon in the Documents Section opens the File Viewer Modal, providing access to the files directly from the Dispatch Display Page. |
To the right of an asset attachment is the three-dot icon which opens the Assets Section Context Menu. | ||
Assets Section | Go To Asset | Selecting "Go To Asset" on the Asset Section context menu opens the asset's Manage Assets Components Page. |
Assets Section | Enter Meter Readings | Selecting "Enter Meter Reading" on the Asset Section context menu opens the Asset Meter Modal, allowing a meter reading to be input directly in the Dispatch Module. WIKI LINK HOW TO UPDATE A METER READING |
Assets Section | Report Fault | Selecting "Report Fault" on the Asset Section context menu opens the Asset Fault Modal, allowing a fault to be reported for an asset directly in the Dispatch Module. WIKI LINK HOW TO REPORT A FAULT |
Assets Section | Edit Attachment | Selecting "Edit Attachment" on the Asset Section context menu opens the Edit Assets Modal, allowing an asset's display name to be edited and relevant asset notes to be included. WIKI LINK HOW TO EDIT A DISPATCH ATTACHMENT |
Assets Section | Delete Attachment | Selecting "Delete Attachment" on the Asset Section context menu opens the Asset Deletion Confirmation Modal which states, "Are you sure you want to remove ASSET NAME?" |
Assets Section |
| To the left of the Asset attachment's displayed name is the Asset Task Status icon, which uses the Asset Task Status Legend to visually communicate the asset's status. |
Actions Section |
| Selecting the Page Icon in the Actions Section opens the New Action Group from Template Modal, allowing new action groups to be created from pre-defined templates. WIKI LINK HOW TO CREATE NEW ACTION GROUPS FROM TEMPLATE |
Reports Section |
| Selecting the triangular Play Icon in the Reports Section runs the report and opens it in the Reports Module. |
Forms Section |
| Selecting the Clipboard Icon in the Forms Section opens the Add Form Entry Modal, allowing a form entry to be submitted directly in the Dispatch Module. |
Forms Section |
| Selecting the PDF Icon to the right of a form entry opens the View Entry Modal which will display the Entry PDF directly in the Dispatch Module. |