Complete List of Calendar Module How Tos
How To: Create a New Calendar Event
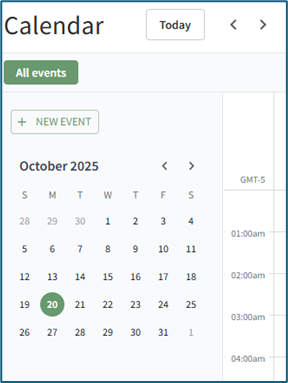
To create a new calendar event, open the Home Page of the Calendar Module.

Select the “New Event” button on the left-hand side above the mini-monthly calendar view.
This opens the New Event Modal.
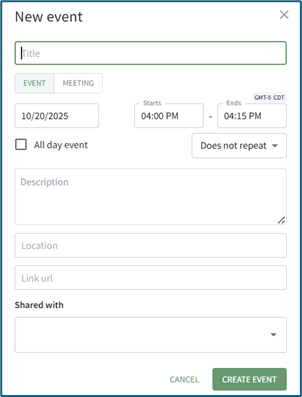
Input the title of the new event.
Select whether the new event is an event or meeting.
The selected value will be indicated by green text and a lightly filled background.
Select the calendar icon in the date field, opening a calendar modal. Select the date of the meeting/event.
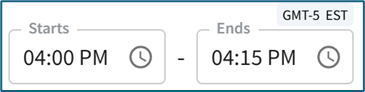
Input a start and end time.
The time zone is indicated above the end time.
Select the checkbox if the meeting / event takes place all day.

Use the dropdown menu to indicate if the meeting/event does not repeat, repeats daily / weekly / monthly / yearly, or every weekday.
Input a meeting / event description, location, and include a URL Link if relevant.
The meeting / event can be shared by selecting an individual, an access level, or a certification role. Users selected here will then be able to see the meeting / event on their Calendar,
Select the “Create Event” button, and the event will now show on the calendar.
How To: Create a New Calendar Filter
The Calendar Home Page has one default filter, All Events, that includes all meetings, events, assets, and documents available to the user on the calendar. The default filter shows below the Calander header.

Making any changes from the current view of the filter you are currently using will allow you to save a new filter. Examples of changes that can be made include de-selecting a filter checkbox below the mini-month calendar view or by clicking the filter icon to the right of the Events Calendar and de-selecting options, such as Meetings Shared With Me.

Select the “+ Save Filters” button to create a new calendar filter, opening the Save Filters Selection Modal.
You can also select the “+” icon to the right of the existing calendar filters to open the Save Filters Selection Modal.

Select the “Confirm” button, and the new filter view now shows on the Home Page.

How To: Create a New Module Level (Calendar Module)
To create a customizable module level in the Calendar Module, go to the Module Level Tab on the Settings Page.

Select the “New Module Level” button opening the New Module Level Modal.

Input the new Module Level Name.
Select “Save and the new Module level will show on the Module Level Table.

Users can select which permissions are allowed for a customized module levels.
Module Level Customization Icons | |
Icon | Explanations |
| The eyeball icon allows you to view users assigned to the module level as well as the permissions assigned to them. |
| The bulleted list icon allows you to assign permissions to customized module levels. |
| The pencil icon opens the Edit Module Level Modal. |
| The trashcan icon opens the Delete Module Level Confirmation Modal. |


Select the Permissions icon to assign permissions to the new Module Level within the Calendar Module by selecting the appropriate checkboxes.

Select “Save” and the permissions are now assigned to the Module Level.
Access levels for all modules can also be managed in the Site Settings Module on the Access Levels Tab.
How To: Delete a Calendar Filter
To delete a calendar filter, go to the Home Page of the Calendar Module. All existing filters show in a horizontal row under the calendar header.

Select the edit icon above the calendar. The edit filter icon is located on the far right of the horizontal row of existing filters.
Calendar Filter Icon Explanations | |
Icons | Explanations |
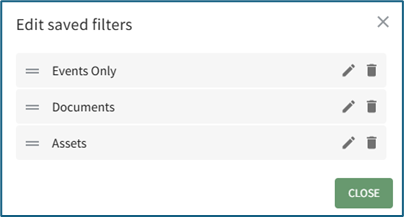
| Selecting the edit filter icon will open the Edit Saved Filters Modal, where filters can be accessed for editing or deletion. |
| The pencil icon shows on the Edit Saved Filters Modal. Selecting it will allow an individual to edit the filter name. |
| The trashcan icon shows on the Edit Saved Filters Modal. Selecting it will allow an individual to delete the filter. |
| The drag and drop icon shows on the Edit Saved Filters Modal. Selecting it will allow an individual to drag and drop the filters into their preferred order that will impact the order shown on the calendar. |
The edit filter icon opens the Edit Saved Filter Modal.
Selecting the trashcan icon opens the Delete Saved Filter Confirmation Modal.

The modal states, “Are you sure you want to delete (Filter Name)?”
Click the “Confirm” button to delete the filter and return to the calendar Home Page.
How To: Edit a Calendar Filter
To edit a calendar filter, go to the Home Page of the Calendar Module. All existing filters show in a horizontal row under the calendar header.

Select the edit icon above the calendar. The edit icon is located on the far right of the horizontal row of existing filters.
Calendar Filter Icon Explanations | |
Icons | Explanations |
| Selecting the edit filter icon will open the Edit Saved Filters Modal, where filters can be accessed for editing or deletion. |
| The pencil icon shows on the Edit Saved Filters Modal. Selecting it will allow an individual to edit the filter name. |
| The trashcan icon shows on the Edit Saved Filters Modal. Selecting it will allow an individual to delete the filter. |
| The drag and drop icon shows on the Edit Saved Filters Modal. Selecting it will allow an individual to drag and drop the filters into their preferred order that will impact the order shown on the calendar. |
The edit icon opens the Edit Saved Filter Modal.

Selecting the pencil icon allows for changes to be made to the filter name.

Make the desired changes to the filter name, and then select the check mark to save the edits.
Click “Close” to return to the calendar Home Page.