Manage Assets Page
Selecting Manage Assets in the Assets Module from the Main Menu opens the Manage Assets Page. The Manage Assets Page in the Assets Module is where assets, components, and task schedules can be created and managed.
The visibility of this page is determined by a user's access level. By default, only individuals with Admin Module Level permissions for the Assets Module will have the ability to manage all assets.
The Manage Assets Table includes all the assets that have been created in your organization and displays the asset/component title, serial number, associated meters, tags, and the asset status. A filter box gives the ability to search by title or tag for active assets. Checkboxes allow for the inclusion of archived or out of service assets/components.
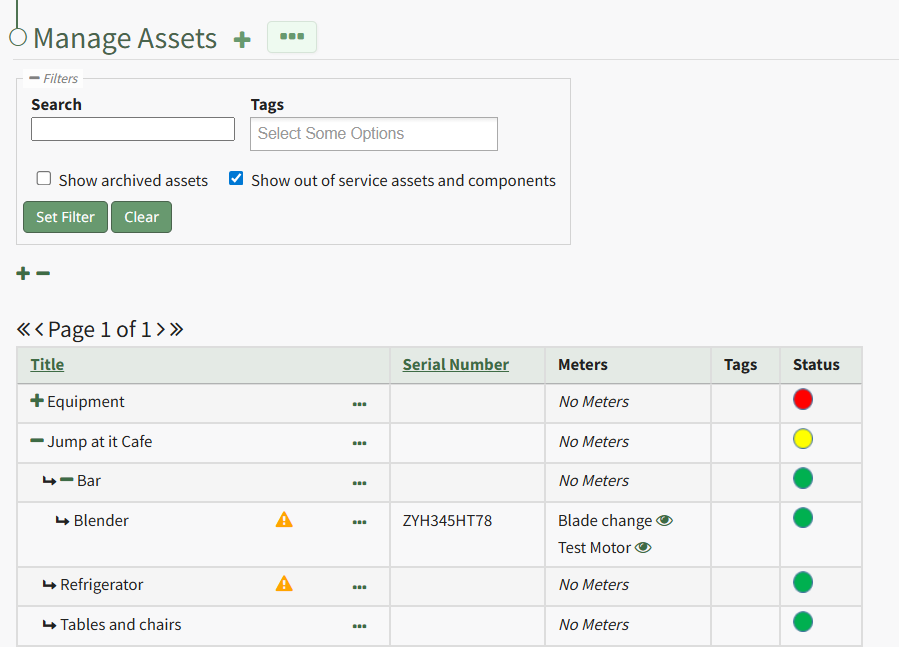
Clicking the plus sign icon to the right of the Manage Assets header will open the New Asset Modal, used in the creation of new assets.
The three-dot icon to the right of the Manage Assets Page header opens the Manage Assets context menu with options for asset management. The Manage Assets Page Context Menu options are explained in the table below.
Manage Assets Page Context Menu Option Explanations | |
Option | Explanation |
Run Report | Selecting “Run Report” from the context menu open the Assets Report Modal, allowing the user to select between five customizable Asset Reports. Reports can be run for an asset in its entirety, or for specific components. Reports can be viewed as a KAStrack Report, PDF, or Excel document. How To: Run an Asset Report{{@768}} |
Create Asset | Selecting "Create Asset" from the context menu opens the New Asset Modal which is used in the creation of a new asset. How To: Create a New Asset{{@474}} |
Export Assets | Selecting “Export Assets” on the context menu allows the user to export all asset data to a . How To: Export Asset Information{{@487}} |
Import Assets | Selecting “Import Assets” from the context menu opens the Import Assets Modal, which allows asset details to be imported into KAStrack for efficiency. A template has been provided for ease in uploading data. Import Asset Information{{@486}} |
Bulk Assign / Unassign Assets | Selecting “Bulk Assign/Unassign Assets” from the context menu opens the Bulk Assign/Unassign Page. This allows an account administrator to assign assets in bulk to individual users or via certification roles. How To: Bulk Assign / Unassign Assets{{@485}} |
To the right of each asset/component title in the Manage Assets Table is a three-dot icon that, when clicked, opens the Asset Management Context Menu. The options on that context menu are explained in the table below.
Asset Management Context Menu Option Explanations | |
Option | Explanation |
Complete Task | Selecting “Complete Task” on the context menu opens the Complete Task Modal, allowing a user to record necessary details and mark the task as complete. How To: Log a Task has been Completed{{@484}} |
Record Fault | Selecting “Record Fault” on the context menu opens the Record Fault Modal, allowing a user to record any necessary details about a fault. How To: Record a Fault{{@483}} |
Update Meter Reading | Selecting “Update Meter Reading” on the context menu opens the Update Meter Reading Modal, allowing a user to record details regarding a meter reading. How To: Update a Meter Reading{{@482}} |
Task Schedule | Selecting "Task Schedule" on the context menu opens an asset's Task Schedule, where new tasks can be added and existing tasks can be managed. How To: View an Asset's Task Schedule{{@776}} |
Run Report | Selecting “Run Report” from the context menu open the Assets Report Modal, allowing the user to select between five customizable Asset Reports. How To: Run an Asset Report{{@768}} |
History | Selecting “History” from the context menu opens the Asset History Page with historical entries for the components/ How To: View an Asset's Historical Logs{{@766}} |
Files | Selecting “Files” from the context menu will open the Files Modal and display any files attached to the asset or component. Only users with appropriate permissions will be able to access files associated with an asset or task. How To: View Files Associated with an Asset/Component{{@777}} |
Edit | Selecting "Edit" on the context menu opens the Edit Asset Modal, which is used to alter asset details. How To: Edit an Asset{{@773}} |
Manage Assignments | Selecting "Manage Assignments" on the context menu opens the Asset Assignments Modal which allows individual users and certification roles to be assigned to an asset. How To: Assign / Unassign Users and Certification Roles to an Asset{{@771}} |
Add Component | Selecting "Add Component" on the context menu opens the New Component Modal, which allows new components to be added to an asset. How To: Add Components to a Parent Asset{{@475}} |
Manage Components | Selecting “Manage Components” from the context menu will open the Manage Asset Components Page where assets and their components can be managed. Only users with appropriate permissions will have access to this page. |
Duplicate | Selecting "Duplicate" on the context menu opens the Copy Asset Modal that allows you to rename the asset before copying. How To: Copy and Rename an Asset{{@772}} |
Move | Selecting "Move" on the context menu opens the Move Asset Modal, allowing you to move an asset/component under another asset/component. How To: Move an Asset/Component under Another Asset/Component{{@774}} |
View | Selecting “View” from the context menu opens an Asset Summary Modal with a summary of the asset/component information. The read-only modal displays details, any associated meters, How To: View an Asset's Summary Modal{{@765}} |
PDF Sheet | Selecting "PDF Sheet" on the context menu opens a PDF Copy of an Asset Data Sheet in a new widow. How To: Access and Asset's PDF Data Sheet{{@769}} |
QR Code | Selecting "QR Code" on the context menu opens the Asset QR Code modal, which displays the QR Code associated with the Asset that when scanned will link a user to asset details. How To: Access an Asset's QR Code{{@770}} |
Manage Meters | Selecting "Manage Meters" on the context menu opens the Asset Meter Modal which lists all meters associated with the asset and allows for new meters to be created. How To: Add a Meter to an Asset{{@495}} |
Cost / Time Summary | Selecting "Cost / Time Summary" on the context menu opens the Cost and Time Summary Modal. How To: View an Asset's Cost / Time Summary{{@775}} |
Archive | Selecting "Archive" on the context menu opens the Archive Confirmation Modal which states, "Are you sure you want to archive this asset? This will also archive any components." How To: Archive an Asset or Component{{@498}} |