An Asset's Task Schedule Page
Each asset created in KAStrack will have it own Task Schedule Page which displays an asset's Task Schedule in tabular format. Tasks are added to an asset and managed from this page.
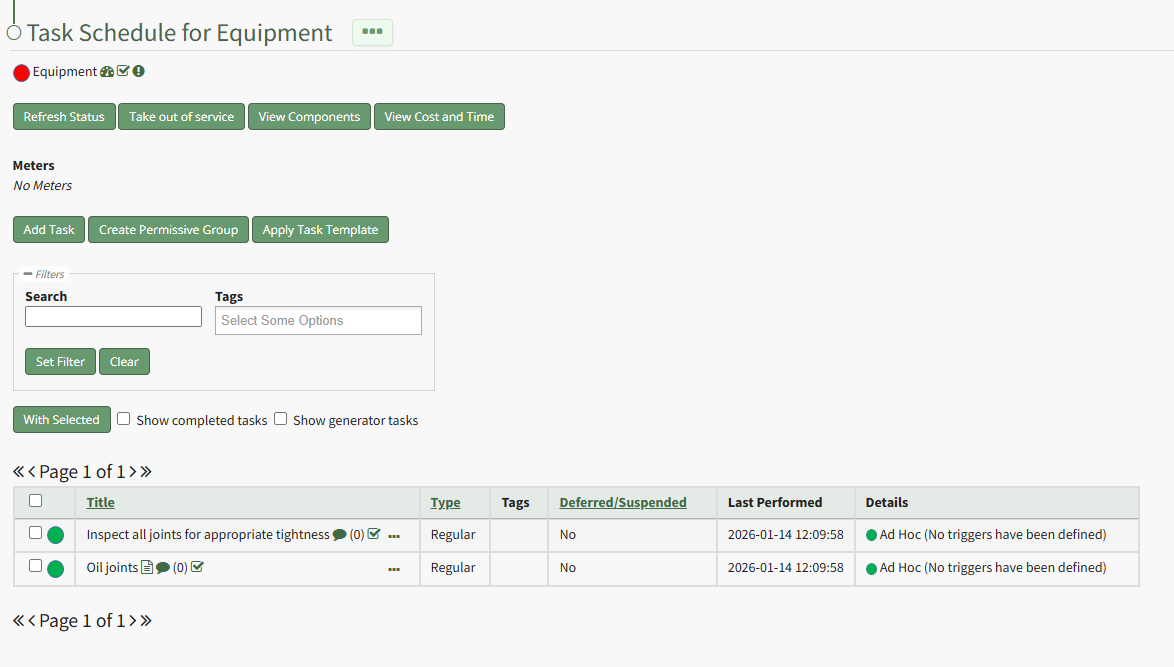
To the right of the Task Schedule Page header is three-dot icon that when clicked, opens the Task Schedule Page Context Menu with options for quick actions. Each of the possible Task Schedule Page Context Menu options are explained in the table below.
Task Schedule Page Context Menu Option Explanations | |
Option | Explanation |
Complete Task | Selecting “Complete Task” on the context menu opens the Complete Task Modal, allowing a user to record necessary details and mark the task as complete. WIKILINK HOW TO: LOG A TASK HAS BEEN COMPLETED |
Record Fault | Selecting “Record Fault” on the context menu opens the Record Fault Modal, allowing a user to record any necessary details about a fault. WIKILINK HOW TO: RECORD A FAULT |
Update Meter Reading | Selecting “Update Meter Reading” on the context menu opens the Update Meter Reading Modal, allowing a user to record details regarding a meter reading. WIKILINK HOW TO: UPDATE A METER READING |
Run Report | Selecting “Run Report” from the context menu open the Assets Report Modal, allowing the user to select between five customizable Asset Reports. WIKILINK MY ASSETS DROPDOWN MENU RUN REPORT |
History | Selecting “History” from the context menu opens the Asset History Page with historical entries for the components/subcomponents that were selected. The Asset History Page contains four historical logs - tasks completed, tasks deferred, as well meter and fault logs. WIKILINK VIEW AN ASSET'S HISTORICAL LOGS |
Edit | Selecting "Edit" on the context menu opens the Edit Asset Modal, which is used to alter asset details. WIKILINK HOW TO EDIT AN ASSET |
Manage Assignments | Selecting "Manage Assignments" on the context menu opens the Asset Assignments Modal which allows individual users and certification roles to be assigned to an asset. WIKILINK HOW TO ASSIGN/UNASSIGN USERS AND CERTIFICATION ROLES TO AN ASSET |
Add Component | Selecting "Add Component" on the context menu opens the New Component Modal, which allows new components to be added to an asset. WIKILINK HOW TO CREATE ASSET COMPONENTS/SUB-COMPONENTS |
Manage Components | Selecting “Manage Components” from the context menu will open the Manage Asset Components Page where assets and their components can be managed. Only users with appropriate permissions will have access to this page. |
In addition to the search and tag filters, checkboxes allow you to customize your Task Schedule view allowing you to include/exclude completed tasks and generator tasks. The Task Schedule Page has several icons. The actions associated with each icon are explained in the Task Schedule Icon Explanation Table below.
Task Schedule Page Icon Explanation Table | |
Icon | Meaning |
| Clicking the oedometer icon opens the Update Meter Reading Modal. This icon initiates the same action as the "Update Meter Reading" option on the Task Schedule Page Context Menu. WIKI LINK HOW TO UPDATE A METER READING |
| Clicking the checkbox icon is a quick link that opens the Complete Task Modal that is used to mark a task as completed and up to date. This icon initiates the same action as the "Complete Task" open on the Task Schedule Page Context Menu. WIKI LINK HOW TO LOG A TASK HAS BEEN COMPLETED |
| Clicking the exclamation point icon opens the Record Fault Modal that is used to indicate an issue with an asset. This icon indicates the same action as the "Record Fault" option on the Task Schedule Page Context Menu. WIKI LINK HOW TO RECORD A FAULT |
| When the page icon is visible in the Task Schedule Table, it is indicating that there is additional information available regarding the task. When the icon is clicked, an Additional Information Sections with notes appears. WIKI LINK HOW TO VIEW ADDITIONAL NOTES ASSOCIATED WITH A TASK |
| Clicking the task note icon opens a text box that allows a user to add interim notes to a task without completing the task . Any previously added interim notes for this task will show when the dialogue icon is clicked. WIKI LINK HOW TO ADD INTERIM NOTES TO A TASK WITHOUT TASK COMPLETION |
| The number within parenthesis indicates the number of interim notes that have been added to a task since the last completed maintenance. |
The Task Schedule Page contains several buttons that enable efficient task management. An explanation of each button on the Task Schedule Page has been included in the table below.
Task Schedule Buttons Explanation Table | |
Icon | Meaning |
Refresh Status | Clicking the Refresh Status button on the Task Schedule Page refreshes the status of the tasks shown on the Task Schedule Table processing any new task information since the page was opening. WIKI LINK HOW TO REFRESH THE TASK SCHEDULE TABLE |
Take Out of Service | Clicking the Take Out of Service button on the Task Schedule Page opens a Status Confirmation Modal which states, "Are you sure you wish to take this asset / component out of service?" WIKI LINK HOW TO TAKE AN ASSET OUT OF SERVICE |
View Components / Hide Components | Clicking the View Components button on the Task Schedule Page will expand the Task Schedule Table to include all tasks associated with a parent asset's components. The View Components button changes to a Hide Components button that will allow you to collapse the task schedule view. WIKI LINK HOW TO VIEW ALL COMPONENTS ON AN ASSET'S TASK SCHEDULE PAGE |
View Cost and Time | Clicking the View Cost and Time button on the Task Schedule Page opens an asset's Cost and Time Summary Modal, displaying the cost and time associated with the asset's tasks. An asset's components can be included in the summary. WIKI LINK HOW TO VIEW AN ASSET'S COST/TIME SUMMARY |
Add Task | Clicking the Add Task button on the Task Schedule Page opens the New Task Modal. WIKI LINK HOW TO ADD A TASK TO AN ASSET/COMPONENT |
Create Permissive Group | Clicking the Create Permissive Group Button on the Task Schedule Page opens the Permissive Task Group Modal. WIKI LINK HOW TO CREATE A PERMISSIVE TASK GROUP |
Apply Task Template | Clicking the Apply Task Template Button on the Task Schedule Page will open the Apply Task Template Modal. WIKI LINK HOW TO CREATE A NEW TASK TEMPLATE
|
With Selected | Clicking the With Selected button on the Task Schedule Page enables a user to complete or delete multiple tasks simultaneously. WIKI LINK HOW TO MARK MULTIPLE TASKS AS COMPLETE ON THE TASK SCHEDULE WIKI LINK HOW TO DELETE MULTIPLE TASKS SIMULTANEOUSLY ON THE TASK SCHEDULE
|
To the right of each task on the Task Schedule Table is three-dot icon that opens the Task Management Context Menu. The options available on that menu are explained in the table below.
Task Schedule Table Context Menu Option Explanation Table | |
Option | Associated Action |
Complete Task | Selecting Complete Task from the task schedule context menu opens the Complete Task Modal. WIKI LINK HOW TO LOG THAT A TASK HAS BEEN COMPLETED |
Task Files | Selecting Task Files from the task schedule context menu opens the Task Files Modal which displays files already attached to the task and can be used to upload new files or access files in the Asset Library. |
Defer Task | Selecting Defer Task from the task schedule context menu opens the Defer Task Modal, where a checkbox is utilized to mark a task as deferred. WIKI LINK HOW TO DEFER A TASK |
Edit Task | Selecting Edit Task from the task schedule context menu opens the Edit Task Modal, where key information regarding the task can be altered. WIKI LINK HOW TO EDIT A TASK |
View Details | Selecting View Details from the task schedule context menu opens the read-only Task Details Modal. WIKI LINK HOW TO VIEW TASK DETAILS |
Duplicate Task | Selecting Duplicate Task from the task schedule context menu opens the Copy Task Modal which allows you to rename the copied task before its creation. WIKI LINK HOW TO COPY AND RENAME A TASK |
Task History | Selecting Task History from the task schedule context menu opens open's the Asset History Page displaying the historical logs associated with that specific task. WIKI LINK HOW TO VIEW HISTORICAL LOGS FOR A SPECIFIED TASK |
Delete Task | Selecting Delete Task from the task schedule context menu opens the Delete Task Confirmation Modal which states, "Please confirm you wish to delete this maintenance." WIKI LINK HOW TO DELETE A TASK |