Tags Module
Tags: Introduction
Tags Module Summary
An Explanation of Tags
A list of the entities that can be tagged in KAStrack are shown in the Tag Association with Modules Table below.
Tag Association with Modules | |
Module | Associated Entities |
Actions | Actions, Action Groups |
Assets | Assets/Components, Tasks |
Attendance Log | Attendance Logs |
Communications | Communication Templates |
Courses | Courses |
Database | Databases, Database Entries |
Dispatch | Dispatches |
Documents | Documents, Folders |
Finance | Budgets |
Forms | Aggregations, Forms, Form Entries |
Grid | Grids |
Inventory | Inventories |
Kanban | Kanban |
People | Certifications, Companies**, Certification Roles ** |
Reports | Charts, Reports |
Most modules allow new tags to be created in the Tags dropdown menu when editing or creating new entities. ** Permissive and Restrictive Tags behave as open Tags for these entities. | |
Understanding Tag Behavior
Tag behavior determines which individuals have access to entities and information within KAStrack. There are three types of tag behavior: open, permissive, and restrictive.
Tag Behavior | ||
Behavior | Explanation | |
Open | Open tags have no effect on who can view the data or entities associated with the tag. They allow an organization to categorize or filter the information by their associated tag. | |
Permissive | Permissive/restrictive tags control visibility constraints through users, certification roles, and/or access levels. They act as a security setting for the entity. Individuals assigned visibility are the only people who can see the entity and the tag. When a singular tag exists on an entity, there is no difference in the functionality of permissive and restrictive tags. Individuals assigned visibility from the tag will have access to the entity. | If an entity is assigned multiple permissive tags, the entity will be visible to anyone assigned visibility to any one of the permissive tags on the entity. The only tags that will be visible are the ones an individual is assigned to. |
Restrictive | If an entity is assigned multiple restrictive tags, the entity will only be visible to individuals that have been assigned visibility to EVERY restrictive tag on the entity. | |
If an entity is assigned a permissive and a restrictive tag, visibility is determined by the restrictive tag. An individual must have visibility of all assigned restrictive tags on an entity to see the entity. Visibility granted from a permissive tag is nullified by the presence of a restrictive tag.
You must include yourself when creating permissive or restrictive tags, otherwise they will no longer be visible to you. If this happens, you will need to contact your site admin or KAStrack technical support. | ||
** Companies and Certification Roles (in the People Module) do not honor permissive and restrictive tags. Any tags assigned to these entities will be treated as open tags, regardless of the assigned behavior. Certifications (in the People Module) DO honor permissive / restrictive tags. | ||
Tags: Module Pages
Search Tagged Page
The Search Tagged Page of the Tags Module allows the user to search through all entities within KAStrack to which tags have been assigned.
People cannot see tags that are not set as visible to them. The visibility of the filtered data or entities will honor the tag behavior.

To utilize the search feature on the Search Tagged Page, at least one tag must be selected from the Tags dropdown menu. Placing the cursor in the dropdown menu will open a list of all tags the user has been assigned visibility. The search, by default, will include all modules. By placing the cursor in the Modules dropdown menu, a user can select specific modules to limit their search to.
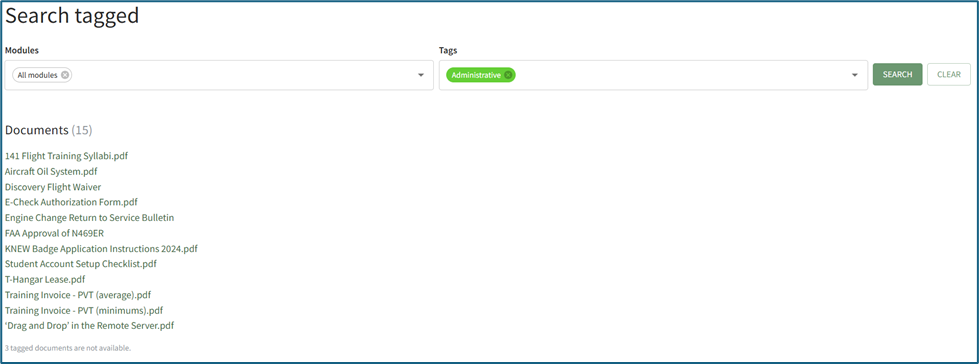
Search results will organize the entities tagged by module. All entities a user has visibility to will show as a clickable link that previews the entity selected or directs the individual to the entity in its associated module. The system will indicate the number of tagged entities not visible to an individual, but will not state what the entities are, indicating that there are entities that are assigned the searched tag that may be hidden by other tags or other privacy settings.
Manage Page
The Manage Page of the Tags Module is comprised of two tabs: Tags and Categories. New tags and new categories can be created, edited, and deleted from the Manage Page.
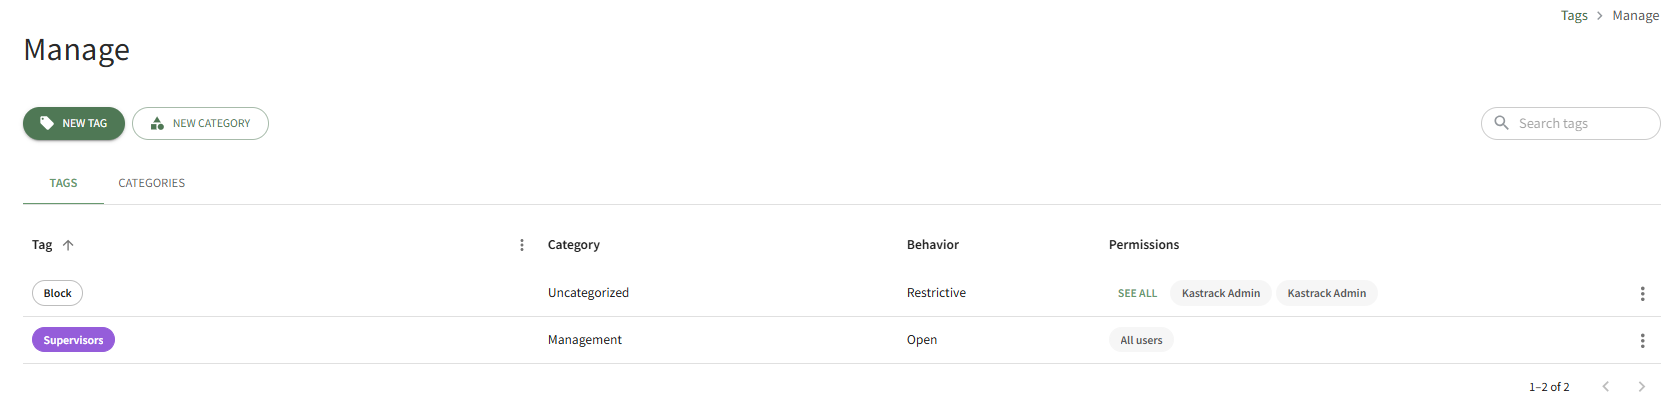
By default, in the Manage Tags tab, individuals with an Admin module level for the Tags Module or an Admin access level will see ALL tags, regardless of if they have been assigned visibility to them. This is an exception to the visibility rules associated with permissive and restrictive tags. This is the only page where they will be granted this exception.
How To: Create a New Tag in the Tags Module
To create a new tag in the Tags Module, go to the Manage Page in the Tags Module.

Select the “New Tag” button, visible from both the Tags and Category Tabs, opening the New Tag Modal.
You can also select “Add Tag” from the vertical icon context menu to the far right of a category on the categories tab, which prefills adding a new Tag to the chosen Category.

Input the name of the new tag into the title field.
Emojis may be used in the tag title.
Select the category for the new tag from the dropdown menu. All categories created will show, as well as an “uncategorized” option.
Categories determine the appearance of tags (their color and formatting).
Select the tag behavior (open, permissive, or restrictive) from the dropdown menu.
Select “Add Tag” and the new tag will show on the Tags List on the Tags Tab.
How To: Create a New Tag Category
To create a new category in the Tags Module, go to the Manage Page in the Tags Module.
Categories determine the appearance of tags. Any tags assigned to a category will have the same style and color as defined for the category in the category tab.

Select the “New Category” button, visible from both the Tags and Category Tabs, opening the New Category Modal.

Input the title of the new category into the textbox.
Select the style of the tag from the dropdown menu. The style options (filled, outline, and striped) are shown below.
Style Options | ||
Field | Outline | Striped |
|
|
|


Click on the color box to customize the color of the category.
KAStrack will generate a preview of a tag assigned the category at the bottom of the new category modal in the preview box.
Select “Add Category” and the new category will show in the Categories List on the Categories Tab.
Tag categories determine the appearance of tags (their color and formatting). The Categories Tab is home to the Categories List, that lists all tag categories with columns that show the category style and category color.
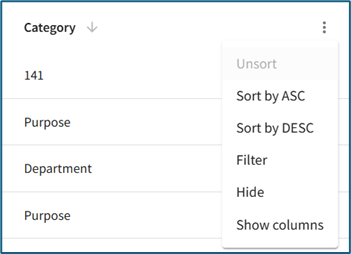
When the cursor hovers over the column header on the Tags List or the Categories List, an arrow and a vertical three dot icon appear.
Tag Behavior | |
Icon | Explanation |
| The up and down arrow icon impacts the alphabetical column sorting communicating if it is set to ascending or descending. |
| The vertical triple dot icon opens the tag table context menu that shows the following options: Sort by ASC, Sort by DESC, Filter, Hide, Show Columns |


The options on the Tag List Context Menu are explained in the Table below.
Tag and Category List Context Menu Option Explanations | |
Option | Explanation |
Sort by ASC | Selecting “Sort by ASC” will organize the data in that column from A to Z. |
Sort by DESC | Selecting “Sort by DESC” will organize the data in that column from Z to A. |
Filter | Selecting “Filter” opens a modal that allows an individual to customize the Tag List. Operator allows for the preferred method of filtering, and any value can be entered into the Value Field. |
Hide | Selecting “Hide” will remove the column from the Tag List. To see the column again, refresh the page. |
Show Columns | Selecting “Show Columns” opens a column header modal. The user has the ability to customize which column headers show on the Tags List. The user’s customized selections will remain in place until they are manually changed again through the Column Header modal or the page is refreshed. The “actions” option controls the visibility of the vertical dot icon that opens the context menu. |
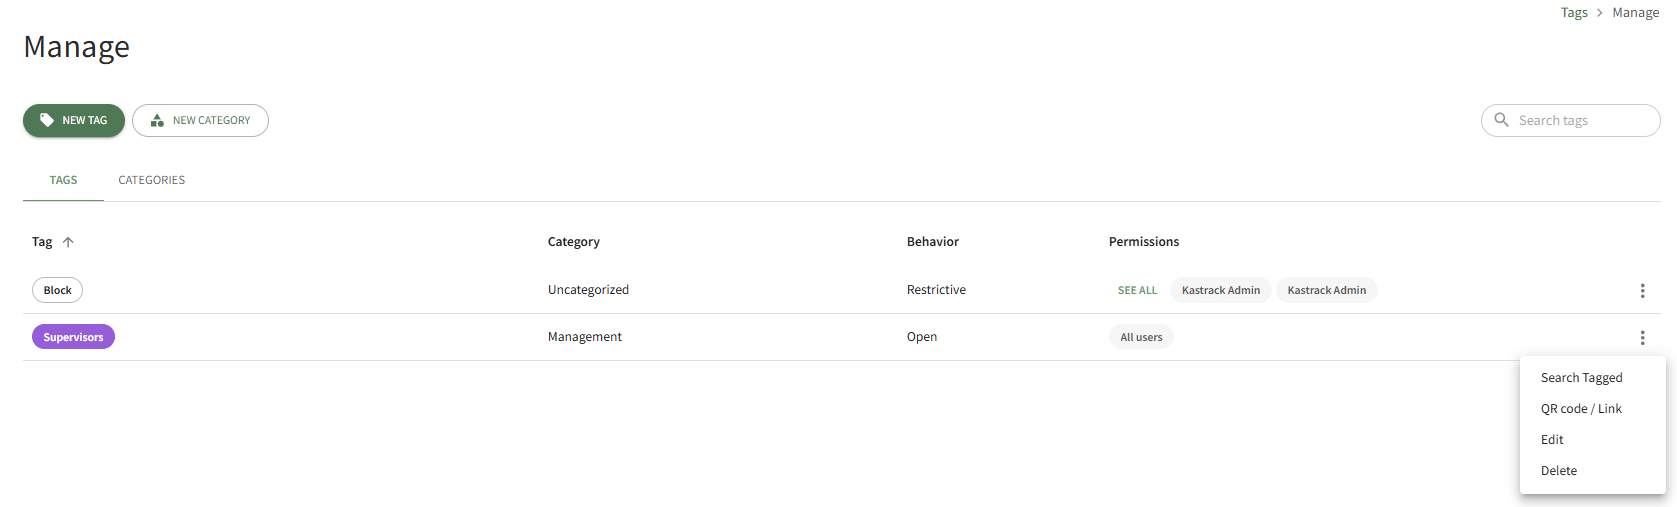
To the far right of each tag entry on the Tags list is a vertical three dot icon that opens a context menu with options that pertain to the specific tag. An explanation of each option is included in the Tag Context Menu Option Explanation Below.
Tag Context Menu Option Explanation | |
Option | Explanation |
Search Tagged | Selecting “Search Tagged” from the context menu will search the system for entities assigned to the tag selected, opening to the search results on the Search Tagged Page. |
QR Code / Link | Selecting “QR Code / Link” from the context menu generates a QR Code and a URL Link that, when accessed, will take an individual to the Search Tagged Page displaying the list of entities associated with the tag category. Access to the tag search results will only be given to system users who have permission to view the tagged item(s). |
When an individual who is not in the KAStrack system accesses the QR Code/URL Link, they will have access to an Items Tagged With (TAG) Page that shows all public entities with that Tag. The individual will be able to access and download the public files and folders as desired. Only Open Tags can be accessed by individuals not logged into KAStrack. | |
Edit | Selecting “Edit” from the context menu opens the Edit Tag Modal. How To: Edit a TagTo edit a tag, go to the Manage Page in Tags Module. Select the Tags Tab.
Click the vertical three dot menu to the far right of the tag you wish to edit. Select “Edit” from the context menu opening the Edit Tag Modal.
Alter the title, category, and behavior as desired. If the tag is permissive or restrictive, you can alter who it is visible to. Select the “Update Tag” button to save the changes.
A confirmation modal appears at the bottom of the Manage Page, indicating the tag was successfully updated. |
Delete | Selecting “Delete” from the context menu will open the Delete Tag Modal. How To: Delete a TagTo delete a tag, go to the Manage Page in Tags Module. Select the Tags Tab.
Click the vertical three dot menu to the far right of the tag you wish to delete. Select “Delete” from the context menu opening the Delete Tag Confirmation Modal.
The confirmation modal states, “Are you sure you want to delete the tag (Tag Name)?” and lists the entities that will be affected by the tag deletion. Select “Delete” and the tag will be removed from the Tag List on the Tags Tab of the Manage Page. Deleting a Tag with Permissive / Restrictive behavior may change who can see and access entities assigned the tag in question. |
To the far right of each category entry on the Categories list is a vertical three dot icon that opens a context menu with options that pertain to the specific category. An explanation of each option is included in the Category Context Menu Option Explanation Below.
Category Context Menu Explanation | |
Option | Explanation |
Add Tags | Selecting “Add Tag” from the context menu will open the New Tag Modal and prefill this Category for the new Tag. How To: Create a New Tag in the Tags ModuleTo create a new tag in the Tags Module, go to the Manage Page in the Tags Module.
Select the “New Tag” button, visible from both the Tags and Category Tabs, opening the New Tag Modal. You can also select “Add Tag” from the vertical icon context menu to the far right of a category on the categories tab, which prefills adding a new Tag to the chosen Category.
Input the name of the new tag into the title field. Emojis may be used in the tag title. Select the category for the new tag from the dropdown menu. All categories created will show, as well as an “uncategorized” option. Categories determine the appearance of tags (their color and formatting). Select the tag behavior (open, permissive, or restrictive) from the dropdown menu. Select “Add Tag” and the new tag will show on the Tags List on the Tags Tab. |
Edit | Selecting “Edit” from the context menu will open the Edit Category Modal. How To: Edit a CategoryTo edit a category, go to the Manage Page in the Tags Module. Select the Categories Tab. 
Select the vertical three dot icon for the category you wish to edit. Select “Edit” from the context menu opening the Edit Category Modal.
Alter the title, style, or color as desired. Select the “Update Category” button to save changes.
A confirmation modal appears at the bottom of the Manage Page, indicating the category was successfully updated. |
Delete | Selecting “Delete” from the context menu will open the Delete Category Modal. How To: Delete a CategoryTo delete a category, go to the Manage Page in the Tags Module. Select the Categories Tab.
Select the vertical three dot icon for the category you wish to edit. Select “Delete” from the context menu opening the Delete Category Confirmation Modal.
The modal states, “Are you sure you want to delete the category (Category Name)?” Select “Delete” and the category will be removed from the Categories List on the Categories Tab of the Manage Page. Any existing Tags in the category will have their Category changed to “uncategorized”. |
Settings Page
The Module Levels Tab of Settings Page can be accessed from the Main Menu. The system default module levels for the module are visible in the Module Levels Table. New module levels with customizable permissions can be created and managed on this tab.
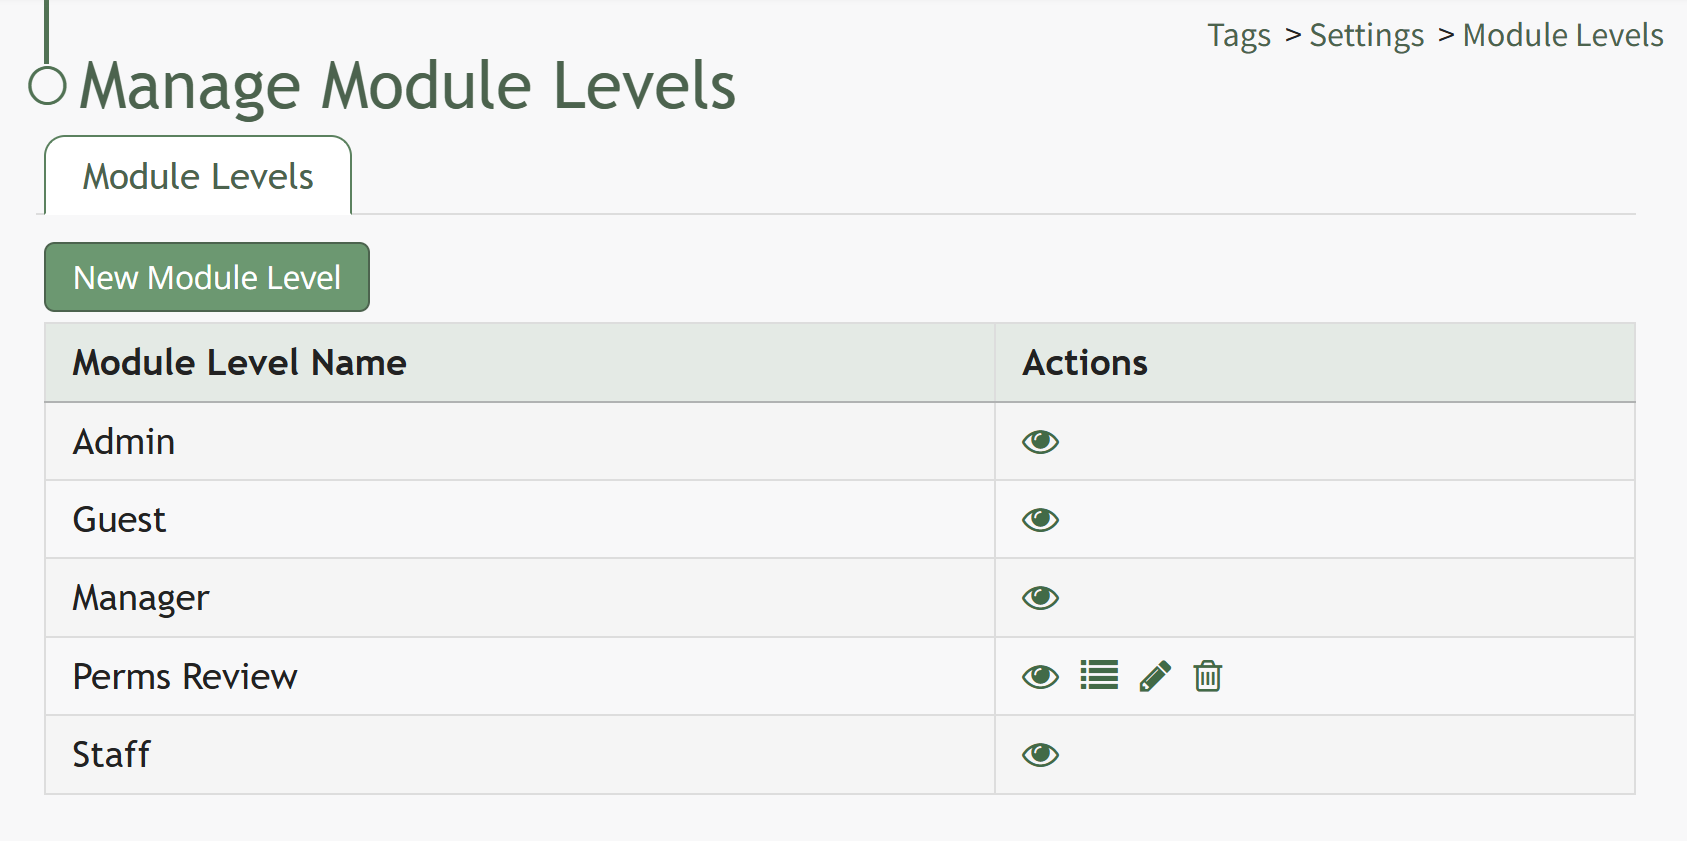
There are four system default module levels associated with the Tags Module. An explanation of the permissions associated with each default module level are shown in the Tags Module Level Permissions Table below.
System default module levels cannot be customized.
Tags Modules Level Permissions Table | |
Module Levels | Permissions |
Admin | Can view all tags, Manage Tag Categories (delete / edit / view tag category), Manage Tags (add / edit / delete / view tag, add tag category, view permissions / edit / delete user tag, view non user tags, edit tag permissions) |
Guest | None |
Manager | Manage Tag Categories (delete / edit / view tag category), Manage Tags (add / edit / delete / view tag, add tag category, view permissions / edit / delete user tag, view non user tags, edit tag permissions) |
Staff | Manage tags (add tags) |
New Module Levels can be created in order to customize module level permissions to suit your organization's needs. An explanation of the icons associated with customized module levels have been provided in the table below.
Module Level Customization Icons | |
Icon | Explanation |
| The eyeball icon allows you to view users assigned to the module level as well as the permissions assigned to them. |
| The bulleted list icon allows you to assign permissions to customized module levels. |
| The pencil icon opens the Edit Module Level Modal. |
| The trashcan icon opens the Delete Module Level Confirmation Modal. |


How To: Create A New Module Level (Tags Module)
Go to the Settings Page of the Tags Module.

Select the “New Module Level” button opening the New Module Level Modal.

Input the new module level name and select the “Save” button.
The new module level now shows in the Module Level Table on the Settings Page.

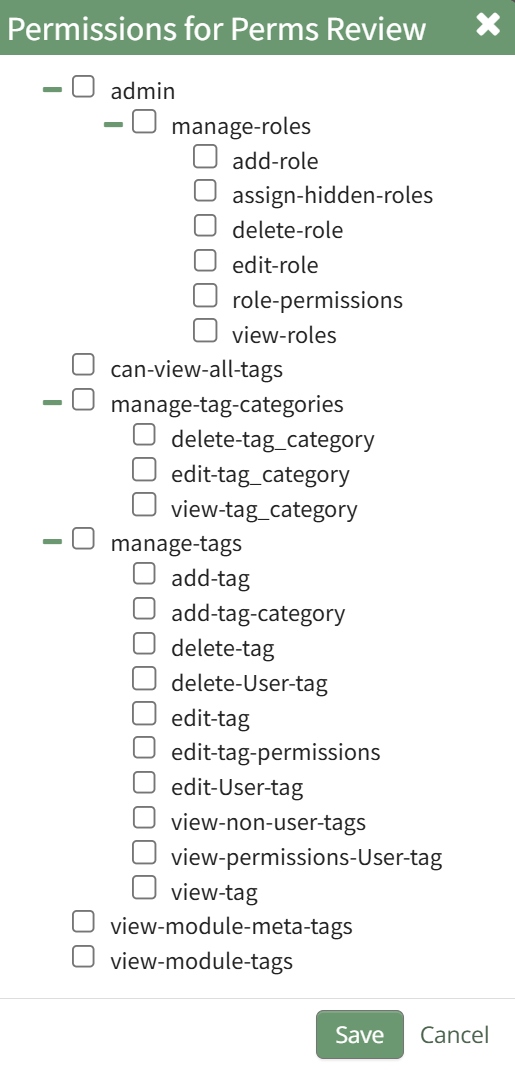
Select the permissions icon from the actions table opening the Permissions for (Module Level Name) Modal.
Module Level Customization Icons | |
Icon | Explanation |
| The eyeball icon allows you to view users assigned to the module level as well as the permissions assigned to them. |
| The bulleted list icon allows you to assign permissions to customized module levels. |
| The pencil icon opens the Edit Module Level Modal. |
| The trashcan icon opens the Delete Module Level Confirmation Modal. |


Select the “Save” button and the permissions are now assigned to the Module Level.
Access levels for all modules can also be managed in the Site Settings Module on the Access Levels Tab.
A complete list of all permissions associated with the Tags Module have been provided below.
Tags: Supplemental Resources
There are no email alerts associated with the Tags Module.
Complete List of Tag Module How Tos
How To: Create a New Module Level (Tags Module)
Go to the Settings Page of the Tags Module.
Select the “New Module Level” button opening the New Module Level Modal.
Input the new module level name and select the “Save” button.
The new module level now shows in the Module Level Table on the Settings Page.
Select the permissions icon from the actions table opening the Permissions for (Module Level Name) Modal.
Module Level Customization Icons | |
Icon | Explanation |
| The eyeball icon allows you to view users assigned to the module level as well as the permissions assigned to them. |
| The bulleted list icon allows you to assign permissions to customized module levels. |
| The pencil icon opens the Edit Module Level Modal. |
| The trashcan icon opens the Delete Module Level Confirmation Modal. |
Select the “Save” button and the permissions are now assigned to the Module Level.
Access levels for all modules can also be managed in the Site Settings Module on the Access Levels Tab.
How To: Create a New Tag Category
To create a new category in the Tags Module, go to the Manage Page in the Tags Module.
Categories determine the appearance of tags. Any tags assigned to a category will have the same style and color as defined for the category in the category tab.
Select the “New Category” button, visible from both the Tags and Category Tabs, opening the New Category Modal.
Input the title of the new category into the textbox.
Select the style of the tag from the dropdown menu. The style options (filled, outline, and striped) are shown below.
Style Options | ||
Field | Outline | Striped |
|
|
|
Click on the color box to customize the color of the category.
KAStrack will generate a preview of a tag assigned the category at the bottom of the new category modal in the preview box.
Select “Add Category” and the new category will show in the Categories List on the Categories Tab.
How To: Create a New Tag from an Entity in Another Module
To create a new tag while creating or editing a new entity in a module other than tags, type in the desired new tag name in the tag field for the entity. For aid in visibility, emojis can be used in the tag name.
How To Determine if a New Tag Can be Created when an Entity is Created / Edited | |
Some modules allow for a new tag to be created when an entity is being created or edited. You can identify if this feature is enabled for an entity by typing in the desired tag name. If this feature is enabled, you will see a line under the Tags Field that states, “Press Enter to add new tag.” If this feature is not enabled, you will see a line under the Tags Field that states, “No options”. | |
Possible |
|
Not Possible |
|


Press “Enter” after typing in the new tag name.

Finish creating / editing the entity as desired. After saving your changes to the entity, the Tag will be created. By default, the new Tag will have Open behavior, and be assigned the “uncategorized” category. To make changes to these settings, go to the Manage Page of the Tags Module.

The newly created tag will be available on the Tags List on the Tags Tab.
Click the vertical dot icon on the far right opening the tag context menu. Select “Edit” opening the Edit Tag Modal.

Alter the Tag Title, Category and Behavior as desired.
How To: Edit a Tag
To edit a tag, go to the Manage Page in Tags Module. Select the Tags Tab.

Click the vertical three dot menu to the far right of the tag you wish to edit.
Select “Edit” from the context menu opening the Edit Tag Modal.

Alter the title, category, and behavior as desired. If the tag is permissive or restrictive, you can alter who it is visible to.
Select the “Update Tag” button to save the changes.

A confirmation modal appears at the bottom of the Manage Page, indicating the tag was successfully updated.
Select the “Update Tag” button and your changes will be saved.
How To: Create a New Tag in the Tags Module
To create a new tag in the Tags Module, go to the Manage Page in the Tags Module.
Select the “New Tag” button, visible from both the Tags and Category Tabs, opening the New Tag Modal.
You can also select “Add Tag” from the vertical icon context menu to the far right of a category on the categories tab, which prefills adding a new Tag to the chosen Category.
Input the name of the new tag into the title field.
Emojis may be used in the tag title.
Select the category for the new tag from the dropdown menu. All categories created will show, as well as an “uncategorized” option.
Categories determine the appearance of tags (their color and formatting).
Select the tag behavior (open, permissive, or restrictive) from the dropdown menu.
Select “Add Tag” and the new tag will show on the Tags List on the Tags Tab.
How To: Delete a Category
To delete a category, go to the Manage Page in the Tags Module. Select the Categories Tab.

Select the vertical three dot icon for the category you wish to edit.
Select “Delete” from the context menu opening the Delete Category Confirmation Modal.

The modal states, “Are you sure you want to delete the category (Category Name)?”
Select “Delete” and the category will be removed from the Categories List on the Categories Tab of the Manage Page. Any existing Tags in the category will have their Category changed to “uncategorized”.
How To: Delete a Tag
To delete a tag, go to the Manage Page in Tags Module. Select the Tags Tab.

Click the vertical three dot menu to the far right of the tag you wish to delete.
Select “Delete” from the context menu opening the Delete Tag Confirmation Modal.

The confirmation modal states, “Are you sure you want to delete the tag (Tag Name)?” and lists the entities that will be affected by the tag deletion.
Select “Delete” and the tag will be removed from the Tag List on the Tags Tab of the Manage Page.
Deleting a Tag with Permissive / Restrictive behavior may change who can see and access entities assigned the tag in question.
How To: Edit a Category
To edit a category, go to the Manage Page in the Tags Module. Select the Categories Tab.
Select the vertical three dot icon for the category you wish to edit.
Select “Edit” from the context menu opening the Edit Category Modal.

Alter the title, style, or color as desired.
Select the “Update Category” button to save changes.

A confirmation modal appears at the bottom of the Manage Page, indicating the category was successfully updated.
How To: Edit a Tag
To edit a tag, go to the Manage Page in Tags Module. Select the Tags Tab.
Click the vertical three dot menu to the far right of the tag you wish to edit.
Select “Edit” from the context menu opening the Edit Tag Modal.
Alter the title, category, and behavior as desired. If the tag is permissive or restrictive, you can alter who it is visible to.
Select the “Update Tag” button to save the changes.
A confirmation modal appears at the bottom of the Manage Page, indicating the tag was successfully updated.