# Site Settings Module

# Site Settings: Introductions

# Site Settings Module Summary

The Site Settings Module is an administrative module that establishes parameters, settings, templates, profiles, and fields that impact other modules in KAStrack.

[![image.png](https://kaswiki.kastrack.com/uploads/images/gallery/2025-11/scaled-1680-/cMwimage.png)](https://kaswiki.kastrack.com/uploads/images/gallery/2025-11/cMwimage.png)

The Site Settings Page is comprised of ten tabs: Company Info Tab, Access Levels Tab, Security Tab, Registration Tab, Email Settings Tab, Inactive Accounts Tab, Payment Settings Tab, Account Fields Tab, Table Defaults Tab, and Logs Tab. The Tabs are also visible on the Main Menu.

# Site Settings: Module Tabs
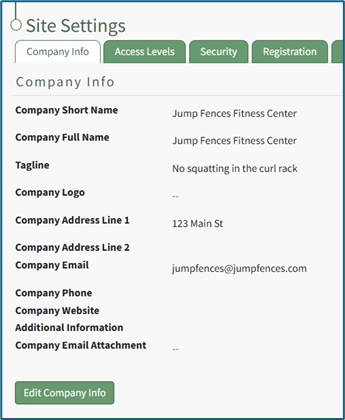
# Company Info Tab

The Company Info Tab displays your organization’s company information. This information is independent of the Companies created on the Companies Page of the People Module.

[![image.png](https://kaswiki.kastrack.com/uploads/images/gallery/2025-11/scaled-1680-/Yr9image.png)](https://kaswiki.kastrack.com/uploads/images/gallery/2025-11/Yr9image.png)

Inputs include: Company Short Name, Company Full Name, Tagline, Company Logo, Company Address, Company Email, Company Phone, Company Website, Additional Information, Company Email Attachment.

<span style="white-space: pre-wrap;">Input a Company Short Name that will be visible in the center of the top bar of the site, in sent emails and for column headers. </span>

<p class="callout info">Changes to the Company Short Name may not be reflected in sent emails for up to 24 hours.</p>

The Company Full Name and Company Tagline are shown on the registration and login pages.

<span style="white-space: pre-wrap;">The Company Logo will show in the footer on all pages throughout the KAStrack system. </span>

<p class="callout info">Although the upload limit for a file is 524 MB, it is highly encouraged to use an image that is optimized for web viewing (e.g. less than 500k which minimizes loading times). We recommend using a logo with a height of 100 pixels or less for a proportionally sized footer.</p>

The Company Email Attachment can optionally be included when sending Shared Reports in the People Module.

<details id="bkmrk-how-to%3A-edit-company"><summary>How To: Edit Company Info</summary>

{{@93}}

</details>

# Access Levels Tab

The Access Level Tab in the Site Setting Module displays access levels and module levels, allows the creation of new access levels, and assigns remote access profiles.

The first clickable link below the Access Levels header, KAStrack, serves a different purpose than the clickable module names. Clicking “KAStrack” shows each of the four default access levels (and any customized access levels that have been created) and their associated module levels. The clickable module names to the right of the KAStrack tab open the module level table for the module selected.

[![image.png](https://kaswiki.kastrack.com/uploads/images/gallery/2026-06/scaled-1680-/nlzimage.png)](https://kaswiki.kastrack.com/uploads/images/gallery/2026-06/nlzimage.png)

Specific user permissions for each module are assigned to Module Levels and each Access Level is comprised of assigned module levels.

<p class="callout info">Each module has default module levels with default permissions assigned to them. Default module levels cannot be altered, but new module levels with customizable permissions can be created.</p>

<span style="white-space: pre-wrap;">Within KAStrack, there are four default access levels that identify system user privileges: Admin, Supervisor, Employee, and Observer. Each Access Level is comprised of multiple module levels. The table below shows the four default access levels and the module levels assigned to each access level. New access levels can be created in the Site Settings Module. </span>

<details id="bkmrk-how-to%3A-create-a-cus"><summary>How To: Create a Customized Access Level</summary>

{{@88}}

</details><table class="align-center" id="bkmrk-access-levels%3A-admin"><colgroup><col style="width: 168px;"></col><col style="width: 168px;"></col><col style="width: 168px;"></col><col style="width: 168px;"></col><col style="width: 168px;"></col></colgroup><tbody><tr><td>**Access Levels:**

</td><td>**Admin**

</td><td>**Supervisor**

</td><td class="align-center">**Employee**

</td><td class="align-center">**Observer**

</td></tr><tr><td>##### **Module**

</td><td colspan="4">##### **Module Access Level**

</td></tr><tr><td>Accounts

</td><td>Admin

</td><td>Supervisor

</td><td>Employee

</td><td>Observer

</td></tr><tr><td>Actions

</td><td>Admin

</td><td>Manager

</td><td>Staff

</td><td>Guest

</td></tr><tr><td>Assets

</td><td>Admin

</td><td>Manager

</td><td>Maintainer

</td><td>Observer

</td></tr><tr><td>Attendance Log

</td><td>Admin

</td><td>Manager

</td><td>Staff

</td><td>Guest

</td></tr><tr><td>Calendar

</td><td>Admin

</td><td>Manager

</td><td>Staff

</td><td>Guest

</td></tr><tr><td>Comments

</td><td>Admin

</td><td>Manager

</td><td>Staff

</td><td>Guest

</td></tr><tr><td>Communications

</td><td>Admin

</td><td>Manager

</td><td>Staff

</td><td style="background-color: rgb(149, 165, 166);"></td></tr><tr><td>Courses

</td><td>Admin

</td><td>Manager

</td><td>Staff

</td><td>Guest

</td></tr><tr><td>Dashboard

</td><td>Admin

</td><td>Manager

</td><td>Staff

</td><td>Guest

</td></tr><tr><td>Database

</td><td>Admin

</td><td>Manager

</td><td>Staff

</td><td style="background-color: rgb(149, 165, 166);"></td></tr><tr><td>Dispatch

</td><td>Admin

</td><td>Manager

</td><td>Staff

</td><td>Guest

</td></tr><tr><td>Documents

</td><td>Admin

</td><td>Manager

</td><td>Staff

</td><td>Guest

</td></tr><tr><td>Finance

</td><td>Admin

</td><td>Supervisor

</td><td>Employee

</td><td>Observer

</td></tr><tr><td>Forms

</td><td>Admin

</td><td>Manager

</td><td style="background-color: rgb(149, 165, 166);"></td><td style="background-color: rgb(149, 165, 166);"></td></tr><tr><td>Grid

</td><td>Admin

</td><td>Manager

</td><td>Staff

</td><td>Guest

</td></tr><tr><td>Integrations

</td><td>Admin

</td><td style="background-color: rgb(149, 165, 166);"></td><td style="background-color: rgb(149, 165, 166);"></td><td style="background-color: rgb(149, 165, 166);"></td></tr><tr><td>Inventory

</td><td>Admin

</td><td>Manager

</td><td>Staff

</td><td>Guest

</td></tr><tr><td>Kanban

</td><td>Admin

</td><td>Manager

</td><td>Staff

</td><td>Guest

</td></tr><tr><td>Meetings

</td><td>Admin

</td><td>Admin

</td><td>User

</td><td>User

</td></tr><tr><td>People

</td><td>Admin

</td><td>Supervisor

</td><td>Employee

</td><td>Observer

</td></tr><tr><td>Remotes

</td><td>Admin

</td><td style="background-color: rgb(149, 165, 166);"></td><td style="background-color: rgb(149, 165, 166);"></td><td style="background-color: rgb(149, 165, 166);"></td></tr><tr><td>Reports

</td><td>Admin

</td><td>Manager

</td><td>Staff

</td><td style="background-color: rgb(149, 165, 166);"></td></tr><tr><td>Tags

</td><td>Admin

</td><td>Manager

</td><td>Staff

</td><td>Guest

</td></tr></tbody></table>

<span style="white-space: pre-wrap;"> 
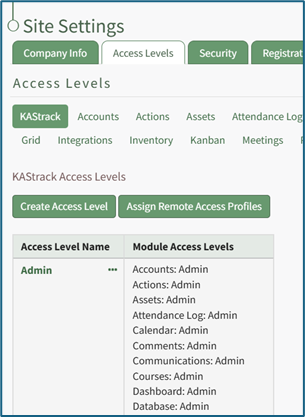
All users must be assigned an access level in order to access the modules in the system and can be assigned to multiple access levels simultaneously. </span>

<p class="callout info">For a user with an Admin Access Level to be tracked within the People Module, they must also be assigned an Employee Access Level.</p>

[![image.png](https://kaswiki.kastrack.com/uploads/images/gallery/2025-11/scaled-1680-/QR9image.png)](https://kaswiki.kastrack.com/uploads/images/gallery/2025-11/QR9image.png)

<span style="white-space: pre-wrap;">Selecting the three dot (…) icon next to the Access Level name opens a context menu with the option to View Access Level. Selecting View Access Level opens an access level page that shows the module level information for that specific access level (and no longer shows details for all access levels). The context menu for Customized Access Levels includes options to Edit Access Level and Edit Module Access. </span>

<details id="bkmrk-how-to%3A-edit-a-custo"><summary>How To: Edit a Customized Access Level</summary>

{{@92}}

</details>Clicking a module name along the top of the Access Levels page will open the Module Level Table, allowing you view the different module levels for that module within the Site Settings Module.

<span style="white-space: pre-wrap;"> </span>[![image.png](https://kaswiki.kastrack.com/uploads/images/gallery/2025-11/scaled-1680-/0Jpimage.png)](https://kaswiki.kastrack.com/uploads/images/gallery/2025-11/0Jpimage.png)

For most modules, selecting “View” within the module level table will bring the user to the Settings Page for the module selected, where specific permissions for the module level can then be viewed. To create a new customized module level, see the How To: Create a New Module Level in the User Manual for the module of interest. Selecting the “Create Module Level” button will direct you to the Settings Page of that module. After creating a new module level, it will show on this page. The Edit button will also direct you to the Settings Page of that module to make any alterations there.

For the modules Accounts, Finance, and Meetings, the View and Edit buttons direct you to sub-pages within Site Settings where you can make any necessary changes.

<details id="bkmrk-how-to%3A-delete-a-cus"><summary>How To: Delete a Customized Access Level</summary>

{{@91}}

</details><details id="bkmrk-how-to%3A-assign-remot"><summary>How To: Assign Remote Access Profiles</summary>

{{@87}}

</details>

# Security Tab

The Security Tab displays the password requirements for the KAStrack system. The user manual refers to the default requirements established by the system, but these can be customized for your organization.

[![image.png](https://kaswiki.kastrack.com/uploads/images/gallery/2025-11/scaled-1680-/Lrlimage.png)](https://kaswiki.kastrack.com/uploads/images/gallery/2025-11/Lrlimage.png)

Default settings include a minimum password length of 8 characters. There are no requirements for usage of uppercase or lowercase letters, special characters, or numbers enabled by default. Users who do not meet requirements are not forced to reset their password on their next login. These options can be altered by editing the Security Settings in the Site Settings Module.

<details id="bkmrk-how-to%3A-edit-passwor"><summary>How To: Edit Password Requirements</summary>

{{@95}}

</details>

# Registrations Tab

The Registration Tab on the Site Settings Page is used to create Registration Profiles. Registration Profiles serve as templates for the efficient generation of new user accounts and can allow existing accounts to update account configurations.

<span style="white-space: pre-wrap;">Each registration profile has a customizable URL link that can be sent to individuals for new account registrations. A registration profile will specify the new user’s access level(s), certification role(s), supervisor(s), and notification template, as well as who should be notified about the new account, who will approve the new account, if email verification of the new account is required, and whether a welcome email should be sent. There is also an ability to leave a customized note for new registrations and a different message for an existing user. </span>

<p class="callout info">
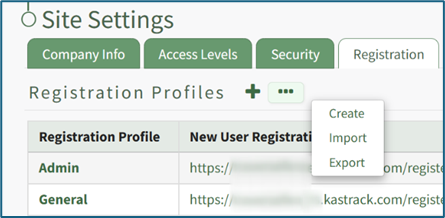
If an existing user logs in from a Registration Profile link, the access level(s), certification role(s), and supervisor(s) listed on the Registration Profile will be added to the user’s account. Any existing access levels, certification roles, and supervisors on their account remain unchanged.</p>

[![image.png](https://kaswiki.kastrack.com/uploads/images/gallery/2025-11/scaled-1680-/HTzimage.png)](https://kaswiki.kastrack.com/uploads/images/gallery/2025-11/HTzimage.png)

Selecting the plus icon to the right of the Registration Profile header is a quick link to the Create New Registration Profile Page. Selecting the three dot (…) icon opens a context menu with three options: Create, Import, and Export.

[![image.png](https://kaswiki.kastrack.com/uploads/images/gallery/2025-11/scaled-1680-/FCKimage.png)](https://kaswiki.kastrack.com/uploads/images/gallery/2025-11/FCKimage.png)

Registration profiles can be enabled/disabled via a checkbox in the rightmost column of the Registration Profile Table so that your organization has control of when this link is activated.

<details id="bkmrk-how-to%3A-create-regis"><summary>How To: Create Registration Profiles</summary>

{{@90}}

</details><details id="bkmrk-how-to%3A-import-regis"><summary>How To: Import Registration Profiles</summary>

{{@105}}

</details><details id="bkmrk-how-to%3A-export-regis"><summary>How To: Export Registration Profiles</summary>

{{@104}}

</details>

# Email Settings Tab

The Email Settings Tab in the Site Settings Module allows for the customization of Email Settings. These settings control what new user accounts will require email verification and if new users will receive welcome emails by default.

[![image.png](https://kaswiki.kastrack.com/uploads/images/gallery/2025-11/scaled-1680-/Ktvimage.png)](https://kaswiki.kastrack.com/uploads/images/gallery/2025-11/Ktvimage.png)

The default system email settings are that email verification requirements are turned off and that welcome emails are enabled. These preferences can be edited.

<details id="bkmrk-how-to%3A-edit-email-s"><summary>How To: Edit Email Settings</summary>

{{@94}}

</details>

# Inactive Accounts Tab

The Inactive Accounts Tab on the Site Settings page allows for customization regarding inactive users. Default system settings prevent inactive users from logging in, prevent user accounts from being automatically deactivated for inactivity, prevent user accounts from being automatically deactivated when certification / role requirements are expired/no longer valid (e.g. red certification status), do not exempt access levels from account deactivation, and has inactivity alerts disabled.

[![image.png](https://kaswiki.kastrack.com/uploads/images/gallery/2025-11/scaled-1680-/tK0image.png)](https://kaswiki.kastrack.com/uploads/images/gallery/2025-11/tK0image.png)

All default settings can be altered on the Inactive Accounts Tab.

<details id="bkmrk-how-to%3A-edit-inactiv"><summary>How To: Edit Inactive Account Settings</summary>

{{@139}}

</details>

# Payment Settings Tab

The Payment Settings Tab on the Site Settings Page shows existing payment configurations and allows for creation of additional ones. Payment configurations are utilized to provide the basic information needed for a third-party processing platform to manage online payments securely.

[![image.png](https://kaswiki.kastrack.com/uploads/images/gallery/2025-11/scaled-1680-/cKTimage.png)](https://kaswiki.kastrack.com/uploads/images/gallery/2025-11/cKTimage.png)

Stripe is currently the only third-party platform that integrates with KAStrack through the Forms Module. Using Stripe ensures KAStrack is autonomous from the payment process. For integration with another merchant, please contact the KAStrack helpdesk.

Some payment configuration required fields, such as configuration name and credit card statement entry, are set by your organization. Other required fields, such as display name, publishable key, and secret key, are Stripe specific and must be found on your Stripe dashboard.

<details id="bkmrk-how-to%3A-create-payme"><summary>How To: Create Payment Configuration Using Stripe</summary>

{{@89}}

</details>

# Account Fields Tab

The Account Fields Tab in the Site Settings Module shows the default fields used in tables in several modules in the KAStrack system and is broken into two groups: System User Account Information Fields and Custom/Additional User Account Information Fields. Permissions are set for these fields on the Account Fields Tab, and custom fields are added/edited/deleted there as well.

[![image.png](https://kaswiki.kastrack.com/uploads/images/gallery/2026-06/scaled-1680-/O4pimage.png)](https://kaswiki.kastrack.com/uploads/images/gallery/2026-06/O4pimage.png)

#### System User Account Information Fields

System User Account Fields are default fields that cannot be edited or deleted because they are essential for software functionality and are referenced in various places across KAStrack.

[![image.png](https://kaswiki.kastrack.com/uploads/images/gallery/2026-06/scaled-1680-/8KDimage.png)](https://kaswiki.kastrack.com/uploads/images/gallery/2026-06/8KDimage.png)

Permissions for system user account information fields can be changed for different access levels.

<p class="callout info">Session Timeout is a KAStrack Admin managed setting (not an Access Level admin) that coincides with security best practices. Users will receive a 20-minute warning, and a session will timeout after 30 minutes of inactivity. When a user logs back into the system, they will be taken back to the page they were on when the session timeout occurred. To alter this timing, please contact you KAStrack account specialist or tech support.</p>

<details id="bkmrk-how-to%3A-edit-permiss"><summary>How To: Edit Permissions for System User Account Information Fields</summary>

{{@859}}

</details>#### Custom/Additional User Account Information Fields

Custom/Additional User Account Information Fields can be edited or deleted because they are not essential to the KAStrack system and can be removed without issue.

[![image.png](https://kaswiki.kastrack.com/uploads/images/gallery/2025-11/scaled-1680-/4NIimage.png)](https://kaswiki.kastrack.com/uploads/images/gallery/2025-11/4NIimage.png)

A new KAStrack subdomain installation will have additional information fields already created: Employee ID, Phone, Address 1 and Address 2. These information fields can be edited to your preference.

<details id="bkmrk-how-to%3A-add-a-custom"><summary>How To: Add a Custom/Additional User Account Information Field</summary>

{{@856}}

</details><details id="bkmrk-how-to%3A-edit-a-custo"><summary>How To: Edit a Custom/Additional User Account Information Field</summary>

{{@857}}

</details><details id="bkmrk-how-to%3A-delete-a-cus"><summary>How To: Delete a Custom/Additional User Account Information Field</summary>

{{@858}}

</details>

# Table Defaults Tab

The Table Defaults Tab in the Site Settings Module allows for the customization of 8 different tables in KAStrack.

[![image.png](https://kaswiki.kastrack.com/uploads/images/gallery/2025-11/scaled-1680-/r5rimage.png)](https://kaswiki.kastrack.com/uploads/images/gallery/2025-11/r5rimage.png)

The dropdown menu below the Table Defaults header lists the tables within KAStrack that are customizable.

<table class="align-center" id="bkmrk-customizible-tables-"><colgroup><col style="width: 240px;"></col><col style="width: 483px;"></col></colgroup><tbody><tr><td class="align-center" colspan="2">**Customizible Tables in KAStrack**

</td></tr><tr><td class="align-center">**Module**

</td><td class="align-center">**Tables**

</td></tr><tr><td>People

</td><td>Users, Users Assigned to a Role, Users Associated with a Certification

</td></tr><tr><td>Accounts

</td><td>Active, Registrations, Archived

</td></tr><tr><td>Finances

</td><td>Active Budgets, Budget Items Per Budget

</td></tr></tbody></table>

Once a table is selected from the dropdown menu, two buttons appear: “Edit Columns” and “View Live Table”. Selecting “View Live Table” will redirect you to the live table in the People, Accounts, or Finance Module.
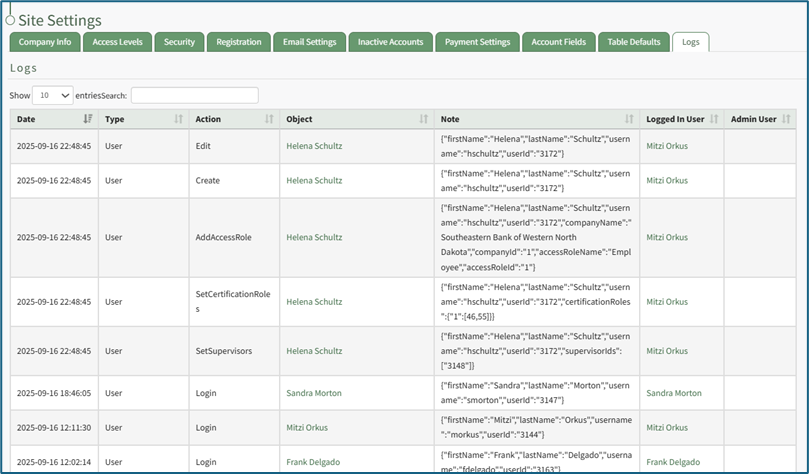
# Logs Tab

The Logs Tab on the Site Settings Page is a log of read-only records of historical actions within your installation.

[![image.png](https://kaswiki.kastrack.com/uploads/images/gallery/2025-11/scaled-1680-/FLOimage.png)](https://kaswiki.kastrack.com/uploads/images/gallery/2025-11/FLOimage.png)

# Site Settings: Supplemental Resources

There are no email alerts associated with the Site Settings Module.

# Complete List of Site Setting Module How Tos

{{@32}}