My Account Page
Each user in KAStrack will have their own My Account Page in the People Module available on the Main Menu, allowing a user to view, manage, and submit required certifications associated with their account. A user's My Account Page is comprised of three tabs: My Certifications, Submit Certifications, and Certification Roles. A detailed explanation of each tab is been included on this page.
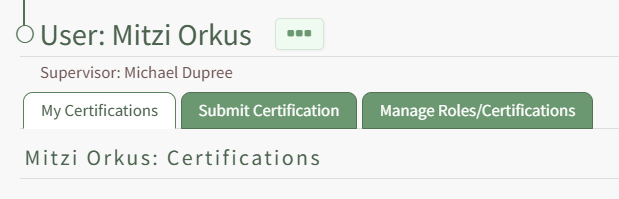
Selecting the three-dot icon to the right of the page header opens the My Account Page Context Menu. The options available on the context menu are explained in the table below.
My Account Page Context Menu Option Explanations | |
Option | Explanation |
View Account Info | Selecting View Account Info from the My Account Page Context Menu directs the user to the Account Info tab on the My Account page in the Accounts Module. This allows the user to view the employee’s username, contact information, and comments channel. |
Edit Account Info | Selecting Edit Account Info from the My Account Page Context Menu directs the user to the Edit Account Info page under the My Account page in the Accounts Module. This allows a user to update employee contact information, their account user photo, and reset their password. |
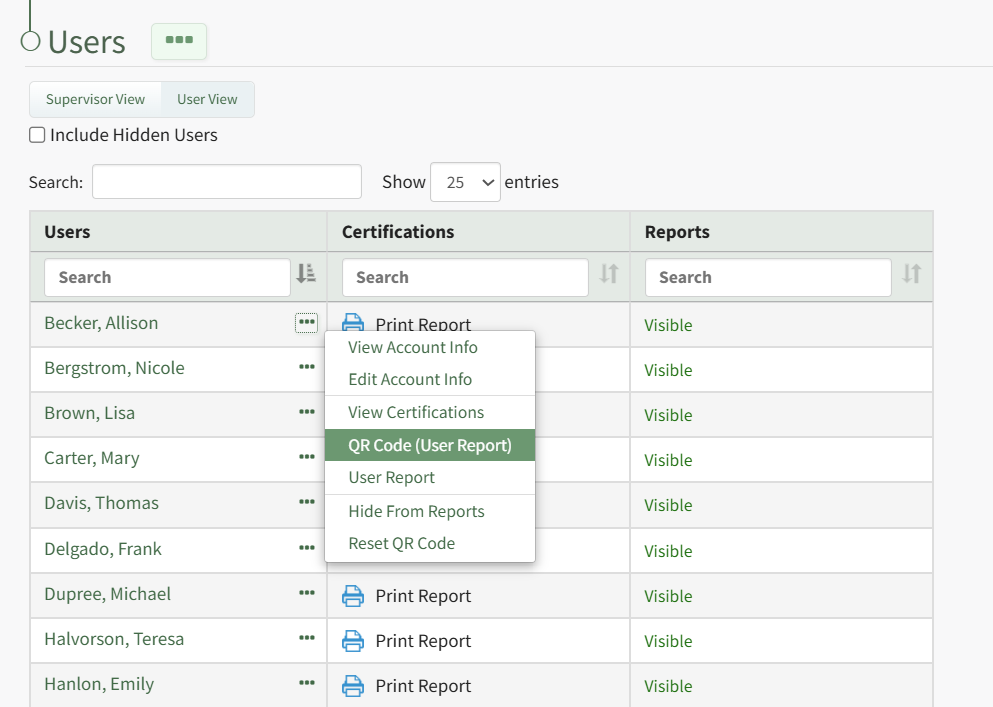
QR Code (User Report) | Selecting QR Code (User Report) from the My Account Page Context Menu opens the QR Code Modal. The QR Code that opens an individual’s Roles and Certifications Report Page. How To: Access a User's Roles and Certifications Report QR CodeTo access a user's roles and certifications report QR Code, open the Users Page in the People Module on the Main Menu. Click the three-dot icon to the right of the specific user's name in the User Table opening the User Table Context Menu.
Select "QR Code (User Report)" from the main menu opening the User Report QR Code Modal. 
Close the modal to return to the Users Page. |
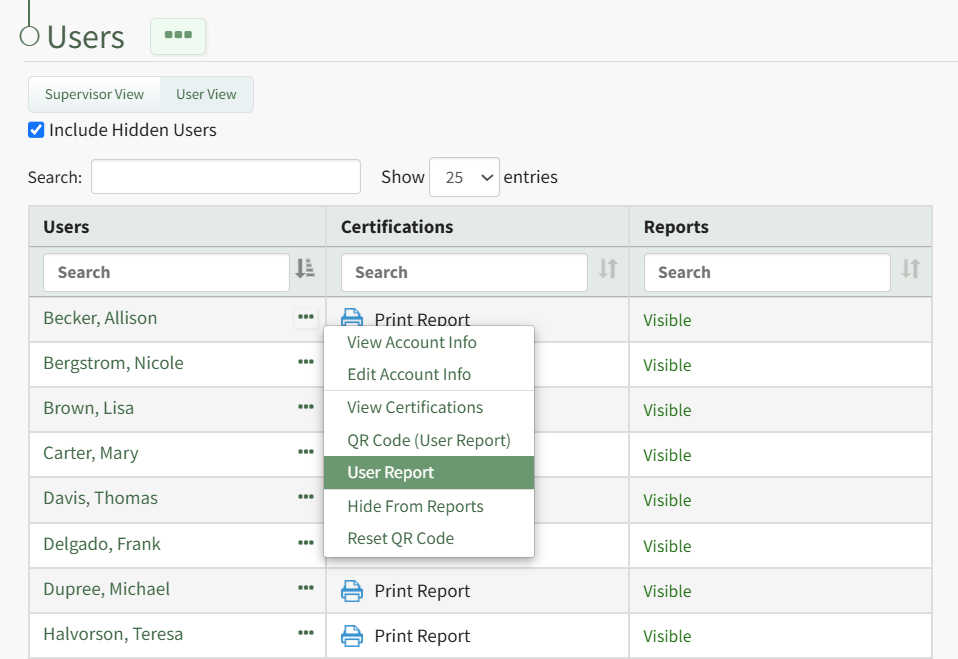
User Report | Selecting User Report from the My Account Page Context Menu opens your Roles and Certifications Report. How To: View a User's Roles and Certifications ReportTo view a User's Roles and Certifications Report, open the Users Page in the People Module from the Main Menu. Click the three-dot icon to the right of the user whose roles and certifications report you wish to view.
Select "User Report" from the context menu opening the individuals User Report.
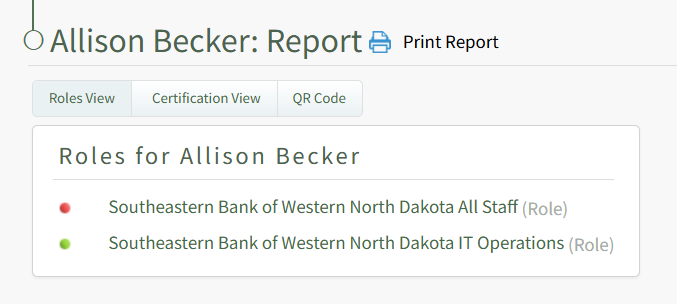
The User Report displays the user's roles and certifications, as well as the QR Code that can be used to access this specific user report. |
The My Certifications Tab
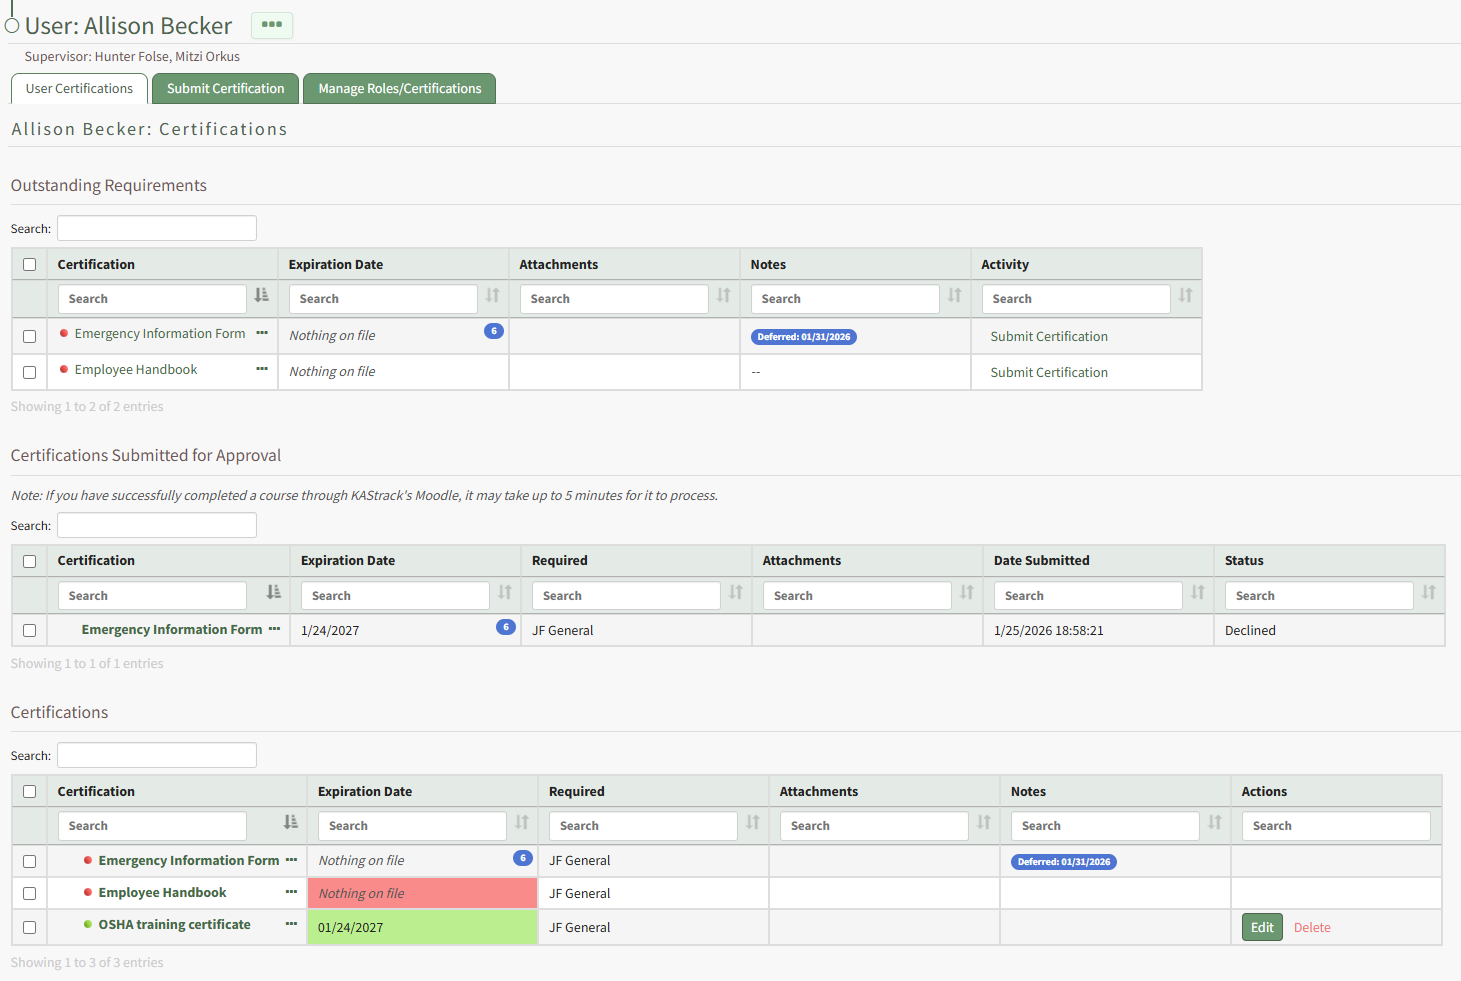
The My Certifications tab on the My Account Page allows a user to view their personal certifications summary. It is comprised of four sections: Outstanding Requirements, Certifications Submitted for Approval, Certifications, and Not Applicable. Each of the sections are outlined below.
The link https://[INSERT YOUR COMPANY'S DOMAIN NAME].kastrack.com/people/user?user_id=me can be provided to any user and will take the individual directly to their personal My Certifications Tab on the My Accounts Page in the People Module.
If there are no certifications relevant to the specific section, no table is visible below the section header.
Outstanding Requirements Section
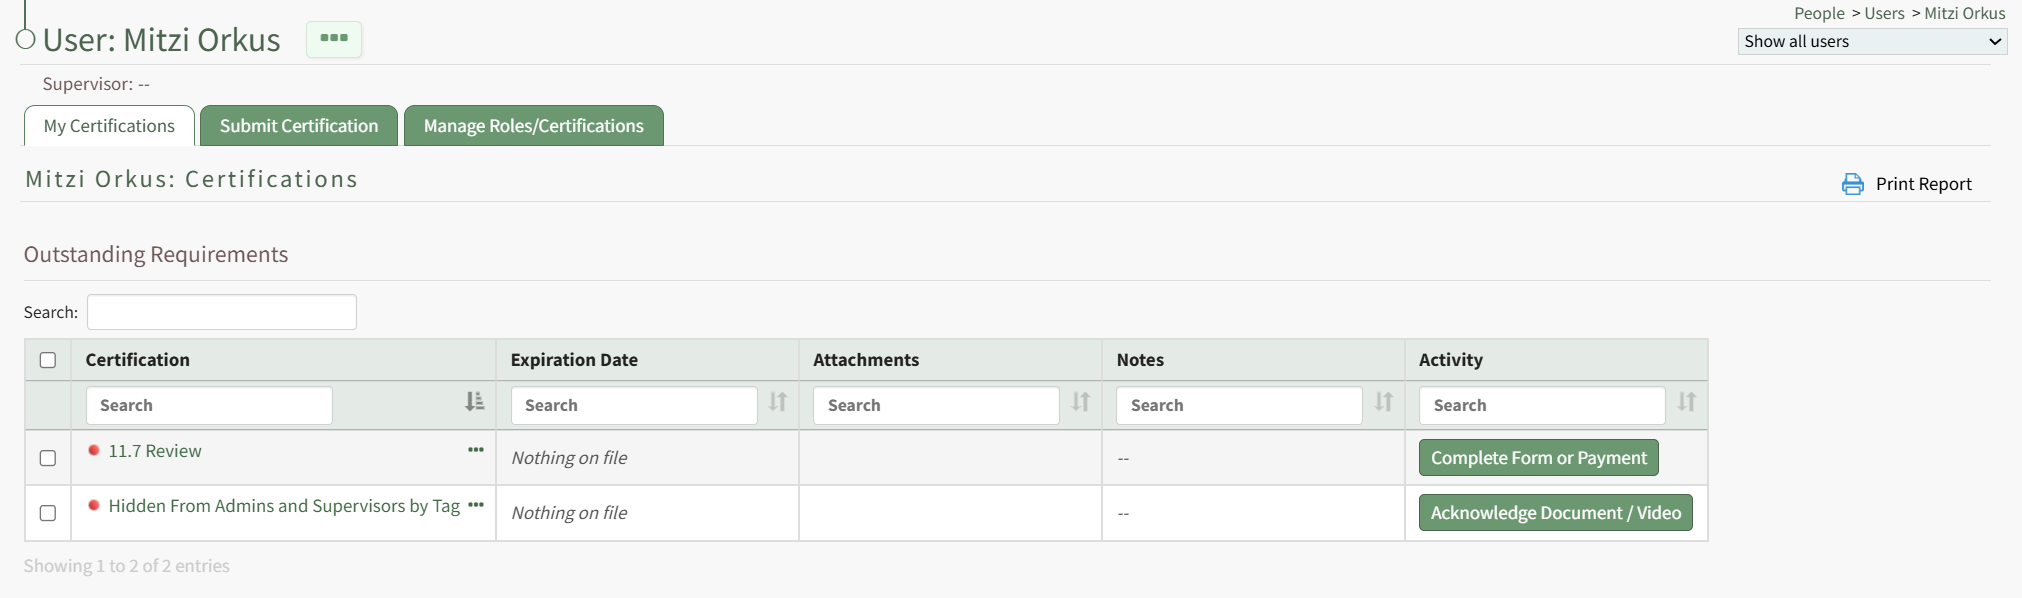
The Outstanding Requirements Section contains a table displays the outstanding or upcoming certifications that the is assigned to the user. This is the user's certification task list.
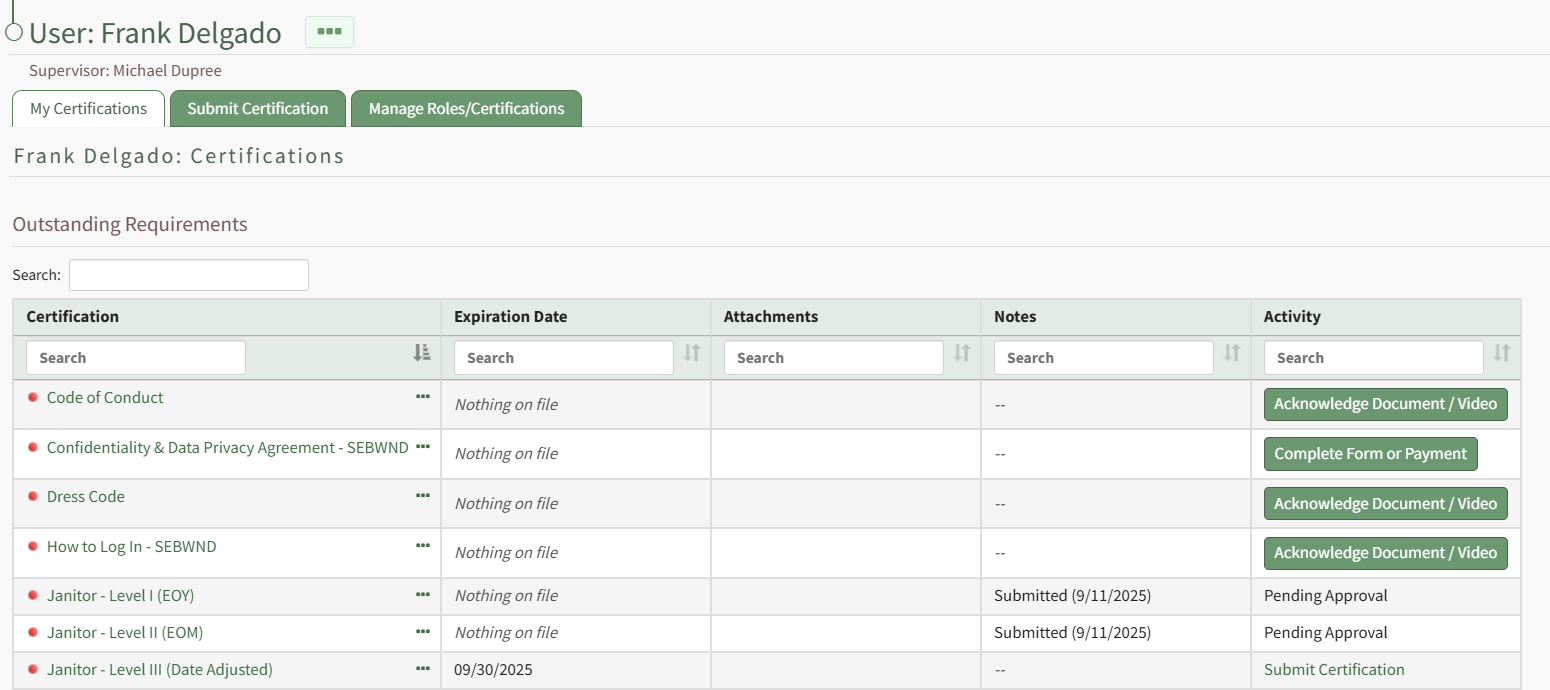
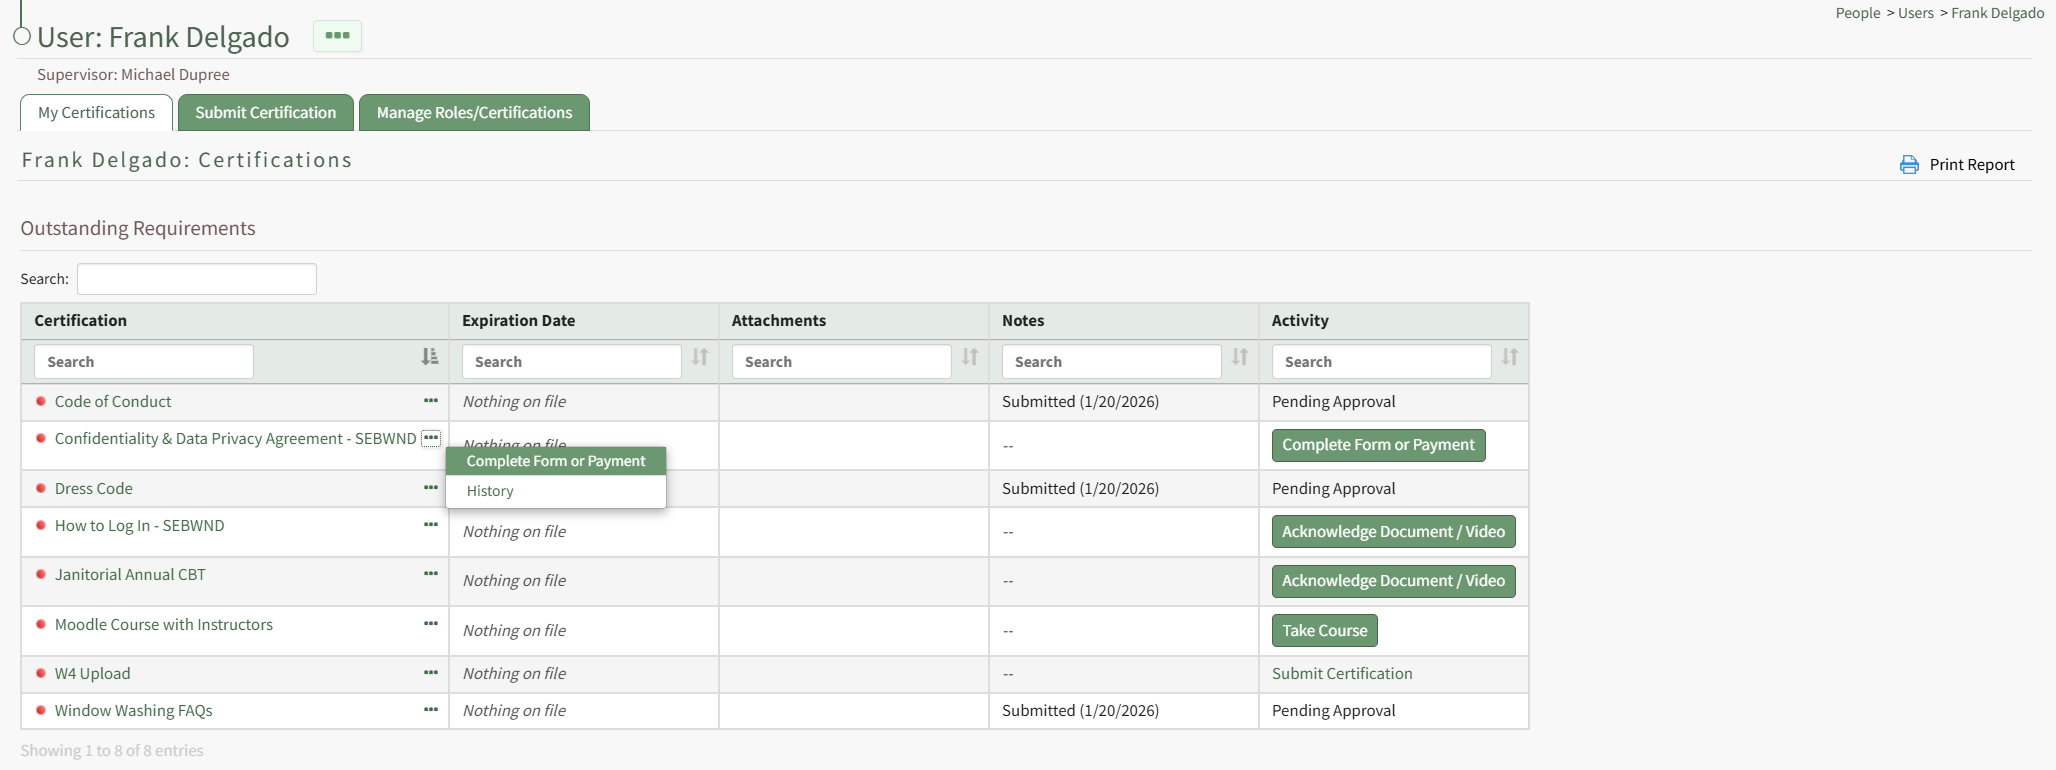
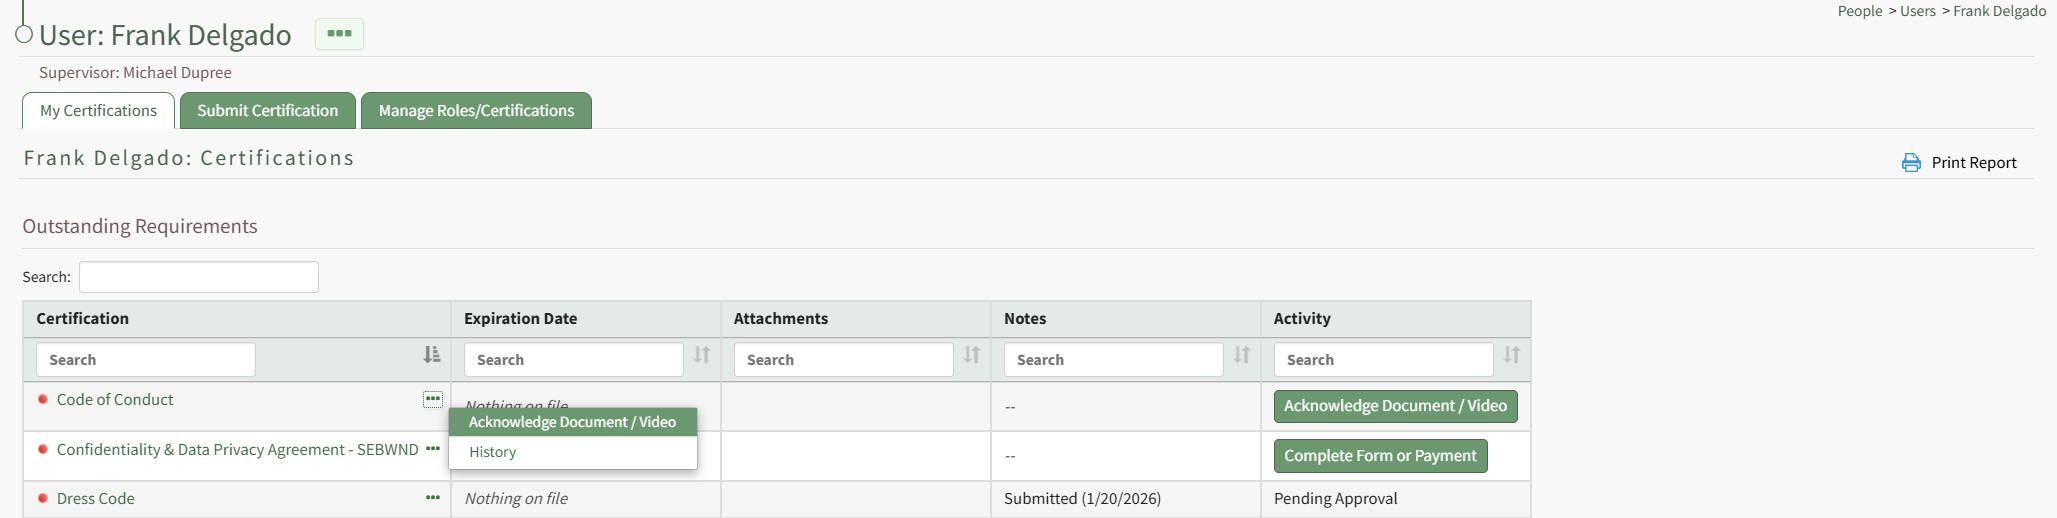
To the right of the certification name in the Outstanding Requirements Table is a three-dot icon that opens a context menu with various options for outstanding required certification management. Options visible on the context menu will vary based on the certification.
User Certifications Details Page Table Context Menu Option Explanations | |
Option | Explanation |
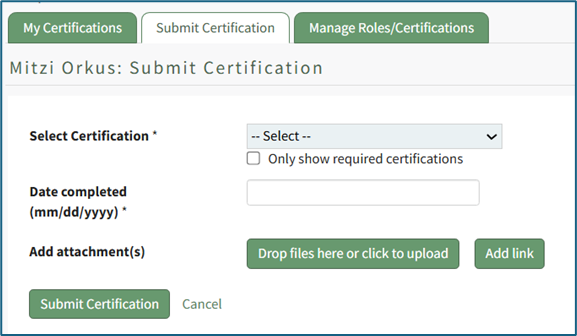
Submit Certifications | Selecting Submit Certification from the context menu for a specific certification opens your certification's Submit Certification Modal. It initiates the same action as the clickable Submit Certification link in the Activity column. How To: Submit a CertificationA user can submit a certification from the Submit Certification tab on the My Account Page in the People Module.
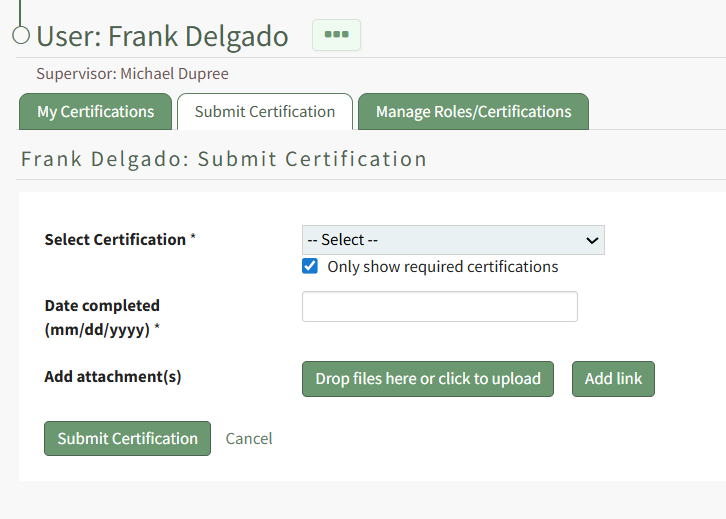
To submit a certification, select the certification to be submitted from the dropdown list. The “Only show required certifications” checkbox can be selected for ease. Placing the cursor in the Date completed textbox opens a calendar modal allowing a user to select the certification completion date. The date can also be entered manually in MM/DD/YYYY format. Add attachments by selecting the “Drop Files Here or Click to Upload” button. Add a link by selecting the “Add Link” button. Select the “Submit Certification” button to submit or “Cancel” to return to the My Certifications tab on the My Account Page.
|
Complete Form or Payment | Selecting Complete Form or Payment from the context menu for your certification will open the form or payment process that needs to be completed. It initiates the same action as the Complete Form or Payment Button in the Activity column. How To: Complete a Form Associated with a Required CertificationOne of the possible required activities for a certification is to require a form to be submitted or a payment to be made.
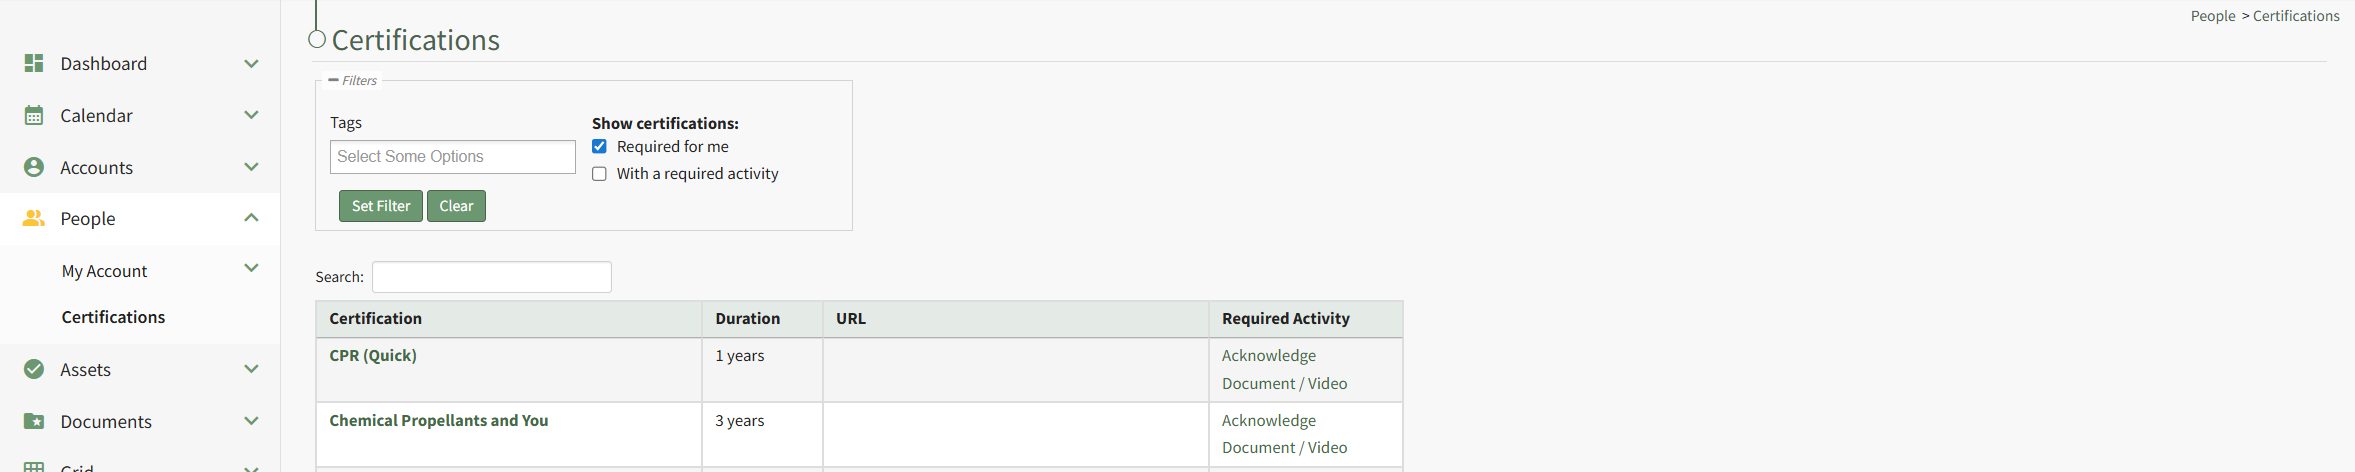
Complete Form or Payment is a context menu open as well as a button in the Activity column on a user's My Certifications Tab on the My Account Page of the People Module. It is also a clickable link in the Required Activity column on a User's Certifications Page.
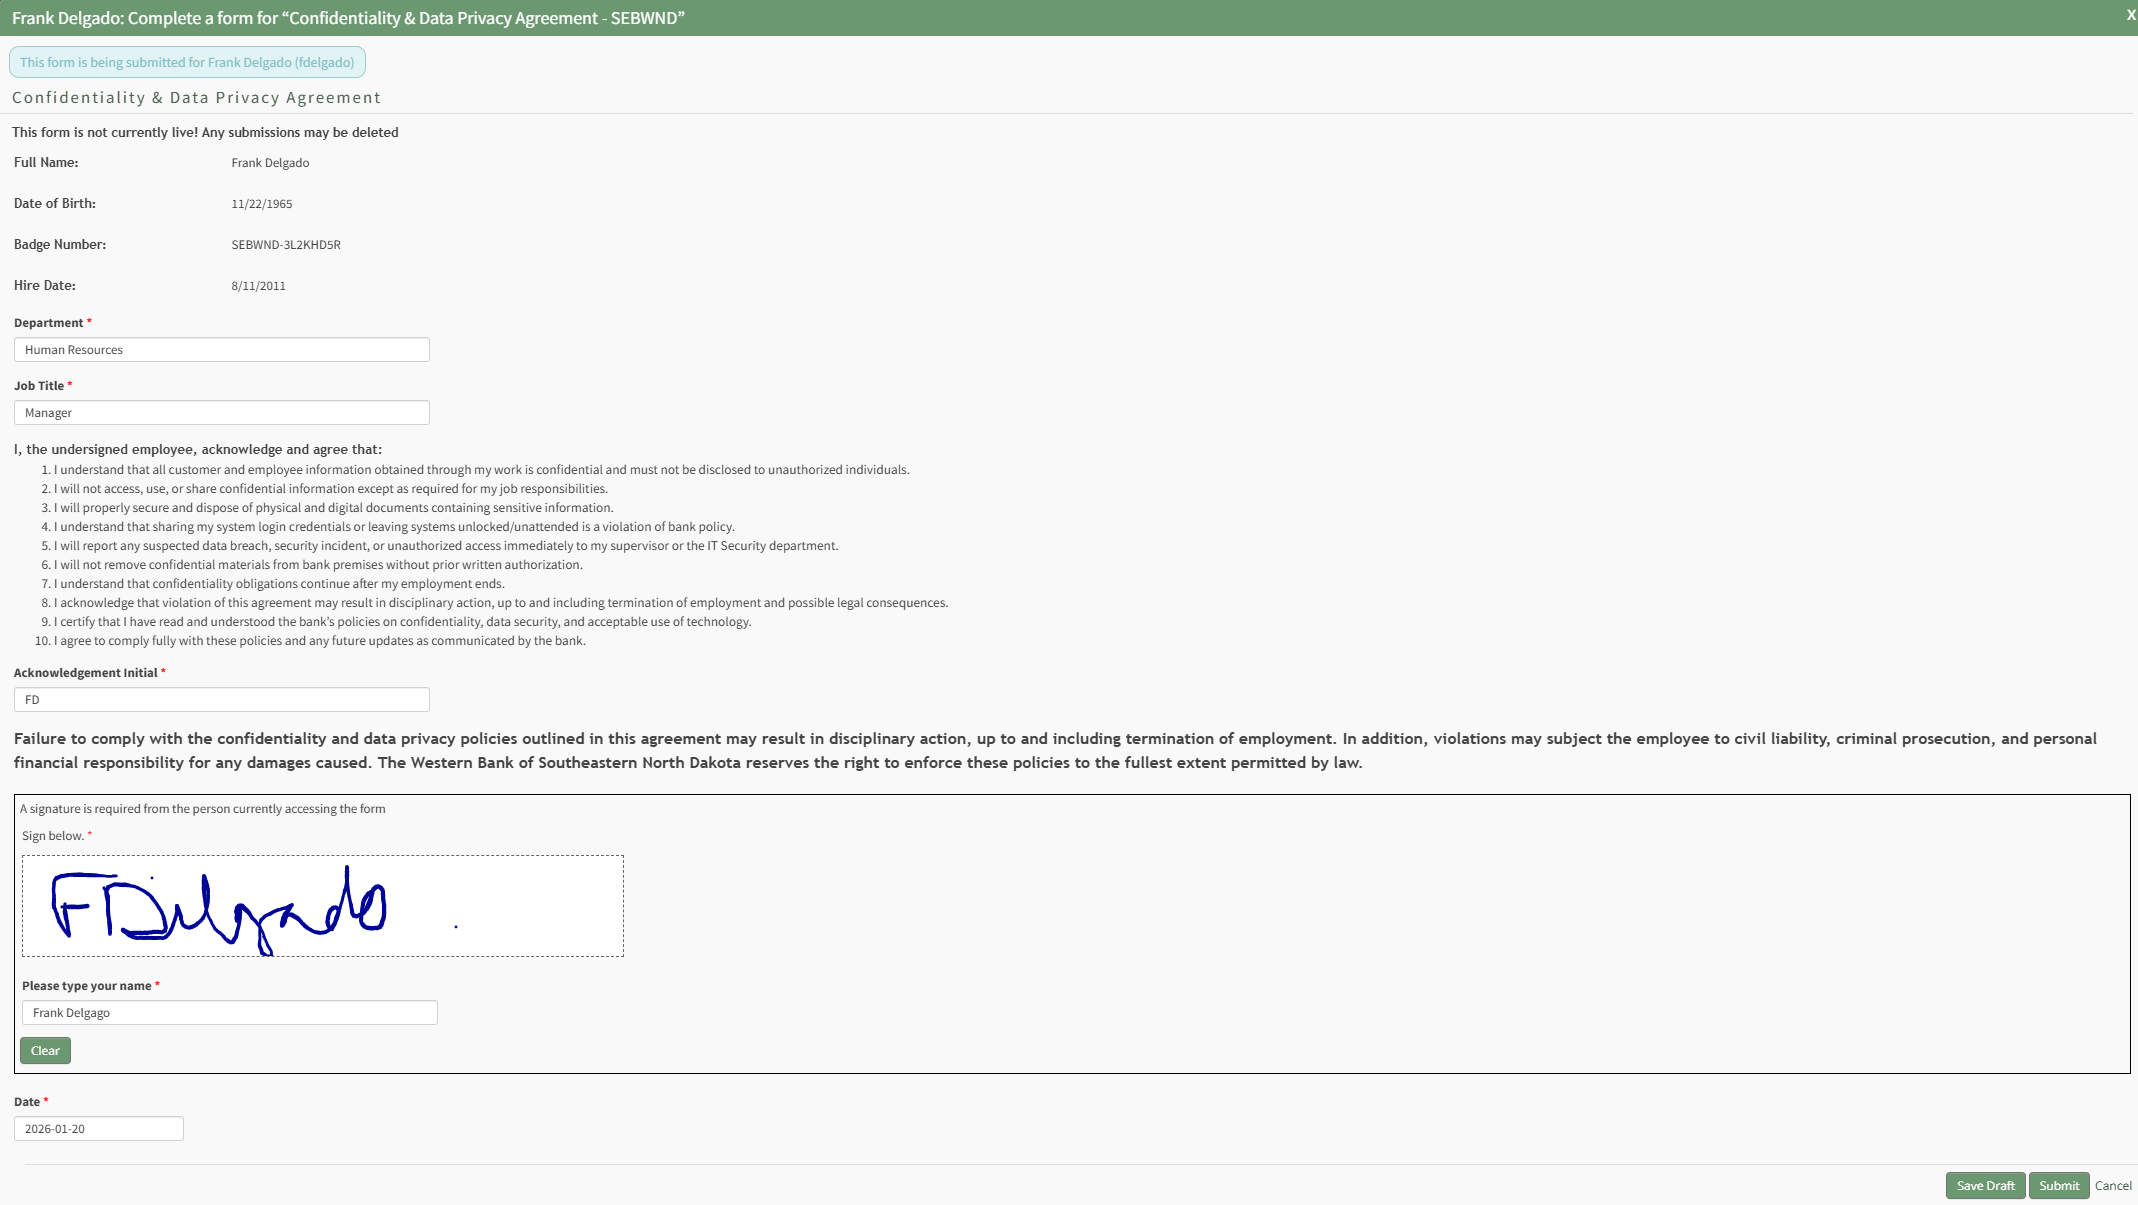
Select Complete Form or Payment to open the Complete a Form Modal, which displays the required activity directly in the modal.
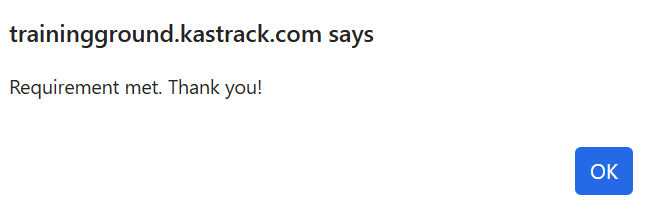
Any Form associated with a required activity has already been created in the Forms Module and Integrated with the People Module. Forms can be customized so that drafts can both be saved as progress is made and submitted from the modal. Select "Submit" from the Complete a Form Modal and a modal confirms that the certification's required actitivity has been met.
Select "OK" to return to the table you initiated completing the activity in.
|
Take Course | Selecting Take Course from the context menu for your certification will open the Course Instructions Page in Courses Module where you can start the required course. It initiates the same action as the Take Course button in the Activity column. How To: Take a Course Associated with a Required CertificationOne of the possible required activities for a certification is to require a user to take a course.
Take Course is a context menu open as well as a button in the Activity column on a user's My Certifications Tab on the My Account Page of the People Module. It is also a clickable link in the Required Activity column on a User's Certifications Page.
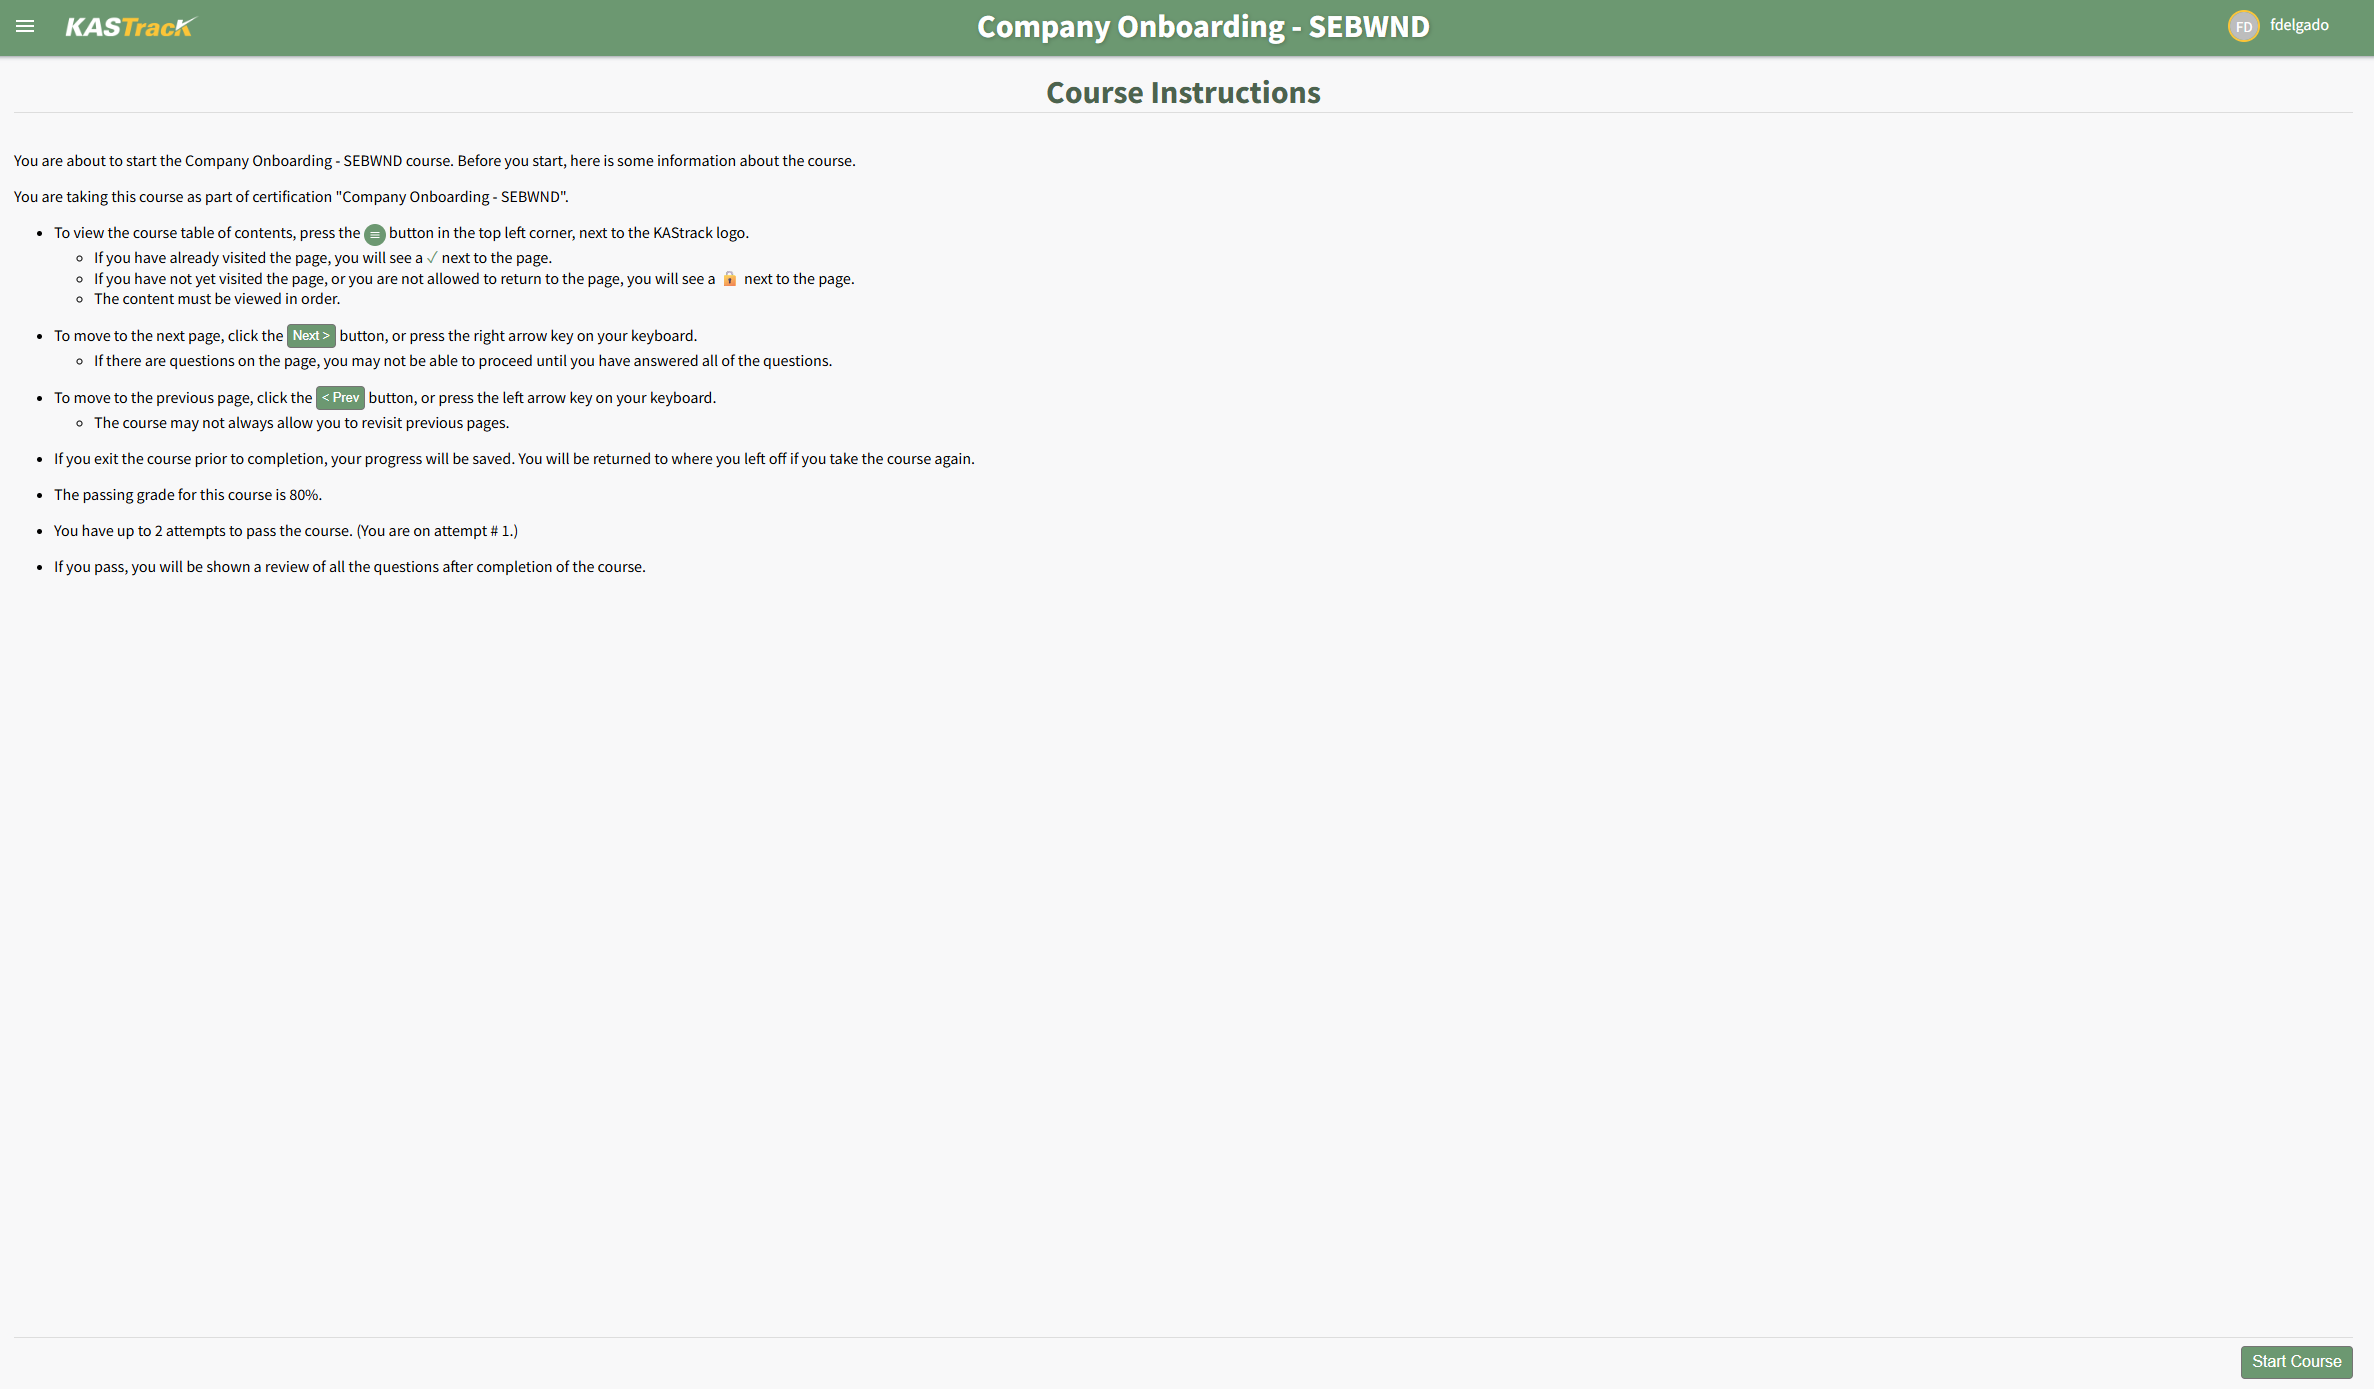
Select Take Course. If the course was created in KAStrack's Courses Module, the option to Take Course will open the Course Instructions Page. After completing the course, select the Back to KAStrack button to return to the People Module.
|
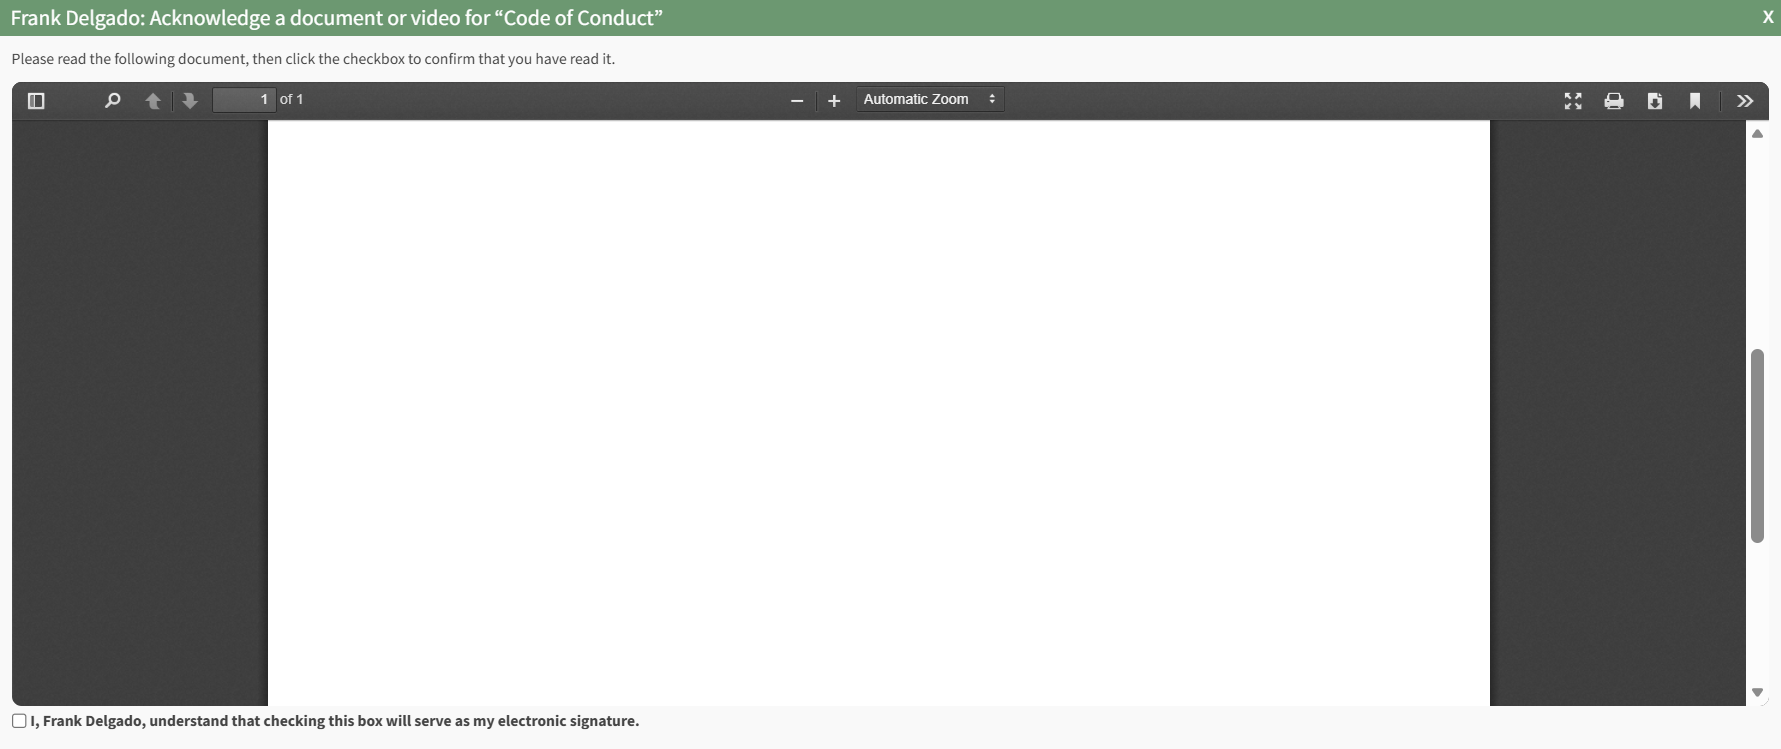
Acknowledge Document/Video | Selecting Acknowledge Document/Video from the context menu for your certification will open the Document/Video Acknowledgement Modal allowing the user to acknowledge the required document/video. It initiates the same action as the Acknowledge Document/Video button in the Activity column. How To: Acknowledge a Document/Video Associated with a Required CertificationOne of the possible required activities for a certification is to require acknowledgement of a document or video.
Acknowledge Document / Video is a context menu open as well as a button in the Activity column on a user's My Certifications Tab on the My Account Page of the People Module. It is also a clickable link in the Required Activity column on a User's Certifications Page.
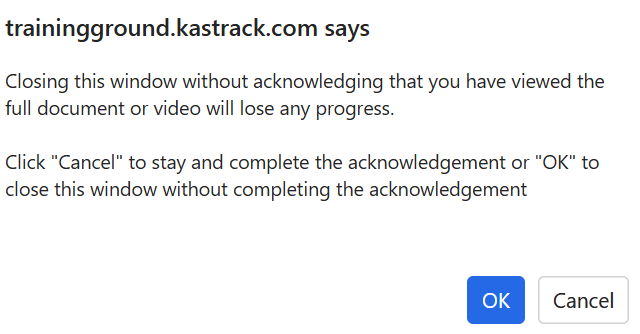
Select Acknowledge Document / Video to open the Acknowledge Document/Video Modal, which displays the required activity directly in the modal.
Click the checkbox with the statement, "I, FIRST/LAST NAME, understand that checking this box will serve as my electronic signature.
Clicking the checkbox completes the required activity. The completion of a required activity can also serve as the certification submission. This is a customizable property available to any certification.
|



Certifications Submitted for Approval Section
The Certifications Submitted for Approval Section contains a table that displays the certifications that have been submitted but are waiting for supervisor approval.

To the right of the certification name in the Submitted Certifications Table is a three-dot icon that opens the Submitted Certifications Context Menu. The table below explains the context menu options.
Submitted Certifications Table Context Menu Option Explanations | |
Option | Explanation |
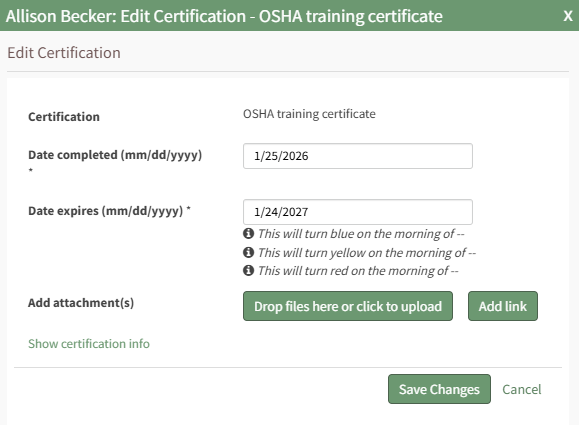
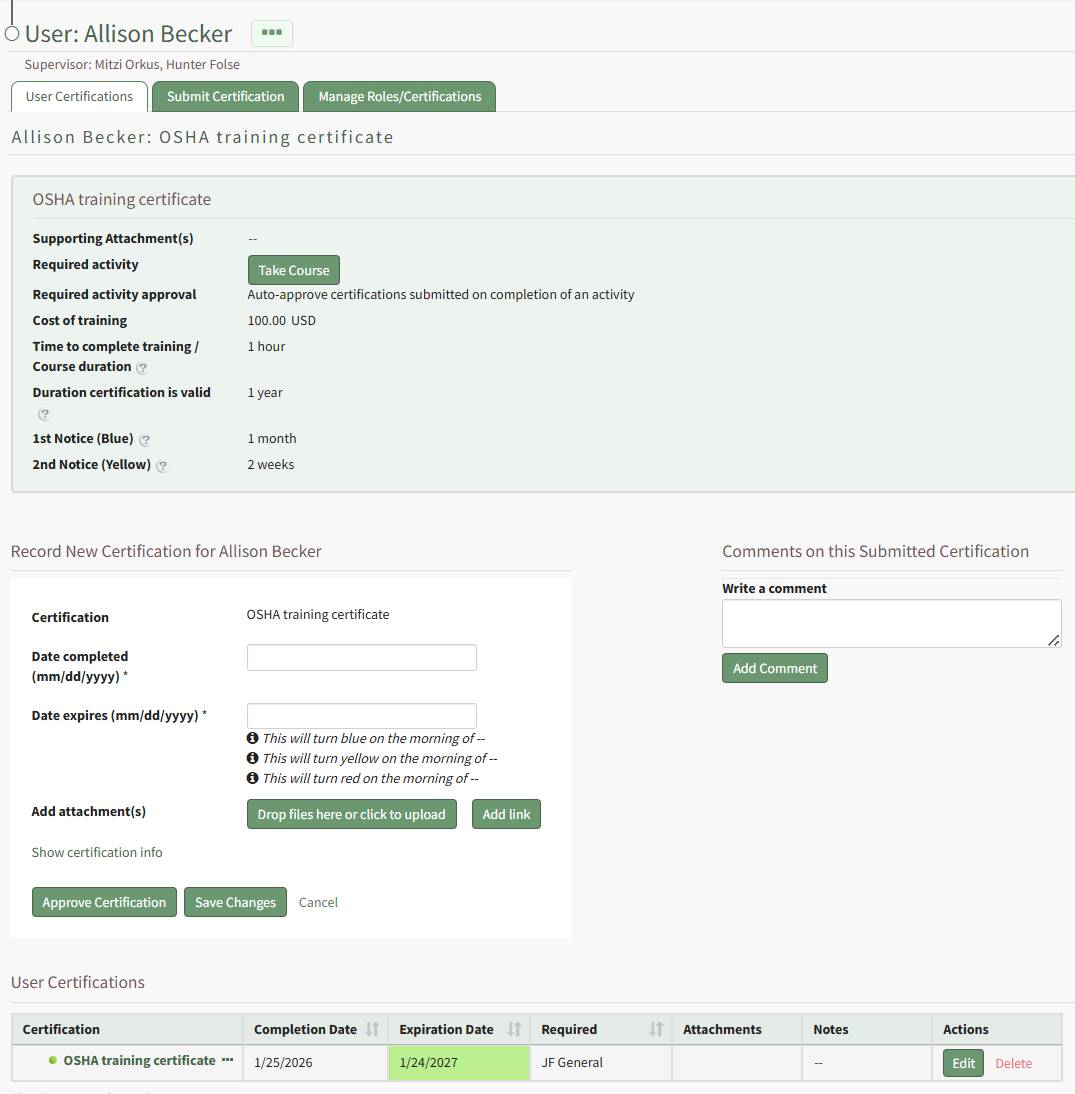
Edit | Selecting Edit from the Submitted Certifications Context Menu opens your certification's Submit Certification Modal. You can edit your certification's completion or expiration date, add attachments or a URL Link to the certification. How To: Edit a User's Certifications Completion/Expiration DatesTo edit a supervised user's certification completion or expiration dates, open the Users Page in the People Module and click the name of the user whose certification you want to attach a file or link to, opening the user's Certifications Details Page.
Click the Edit button in the Actions column to open the Edit Certification Modal.
Editing the completion date will result in the system editing the certification expiration date. Select the Save Changes button. Your edits will be reflected in the Certifications Table. How To: Attach a File or Link to a User's CertificationTo attach a file or link to a supervised user's certification, open the Users Page in the People Module and click the name of the user whose certification you want to attach a file or link to, opening the user's Certifications Details Page.
Click the certification name in the table opening the user's certification.
Select the "Drag Files Here or Click to Upload" button to attach a file to the user's certifications. Select the Add Link button to include a URL Link with the certification. Click the Save Changes button when complete.
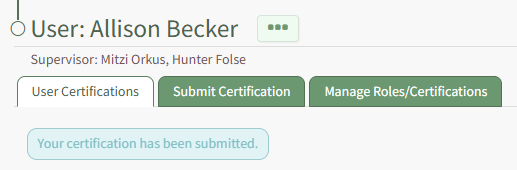
A textbox beneath the User Certification Tab confirms that your changes were submitted.
|
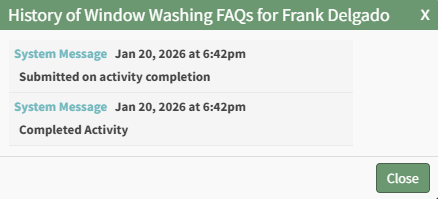
History | Selecting History from the Submitted Certifications Context Menu opens your certification's History Modal. This read-only modal summarizes the historical details associated with the user's certification. How To: View a User's Certification History ModalSupervisors and admins can access a supervised user's certification History Modal by opening the User Certification Tab on specific user's Certifications Details Page. Select the name of the relevant user from the Users Page to open the user's Certifications Details Page. User's can access the History Modal for one of their assigned certifications by opening the My Certification Tab on the My Account Page of the People Module.
History is a context menu option in each of the User Certification Tables. Select History from the context menu opening the user's Certification History Modal.
The read-only modal shows any history regarding the user's certification. Select close to return to the page you were previously viewing.
|

Certifications Section
The Certifications Section contains a table that displays the certifications that shows all certifications that are required or were previously completed by the user.
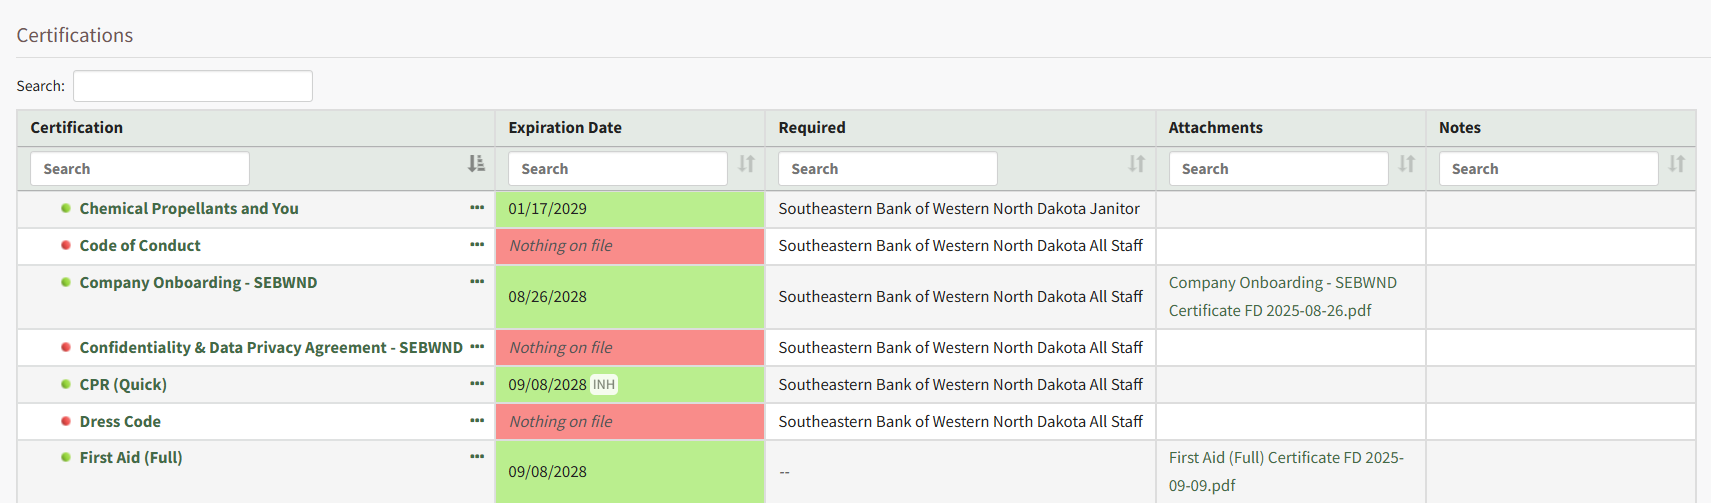
To the left of the certification name, the dot indicates the certification status. This matches the coloring of the expiration date cell. The required column states which certification role the certification is required for. The attachments column could include a PDF of the form entry, auto-generated certificates, or manual uploads.
Clicking on the three-dot icon to the right of the Certification Name opens a context menu with the options for certifications management. The possible context menu options are explained in the table below.
Certifications Table Context Menu Option Explanations | |
Option | Explanation |
Complete Form or Payment | Selecting Complete Form or Payment from the context menu for your certification will open the form or payment process that needs to be completed. It initiates the same action as the Complete Form or Payment Button in the Activity column. How To: Complete a Form Associated with a Required CertificationOne of the possible required activities for a certification is to require a form to be submitted or a payment to be made.
Complete Form or Payment is a context menu open as well as a button in the Activity column on a user's My Certifications Tab on the My Account Page of the People Module. It is also a clickable link in the Required Activity column on a User's Certifications Page.
Select Complete Form or Payment to open the Complete a Form Modal, which displays the required activity directly in the modal.
Any Form associated with a required activity has already been created in the Forms Module and Integrated with the People Module. Forms can be customized so that drafts can both be saved as progress is made and submitted from the modal. Select "Submit" from the Complete a Form Modal and a modal confirms that the certification's required actitivity has been met.
Select "OK" to return to the table you initiated completing the activity in. How To: Complete Payment for a Required CertificationTo complete a payment for a required certification, open the My Certifications Tab on the My Account Page in the People Module from the Main Menu.
The certification that required a payment will be visible in the Outstanding Requirements Table. Select the Complete Form or Payment button in the Activity column to the right of the certification opening the Complete Payment Modal. The fields on the modal can vary. Complete the instructions on the modal to make payment and complete the certification requirement.
|
Take Course | Selecting Take Course from the context menu for your certification will open the Course Instructions Page in Courses Module where you can start the required course. It initiates the same action as the Take Course button in the Activity column. How To: Take a Course Associated with a Required CertificationOne of the possible required activities for a certification is to require a user to take a course.
Take Course is a context menu open as well as a button in the Activity column on a user's My Certifications Tab on the My Account Page of the People Module. It is also a clickable link in the Required Activity column on a User's Certifications Page.
Select Take Course. If the course was created in KAStrack's Courses Module, the option to Take Course will open the Course Instructions Page. After completing the course, select the Back to KAStrack button to return to the People Module.
|
Acknowledge Document/Video | Selecting Acknowledge Document/Video from the context menu for your certification will open the Document/Video Acknowledgement Modal allowing the user to acknowledge the required document/video. It initiates the same action as the Acknowledge Document/Video button in the Activity column. How To: Acknowledge a Document/Video Associated with a Required CertificationOne of the possible required activities for a certification is to require acknowledgement of a document or video.
Acknowledge Document / Video is a context menu open as well as a button in the Activity column on a user's My Certifications Tab on the My Account Page of the People Module. It is also a clickable link in the Required Activity column on a User's Certifications Page.
Select Acknowledge Document / Video to open the Acknowledge Document/Video Modal, which displays the required activity directly in the modal.
Click the checkbox with the statement, "I, FIRST/LAST NAME, understand that checking this box will serve as my electronic signature.
Clicking the checkbox completes the required activity. The completion of a required activity can also serve as the certification submission. This is a customizable property available to any certification.
|
History | Selecting History from the context menu opens the specific user's Certification History Modal. This read-only modal summarizes the historical details associated with the user's certification. How To: View a User's Certification History ModalSupervisors and admins can access a supervised user's certification History Modal by opening the User Certification Tab on specific user's Certifications Details Page. Select the name of the relevant user from the Users Page to open the user's Certifications Details Page. User's can access the History Modal for one of their assigned certifications by opening the My Certification Tab on the My Account Page of the People Module.
History is a context menu option in each of the User Certification Tables. Select History from the context menu opening the user's Certification History Modal.
The read-only modal shows any history regarding the user's certification. Select close to return to the page you were previously viewing.
|
Not Applicable Section
The Not Applicable Section separates certifications that are assigned to you through your certification role but you are not required to complete. The table displays certifications that are required for other employees in one of your specified certification roles but an administrator designated as not applicable for this user.
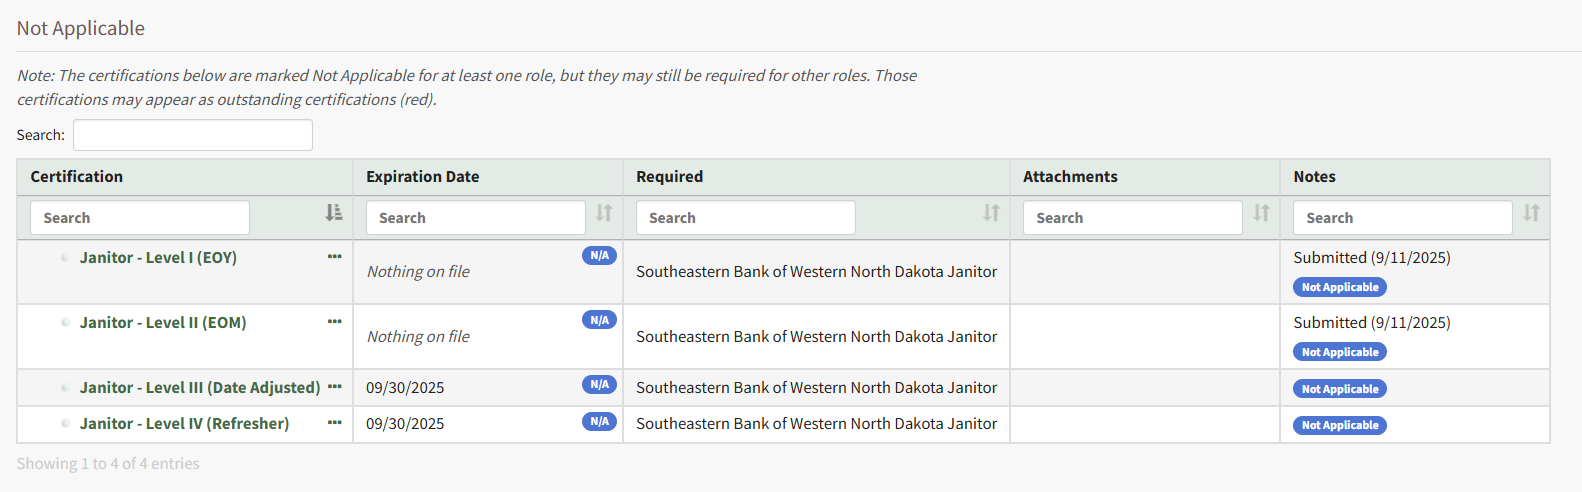
Clicking on the three-dot icon to the right of the Certification Name in the Not Applicable Section opens a context menu with the options for certifications management. The possible context menu options are explained in the table below.
Not Applicable Table Context Menu Option Explanations | |
Option | Explanation |
Submit Certification | Selecting Submit Certification from the context menu for the certification designated at not applicable opens the certification's Submit Certification Modal. It initiates the same action as the clickable Submit Certification link in the Activity column. How To: Submit a CertificationA user can submit a certification from the Submit Certification tab on the My Account Page in the People Module.
To submit a certification, select the certification to be submitted from the dropdown list. The “Only show required certifications” checkbox can be selected for ease. Placing the cursor in the Date completed textbox opens a calendar modal allowing a user to select the certification completion date. The date can also be entered manually in MM/DD/YYYY format. Add attachments by selecting the “Drop Files Here or Click to Upload” button. Add a link by selecting the “Add Link” button. Select the “Submit Certification” button to submit or “Cancel” to return to the My Certifications tab on the My Account Page.
|
History | Selecting History from the context menu opens the Certification History Modal for the certification. This read-only modal summarizes the historical details associated with the user's certification. How To: View a User's Certification History ModalSupervisors and admins can access a supervised user's certification History Modal by opening the User Certification Tab on specific user's Certifications Details Page. Select the name of the relevant user from the Users Page to open the user's Certifications Details Page. User's can access the History Modal for one of their assigned certifications by opening the My Certification Tab on the My Account Page of the People Module.
History is a context menu option in each of the User Certification Tables. Select History from the context menu opening the user's Certification History Modal.
The read-only modal shows any history regarding the user's certification. Select close to return to the page you were previously viewing.
|
The Submit Certifications Tab
The Submit Certifications Tab is a place where you can submit your required certifications for approval.
The link https://[INSERT YOUR COMPANY'S DOMAIN NAME].kastrack.com/people/user/submitCertification?user_id=me can be provided to any user and will take the individual directly to their personal Submit Certifications Tab on the My Accounts Page in the People Module.
The Manage Roles/Certifications Tab
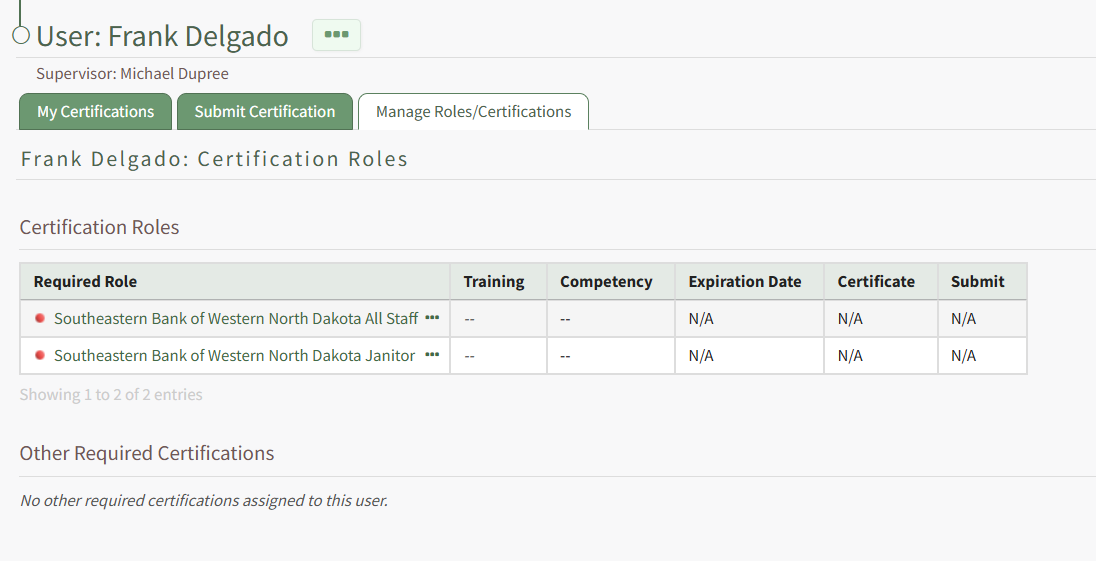
The Manage Roles/Certifications Tab on The My Account Page in the People Modules displays an employee’s certification roles in tabular form.
The link https://[INSERT YOUR COMPANY'S DOMAIN NAME].kastrack.com/people/user/roles?user_id=me can be provided to any user and will take the individual directly to their personal Manage Roles/Certifications Tab on the My Accounts Page in the People Module.
How To: Record a New Competency Certificate
Competency tracking allows your organization a way to track users’ fitness / competence to be assigned to a particular role. This provides a way to ensure users meet the necessary requirements and standards to perform the role they're in. When competency tracking is enabled for your KAStrack installation, you can set up individual Certification Roles to track competency by defining competency settings in the Certification Role's Details Page.
Define Competency Settings for a Role
If competency tracking is enabled for your KAStrack installation, you can define the Competency Settings for a Certification Role while creating or editing the role. Competency allows your organization a way to track users’ fitness / competence to be assigned to a particular role. This provides a way to ensure users meet the necessary requirements and standards to perform the role they're in.
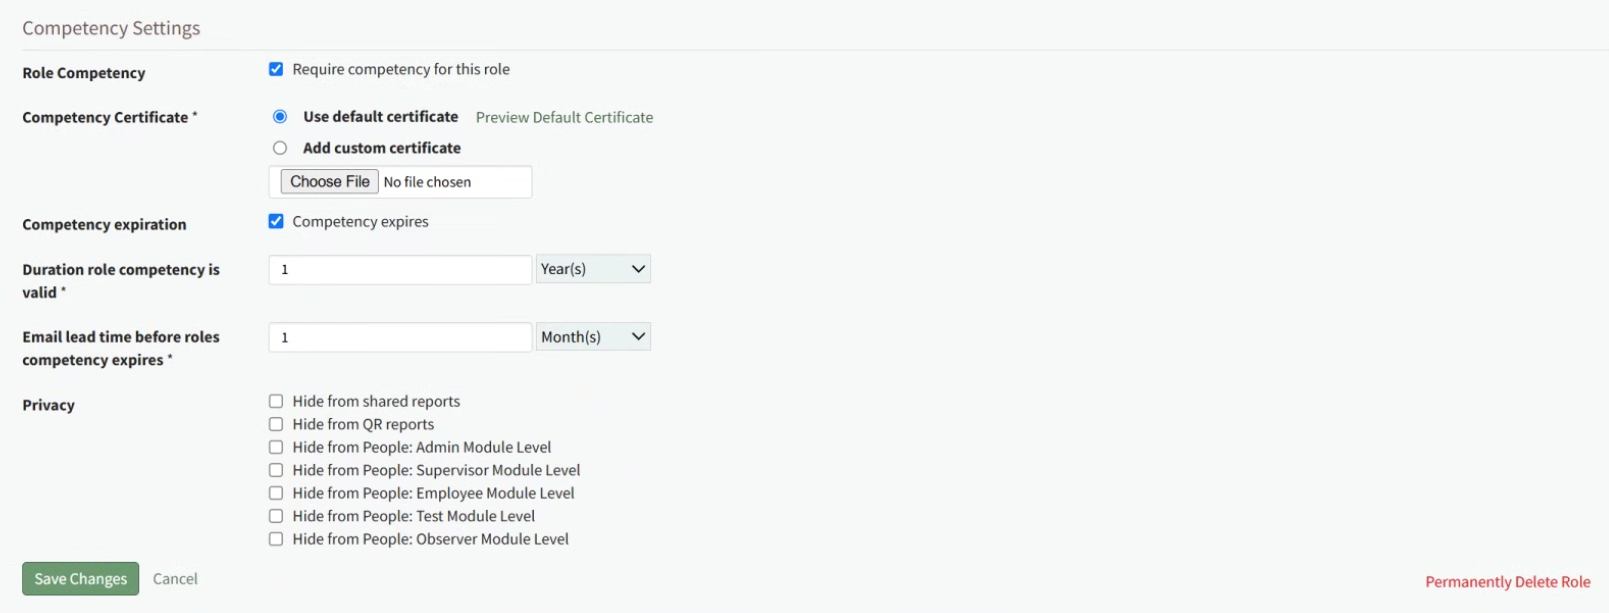
To enable Competency tracking for a Certification Role, click the checkbox next to “Require competency for this role”.
Next, choose whether to “Use default certificate” or “Add custom certificate” for Competency evaluation. Using the default certificate will assign a system-generated evaluation worksheet to be filled out when the assigned user’s competency requirement is being completed. If you’d like to use a different certificate for this purpose, choose “Add custom certificate” and then select the “Choose File” button underneath it and upload the desired file.
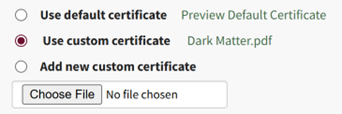
When editing Competency Settings after a custom certificate has been selected, these options change to allow selection between the default certificate, the existing custom certificate, and adding a new custom certificate.
If the competency expires after a certain amount of time, click the checkbox next to “Competency expires”. This allows you to define the “Duration role competency is valid” and “Email lead time before roles competency expires”. The duration the competency is valid refers to the time until the competency expires. The email lead time refers to the warning period given to the user before their competency has expired. Fill in a numerical value next to each field, and choose the time period of either years, months, weeks, or days. To ensure the user is properly alerted that their competency is expiring soon, make sure that the “Email lead time” value is sooner than the value for the “Duration role competency is valid”.
Privacy settings on the Competency allow you to hide competency for this role from various reports and/or users with specified People Module Levels. Click the checkbox next to any options you’d like to hide the role competency from. If choosing People Module Levels, users with only those Module Levels will not see the role competency when viewing reports that include it, and also will not see it as a required action If they are assigned to this Certification Role. If you’d like to hide the Competency from inclusion in any shared reports or QR reports, regardless of a user’s People Module Levels, select those options.
Selecting a People Module Level in Privacy hides the Competency from users with only that Module Level. If a user has multiple People Module Levels, they may still see the Competency unless the Competency is hidden from all of those Module Levels.
How To: Record a New Competency Certificate
Competency tracking allows your organization a way to track users’ fitness / competence to be assigned to a particular role. This provides a way to ensure users meet the necessary requirements and standards to perform the role they're in. When competency tracking is enabled for your KAStrack installation, you can set up individual Certification Roles to track competency by defining competency settings in the Certification Role's Details Page.
Define Competency Settings for a Role
If competency tracking is enabled for your KAStrack installation, you can define the Competency Settings for a Certification Role while creating or editing the role. Competency allows your organization a way to track users’ fitness / competence to be assigned to a particular role. This provides a way to ensure users meet the necessary requirements and standards to perform the role they're in.
To enable Competency tracking for a Certification Role, click the checkbox next to “Require competency for this role”.
Next, choose whether to “Use default certificate” or “Add custom certificate” for Competency evaluation. Using the default certificate will assign a system-generated evaluation worksheet to be filled out when the assigned user’s competency requirement is being completed. If you’d like to use a different certificate for this purpose, choose “Add custom certificate” and then select the “Choose File” button underneath it and upload the desired file.
When editing Competency Settings after a custom certificate has been selected, these options change to allow selection between the default certificate, the existing custom certificate, and adding a new custom certificate.
If the competency expires after a certain amount of time, click the checkbox next to “Competency expires”. This allows you to define the “Duration role competency is valid” and “Email lead time before roles competency expires”. The duration the competency is valid refers to the time until the competency expires. The email lead time refers to the warning period given to the user before their competency has expired. Fill in a numerical value next to each field, and choose the time period of either years, months, weeks, or days. To ensure the user is properly alerted that their competency is expiring soon, make sure that the “Email lead time” value is sooner than the value for the “Duration role competency is valid”.
Privacy settings on the Competency allow you to hide competency for this role from various reports and/or users with specified People Module Levels. Click the checkbox next to any options you’d like to hide the role competency from. If choosing People Module Levels, users with only those Module Levels will not see the role competency when viewing reports that include it, and also will not see it as a required action If they are assigned to this Certification Role. If you’d like to hide the Competency from inclusion in any shared reports or QR reports, regardless of a user’s People Module Levels, select those options.
Selecting a People Module Level in Privacy hides the Competency from users with only that Module Level. If a user has multiple People Module Levels, they may still see the Competency unless the Competency is hidden from all of those Module Levels.
How To: Record a New Competency Certificate
Competency tracking allows your organization a way to track users’ fitness / competence to be assigned to a particular role. This provides a way to ensure users meet the necessary requirements and standards to perform the role they're in. When competency tracking is enabled for your KAStrack installation, you can set up individual Certification Roles to track competency by defining competency settings in the Certification Role's Details Page.
Define Competency Settings for a Role
If competency tracking is enabled for your KAStrack installation, you can define the Competency Settings for a Certification Role while creating or editing the role. Competency allows your organization a way to track users’ fitness / competence to be assigned to a particular role. This provides a way to ensure users meet the necessary requirements and standards to perform the role they're in.
To enable Competency tracking for a Certification Role, click the checkbox next to “Require competency for this role”.
Next, choose whether to “Use default certificate” or “Add custom certificate” for Competency evaluation. Using the default certificate will assign a system-generated evaluation worksheet to be filled out when the assigned user’s competency requirement is being completed. If you’d like to use a different certificate for this purpose, choose “Add custom certificate” and then select the “Choose File” button underneath it and upload the desired file.
When editing Competency Settings after a custom certificate has been selected, these options change to allow selection between the default certificate, the existing custom certificate, and adding a new custom certificate.
If the competency expires after a certain amount of time, click the checkbox next to “Competency expires”. This allows you to define the “Duration role competency is valid” and “Email lead time before roles competency expires”. The duration the competency is valid refers to the time until the competency expires. The email lead time refers to the warning period given to the user before their competency has expired. Fill in a numerical value next to each field, and choose the time period of either years, months, weeks, or days. To ensure the user is properly alerted that their competency is expiring soon, make sure that the “Email lead time” value is sooner than the value for the “Duration role competency is valid”.
Privacy settings on the Competency allow you to hide competency for this role from various reports and/or users with specified People Module Levels. Click the checkbox next to any options you’d like to hide the role competency from. If choosing People Module Levels, users with only those Module Levels will not see the role competency when viewing reports that include it, and also will not see it as a required action If they are assigned to this Certification Role. If you’d like to hide the Competency from inclusion in any shared reports or QR reports, regardless of a user’s People Module Levels, select those options.
Selecting a People Module Level in Privacy hides the Competency from users with only that Module Level. If a user has multiple People Module Levels, they may still see the Competency unless the Competency is hidden from all of those Module Levels.
How To: Record a New Competency Certificate
{{@919}}
Once a Certification Role has Competency settings defined, there are three ways that the Competency can be marked complete for a user.
Recording Competency Certificates from an individual User's Page
Employees, their Supervisor(s), and site Admins can record Competency Certificates by visiting an individual User's page in the People Module.
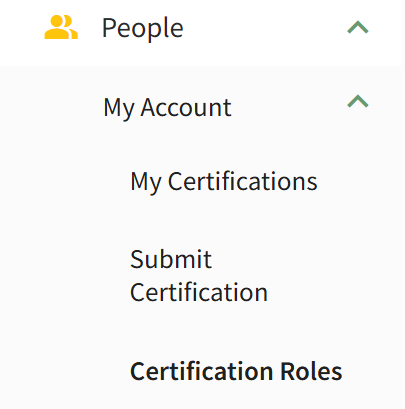
For an Employee looking to record their own Competency Certificate, click on People, then My Account, then Certification Roles from the Main Menu to access the Manage Roles/Certifications tab of the User page.
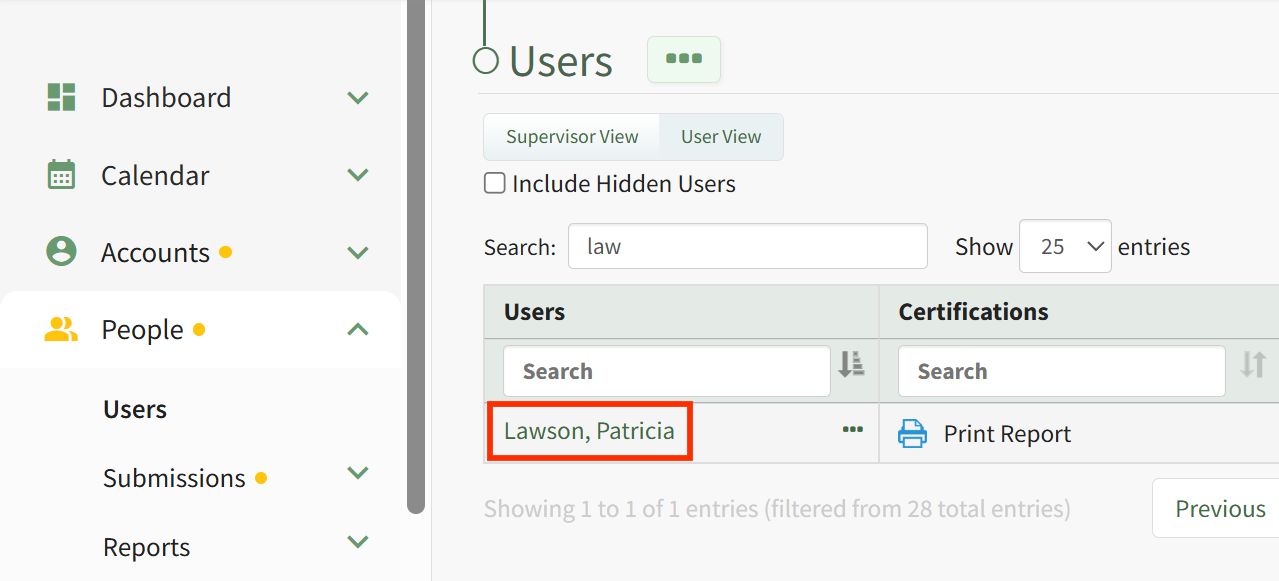
For a Supervisor or Admin looking to record Competency for another user, click on People, then Users from the Main Menu, then click on the name of the user you wish to record Competency for.
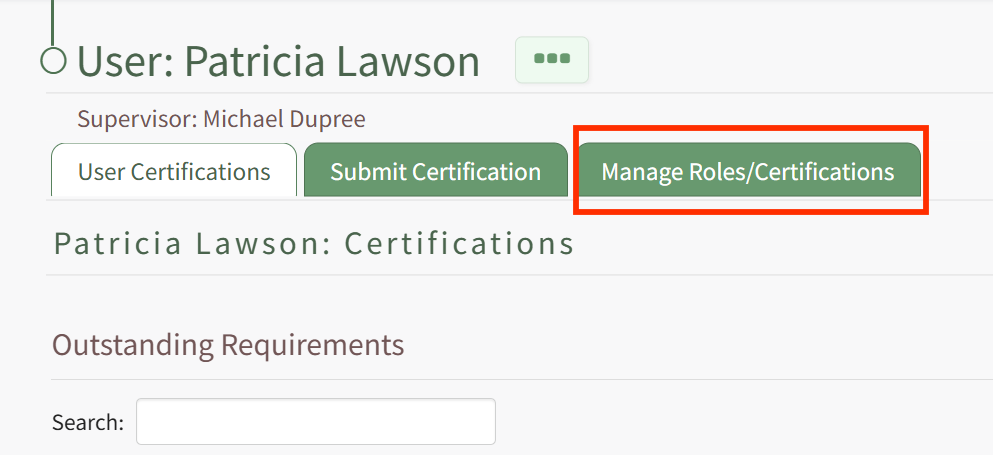
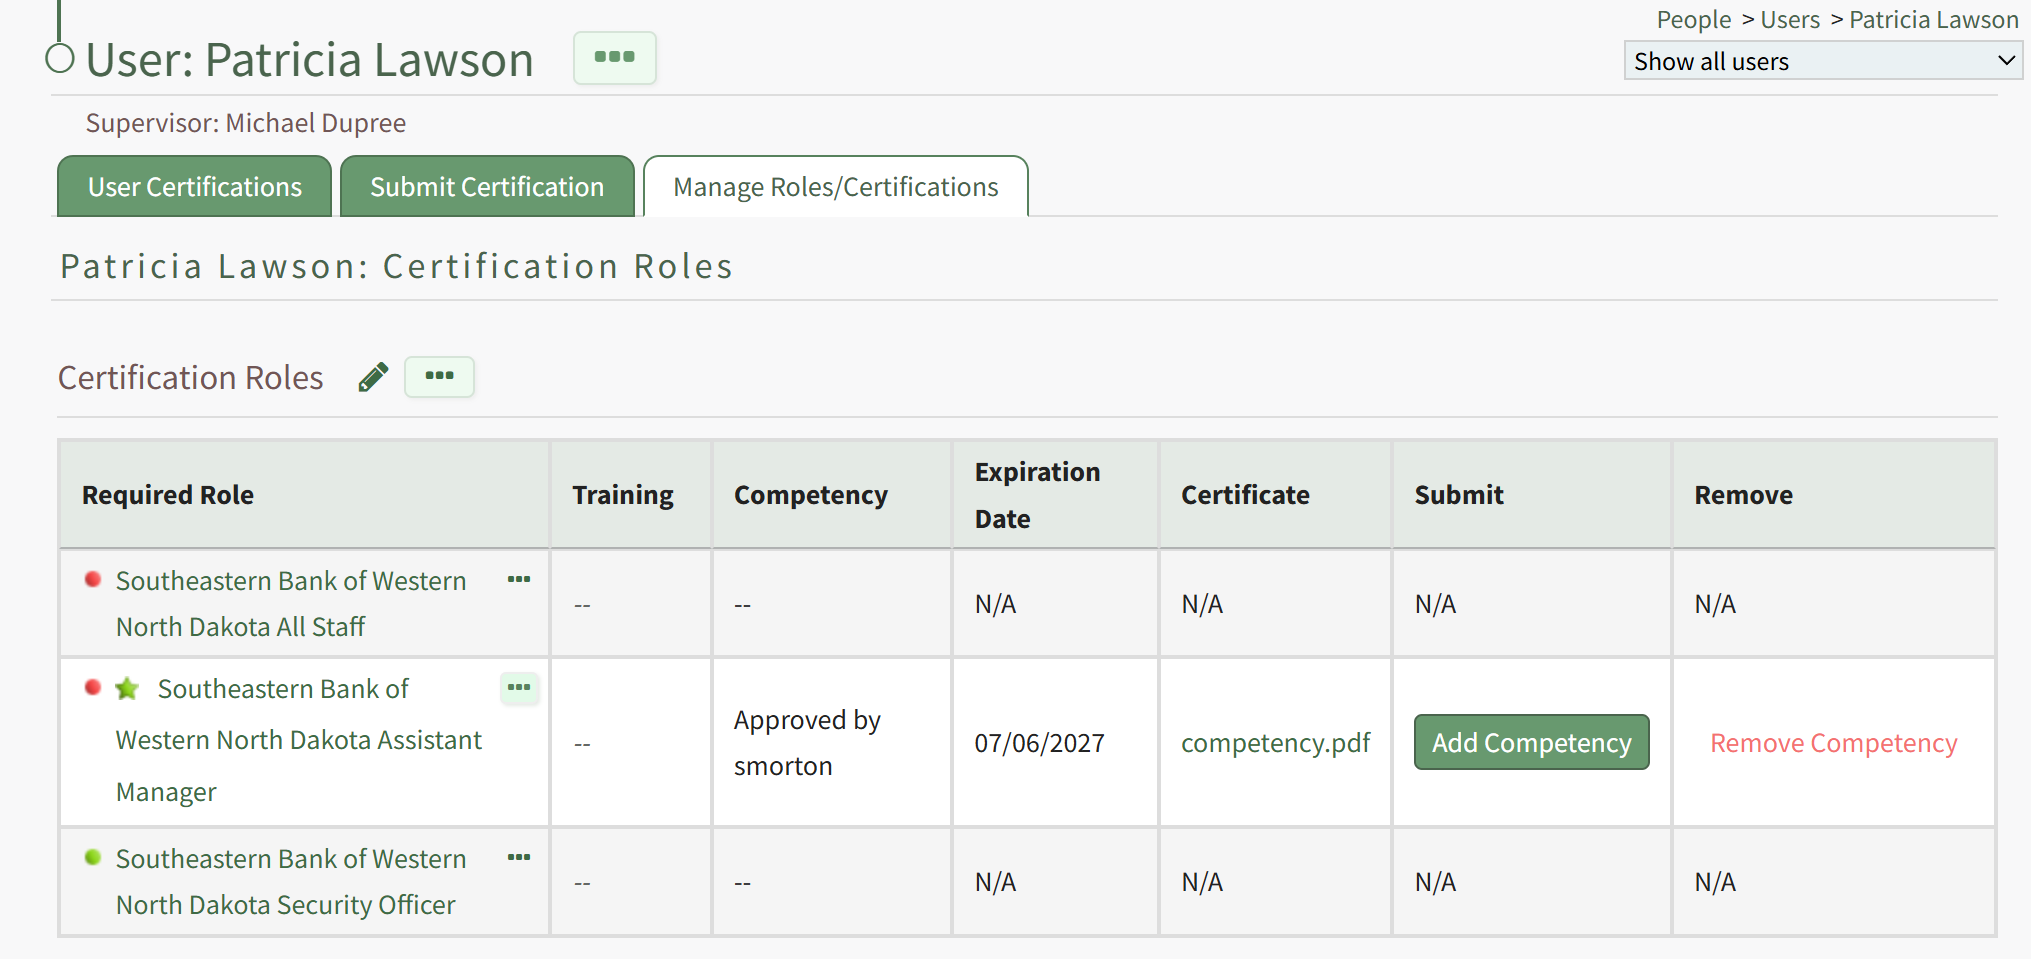
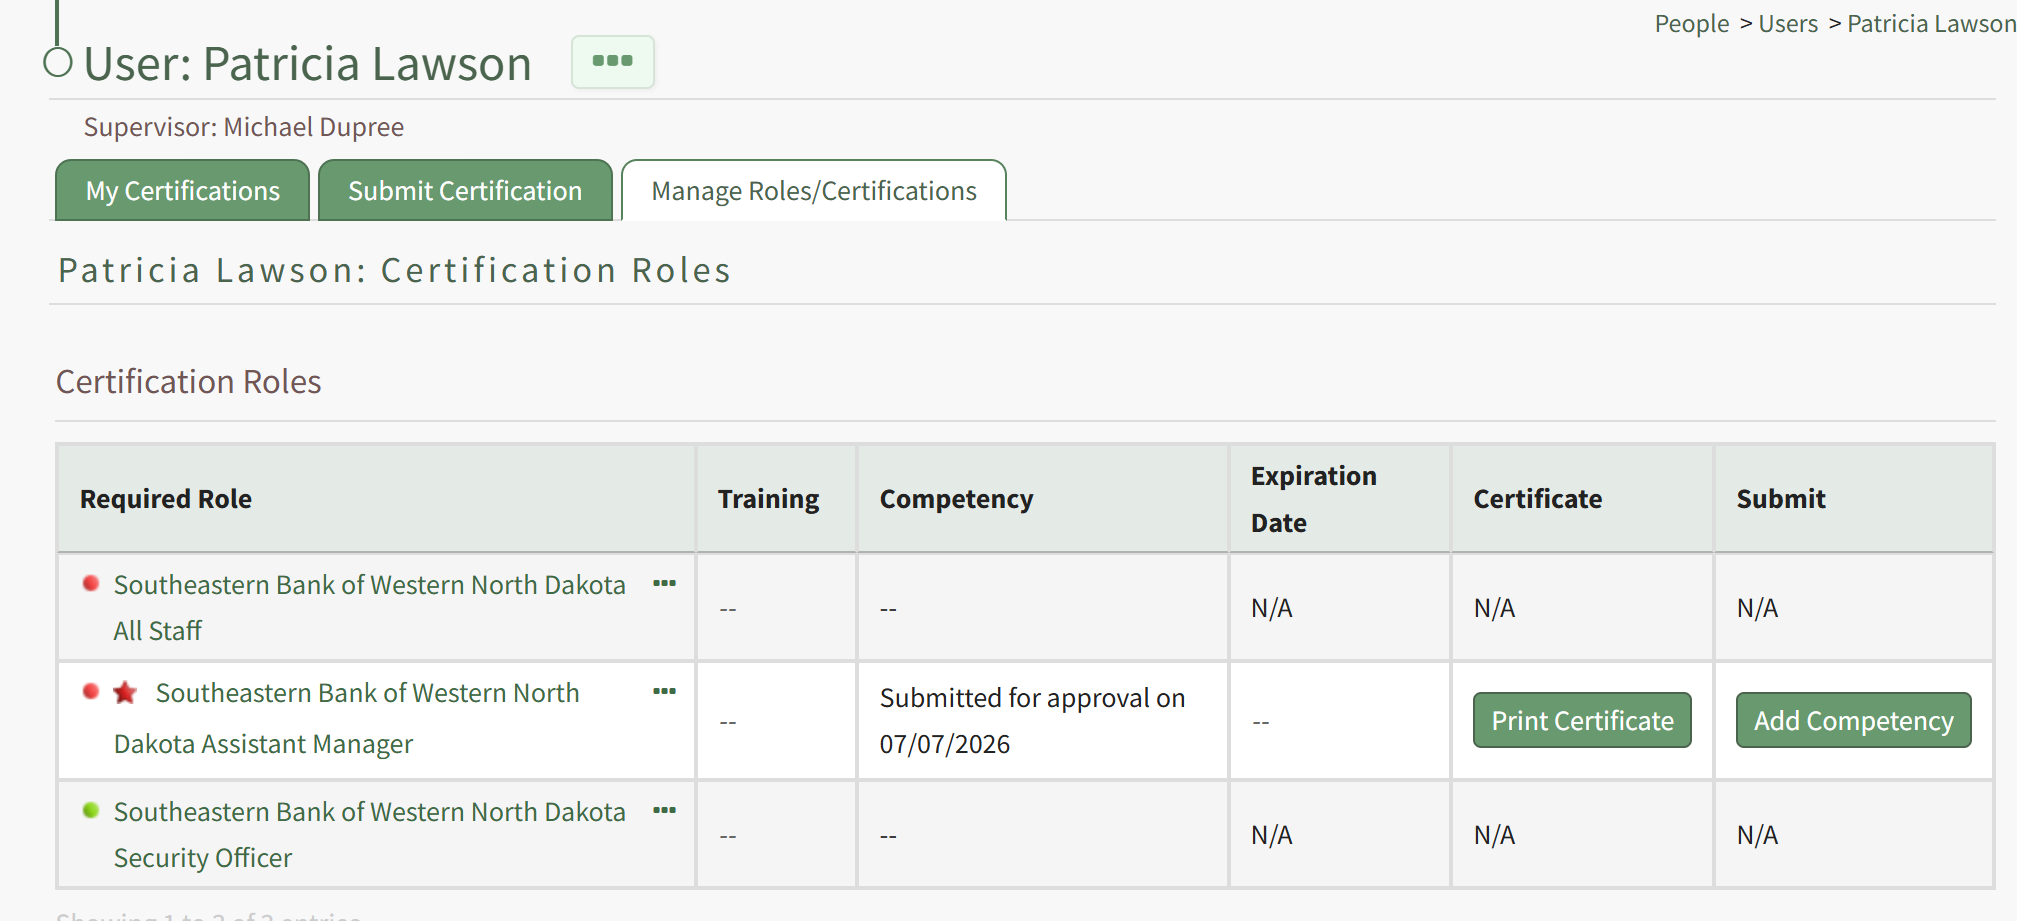
Once on the Manage Roles/Certifications tab, you will see the Certification Roles and Other Required Certifications tables. If the user is assigned a Certification Role that has Competency required, this will be indicated in the Certification Roles table by a star icon next to the Certification Role's Name in the Required Role column. The Competency column of the table will show a status message, an Expiration Date will be provided in the Expiration Column (if an approved submission already exists), a Certificate Template can be printed from the Certificate column (this may take a few minutes), and you can record the new Competency Completion from the Submit Column. Thus, to record a new Competency Completion for the associated Role, click the Add Competency button in the Submit column.
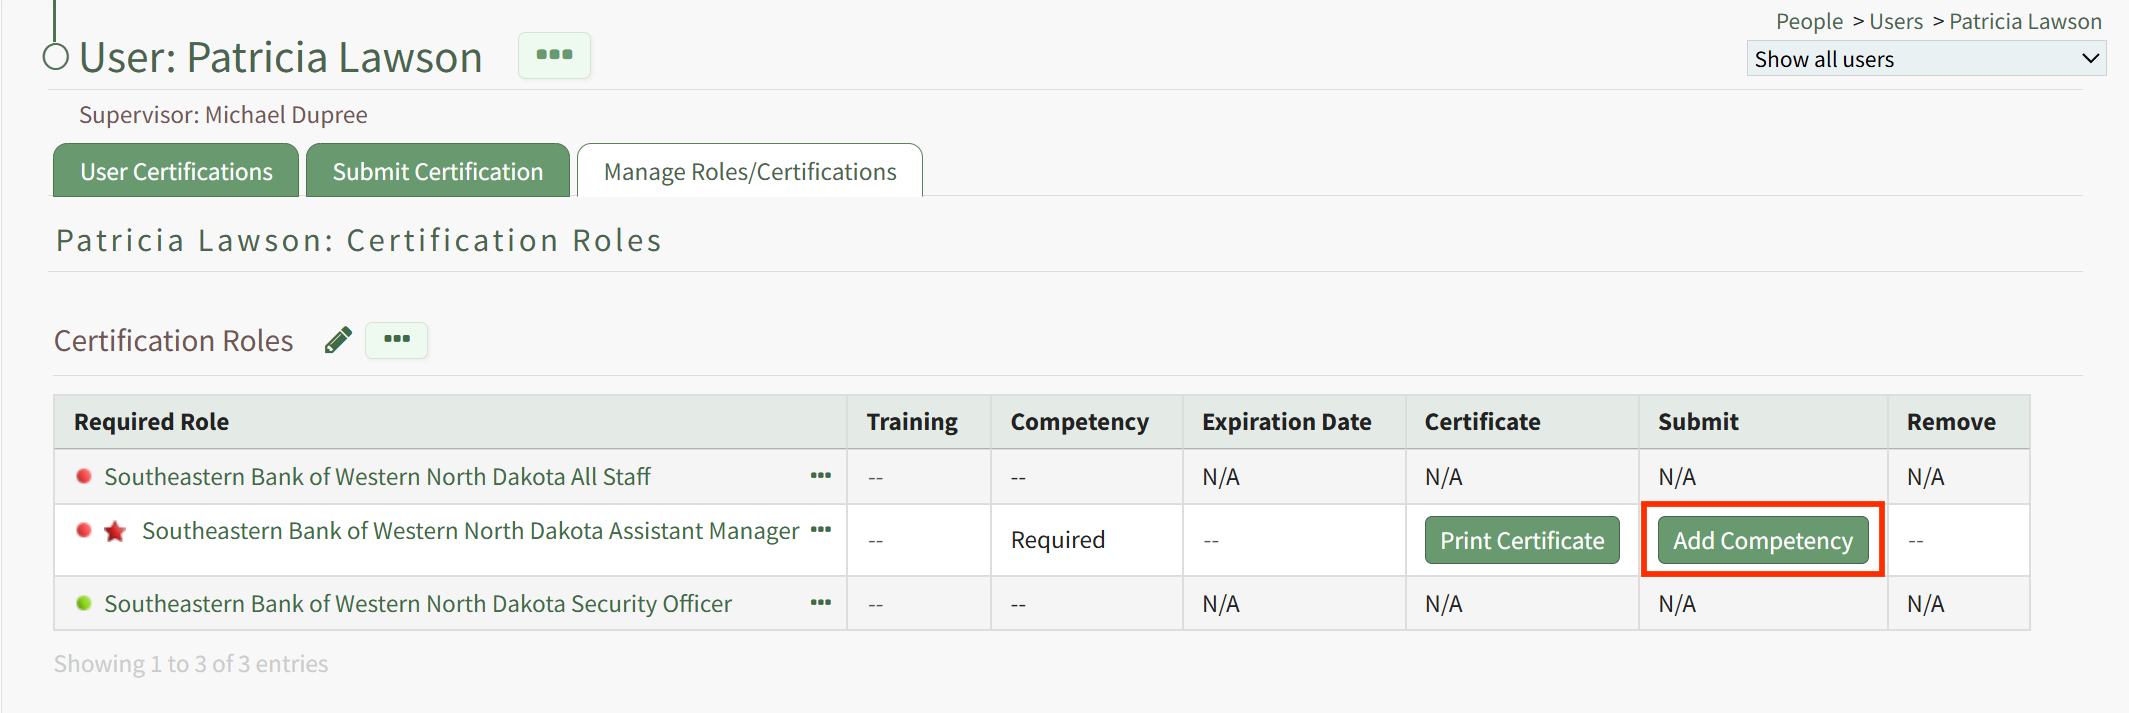
Clicking Add Competency launches the Add Competency to Required Role page for the user. Fill in the fields on the page, including who has approved the completion and the Date Completed. If the competency expires, an expiration date will be filled in automatically for the user. If this expiration date is not acceptable, you can change it to a sufficient expiration date. If a Competency Certificate is required for completion, then select the Choose File button to upload the completed Certificate file.
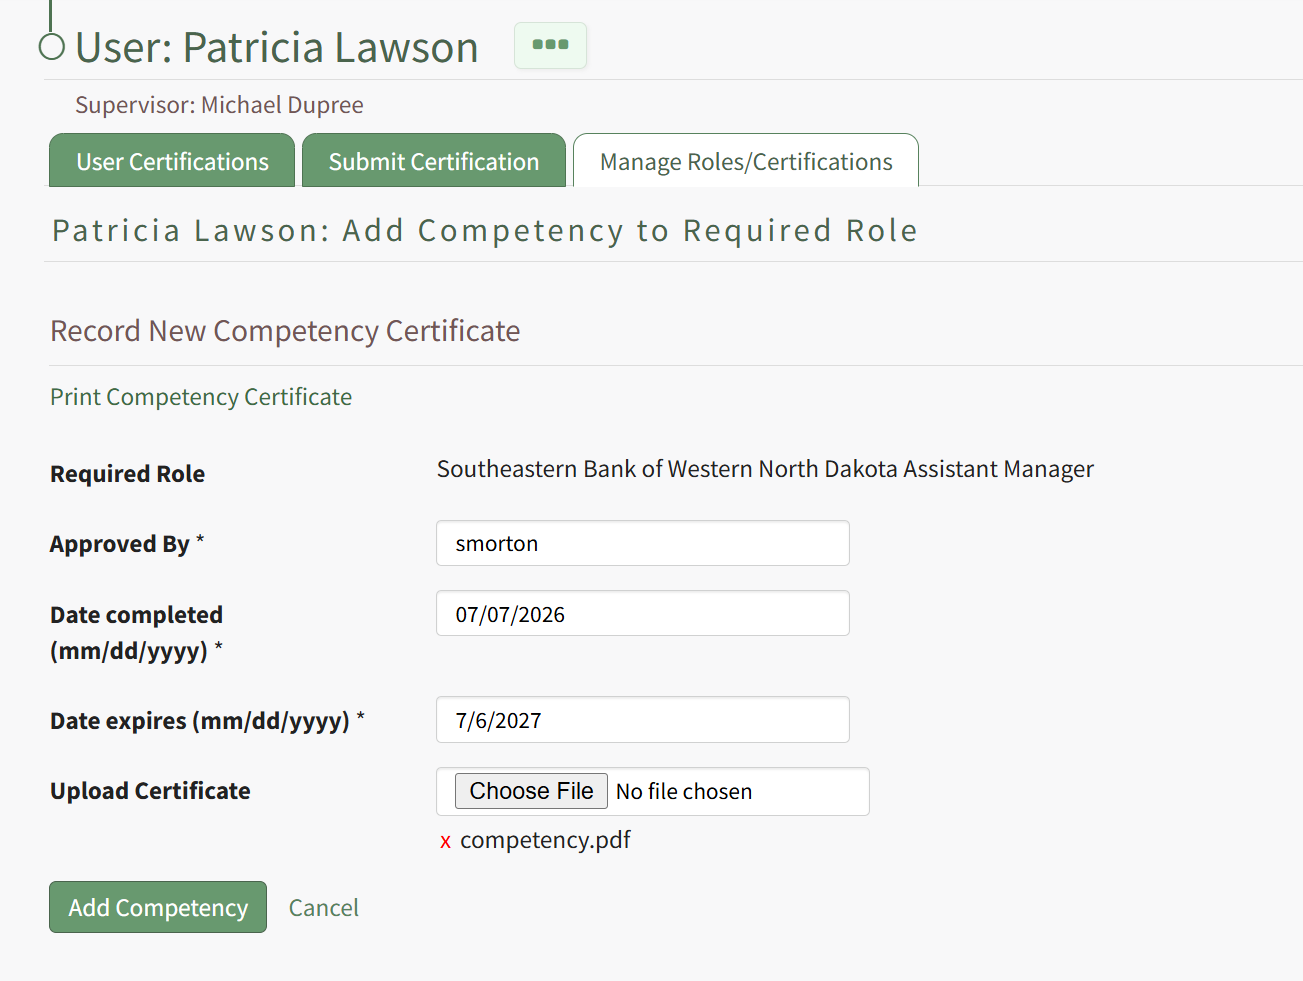
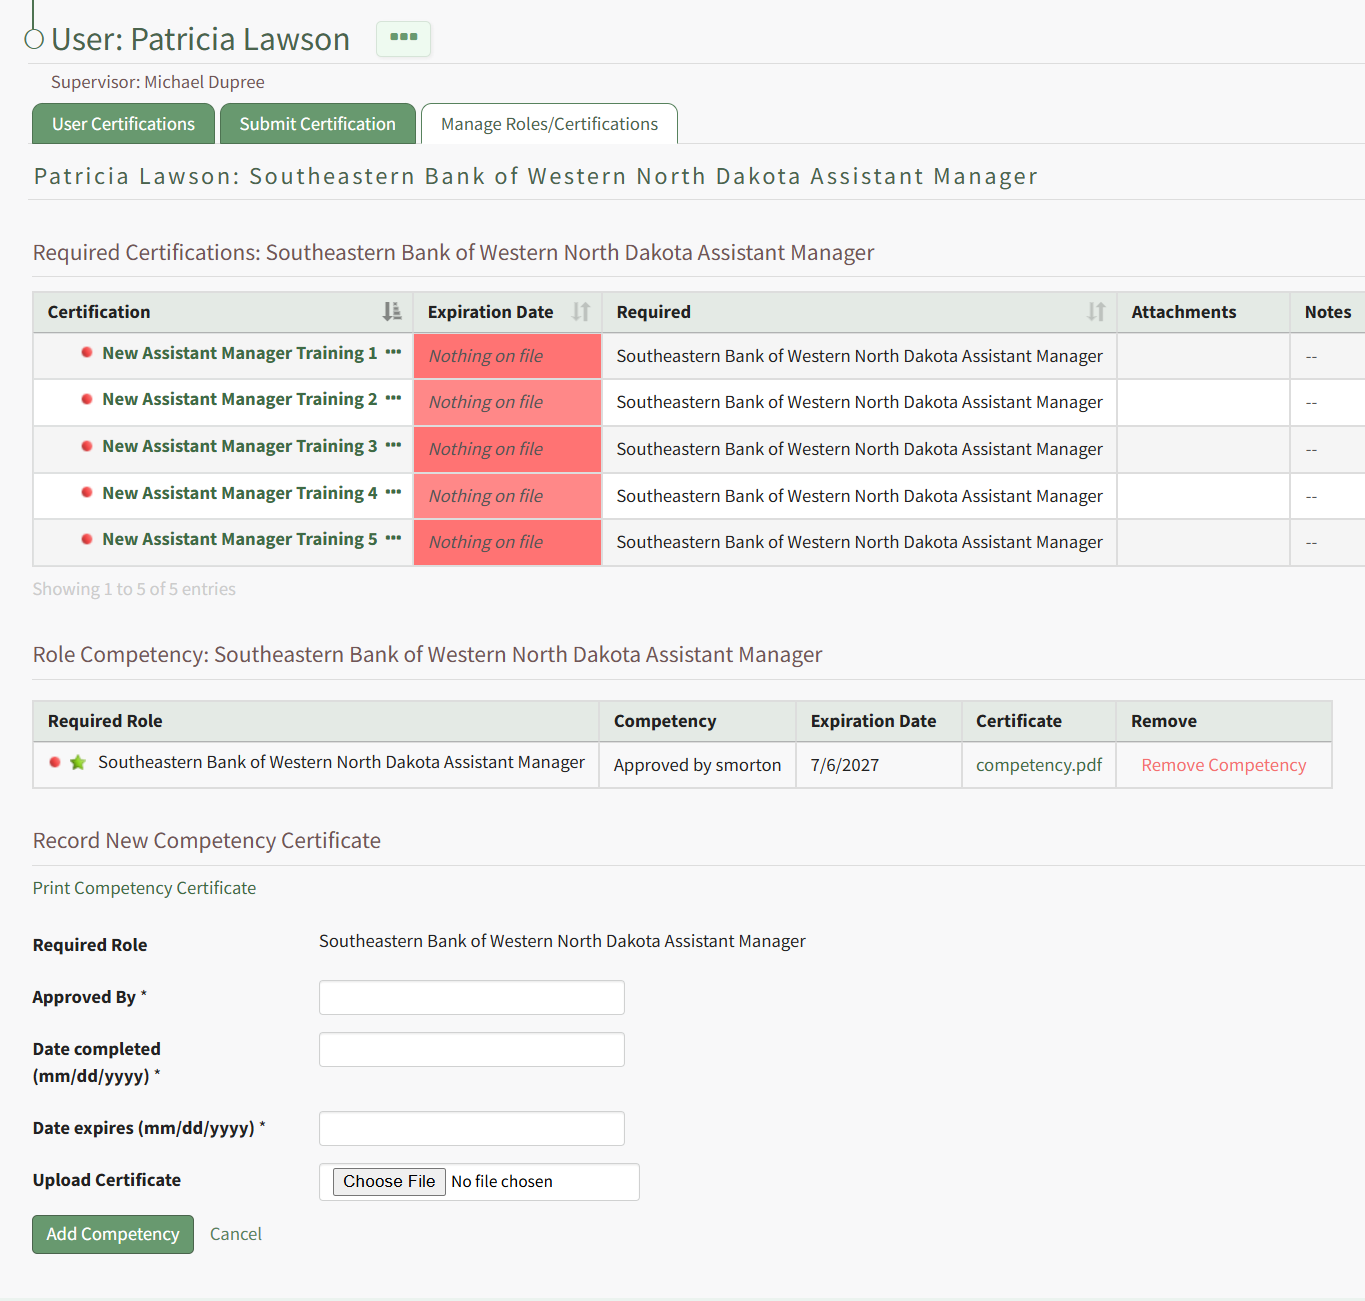
Hit the Add Competency button, and the completion will be submitted. This will redirect to the specific Role Page for this user, and show a summary of the Competency Completion submission.
If submitted by an Admin or Supervisor, the Competency Completion will show as approved.
This is also reflected in the overall Certification Roles table for the user from the Manage Roles/Certifications tab.
If the Employee has submitted their own Competency Completion, the status will show as "Submitted for approval".
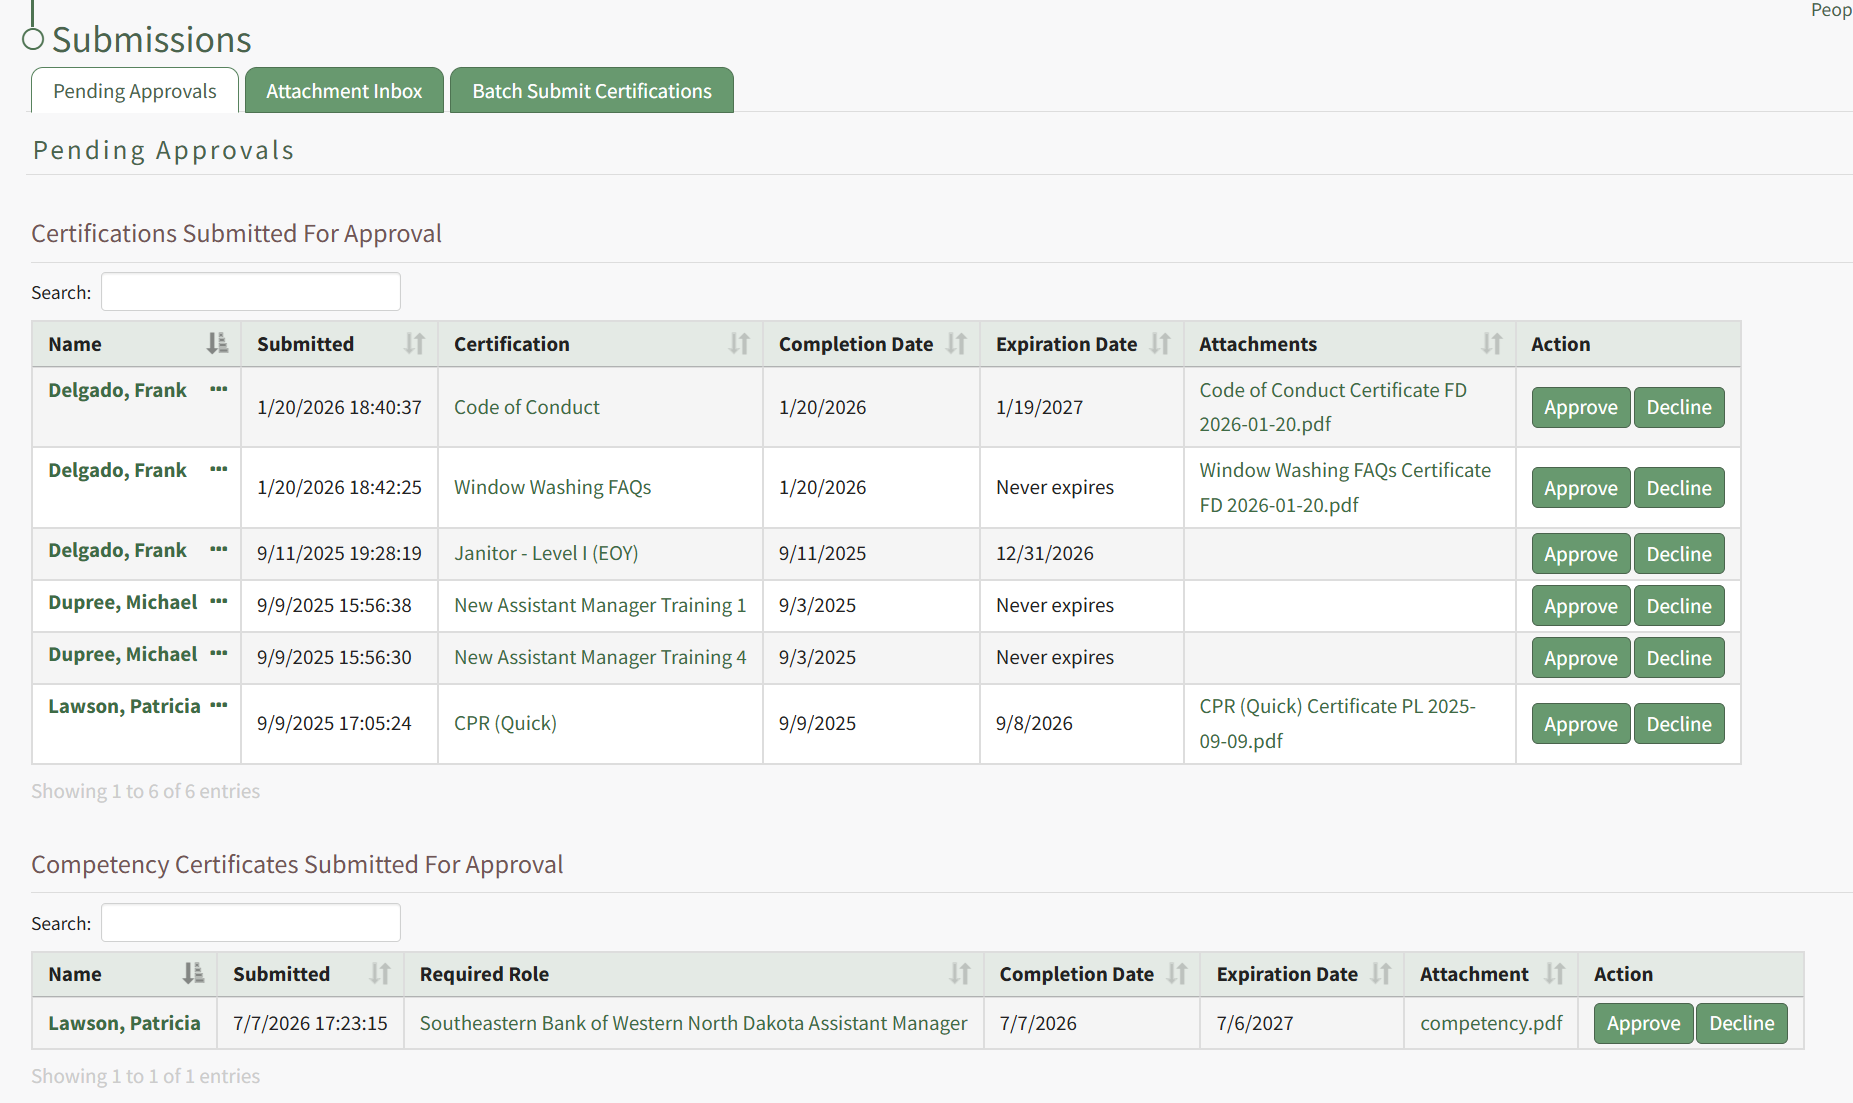
An Admin or Supervisor can then review the Competency Completion by going to People, then clicking Submissions, then Pending Approvals from the Main Menu. Competency Completions pending approval are shown in the bottom table, "Competency Certificates Submitted For Approval".
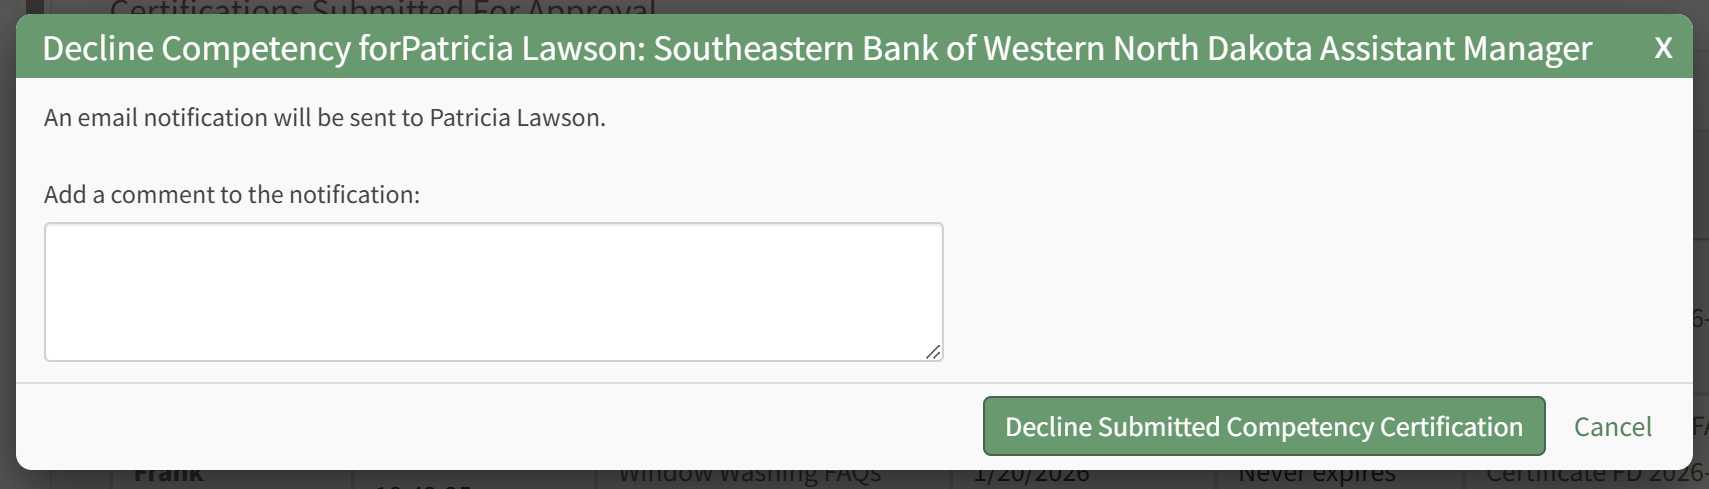
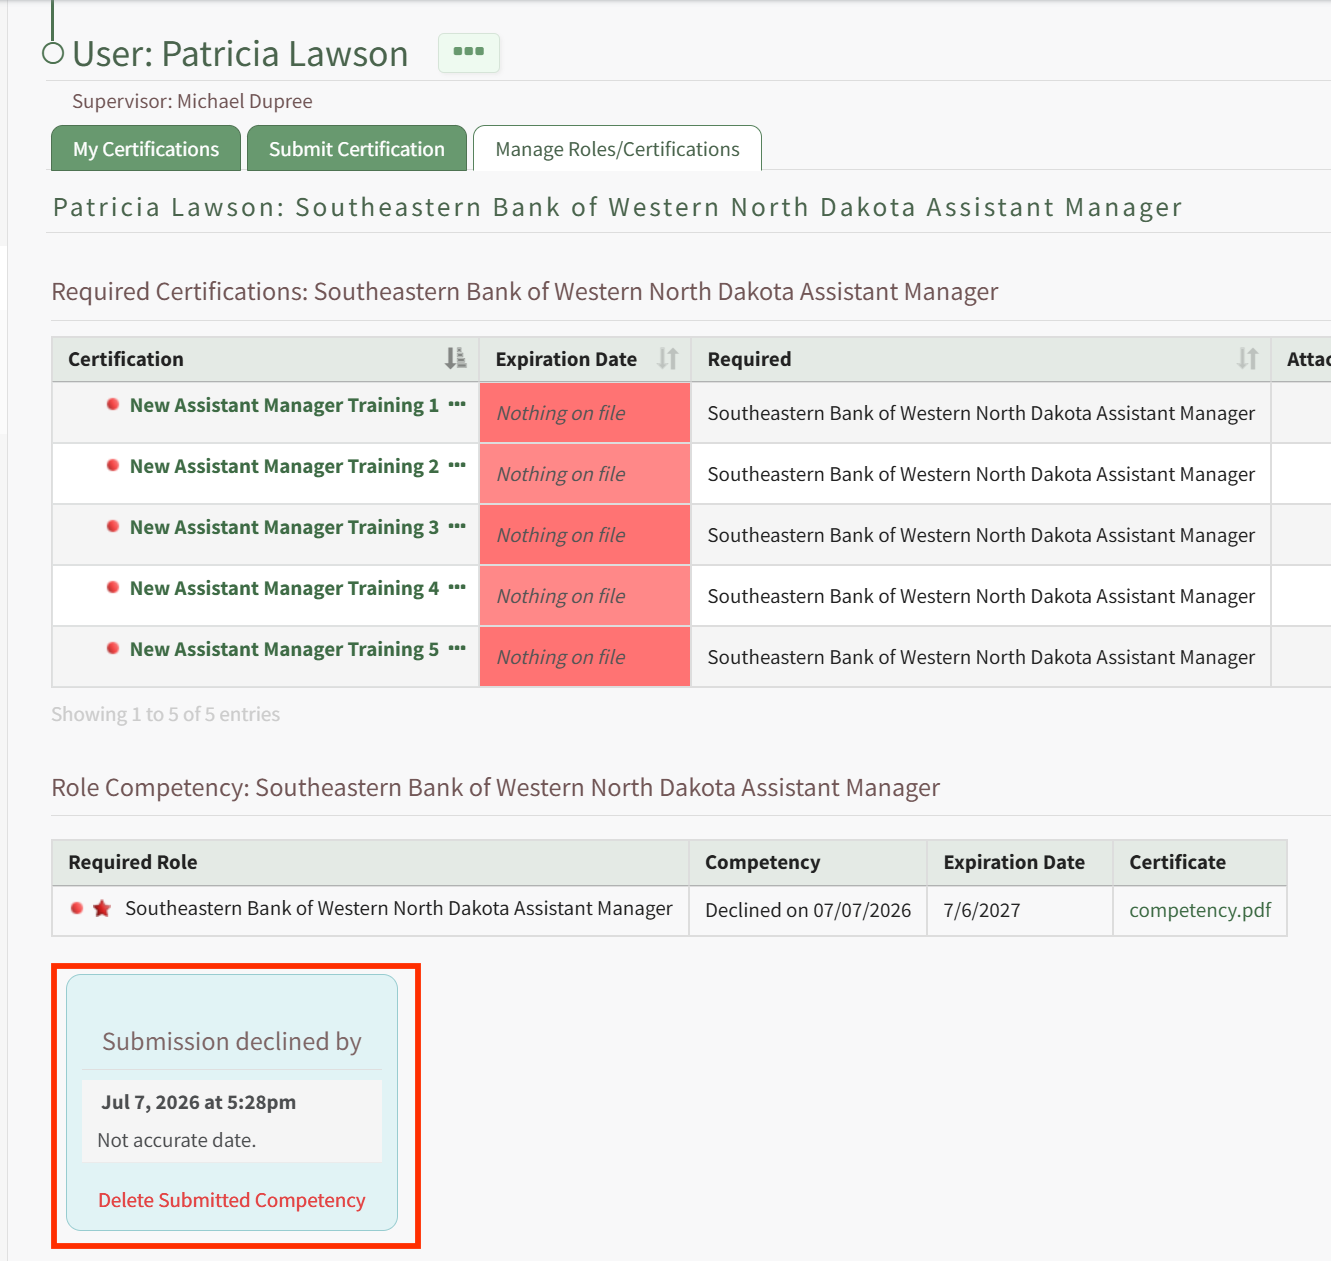
Click Approve to Approve the submission, or Decline if there are issues with the submission. If you select Decline, a modal appears allow for input of a message to the user of why the submission was declined.
The user will see this message in the specific role page associated with that Competency.
Recording Competency Certificates from the Roles Page
A Supervisor or site Admin can record Competency Certificates by visiting the Roles page of the People Module.
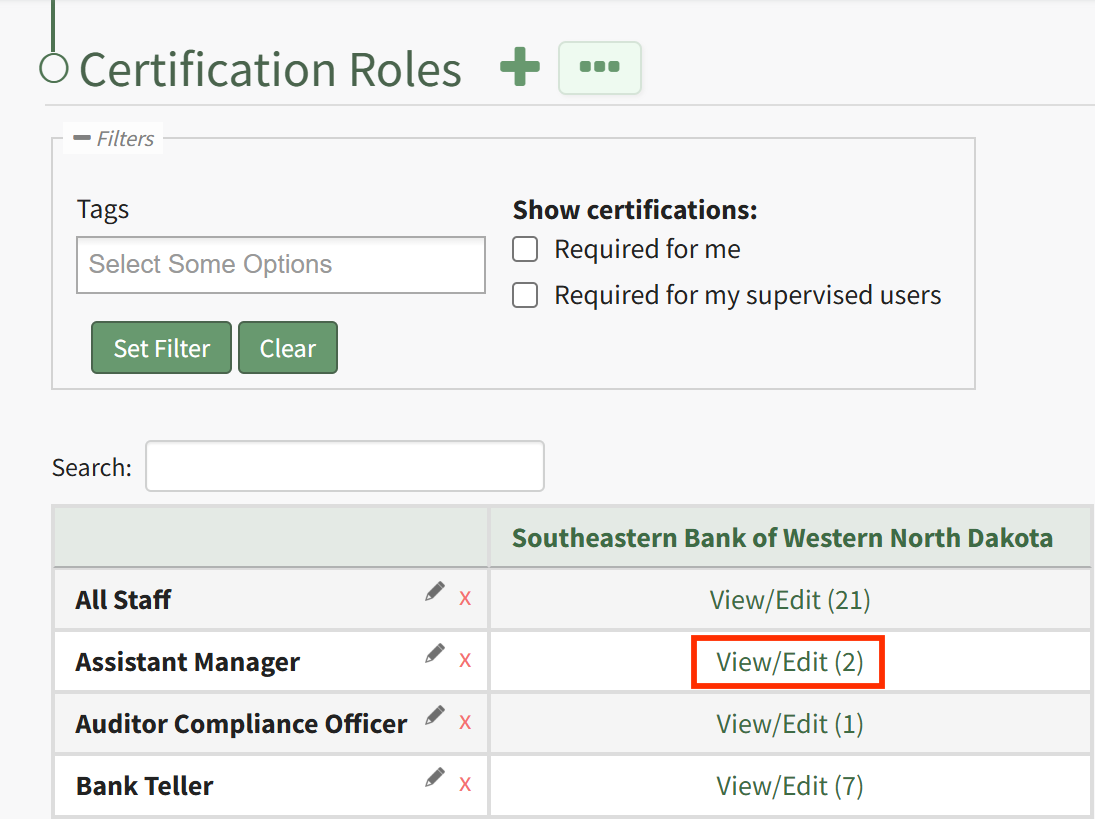
To do this, click the "View/Edit (#)" link for the particular Certification Role with Competency under its associated Company.
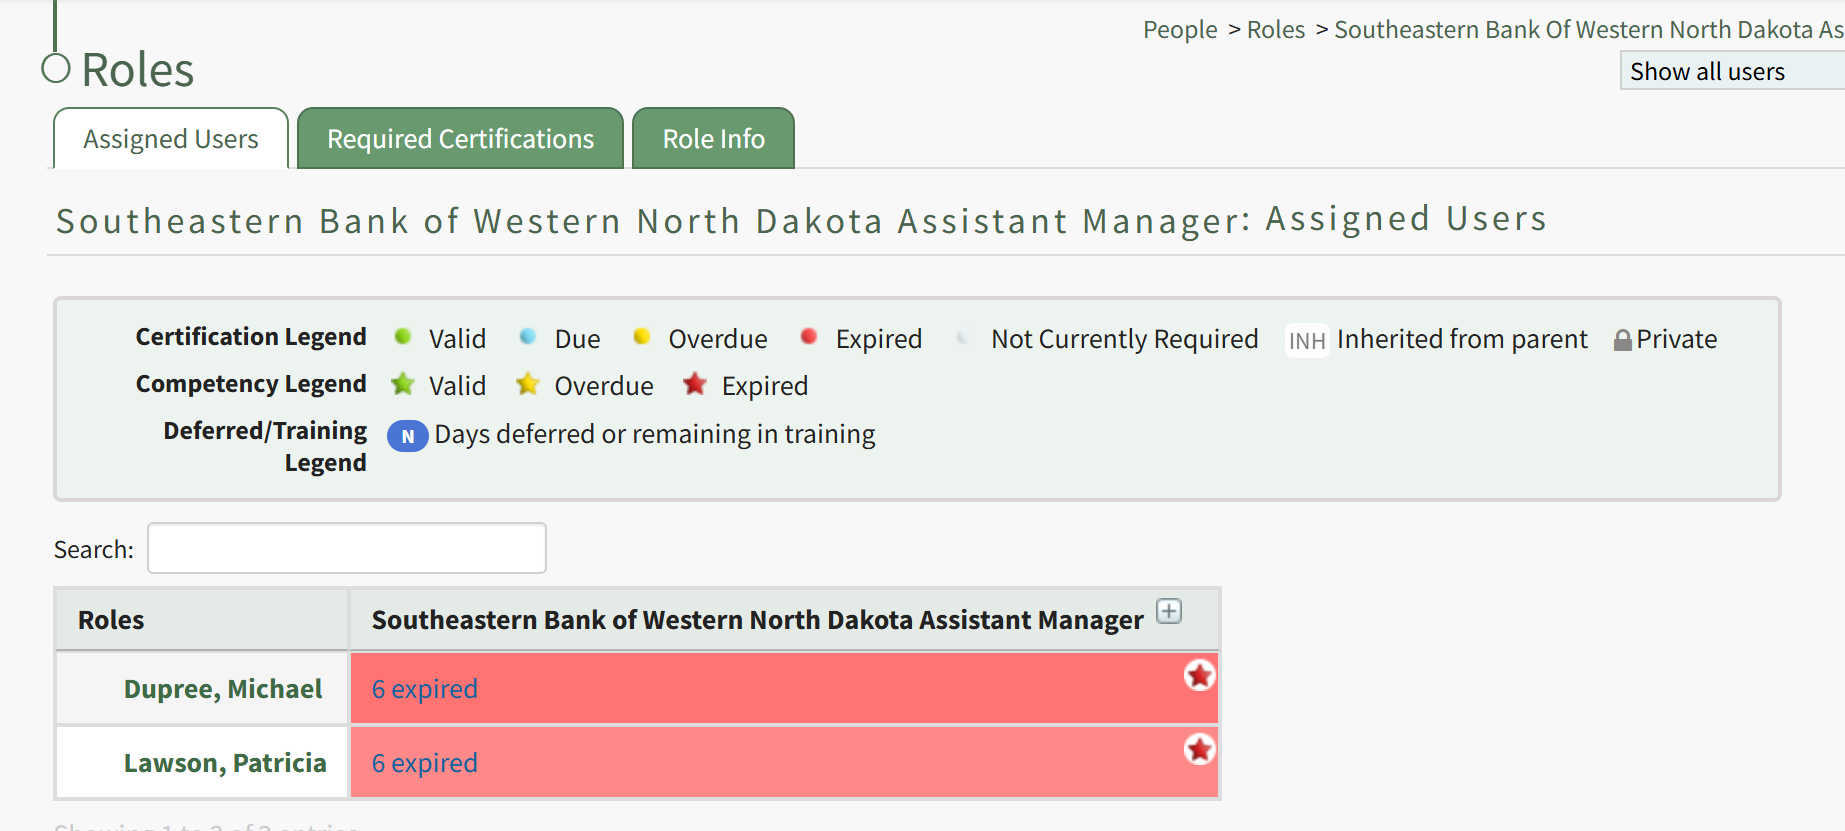
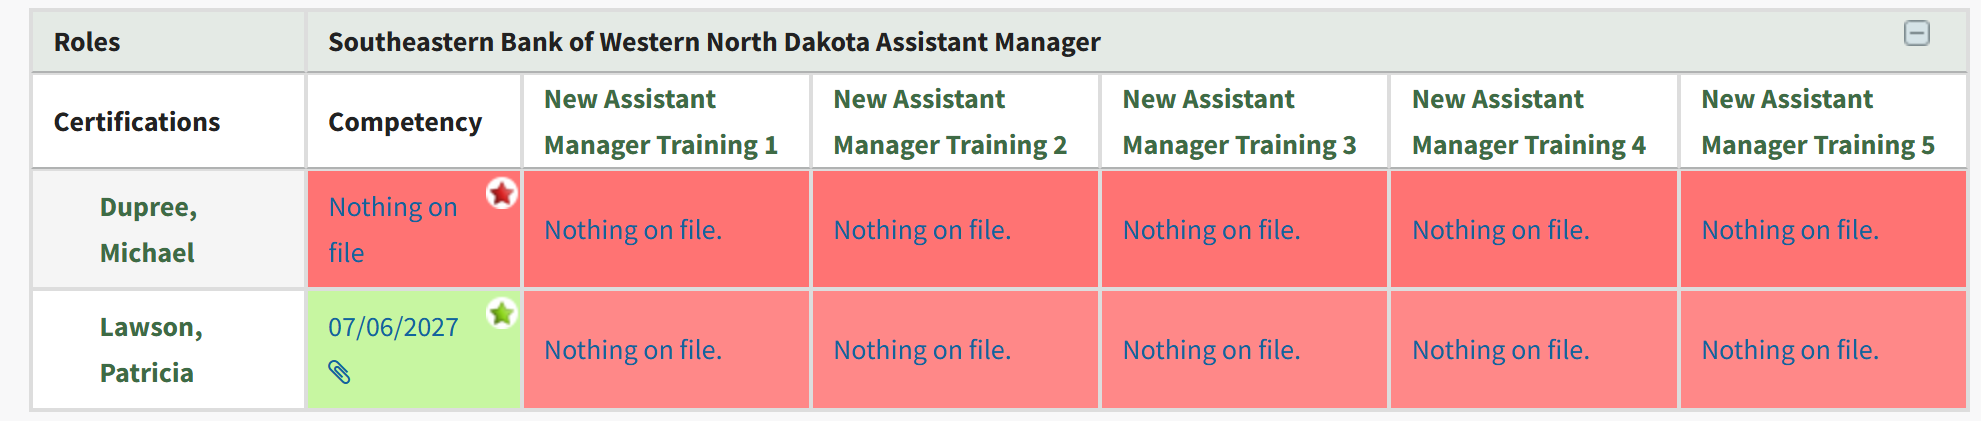
This launches the Roles page for this specific role. From the Assigned Users tab, locate the filtered matrix table of users assigned to this role. If Competency is required for this role, a star will be visible in the cell for users assigned a Competency requirement.
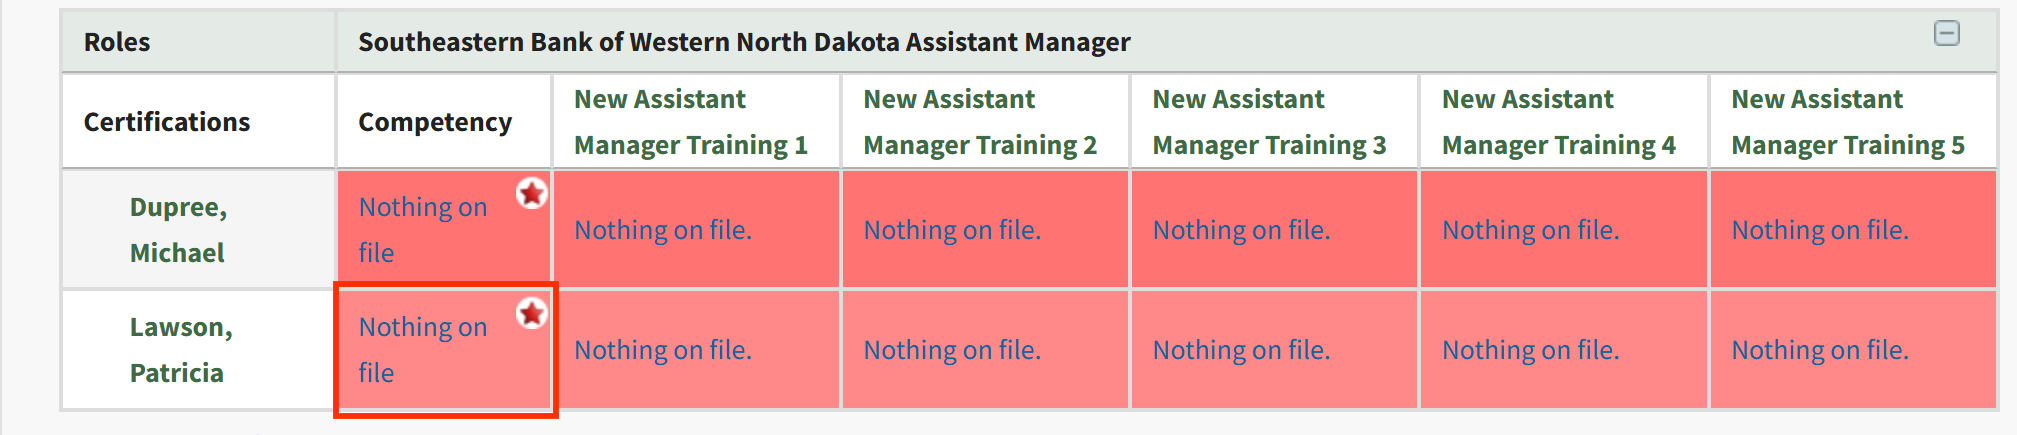
Click on the plus button next to the role name in the column heading for the matrix, or on a particular cell, to expand the table. When competency is enabled, the first column after assigned users' names will be a column for the Role's Competency, followed by columns for Certifications required by that Role. To record a new Competency Completion, click the cell for the user you wish to record Competency for.
This will launch the Competency modal for this Assigned User. Click the Add Competency button to Add Competency as described in the section above.
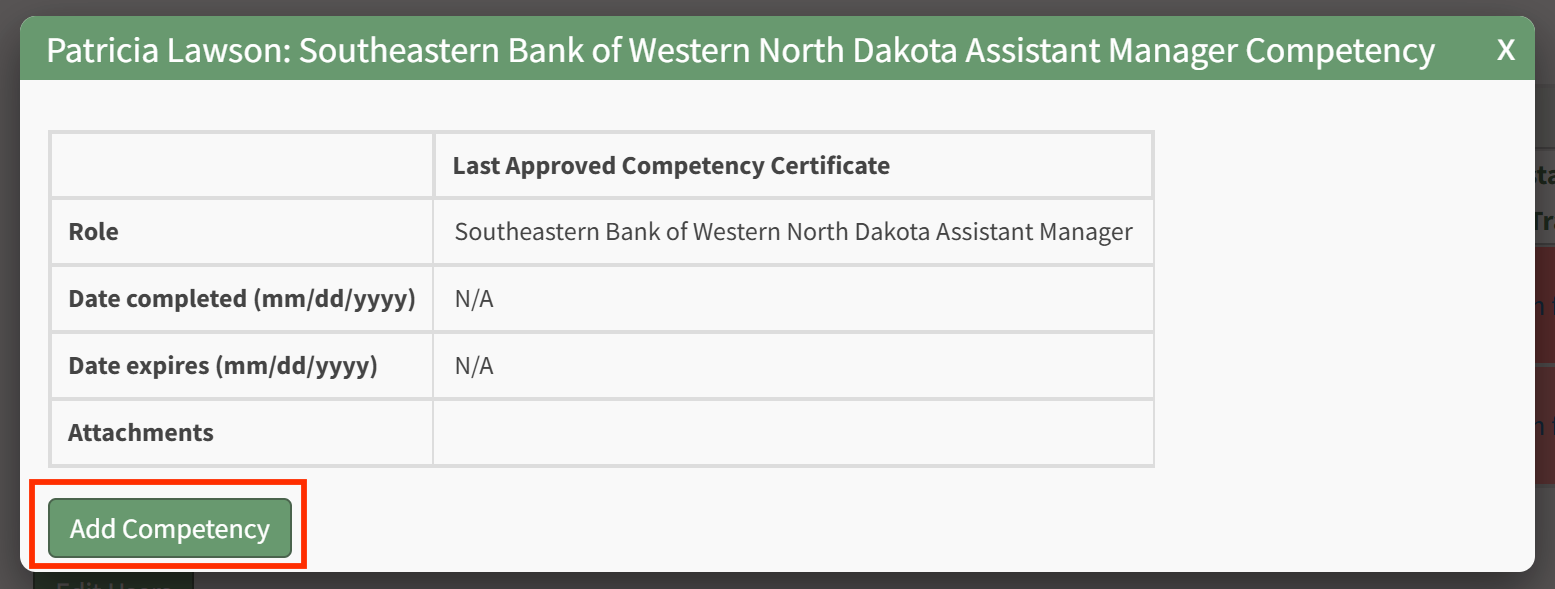
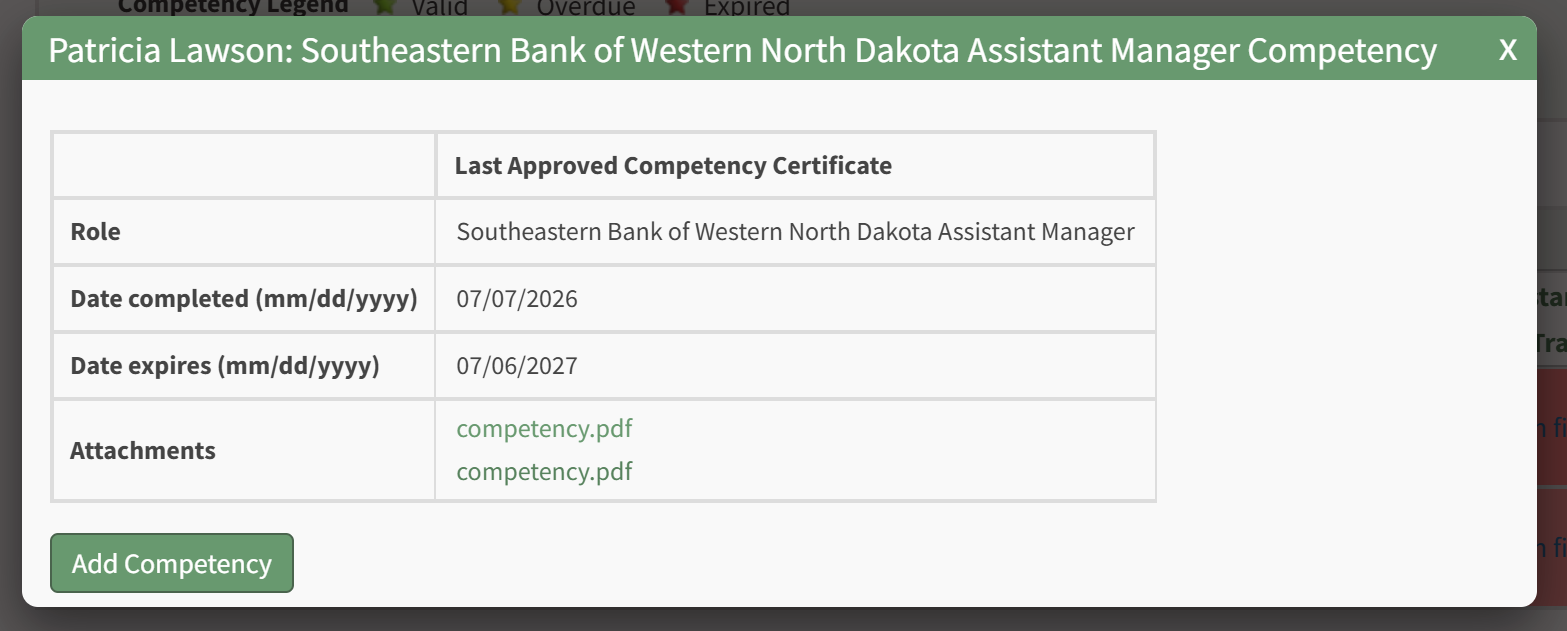
After completion has been submitted and approved, you will be redirected to the specific Role Page for this user, and show a summary of the Competency Completion submission.
Recording Competency Certificates from the People Matrix
A Supervisor or site Admin can record Competency Certificates by visiting the Matrix page of the People Module.
This launches the Matrix page for all Certifications Roles and associated users. Locate the full matrix table of users and their associated Certification Roles. If Competency is required for a role, a star will be visible in the cell for users assigned a Competency requirement.
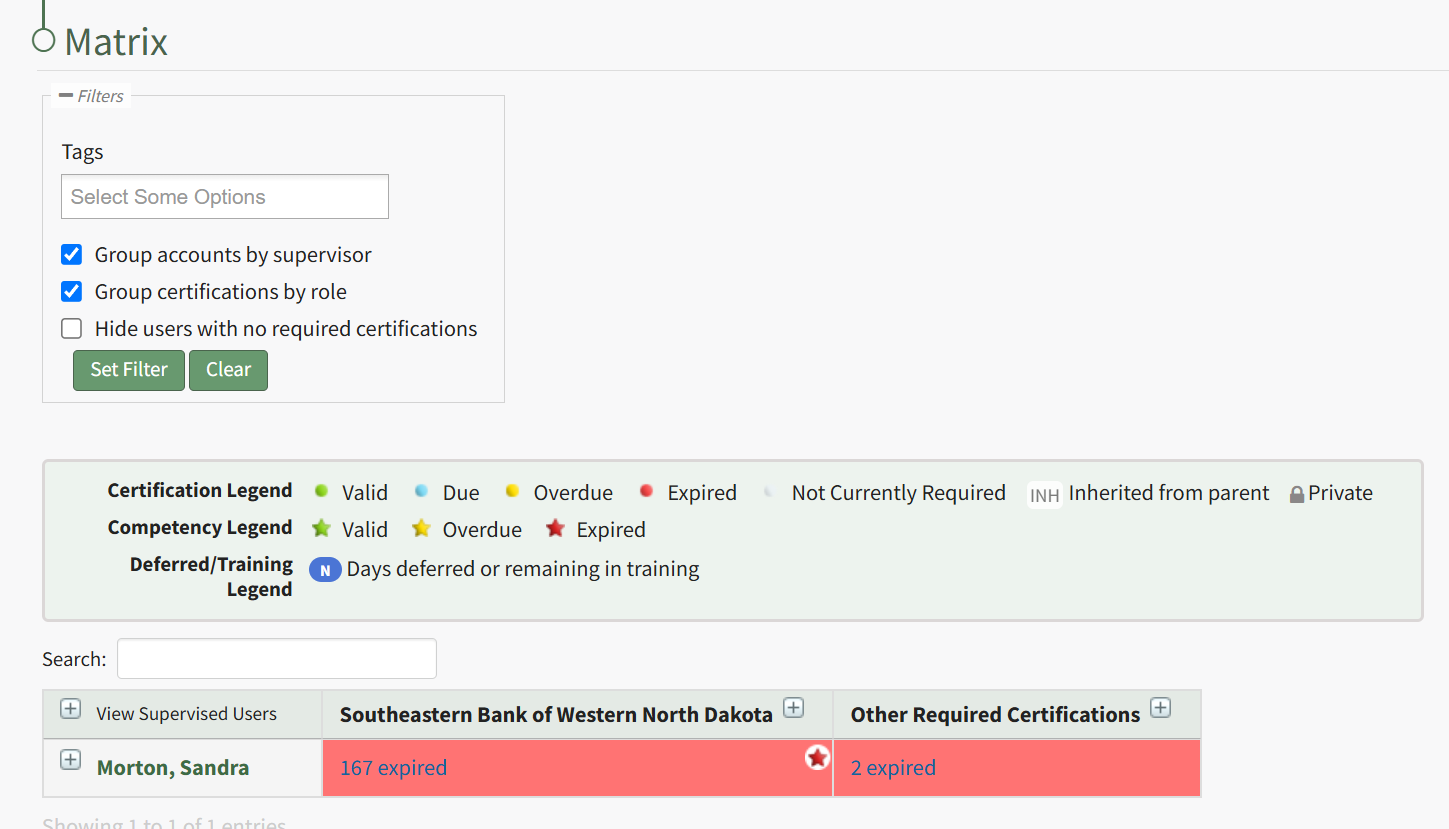
Click on the plus button next to the role name in the column heading for the matrix, or on a particular cell, to expand the table. When competency is enabled, the first sub-column under the Role Name heading will be for the Role's Competency, followed by columns for Certifications required by that Role. To record a new Competency Completion, click the cell for the user you wish to record Competency for.
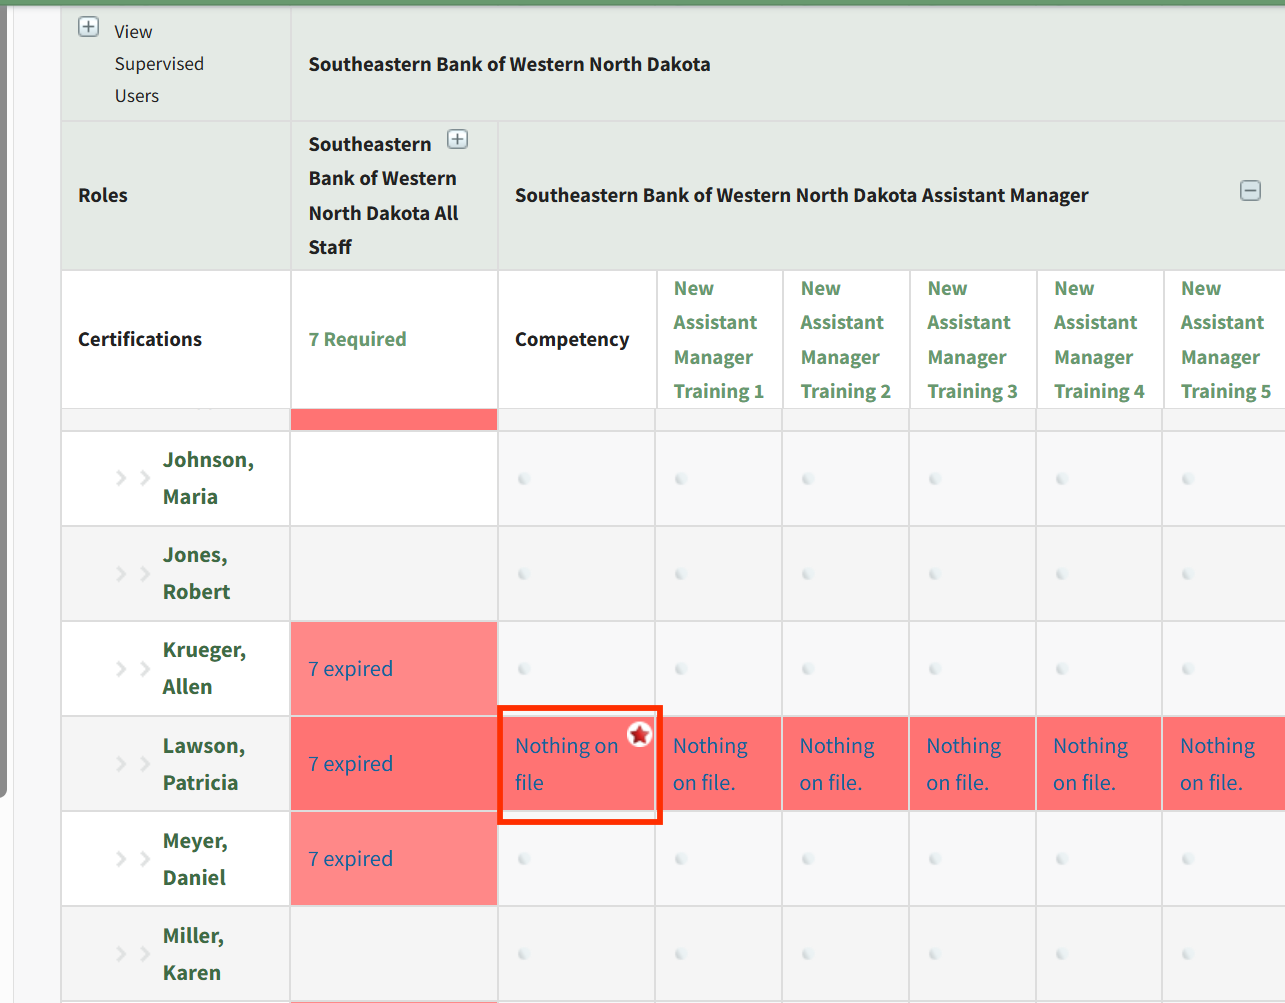
This will launch the Competency modal for this Assigned User. Click the Add Competency button to Add Competency as described in the section above.
After completion has been submitted and approved, you will be redirected to the specific Role Page for this user, and show a summary of the Competency Completion submission.
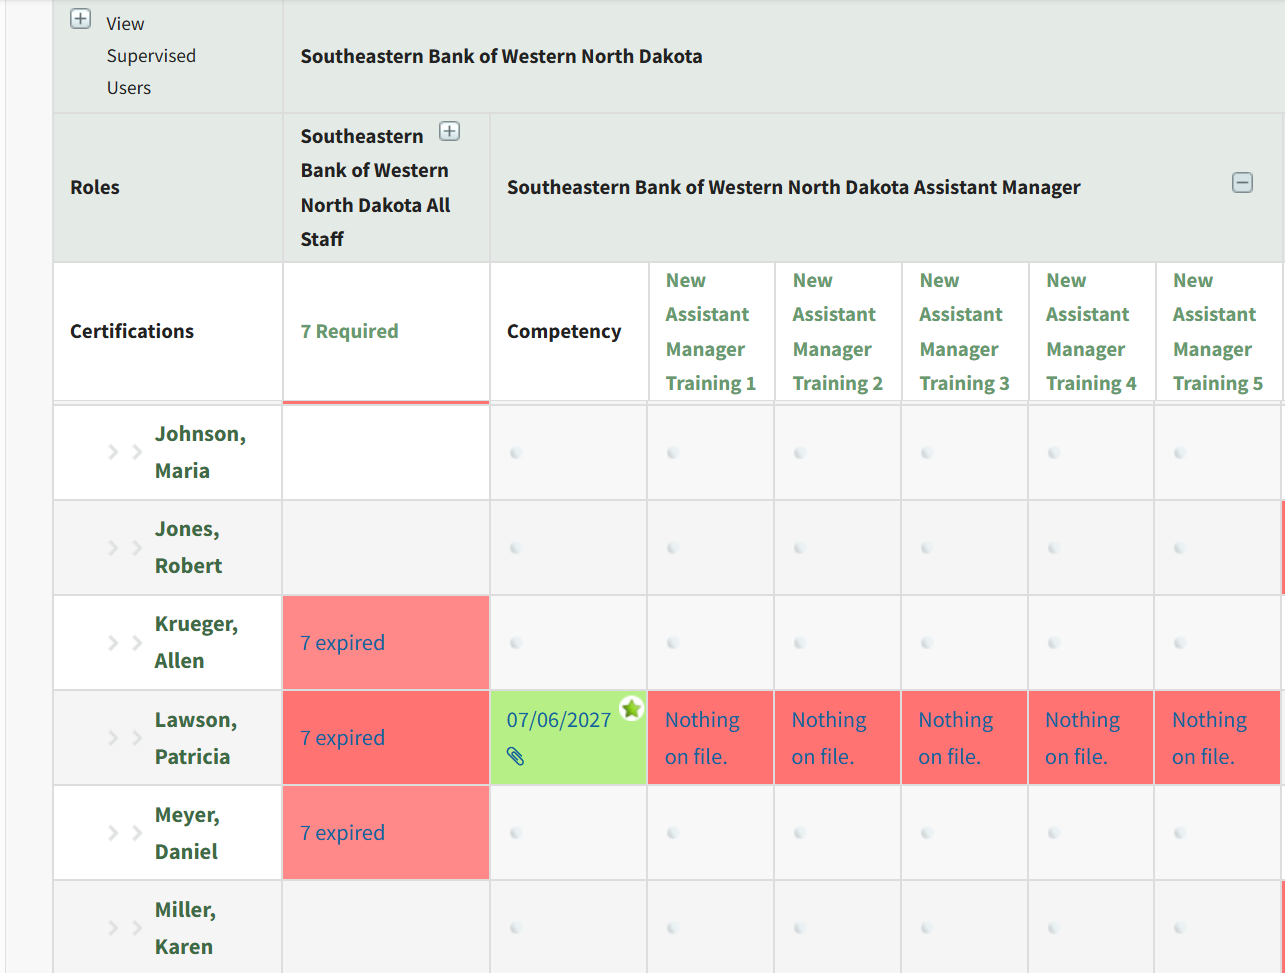
Once a Certification Role has Competency settings defined, there are three ways that the Competency can be marked complete for a user.
Recording Competency Certificates from an individual User's Page
Employees, their Supervisor(s), and site Admins can record Competency Certificates by visiting an individual User's page in the People Module.
For an Employee looking to record their own Competency Certificate, click on People, then My Account, then Certification Roles from the Main Menu to access the Manage Roles/Certifications tab of the User page.
For a Supervisor or Admin looking to record Competency for another user, click on People, then Users from the Main Menu, then click on the name of the user you wish to record Competency for.
Once on the Manage Roles/Certifications tab, you will see the Certification Roles and Other Required Certifications tables. If the user is assigned a Certification Role that has Competency required, this will be indicated in the Certification Roles table by a star icon next to the Certification Role's Name in the Required Role column. The Competency column of the table will show a status message, an Expiration Date will be provided in the Expiration Column (if an approved submission already exists), a Certificate Template can be printed from the Certificate column (this may take a few minutes), and you can record the new Competency Completion from the Submit Column. Thus, to record a new Competency Completion for the associated Role, click the Add Competency button in the Submit column.
Clicking Add Competency launches the Add Competency to Required Role page for the user. Fill in the fields on the page, including who has approved the completion and the Date Completed. If the competency expires, an expiration date will be filled in automatically for the user. If this expiration date is not acceptable, you can change it to a sufficient expiration date. If a Competency Certificate is required for completion, then select the Choose File button to upload the completed Certificate file.
Hit the Add Competency button, and the completion will be submitted. This will redirect to the specific Role Page for this user, and show a summary of the Competency Completion submission.
If submitted by an Admin or Supervisor, the Competency Completion will show as approved.
This is also reflected in the overall Certification Roles table for the user from the Manage Roles/Certifications tab.
If the Employee has submitted their own Competency Completion, the status will show as "Submitted for approval".
An Admin or Supervisor can then review the Competency Completion by going to People, then clicking Submissions, then Pending Approvals from the Main Menu. Competency Completions pending approval are shown in the bottom table, "Competency Certificates Submitted For Approval".
Click Approve to Approve the submission, or Decline if there are issues with the submission. If you select Decline, a modal appears allow for input of a message to the user of why the submission was declined.
The user will see this message in the specific role page associated with that Competency.
Recording Competency Certificates from the Roles Page
A Supervisor or site Admin can record Competency Certificates by visiting the Roles page of the People Module.
To do this, click the "View/Edit (#)" link for the particular Certification Role with Competency under its associated Company.
This launches the Roles page for this specific role. From the Assigned Users tab, locate the filtered matrix table of users assigned to this role. If Competency is required for this role, a star will be visible in the cell for users assigned a Competency requirement.
Click on the plus button next to the role name in the column heading for the matrix, or on a particular cell, to expand the table. When competency is enabled, the first column after assigned users' names will be a column for the Role's Competency, followed by columns for Certifications required by that Role. To record a new Competency Completion, click the cell for the user you wish to record Competency for.
This will launch the Competency modal for this Assigned User. Click the Add Competency button to Add Competency as described in the section above.
After completion has been submitted and approved, you will be redirected to the specific Role Page for this user, and show a summary of the Competency Completion submission.
Recording Competency Certificates from the People Matrix
A Supervisor or site Admin can record Competency Certificates by visiting the Matrix page of the People Module.
This launches the Matrix page for all Certifications Roles and associated users. Locate the full matrix table of users and their associated Certification Roles. If Competency is required for a role, a star will be visible in the cell for users assigned a Competency requirement.
Click on the plus button next to the role name in the column heading for the matrix, or on a particular cell, to expand the table. When competency is enabled, the first sub-column under the Role Name heading will be for the Role's Competency, followed by columns for Certifications required by that Role. To record a new Competency Completion, click the cell for the user you wish to record Competency for.
This will launch the Competency modal for this Assigned User. Click the Add Competency button to Add Competency as described in the section above.
After completion has been submitted and approved, you will be redirected to the specific Role Page for this user, and show a summary of the Competency Completion submission.
Once a Certification Role has Competency settings defined, there are three ways that the Competency can be marked complete for a user.
Recording Competency Certificates from an individual User's Page
Employees, their Supervisor(s), and site Admins can record Competency Certificates by visiting an individual User's page in the People Module.
For an Employee looking to record their own Competency Certificate, click on People, then My Account, then Certification Roles from the Main Menu to access the Manage Roles/Certifications tab of the User page.
For a Supervisor or Admin looking to record Competency for another user, click on People, then Users from the Main Menu, then click on the name of the user you wish to record Competency for.
Once on the Manage Roles/Certifications tab, you will see the Certification Roles and Other Required Certifications tables. If the user is assigned a Certification Role that has Competency required, this will be indicated in the Certification Roles table by a star icon next to the Certification Role's Name in the Required Role column. The Competency column of the table will show a status message, an Expiration Date will be provided in the Expiration Column (if an approved submission already exists), a Certificate Template can be printed from the Certificate column (this may take a few minutes), and you can record the new Competency Completion from the Submit Column. Thus, to record a new Competency Completion for the associated Role, click the Add Competency button in the Submit column.
Clicking Add Competency launches the Add Competency to Required Role page for the user. Fill in the fields on the page, including who has approved the completion and the Date Completed. If the competency expires, an expiration date will be filled in automatically for the user. If this expiration date is not acceptable, you can change it to a sufficient expiration date. If a Competency Certificate is required for completion, then select the Choose File button to upload the completed Certificate file.
Hit the Add Competency button, and the completion will be submitted. This will redirect to the specific Role Page for this user, and show a summary of the Competency Completion submission.
If submitted by an Admin or Supervisor, the Competency Completion will show as approved.
This is also reflected in the overall Certification Roles table for the user from the Manage Roles/Certifications tab.
If the Employee has submitted their own Competency Completion, the status will show as "Submitted for approval".
An Admin or Supervisor can then review the Competency Completion by going to People, then clicking Submissions, then Pending Approvals from the Main Menu. Competency Completions pending approval are shown in the bottom table, "Competency Certificates Submitted For Approval".
Click Approve to Approve the submission, or Decline if there are issues with the submission. If you select Decline, a modal appears allow for input of a message to the user of why the submission was declined.
The user will see this message in the specific role page associated with that Competency.
Recording Competency Certificates from the Roles Page
A Supervisor or site Admin can record Competency Certificates by visiting the Roles page of the People Module.
To do this, click the "View/Edit (#)" link for the particular Certification Role with Competency under its associated Company.
This launches the Roles page for this specific role. From the Assigned Users tab, locate the filtered matrix table of users assigned to this role. If Competency is required for this role, a star will be visible in the cell for users assigned a Competency requirement.
Click on the plus button next to the role name in the column heading for the matrix, or on a particular cell, to expand the table. When competency is enabled, the first column after assigned users' names will be a column for the Role's Competency, followed by columns for Certifications required by that Role. To record a new Competency Completion, click the cell for the user you wish to record Competency for.
This will launch the Competency modal for this Assigned User. Click the Add Competency button to Add Competency as described in the section above.
After completion has been submitted and approved, you will be redirected to the specific Role Page for this user, and show a summary of the Competency Completion submission.
Recording Competency Certificates from the People Matrix
A Supervisor or site Admin can record Competency Certificates by visiting the Matrix page of the People Module.
This launches the Matrix page for all Certifications Roles and associated users. Locate the full matrix table of users and their associated Certification Roles. If Competency is required for a role, a star will be visible in the cell for users assigned a Competency requirement.
Click on the plus button next to the role name in the column heading for the matrix, or on a particular cell, to expand the table. When competency is enabled, the first sub-column under the Role Name heading will be for the Role's Competency, followed by columns for Certifications required by that Role. To record a new Competency Completion, click the cell for the user you wish to record Competency for.
This will launch the Competency modal for this Assigned User. Click the Add Competency button to Add Competency as described in the section above.
After completion has been submitted and approved, you will be redirected to the specific Role Page for this user, and show a summary of the Competency Completion submission.
The Certification Roles Table
The colored dot to the left of the Required Role designates the status of an employee’s certification. The colored star following the dot designates the status of an employee’s competency for the role (the star does not show if competency is not required for the role in question). Table columns indicate if an employee is in training, notes on a competency, the expiration date (if there is one), and the completed competency certificate. The submit column allows for a competency submission, and the remove column allows for the removal of the competency.
The three dot (…) icon located to the right of the Required Role in the Certification Roles Table opens a context menu whose options are explained in the table below.
Certification Roles Table Context Menu Option Explanation | |
Option | Explanations |
View Details | Selecting View Details from the context menu opens the Required Certifications Table displaying your recorded certifications on the Manage Roles/Certifications Tab. |
The Other Required Certifications Table
Below the Certification Roles Table on the Manage Roles/Certifications tab is a table for Other Required Certifications that are not associated with a user’s required roles.
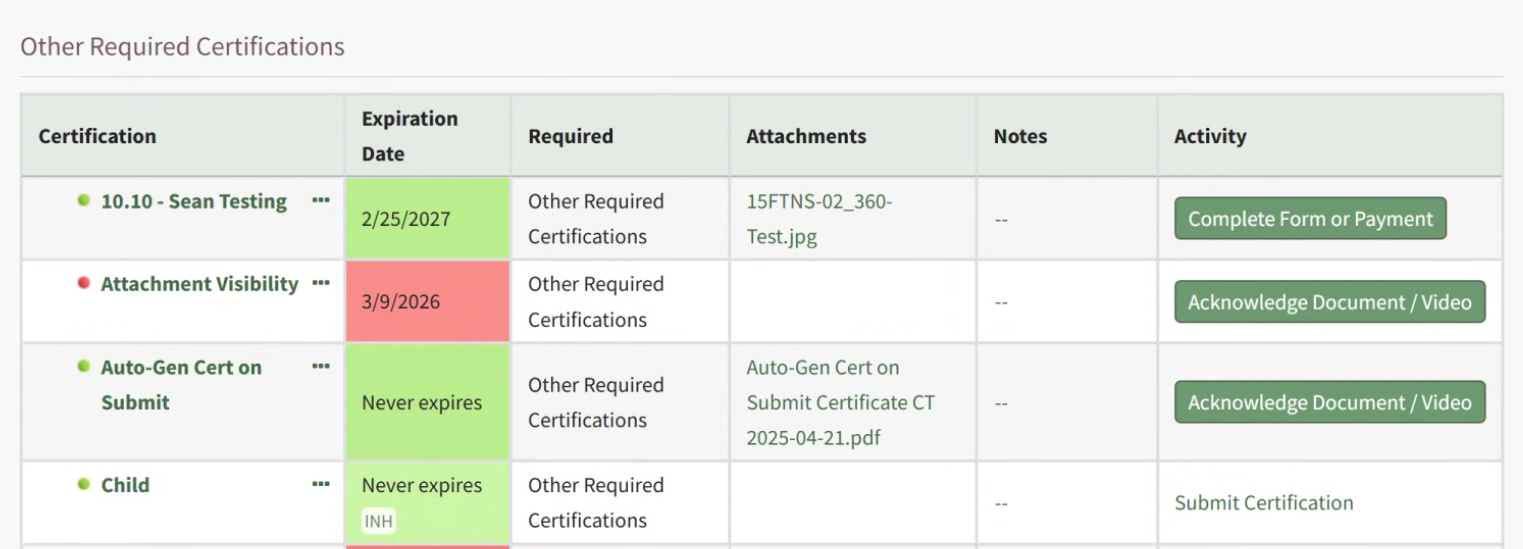
The Required Certifications Table displays the user’s required certifications in tabular form. The three dot (…) icon next to the Certification allows the user to complete the certification's required action or view your certification's History Modal.