Finance Module
- Finance: Introduction
- Finance Module Summary
- Understanding Budgets and Budget Items
- Understanding Budget Item Approval and Approval Notifications
- Understanding Budget Alerts
- Finance Module: Module Level Permissions
- Customizable Tables in the Finance Module
- Finance: Module Pages
- Budgets Page: Active / Closed / Archived Tabs
- Budgets Page: Reports Tab
- Budgets Page: Module Settings Tab
- Invoices Page
- Finance: Supplemental Resources
Finance: Introduction
Finance Module Summary
The Finance Module allows individuals to create and manage simple budgets. Individual budget items and any relevant attachments can be added to budgets and deducted from the balance. Budget item approval and its related notifications are fully customizable, including alerts for when the remaining budget amount or percentage drops below a chosen threshold.
There is no Settings Page in the Finance Module. Module Levels for the Finance Module can customized through the Access Level Tabs of the Site Settings Module.
How To: Create a New Module Level (Finance Module)
To access an attachment associated with a specific budget item, go to the Active Tab of the Budgets Page in the Finance Module.
Attachments can also be accessed for Closed or Archived Budgets on the appropriate tabs.

Clicking on the attachment file number in the attachments column opens the associated attachments file name as a clickable links that, if selected, will open the attached file for viewing.
You can also access your attachments by clicking on the budget name or the eyeball icon in the actions column of the Active Budgets Table which opens the Budget Items Per Budget Table.
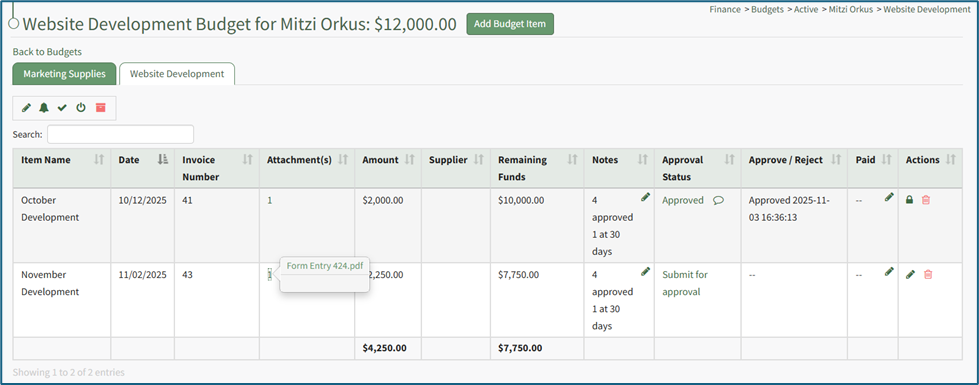
Click on the attachment’s entry for the desired budget item opening a modal with the attachment name. Click the attachment name and the attachment will automatically be downloaded to your personal device.
The User Manual for the Finance Module is updated through Version 11.12.
Understanding Budgets and Budget Items
The Active Budgets Table shows summary information regarding all active budgets on the Active Tab of the Budgets Page in the Finance Module. Closed and archived budgets utilize the same page, but they are housed separately on the Closed and Archived Tabs of the Budgets Page.
Within the budget table, account information fields are used as the column headers. The default columns are Account, Name, Most Recent Activity, Outstanding Items, Attachments, Pending Approvals, Total Budget, Amount Used, Amount Remaining, and Actions. However, any desired field can be created by an administrator.
How To: Add a Custom/Additional User Account Information Field
To add a user account information field, open the Account Fields Tab in the Site Settings Module from the Main Menu.
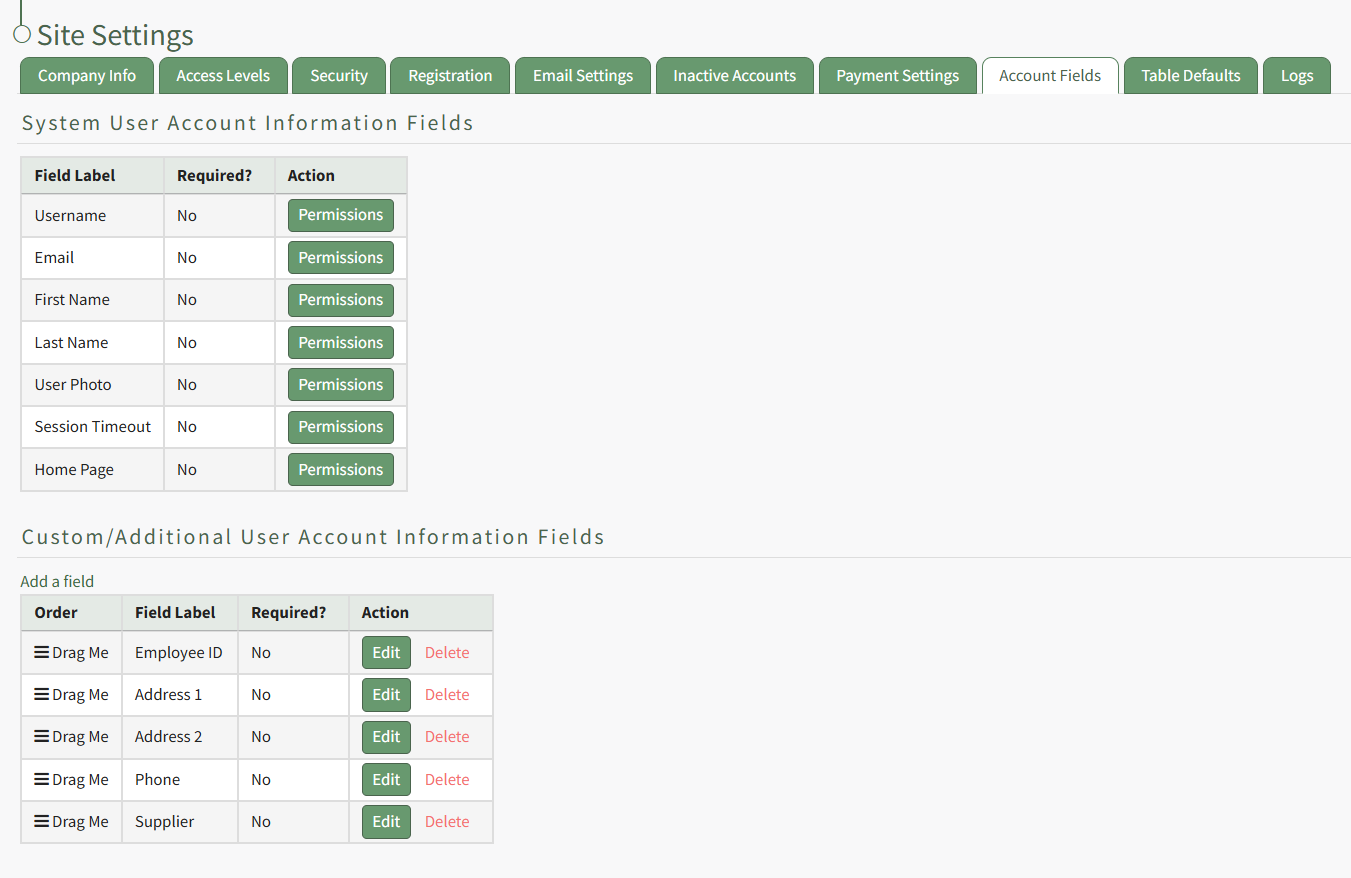
Click the "Add a Field" clickable link above the Custom / Additional User Account Information Fields opening the Add Field Modal.
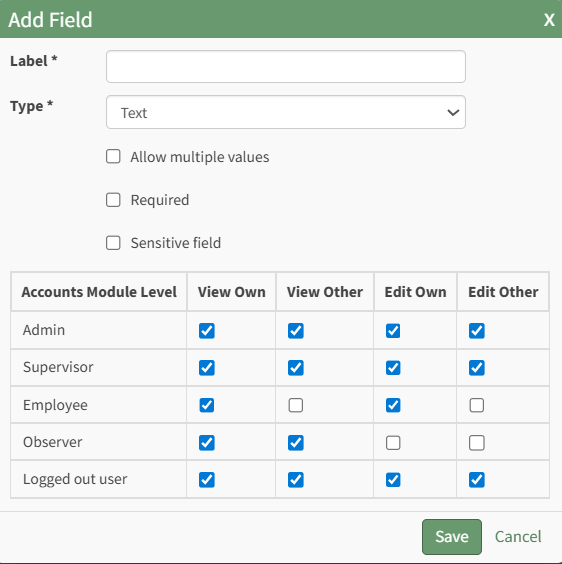
Input the label for the field.
Select the field type (text or email) from the dropdown menu.
Selecting the checkbox enables customization to "Allow multiple values," make the field "Required," or make it a "Sensitive Field."
Designating the field as a "Sensitive Field" allows an extra step in form security when integrating these fields within the Form module. The Form Designer must explicitly choose when they wish to use a sensitive field.
The Permissions Table determines who can view / edit their own and other user's fields. Selecting the checkbox gives the individual the specified permission. Deselecting the checkbox removed the permission.
Select the "Save" button and the custom field now shows in the table.
Use the Drag Me icon to drag and drop the field into your desired position of choice.
The Active Budgets Table can be customized on the Table Defaults Tab of the Site Settings Module.
How To: Edit the Finance Module Active Budgets Table
To edit the Active Budgets Table in the Finance Module, go to the Table Defaults Tab in the Site Settings Module.
Select “Finance: Active Budget” from the dropdown menu.
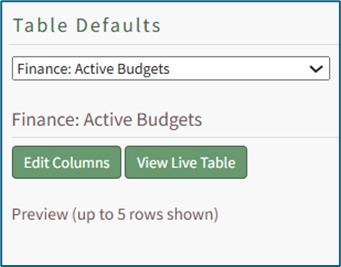
Select the “Edit Columns” button, opening the Choose Columns Modal. The default column choices include: account, name, most recent activity, outstanding items, attachments, pending approvals, total budget, amount used, amount remaining, actions, description, system notes, username, email, first name, last name, phone, Address 1, and Address 2, employee ID and any customized account fields.
How To: Add a Custom/Additional User Account Information Field
To add a user account information field, open the Account Fields Tab in the Site Settings Module from the Main Menu.
Click the "Add a Field" clickable link above the Custom / Additional User Account Information Fields opening the Add Field Modal.
Input the label for the field.
Select the field type (text or email) from the dropdown menu.
Selecting the checkbox enables customization to "Allow multiple values," make the field "Required," or make it a "Sensitive Field."
Designating the field as a "Sensitive Field" allows an extra step in form security when integrating these fields within the Form module. The Form Designer must explicitly choose when they wish to use a sensitive field.
The Permissions Table determines who can view / edit their own and other user's fields. Selecting the checkbox gives the individual the specified permission. Deselecting the checkbox removed the permission.
Select the "Save" button and the custom field now shows in the table.
Use the Drag Me icon to drag and drop the field into your desired position of choice.
The bars icon allows the columns to be positioned in the order of your choosing.
Click “Cancel” to return to the Table Defaults Tab without making any changes.
Select the “Save” button to make the desired changes and return to the Table Defaults Tab. A preview of the first five rows of the table is shown. Select the “View Live Table” button to be directed to the live table in the Finance Module.
This would include any additional fields created as discussed above as well as other existing account fields.

The “Add New Budget” button is available from any tab on the Budget Page.
Within the Finance Module, Account refers to the individual whose account is linked to the budget as its owner. If the account that created the budget is archived or deleted, it can impact the budget status depending on the budget settings selected.
A variety of icons are used to navigate the budget table and actions associated with it. They are explained in the Budget Icon Explanations Table Below.
Budget Icon Explanations | |
Icon | Explanation |
| This sort ascending and sort descending icons indicate that the column that is being used to sort the table. The stair step to the right of the arrow indicates if the information is ascending or descending (alphabetically or numerical value). |
| The down and up arrow icon indicates that this column is currently not being used for sorting. Clicking this icon will result in the table being sorted by these entries, and the icon will change to the ascending icon shown above. |
| This icon is present if the tabular information does not fit entirely on your screen. Selecting it will expand the information below the entry row so that all information for the entry can be visible at once. |
| The eyeball icon is used to view a budget and opens the Budget Items Per Budget Table. |
| The pencil icon is used to edit a budget and opens the Edit Budget Modal. |
| The bell icon is used to Add a budget alert and opens the Add Alert Modal. This alert allows individuals or those with a specific certification role to receive notification what a budget fall below a specified percent or amount of funds remaining. |
| The checkmark icon is used to edit approvers and opens the Edit Approvers Modal where individual accounts or certification roles are identified as an approver and notification settings for budget approval and / or rejection are established. |
| The power icon is used to close an active budget. |
| The file box icon is used to archive a budget that is active or closed. |
| The restore icon is used to open a budget that has been closed or archived. |
| The trash can icon is used to delete a budget. To delete a budget, it must first be archived. |


When an individual elects to view a budget, it opens the Budget Items Per Budget Table which shows detailed information about each individual budget item. Like the active budget table, this is also customizable. Account Information fields are used as the column headers. The default columns are Item Name, Date, Invoice Number, Attachment (s), Amount, Remaining Funds, Notes, Approval Status, Approve/Reject, Paid, and Actions. However, any desired field can be created by an administrator.
How To: Add a Custom/Additional User Account Information Field
To add a user account information field, open the Account Fields Tab in the Site Settings Module from the Main Menu.
Click the "Add a Field" clickable link above the Custom / Additional User Account Information Fields opening the Add Field Modal.
Input the label for the field.
Select the field type (text or email) from the dropdown menu.
Selecting the checkbox enables customization to "Allow multiple values," make the field "Required," or make it a "Sensitive Field."
Designating the field as a "Sensitive Field" allows an extra step in form security when integrating these fields within the Form module. The Form Designer must explicitly choose when they wish to use a sensitive field.
The Permissions Table determines who can view / edit their own and other user's fields. Selecting the checkbox gives the individual the specified permission. Deselecting the checkbox removed the permission.
Select the "Save" button and the custom field now shows in the table.
Use the Drag Me icon to drag and drop the field into your desired position of choice.
The Active Budgets Table can be customized on the Table Defaults Tab of the Site Settings Module.
How To: Edit the Finance Module Budget Items Per Budget Table
To edit the Budget Items per Budget Table in the Finance Module, go to the Table Defaults Tab in the Site Settings Module.
Select “Finance: Budget Items Per Budget” from the dropdown menu.

Select the “Edit Columns” button, opening the Choose Columns Modal. The default column choices include: item name, date, invoice number, attachment(s), amount, remaining funds, notes, approval status, approve / reject, paid, actions, username, email, first name, last name, employee ID, phone, Address 1 and Address 2 and any customized account fields.
How To: Add a Custom / Additional User Account Information Field
To add a user account information field, open the Account Fields Tab in the Site Settings Module from the Main Menu.
Click the "Add a Field" clickable link above the Custom / Additional User Account Information Fields opening the Add Field Modal.
Input the label for the field.
Select the field type (text or email) from the dropdown menu.
Selecting the checkbox enables customization to "Allow multiple values," make the field "Required," or make it a "Sensitive Field."
Designating the field as a "Sensitive Field" allows an extra step in form security when integrating these fields within the Form module. The Form Designer must explicitly choose when they wish to use a sensitive field.
The Permissions Table determines who can view / edit their own and other user's fields. Selecting the checkbox gives the individual the specified permission. Deselecting the checkbox removed the permission.
Select the "Save" button and the custom field now shows in the table.
Use the Drag Me icon to drag and drop the field into your desired position of choice.
The bars icon allows the columns to be positioned in the order of your choosing.
Click “Cancel” to return to the Table Defaults Tab without making any changes.
Select the “Save” button to make the desired changes and return to the Table Defaults Tab. A preview of the first five rows of the table is shown. Select the “View Live Table” button to be directed to the live table in the Finance Module.
This would include any additional fields created as discussed above as well as other existing account fields.
When viewing a specific budget, the “Add Budget Item” button is available to the right of the page header.
How To: Add a Budget Item
To add a budget item to a specific budget, go to the Active Tab of the Budgets Page in the Finance Module. Open the specific budget either by clicking the name of the budget or the eyeball icon in the action column of the desired budget.
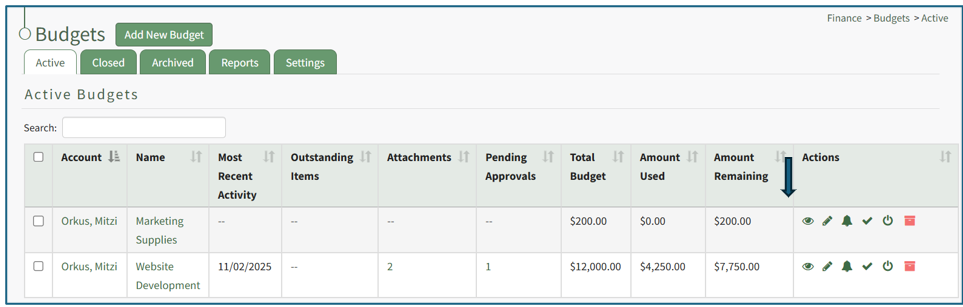
The icon opens the specific budget, showing the Budget Item Per Budget Table.
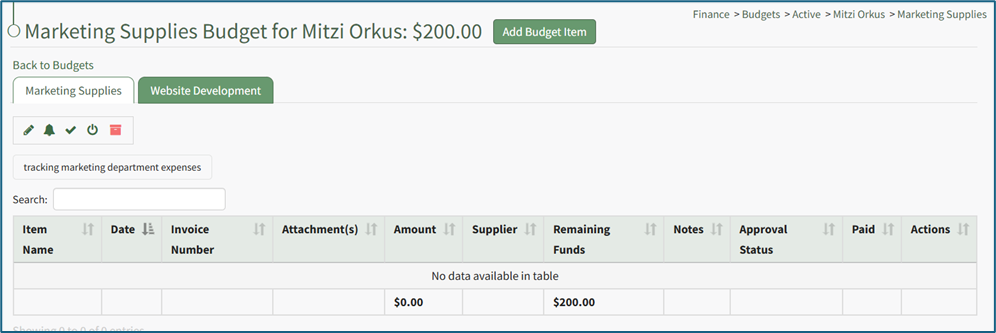
Select the “Add Budget Item” button to the right of the budget header opening the Add Budget Item Modal.
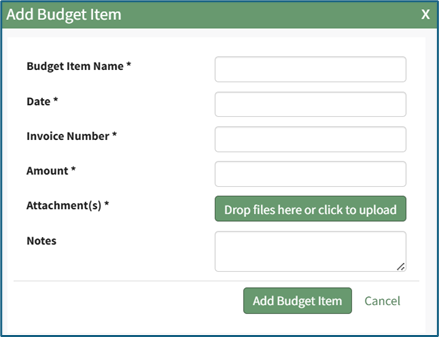
Include the Budget Item Name and the Date. Include the invoice number, amount, and associated attachments. Multiple attachments can be included, but at least one is required. All fields, with the exception of notes, are required by the modal.
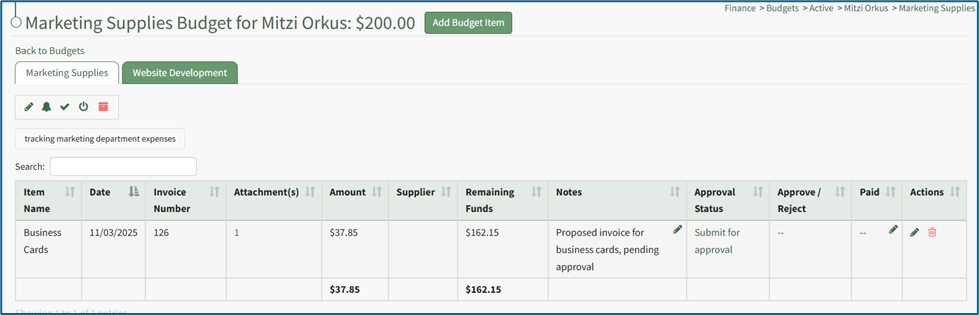
Select “Add Budget Item” from the bottom of the modal, and the budget item will now appear in the budget specific Budget Item Per Budget Table and can be submitted for approval (if approval is enabled).
How To: Submit a Budget Item for Approval
Budget items can only be submitted for active budgets. To submit a budget item for approval, go to the Active Tab of the Budgets Page in the Finance Module. Open the specific budget with the budget item that needs to be submitted for approval either by clicking the name of the budget or the eyeball icon in the action column of the desired budget.

This opens the budget, showing the Budget Item per Budget Table.

To submit the budget item for approval, select the clickable link “Submit for Approval” in the Approval Status column.

The approval status now shows how many of the required approvals have been granted. The comment icon shows the date and time the budget item was submitted for approval.

Each budget will show as an individual tab allowing for more efficient access. The clickable link “Back to Budgets” will take an individual to the Active Tab of the Budgets Page. Action icons show above a filter that allows an individual to search for specific budget items within a singular budget.

Understanding Budget Item Approval and Approval Notifications
Budget items do not require approval by default. There is an ability to customize approvals. Approvers can be individuals or certification roles, and can be required or optional. If a certification role is required to approve a budget item, approval can be granted if one individual with the certification role approves the item or all can be required to approve the item as well.
There are two checkboxes associated with adding an approver, although neither is required. The first is in regards to when approval will be given. The “Only allow approval when all above required groups have been given approval” checkbox will not mark a budget item as approved until all required groups have approved the item.
The second checkbox impacts when alerts regarding a budget will be sent. The “Send alerts to all approvers in this group when their approval is required for a budget item” opens an additional checkbox when selected. Select the “Only send an alert to this group when all above required groups have been given approval” if you want the alert set after all required signatures have been received.
There are five options of who the system should notify when a budget has received all required approvals or when it has been rejected: the user who submitted the budget item, the users who have approved the budget item, all users in all approval groups, the account holder, and the account holder’s supervisor(s). Multiple, all, or no checkboxes can be selected.
How To: Set / Edit a Budget's Approvers and Approval Notifications
You can only edit approvers and approval notifications for an active budget.
To set or edit a budget’s approvers and / or approval notifications, go to the Active Tab of the Budgets Page in the Finance Module. Select the check icon in the Actions column of the Active Accounts Table.
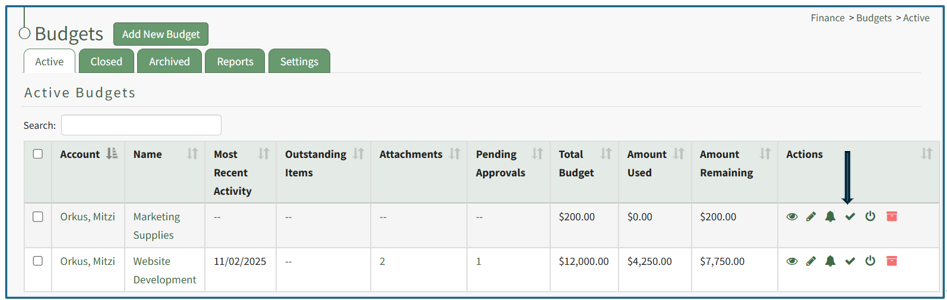
This opens the Edit Approvers Modal.

There are five options of who the system should notify when a budget has received all required approvals or when it has been rejected: the user who submitted the budget item, the users who have approved the budget item, all users in all approval groups, the account holder, and the account holder’s supervisor(s). Multiple, all, or no checkboxes can be selected.
To add an approver, click the “+ Add An Approver” button and the modal expands.
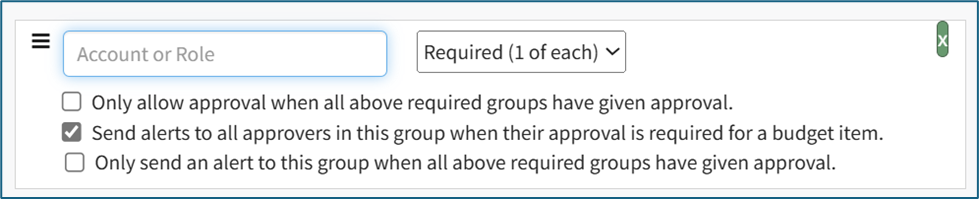
Add an individual account or a certification role and identify if their approval is required or optional. Multiple approvers can be added in this expansion, or you can click “+Add an Approver” again if the permissions/requirements need to be different for the different approvers.
There are two checkboxes associated with adding an approver. The first is in regard to when approval will be given. The “Only allow approval when all above required groups have been given approval” checkbox will not mark a budget item as approved until all required groups have been approved.
The second checkbox impacts when alerts regarding a budget will be sent. The “Send alerts to all approvers in this group when their approval is required for a budget item” opens an additional checkbox when selected. Select the “Only send an alert to this group when all above required groups have been given approval” to send an alert when a required signatures have been received.
After making the appropriate selections, the modal will state how many budget items will be affected by the changes being made.

You have the choice to “Mark as Approved any budget items that will become fully approved when this form is saved” or to “Clear existing approvals for any budget items that will become fully approved when this form is saved.” You cannot select both.
Once all changes to approvers and approval notifications for the budget have been made, select the “Save” button and you will return to the Active Tab of the Budgets Page.
How To: Submit a Budget Item for Approval
Budget items can only be submitted for active budgets. To submit a budget item for approval, go to the Active Tab of the Budgets Page in the Finance Module. Open the specific budget with the budget item that needs to be submitted for approval either by clicking the name of the budget or the eyeball icon in the action column of the desired budget.
This opens the budget, showing the Budget Item per Budget Table.
To submit the budget item for approval, select the clickable link “Submit for Approval” in the Approval Status column.
The approval status now shows how many of the required approvals have been granted. The comment icon shows the date and time the budget item was submitted for approval.
How To: Unlock a Submitted Budget Item for Editing
In order to edit an approved budget item, any existing approvals and rejections regarding the budget item will be cancelled. The budget item must then be unlocked before editing is possible.
To unlock a submitted budget item for editing, select the appropriate budget from the Active/Closed/Archived Budget tab. Click the budget title to be taken to the Budget Item Per Budget Table.
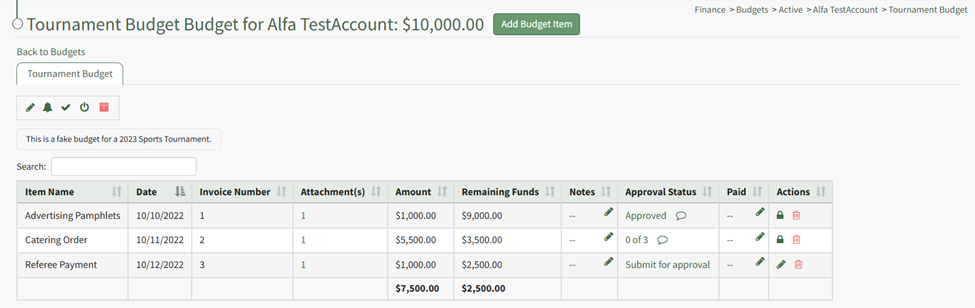
Click the lock icon in the actions column of the budget item you wish to edit.
The lock icon opens a Confirmation Modal which states, “Locked for editing. Would you like to cancel approvals and rejection and unlock editing?
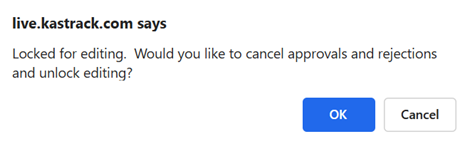
Select OK.
The lock icon is now replaced with the pencil icon in the actions column and the budget item is unlocked.

The pencil icon opens the Edit Budget Item Modal if clicked.
How To: Edit a Budget Item
Only active budgets can be edited. To edit a budget, go to the Active Tab of the Budgets Page in the Finance Module. Click the pencil icon in the Actions column of the Active Table.

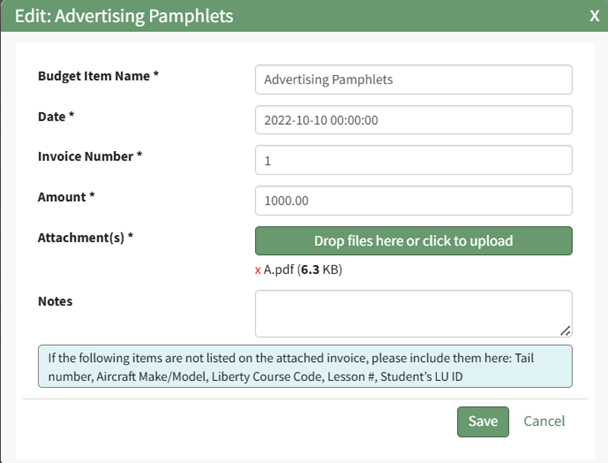
This opens the Edit (BUDGET NAME) Modal.

Make any desired changes to the Budget Name, Description, Account, Amount, or Tags associated with the budget.
When done making changes, click the “Save” button and return to the Active Tab of the Budgets Page.
How To: Resubmit a Budget Item for Approval after Edits Are Made
A Budget Item must be unlocked for edits to be made.
How To: Unlock a Submitted Budget Item for Editing
In order to edit an approved budget item, any existing approvals and rejections regarding the budget item will be cancelled. The budget item must then be unlocked before editing is possible.
To unlock a submitted budget item for editing, select the appropriate budget from the Active/Closed/Archived Budget tab. Click the budget title to be taken to the Budget Item Per Budget Table.
Click the lock icon in the actions column of the budget item you wish to edit.
The lock icon opens a Confirmation Modal which states, “Locked for editing. Would you like to cancel approvals and rejection and unlock editing?
Select OK.
The lock icon is now replaced with the pencil icon in the actions column and the budget item is unlocked.
The pencil icon opens the Edit Budget Item Modal if clicked.
How To: Edit a Budget Item
Only active budgets can be edited. To edit a budget, go to the Active Tab of the Budgets Page in the Finance Module. Click the pencil icon in the Actions column of the Active Table.
This opens the Edit (BUDGET NAME) Modal.
Make any desired changes to the Budget Name, Description, Account, Amount, or Tags associated with the budget.
When done making changes, click the “Save” button and return to the Active Tab of the Budgets Page.

Unlocking the budget item allows the pencil icon to be selected for edits to the budget.
How To: Edit a Budget Item After Submission for Approval
Go to the Active/Closed/Archived Budget Table and click the title of the budget you wish to edit, opening the Budget Item Per Budget Table.
If the budget item has already been submitted for approval, it must be unlocked first before edits can be made.
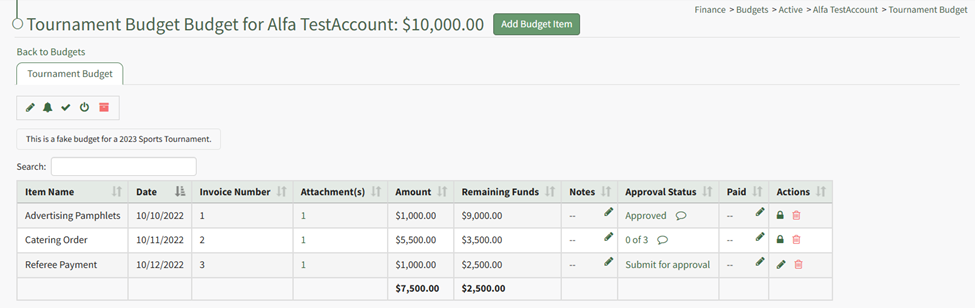
Unlock the approved budget item.
How To: Unlock a Submitted Budget Item for Editing
In order to edit an approved budget item, any existing approvals and rejections regarding the budget item will be cancelled. The budget item must then be unlocked before editing is possible.
To unlock a submitted budget item for editing, select the appropriate budget from the Active/Closed/Archived Budget tab. Click the budget title to be taken to the Budget Item Per Budget Table.
Click the lock icon in the actions column of the budget item you wish to edit.
The lock icon opens a Confirmation Modal which states, “Locked for editing. Would you like to cancel approvals and rejection and unlock editing?
Select OK.
The lock icon is now replaced with the pencil icon in the actions column and the budget item is unlocked.
The pencil icon opens the Edit Budget Item Modal if clicked.
How To: Edit a Budget Item
{{@308}}
The lock icon is now replaced with the pencil icon in the actions column, and the budget item is unlocked.

The pencil icon opens the Edit Budget Item Modal if clicked.
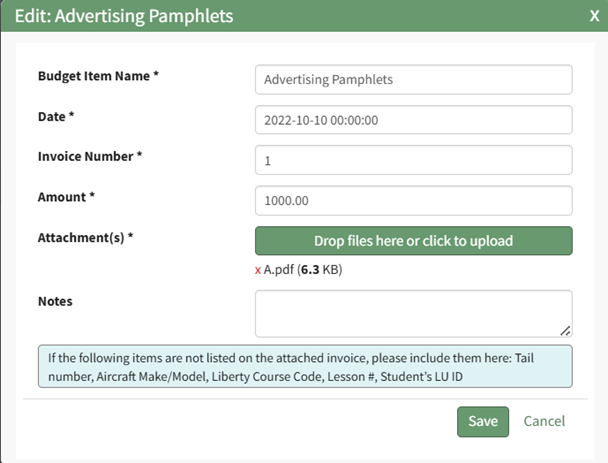
Make the necessary changes and select Save for your edits to be recorded.
You must resubmit your budget items for approval.
How To: Resubmit a Budget Item for Approval after Edits Are Made
A Budget Item must be unlocked for edits to be made.
How To: Unlock a Submitted Budget Item for Editing
{{@314}}
Unlocking the budget item allows the pencil icon to be selected for edits to the budget.
How To: Edit a Budget Item After Submission for Approval
{{@316}}

Once edits have been made, the budget item should be resubmitted for approval. Click the “Submit for approval” link in the Approval Status column.
The Approval Status changes, now showing how many approvals have been received and the total needed. The budget item is locked again.

Once edits have been made, the budget item should be resubmitted for approval. Click the “Submit for approval” link in the Approval Status column.
The Approval Status changes, now showing how many approvals have been received and the total needed. The budget item is locked again.
Understanding Budget Alerts
Any budget can have customized alerts that notify individuals or certification roles when the amount or percentage remaining of a budget falls below a specified threshold.
How To: Add a Budget Alert
Budget alerts can only be added to active budgets. To add a budget alert, locate the budget you wish to add an alert to on the Active Tab of the Budgets Page. Click the bell icon in the Actions column of the budget table.

This opens the Edit Alerts Modal.

Select the “Add an Alert” button and the modal expands.

An alert can be based on when the amount remaining in the budget falls below a specified amount or when the amount remaining in the budget falls below a specified percent.
Input the percentage or amount for the alert threshold as well as the individual account or certification role to receive the alert. Multiple accounts and / or roles can be selected to receive the alert.
Select the “Save” button and return to the Active Tab of the Budgets Page.
Additional alerts can be added if desired. Existing alerts will show on the Edit Alert Modal.

Finance Module: Module Level Permissions
The default permissions that are granted to each module level in the Finance Module are managed through the Access Levels Tab of the Site Settings Module.
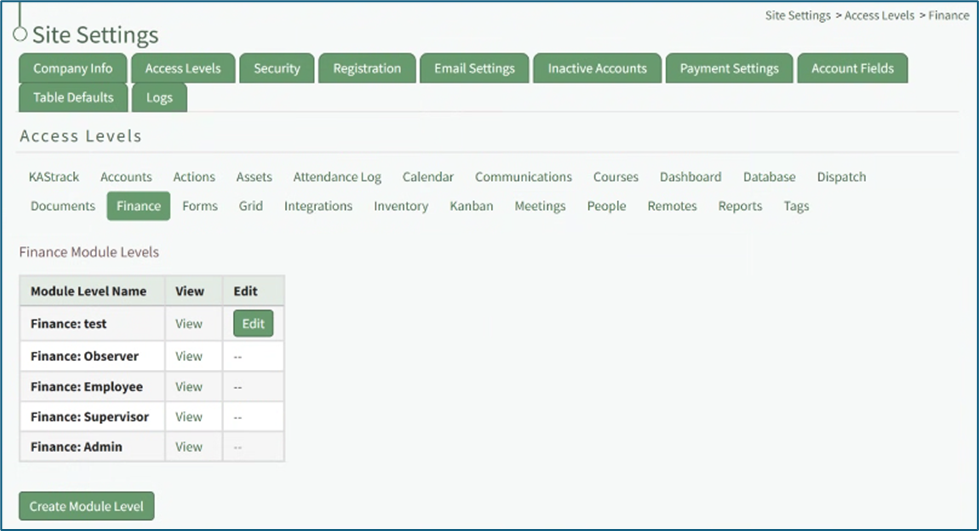
There are four base Module Levels with default permissions in the Finance Module that cannot be altered by the user:
Finance Module - Module Level Permissions Table | |
Module Level | Permissions |
Admin | Can access active budgets, Can access closed budgets, Can access archived budgets, Can view accessible budgets assigned to me, Can view accessible budgets of supervised users, Can view accessible budgets of all users, Can submit budget items for approval for budgets assigned to me, Can submit budget items for approval for budgets of my supervised users, Can submit budget items for approval for all budgets, Can edit existing budget items for viewable budgets (including the notes field), Can edit existing budget item notes field, Can create and delete budget items for viewable budgets, Can edit budgets, Can create and delete budgets, Can mark budgets paid, Can archive and un-archive budgets, Can close and open budgets |
Supervisors | Can access active budgets, Can access closed budgets, Can access archived budgets, Can view accessible budgets assigned to me, Can view accessible budgets of supervised users, Can submit budget items for approval for budgets of my supervised users, Can edit existing budget items for viewable budgets (including the notes field), Can edit existing budget item notes field, Can create and delete budget items for viewable budgets, Can archive and un-archive budgets, Can close and open budgets |
Employees | Can access active budgets, Can access closed budgets, Can access archived budgets, Can view accessible budgets assigned to me |
Observer | Can access active budgets, Can access closed budgets, Can access archived budgets, Can view accessible budgets of all users |
Customized Module Levels can be created.
How To: Create a New Module Level (Finance Module)
To access an attachment associated with a specific budget item, go to the Active Tab of the Budgets Page in the Finance Module.
Attachments can also be accessed for Closed or Archived Budgets on the appropriate tabs.
Clicking on the attachment file number in the attachments column opens the associated attachments file name as a clickable links that, if selected, will open the attached file for viewing.
You can also access your attachments by clicking on the budget name or the eyeball icon in the actions column of the Active Budgets Table which opens the Budget Items Per Budget Table.
Click on the attachment’s entry for the desired budget item opening a modal with the attachment name. Click the attachment name and the attachment will automatically be downloaded to your personal device.
Customizable Tables in the Finance Module
There are two tables in the Finance Module than can be customized for your organization's specific needs.
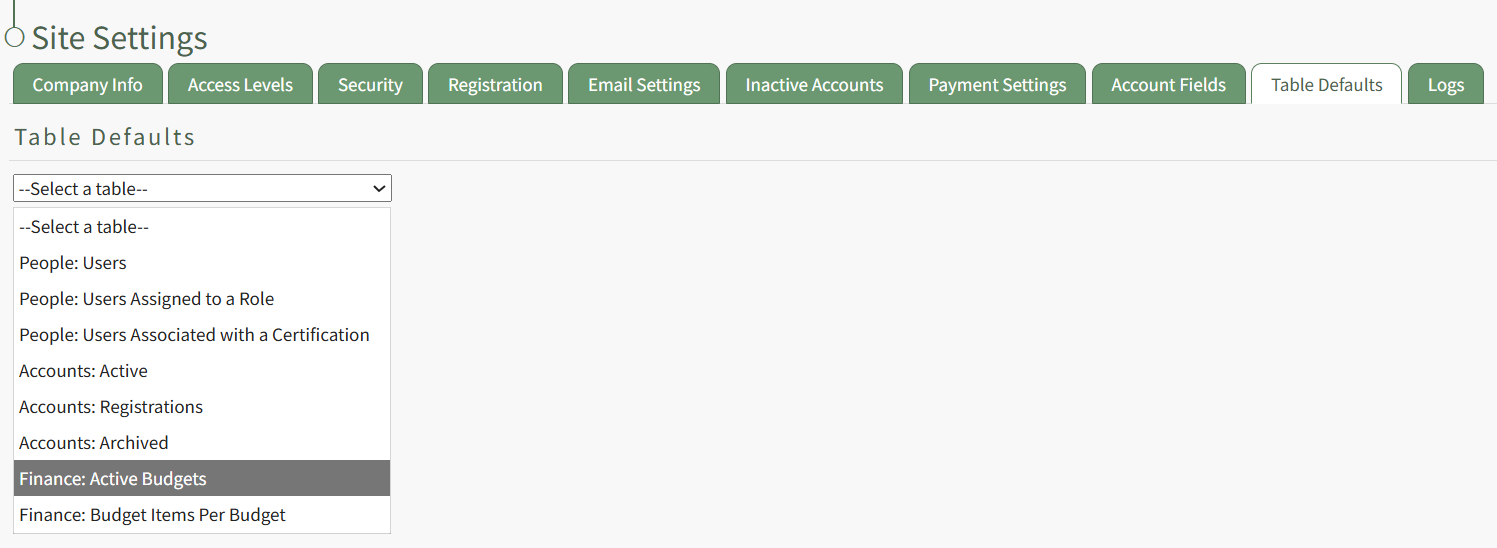
The Active Budgets Table (on the Active Tab of the Budgets Page of the Finance Module), the Budget Items per Budget Table (on a specific budget's Details Page) are customizable.
How To: Edit the Finance Module Active Budgets Table
To edit the Active Budgets Table in the Finance Module, go to the Table Defaults Tab in the Site Settings Module.
Select “Finance: Active Budget” from the dropdown menu.
Select the “Edit Columns” button, opening the Choose Columns Modal. The default column choices include: account, name, most recent activity, outstanding items, attachments, pending approvals, total budget, amount used, amount remaining, actions, description, system notes, username, email, first name, last name, phone, Address 1, and Address 2, employee ID and any customized account fields.
How To: Add a Custom/Additional User Account Information Field
To add a user account information field, open the Account Fields Tab in the Site Settings Module from the Main Menu.
Click the "Add a Field" clickable link above the Custom / Additional User Account Information Fields opening the Add Field Modal.
Input the label for the field.
Select the field type (text or email) from the dropdown menu.
Selecting the checkbox enables customization to "Allow multiple values," make the field "Required," or make it a "Sensitive Field."
Designating the field as a "Sensitive Field" allows an extra step in form security when integrating these fields within the Form module. The Form Designer must explicitly choose when they wish to use a sensitive field.
The Permissions Table determines who can view / edit their own and other user's fields. Selecting the checkbox gives the individual the specified permission. Deselecting the checkbox removed the permission.
Select the "Save" button and the custom field now shows in the table.
Use the Drag Me icon to drag and drop the field into your desired position of choice.
The bars icon allows the columns to be positioned in the order of your choosing.
Click “Cancel” to return to the Table Defaults Tab without making any changes.
Select the “Save” button to make the desired changes and return to the Table Defaults Tab. A preview of the first five rows of the table is shown. Select the “View Live Table” button to be directed to the live table in the Finance Module.
How To: Edit the Finance Module Budget Items Per Budget Table
To edit the Budget Items per Budget Table in the Finance Module, go to the Table Defaults Tab in the Site Settings Module.
Select “Finance: Budget Items Per Budget” from the dropdown menu.
Select the “Edit Columns” button, opening the Choose Columns Modal. The default column choices include: item name, date, invoice number, attachment(s), amount, remaining funds, notes, approval status, approve / reject, paid, actions, username, email, first name, last name, employee ID, phone, Address 1 and Address 2 and any customized account fields.
How To: Add a Custom / Additional User Account Information Field
To add a user account information field, open the Account Fields Tab in the Site Settings Module from the Main Menu.
Click the "Add a Field" clickable link above the Custom / Additional User Account Information Fields opening the Add Field Modal.
Input the label for the field.
Select the field type (text or email) from the dropdown menu.
Selecting the checkbox enables customization to "Allow multiple values," make the field "Required," or make it a "Sensitive Field."
Designating the field as a "Sensitive Field" allows an extra step in form security when integrating these fields within the Form module. The Form Designer must explicitly choose when they wish to use a sensitive field.
The Permissions Table determines who can view / edit their own and other user's fields. Selecting the checkbox gives the individual the specified permission. Deselecting the checkbox removed the permission.
Select the "Save" button and the custom field now shows in the table.
Use the Drag Me icon to drag and drop the field into your desired position of choice.
The bars icon allows the columns to be positioned in the order of your choosing.
Click “Cancel” to return to the Table Defaults Tab without making any changes.
Select the “Save” button to make the desired changes and return to the Table Defaults Tab. A preview of the first five rows of the table is shown. Select the “View Live Table” button to be directed to the live table in the Finance Module.
Customizable user account information fields can be created and utilized in the tables as needed.
How To: Add a Custom / Additional User Account Information Field
To add a user account information field, open the Account Fields Tab in the Site Settings Module from the Main Menu.
Click the "Add a Field" clickable link above the Custom / Additional User Account Information Fields opening the Add Field Modal.
Input the label for the field.
Select the field type (text or email) from the dropdown menu.
Selecting the checkbox enables customization to "Allow multiple values," make the field "Required," or make it a "Sensitive Field."
Designating the field as a "Sensitive Field" allows an extra step in form security when integrating these fields within the Form module. The Form Designer must explicitly choose when they wish to use a sensitive field.
The Permissions Table determines who can view / edit their own and other user's fields. Selecting the checkbox gives the individual the specified permission. Deselecting the checkbox removed the permission.
Select the "Save" button and the custom field now shows in the table.
Use the Drag Me icon to drag and drop the field into your desired position of choice.
Finance: Module Pages
Budgets Page: Active / Closed / Archived Tabs
The Budgets Page of the Finance Module is comprised of five tabs: Active, Closed, Archived, Reports, and Settings. The active tab you’re on is designated by the white coloration.
The “Add New Budget” button will show to the right of the budget header, regardless of which tab is open.
How To: Add a New Budget
To create a new budget within the Finance Module, go to any tab on the Budgets Page and select the “Add New Budget” button.

This opens the Add New Budget Modal.

Input the budget name and a description.
Identify the individual to be listed as the account. Account refers to the individual whose account is linked to the budget as an owner.
You can only select one individual.
Include the budget amount.
If an individual is not associated with a budget as the account holder or an approver, they cannot be given visibility.
Click the “Create Budget” button and the newly created budget will show in the Active Budgets Table on the Active Tab of the Budgets Page.

All budgets are grouped as active, closed or archived, and are shown in budget tables on the different tabs. A budget is only visible to account users if they are listed as the account holder of the budget or if they are listed as an approver on the budget.
If an individual is not associated with a budget as the account holder or an approver, they cannot be given visibility.
An explanation of the budget table can be found under the Understanding Budgets and Budget Items of the User Manual.
To open a budget (regardless of its status), you can click directly on the budget name or click the eyeball icon in the action column of the table.
The actions available in the budget table vary by tab.
Actions Available in the Budget Table Based on Status | |
Tab | Actions Available |
Active | View Budget, Edit Budget, Add Budget Alert, Edit Approvers / Notifications, Close Budget, and Archive Budget |
Closed | View Budget, Make Budget Active, Archive Budget |
Archived | Make Budget Active, Delete Budget |
Budgets Page: Reports Tab
The Reports Tab highlights system reports from the Reports Module that are relevant to budgets. System Reports displayed on the Reports Tab include the Budget Summary Report, Pending Approvals Report, and Approval Status Report.
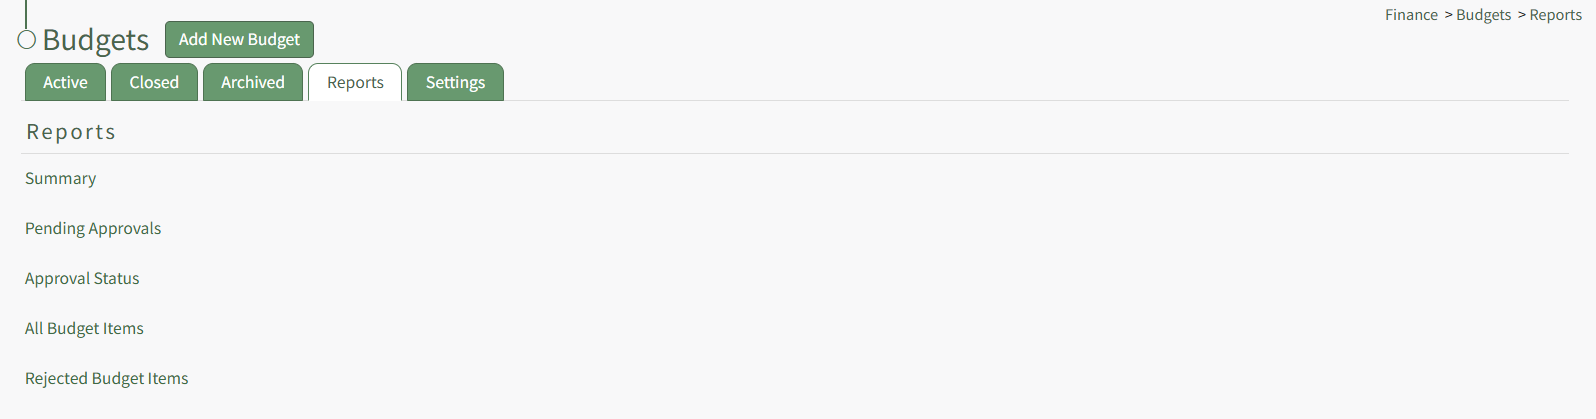
The System Budget Report Fields by Report Table below states each of the fields included in the report.
System Budget Report Fields by Report | |
Report Name | Report Fields |
Summary | Account, Budget Name, Amount Used, Total Budget, Percent Used |
Pending Approval | Account, Budget, Budget Item, Data, Invoice Number, Attachment(s), Amount, Approve / Reject |
Approval Status | Account, Student ID, Email, Budget, Budget Item, Date, Invoice Number, Attachment(s), Amount, Remaining Approvers |
All Budget Items | Account, Budget, Budget Item, Date, Invoice Number, Attachment(s), Amount, View Budget Item |
Rejected Budget Items | Account, Budget, Budget Item, Date, Invoice Number, Attachment(s), Amount, View Budget Item |
Each report listed is a clickable link that will open in the Reports Module. A details explanation of the Report Page can be found in the User Manual under the Reports Module.
Budgets Page: Module Settings Tab
The Module Settings Tab allows an individual to customize settings for archived budgets and settings for budget deletion.

Budgets will automatically be archived when the user account associated with the active budget is archived. Un-archiving a user will result in the automatically archived budgets to return to their previous state (active or closed). If the budget was manually archived before the user was archived, the budget will remain archived. You can deselect the “Archive budgets when associated user account is archived” checkbox if you do not want budgets to be archived when associated user accounts are archived.
Selecting the “Delete budgets when associated user account is deleted” checkbox will result in budgets being automatically deleted when the associated user account is deleted. When this budget setting is selected, an additional checkbox becomes available. If the “Only delete “empty” budgets with no recorded budget items” checkbox is selected, a budget will not be deleted if there are budget items recorded within the budget.
Changes must be saved by clicking the “Save” button in order for the settings modifications to be recorded by the system.
Invoices Page
The Invoices Page is populated with data from the FS Pro Integration that was built for and only accessible by a specific client’s servers and thus, is presently non-functional for other clients.
Finance: Supplemental Resources
Finance Module Email Alert Summary
Users can enable and set their own notification preferences for system emails on the Notifications Tab of the My Accounts Page in the Accounts Module.
How To: Edit Email Report/Alert Notification Settings for Existing Accounts
To edit email report / alert settings for existing accounts, go to the Account Settings Tab on the Settings Page of the Communications Module.

Select the users whose email report/ alerts notification settings you wish to edit.

The Search textbox simplifies the search for specific users. The dropdown menu allows you to select between users’ current statuses for Reports/Alerts receipt. If you wish to edit all user accounts with the same new settings, select the checkbox in the title row of the table to select all users in the table. Selecting a user in one table automatically selects them in the other.
Select the “Edit Selected” button, opening the Update Account Settings Modal.


Make the desired changes for both email reports/alerts that you would like to apply to the pre-selected users.
Select “Save” for the notification preferences to be altered. Click “Cancel” to return to the Account Settings Tab on the Settings Page with any user accounts being impacted.
Finance Module Email Alerts Summary Table | |
Email Alert | Digestible |
Budget Item Approved | Can be sent via digest |
Budget Item Rejected (Can Submit) | Can be sent via digest |
Budget Item Rejected (Cannot Submit) | Can be sent via digest |
Administrators can update the system default settings (including whether they are sent in real time or digestible) for alert emails on the Settings Page of the Communications Module.
Complete List of Finance Module How Tos
How To: Access a Budget Item Attachment
To access an attachment associated with a specific budget item, go to the Active Tab of the Budgets Page in the Finance Module.
Attachments can also be accessed for Closed or Archived Budgets on the appropriate tabs.
Clicking on the attachment file number in the attachments column opens the associated attachments file name as a clickable links that, if selected, will open the attached file for viewing.
You can also access your attachments by clicking on the budget name or the eyeball icon in the actions column of the Active Budgets Table which opens the Budget Items Per Budget Table.
Click on the attachment’s entry for the desired budget item opening a modal with the attachment name. Click the attachment name and the attachment will automatically be downloaded to your personal device.
How To: Add a Budget Alert
Budget alerts can only be added to active budgets. To add a budget alert, locate the budget you wish to add an alert to on the Active Tab of the Budgets Page. Click the bell icon in the Actions column of the budget table.
This opens the Edit Alerts Modal.
Select the “Add an Alert” button and the modal expands.
An alert can be based on when the amount remaining in the budget falls below a specified amount or when the amount remaining in the budget falls below a specified percent.
Input the percentage or amount for the alert threshold as well as the individual account or certification role to receive the alert. Multiple accounts and / or roles can be selected to receive the alert.
Select the “Save” button and return to the Active Tab of the Budgets Page.
Additional alerts can be added if desired. Existing alerts will show on the Edit Alert Modal.
How To: Add a Budget Item
To add a budget item to a specific budget, go to the Active Tab of the Budgets Page in the Finance Module. Open the specific budget either by clicking the name of the budget or the eyeball icon in the action column of the desired budget.
The icon opens the specific budget, showing the Budget Item Per Budget Table.
Select the “Add Budget Item” button to the right of the budget header opening the Add Budget Item Modal.
Include the Budget Item Name and the Date. Include the invoice number, amount, and associated attachments. Multiple attachments can be included, but at least one is required. All fields, with the exception of notes, are required by the modal.
Select “Add Budget Item” from the bottom of the modal, and the budget item will now appear in the budget specific Budget Item Per Budget Table and can be submitted for approval (if approval is enabled).
How To: Submit a Budget Item for Approval
Budget items can only be submitted for active budgets. To submit a budget item for approval, go to the Active Tab of the Budgets Page in the Finance Module. Open the specific budget with the budget item that needs to be submitted for approval either by clicking the name of the budget or the eyeball icon in the action column of the desired budget.
This opens the budget, showing the Budget Item per Budget Table.
To submit the budget item for approval, select the clickable link “Submit for Approval” in the Approval Status column.
The approval status now shows how many of the required approvals have been granted. The comment icon shows the date and time the budget item was submitted for approval.
How To: Add a New Budget
To create a new budget within the Finance Module, go to any tab on the Budgets Page and select the “Add New Budget” button.
This opens the Add New Budget Modal.
Input the budget name and a description.
Identify the individual to be listed as the account. Account refers to the individual whose account is linked to the budget as an owner.
You can only select one individual.
Include the budget amount.
If an individual is not associated with a budget as the account holder or an approver, they cannot be given visibility.
Click the “Create Budget” button and the newly created budget will show in the Active Budgets Table on the Active Tab of the Budgets Page.
How To: Approve / Reject a Budget Item
How To: Archive a Budget
Both an active budget and a closed budget can be archived. To archive a budget, locate the budget to be archived on the Active or Closed Tab of the Budgets Page. Click the file box icon in the Actions column of the budget table.

This will open a confirmation modal stating, “Are you sure you want to archive this budget?”

The budget will no longer show on the Active (or Closed) Tab of the Budgets Page, which will display a message stating the budget is now closed.

The archived budget will now show on the Archived Tab of the Budgets Page.

How To: Close a Budget
Only active budgets can be closed. To close an active budget, go to the Active Tab of the Budgets Page in the Finance Module. Click the power icon in the Actions column of the Active Table.

This will open a confirmation modal stating, “Are you sure you want to close this budget? Alerts will no longer be sent.” Select the “OK” button.

The budget will no longer show on the Active Tab of the Budgets Page, which will display a message stating the budget is now closed.

The closed budget will now show on the Closed Tab of the Budgets Page.

How To: Create a New Module Level (Finance Module)
To access an attachment associated with a specific budget item, go to the Active Tab of the Budgets Page in the Finance Module.
Attachments can also be accessed for Closed or Archived Budgets on the appropriate tabs.
Clicking on the attachment file number in the attachments column opens the associated attachments file name as a clickable links that, if selected, will open the attached file for viewing.
You can also access your attachments by clicking on the budget name or the eyeball icon in the actions column of the Active Budgets Table which opens the Budget Items Per Budget Table.
Click on the attachment’s entry for the desired budget item opening a modal with the attachment name. Click the attachment name and the attachment will automatically be downloaded to your personal device.
How To: Edit a Budget Alert
Budget alerts only exist for active budgets. To edit an existing budget alert, locate the budget whose alert you wish to edit on the Active Tab of the Budgets Page. Click the bell icon in the Actions column of the budget table.
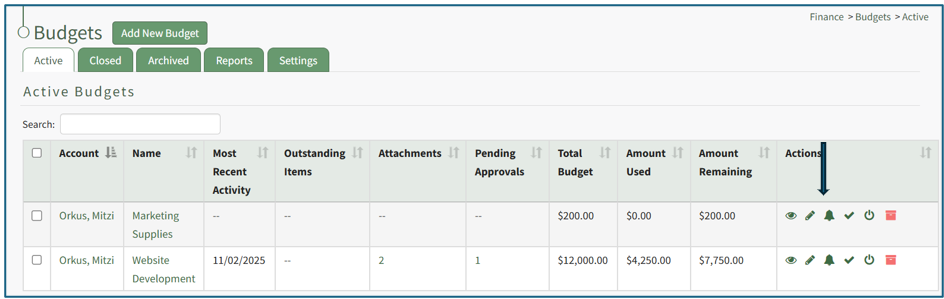
This opens the Edit Alerts Modal which will show any existing alerts.
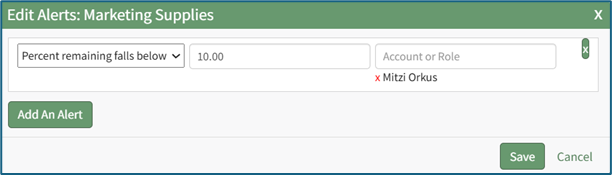
Make the desired changes to the alert. An alert can be based on when the amount remaining in the budget falls below a specified amount or when the amount remaining in the budget falls below a specified percent.
Select the “Save” button and return to the Active Tab of the Budgets Page.
How To: Edit a Budget ITEM
Only active budgets can be edited. To edit a budget, go to the Active Tab of the Budgets Page in the Finance Module. Click the pencil icon in the Actions column of the Active Table.
This opens the Edit (BUDGET NAME) Modal.
Make any desired changes to the Budget Name, Description, Account, Amount, or Tags associated with the budget.
When done making changes, click the “Save” button and return to the Active Tab of the Budgets Page.
How To: Edit a Budget Item After Submission for Approval
Go to the Active/Closed/Archived Budget Table and click the title of the budget you wish to edit, opening the Budget Item Per Budget Table.
If the budget item has already been submitted for approval, it must be unlocked first before edits can be made.
Unlock the approved budget item.
How To: Unlock a Submitted Budget Item for Editing
In order to edit an approved budget item, any existing approvals and rejections regarding the budget item will be cancelled. The budget item must then be unlocked before editing is possible.
To unlock a submitted budget item for editing, select the appropriate budget from the Active/Closed/Archived Budget tab. Click the budget title to be taken to the Budget Item Per Budget Table.
Click the lock icon in the actions column of the budget item you wish to edit.
The lock icon opens a Confirmation Modal which states, “Locked for editing. Would you like to cancel approvals and rejection and unlock editing?
Select OK.
The lock icon is now replaced with the pencil icon in the actions column and the budget item is unlocked.
The pencil icon opens the Edit Budget Item Modal if clicked.
How To: Edit a Budget Item
{{@308}}
The lock icon is now replaced with the pencil icon in the actions column, and the budget item is unlocked.
The pencil icon opens the Edit Budget Item Modal if clicked.
Make the necessary changes and select Save for your edits to be recorded.
You must resubmit your budget items for approval.
How To: Resubmit a Budget Item for Approval after Edits Are Made
A Budget Item must be unlocked for edits to be made.
How To: Unlock a Submitted Budget Item for Editing
{{@314}}
Unlocking the budget item allows the pencil icon to be selected for edits to the budget.
How To: Edit a Budget Item After Submission for Approval
{{@316}}
Once edits have been made, the budget item should be resubmitted for approval. Click the “Submit for approval” link in the Approval Status column.
The Approval Status changes, now showing how many approvals have been received and the total needed. The budget item is locked again.
How To: Resubmit a Budget Item for Approval after Edits Are Made
A Budget Item must be unlocked for edits to be made.
How To: Unlock a Submitted Budget Item for Editing
In order to edit an approved budget item, any existing approvals and rejections regarding the budget item will be cancelled. The budget item must then be unlocked before editing is possible.
To unlock a submitted budget item for editing, select the appropriate budget from the Active/Closed/Archived Budget tab. Click the budget title to be taken to the Budget Item Per Budget Table.
Click the lock icon in the actions column of the budget item you wish to edit.
The lock icon opens a Confirmation Modal which states, “Locked for editing. Would you like to cancel approvals and rejection and unlock editing?
Select OK.
The lock icon is now replaced with the pencil icon in the actions column and the budget item is unlocked.
The pencil icon opens the Edit Budget Item Modal if clicked.
How To: Edit a Budget Item
{{@308}}
Unlocking the budget item allows the pencil icon to be selected for edits to the budget.
How To: Edit a Budget Item After Submission for Approval
Go to the Active/Closed/Archived Budget Table and click the title of the budget you wish to edit, opening the Budget Item Per Budget Table.
If the budget item has already been submitted for approval, it must be unlocked first before edits can be made.
Unlock the approved budget item.
How To: Unlock a Submitted Budget Item for Editing
{{@314}}
The lock icon is now replaced with the pencil icon in the actions column, and the budget item is unlocked.
The pencil icon opens the Edit Budget Item Modal if clicked.
Make the necessary changes and select Save for your edits to be recorded.
You must resubmit your budget items for approval.
How To: Resubmit a Budget Item for Approval after Edits Are Made
{{@315}}
Once edits have been made, the budget item should be resubmitted for approval. Click the “Submit for approval” link in the Approval Status column.
The Approval Status changes, now showing how many approvals have been received and the total needed. The budget item is locked again.
How To: Set / Edit a Budget's Approvers and Approval Notifications
You can only edit approvers and approval notifications for an active budget.
To set or edit a budget’s approvers and / or approval notifications, go to the Active Tab of the Budgets Page in the Finance Module. Select the check icon in the Actions column of the Active Accounts Table.
This opens the Edit Approvers Modal.
There are five options of who the system should notify when a budget has received all required approvals or when it has been rejected: the user who submitted the budget item, the users who have approved the budget item, all users in all approval groups, the account holder, and the account holder’s supervisor(s). Multiple, all, or no checkboxes can be selected.
To add an approver, click the “+ Add An Approver” button and the modal expands.
Add an individual account or a certification role and identify if their approval is required or optional. Multiple approvers can be added in this expansion, or you can click “+Add an Approver” again if the permissions/requirements need to be different for the different approvers.
There are two checkboxes associated with adding an approver. The first is in regard to when approval will be given. The “Only allow approval when all above required groups have been given approval” checkbox will not mark a budget item as approved until all required groups have been approved.
The second checkbox impacts when alerts regarding a budget will be sent. The “Send alerts to all approvers in this group when their approval is required for a budget item” opens an additional checkbox when selected. Select the “Only send an alert to this group when all above required groups have been given approval” to send an alert when a required signatures have been received.
After making the appropriate selections, the modal will state how many budget items will be affected by the changes being made.
You have the choice to “Mark as Approved any budget items that will become fully approved when this form is saved” or to “Clear existing approvals for any budget items that will become fully approved when this form is saved.” You cannot select both.
Once all changes to approvers and approval notifications for the budget have been made, select the “Save” button and you will return to the Active Tab of the Budgets Page.
How To: Submit a Budget Item for Approval
Budget items can only be submitted for active budgets. To submit a budget item for approval, go to the Active Tab of the Budgets Page in the Finance Module. Open the specific budget with the budget item that needs to be submitted for approval either by clicking the name of the budget or the eyeball icon in the action column of the desired budget.
This opens the budget, showing the Budget Item per Budget Table.
To submit the budget item for approval, select the clickable link “Submit for Approval” in the Approval Status column.
The approval status now shows how many of the required approvals have been granted. The comment icon shows the date and time the budget item was submitted for approval.
How To: Unlock a Submitted Budget Item for Editing
In order to edit an approved budget item, any existing approvals and rejections regarding the budget item will be cancelled. The budget item must then be unlocked before editing is possible.
To unlock a submitted budget item for editing, select the appropriate budget from the Active/Closed/Archived Budget tab. Click the budget title to be taken to the Budget Item Per Budget Table.
Click the lock icon in the actions column of the budget item you wish to edit.
The lock icon opens a Confirmation Modal which states, “Locked for editing. Would you like to cancel approvals and rejection and unlock editing?
Select OK.
The lock icon is now replaced with the pencil icon in the actions column and the budget item is unlocked.
The pencil icon opens the Edit Budget Item Modal if clicked.
How To: Edit a Budget Item
Only active budgets can be edited. To edit a budget, go to the Active Tab of the Budgets Page in the Finance Module. Click the pencil icon in the Actions column of the Active Table.
This opens the Edit (BUDGET NAME) Modal.
Make any desired changes to the Budget Name, Description, Account, Amount, or Tags associated with the budget.
When done making changes, click the “Save” button and return to the Active Tab of the Budgets Page.