# Communications: Module Pages

# Send Communications Page

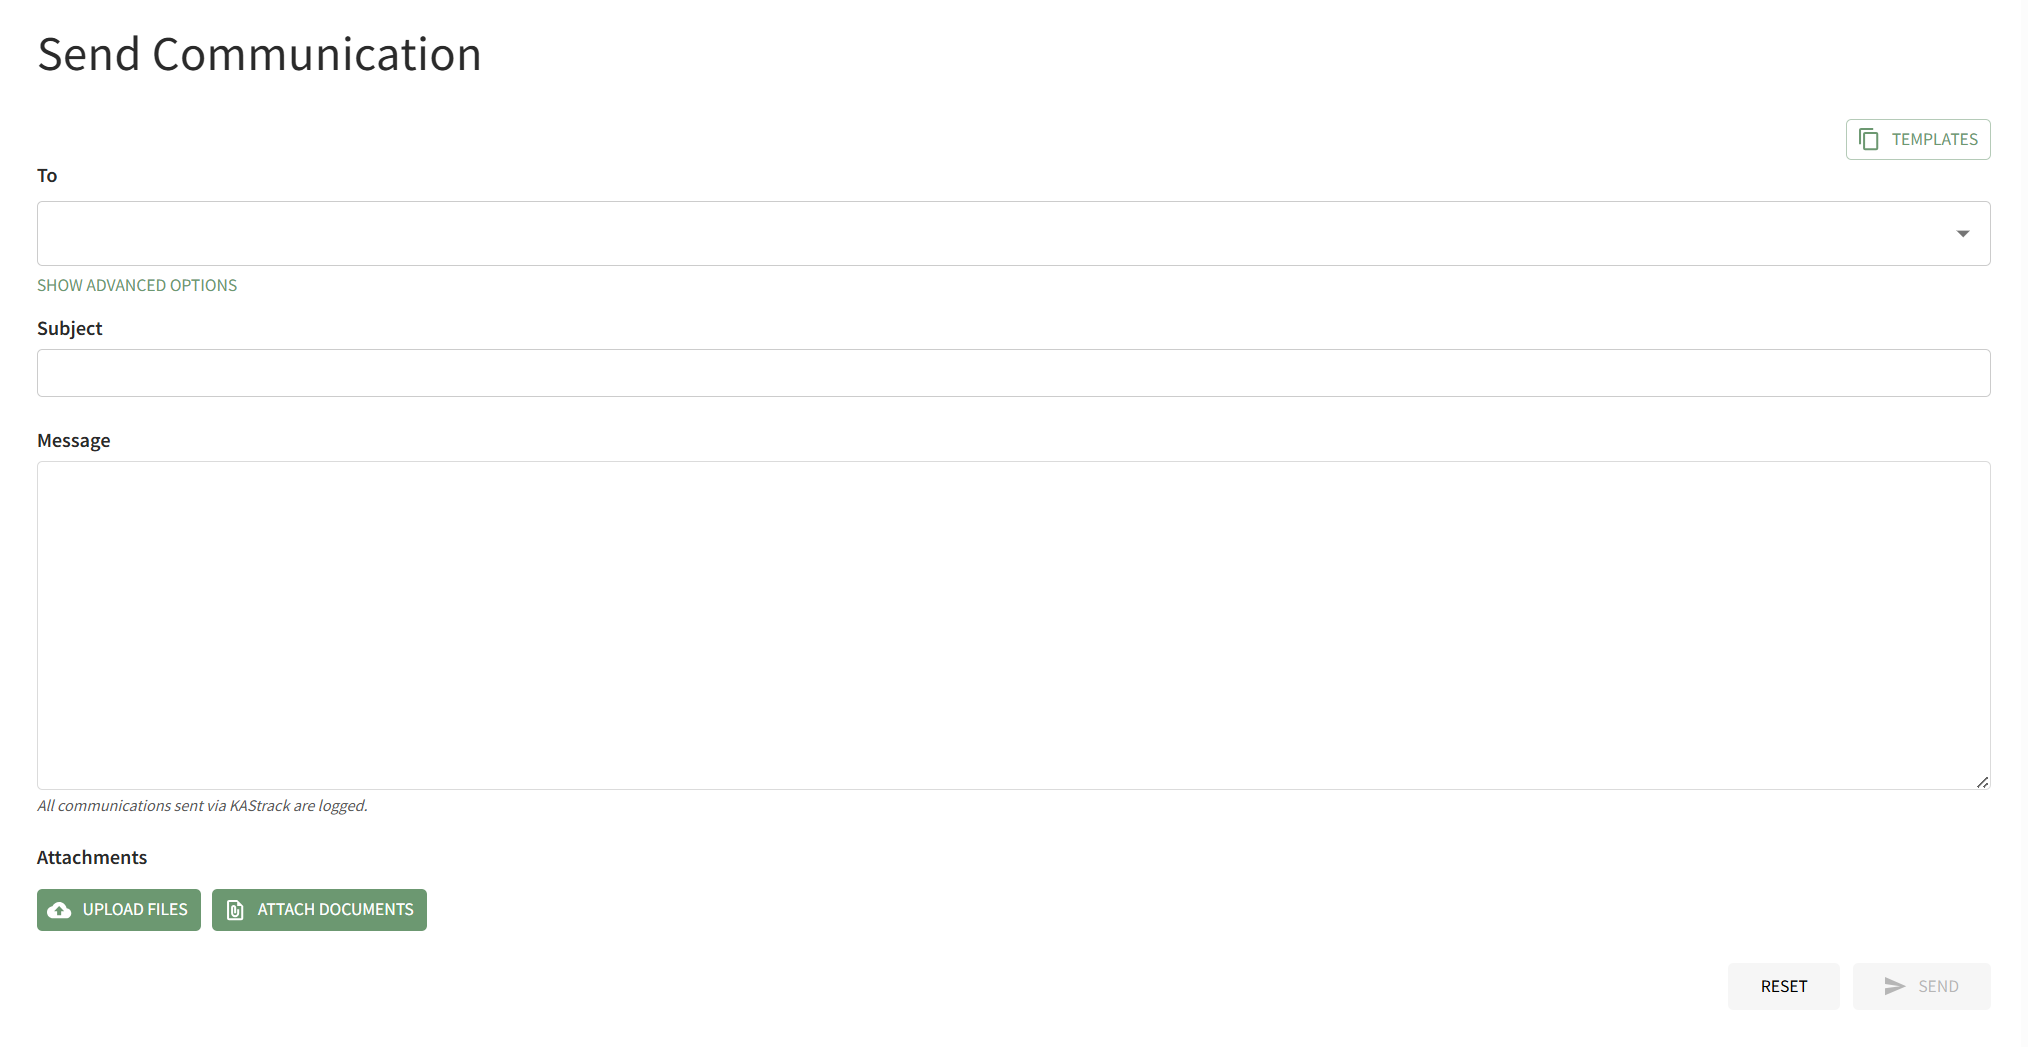
The Send Communications Page of the Communications Module allows individuals with the appropriate module access level (administrators and supervisors by default) to send communications within KAStrack.

<p class="callout info">All communications sent via KAStrack are logged. </p>

[![image.png](https://kaswiki.kastrack.com/uploads/images/gallery/2026-06/scaled-1680-/3xBimage.png)](https://kaswiki.kastrack.com/uploads/images/gallery/2026-06/3xBimage.png)

To send a message in KAStrack from the Communications Page, select the individuals, Certification Roles, or Access Levels who are to receive the message being sent, inputting a subject line and message. Communications can have attachments from your personal device uploaded to them or have files from the Documents Module attached.

<details id="bkmrk-how-to%3A-send-an-emai"><summary>How To: Send an Email in KAStrack</summary>

{{@932}}

</details><details id="bkmrk-how-to%3A-upload-a-fil"><summary>How To: Attach a File to a System Message</summary>

{{@922}}

</details><details id="bkmrk-how-to%3A-attach-a-doc"><summary>How To: Attach a Documents Module File To an Email</summary>

{{@921}}

</details>The templates button on the far right allows an individual to select and apply communications templates.

<details id="bkmrk-how-to%3A-use-a-commun"><summary>How To: Use a Communications Template when Sending an Email</summary>

{{@113}}

</details><p class="callout info">If a Communication Template is applied to a message on the Send Communications Page, the template will override any information that was manually entered in the subject line and message field. </p>

<details id="bkmrk-how-to%3A-create-new-c"><summary>How To: Create New Communication Templates</summary>

{{@107}}

</details>#### Advanced Options

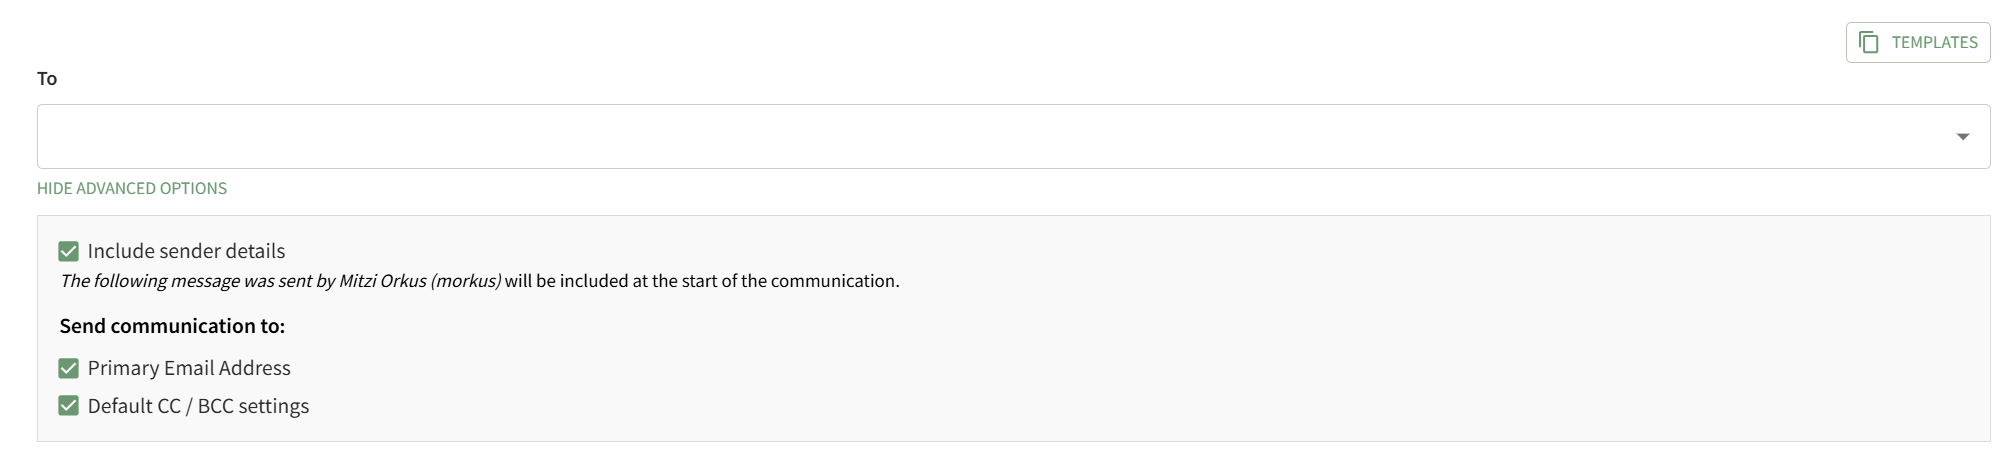
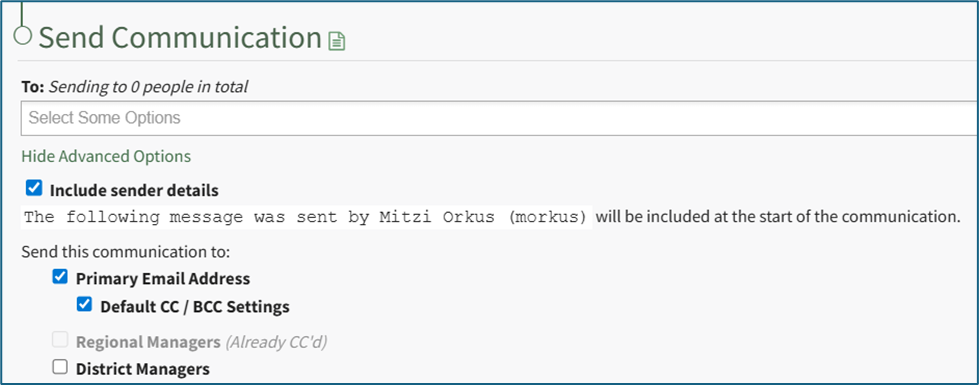
Clicking “Show Advanced Options” beneath the To field expands the Send Communication Page showing advanced options for sending messages.

<p class="callout info">By default, Advanced Options are only available for Admin Access Levels.</p>

[![image.png](https://kaswiki.kastrack.com/uploads/images/gallery/2026-06/scaled-1680-/Tqrimage.png)](https://kaswiki.kastrack.com/uploads/images/gallery/2026-06/Tqrimage.png)

Selecting the “Include sender details” checkbox will include the following message at the start of the communication, “The following message was sent by FIRST NAME LAST NAME (Username).”

Selecting the “Primary Email Address” checkbox will send the communication to the primary email address of the individuals or certification roles listed in the “To” line. The Primary Email Address refers to the system account field “Email” on users’ accounts.

Selecting the “Default CC / BCC Settings” checkbox will send the communication per the customized specifications made on the Module Settings Tab of the Settings Page in the Communications Module.

Any other additional account fields set as type “Email” will show below the “Default CC/BCC Settings” checkbox. If the additional account information field is already selected through the CC/BCC Settings, it will show in gray and state “(Already CC’d)”.

[![image.png](https://kaswiki.kastrack.com/uploads/images/gallery/2025-11/scaled-1680-/iTYimage.png)](https://kaswiki.kastrack.com/uploads/images/gallery/2025-11/iTYimage.png)
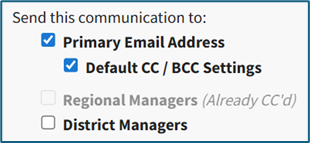
Any additional account information fields not already included through your customized settings will show with a checkbox and can be added if desired.

<p class="callout info"> In order to customize CC/BCC Settings, review the section on the Module Settings Tab.</p>

<details id="bkmrk-how-to%3A-set-up-addit"><summary>How To: Set Up Additional Account Fields for Email Settings</summary>

{{@112}}

</details>

# QR Codes Page

The QR Codes Page in the Communications Module allows a user to create and manage custom QR codes with specified URL destinations.

[![image.png](https://kaswiki.kastrack.com/uploads/images/gallery/2026-06/scaled-1680-/atSimage.png)](https://kaswiki.kastrack.com/uploads/images/gallery/2026-06/atSimage.png)

A button beneath the page header allows you to download multiple QR codes at once and to download the number of times a QR Code was used and its date of last use as a CSV file.

<details id="bkmrk-how-to%3A-download-mul"><summary>How To: Download Multiple QR Codes at Once</summary>

{{@928}}

</details><details id="bkmrk-how-to%3A-download-qr-"><summary>How To: Download QR Code Hits Data in a CSV File</summary>

{{@929}}

</details>All QR Codes created are listed in the QR Code Table. An explanation of the icons used on the QR Code Page is included in the table below.

<table id="bkmrk-qr-code-page-iconsic"><colgroup><col style="width: 76px;"></col><col style="width: 758px;"></col></colgroup><tbody><tr><td colspan="2">**QR Code Page Icons**

</td></tr><tr><td>**Icon**

</td><td>**Associated Action**

</td></tr><tr><td>[![image.png](https://kaswiki.kastrack.com/uploads/images/gallery/2026-06/scaled-1680-/tfsimage.png)](https://kaswiki.kastrack.com/uploads/images/gallery/2026-06/tfsimage.png)

</td><td>Selecting the plus-sign icon to the right of the QR Code page header opens the New QR Code Modal.

<details><summary>How To: Create a Custom QR Code</summary>

{{@925}}

</details></td></tr><tr><td>[![image.png](https://kaswiki.kastrack.com/uploads/images/gallery/2026-06/scaled-1680-/2HSimage.png)](https://kaswiki.kastrack.com/uploads/images/gallery/2026-06/2HSimage.png)

</td><td>Selecting the two-page icon in the URL Column of the QR Code Table copies the QR Code's Destination URL Link.

<details><summary>How To: Copy a QR Code's Destination URL Link</summary>

{{@924}}

</details></td></tr><tr><td>[![image.png](https://kaswiki.kastrack.com/uploads/images/gallery/2026-06/scaled-1680-/Vbqimage.png)](https://kaswiki.kastrack.com/uploads/images/gallery/2026-06/Vbqimage.png)

</td><td>Selecting the paper and pencil icon in the Actions Column of the QR Code Table opens the Edit QR Code Modal.

<details><summary>How To: Edit a QR Code</summary>

{{@930}}

</details></td></tr><tr><td>[![image.png](https://kaswiki.kastrack.com/uploads/images/gallery/2026-06/scaled-1680-/hVhimage.png)](https://kaswiki.kastrack.com/uploads/images/gallery/2026-06/hVhimage.png)

</td><td>Selecting the trashcan icon in the Actions Column of the QR Code Table opens the QR Code Deletion Confirmation Modal.

<details><summary>How To: Delete a QR Code</summary>

{{@926}}

</details></td></tr></tbody></table>

Individual QR codes can be viewed, copied, or downloaded as needed.

<details id="bkmrk-how-to%3A-view-a-qr-co"><summary>How To: View a Custom QR Code</summary>

{{@933}}

</details><details id="bkmrk-how-to%3A-copy-a-qr-co"><summary>How To: Copy a QR Code</summary>

{{@923}}

</details><details id="bkmrk-how-to%3A-download-an-"><summary>How To: Download an Individual QR Code</summary>

{{@927}}

</details>The record of the number of times a QR Code has been used can be reset whenever desired.

<details id="bkmrk-how-to%3A-reset-the-hi"><summary>How To: Reset the Hit Count on a QR Code</summary>

{{@931}}

</details>

# Supervisor Page

The Supervisor Page of the Communications Module allows for the viewing and bulk editing of the Email Report and Email Alert Notifications Settings preferences for the users you directly supervise.

[![image.png](https://kaswiki.kastrack.com/uploads/images/gallery/2025-11/scaled-1680-/k52image.png)](https://kaswiki.kastrack.com/uploads/images/gallery/2025-11/k52image.png)

<span style="white-space: pre-wrap;">The page is divided into two tables, one for Email Reports and one for Email Alerts. </span>

<p class="callout info">Selecting the checkbox in the first column of the title row of the Reports and Alerts Table will select all supervised users in that table. Selecting a user in one table automatically selects them in the other.</p>

At the top of the page, you can filter users by username, first name, or last name. Begin typing in the Search field and the page will automatically filter to matching users. The dropdown to the right of the Search field allows you to filter by users who have Active or Inactive status for either Email Reports or Email Alerts. Leave the dropdown blank to show all users regardless of status.

The Account Settings Reports Table will list all users that you supervise. If the user is receiving a reports email, a check will show in the Active Column. If not, an X will show. The report sent for each module will be listed, or Do Not Receive will show if none are selected. The frequency email reports are received will show in the frequency column.

The Account Settings Alerts Table will list all account users that you supervise. If the user is receiving alert emails, a check will show in the Active Column. If not, an X will show. Each module will state if alerts are being sent in Real Time, Digested (sent between midnight and 4 a.m. Central Time (United States)daily), or set to Do Not Receive.

Once you have selected users, you can choose either of the Set Selected or Edit Selected buttons at the top of the page. Set Selected allows you to apply an existing Notification Template to the selected user(s). Choose a Notification Template from the dropdown menu, then select “Save” to apply the template to the selected user(s), or press “Cancel” to close the modal and go back to the Supervisors page.

[![image.png](https://kaswiki.kastrack.com/uploads/images/gallery/2025-11/scaled-1680-/fKcimage.png)](https://kaswiki.kastrack.com/uploads/images/gallery/2025-11/fKcimage.png)
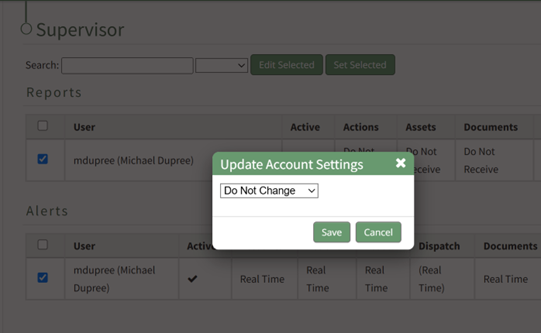
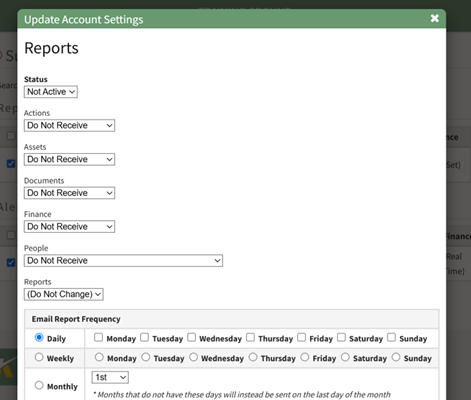
Edit Selected allows you to change specific settings for the selected users. You can choose to update the users’ status for Reports / Alerts, which Reports they receive, their Report receipt frequency, and whether they should receive Email Alerts in Real Time, Digested, or not at all (Do Not Receive). After making any changes, select “Save” to apply the changes to the selected user(s), or press “Cancel” to close the modal and go back to the Supervisors page.

[![image.png](https://kaswiki.kastrack.com/uploads/images/gallery/2025-11/scaled-1680-/T3Simage.png)](https://kaswiki.kastrack.com/uploads/images/gallery/2025-11/T3Simage.png)
[![image.png](https://kaswiki.kastrack.com/uploads/images/gallery/2025-11/scaled-1680-/sEmimage.png)](https://kaswiki.kastrack.com/uploads/images/gallery/2025-11/sEmimage.png)

# Settings Page: Module Settings Tab

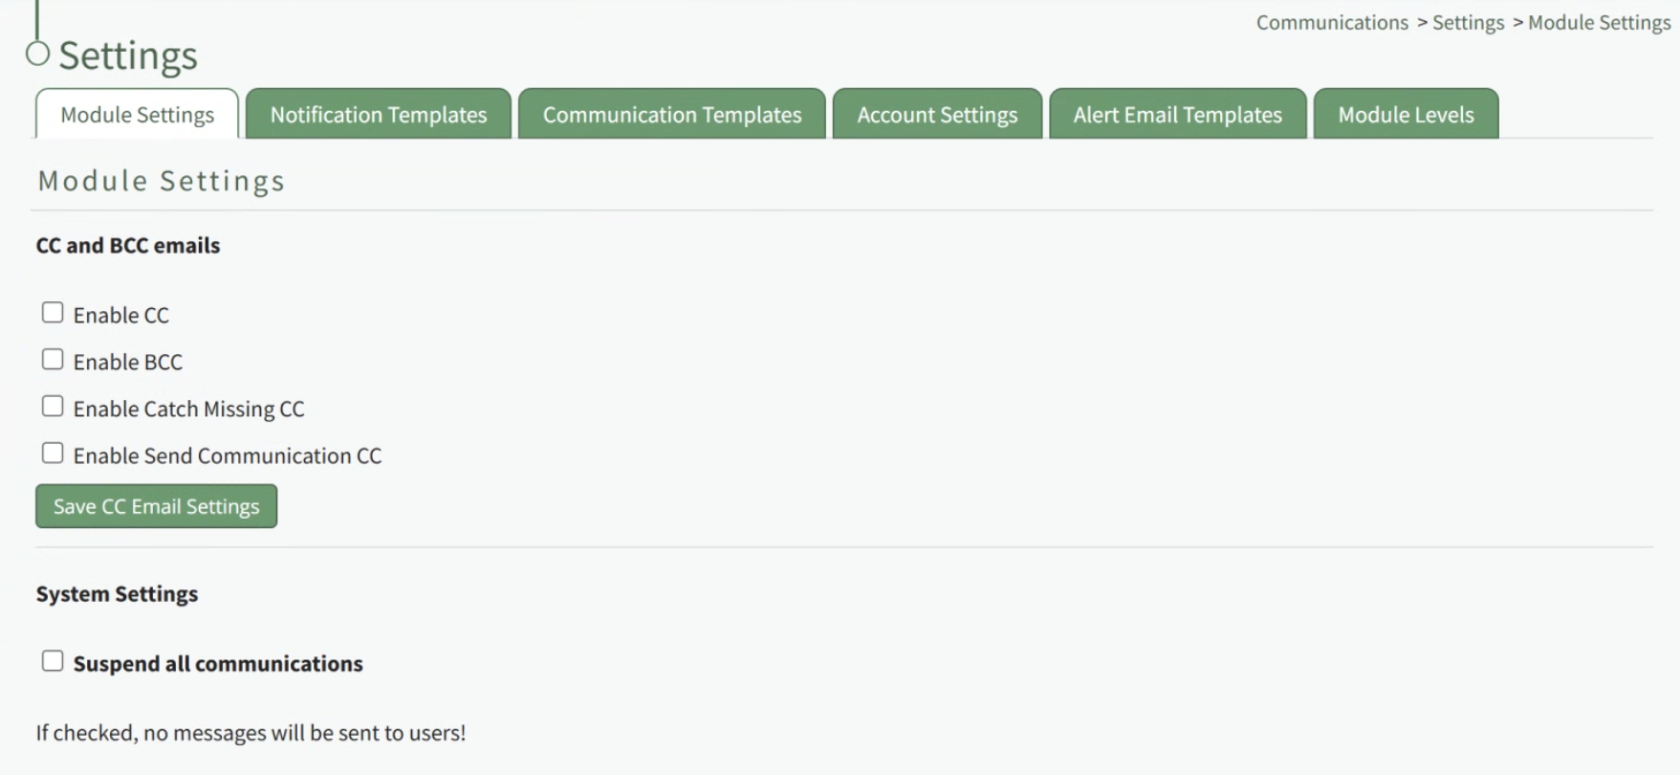
The Module Settings Tab on the Settings Page of Communications Module allows a user to designate preferences for communications manually sent through the Send Communications Page of the module as well as for communications automatically sent from the system.

[![image.png](https://kaswiki.kastrack.com/uploads/images/gallery/2026-06/scaled-1680-/DGOimage.png)](https://kaswiki.kastrack.com/uploads/images/gallery/2026-06/DGOimage.png)
#### Email Settings

There are three checkboxes that allow for the customization of communications automatically sent from the system: Enable CC, Enable BCC, and Enable Catch Missing CC. The fourth checkbox, Enable Send Communication CC, pertains to the customization of manually sent communications.

<p class="callout info"><span style="white-space: pre-wrap;">In order to utilize some of these module settings features, you must set up additional account fields first. </span></p>

<details id="bkmrk-how-to%3A-set-up-addit"><summary>How To: Set Up Additional Account Fields for Email Settings</summary>

{{@112}}

</details>Traditionally, CC (carbon copy) and BCC (blind carbon copy) are ways of including additional recipients in an email besides the main person (or people) the email is addressed to.

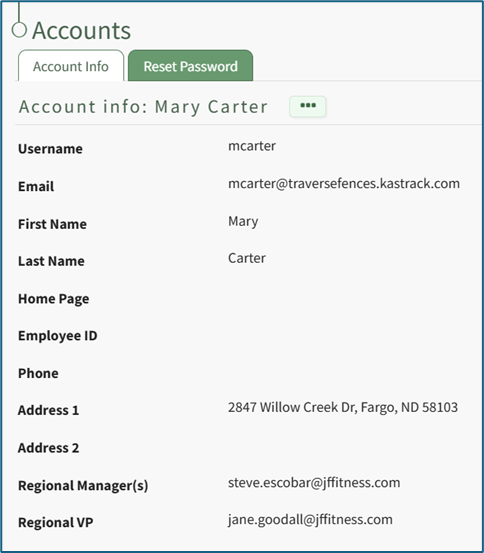
<span style="white-space: pre-wrap;">Selecting “Enable CC” will CC included users for all communications automatically sent through the system and allows everyone on the email to see who was copied. An additional account email information field on the Account Info: (User Name) Page can be used to organize email addresses for individuals other than the primary email address on the account. Select the additional account information email field you would like CC’d from the dropdown menu shown when the Enable CC checkbox is selected. </span>

<p class="callout info">Only one email account field can be selected via drop down menu.</p>

[![image.png](https://kaswiki.kastrack.com/uploads/images/gallery/2025-11/scaled-1680-/mOcimage.png)](https://kaswiki.kastrack.com/uploads/images/gallery/2025-11/mOcimage.png)

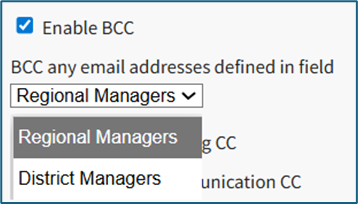
<span style="white-space: pre-wrap;">Selecting “Enable BCC” will BCC included users for all communications automatically sent through the system but does not allow the main recipients or CC’d recipients of the email to see who was copied. An additional account email information field on the Account Info: (User Name) Page can be used to organize email addresses for individual’s other than the primary email address on the account. Select the additional account information email field you would like BCC’d from the dropdown menu shown when the Enable BCC checkbox was selected. </span>

[![image.png](https://kaswiki.kastrack.com/uploads/images/gallery/2025-11/scaled-1680-/uo0image.png)](https://kaswiki.kastrack.com/uploads/images/gallery/2025-11/uo0image.png)

<p class="callout info">Only one email field can be selected via drop down menu.</p>

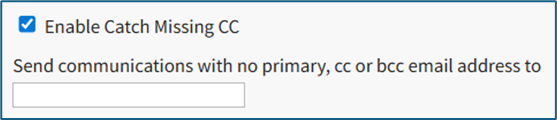
Select “Enable Catch Missing CC” and input an email address if you would like an email sent to an individual on behalf of a user whose primary email address field, as well as any CC and BCC email addresses (if present on their account), are all system-generated email addresses or blank. KAStrack has the capability to determine if an account user has input an email address of if a system-generated @\[subdomain\].katrack.com email address is being utilized.

[![image.png](https://kaswiki.kastrack.com/uploads/images/gallery/2025-11/scaled-1680-/t7Uimage.png)](https://kaswiki.kastrack.com/uploads/images/gallery/2025-11/t7Uimage.png)
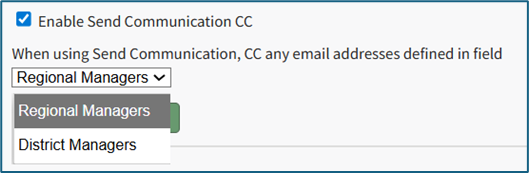
<span style="white-space: pre-wrap;">Selecting “Enable Send Communication CC” applies to the customization of manually sent communications originating on the Send Communications Page in the Communications Module. </span>

<p class="callout info">Only one email account field can be selected via drop down menu, but additional email account fields can be selected from the Send Communications Page.</p>

[![image.png](https://kaswiki.kastrack.com/uploads/images/gallery/2025-11/scaled-1680-/Qy6image.png)](https://kaswiki.kastrack.com/uploads/images/gallery/2025-11/Qy6image.png)

<span style="white-space: pre-wrap;">Users will still have the ability to customize their CC selection from the Send Communications Page. </span><span style="background-color: aqua;">WIKI LINK ADVANCED OPTIONS (SEND COMMUNICATIONS PAGE)</span>

[![image.png](https://kaswiki.kastrack.com/uploads/images/gallery/2025-11/scaled-1680-/tVFimage.png)](https://kaswiki.kastrack.com/uploads/images/gallery/2025-11/tVFimage.png)

#### System Settings

[![image.png](https://kaswiki.kastrack.com/uploads/images/gallery/2025-11/scaled-1680-/ZZ3image.png)](https://kaswiki.kastrack.com/uploads/images/gallery/2025-11/ZZ3image.png)

If the “Suspend all communications” checkbox is selected, only necessary messages will still be sent to users. (e.g. Direct Communications, Password resets, etc.).

# Settings Page: Notifications Templates Tab

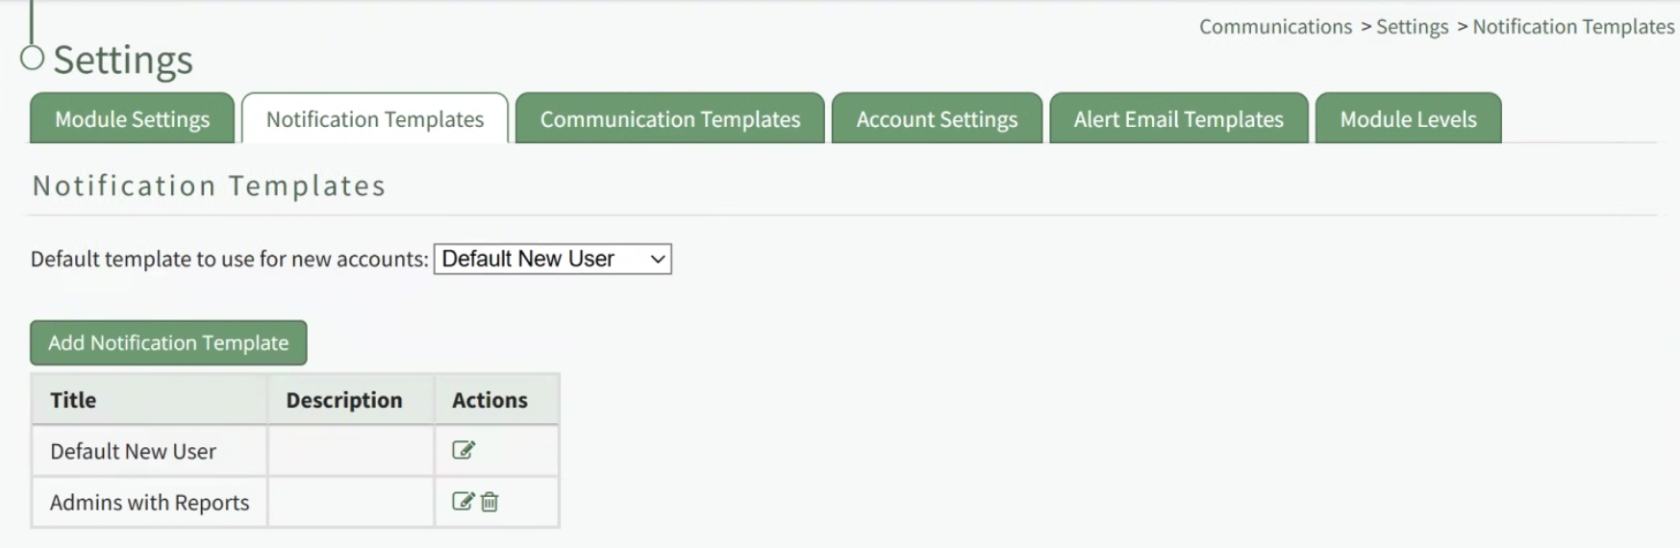
The Notification Templates Tab in the Communications Module houses the Default New User Template, which details the default designations for report and alert notifications that can be applied to all newly created user accounts. New user accounts manually created on the Create Tab of the Accounts Module will utilize the template specified via the dropdown menu to the right of “Default template to use for new accounts:”.

[![image.png](https://kaswiki.kastrack.com/uploads/images/gallery/2026-06/scaled-1680-/35ximage.png)](https://kaswiki.kastrack.com/uploads/images/gallery/2026-06/35ximage.png)
<span style="white-space: pre-wrap;">The preferred Notification Template applied to account being created via a Registration Profile Link can be specified in the Registration Profile design, when asked which notification template to apply. </span>

<details id="bkmrk-how-to%3A-create-regis"><summary>How To: Create Registration Profiles (Site Settings Module)</summary>

{{@90}}

</details><span style="white-space: pre-wrap;">Email report notifications and email alert notifications can be customized by an individual on the Notifications Tab on the My Account Page in the Accounts Module. Prior to an individual’s customization selections, the default template selected in the Communications Module establishes the default settings. </span>

<span style="white-space: pre-wrap;">The system-generated Default New User template can be edited. </span>

<details id="bkmrk-how-to%3A-edit-new-use"><summary>How To: Edit New User Notification Templates</summary>

{{@111}}

</details><span style="white-space: pre-wrap;">New Notification Templates can also be created. </span>

<details id="bkmrk-how-to%3A-create-new-n"><summary>How To: Create New Notification Templates</summary>

{{@109}}

</details>#### Email Report Settings Explanation

<span style="color: black;">KAStrack generates and sends reports for the following modules: Actions, Assets, Documents, Finances, and People, and Reports.</span>

<table id="bkmrk-regular-reports-avai"><colgroup><col style="width: 121px;"></col><col style="width: 647px;"></col></colgroup><tbody><tr><td colspan="2">**Regular Reports Available via Email Communication**

</td></tr><tr><td>**Module**

</td><td>**Reports Available**

</td></tr><tr><td>Actions

</td><td><span style="color: black;">Executive Summary</span>

</td></tr><tr><td>Assets

</td><td><span style="color: black;">Executive Summary, Detailed Report</span>

</td></tr><tr><td>Documents

</td><td><span style="color: black;">Executive Summary</span>

</td></tr><tr><td>Finance

</td><td><span style="color: black;">My Budgets, Executive Summary</span>

</td></tr><tr><td>People

</td><td><span style="color: black;">Executive Summary, Detailed Report (All Users), Detailed Report (Supervised Users), Detailed Report (All Users Group By Supervisor)</span>

</td></tr><tr><td>Report

</td><td><span style="color: black;">System and Custom Reports from the reports module.</span><span style="white-space: pre-wrap;"> </span><span style="color: black;">A complete list of the reports available to an individual can be viewed on their reports module homepage.</span>

</td></tr></tbody></table>

<span style="color: black;">Daily email report notifications can be sent every day of the week, or on specific days. Select the appropriate checkboxes to indicate your preference. Selecting a weekly email report notification requires you to indicate which day of the week you prefer the report summary email to be sent. Selecting a monthly frequency requires the user to specify which numerical day of the month from a dropdown menu you wish to receive the report summary. The days that are not included in every month (29, 30, 31) have an asterisk next to them. If the current month does not have that particular date, the system will send the report on the final day of the month.</span>

#### Email Alert Settings Explanation

<span style="color: black;">KAStrack sends email alerts for the following modules: Accounts, Actions, Assets, Dispatch, Documents, Finance, Forms, Meetings, and People. Each module has a dropdown menu with three options that designate when an email alert is sent: “Real Time”, “Digest”, and “Do Not Receive”.</span>

[![image.png](https://kaswiki.kastrack.com/uploads/images/gallery/2025-11/scaled-1680-/goYimage.png)](https://kaswiki.kastrack.com/uploads/images/gallery/2025-11/goYimage.png)

<span style="color: black;">Real Time is the default setting that sends email alerts in real time. Digest is KAStrack’s delayed timing feature. Selecting “Digest” will summarize all alerts with this designation to be sent daily between midnight and 4 a.m. Central Time (United States). As noted in KAStrack, alert digests are not applicable to all alerts.</span><span style="white-space: pre-wrap;"> </span>

<p class="callout info"><span style="color: black;">Whether or not an alert is digestible can be customized on the Alert Email Templates Tab of the Communications Module.</span></p>

<span style="white-space: pre-wrap;">Do Not Receive designates that the user does not wish to receive email alerts about that specific module. </span>

<p class="callout info"><span style="color: black;">Communications sent from users are always sent in real time.</span></p>

# Settings Page: Communications Template Tab

<span style="white-space: pre-wrap;">The Communication Templates Tab on the Settings Page of the Communications Module is where new communication templates can be created and managed. </span>

<p class="callout info"><span style="white-space: pre-wrap;">There are no system default Communication Templates. </span></p>

[![image.png](https://kaswiki.kastrack.com/uploads/images/gallery/2025-11/scaled-1680-/d9dimage.png)](https://kaswiki.kastrack.com/uploads/images/gallery/2025-11/d9dimage.png)

Communication templates are used to design the prefilling of fields and preloading of attachments for use when sending messages in the system from the Send Communications Page.

<details id="bkmrk-how-to%3A-create-new-c"><summary>How To: Create New Communication Templates</summary>

{{@107}}

</details>

# Settings Page: Account Setting Tab

The Account Settings Tab on the Settings Page of the Communications Module allows for the viewing and bulk editing of account users’ Email Report and Email Alert Notifications Settings preferences.

[![image.png](https://kaswiki.kastrack.com/uploads/images/gallery/2025-11/scaled-1680-/bZtimage.png)](https://kaswiki.kastrack.com/uploads/images/gallery/2025-11/bZtimage.png)

<span style="white-space: pre-wrap;"> The page is divided into two tables, one for Email Reports and one for Email Alerts. </span>

<p class="callout info">Selecting the checkbox in the first column and first row of the Reports and Alerts Table will select all users in that table. Selecting a user in one table automatically selects them in the other.</p>

At the top of the page, you can filter users by username, first name, or last name. Begin typing in the long Search field and the page will automatically filter to matching users. The dropdown to the right of the Search field allows you to filter by users who have Active or Inactive status for either Email Reports or Email Alerts. Leave the dropdown blank to show all users regardless of status.

[![image.png](https://kaswiki.kastrack.com/uploads/images/gallery/2025-11/scaled-1680-/UeQimage.png)](https://kaswiki.kastrack.com/uploads/images/gallery/2025-11/UeQimage.png)

The Account Settings Reports Table will list all users. If the user is receiving reports, a check will show in the Active Column. If not, an X will show. The report sent for each module will be listed, or Do Not Receive will show if none are selected. The frequency email reports are received will show in the frequency column.

The Account Settings Alerts Table will list all account users. If the user is receiving reports, a check will show in the Active Column. If not, an X will show. Each module will state if alerts are being sent in Real Time, Digested (sent between midnight and 4 a.m. Central Time (United States) daily), or set to Do Not Receive.

<span style="white-space: pre-wrap;">The “Edit Selected” button will edit email report/alert settings for existing users. </span>

<details id="bkmrk-how-to%3A-edit-email-r"><summary>How To: Edit Email Report / Alert Settings for Existing Users</summary>

{{@110}}

</details><span style="white-space: pre-wrap;">The “Set Selected” button will apply a notifications template for existing users. </span>

<details id="bkmrk-how-to%3A-apply-a-noti"><summary>How To: Apply a Notification Template to Existing Accounts</summary>

{{@106}}

</details>

# Settings Page: Alert Email Templates Tab

The Alert Email Templates Tab on the Settings Page of the Communications Module allows for the viewing of all alert templates in tabular form organized by module.

[![image.png](https://kaswiki.kastrack.com/uploads/images/gallery/2025-11/scaled-1680-/Qjwimage.png)](https://kaswiki.kastrack.com/uploads/images/gallery/2025-11/Qjwimage.png)

[![image.png](https://kaswiki.kastrack.com/uploads/images/gallery/2025-11/scaled-1680-/z8Aimage.png)](https://kaswiki.kastrack.com/uploads/images/gallery/2025-11/z8Aimage.png)

<span style="white-space: pre-wrap;">The Alert Email Templates Table shows the module name, the name of the alert, the status (Active/Inactive), if it is set to digestible (1=Yes, 0=No), and the subject of the email alert. </span>

<p class="callout info"><span style="white-space: pre-wrap;">If an email alert is </span><span style="color: black;">Digestible, the alert has a delayed timing feature. All digestible alerts are summarized and sent daily between midnight and 4 a.m. Central Time (United States).</span></p>

<span style="color: black;">There are two actions associated with the Alert Email Template Table. The eyeball icon opens the View Email config Modal. The edit icon opens the Edit Email config modal.</span>

<table class="align-center" id="bkmrk-mail-merge-fields-av"><colgroup><col style="width: 143px;"></col><col style="width: 457px;"></col></colgroup><tbody><tr><td colspan="2">**Mail Merge Fields Available to All Emails**

</td></tr><tr><td><span style="color: black;">\#Username#</span>

</td><td><span style="color: black;">The username for the user receiving the email, if known</span>

</td></tr><tr><td><span style="color: black;">\#FirstName#</span>

</td><td><span style="color: black;">The first name for the user receiving the email, if known</span>

</td></tr><tr><td><span style="color: black;">\#LastName#</span>

</td><td><span style="color: black;">The first name for the user receiving the email, if known</span>

</td></tr><tr><td><span style="color: black;">\#FullName#</span>

</td><td class="align-center"><span style="color: black;">The last name for the user receiving the email, if known</span>

</td></tr><tr><td><span style="color: black;">\#BaseURL#</span>

</td><td class="align-center"><span style="color: black;">The base URL for the module</span>

</td></tr></tbody></table>

<span style="color: black;">Selecting the eyeball icon, opening the View Email config Modal, allows a user to see the email alert template including the name, a description of the alert, the subject of the email, and the body of the email (plain-text and HTML).</span>

[![image.png](https://kaswiki.kastrack.com/uploads/images/gallery/2025-11/scaled-1680-/D4uimage.png)](https://kaswiki.kastrack.com/uploads/images/gallery/2025-11/D4uimage.png)

<span style="color: black;">Selecting the edit icon opens the Edit Email config Modal displaying the Email Alert Template. Within this modal, the status (active/inactive), digestible status, subject, body, and smart mail merge options can all be customized for your organization’s preferences.</span>

# Settings Page: Module Levels Tab

<span style="white-space: pre-wrap;">The Module Levels Tab on the Settings Page can be accessed from the Main Menu. </span><span style="color: rgb(68, 68, 68); background-color: rgb(255, 255, 255);">The system default module levels for the module are visible in the Module Levels Table. New module levels with customizable permissions can be created and managed on this tab.</span>

[![image.png](https://kaswiki.kastrack.com/uploads/images/gallery/2026-06/scaled-1680-/oDLimage.png)](https://kaswiki.kastrack.com/uploads/images/gallery/2026-06/oDLimage.png)

There are three system default module levels associated with the Communications Module. An explanation of the permissions associated with each default module level are shown in the Communications Module Level Permissions Table below.

<p class="callout info">System default module levels cannot be customized.</p>

<table id="bkmrk-communications-modul"><colgroup><col style="width: 105px;"></col><col style="width: 721px;"></col></colgroup><tbody><tr><td colspan="2">**Communications Module Level Permissions Table**

</td></tr><tr><td>**Module Level**

</td><td>**Permissions**

</td></tr><tr><td>Admin

</td><td>send communication, advanced send comm options, edit supervised users settings, manage notification templates (new/edit/delete), edit any users settings, edit new user settings, switch on off, manage roles (view roles, add role, unassign role, role permissions, assign hidden roles, edit role, delete role, assign roles), manage email config (view, edit, delete,and revert emailconfig), setup cc email, manage communication templates (view, edit, delete communication templates)

</td></tr><tr><td>Manager

</td><td>edit supervised users settings, view email config, send communication

</td></tr><tr><td>Staff

</td><td>N/A

</td></tr></tbody></table>

<span style="color: rgb(68, 68, 68); background-color: rgb(255, 255, 255);">New Module Levels can be created in order to customize module level permissions. An explanation of the icons associated with customized module levels have been provided in the table below.</span>

<table id="bkmrk-module-level-customi" style="box-sizing: border-box; outline-color: rgb(32, 110, 167); outline-width: 1px; margin: 0.3em 0px 1.375em; padding: 0px; border: 0px; font-style: normal; font-variant-ligatures: normal; font-variant-caps: normal; font-variant-numeric: inherit; font-variant-east-asian: inherit; font-variant-alternates: inherit; font-variant-position: inherit; font-variant-emoji: inherit; font-weight: 400; font-stretch: inherit; font-size: 14px; line-height: inherit; font-family: -apple-system, BlinkMacSystemFont, "Segoe UI", Oxygen, Ubuntu, Roboto, Cantarell, "Fira Sans", "Droid Sans", "Helvetica Neue", sans-serif; font-optical-sizing: inherit; font-size-adjust: inherit; font-kerning: inherit; font-feature-settings: inherit; font-variation-settings: inherit; font-language-override: inherit; vertical-align: baseline; border-collapse: collapse; border-spacing: 0px; min-width: 100px; max-width: 100%; hyphens: auto; table-layout: fixed; color: rgb(68, 68, 68); letter-spacing: normal; orphans: 2; text-align: start; text-transform: none; widows: 2; word-spacing: 0px; -webkit-text-stroke-width: 0px; white-space: normal; background-color: rgb(255, 255, 255); text-decoration-thickness: initial; text-decoration-style: initial; text-decoration-color: initial;"><colgroup><col></col><col></col></colgroup><tbody><tr style="box-sizing: border-box; outline-color: rgb(32, 110, 167); outline-width: 1px; margin: 0px; padding: 0px; border: 0px; font: inherit; vertical-align: baseline;"><td colspan="2" style="box-sizing: border-box; outline-color: rgb(32, 110, 167); outline-width: 1px; margin: 0px; padding: 6px 8px; border: 1px solid rgb(221, 221, 221); font-style: inherit; font-variant: inherit; font-weight: inherit; font-stretch: inherit; font-size: inherit; line-height: 1.2; font-family: inherit; font-optical-sizing: inherit; font-size-adjust: inherit; font-kerning: inherit; font-feature-settings: inherit; font-variation-settings: inherit; font-language-override: inherit; vertical-align: top; min-width: 10px; overflow: auto; word-break: break-word;">**Module Level Customization Icons**

</td></tr><tr style="box-sizing: border-box; outline-color: rgb(32, 110, 167); outline-width: 1px; margin: 0px; padding: 0px; border: 0px; font: inherit; vertical-align: baseline;"><td style="box-sizing: border-box; outline-color: rgb(32, 110, 167); outline-width: 1px; margin: 0px; padding: 6px 8px; border: 1px solid rgb(221, 221, 221); font-style: inherit; font-variant: inherit; font-weight: inherit; font-stretch: inherit; font-size: inherit; line-height: 1.2; font-family: inherit; font-optical-sizing: inherit; font-size-adjust: inherit; font-kerning: inherit; font-feature-settings: inherit; font-variation-settings: inherit; font-language-override: inherit; vertical-align: top; min-width: 10px; overflow: auto; word-break: break-word;">**Icon**

</td><td style="box-sizing: border-box; outline-color: rgb(32, 110, 167); outline-width: 1px; margin: 0px; padding: 6px 8px; border: 1px solid rgb(221, 221, 221); font-style: inherit; font-variant: inherit; font-weight: inherit; font-stretch: inherit; font-size: inherit; line-height: 1.2; font-family: inherit; font-optical-sizing: inherit; font-size-adjust: inherit; font-kerning: inherit; font-feature-settings: inherit; font-variation-settings: inherit; font-language-override: inherit; vertical-align: top; min-width: 10px; overflow: auto; word-break: break-word;">**Explanation**

</td></tr><tr style="box-sizing: border-box; outline-color: rgb(32, 110, 167); outline-width: 1px; margin: 0px; padding: 0px; border: 0px; font: inherit; vertical-align: baseline;"><td style="box-sizing: border-box; outline-color: rgb(32, 110, 167); outline-width: 1px; margin: 0px; padding: 6px 8px; border: 1px solid rgb(221, 221, 221); font-style: inherit; font-variant: inherit; font-weight: inherit; font-stretch: inherit; font-size: inherit; line-height: 1.2; font-family: inherit; font-optical-sizing: inherit; font-size-adjust: inherit; font-kerning: inherit; font-feature-settings: inherit; font-variation-settings: inherit; font-language-override: inherit; vertical-align: top; min-width: 10px; overflow: auto; word-break: break-word;">[![image.png](https://kaswiki.kastrack.com/uploads/images/gallery/2025-12/scaled-1680-/OQrimage.png)](https://kaswiki.kastrack.com/uploads/images/gallery/2025-12/OQrimage.png)

</td><td style="box-sizing: border-box; outline-color: rgb(32, 110, 167); outline-width: 1px; margin: 0px; padding: 6px 8px; border: 1px solid rgb(221, 221, 221); font-style: inherit; font-variant: inherit; font-weight: inherit; font-stretch: inherit; font-size: inherit; line-height: 1.2; font-family: inherit; font-optical-sizing: inherit; font-size-adjust: inherit; font-kerning: inherit; font-feature-settings: inherit; font-variation-settings: inherit; font-language-override: inherit; vertical-align: top; min-width: 10px; overflow: auto; word-break: break-word;">The eyeball icon allows you to view users assigned to the module level as well as the permissions assigned to them.

</td></tr><tr style="box-sizing: border-box; outline-color: rgb(32, 110, 167); outline-width: 1px; margin: 0px; padding: 0px; border: 0px; font: inherit; vertical-align: baseline;"><td style="box-sizing: border-box; outline-color: rgb(32, 110, 167); outline-width: 1px; margin: 0px; padding: 6px 8px; border: 1px solid rgb(221, 221, 221); font-style: inherit; font-variant: inherit; font-weight: inherit; font-stretch: inherit; font-size: inherit; line-height: 1.2; font-family: inherit; font-optical-sizing: inherit; font-size-adjust: inherit; font-kerning: inherit; font-feature-settings: inherit; font-variation-settings: inherit; font-language-override: inherit; vertical-align: top; min-width: 10px; overflow: auto; word-break: break-word;">[![image.png](https://kaswiki.kastrack.com/uploads/images/gallery/2025-12/scaled-1680-/Bbrimage.png)](https://kaswiki.kastrack.com/uploads/images/gallery/2025-12/Bbrimage.png)

</td><td style="box-sizing: border-box; outline-color: rgb(32, 110, 167); outline-width: 1px; margin: 0px; padding: 6px 8px; border: 1px solid rgb(221, 221, 221); font-style: inherit; font-variant: inherit; font-weight: inherit; font-stretch: inherit; font-size: inherit; line-height: 1.2; font-family: inherit; font-optical-sizing: inherit; font-size-adjust: inherit; font-kerning: inherit; font-feature-settings: inherit; font-variation-settings: inherit; font-language-override: inherit; vertical-align: top; min-width: 10px; overflow: auto; word-break: break-word;">The bulleted list icon allows you to assign permissions to customized module levels.

</td></tr><tr style="box-sizing: border-box; outline-color: rgb(32, 110, 167); outline-width: 1px; margin: 0px; padding: 0px; border: 0px; font: inherit; vertical-align: baseline;"><td style="box-sizing: border-box; outline-color: rgb(32, 110, 167); outline-width: 1px; margin: 0px; padding: 6px 8px; border: 1px solid rgb(221, 221, 221); font-style: inherit; font-variant: inherit; font-weight: inherit; font-stretch: inherit; font-size: inherit; line-height: 1.2; font-family: inherit; font-optical-sizing: inherit; font-size-adjust: inherit; font-kerning: inherit; font-feature-settings: inherit; font-variation-settings: inherit; font-language-override: inherit; vertical-align: top; min-width: 10px; overflow: auto; word-break: break-word;">[![image.png](https://kaswiki.kastrack.com/uploads/images/gallery/2025-12/scaled-1680-/ELJimage.png)](https://kaswiki.kastrack.com/uploads/images/gallery/2025-12/ELJimage.png)

</td><td style="box-sizing: border-box; outline-color: rgb(32, 110, 167); outline-width: 1px; margin: 0px; padding: 6px 8px; border: 1px solid rgb(221, 221, 221); font-style: inherit; font-variant: inherit; font-weight: inherit; font-stretch: inherit; font-size: inherit; line-height: 1.2; font-family: inherit; font-optical-sizing: inherit; font-size-adjust: inherit; font-kerning: inherit; font-feature-settings: inherit; font-variation-settings: inherit; font-language-override: inherit; vertical-align: top; min-width: 10px; overflow: auto; word-break: break-word;">The pencil icon opens the Edit Module Level Modal.

</td></tr><tr style="box-sizing: border-box; outline-color: rgb(32, 110, 167); outline-width: 1px; margin: 0px; padding: 0px; border: 0px; font: inherit; vertical-align: baseline;"><td style="box-sizing: border-box; outline-color: rgb(32, 110, 167); outline-width: 1px; margin: 0px; padding: 6px 8px; border: 1px solid rgb(221, 221, 221); font-style: inherit; font-variant: inherit; font-weight: inherit; font-stretch: inherit; font-size: inherit; line-height: 1.2; font-family: inherit; font-optical-sizing: inherit; font-size-adjust: inherit; font-kerning: inherit; font-feature-settings: inherit; font-variation-settings: inherit; font-language-override: inherit; vertical-align: top; min-width: 10px; overflow: auto; word-break: break-word;">[![image.png](https://kaswiki.kastrack.com/uploads/images/gallery/2025-12/scaled-1680-/Uwlimage.png)](https://kaswiki.kastrack.com/uploads/images/gallery/2025-12/Uwlimage.png)

</td><td style="box-sizing: border-box; outline-color: rgb(32, 110, 167); outline-width: 1px; margin: 0px; padding: 6px 8px; border: 1px solid rgb(221, 221, 221); font-style: inherit; font-variant: inherit; font-weight: inherit; font-stretch: inherit; font-size: inherit; line-height: 1.2; font-family: inherit; font-optical-sizing: inherit; font-size-adjust: inherit; font-kerning: inherit; font-feature-settings: inherit; font-variation-settings: inherit; font-language-override: inherit; vertical-align: top; min-width: 10px; overflow: auto; word-break: break-word;">The trashcan icon opens the Delete Module Level Confirmation Modal.

</td></tr></tbody></table>

<details id="bkmrk-how-to%3A-create-a-new"><summary>How To: Create a New Module Level (Communications Module)</summary>

{{@108}}

</details>A complete list of all permissions associated with the Communications Module have been provided below.

[![image.png](https://kaswiki.kastrack.com/uploads/images/gallery/2026-06/scaled-1680-/wF6image.png)](https://kaswiki.kastrack.com/uploads/images/gallery/2026-06/wF6image.png)