# Attendance Module

# Attendance: Introduction

# Attendance Module Summary

The Attendance Log Module integrates with the Form Module to create attendance logs that can be used for a variety of purposes including (but not limited to) meeting/event attendance tracking, facility sign ins, and emergency mustering accountability. Your organization can have multiple attendance logs that can be used simultaneously.

All Attendance Logs are based on a form. Each attendance log must have its own form that cannot be used by another attendance log.

<p class="callout info">Forms can be copied for ease of creating multiple attendance logs. </p>

<details id="bkmrk-how-to%3A-copy-a-form%7B"><summary>How To: Copy a Form</summary>

{{@385}}

</details><p class="callout success">The User Manual for the {{@951#bkmrk-attendance-module-is}}</p>

# Understanding Muster Mode

Muster is a term used by facilities when they need to take attendance during an emergency. It is the process of accounting for all personnel after an evacuation or incident.

Each attendance log within KAStrack will have the ability to go into muster mode, for either a drill or an actual emergency. Muster Mode enables an organization to easily verify that everyone has safely exited the facility and is present at the designated safe area, emergency responders have an accurate list of who may still be inside, and that the company complies with safety and emergency management protocols.

Within KAStrack, QR Codes and URL Links associated with Muster Mode will only be active when Muster Mode has been activated in the attendance log.

There are two pages in the Attendance Log Module related with Muster Mode: the Muster Page and the Muster History Page.

<details id="bkmrk-how-to%3A-activate-mus"><summary>How To: Activate Muster Mode for a Drill</summary>

{{@501}}

</details><details id="bkmrk-how-to%3A-activate-mus-1"><summary>How To: Activate Muster Mode for an Emergency</summary>

{{@502}}

</details>

# Attendance: Module Pages

# Home Page

<span style="white-space: pre-wrap;">The Home Page of the Attendance Log Module displays the Attendance Log Table, listing all Attendance Logs. The Home Page also has a Create Attendance Log button that enables the creation of a new attendance log. Each attendance log has multiple pages withing the individual log, that are explained under Individual Attendance Log Specific Pages. </span>

[![image.png](https://kaswiki.kastrack.com/uploads/images/gallery/2025-12/scaled-1680-/DUZimage.png)](https://kaswiki.kastrack.com/uploads/images/gallery/2025-12/DUZimage.png)

#### Individual Attendance Log Specific Pages

Each individual attendance log is comprised of several different pages. A complete list and the functional purpose of each page is explained in the table below.

<table id="bkmrk-attendance-log-pages"><colgroup><col style="width: 135px;"></col><col style="width: 795px;"></col></colgroup><tbody><tr><td colspan="2">**Attendance Log Pages Specific to an Individual Log**

</td></tr><tr><td>**Page Name**

</td><td>**Purpose**

</td></tr><tr><td>[Information Page](https://kaswiki.kastrack.com/books/attendance-module/page/attendance-log-information-page)

</td><td>The Information Page, identified as the Attendance Log on the context menu, highlights key information, display QR codes and URL Links for access, and buttons for easy module navigation.

</td></tr><tr><td>[Currently Signed In Page](https://kaswiki.kastrack.com/books/attendance-module/page/attendance-log-currently-signed-in-page)

</td><td><span style="white-space: pre-wrap;">The Currently Signed In Page displays a table that shows the individuals currently signed in to the attendance log in tabular format. </span>

</td></tr><tr><td>[All Entries Page](https://kaswiki.kastrack.com/books/attendance-module/page/attendance-log-all-entries-page)

</td><td><span style="white-space: pre-wrap;">The All Entries Page shows all historical entries of individuals that have signed in through the attendance log. </span>

</td></tr><tr><td>[Admittance Desk Page](https://kaswiki.kastrack.com/books/attendance-module/page/attendance-log-admittance-desk-page)

</td><td><span style="white-space: pre-wrap;">The Admittance Desk Page can be enabled if an individual is assigned the responsibility of signing in / out individuals at an attendance desk (opposed to a self-sign in process that would use the Display Page). </span>

</td></tr><tr><td>[Muster Page](https://kaswiki.kastrack.com/books/attendance-module/page/attendance-log-muster-page)

</td><td><span style="white-space: pre-wrap;">The Muster Page is the page used when muster mode as been initiated to mark individuals as accounted for during the muster. </span>

</td></tr><tr><td>[Muster History Page](https://kaswiki.kastrack.com/books/attendance-module/page/attendance-log-muster-history-page)

</td><td><span style="white-space: pre-wrap;">The Muster History Page displays a table that serves as a log showing all historical muster information in the Attendance Log. Both drills and emergency muster information shows on this page. </span>

</td></tr><tr><td>Display Page

</td><td><span style="white-space: pre-wrap;">The Display Page is the screen visible as individuals sign in and sign out. QR codes can display on the page, as well as customizable fields that you can select for attendees to see. </span>

</td></tr><tr><td>[Display Devices Page](https://kaswiki.kastrack.com/books/attendance-module/page/attendance-log-display-devices-page)

</td><td><span style="white-space: pre-wrap;">The Display Devices Page is only utilized when your organization is using Raspberry Pi to show the attendance log Display Page on a screen that is not a computer. </span>

</td></tr></tbody></table>

To the right of each title is a three-dot icon which will open the Attendance Log Table context menu. An explanation of each context menu option has been included in the Attendance Log Context Menu Option Explanation Table.

<table id="bkmrk-attendance-log-conte"><colgroup><col style="width: 131px;"></col><col style="width: 737px;"></col></colgroup><tbody><tr><td colspan="2">**Attendance Log Context Menu Explanation Table**

</td></tr><tr><td>**Option**

</td><td>**Explanation**

</td></tr><tr><td>Attendance Log

</td><td><span style="white-space: pre-wrap;">Selecting “Attendance Log” from the context menu opens the attendance log’s Summary Page. </span>

</td></tr><tr><td>Currently Signed In

</td><td><span style="white-space: pre-wrap;">Selecting “Currently Signed In” from the context menu opens the attendance log’s Currently Signed In Page. </span>

</td></tr><tr><td>All Entries

</td><td><span style="white-space: pre-wrap;">Selecting “All Entries” from the context menu opens the attendance log’s All Entries Page. </span>

</td></tr><tr><td>Muster

</td><td><span style="white-space: pre-wrap;">Selecting “Muster” from the context menu opens the attendance log’s Muster Page, where an emergency muster can be activated. </span>

</td></tr><tr><td>Muster History

</td><td>Selecting “Muster History” from the context menu opens the attendance log’s Muster History Page, where a record of all historical muster data can be accessed.

</td></tr><tr><td>Display Page

</td><td>Selecting “Display Page” from the context menu opens the Attendance Log Display Page in a separate tab which can show QR codes for sign in / sign out and any fields customized to be displayed as individuals use the attendance log.

</td></tr><tr><td>Manage Entries in Forms

</td><td><span style="white-space: pre-wrap;">Selecting “Manage Entries in Forms” from the context menu opens the Manage Entries Page in the Forms Module, where entries can be viewed, added, imported, and exported. Entries can all be bulk edited from this page. </span>

</td></tr><tr><td>Attendance Log Properties

</td><td>Selecting “Attendance Log Properties” from the context menu opens the Edit Attendance Log Modal. From this modal, the attendance log name, tags, URL Link, field mappings, fields related to sign in, and display page options can be edited.

</td></tr><tr><td>Manage Display Page Devices

</td><td><span style="white-space: pre-wrap;">Selecting “Manage Display Page Devices” from the context menu opens the Display Devices Page. </span>

<p class="callout info"><span style="white-space: pre-wrap;">To setup Display Devices for an attendance log, please contact KAStrack’s technical support team. </span></p>

</td></tr><tr><td>Delete Attendance Log

</td><td><span style="white-space: pre-wrap;">Selecting “Delete Attendance Log” from the context menu opens a Deletion Confirmation Modal which requires confirmation before deleting the selected attendance log. </span>

<details><summary>Delete an Attendance Log</summary>

{{@508}}

</details></td></tr></tbody></table>

Clicking on a specific attendance log title will open that attendance log’s Information Page.

# Attendance Log: Information Page

The Attendance Log Information Page highlights key information about an individual Attendance Log, displays QR codes and URL Links for Sign In / Sign Out / Muster, and provides buttons that allow for easy navigation. To the right of the page header is a three-dot icon that opens the content menu with various options.

[![image.png](https://kaswiki.kastrack.com/uploads/images/gallery/2025-12/scaled-1680-/cOLimage.png)](https://kaswiki.kastrack.com/uploads/images/gallery/2025-12/cOLimage.png)

Below the Information Page header, the number of individuals currently signed in to an attendance log and the total entries to date are displayed. Both of the numerical values are clickable links. Clicking the number currently signed in will take you to the Currently Signed In Page. Clicking the number of total entries will take you to the All Entries Page. Selecting the Refresh Icon to the right of total entries will refresh and update the total entries.

[![image.png](https://kaswiki.kastrack.com/uploads/images/gallery/2025-12/scaled-1680-/Mjiimage.png)](https://kaswiki.kastrack.com/uploads/images/gallery/2025-12/Mjiimage.png)

To the right are four buttons that access other pages associated with this attendance log.

<table id="bkmrk-attendance-log-infor"><colgroup><col style="width: 166px;"></col><col style="width: 669px;"></col></colgroup><tbody><tr><td colspan="2">**Attendance Log Information Page Button Explanations**

</td></tr><tr><td>**Button**

</td><td>**Action**

</td></tr><tr><td>[![image.png](https://kaswiki.kastrack.com/uploads/images/gallery/2025-12/scaled-1680-/gUbimage.png)](https://kaswiki.kastrack.com/uploads/images/gallery/2025-12/gUbimage.png)

</td><td><span style="white-space: pre-wrap;">Selecting the Admittance Desk button opens the Attendance Log’s Admittance Desk Page. </span>

</td></tr><tr><td>[![image.png](https://kaswiki.kastrack.com/uploads/images/gallery/2025-12/scaled-1680-/iouimage.png)](https://kaswiki.kastrack.com/uploads/images/gallery/2025-12/iouimage.png)

</td><td><span style="white-space: pre-wrap;">Selecting the Currently Signed In button opens the Currently Signed In Page. </span>

</td></tr><tr><td>[![image.png](https://kaswiki.kastrack.com/uploads/images/gallery/2025-12/scaled-1680-/hU0image.png)](https://kaswiki.kastrack.com/uploads/images/gallery/2025-12/hU0image.png)

</td><td>Selecting the Muster (Drill) button opens the Muster Page. Drill is automatically included as the reason for activating muster mode.

</td></tr><tr><td>[![image.png](https://kaswiki.kastrack.com/uploads/images/gallery/2025-12/scaled-1680-/Jnqimage.png)](https://kaswiki.kastrack.com/uploads/images/gallery/2025-12/Jnqimage.png)

</td><td><span style="white-space: pre-wrap;">Selecting the Muster (Emergency) button opens the Muster Page. You must include the reason for activating muster mode when you select the emergency button. </span>

</td></tr></tbody></table>

<span style="white-space: pre-wrap;">The Attendance Log Information Page has three sections: Sign In, Sign Out, and Muster. Each of these sections has a URL Link and QR Code to access the function of that section. There are three buttons that allow an individual to download the QR Code, Copy QR Code, and Copy URL. </span>

<p class="callout info">The QR Code for muster mode will only work when muster mode has been activated.</p>

[![image.png](https://kaswiki.kastrack.com/uploads/images/gallery/2025-12/scaled-1680-/SVDimage.png)](https://kaswiki.kastrack.com/uploads/images/gallery/2025-12/SVDimage.png)

# Attendance Log: Currently Signed In Page

<span style="white-space: pre-wrap;">The Currently Signed In Page displays a table that shows the individuals currently signed in to the attendance log in tabular format. The columns displayed in the Currently Signed In Table were selected when you created the attendance log and can be edited if desired. </span>

<details id="bkmrk-how-to%3A-edit-the-col"><summary>How To: Edit the Columns on the Currently Signed In Page Table</summary>

{{@512}}

</details><span style="white-space: pre-wrap;">The three-dot icon to the right of the page header opens a context menu with options for navigating the different pages of the Attendance Log. </span>

[![image.png](https://kaswiki.kastrack.com/uploads/images/gallery/2025-12/scaled-1680-/OiBimage.png)](https://kaswiki.kastrack.com/uploads/images/gallery/2025-12/OiBimage.png)

There are five action buttons associated with the Currently Signed In Page explained below. There is a search bar that allows you to search for and find entries as needed.

<table id="bkmrk-currently-signed-in-"><colgroup><col style="width: 125px;"></col><col style="width: 701px;"></col></colgroup><tbody><tr><td colspan="2">**Currently Signed In Page Button Explanations**

</td></tr><tr><td>**Button**

</td><td>**Explanation**

</td></tr><tr><td>Mark as Signed Out

</td><td><span style="white-space: pre-wrap;">The Mark as Signed Out button allows an individual to mark a singular individual as checked out. </span>

<details><summary>How To: Sign Out an Individual</summary>

{{@523}}

</details></td></tr><tr><td>Mark Checked as Signed Out

</td><td><span style="white-space: pre-wrap;">The Marked Checked as Signed Out button allows an individual to simultaneously check out multiple individuals. </span>

<details><summary>How To: Sign Out Other Individuals (In Bulk)</summary>

{{@525}}

</details></td></tr><tr style="height: 10px;"><td>Mark Older Than as Signed Out

</td><td><span style="white-space: pre-wrap;">When the Mark Older Than as Signed Out button is selected, it will open the Mark Older Than Modal that allows for a date / time to be input. All entries prior to that date and time can be marked as Signed Out from here. </span>

<details><summary>How To: Mark Entries Prior to a Date/Time as Signed Out</summary>

{{@517}}

</details></td></tr><tr><td>Refresh Table

</td><td>Selecting the Refresh Table button is used to reload the data currently shown in the table. When clicked, the system will query the latest records and replace any outdated or cached information.

<details><summary>How To: Refresh the Currently Signed In Table</summary>

{{@519}}

</details></td></tr><tr><td>Attendance Log

</td><td><span style="white-space: pre-wrap;">Selecting the Attendance Log button opens the Attendance Log’s Information Page. </span>

</td></tr><tr><td>Admittance Desk

</td><td><span style="white-space: pre-wrap;">Selecting the Admittance Desk button opens the Attendance Log’s Admittance Desk Page. </span>

</td></tr></tbody></table>

# Attendance Log: All Entries Page

<span style="white-space: pre-wrap;">The All Entries Page displays a table that shows all current and historical entries in the Attendance Log. The columns displayed in the All Entries Table were selected when you created the attendance log and can be edited if desired. </span>

<p class="callout info">There are two system fields available that do not stem from the attendance log base form, Entry Initiator and Time One Site. They can be added to your attendance log by editing the columns on the All Entries Page.</p>

<details id="bkmrk-how-to%3A-edit-the-col"><summary>How To: Edit the Columns on the All Entries Page Table</summary>

{{@511}}

</details>The three-dot icon to the right of the page header opens a context menu with options for navigating the different pages of the attendance log.

A dynamic restriction field allows the All Entries Table to pull entries relevant to a specific time period that can be input, and has buttons to pull entries for today, yesterday, the last 7 days, last 30 days, month to date, last month, year to date, and last year. There is also a search filter that allows you to search for and find entries as needed.

[![image.png](https://kaswiki.kastrack.com/uploads/images/gallery/2026-06/scaled-1680-/B3Vimage.png)](https://kaswiki.kastrack.com/uploads/images/gallery/2026-06/B3Vimage.png)

The Time on Site button generates a Time On Site Summary Report.

<details id="bkmrk-how-to%3A-generate-a-t"><summary>How To: Generate a Time On Site Summary Report</summary>

{{@915}}

</details><span style="white-space: pre-wrap;">Individual entries can be deleted from the All Entries Page. </span>

<details id="bkmrk-how-to%3A-delete-an-in"><summary>How To: Delete an Individual Attendance Log Entry</summary>

{{@509}}

</details>

# Attendance Log: Admittance Desk Page

The Admittance Desk Page should be enabled when your organization wants an individual to be responsible for individuals signing in/out, as opposed to a self-sign in process. The page can be accessed by selecting the “Admittance Desk” button on an attendance log’s Information Page. Individual users can be searched for, and signed in/out through this page.

[![image.png](https://kaswiki.kastrack.com/uploads/images/gallery/2025-12/scaled-1680-/C4simage.png)](https://kaswiki.kastrack.com/uploads/images/gallery/2025-12/C4simage.png)

<table id="bkmrk-admittance-desk-page"><colgroup><col style="width: 131px;"></col><col style="width: 704px;"></col></colgroup><tbody><tr><td colspan="2">**Admittance Desk Page Button Explanation**

</td></tr><tr><td>**Button**

</td><td>**Explanation**

</td></tr><tr><td>Attendance Log

</td><td><span style="white-space: pre-wrap;">Selecting the Attendance Log button opens the Attendance Log’s Information Page. </span>

</td></tr><tr><td>Signed in Users

</td><td><span style="white-space: pre-wrap;">Selecting the Signed In Users button opens the attendance log’s Currently Signed In Page. </span>

</td></tr><tr><td>Sign In QR for Unregistered Users

</td><td>Selecting the Sign In QR for Unregistered Users opens a Modal that displays a QR Code that can be used by individuals that are not registered KAStrack users.

</td></tr><tr><td>Add to Role

</td><td>The Add to Role button is displayed when a system user is not green for an associated certification role. Selecting Add To Role will open a Certifications button that if clicked will take the admittance desk to the My Certifications Tab for that specific user, where outstanding certification role issues can be addressed.

</td></tr><tr><td>Sign In OR  
Mark as Signed Out

</td><td>The Name column of the Admittance Desk Table will show a button, “Sign In” if the user is not signed in to the attendance log and “Mark as Signed Out” if the user is signed in to the attendance log. Click this button to sign in/out individuals.

</td></tr></tbody></table>

<span style="white-space: pre-wrap;">The fields that show on the Admittance Desk Page can be customized by your organization. Any requirements for the associated certification role will be visible, as well and any additional account fields selected. </span>

<details id="bkmrk-how-to%3A-edit-the-adm"><summary>How To: Edit the Admittance Desk Page</summary>

{{@510}}

</details>

# Attendance Log: Muster Page

The Muster Page can be activated in Drill or Emergency Mode. The buttons available on both modes of the Muster Page are explained in the table below.

<table id="bkmrk-muster-page-button-e"><colgroup><col style="width: 134px;"></col><col style="width: 717px;"></col></colgroup><tbody><tr><td colspan="2">**Muster Page Button Explanations**

</td></tr><tr><td>**Button**

</td><td>**Associated Actions**

</td></tr><tr><td>View Muster Link and QR Code

</td><td>Selecting the “View Muster Link and QR Code” button opens a QR Code and Link for Muster Modal that displays the URL Link and QR Code to be used by individuals to mark themselves as accounted for. The modal allows for the QR Code to be downloaded, and for the QR Code/URL Link to be copied.

</td></tr><tr><td>Deactivate Muster Mode

</td><td><span style="white-space: pre-wrap;">Selecting the “Deactivate Muster Mode” button opens the Deactivate Muster Modal which offers an ability to record deactivation notes before confirming you are ready to deactivate muster mode. </span>

<details><summary>How To: Deactivate Muster Mode</summary>

{{@507}}

</details></td></tr><tr><td>Mark Checked As Accounted For

</td><td>Selecting the red “Mark Checked as Accounted For” button allows for multiple individuals to be accounted for simultaneously during muster mode.

</td></tr><tr><td>Mark Checked as Signed Out

</td><td>Selecting the “Mark Checked as Signed Out” button allows for individuals who are no longer on the premises but failed to sign out to be signed out rather than indicated as accounted for during the muster.

<details><summary>How To: Sign Out Individuals when In Muster Mode</summary>

{{@524}}

</details></td></tr><tr><td>Mark Older Than as Accounted For

</td><td>Selecting the “Mark Older Than as Accounted For” button opens a modal that allows you to input a date and time so that anyone signed in before the specified date/time will be marked as accounted for.

<details><summary>How To: Mark Individuals Signed In Prior to A Date/Time as Accounted For While in Muster Mode</summary>

{{@518}}

</details></td></tr><tr style="height: 10px;"><td>Refresh Table

</td><td>Selecting the Refresh Table button is used to reload the data currently shown in the table. When clicked, the system will query the latest records and replace any outdated or cached information.

<details><summary>How To: Refresh the Muster Table while in Muster Mode</summary>

{{@521}}

</details></td></tr><tr><td>Account For

</td><td>Selecting the “Account For” button in the Muster Table will mark the specific individual as accounted for during the muster.

</td></tr><tr style="height: 10px;"><td>Mark as Signed Out

</td><td><span style="white-space: pre-wrap;">Selecting the “Mark as Signed Out” button in the Muster Table will mark the specific individual as signed out during the muster. </span>

<details><summary>How To: Sign Out Individuals when In Muster Mode</summary>

{{@524}}

</details></td></tr></tbody></table>

### Muster (Drill)

<span style="white-space: pre-wrap;">The Muster (Drill) Page can only be opened by going to an attendance log’s Information Page and selecting the yellow Muster (Drill) button. </span>

<p class="callout info">This does not automatically activate Muster Mode.</p>

Before muster mode is activated, the Muster (Drill) Page displays a textbox for any desired information regarding the drill to be entered. The “Start Drill” button activates muster mode. Clicking “Do Not Start Drill” will take you back to the attendance log’s Information Page.

[![image.png](https://kaswiki.kastrack.com/uploads/images/gallery/2025-12/scaled-1680-/VkVimage.png)](https://kaswiki.kastrack.com/uploads/images/gallery/2025-12/VkVimage.png)

Once the drill has started and the Attendance Log is in muster mode, the page changes.

[![image.png](https://kaswiki.kastrack.com/uploads/images/gallery/2025-12/scaled-1680-/qIMimage.png)](https://kaswiki.kastrack.com/uploads/images/gallery/2025-12/qIMimage.png)

<span style="white-space: pre-wrap;">At the top of the Muster Page, a section states when muster mode was initiated, how long it has been in progress, and how many individuals have been accounted for. The table visible in muster mode is customizable and can be editing to show any fields desired. </span>

<details id="bkmrk-how-to%3A-edit-the-col"><summary>How To: Edit the Columns that Show when Mustering</summary>

{{@514}}

</details>A dropbox on the muster page allows for the names displayed on the muster page to be filtered.

[![image.png](https://kaswiki.kastrack.com/uploads/images/gallery/2025-12/scaled-1680-/TqGimage.png)](https://kaswiki.kastrack.com/uploads/images/gallery/2025-12/TqGimage.png)

You can choose to show everyone, only show the people who are not accounted for, only show people who are accounted for, only show people who are signed out and not yet accounted for, and only show people who are signed out.

### Muster (Emergency)

<span style="white-space: pre-wrap;">The Muster (Emergency) Page can only be opened by the “Muster” option on the attendance log context menu or by going to an attendance log’s Information Page and selecting the red Muster (Emergency) button. </span>

<p class="callout info">This does not automatically activate Muster Mode.</p>

Before muster mode is activated, the Muster (Emergency) Page displays a textbox for any desired information regarding the drill to be entered. The “Activate” button activates an emergency muster mode.

[![image.png](https://kaswiki.kastrack.com/uploads/images/gallery/2025-12/scaled-1680-/BPgimage.png)](https://kaswiki.kastrack.com/uploads/images/gallery/2025-12/BPgimage.png)

Once the emergency muster has started and the Attendance Log is in muster mode, the page changes.

[![image.png](https://kaswiki.kastrack.com/uploads/images/gallery/2025-12/scaled-1680-/jBbimage.png)](https://kaswiki.kastrack.com/uploads/images/gallery/2025-12/jBbimage.png)

<span style="white-space: pre-wrap;">At the top of the Muster Page, a section states when muster mode was initiated, how long it has been in progress, and how many individuals have been accounted for. The table visible in muster mode is customizable and can be editing to show any fields desired. </span>

<details id="bkmrk-how-to%3A-edit-the-col-1"><summary>How To: Edit the Columns that Show when Mustering</summary>

{{@514}}

</details>A dropbox on the muster page allows for the names displayed on the muster page to be filtered.

[![image.png](https://kaswiki.kastrack.com/uploads/images/gallery/2025-12/scaled-1680-/gOdimage.png)](https://kaswiki.kastrack.com/uploads/images/gallery/2025-12/gOdimage.png)

You can chose to show everyone, only show the people who are not accounted for, only show people who are accounted for, only show people who are signed out and not yet accounted for, and only show people who are signed out.

# Attendance Log: Muster History Page

<span style="white-space: pre-wrap;">The Muster History Page displays a table that serves as a log showing all historical muster information in the Attendance Log. Both drills and emergency muster information shows in the Muster History Table using the columns that were selected when you created the attendance log and can be edited if desired. </span>

<details id="bkmrk-how-to%3A-edit-the-col"><summary>How To: Edit the Columns on the Muster History Page</summary>

{{@513}}

</details>The three-dot icon to the right of the page header opens a context menu with options for navigating the different pages of the attendance log.

[![image.png](https://kaswiki.kastrack.com/uploads/images/gallery/2025-12/scaled-1680-/15Vimage.png)](https://kaswiki.kastrack.com/uploads/images/gallery/2025-12/15Vimage.png)

# Attendance Log: Display Devices Page

The Display Devices Page is only for organizations that use a KAStrack supplied Raspberry Pi to manage the attendance log Display Page. This eliminates the need for a dedicated computer.

[![image.png](https://kaswiki.kastrack.com/uploads/images/gallery/2025-12/scaled-1680-/hTiimage.png)](https://kaswiki.kastrack.com/uploads/images/gallery/2025-12/hTiimage.png)

Please contact the KAStrack Tech Support team to discuss display devices for your facility.

# Attendance Settings

<p class="callout info">The Settings Page of the Attendance Module cannot be accessed from the Main Menu or within the module itself. </p>

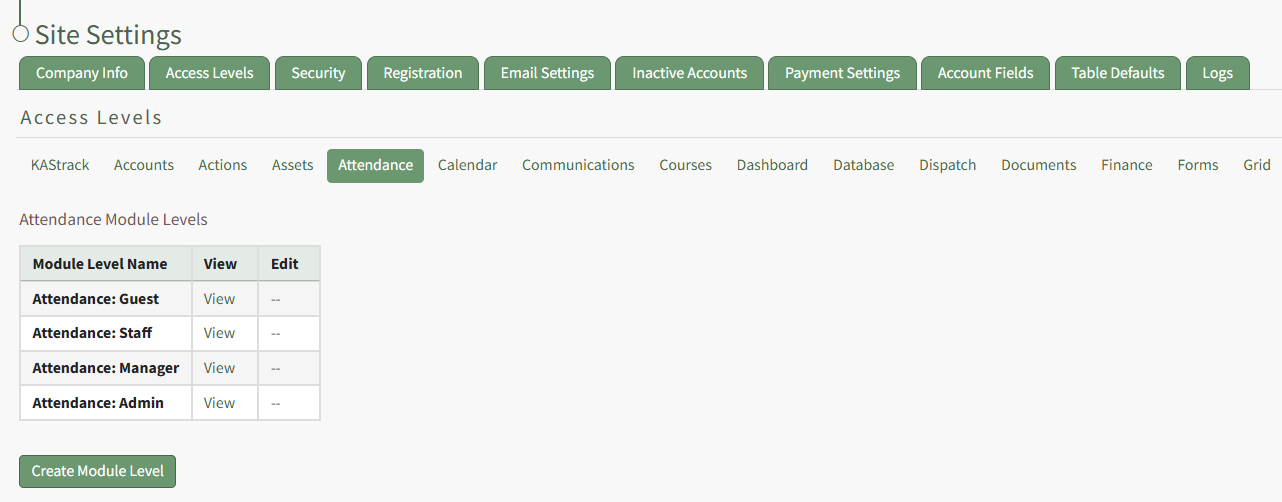
<p class="callout info">To access the Settings Page of the Attendance Module, open the Access Levels Tab in the Site Settings Module from the Main Menu and Select the Attendance Tab below the Access Levels header. </p>

[![image.png](https://kaswiki.kastrack.com/uploads/images/gallery/2026-06/scaled-1680-/JKgimage.png)](https://kaswiki.kastrack.com/uploads/images/gallery/2026-06/JKgimage.png)

Clicking "View" in the Attendance Module Levels Table or the Create Module Level button will open the Manage Module Levels Page for the Attendance Module.

[![image.png](https://kaswiki.kastrack.com/uploads/images/gallery/2026-06/scaled-1680-/BDRimage.png)](https://kaswiki.kastrack.com/uploads/images/gallery/2026-06/BDRimage.png)
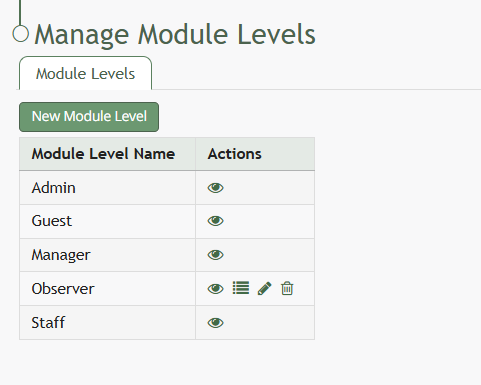
<span style="color: rgb(0, 0, 0); background-color: rgb(255, 255, 255);">There are four system default module levels associated with the Attendance Module. An explanation of the permissions associated with each default module level are shown in the Attendance Module Level Permissions Table below. </span>

<p class="callout info">System default module levels cannot be customized.</p>

<table id="bkmrk-attendance-module---"><colgroup><col style="width: 125px;"></col><col style="width: 708px;"></col></colgroup><tbody><tr><td colspan="2">**Attendance Module - Module Level Permissions**

</td></tr><tr><td>**Module Level**

</td><td>**Permissions**

</td></tr><tr><td>Admin

</td><td>Manage Attendance Log (delete/edit/view/create attendance log), Manage roles (add/delete/edit/view role, assign hidden roles, role permissions), Manage permissions (delete/view permissions, list manage permissions)

</td></tr><tr><td>Manager

</td><td>Manage Attendance Log (delete/edit/view/create attendance log)

</td></tr><tr><td>Staff

</td><td>View Attendance Log

</td></tr><tr><td>Guest

</td><td>None

</td></tr></tbody></table>

New Module levels can be created in order to customize module level permissions. An explanation of the icons associated with customized module levels have been provided in the table below.

<table id="bkmrk-module-level-customi" style="box-sizing: border-box; outline-color: rgb(32, 110, 167); outline-width: 1px; margin: 0.3em 0px 1.375em; padding: 0px; border: 0px; font-style: normal; font-variant-ligatures: normal; font-variant-caps: normal; font-variant-numeric: inherit; font-variant-east-asian: inherit; font-variant-alternates: inherit; font-variant-position: inherit; font-variant-emoji: inherit; font-weight: 400; font-stretch: inherit; font-size: 14px; line-height: inherit; font-family: -apple-system, BlinkMacSystemFont, "Segoe UI", Oxygen, Ubuntu, Roboto, Cantarell, "Fira Sans", "Droid Sans", "Helvetica Neue", sans-serif; font-optical-sizing: inherit; font-size-adjust: inherit; font-kerning: inherit; font-feature-settings: inherit; font-variation-settings: inherit; font-language-override: inherit; vertical-align: baseline; border-collapse: collapse; border-spacing: 0px; min-width: 100px; max-width: 100%; hyphens: auto; table-layout: fixed; color: rgb(68, 68, 68); letter-spacing: normal; orphans: 2; text-align: start; text-transform: none; widows: 2; word-spacing: 0px; -webkit-text-stroke-width: 0px; white-space: normal; text-decoration-thickness: initial; text-decoration-style: initial; text-decoration-color: initial; background-color: rgb(255, 255, 255);"><colgroup><col></col><col style="width: 776px;"></col></colgroup><tbody><tr style="box-sizing: border-box; outline-color: rgb(32, 110, 167); outline-width: 1px; margin: 0px; padding: 0px; border: 0px; font: inherit; vertical-align: baseline;"><td colspan="2" style="box-sizing: border-box; outline-color: rgb(32, 110, 167); outline-width: 1px; margin: 0px; padding: 6px 8px; border: 1px solid rgb(221, 221, 221); font-style: inherit; font-variant: inherit; font-weight: inherit; font-stretch: inherit; font-size: inherit; line-height: 1.2; font-family: inherit; font-optical-sizing: inherit; font-size-adjust: inherit; font-kerning: inherit; font-feature-settings: inherit; font-variation-settings: inherit; font-language-override: inherit; vertical-align: top; min-width: 10px; overflow: auto; word-break: break-word;">**Module Level Customization Icons**

</td></tr><tr style="box-sizing: border-box; outline-color: rgb(32, 110, 167); outline-width: 1px; margin: 0px; padding: 0px; border: 0px; font: inherit; vertical-align: baseline;"><td style="box-sizing: border-box; outline-color: rgb(32, 110, 167); outline-width: 1px; margin: 0px; padding: 6px 8px; border: 1px solid rgb(221, 221, 221); font-style: inherit; font-variant: inherit; font-weight: inherit; font-stretch: inherit; font-size: inherit; line-height: 1.2; font-family: inherit; font-optical-sizing: inherit; font-size-adjust: inherit; font-kerning: inherit; font-feature-settings: inherit; font-variation-settings: inherit; font-language-override: inherit; vertical-align: top; min-width: 10px; overflow: auto; word-break: break-word;">**Icon**

</td><td style="box-sizing: border-box; outline-color: rgb(32, 110, 167); outline-width: 1px; margin: 0px; padding: 6px 8px; border: 1px solid rgb(221, 221, 221); font-style: inherit; font-variant: inherit; font-weight: inherit; font-stretch: inherit; font-size: inherit; line-height: 1.2; font-family: inherit; font-optical-sizing: inherit; font-size-adjust: inherit; font-kerning: inherit; font-feature-settings: inherit; font-variation-settings: inherit; font-language-override: inherit; vertical-align: top; min-width: 10px; overflow: auto; word-break: break-word;">**Explanation**

</td></tr><tr style="box-sizing: border-box; outline-color: rgb(32, 110, 167); outline-width: 1px; margin: 0px; padding: 0px; border: 0px; font: inherit; vertical-align: baseline;"><td style="box-sizing: border-box; outline-color: rgb(32, 110, 167); outline-width: 1px; margin: 0px; padding: 6px 8px; border: 1px solid rgb(221, 221, 221); font-style: inherit; font-variant: inherit; font-weight: inherit; font-stretch: inherit; font-size: inherit; line-height: 1.2; font-family: inherit; font-optical-sizing: inherit; font-size-adjust: inherit; font-kerning: inherit; font-feature-settings: inherit; font-variation-settings: inherit; font-language-override: inherit; vertical-align: top; min-width: 10px; overflow: auto; word-break: break-word;">[![image.png](https://kaswiki.kastrack.com/uploads/images/gallery/2025-12/scaled-1680-/OQrimage.png)](https://kaswiki.kastrack.com/uploads/images/gallery/2025-12/OQrimage.png)

</td><td style="box-sizing: border-box; outline-color: rgb(32, 110, 167); outline-width: 1px; margin: 0px; padding: 6px 8px; border: 1px solid rgb(221, 221, 221); font-style: inherit; font-variant: inherit; font-weight: inherit; font-stretch: inherit; font-size: inherit; line-height: 1.2; font-family: inherit; font-optical-sizing: inherit; font-size-adjust: inherit; font-kerning: inherit; font-feature-settings: inherit; font-variation-settings: inherit; font-language-override: inherit; vertical-align: top; min-width: 10px; overflow: auto; word-break: break-word;">The eyeball icon allows you to view users assigned to the module level as well as the permissions assigned to them.

</td></tr><tr style="box-sizing: border-box; outline-color: rgb(32, 110, 167); outline-width: 1px; margin: 0px; padding: 0px; border: 0px; font: inherit; vertical-align: baseline;"><td style="box-sizing: border-box; outline-color: rgb(32, 110, 167); outline-width: 1px; margin: 0px; padding: 6px 8px; border: 1px solid rgb(221, 221, 221); font-style: inherit; font-variant: inherit; font-weight: inherit; font-stretch: inherit; font-size: inherit; line-height: 1.2; font-family: inherit; font-optical-sizing: inherit; font-size-adjust: inherit; font-kerning: inherit; font-feature-settings: inherit; font-variation-settings: inherit; font-language-override: inherit; vertical-align: top; min-width: 10px; overflow: auto; word-break: break-word;">[![image.png](https://kaswiki.kastrack.com/uploads/images/gallery/2025-12/scaled-1680-/Bbrimage.png)](https://kaswiki.kastrack.com/uploads/images/gallery/2025-12/Bbrimage.png)

</td><td style="box-sizing: border-box; outline-color: rgb(32, 110, 167); outline-width: 1px; margin: 0px; padding: 6px 8px; border: 1px solid rgb(221, 221, 221); font-style: inherit; font-variant: inherit; font-weight: inherit; font-stretch: inherit; font-size: inherit; line-height: 1.2; font-family: inherit; font-optical-sizing: inherit; font-size-adjust: inherit; font-kerning: inherit; font-feature-settings: inherit; font-variation-settings: inherit; font-language-override: inherit; vertical-align: top; min-width: 10px; overflow: auto; word-break: break-word;">The bulleted list icon allows you to assign permissions to customized module levels.

</td></tr><tr style="box-sizing: border-box; outline-color: rgb(32, 110, 167); outline-width: 1px; margin: 0px; padding: 0px; border: 0px; font: inherit; vertical-align: baseline;"><td style="box-sizing: border-box; outline-color: rgb(32, 110, 167); outline-width: 1px; margin: 0px; padding: 6px 8px; border: 1px solid rgb(221, 221, 221); font-style: inherit; font-variant: inherit; font-weight: inherit; font-stretch: inherit; font-size: inherit; line-height: 1.2; font-family: inherit; font-optical-sizing: inherit; font-size-adjust: inherit; font-kerning: inherit; font-feature-settings: inherit; font-variation-settings: inherit; font-language-override: inherit; vertical-align: top; min-width: 10px; overflow: auto; word-break: break-word;">[![image.png](https://kaswiki.kastrack.com/uploads/images/gallery/2025-12/scaled-1680-/ELJimage.png)](https://kaswiki.kastrack.com/uploads/images/gallery/2025-12/ELJimage.png)

</td><td style="box-sizing: border-box; outline-color: rgb(32, 110, 167); outline-width: 1px; margin: 0px; padding: 6px 8px; border: 1px solid rgb(221, 221, 221); font-style: inherit; font-variant: inherit; font-weight: inherit; font-stretch: inherit; font-size: inherit; line-height: 1.2; font-family: inherit; font-optical-sizing: inherit; font-size-adjust: inherit; font-kerning: inherit; font-feature-settings: inherit; font-variation-settings: inherit; font-language-override: inherit; vertical-align: top; min-width: 10px; overflow: auto; word-break: break-word;">The pencil icon opens the Edit Module Level Modal.

</td></tr><tr style="box-sizing: border-box; outline-color: rgb(32, 110, 167); outline-width: 1px; margin: 0px; padding: 0px; border: 0px; font: inherit; vertical-align: baseline;"><td style="box-sizing: border-box; outline-color: rgb(32, 110, 167); outline-width: 1px; margin: 0px; padding: 6px 8px; border: 1px solid rgb(221, 221, 221); font-style: inherit; font-variant: inherit; font-weight: inherit; font-stretch: inherit; font-size: inherit; line-height: 1.2; font-family: inherit; font-optical-sizing: inherit; font-size-adjust: inherit; font-kerning: inherit; font-feature-settings: inherit; font-variation-settings: inherit; font-language-override: inherit; vertical-align: top; min-width: 10px; overflow: auto; word-break: break-word;">[![image.png](https://kaswiki.kastrack.com/uploads/images/gallery/2025-12/scaled-1680-/Uwlimage.png)](https://kaswiki.kastrack.com/uploads/images/gallery/2025-12/Uwlimage.png)

</td><td style="box-sizing: border-box; outline-color: rgb(32, 110, 167); outline-width: 1px; margin: 0px; padding: 6px 8px; border: 1px solid rgb(221, 221, 221); font-style: inherit; font-variant: inherit; font-weight: inherit; font-stretch: inherit; font-size: inherit; line-height: 1.2; font-family: inherit; font-optical-sizing: inherit; font-size-adjust: inherit; font-kerning: inherit; font-feature-settings: inherit; font-variation-settings: inherit; font-language-override: inherit; vertical-align: top; min-width: 10px; overflow: auto; word-break: break-word;">The trashcan icon opens the Delete Module Level Confirmation Modal.

</td></tr></tbody></table>

<details id="bkmrk-how-to%3A-create-a-new"><summary>How To: Create a New Module Level (Attendance Module)</summary>

{{@950}}

</details>A complete list of the permissions associated with the Attendance Module have been included below.

[![image.png](https://kaswiki.kastrack.com/uploads/images/gallery/2026-06/scaled-1680-/CcHimage.png)](https://kaswiki.kastrack.com/uploads/images/gallery/2026-06/CcHimage.png)

# Integrating a Base Form to Create a New Attendance Log

In order to create an attendance log, you must have created a form in the Forms Module that is integrated with the Attendance Module that contains specific fields required for the attendance log’s Field Mappings.

# Creating a Base Form for a New Attendance Log

To create the base form required to create a new attendance log, go to the Home Page of the Forms Module.

[![image.png](https://kaswiki.kastrack.com/uploads/images/gallery/2026-01/scaled-1680-/GEVimage.png)](https://kaswiki.kastrack.com/uploads/images/gallery/2026-01/GEVimage.png)

Select the “Create Form” button opening the New Form Modal.

[![image.png](https://kaswiki.kastrack.com/uploads/images/gallery/2026-01/scaled-1680-/Txiimage.png)](https://kaswiki.kastrack.com/uploads/images/gallery/2026-01/Txiimage.png)

Input a title for the form and include any notes as desired. You can tag the form with open, permissive, or restrictive tags to customize visibility if desired, and place the form in the group of your choosing.

Select the “Allow Public Entries” checkbox if your attendance log will record users who are not logged in to KAStrack or who do not have an account. If the attendance log will solely be used by individuals who use KAStrack and have an account, you can leave this checkbox blank.

If you will be using a customized PDF output for attendance log sign in / sign out entries, select the “Use the appropriate uploaded PDF revision” checkbox. If the generic output is sufficient, select “Use KAStrack Generated PDF”.

To ensure that your form integrates with the attendance log, select “Attendance: Integrate with the Attendance Module” from the drop-down menu below the Field Title “Allow Integration With”.

[![image.png](https://kaswiki.kastrack.com/uploads/images/gallery/2026-01/scaled-1680-/naMimage.png)](https://kaswiki.kastrack.com/uploads/images/gallery/2026-01/naMimage.png)

<span style="white-space: pre-wrap;">Details regarding Advanced Settings and Form Styling when creating a new form can be explored in the Customizable Options for Form Creation Section of the User Manual. </span>

After customizing the form for your need, select the “Save” button at the bottom of the modal opening the Fields Tab for your newly created form.

[![image.png](https://kaswiki.kastrack.com/uploads/images/gallery/2026-01/scaled-1680-/NGvimage.png)](https://kaswiki.kastrack.com/uploads/images/gallery/2026-01/NGvimage.png)

To create an attendance log, your form must have the following seven fields and all of them should be set to start hidden.

##### Required Field 1 of 7

<span style="white-space: pre-wrap;">The first field to be created is a date/time field to be used when a person signs in (Time In). Select the “New Field” button opening the New Form Field modal. At a minimum, input the field name. Select Date/Time from the Field Type drop-down menu. Select the “Start Hidden” checkbox. Under Date/Time Format, select your preferred format from the drop-down menu. </span>

<p class="callout info"><span style="white-space: pre-wrap;">The date and time format used for your attendance log can be customized if desired. </span></p>

<details id="bkmrk-how-to%3A-create-a-cus"><summary>How To: Create a Custom Date/Time Format for an Attendance Log</summary>

{{@505}}

</details>[![image.png](https://kaswiki.kastrack.com/uploads/images/gallery/2026-01/scaled-1680-/oqQimage.png)](https://kaswiki.kastrack.com/uploads/images/gallery/2026-01/oqQimage.png)

Select the “Save” button at the bottom of the modal and return to the Form’s Fields Tab.

##### Required Field 2 of 7

The second field to be created is a date/time field to be used when a person signs out (Time Out). Select the “New Field” button opening the New Form Field modal. At a minimum, input the field name. Select Date/Time from Field Type drop-down menu. Select the “Start Hidden” checkbox. Select your preferred Date/Time Format from the drop-down menu.

[![image.png](https://kaswiki.kastrack.com/uploads/images/gallery/2026-01/scaled-1680-/bNximage.png)](https://kaswiki.kastrack.com/uploads/images/gallery/2026-01/bNximage.png)

Select the “Save” button at the bottom of the modal to return to the Form’s Fields Tab.

##### Required Field 3 of 7

The third field to be created is a date/time field to be used when a person is accounted for when mustering. Select the “New Field” button opening the New Form Field modal. At a minimum, input the field name. Select Date/Time from Field Type drop-down menu. Select the “Start Hidden” checkbox. Select your preferred Date/Time Format from a drop-down menu.

[![image.png](https://kaswiki.kastrack.com/uploads/images/gallery/2026-01/scaled-1680-/rXSimage.png)](https://kaswiki.kastrack.com/uploads/images/gallery/2026-01/rXSimage.png)

Select the “Save” button at the bottom of the modal and return to the Form’s Fields Tab.

##### Required Field 4 of 7

The fourth field to be created is a user/role select field for when someone is signed out (to indicate who signed them out). Select the “New Field” button opening the New Form Field modal. At a minimum, input the field name. Select User / Role Select (in the accounts category) from the Field Type drop-down menu. Select the “Start Hidden” checkbox. You can customize who is visible on the drop-down menu if desired. Indicate if you would like to show all users, specific users, certification roles, and / or access levels. This will be used to indicate who signed the individual out. Select the “Multiple” checkbox if you want to allow multiple options to be selected when indicating who signed an individual out of the attendance log.

[![image.png](https://kaswiki.kastrack.com/uploads/images/gallery/2026-01/scaled-1680-/f6wimage.png)](https://kaswiki.kastrack.com/uploads/images/gallery/2026-01/f6wimage.png)

Select the “Save” button at the bottom of the modal and return to the Form’s Fields Tab.

##### Required Field 5 of 7

The fifth field to be created is a user/role select field for when someone is accounted for (to indicate who accounted for them). Select the “New Field” button opening the New Form Field modal. At a minimum, input the field name. Select User / Role Select (in the accounts category) from the Field Type drop-down menu. Select the “Start Hidden” checkbox. Make any other customizable choices as desired.

[![image.png](https://kaswiki.kastrack.com/uploads/images/gallery/2026-01/scaled-1680-/BwMimage.png)](https://kaswiki.kastrack.com/uploads/images/gallery/2026-01/BwMimage.png)

Select the “Save” button at the bottom of the modal and return to the Form’s Fields Tab.

##### Required Field 6 of 7

The sixth field to be created is a checkbox field for when someone is signed out (to indicate whether they signed out themselves or were marked as signed out). Select the “New Field” button opening the New Form Field modal. At a minimum, input the field name. Select Checkbox from the Field Type drop-down menu. Select the “Start Hidden” checkbox. Make any other customizable choices as desired.

[![image.png](https://kaswiki.kastrack.com/uploads/images/gallery/2026-01/scaled-1680-/MU1image.png)](https://kaswiki.kastrack.com/uploads/images/gallery/2026-01/MU1image.png)

Select the “Save” button at the bottom of the modal to return to the Form’s Fields Tab.

##### Required Field 7 of 7

The seventh field to be created is a checkbox field for when someone is accounted for (to indicate whether they accounted for themselves or were marked as accounted for). Select the “New Field” button opening the New Form Field modal. At a minimum, input the field name. Select Checkbox from the Field Type drop-down menu. Select the “Start Hidden” checkbox. Make any other customizable choices as desired.

Select the “Save” button at the bottom of the modal and return to the Form’s Fields Tab.

Now that all required fields have been created, you will need at least one more field that will be used to capture details of the person signing in. Examples might include (but are not limited to) “Name,” “Company,” “Cellphone,” or “Department.” Multiple fields can be utilized here based on your organization’s desires for the attendance log. Select the “New Field” button opening the New Field Modal. Create your additional fields for identification purposes, and select “Save” when done to return to the Fields Tab. Your Form fields are now complete.

[![image.png](https://kaswiki.kastrack.com/uploads/images/gallery/2026-01/scaled-1680-/5L5image.png)](https://kaswiki.kastrack.com/uploads/images/gallery/2026-01/5L5image.png)

##### Form Rules

Your Attendance Log Form should have a rule established to set the sign in date/time field to the current time. To create this rule, select the Rules Tab at the top of the page or select “Rules” from the context menu accessible from the three-dot icon to the right of the page header. This opens the Form’s Rules Tab.

[![image.png](https://kaswiki.kastrack.com/uploads/images/gallery/2026-01/scaled-1680-/UZ7image.png)](https://kaswiki.kastrack.com/uploads/images/gallery/2026-01/UZ7image.png)

Select the “New Rule” button opening the New Form Rule Modal. Input a Rule Name.

[![image.png](https://kaswiki.kastrack.com/uploads/images/gallery/2026-01/scaled-1680-/sEZimage.png)](https://kaswiki.kastrack.com/uploads/images/gallery/2026-01/sEZimage.png)

Leave the status as Active and leave the condition as “Always run.”

Select the “+” plus sign icon to the right of Actions to expand the modal. Select “Change the Value of Fields” from the Field Management Category as the Action. Select the field(s) you wish to always run the current date/time rule on.

Select “Set To” from the drop-down menu for the Change Value Type field.

Select “The Current Date / Time” from the drop-down menu for the Set To field.

[![image.png](https://kaswiki.kastrack.com/uploads/images/gallery/2026-01/scaled-1680-/EL9image.png)](https://kaswiki.kastrack.com/uploads/images/gallery/2026-01/EL9image.png)

Select “Save” and the action just outlined will be saved and shows on the New Form Rule Modal.

[![image.png](https://kaswiki.kastrack.com/uploads/images/gallery/2026-01/scaled-1680-/OhOimage.png)](https://kaswiki.kastrack.com/uploads/images/gallery/2026-01/OhOimage.png)

Select the New Form Rule “Save” button and the rule will now show as active on the Rules Tab.

[![image.png](https://kaswiki.kastrack.com/uploads/images/gallery/2026-01/scaled-1680-/dtYimage.png)](https://kaswiki.kastrack.com/uploads/images/gallery/2026-01/dtYimage.png)

<span style="white-space: pre-wrap;">While there are dozens of options for the customization of your attendance log form, this is the basic requirements for functionality. The attendance log is now ready to be created. </span>

Example of how the form fields will be utilized in an attendance log:

[![image.png](https://kaswiki.kastrack.com/uploads/images/gallery/2026-01/scaled-1680-/D4mimage.png)](https://kaswiki.kastrack.com/uploads/images/gallery/2026-01/D4mimage.png)

# Creating A New Attendance Log

<p class="callout info"><span style="white-space: pre-wrap;">In order to create an attendance log, you must first create a form that is integrated with the Attendance Module. </span></p>

<details id="bkmrk-how-to%3A-create-the-b"><summary>How To: Create the Base Form for an Attendance Log</summary>

{{@712}}

</details>Once the base form required for the attendance log field mappings has been created, you are ready to create an Attendance Log. Go to the Home Page of the Attendance Module. Select the “Create Attendance Log” button.

[![image.png](https://kaswiki.kastrack.com/uploads/images/gallery/2026-01/scaled-1680-/A4Yimage.png)](https://kaswiki.kastrack.com/uploads/images/gallery/2026-01/A4Yimage.png)

This opens the New Attendance Log Modal.

[![image.png](https://kaswiki.kastrack.com/uploads/images/gallery/2026-01/scaled-1680-/rPximage.png)](https://kaswiki.kastrack.com/uploads/images/gallery/2026-01/rPximage.png)

<span style="white-space: pre-wrap;">Input the Name of the new attendance log and, if needed, select any tags to be associated with the attendance log. </span>

Select the form for the attendance log from the Form drop-down menu, which will list all forms integrated with the Attendance Module. Select the “Save” button at the bottom of the New Attendance Log Modal.

This opens the Edit Attendance Log Modal.

[![image.png](https://kaswiki.kastrack.com/uploads/images/gallery/2026-01/scaled-1680-/xrJimage.png)](https://kaswiki.kastrack.com/uploads/images/gallery/2026-01/xrJimage.png)

The attendance log name already shows, along with any associated tags. Tags can also be added here if desired. The URL path will add the form’s name to the end, but this can also be edited if desired.

<span style="white-space: pre-wrap;">If the associated form was set to public, the public checkbox will automatically be selected on the Edit Attendance Log Modal. If the form was not made public, the attendance log cannot be made public and this option would not be selectable. </span>

<p class="callout info">You can set the form to public by editing the form in the Forms module and clicking the “Allow Public Entries” checkbox.</p>

<span style="white-space: pre-wrap;">Select “Show in Main Menu” if you would like the Attendance Log to show as an option on the Main Menu. </span>

<p class="callout info">In order to see the new attendance log on the main menu, you will either have to refresh the page, or log out and log back in once the new attendance log has been created.</p>

The Edit Attendance Log Modal has five different sections: Field Mappings**\***, Fields Related to Managing Sign Ins**\***<span style="white-space: pre-wrap;">, Display Page Options, Admittance Desk Options, and Fields Related to When Someone is signing themselves in or out (or accounting for themselves while mustering) </span>**\***<span style="white-space: pre-wrap;">. </span>

<p class="callout info"><span style="white-space: pre-wrap;">An </span>**\***<span style="white-space: pre-wrap;"> asterisk denotes a required field.</span></p>

After going through each section, select “Save” at the bottom of the modal to return to the Attendance Home Page where the newly created attendance log will show in the Attendance Log Table.

# Attendance Log Property Explanations

The Edit Attendance Log Modal has five separate sections that expand for customization of each individual attendance log. An explanation of each section has been included below.

<p class="callout info"><span style="white-space: pre-wrap;">An </span>**\***<span style="white-space: pre-wrap;"> asterisk denotes a required field.</span></p>

#### Field Mappings

Field Mappings correlate to the seven required fields that were created in the base form for the attendance log. Each are a required field. Match the field names used in your attendance log form to the appropriate title using the drop-down menus provided.

[![image.png](https://kaswiki.kastrack.com/uploads/images/gallery/2026-01/scaled-1680-/kgtimage.png)](https://kaswiki.kastrack.com/uploads/images/gallery/2026-01/kgtimage.png)
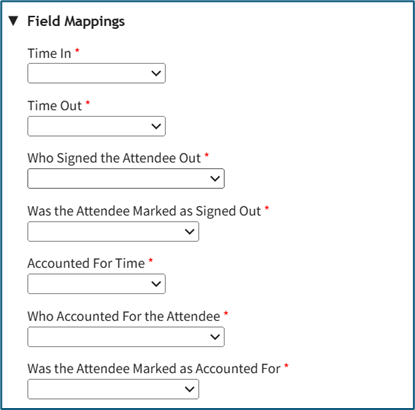
An explanation of the Field Mapping Fields are included in the table below.

<table id="bkmrk-field-mappings-field"><colgroup><col style="width: 130px;"></col><col style="width: 732px;"></col></colgroup><tbody><tr><td colspan="2">**Field Mappings Field Explanations**

</td></tr><tr><td>**Field**

</td><td>**Explanation**

</td></tr><tr><td>\*Time In

</td><td>Time In is referring to the date / time field created for when a person signs in.

</td></tr><tr><td>\*Time Out

</td><td>Time Out is referring to the date / time field created for when a person signs out.

</td></tr><tr><td>\*Who Signed the Attendee Out

</td><td>Who Signed the Attendee Out is referring to the user / role select field created for when someone is signed out, to indicate who signed them out.

</td></tr><tr><td>\*Was the Attendee Marked As Signed Out

</td><td>Was the Attendee Marked as Signed Out is referring to the checkbox field created for when someone is signed out, to indicate whether they signed out themselves, or were marked as signed out.

</td></tr><tr><td>\*Accounted for Time

</td><td>Accounted For Time is referring to the date / time field created for when a person is accounted for when mustering.

</td></tr><tr><td>\*Who Accounted for the Attendee

</td><td>Who Accounted for the Attendee is referring to the user / role select field created for when someone is accounted for, to indicate who accounted for them.

</td></tr><tr><td>\*Was the Attendee Marked As Accounted For

</td><td>Was the Attendee Marked as Accounted For is referring to the checkbox field created for when someone is accounted for, to indicate whether they accounted for themselves, or were marked as accounted for.

</td></tr></tbody></table>

#### Fields Related to Managing Sign Ins

The Fields Related to Managing Sign Ins allows an individual to customize the information shown on several pages in the Attendance Log. Each of the fields in this section is a required field. The Fields Related to Managing Sign Ins Explanations Table below describes the purpose of each field.

[![image.png](https://kaswiki.kastrack.com/uploads/images/gallery/2026-01/scaled-1680-/VU2image.png)](https://kaswiki.kastrack.com/uploads/images/gallery/2026-01/VU2image.png)

<table id="bkmrk-fields-related-to-ma-1"><colgroup><col style="width: 240px;"></col><col style="width: 581px;"></col></colgroup><tbody><tr><td colspan="2">**Fields Related to Managing Sign Ins Explanations**

</td></tr><tr><td>**Field**

</td><td>**What is Being Impacted**

</td></tr><tr><td>\*Field(s) to show when viewing people currently signed in

</td><td>The fields selected from the drop-down menu here will be the columns displayed on the Currently Signed In Page.

</td></tr><tr><td>\*Field(s) to show when viewing all entries

</td><td>The fields selected from the drop-down menu here will be the columns displayed on the All Entries Page.

</td></tr><tr><td>\*Field(s) to show when mustering

</td><td>The fields selected from the drop-down menu here will be the columns displayed on the Muster Page.

</td></tr><tr><td>\*Field(s) to show when viewing muster history

</td><td>The fields selected from the drop-down menu here will be the columns displayed on the Muster History Page.

</td></tr></tbody></table>

#### Display Option Pages

The Display Page Options section has one checkbox, “Enable the display page”.

[![image.png](https://kaswiki.kastrack.com/uploads/images/gallery/2026-01/scaled-1680-/u4wimage.png)](https://kaswiki.kastrack.com/uploads/images/gallery/2026-01/u4wimage.png)

The Display Page is a screen that will show information based on your selections and will update as individuals use the attendance log.

[![image.png](https://kaswiki.kastrack.com/uploads/images/gallery/2026-01/scaled-1680-/yIOimage.png)](https://kaswiki.kastrack.com/uploads/images/gallery/2026-01/yIOimage.png)

When this checkbox is selected, the modal expands with additional options for customization of the display.

[![image.png](https://kaswiki.kastrack.com/uploads/images/gallery/2026-01/scaled-1680-/Aefimage.png)](https://kaswiki.kastrack.com/uploads/images/gallery/2026-01/Aefimage.png)

<table id="bkmrk-display-page-option-" style="margin: 0.3em 0px 1.375em; padding: 0px; border: 0px; font-style: normal; font-weight: 400; font-size: 14px; line-height: inherit; font-family: -apple-system, BlinkMacSystemFont, "Segoe UI", Oxygen, Ubuntu, Roboto, Cantarell, "Fira Sans", "Droid Sans", "Helvetica Neue", sans-serif; vertical-align: baseline; border-collapse: collapse; border-spacing: 0px; min-width: 100px; max-width: 100%; table-layout: fixed; color: rgb(68, 68, 68); letter-spacing: normal; text-transform: none; word-spacing: 0px; white-space: normal; background-color: rgb(255, 255, 255); text-decoration-thickness: initial; text-decoration-style: initial; text-decoration-color: initial;"><colgroup><col></col><col></col></colgroup><tbody><tr style="margin: 0px; padding: 0px; border: 0px; font: inherit; vertical-align: baseline;"><td colspan="4" style="margin: 0px; padding: 6px 8px; border: 1px solid rgb(221, 221, 221); font-style: inherit; font-variant: inherit; font-weight: inherit; font-size: inherit; line-height: 1.2; font-family: inherit; vertical-align: top; min-width: 10px; overflow: auto;">**Display Page Option Section Explanations**

</td></tr><tr style="margin: 0px; padding: 0px; border: 0px; font: inherit; vertical-align: baseline;"><td style="margin: 0px; padding: 6px 8px; border: 1px solid rgb(221, 221, 221); font-style: inherit; font-variant: inherit; font-weight: inherit; font-size: inherit; line-height: 1.2; font-family: inherit; vertical-align: top; min-width: 10px; overflow: auto;">**Field**

</td><td colspan="3" style="margin: 0px; padding: 6px 8px; border: 1px solid rgb(221, 221, 221); font-style: inherit; font-variant: inherit; font-weight: inherit; font-size: inherit; line-height: 1.2; font-family: inherit; vertical-align: top; min-width: 10px; overflow: auto;">**Comments**

</td></tr><tr style="margin: 0px; padding: 0px; border: 0px; font: inherit; vertical-align: baseline;"><td style="margin: 0px; padding: 6px 8px; border: 1px solid rgb(221, 221, 221); font-style: inherit; font-variant: inherit; font-weight: inherit; font-size: inherit; line-height: 1.2; font-family: inherit; vertical-align: top; min-width: 10px; overflow: auto;">Title for the Display Page

</td><td colspan="3" style="margin: 0px; padding: 6px 8px; border: 1px solid rgb(221, 221, 221); font-style: inherit; font-variant: inherit; font-weight: inherit; font-size: inherit; line-height: 1.2; font-family: inherit; vertical-align: top; min-width: 10px; overflow: auto;">You can give the display page a title different that is different from the name of the attendance log. The Display Page Title will show in the top left-hand corner of the Display Page.

</td></tr><tr style="margin: 0px; padding: 0px; border: 0px; font: inherit; vertical-align: baseline;"><td style="margin: 0px; padding: 6px 8px; border: 1px solid rgb(221, 221, 221); font-style: inherit; font-variant: inherit; font-weight: inherit; font-size: inherit; line-height: 1.2; font-family: inherit; vertical-align: top; min-width: 10px; overflow: auto;">Text for the Display Page

</td><td colspan="3" style="margin: 0px; padding: 6px 8px; border: 1px solid rgb(221, 221, 221); font-style: inherit; font-variant: inherit; font-weight: inherit; font-size: inherit; line-height: 1.2; font-family: inherit; vertical-align: top; min-width: 10px; overflow: auto;">The text for the Display Page is seen immediately beneath the page header. You can customize this text or leave it blank.

</td></tr><tr style="margin: 0px; padding: 0px; border: 0px; font: inherit; vertical-align: baseline;"><td style="margin: 0px; padding: 6px 8px; border: 1px solid rgb(221, 221, 221); font-style: inherit; font-variant: inherit; font-weight: inherit; font-size: inherit; line-height: 1.2; font-family: inherit; vertical-align: top; min-width: 10px; overflow: auto;">Field(s) to Include on the Display Page

</td><td colspan="3" style="margin: 0px; padding: 6px 8px; border: 1px solid rgb(221, 221, 221); font-style: inherit; font-variant: inherit; font-weight: inherit; font-size: inherit; line-height: 1.2; font-family: inherit; vertical-align: top; min-width: 10px; overflow: auto;">Select the fields you want to be visible on the Display Page. All fields included on the Attendance Log Form will show as Display Page field options.

</td></tr><tr style="margin: 0px; padding: 0px; border: 0px; font: inherit; vertical-align: baseline;"><td style="margin: 0px; padding: 6px 8px; border: 1px solid rgb(221, 221, 221); font-style: inherit; font-variant: inherit; font-weight: inherit; font-size: inherit; line-height: 1.2; font-family: inherit; vertical-align: top; min-width: 10px; overflow: auto;">Font Size (em)

</td><td colspan="3" style="margin: 0px; padding: 6px 8px; border: 1px solid rgb(221, 221, 221); font-style: inherit; font-variant: inherit; font-weight: inherit; font-size: inherit; line-height: 1.2; font-family: inherit; vertical-align: top; min-width: 10px; overflow: auto;">Font size is automatically set a 1em. Input the desired font size.

<p class="callout info"><span style="white-space: pre-wrap;">An em is a unit in the field of typography, equal to the currently specified point size that corresponds to the body height of the typeface. </span></p>

</td></tr><tr style="margin: 0px; padding: 0px; border: 0px; font: inherit; vertical-align: baseline;"><td style="margin: 0px; padding: 6px 8px; border: 1px solid rgb(221, 221, 221); font-style: inherit; font-variant: inherit; font-weight: inherit; font-size: inherit; line-height: 1.2; font-family: inherit; vertical-align: top; min-width: 10px; overflow: auto;">Field Widths (pixels)

</td><td colspan="3" style="margin: 0px; padding: 6px 8px; border: 1px solid rgb(221, 221, 221); font-style: inherit; font-variant: inherit; font-weight: inherit; font-size: inherit; line-height: 1.2; font-family: inherit; vertical-align: top; min-width: 10px; overflow: auto;">Leave this blank for auto widths, or specify one width per column, separated by spaces. Use ‘auto’ to use auto width for a column. (For example, if there are three columns then ‘auto 100 100’ will set the column width for the last two columns to 100px, and auto-size the first column).

</td></tr><tr style="margin: 0px; padding: 0px; border: 0px; font: inherit; vertical-align: baseline;"><td style="margin: 0px; padding: 6px 8px; border: 1px solid rgb(221, 221, 221); font-style: inherit; font-variant: inherit; font-weight: inherit; font-size: inherit; line-height: 1.2; font-family: inherit; vertical-align: top; min-width: 10px; overflow: auto;">On the Display Page, Show...

</td><td colspan="3" style="margin: 0px; padding: 6px 8px; border: 1px solid rgb(221, 221, 221); font-style: inherit; font-variant: inherit; font-weight: inherit; font-size: inherit; line-height: 1.2; font-family: inherit; vertical-align: top; min-width: 10px; overflow: auto;">There are two selections provided via drop-down menu for who shows on the display page: “People who are currently signed in” OR “People Who Have Signed In Today”

</td></tr><tr style="margin: 0px; padding: 0px; border: 0px; font: inherit; vertical-align: baseline;"><td style="margin: 0px; padding: 6px 8px; border: 1px solid rgb(221, 221, 221); font-style: inherit; font-variant: inherit; font-weight: inherit; font-size: inherit; line-height: 1.2; font-family: inherit; vertical-align: top; min-width: 10px; overflow: auto;">Scroll Rate (seconds)

</td><td colspan="3" style="margin: 0px; padding: 6px 8px; border: 1px solid rgb(221, 221, 221); font-style: inherit; font-variant: inherit; font-weight: inherit; font-size: inherit; line-height: 1.2; font-family: inherit; vertical-align: top; min-width: 10px; overflow: auto;">The scroll rate is automatically set to 30 seconds. If your screen only shows 25 entries at a time, scroll rate dictates how long the screen will show those 25 entries before scrolling to the next 25 entries.

</td></tr><tr style="margin: 0px; padding: 0px; border: 0px; font: inherit; vertical-align: baseline;"><td style="margin: 0px; padding: 6px 8px; border: 1px solid rgb(221, 221, 221); font-style: inherit; font-variant: inherit; font-weight: inherit; font-size: inherit; line-height: 1.2; font-family: inherit; vertical-align: top; min-width: 10px; overflow: auto;">Include the Sign In QR Code Checkbox

</td><td colspan="3" style="margin: 0px; padding: 6px 8px; border: 1px solid rgb(221, 221, 221); font-style: inherit; font-variant: inherit; font-weight: inherit; font-size: inherit; line-height: 1.2; font-family: inherit; vertical-align: top; min-width: 10px; overflow: auto;">Selecting this checkbox will result in the Sign In QR Code being displayed on the Display Page.

</td></tr><tr style="margin: 0px; padding: 0px; border: 0px; font: inherit; vertical-align: baseline;"><td style="margin: 0px; padding: 6px 8px; border: 1px solid rgb(221, 221, 221); font-style: inherit; font-variant: inherit; font-weight: inherit; font-size: inherit; line-height: 1.2; font-family: inherit; vertical-align: top; min-width: 10px; overflow: auto;">Include the Sign Out QR Code Checkbox

</td><td colspan="3" style="margin: 0px; padding: 6px 8px; border: 1px solid rgb(221, 221, 221); font-style: inherit; font-variant: inherit; font-weight: inherit; font-size: inherit; line-height: 1.2; font-family: inherit; vertical-align: top; min-width: 10px; overflow: auto;">Selecting this checkbox will result in the Sign Out QR Code being displayed on the Display Page.

</td></tr><tr style="margin: 0px; padding: 0px; border: 0px; font: inherit; vertical-align: baseline;"><td rowspan="12" style="margin: 0px; padding: 6px 8px; border: 1px solid rgb(221, 221, 221); font-style: inherit; font-variant: inherit; font-weight: inherit; font-size: inherit; line-height: 1.2; font-family: inherit; vertical-align: top; min-width: 10px; overflow: auto;">Use Muster Display When Mustering

</td><td colspan="3" style="margin: 0px; padding: 6px 8px; border: 1px solid rgb(221, 221, 221); font-style: inherit; font-variant: inherit; font-weight: inherit; font-size: inherit; line-height: 1.2; font-family: inherit; vertical-align: top; min-width: 10px; overflow: auto;">Selecting this checkbox will result in the Mustering Display Page being shown as opposed to the regular Display Page when in Muster mode. When selected, it expands to show additional fields.

</td></tr><tr style="margin: 0px; padding: 0px; border: 0px; font: inherit; vertical-align: baseline;"><td style="margin: 0px; padding: 6px 8px; border: 1px solid rgb(221, 221, 221); font-style: inherit; font-variant: inherit; font-weight: inherit; font-size: inherit; line-height: 1.2; font-family: inherit; vertical-align: top; min-width: 10px; overflow: auto;">**Fields**

</td><td colspan="2" style="margin: 0px; padding: 6px 8px; border: 1px solid rgb(221, 221, 221); font-style: inherit; font-variant: inherit; font-weight: inherit; font-size: inherit; line-height: 1.2; font-family: inherit; vertical-align: top; min-width: 10px; overflow: auto;">**Comments**

</td></tr><tr style="margin: 0px; padding: 0px; border: 0px; font: inherit; vertical-align: baseline;"><td style="margin: 0px; padding: 6px 8px; border: 1px solid rgb(221, 221, 221); font-style: inherit; font-variant: inherit; font-weight: inherit; font-size: inherit; line-height: 1.2; font-family: inherit; vertical-align: top; min-width: 10px; overflow: auto;">Muster Mode

</td><td colspan="2" style="margin: 0px; padding: 6px 8px; border: 1px solid rgb(221, 221, 221); font-style: inherit; font-variant: inherit; font-weight: inherit; font-size: inherit; line-height: 1.2; font-family: inherit; vertical-align: top; min-width: 10px; overflow: auto;">There are two options for this drop-down menu. The first option is “Show not accounted for people and stats”, which will show information about individuals who have not accounted for themselves or have not been marked as accounted for. The second option is “Only show QR Code”, which will display the muster mode QR Code instead.

</td></tr><tr style="margin: 0px; padding: 0px; border: 0px; font: inherit; vertical-align: baseline;"><td style="margin: 0px; padding: 6px 8px; border: 1px solid rgb(221, 221, 221); font-style: inherit; font-variant: inherit; font-weight: inherit; font-size: inherit; line-height: 1.2; font-family: inherit; vertical-align: top; min-width: 10px; overflow: auto;">Fields to Include on the display page when mustering

</td><td colspan="2" style="margin: 0px; padding: 6px 8px; border: 1px solid rgb(221, 221, 221); font-style: inherit; font-variant: inherit; font-weight: inherit; font-size: inherit; line-height: 1.2; font-family: inherit; vertical-align: top; min-width: 10px; overflow: auto;">Select the fields you would like to be visible on the Mustering Display Page. All fields included on the attendance log form will show as options.

</td></tr><tr style="margin: 0px; padding: 0px; border: 0px; font: inherit; vertical-align: baseline;"><td style="margin: 0px; padding: 6px 8px; border: 1px solid rgb(221, 221, 221); font-style: inherit; font-variant: inherit; font-weight: inherit; font-size: inherit; line-height: 1.2; font-family: inherit; vertical-align: top; min-width: 10px; overflow: auto;">Include the muster QR code

</td><td colspan="2" style="margin: 0px; padding: 6px 8px; border: 1px solid rgb(221, 221, 221); font-style: inherit; font-variant: inherit; font-weight: inherit; font-size: inherit; line-height: 1.2; font-family: inherit; vertical-align: top; min-width: 10px; overflow: auto;">Selecting this checkbox will show the Muster QR Code on the Muster Display Page.

</td></tr><tr style="margin: 0px; padding: 0px; border: 0px; font: inherit; vertical-align: baseline;"><td rowspan="7" style="margin: 0px; padding: 6px 8px; border: 1px solid rgb(221, 221, 221); font-style: inherit; font-variant: inherit; font-weight: inherit; font-size: inherit; line-height: 1.2; font-family: inherit; vertical-align: top; min-width: 10px; overflow: auto;">Show Accounted For List

</td><td colspan="2" style="margin: 0px; padding: 6px 8px; border: 1px solid rgb(221, 221, 221); font-style: inherit; font-variant: inherit; font-weight: inherit; font-size: inherit; line-height: 1.2; font-family: inherit; vertical-align: top; min-width: 10px; overflow: auto;">Selecting this checkbox results in the Accounted For List showing on the Muster Display Page. It expands when selected with additional options.

</td></tr><tr style="margin: 0px; padding: 0px; border: 0px; font: inherit; vertical-align: baseline;"><td style="margin: 0px; padding: 6px 8px; border: 1px solid rgb(221, 221, 221); font-style: inherit; font-variant: inherit; font-weight: inherit; font-size: inherit; line-height: 1.2; font-family: inherit; vertical-align: top; min-width: 10px; overflow: auto;">**Fields**

</td><td style="margin: 0px; padding: 6px 8px; border: 1px solid rgb(221, 221, 221); font-style: inherit; font-variant: inherit; font-weight: inherit; font-size: inherit; line-height: 1.2; font-family: inherit; vertical-align: top; min-width: 10px; overflow: auto;">**Comments**

</td></tr><tr style="margin: 0px; padding: 0px; border: 0px; font: inherit; vertical-align: baseline;"><td style="margin: 0px; padding: 6px 8px; border: 1px solid rgb(221, 221, 221); font-style: inherit; font-variant: inherit; font-weight: inherit; font-size: inherit; line-height: 1.2; font-family: inherit; vertical-align: top; min-width: 10px; overflow: auto;">Pattern for the Accounted for List

</td><td style="margin: 0px; padding: 6px 8px; border: 1px solid rgb(221, 221, 221); font-style: inherit; font-variant: inherit; font-weight: inherit; font-size: inherit; line-height: 1.2; font-family: inherit; vertical-align: top; min-width: 10px; overflow: auto;">You can use the pattern field to reference your form fields in the Accounted For List. Input the fields you would like displayed in order. Example: #FieldName1# #FieldName2#

</td></tr><tr style="margin: 0px; padding: 0px; border: 0px; font: inherit; vertical-align: baseline;"><td style="margin: 0px; padding: 6px 8px; border: 1px solid rgb(221, 221, 221); font-style: inherit; font-variant: inherit; font-weight: inherit; font-size: inherit; line-height: 1.2; font-family: inherit; vertical-align: top; min-width: 10px; overflow: auto;">Accounted for List Font Size (em)

</td><td style="margin: 0px; padding: 6px 8px; border: 1px solid rgb(221, 221, 221); font-style: inherit; font-variant: inherit; font-weight: inherit; font-size: inherit; line-height: 1.2; font-family: inherit; vertical-align: top; min-width: 10px; overflow: auto;">The font size for the accounted for list is set at 1em but can be altered.

</td></tr><tr style="margin: 0px; padding: 0px; border: 0px; font: inherit; vertical-align: baseline;"><td style="margin: 0px; padding: 6px 8px; border: 1px solid rgb(221, 221, 221); font-style: inherit; font-variant: inherit; font-weight: inherit; font-size: inherit; line-height: 1.2; font-family: inherit; vertical-align: top; min-width: 10px; overflow: auto;">Accounted for List Pagination Speed (seconds)

</td><td style="margin: 0px; padding: 6px 8px; border: 1px solid rgb(221, 221, 221); font-style: inherit; font-variant: inherit; font-weight: inherit; font-size: inherit; line-height: 1.2; font-family: inherit; vertical-align: top; min-width: 10px; overflow: auto;">The pagination speed of the accounted for list is set at 30 seconds but can be altered.

</td></tr><tr style="margin: 0px; padding: 0px; border: 0px; font: inherit; vertical-align: baseline;"><td style="margin: 0px; padding: 6px 8px; border: 1px solid rgb(221, 221, 221); font-style: inherit; font-variant: inherit; font-weight: inherit; font-size: inherit; line-height: 1.2; font-family: inherit; vertical-align: top; min-width: 10px; overflow: auto;">Sort By Field

</td><td style="margin: 0px; padding: 6px 8px; border: 1px solid rgb(221, 221, 221); font-style: inherit; font-variant: inherit; font-weight: inherit; font-size: inherit; line-height: 1.2; font-family: inherit; vertical-align: top; min-width: 10px; overflow: auto;">Select which field you would like the Muster Display Page to use for sorting.

</td></tr><tr style="margin: 0px; padding: 0px; border: 0px; font: inherit; vertical-align: baseline;"><td style="margin: 0px; padding: 6px 8px; border: 1px solid rgb(221, 221, 221); font-style: inherit; font-variant: inherit; font-weight: inherit; font-size: inherit; line-height: 1.2; font-family: inherit; vertical-align: top; min-width: 10px; overflow: auto;">QR Code Size (pixels)

</td><td style="margin: 0px; padding: 6px 8px; border: 1px solid rgb(221, 221, 221); font-style: inherit; font-variant: inherit; font-weight: inherit; font-size: inherit; line-height: 1.2; font-family: inherit; vertical-align: top; min-width: 10px; overflow: auto;">The QR Code size is set for 200 pixels but can be altered.

</td></tr></tbody></table>

#### Admittance Desk Options

Admittance Desk Options are relevant when you want an individual (e.g. a receptionist) to easily check role status and sign someone in or out.

Select the “Enable Admittance Desk” checkbox to enable this feature.

The Associated Certification Role field shows a drop-down menu with all of the certification roles. After selecting a role, the Admittance Desk Page will display the status for that role and its relevant certifications a user. This feature is useful if, for example, you only wanted to admit individuals who have a Valid (green) status for a specific certification role.

[![image.png](https://kaswiki.kastrack.com/uploads/images/gallery/2026-01/scaled-1680-/Z9Timage.png)](https://kaswiki.kastrack.com/uploads/images/gallery/2026-01/Z9Timage.png)

Drag and drop any additional table column options desired from the Available Box on the right-hand side into the Selected Box on the left-hand side. These options are based on your site’s account and custom account fields.

#### Fields Related to when Someone is Signing In/Out or Accounting for Themselves while Mustering

The following fields are related to when someone is signing themselves in or out, or accounting for themselves while mustering. An explanation of the fields has been included in the Fields Related to Signing In / Out or Mustering Explanations Table below.

[![image.png](https://kaswiki.kastrack.com/uploads/images/gallery/2026-01/scaled-1680-/nrLimage.png)](https://kaswiki.kastrack.com/uploads/images/gallery/2026-01/nrLimage.png)

<table id="bkmrk-fields-related-to-si"><colgroup><col style="width: 240px;"></col><col style="width: 633px;"></col></colgroup><tbody><tr><td colspan="2">**Fields Related to Signing In/Out and Mustering Explanations**

</td></tr><tr><td>**Field**

</td><td>**Explanation**

</td></tr><tr><td>Field(s) to Remember between Sign Ins

</td><td>For attendance logs that have repeat sign ins, this feature will allow for key information to be saved by the system so that it doesn’t have to be re-entered by the individual every time they sign in.

</td></tr><tr><td>\*Field(s) to check when looking for an entry

</td><td>When a user is looking for an entry, these are the fields they fill in to search for an entry.

</td></tr><tr><td>\*Pattern for when signing out / accounting for self

</td><td><span style="white-space: pre-wrap;">This pattern defines what an individual sees when they are signing out/accounting for themself during mustering. Input the fields you would like displayed in order. </span>

Example: #FieldName1# #FieldName2#

</td></tr><tr><td>\*Text for Sign Out button

</td><td>The field has the automatic input “Sign Out” that can be customized in this textbox as desired.

</td></tr><tr><td>**\***Text for Accounted For button

</td><td>The field has the automatic input “I’m Here” that can be customized in this textbox as desired.

</td></tr><tr><td>\*Message to display once signed out

</td><td>The field has the automatic input “You have been signed out.” The message can be customized as desired.

</td></tr><tr><td>\*Message to display once accounted for

</td><td>The field has the automatic input “You have been accounted for.” The message can be customed as desired.

</td></tr></tbody></table>

# Attendance: Supplemental Resources

There are no email alerts associated with the Attendance Module.

# Complete List of Attendance Module How Tos

{{@500}}