Assets: Module Pages
- Assets Home Page - The Upcoming Task Table
- My Assets Page
- Manage Assets Page
- Assets Files Page
- Assets Reports Page
- Assets Settings Page: Asset Types Tab
- Assets Settings Page: Task Template Tab
- Assets Settings Page: Meter Types Tab
- Assets Settings Page: Manufacturers Tab
- Assets Settings Page: Module Level Tab
Assets Home Page - The Upcoming Task Table
The Home Page in the Assets Module is labeled with the header Your Upcoming Tasks and displays the user’s upcoming tasks or workorders for the day that are associated with the assets that individual has been assigned responsibility for. The Upcoming Task Table includes the asset/subcomponent title, asset serial number, upcoming tasks and their status.

The Home Page has three buttons for Upcoming Task Management that are explained in the Assets Home Page Button Explanation Table below. The icons allow for page viewing customization.
Assets Home Page Button Explanation Table | |
Button | Associated Action |
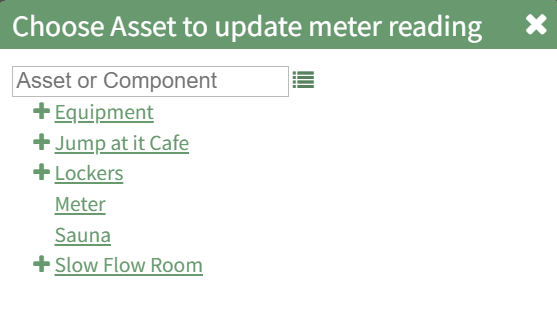
Update Meter Reading | Clicking the Update Meter Reading button will open a modal that prompts you to select the asset the meter is associated with. The appropriate meter can then be selected from the Update Meter Reading Modal. How To: Update a Meter ReadingIn order to update an asset's meter reading, go to the Assets Module Home Page opening the Upcoming Tasks Table. Click the “Update Meter Reading" button from the Asset Module Homepage.
The Choose Asset Modal will prompt you to identify which asset you want to log data for. Click the bulleted list icon to access your assets. Selecting the plus sign “+” icon will expand the components within the Asset. Selecting “Update Meter Reading” from the Upcoming Task Table Context Menu will open the same modal for the specified asset.
Select the appropriate asset, opening the Update Meter Reading Modal.
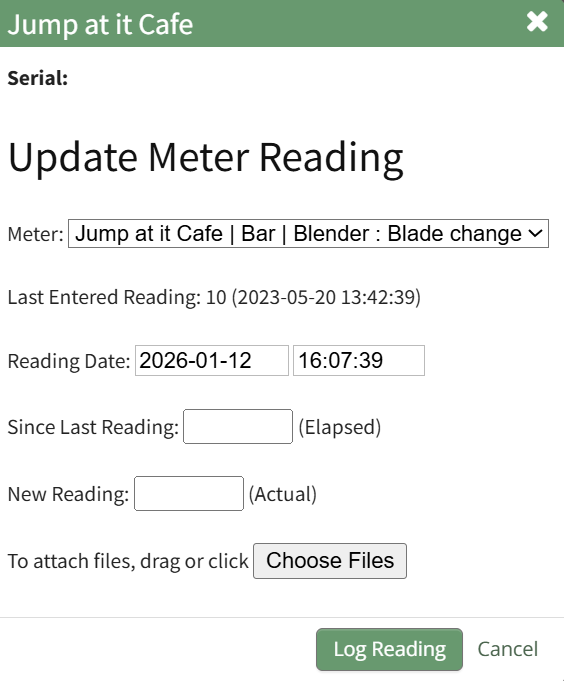
The meters associated with the asset/component selected show in a dropdown menu. Select the meter whose meter data you wish to record. The most recent meter reading shows in the Update Meter Reading Modal as the “Last Entered Reading.” KAStrack automatically inputs the current date and time. The user can enter an elapsed value (if preferred) and KAStrack will input the new actual, or the user can input the new meter reading and the elapsed value will be automatically input. Attach any files (if there are checklists, forms, etc.) associated with the meter reading. Select the “Log Reading” button to update the meter usage. Click cancel to return to the Assets Module Homepage. |
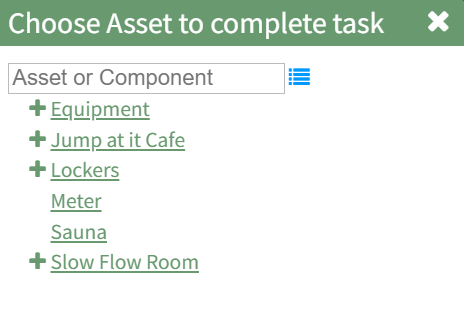
Complete Task | Selecting the Complete Task button will open a modal that prompts you to select the asset the task is associated with. The completed task(s) can be selected via checkbox on the Complete Task Modal. How To: Log a Task has been CompletedIn order to log that a task has been completed and is current/up to date (a green task status), go to the Upcoming Task Table on the Home Page of the Assets Module. Select the “Complete Task” button from the top of the Your Upcoming Tasks Page.
The Choose Asset Modal will prompt you to identify which asset you want to log data for. Click the bulleted list icon to access your assets. Selecting the plus sign “+” icon will expand the components under the asset. Selecting “Complete Task” from the three dot (…) context menu to the right of the asset / component title will open the same modal for the specified asset.
Select the appropriate asset, opening the asset's Complete Task Modal. Click the green View All clickable link to list all tasks associated with the selected asset, including tasks that are current / up to date (green status).
Serial numbers and the asset description will show at the top of the modal. Clicking the “Show Subcomponents” checkbox shows any subcomponent tasks associated with the asset, expanding the modal when selected. Beneath the task in bold is a note that indicates the parameters for the task, referred to as a trigger in KAStrack. Triggers refer to the task behavior, frequency or usage standards that KAStrack will applies to tasks to determine their schedule for completion. To log the task, select the checkbox of the completed task. You can manually enter the date (MM/DD/YYYY format) and time (hh:mm:ss format) that the task was completed, or select “Now” in order to input the current date and time. Click the “Complete Task” button to save the changes and complete the task. Click cancel to return to the Assets Module Homepage. |
Record Fault | Selecting the Record Fault button will open a modal that prompts you to select the asset the fault is associated with. The fault can then be recorded through the Record Fault Modal. How To: Record a FaultLogging faults allows your company to track trending data in KAStrack by recording incidents and any data associated with this issue/failure. In order to record fault with an equipment issue/failure, go to the Upcoming Task Table on the Asset Module Homepage and select the "Record Fault" button beneath the page header.
The Choose Asset Modal will prompt you to identify which asset you want to log data for. Click the bulleted list icon to access your assets. Selecting the plus sign “+” icon will expand the components within the Asset. Selecting “Record Fault” from the three dot (…) context menu will open the same modal for the specified asset.
Select the appropriate asset, opening the Record Fault Modal.
Select the “Log Fault” button to record the incident. Select the “Log Fault and Resolve” button to complete two actions in one step: log the issue and indicate that it has been addressed. Click cancel to return to the Assets Module Homepage. |
| Selecting the plus sign icon expands the view of the Upcoming Task Table, showing tasks organized by sub-components and not just the parent asset. |
| Selecting the minus sign icon collapses the View of the Upcoming Task Table, grouping all sub-component tasks together and listing them under the parent asset. |
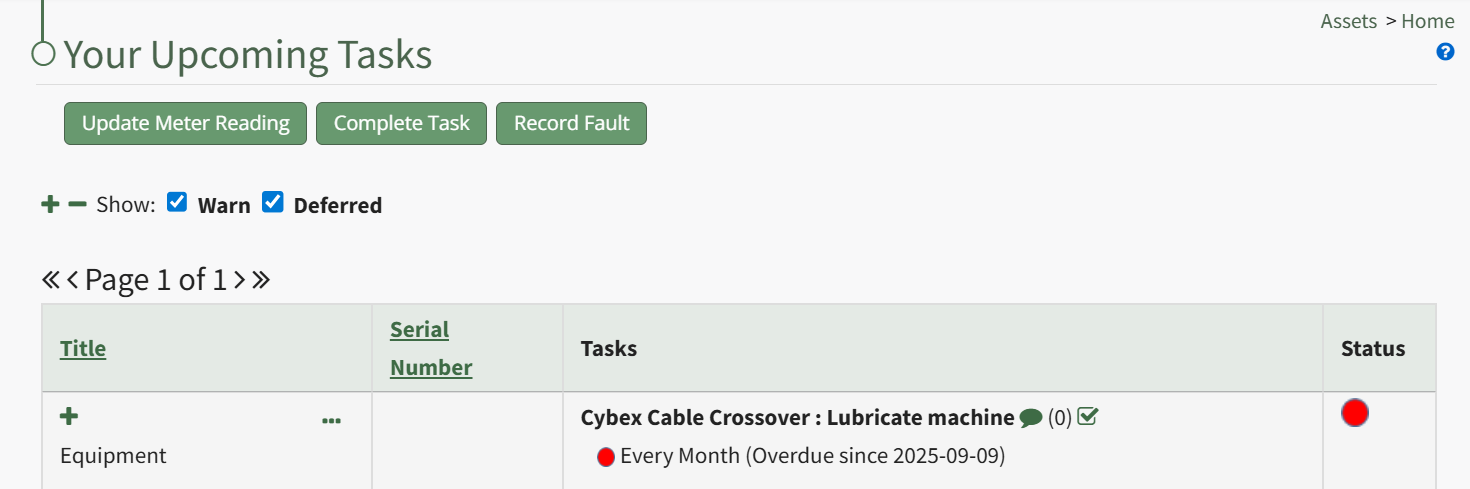

Checkboxes allow you to include / exclude tasks that are deferred or have a warning status associated with them.
The Assets/Task Status Color Legend and icons associated with the Upcoming Task Table are explained in the Upcoming Task Page Icon Explanation Table below.
Upcoming Task Page Icon Explanation Table | |
Icon | Meaning |
| The page icon indicates that there is a dialogue box with additional information regarding the task. When clicked, an Additional Information Sections with notes appears. |
| The double page icon indicates that a document has been uploaded in the Assets Module for review. Files in the Asset Module are saved independently from the Documents Module. |
| The task note icon opens a text box that allows a user to add notes without completing the task since the last completed maintenance. Any notes previously added interim notes for this task will show under the text box. |
| The number within parenthesis indicates the number of comments that have been made since the last completed maintenance. |
| The checkbox icon is a quick link that opens the Complete Task Modal that is used to mark a task as completed and up to date. How To: Log a Task has been CompletedIn order to log that a task has been completed and is current/up to date (a green task status), go to the Upcoming Task Table on the Home Page of the Assets Module. Select the “Complete Task” button from the top of the Your Upcoming Tasks Page.
The Choose Asset Modal will prompt you to identify which asset you want to log data for. Click the bulleted list icon to access your assets. Selecting the plus sign “+” icon will expand the components under the asset. Selecting “Complete Task” from the three dot (…) context menu to the right of the asset / component title will open the same modal for the specified asset.
Select the appropriate asset, opening the asset's Complete Task Modal. Click the green View All clickable link to list all tasks associated with the selected asset, including tasks that are current / up to date (green status).
Serial numbers and the asset description will show at the top of the modal. Clicking the “Show Subcomponents” checkbox shows any subcomponent tasks associated with the asset, expanding the modal when selected. Beneath the task in bold is a note that indicates the parameters for the task, referred to as a trigger in KAStrack. Triggers refer to the task behavior, frequency or usage standards that KAStrack will applies to tasks to determine their schedule for completion. To log the task, select the checkbox of the completed task. You can manually enter the date (MM/DD/YYYY format) and time (hh:mm:ss format) that the task was completed, or select “Now” in order to input the current date and time. Click the “Complete Task” button to save the changes and complete the task. Click cancel to return to the Assets Module Homepage. |
| A greet status icon in the Assets Module indicates that a task is current and up to date. |
| A yellow status icon in the Assets Module is a warning that a deadline is upcoming. |
| A red status icon in the Assets Module indicates that a task is past due. |
| A blue status icon in the Assets Module indicates that a task has been deferred. |
| A grey status icon in the Assets Module indicates that an asset or component is out of service. Any sub-component would also be archived. |
| A white status icon in the Assets Module indicates that an asset or component is archived. Any sub-component would also be archived. |
| A purple status icon in the Assets Module indicates that a before task linked to a deferred corrective action. |
| A yellow triangle status icon in the Assets Module is a warning that a critical item has an upcoming deadline |
| A red triangle status icon in the Assets Module indicates that a critical item is past due. |
Tasks are grouped together and displayed in the Upcoming Task table by asset, highlighting the tasks that are not current / up to date.
 To the right of each asset title is a three-dot icon that opens a context menu with a list of options for quick task management. The Upcoming Task Table Context Menu Options are explained in the table below.
My Upcoming Tasks Table Context Menu Option Explanations | |||||||||||||||||||||||||
Option | Explanation | ||||||||||||||||||||||||
Complete Task | Selecting “Complete Task” on the context menu opens the Complete Task Modal, allowing a user to record necessary details and mark the task as complete. How To: Log a Task has been CompletedIn order to log that a task has been completed and is current/up to date (a green task status), go to the Upcoming Task Table on the Home Page of the Assets Module. Select the “Complete Task” button from the top of the Your Upcoming Tasks Page.
The Choose Asset Modal will prompt you to identify which asset you want to log data for. Click the bulleted list icon to access your assets. Selecting the plus sign “+” icon will expand the components under the asset. Selecting “Complete Task” from the three dot (…) context menu to the right of the asset / component title will open the same modal for the specified asset.
Select the appropriate asset, opening the asset's Complete Task Modal. Click the green View All clickable link to list all tasks associated with the selected asset, including tasks that are current / up to date (green status).
Serial numbers and the asset description will show at the top of the modal. Clicking the “Show Subcomponents” checkbox shows any subcomponent tasks associated with the asset, expanding the modal when selected. Beneath the task in bold is a note that indicates the parameters for the task, referred to as a trigger in KAStrack. Triggers refer to the task behavior, frequency or usage standards that KAStrack will applies to tasks to determine their schedule for completion. To log the task, select the checkbox of the completed task. You can manually enter the date (MM/DD/YYYY format) and time (hh:mm:ss format) that the task was completed, or select “Now” in order to input the current date and time. Click the “Complete Task” button to save the changes and complete the task. Click cancel to return to the Assets Module Homepage. | ||||||||||||||||||||||||
Record Fault | Selecting “Record Fault” on the context menu opens the Record Fault Modal, allowing a user to record any necessary details about a fault. How To: Record a FaultLogging faults allows your company to track trending data in KAStrack by recording incidents and any data associated with this issue/failure. In order to record fault with an equipment issue/failure, go to the Upcoming Task Table on the Asset Module Homepage and select the "Record Fault" button beneath the page header.
The Choose Asset Modal will prompt you to identify which asset you want to log data for. Click the bulleted list icon to access your assets. Selecting the plus sign “+” icon will expand the components within the Asset. Selecting “Record Fault” from the three dot (…) context menu will open the same modal for the specified asset.
Select the appropriate asset, opening the Record Fault Modal.
Select the “Log Fault” button to record the incident. Select the “Log Fault and Resolve” button to complete two actions in one step: log the issue and indicate that it has been addressed. Click cancel to return to the Assets Module Homepage. | ||||||||||||||||||||||||
Update Meter Reading | Selecting “Update Meter Reading” on the context menu opens the Update Meter Reading Modal, allowing a user to record details regarding a meter reading. How To: Update a Meter ReadingIn order to update an asset's meter reading, go to the Assets Module Home Page opening the Upcoming Tasks Table. Click the “Update Meter Reading" button from the Asset Module Homepage.
The Choose Asset Modal will prompt you to identify which asset you want to log data for. Click the bulleted list icon to access your assets. Selecting the plus sign “+” icon will expand the components within the Asset. Selecting “Update Meter Reading” from the Upcoming Task Table Context Menu will open the same modal for the specified asset.
Select the appropriate asset, opening the Update Meter Reading Modal.
The meters associated with the asset/component selected show in a dropdown menu. Select the meter whose meter data you wish to record. The most recent meter reading shows in the Update Meter Reading Modal as the “Last Entered Reading.” KAStrack automatically inputs the current date and time. The user can enter an elapsed value (if preferred) and KAStrack will input the new actual, or the user can input the new meter reading and the elapsed value will be automatically input. Attach any files (if there are checklists, forms, etc.) associated with the meter reading. Select the “Log Reading” button to update the meter usage. Click cancel to return to the Assets Module Homepage. | ||||||||||||||||||||||||
View | Selecting “View” from the context menu opens an Asset Summary Modal with a summary of the asset/component information. The read-only modal displays details, any associated meters, sub-components, assignments, and tasks associated with an asset. How To: View an Asset's Summary ModalTo view an asset's summary modal that lists all relevant information regarding an asset, go to the My Assets Page under the Assets Module on the Main Menu. Use filters as needs to pull up the asset you wish to view. Click the three-dot icon to the right of the asset/component title opening the context menu and select "View".
This opens the Asset Summary Modal. The read-only modal shows the asset details, meters associated with the asset, lists the components of the asset, the users assigned to the asset, and any tasks on the asset's task schedule.
Click the close button to return to the My Assets Page. | ||||||||||||||||||||||||
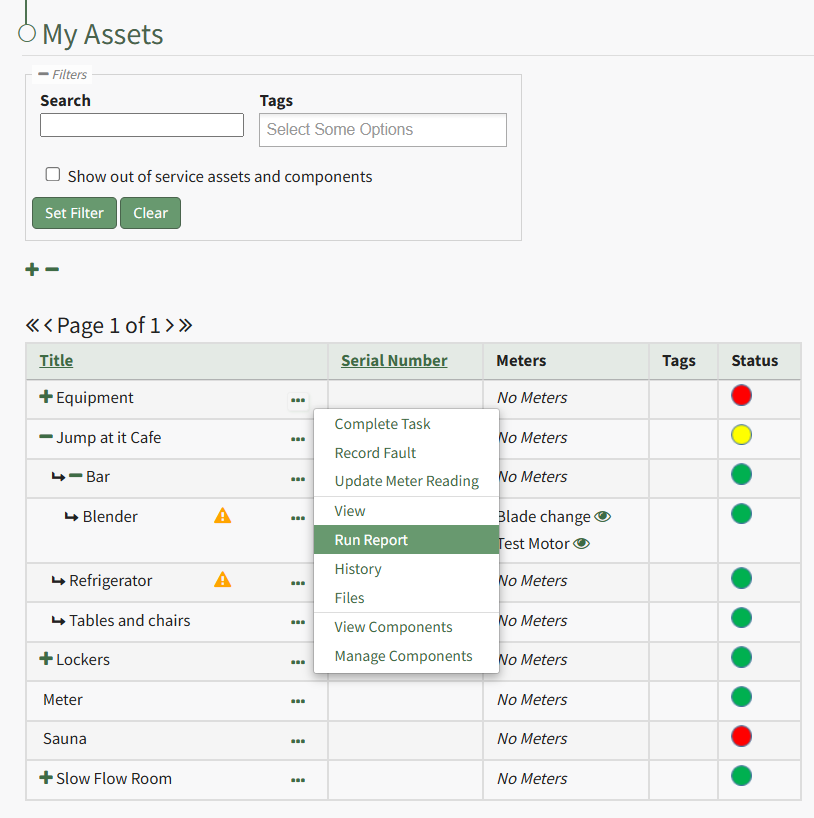
Run Report | Selecting “Run Report” from the context menu open the Assets Report Modal, allowing the user to select between five customizable Asset Reports. How To: Run an Asset ReportTo run an asset report, open the My Asset Page in the Assets Module on the Main Menu. Use filters as needed and identify the asset/component you want to run a report on. Click the three-dot icon to the right of the asset title opening a context menu.
Select "Run Report" from the context menu opening the Assets Report Modal with options for running various types of reports.
Reports can be run for an asset in its entirety, specific components or subcomponents. They type of report can be selected from a dropdown menu on the Assets Report Modal. An explanation of report types is included in the table below.
Select the "Create Report" button after completing the inputs on the Assets Report Modal and the system will generate your report in the viewing preference you selected. | ||||||||||||||||||||||||
History | Selecting “History” from the context menu opens the Asset History Page with historical entries for the components/sub-components that were selected. The Asset History Page contains four historical logs - tasks completed, tasks deferred, as well meter and fault logs. How To: View an Asset's Historical LogsAn asset's historical data can be accessed from an asset's History Page. To access an asset's history, go to the My Assets Page in the Assets Module on the Main Menu. Use the filters as needed to identify the access whose history you wish to view, and click the three-dot icon to the right of the asset name. This opens a context menu.
Select "History" from the context menu opening the Asset History Page. | ||||||||||||||||||||||||
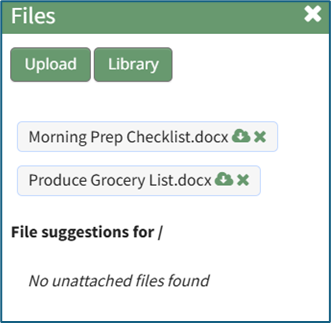
Files | Selecting “Files” from the context menu will open the Files Modal and display any files attached to the asset or component. Only users with appropriate permissions will be able to access files associated with an asset or task. How To: View a File Attached to a TaskTo view a file associated with a specific task, open the Task Schedule Page for the asset of interest. How To: View an Asset's Task ScheduleAn asset's historical data can be accessed from an asset's History Page. To access an asset's history, go to the My Assets Page in the Assets Module on the Main Menu. Use the filters as needed to identify the access whose history you wish to view, and click the three-dot icon to the right of the asset name. This opens a context menu.
Select "History" from the context menu opening the Asset History Page.
Click the three dot (…) icon next to the right of title whose files you wish to view on the Task Schedule Table opening the context menu. Select “Task Files” opening the Files modal.
Any files associated with the task are shown on the Files modal. | ||||||||||||||||||||||||
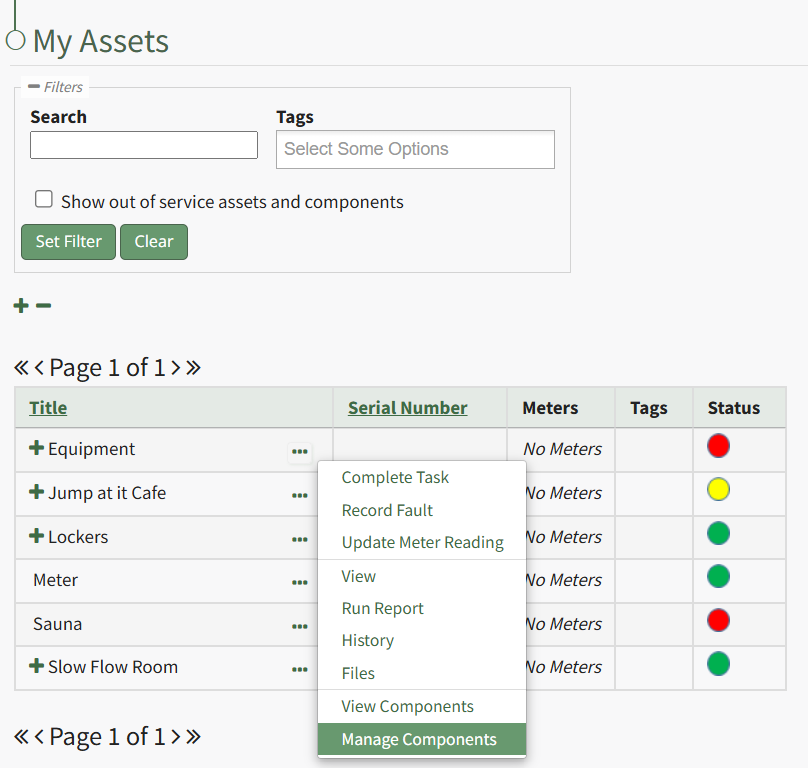
Manage Components | Selecting “Manage Components” from the context menu will open the Manage Asset Components Page where assets and their components can be managed. Only users with appropriate permissions will have access to this page. | ||||||||||||||||||||||||
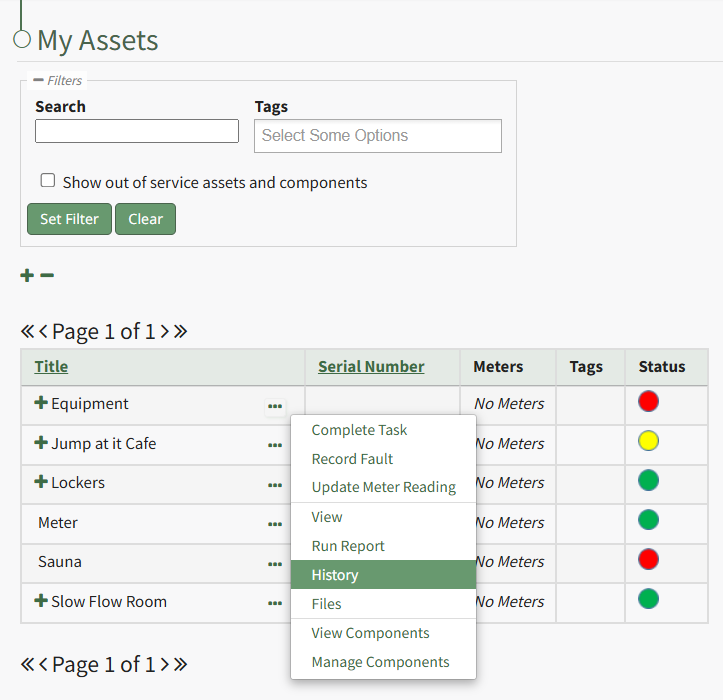
My Assets Page
The My Assets Page in the Assets Module displays all assets and all sub-components that are assigned to the user in tabular format (whereas the Homepage only shows a user’s upcoming tasks). The My Assets Table displays a summary of the asset that includes the title, serial number, meters, tags, and task status. Specific color icons indicate task status in the status column.
Clicking the blue question icon in the right-hand corner opens the Assets Module Status Legend.
The yellow hazard icon that is displayed to the right of an asset/component title indicates that the asset has a critical item designation. This is a subjective designation in KAStrack to be used at the discretion of your company. Critical items are prioritized on shown first on the Asset Module Summary Widget visible on the Dashboard.
A user can search for assets/components via the filter box at the top of the screen. Users can search by asset title or tags.
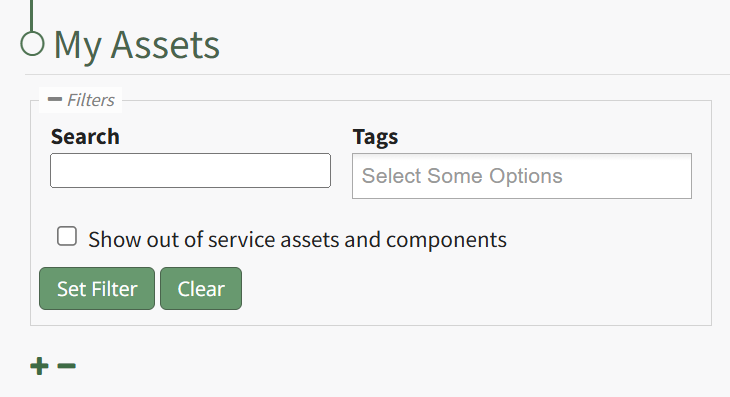
The “Show out of service assets” checkbox in the filter box includes out of service assets and components in a search.
My Assets Page Icon Explanation Table | |
Icon | Associated Action |
| Selecting the plus sign icon expands the view of the Upcoming Task Table, showing tasks organized by sub-components and not just the parent asset. |
| Selecting the minus sign icon collapses the View of the Upcoming Task Table, grouping all sub-component tasks together and listing them under the parent asset. |
| When the eyeball icon is visible, it indicates that there is a meter associated with the asset/component. Selecting the eyeball icon opens a View Meter Modal that states any tasks associated with the meter. |
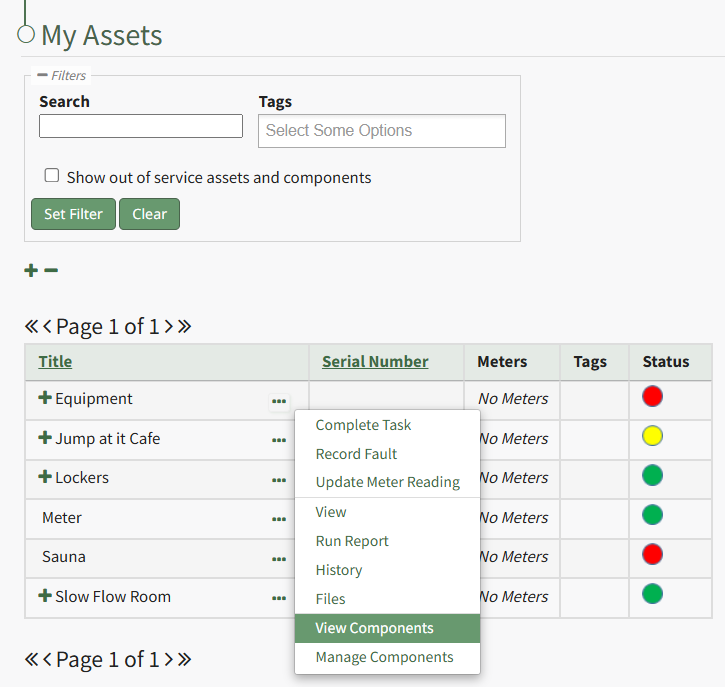
To the right of an asset or sub-component title in the My Assets table is a three-dot icon that opens to the My Assets Context Menu that when clicked, displayed options available for asset management.
My Assets Context Menu Option Explanations | |||||||||||||||||||||||||
Option | Explanation | ||||||||||||||||||||||||
Complete Task | Selecting “Complete Task” on the context menu opens the Complete Task Modal, allowing a user to record necessary details and mark the task as complete. How To: Log a Task has been CompletedIn order to log that a task has been completed and is current/up to date (a green task status), go to the Upcoming Task Table on the Home Page of the Assets Module. Select the “Complete Task” button from the top of the Your Upcoming Tasks Page.
The Choose Asset Modal will prompt you to identify which asset you want to log data for. Click the bulleted list icon to access your assets. Selecting the plus sign “+” icon will expand the components under the asset. Selecting “Complete Task” from the three dot (…) context menu to the right of the asset / component title will open the same modal for the specified asset.
Select the appropriate asset, opening the asset's Complete Task Modal. Click the green View All clickable link to list all tasks associated with the selected asset, including tasks that are current / up to date (green status).
Serial numbers and the asset description will show at the top of the modal. Clicking the “Show Subcomponents” checkbox shows any subcomponent tasks associated with the asset, expanding the modal when selected. Beneath the task in bold is a note that indicates the parameters for the task, referred to as a trigger in KAStrack. Triggers refer to the task behavior, frequency or usage standards that KAStrack will applies to tasks to determine their schedule for completion. To log the task, select the checkbox of the completed task. You can manually enter the date (MM/DD/YYYY format) and time (hh:mm:ss format) that the task was completed, or select “Now” in order to input the current date and time. Click the “Complete Task” button to save the changes and complete the task. Click cancel to return to the Assets Module Homepage. | ||||||||||||||||||||||||
Record Fault | Selecting “Record Fault” on the context menu opens the Record Fault Modal, allowing a user to record any necessary details about a fault. How To: Record a FaultLogging faults allows your company to track trending data in KAStrack by recording incidents and any data associated with this issue/failure. In order to record fault with an equipment issue/failure, go to the Upcoming Task Table on the Asset Module Homepage and select the "Record Fault" button beneath the page header.
The Choose Asset Modal will prompt you to identify which asset you want to log data for. Click the bulleted list icon to access your assets. Selecting the plus sign “+” icon will expand the components within the Asset. Selecting “Record Fault” from the three dot (…) context menu will open the same modal for the specified asset.
Select the appropriate asset, opening the Record Fault Modal.
Select the “Log Fault” button to record the incident. Select the “Log Fault and Resolve” button to complete two actions in one step: log the issue and indicate that it has been addressed. Click cancel to return to the Assets Module Homepage. | ||||||||||||||||||||||||
Update Meter Reading | Selecting “Update Meter Reading” on the context menu opens the Update Meter Reading Modal, allowing a user to record details regarding a meter reading. How To: Update a Meter ReadingIn order to update an asset's meter reading, go to the Assets Module Home Page opening the Upcoming Tasks Table. Click the “Update Meter Reading" button from the Asset Module Homepage.
The Choose Asset Modal will prompt you to identify which asset you want to log data for. Click the bulleted list icon to access your assets. Selecting the plus sign “+” icon will expand the components within the Asset. Selecting “Update Meter Reading” from the Upcoming Task Table Context Menu will open the same modal for the specified asset.
Select the appropriate asset, opening the Update Meter Reading Modal.
The meters associated with the asset/component selected show in a dropdown menu. Select the meter whose meter data you wish to record. The most recent meter reading shows in the Update Meter Reading Modal as the “Last Entered Reading.” KAStrack automatically inputs the current date and time. The user can enter an elapsed value (if preferred) and KAStrack will input the new actual, or the user can input the new meter reading and the elapsed value will be automatically input. Attach any files (if there are checklists, forms, etc.) associated with the meter reading. Select the “Log Reading” button to update the meter usage. Click cancel to return to the Assets Module Homepage. | ||||||||||||||||||||||||
View | Selecting “View” from the context menu opens an Asset Summary Modal with a summary of the asset/component information. The read-only modal displays details, any associated meters, sub-components, assignments, and tasks associated with an asset. How To: View an Asset's Summary ModalTo view an asset's summary modal that lists all relevant information regarding an asset, go to the My Assets Page under the Assets Module on the Main Menu. Use filters as needs to pull up the asset you wish to view. Click the three-dot icon to the right of the asset/component title opening the context menu and select "View".
This opens the Asset Summary Modal. The read-only modal shows the asset details, meters associated with the asset, lists the components of the asset, the users assigned to the asset, and any tasks on the asset's task schedule.
Click the close button to return to the My Assets Page. | ||||||||||||||||||||||||
Run Report | Selecting “Run Report” from the context menu open the Assets Report Modal, allowing the user to select between five customizable Asset Reports. How To: Run an Asset ReportTo run an asset report, open the My Asset Page in the Assets Module on the Main Menu. Use filters as needed and identify the asset/component you want to run a report on. Click the three-dot icon to the right of the asset title opening a context menu.
Select "Run Report" from the context menu opening the Assets Report Modal with options for running various types of reports.
Reports can be run for an asset in its entirety, specific components or subcomponents. They type of report can be selected from a dropdown menu on the Assets Report Modal. An explanation of report types is included in the table below.
Select the "Create Report" button after completing the inputs on the Assets Report Modal and the system will generate your report in the viewing preference you selected. | ||||||||||||||||||||||||
History | Selecting “History” from the context menu opens the Asset History Page with historical entries for the components/sub-components that were selected. The Asset History Page contains four historical logs - tasks completed, tasks deferred, as well meter and fault logs. How To: View an Asset's Historical LogsAn asset's historical data can be accessed from an asset's History Page. To access an asset's history, go to the My Assets Page in the Assets Module on the Main Menu. Use the filters as needed to identify the access whose history you wish to view, and click the three-dot icon to the right of the asset name. This opens a context menu.
Select "History" from the context menu opening the Asset History Page. | ||||||||||||||||||||||||
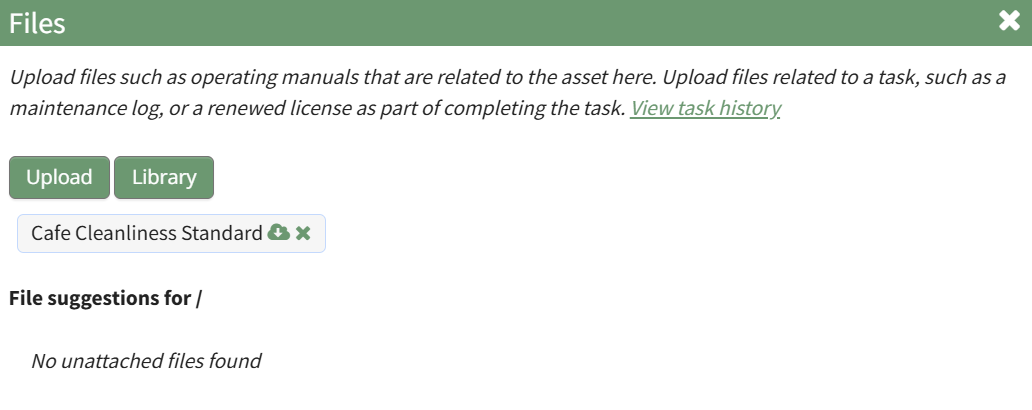
Files | Selecting “Files” from the context menu will open the Files Modal and display any files attached to the asset or component. Only users with appropriate permissions will be able to access files associated with an asset or task. How To: View Files Associated with an Asset/ComponentTo view the files associated with an asset and its components, open the Manage Assets Page in the Assets Module on the Main Menu. Use filters as needed and identify the asset/component whose files you wish to view. Click the three-dot icon to the right of the asset title opening the Asset Management Context Menu.
Select "Files" from the context menu opening the Asset Files Modal.
Upload files such as operating manuals that are related to the asset here. Upload files related to a task, such as a maintenance log, or a renewed license as part of completing the task. You are now able to view all files associated with the asset. | ||||||||||||||||||||||||
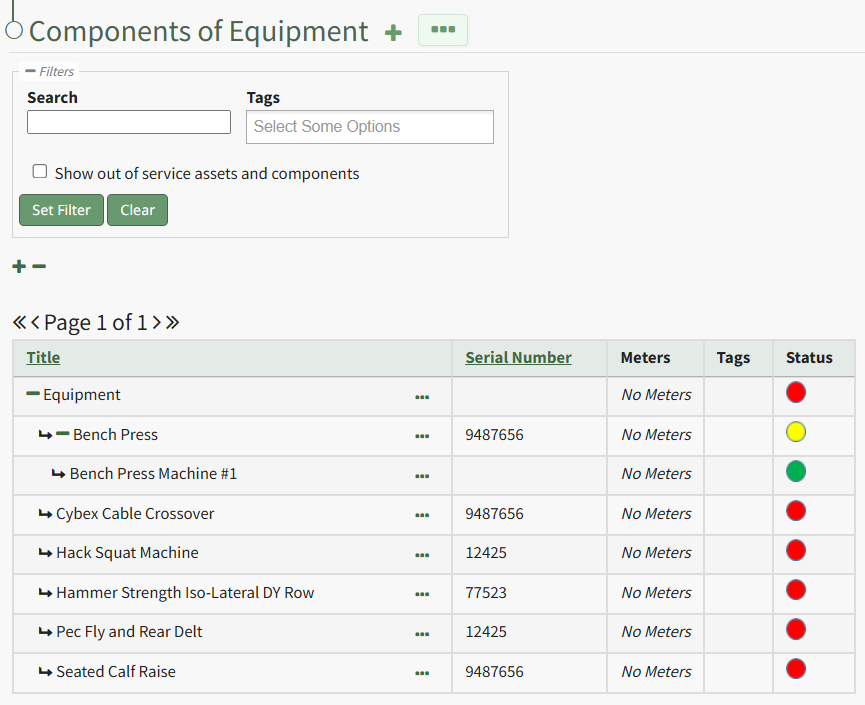
View Components | Selecting "View Components" from the context menu will open the Asset Components Page. The context menu options for the Asset Components Page are limited in comparison to the Manage Asset Components Page but enables appropriate access to information for various module levels. How To: View an Asset's ComponentsTo view any components associated with a parent asset, go to the My Assets Page in the Assets Module on the Main Menu. Use the filters as needed to identify the assets whose components you wish to view. Click the three-dot icon to the right of the asset's title opening a context menu.
Select "View Components" from the context menu opening the Asset Component Page.
An expanded view of all asset components will now be visible in the Asset Component Table. | ||||||||||||||||||||||||
Manage Components | Selecting “Manage Components” from the context menu will open the Manage Asset Components Page where assets and their components can be managed. Only users with appropriate permissions will have access to this page. | ||||||||||||||||||||||||
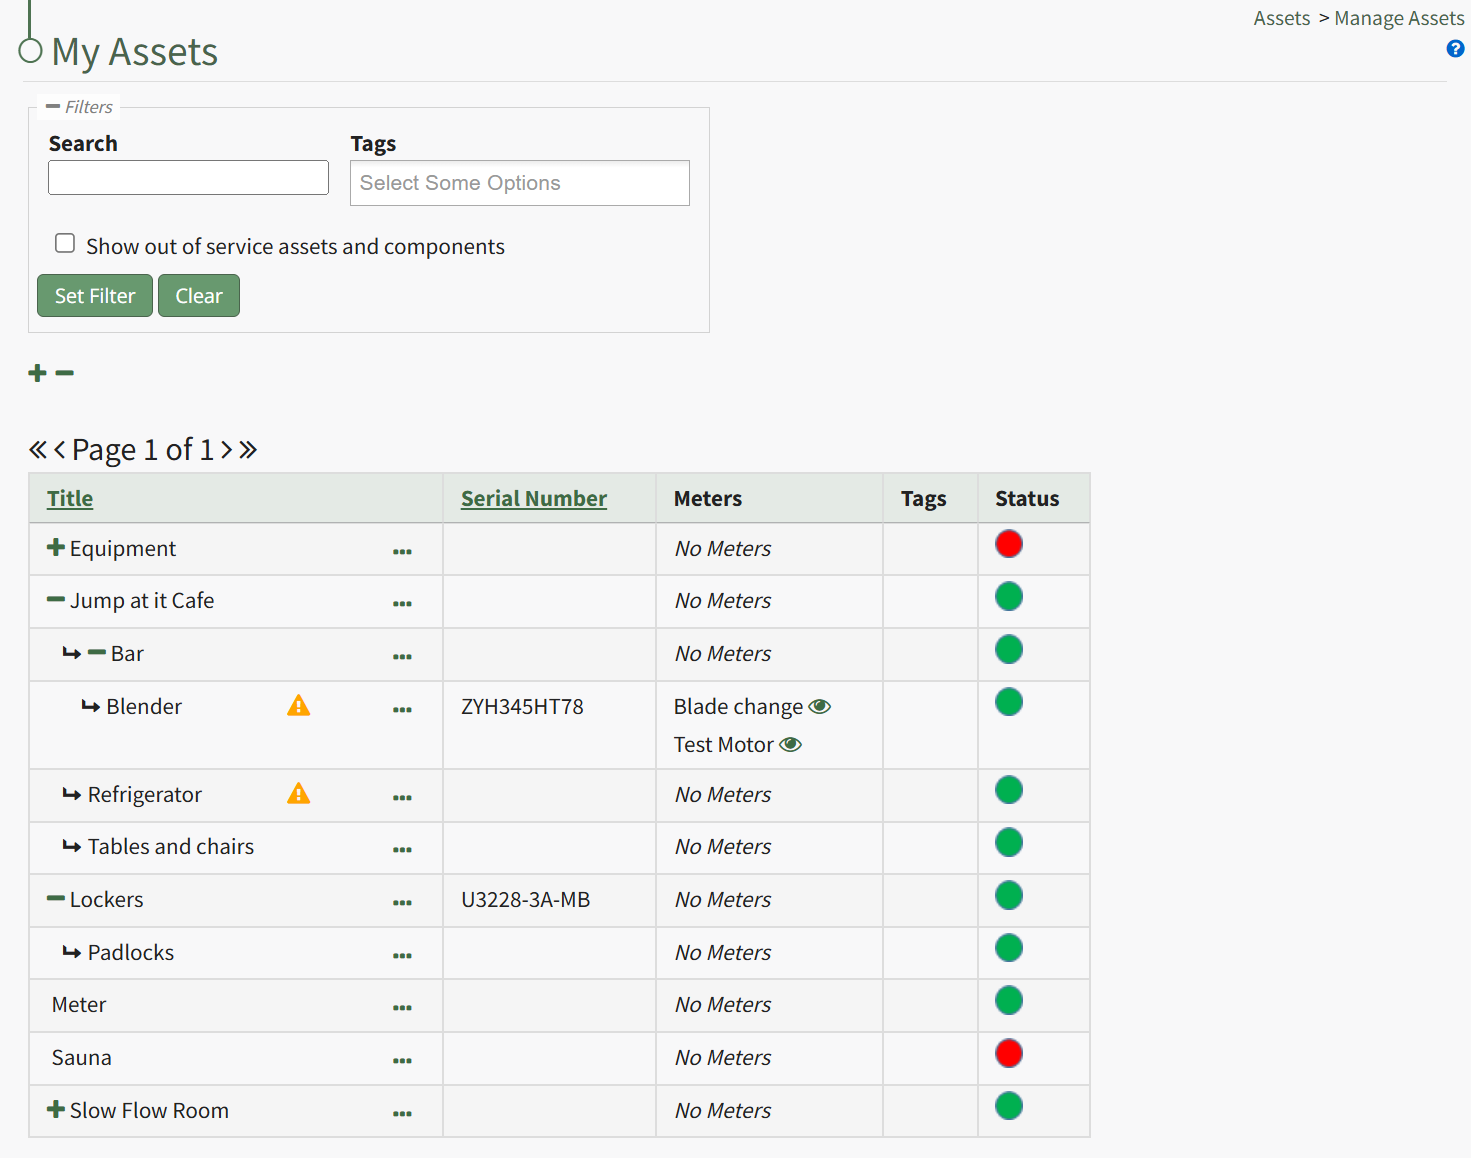
Manage Assets Page
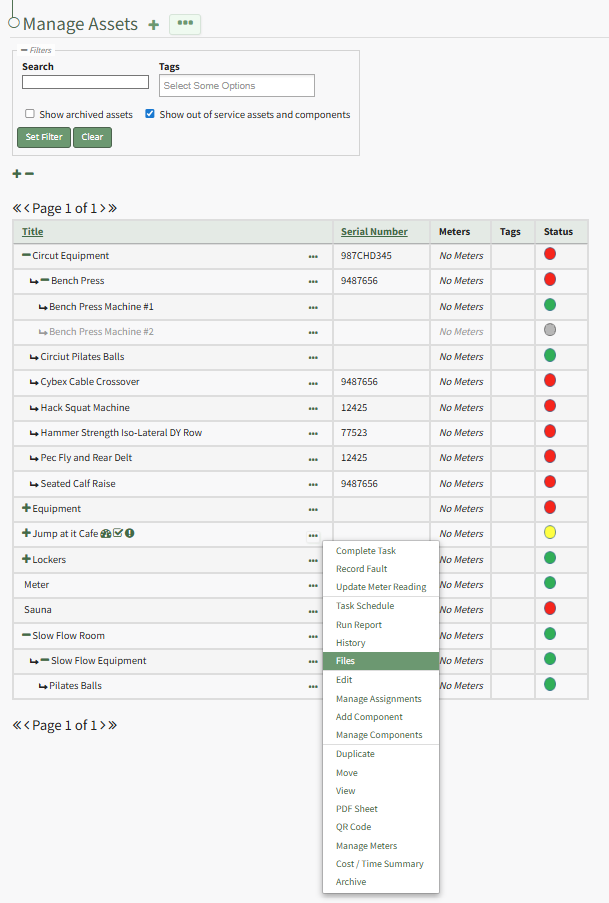
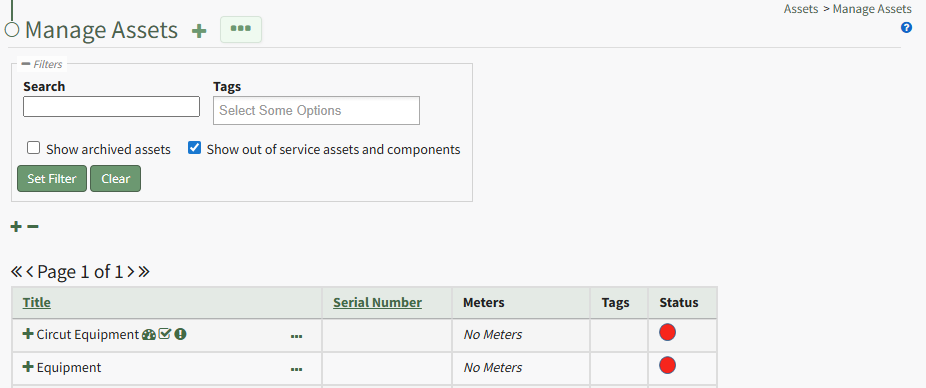
Selecting Manage Assets in the Assets Module from the Main Menu opens the Manage Assets Page. The Manage Assets Page in the Assets Module is where assets, components, and task schedules can be created and managed.
The visibility of this page is determined by a user's access level. By default, only individuals with Admin Module Level permissions for the Assets Module will have the ability to manage all assets.
The Manage Assets Table includes all the assets that have been created in your organization and displays the asset/component title, serial number, associated meters, tags, and the asset status. A filter box gives the ability to search by title or tag for active assets. Checkboxes allow for the inclusion of archived or out of service assets/components.
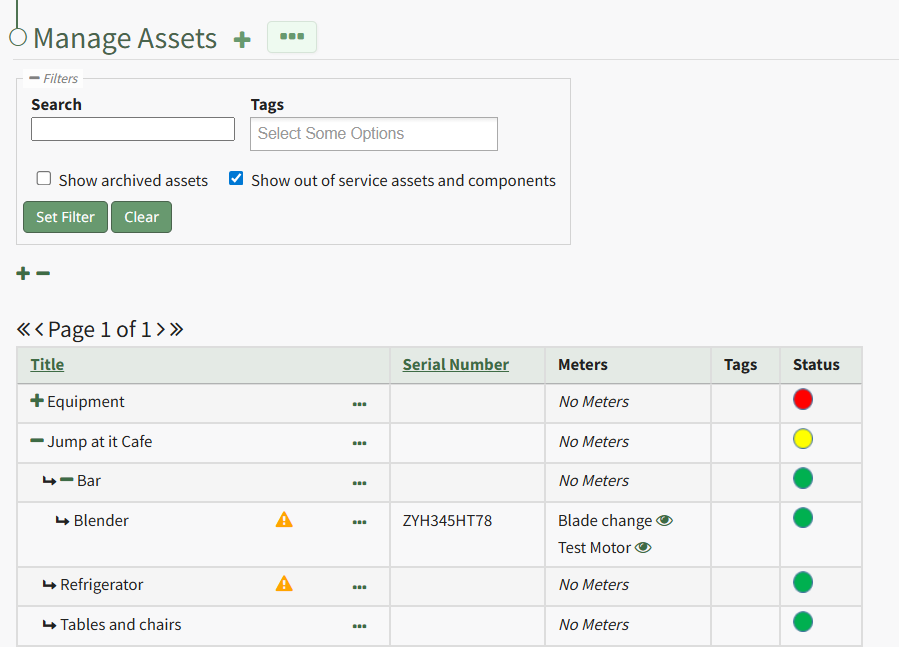
Clicking the plus sign icon to the right of the Manage Assets header will open the New Asset Modal, used in the creation of new assets.
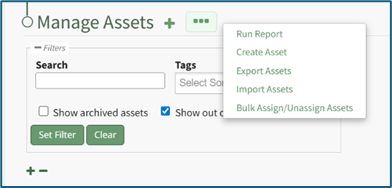
The three-dot icon to the right of the Manage Assets Page header opens the Manage Assets context menu with options for asset management. The Manage Assets Page Context Menu options are explained in the table below.
Manage Assets Page Context Menu Option Explanations | |||||||||||||||||||||||||||||||||||||||
Option | Explanation | ||||||||||||||||||||||||||||||||||||||
Run Report | Selecting “Run Report” from the context menu open the Assets Report Modal, allowing the user to select between five customizable Asset Reports. Reports can be run for an asset in its entirety, or for specific components. Reports can be viewed as a KAStrack Report, PDF, or Excel document. How To: Run an Asset ReportTo run an asset report, open the My Asset Page in the Assets Module on the Main Menu. Use filters as needed and identify the asset/component you want to run a report on. Click the three-dot icon to the right of the asset title opening a context menu.
Select "Run Report" from the context menu opening the Assets Report Modal with options for running various types of reports.
Reports can be run for an asset in its entirety, specific components or subcomponents. They type of report can be selected from a dropdown menu on the Assets Report Modal. An explanation of report types is included in the table below.
Select the "Create Report" button after completing the inputs on the Assets Report Modal and the system will generate your report in the viewing preference you selected. | ||||||||||||||||||||||||||||||||||||||
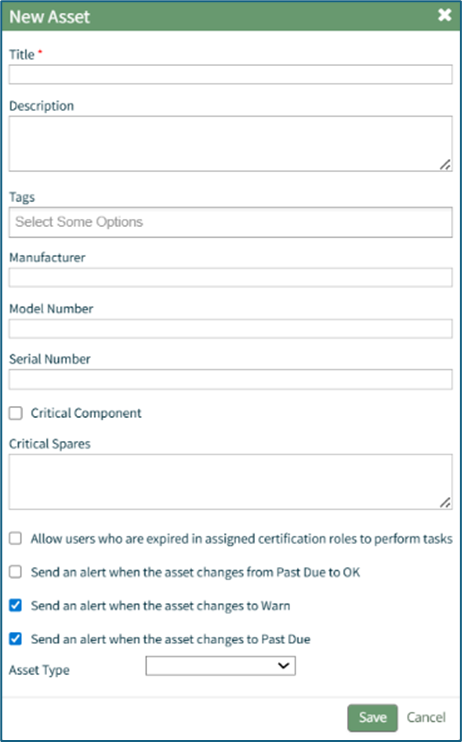
Create Asset | Selecting "Create Asset" from the context menu opens the New Asset Modal which is used in the creation of a new asset. How To: Create a New AssetTo create a new asset, open the Manage Assets Page in the Asset Module and click the plus sign (+) icon to open the New Asset modal.
You can also access the New Asset Modal by clicking the three dot (…) icon and selecting “Create Asset” from the context menu.
The New Asset Modal requires the entry of an Asset Title. Optional fields include an asset description, tags, manufacturer, model number, serial number, and critical spares. Select the "Critical Component" checkbox to designate this asset as a critical component. This term is subjective for your organization to define. Designating an asset as a critical component will result in a hazard symbol being used as a visual indicator.
Critical items are prioritized and show separately on the Assets Module Summary. An entire asset is designated as a critical. All components and associated tasks will also have a critical component designation. KAStrack’s default setting prevents users with an expired certification role from performing tasks (such as completing tasks, recording faults, and updating meter readings. Select the “Allow users who are expired in assigned certification roles to perform tasks” checkbox to allow a user to perform tasks regardless of their assigned certification role status. The remaining three checkbox options all relate to asset status alert preferences. The “Send an alert when the asset changes from Past Due to OK” checkbox will send an alert via email to the assigned users when the task status changes from past due (red) to current/up to date (green). The “Send an alert when the asset changes to Warn” checkbox will send an alert via email to all users assigned to the asset when the task status changes from current/up to date (green) to warn (yellow). The “Send an alert when the asset changes to Past Due” checkbox will send an alert via email to all users assigned to the asset when the task status changes to past due (red). Asset Types are customizable to your company and are created on the Settings Page of the Asset Module. Once an asset type has been created, you can select one from the dropdown menu in the New Asset Modal to enable additional filtering capabilities. Asset Types allows your organization to add customizable fields unique to individual assets. How To: Create a New Asset TypeTo create a new asset type, open the Asset Types Tab on the Settings Page of the Assets Module.
Selecting the “Add Asset Type” button opens the New Asset Type modal.
Input the title of the New Asset Type and click “Save”. The newly created Asset Type will now show in the table on the Asset Type tab on the Settings page and is ready for you to add fields to. How To: Add Fields to an Asset TypeIn order to include unique, customized additional information regarding an Asset, you must first create an asset type and then add fields to it. This allows your organization to specify whatever information they choose to regarding their assets. How To: Create a New Asset Type{{@470}} To add additional fields to an asset type, go to the Asset Types Tab on the Settings Page of the Assets Module. Click the three-dot icon to the right of the Asset Type title to open the Asset Type Context Menu.
Select "Fields" from the context menu opening the Asset Type Fields Page.
Click the "Add Field" button opening the New Field Modal.
Input a label for the field and select the field type from a dropdown menu. Options include: text field, number, password field, text box, date field, and checkbox. Validation uses standard JavaScript RegExp constructor for validating Field input values entered by end-users. Entering a RegExp validation string will check against the input value. Include a description of the field of validation (optional). Select “Save” and a popup confirms that the asset has been saved. The new field now shows on the Asset Type Field Page. Select the “Save” button at the bottom of the New Asset Modal to create the new asset or click “Cancel” to close the modal without saving and return to the Manage Assets Page. After an asset is created, it will appear in the Manage Asset Table where it can be managed. | ||||||||||||||||||||||||||||||||||||||
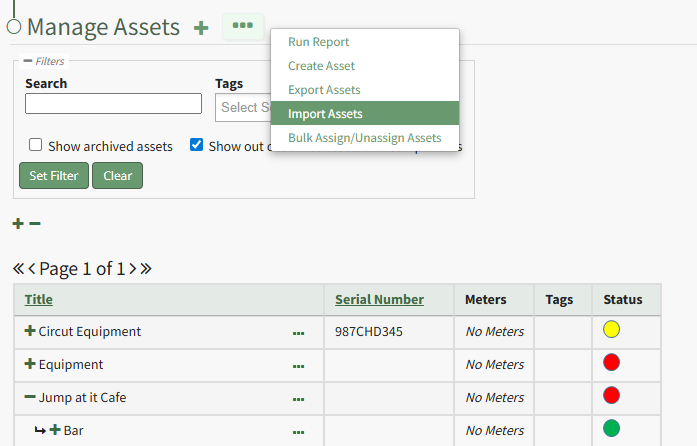
Export Assets | Selecting “Export Assets” on the context menu allows the user to export all asset data to a .CSV file. All assets can be exported, or individual assets/components can be selected. How To: Export Asset InformationTo bulk import asset information using a CSV file, open the Manage Assets Page from the Main Menu in the Assets Module and click the three dot (…) icon to the right of the page header to open the Manage Assets Page Context Menu.
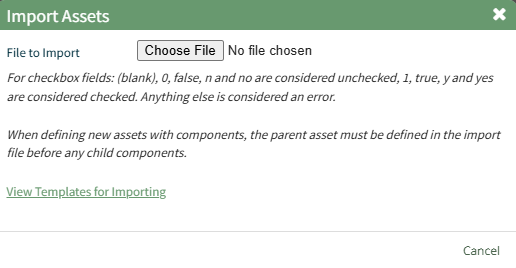
Click “Import Assets” from the context menu to open the Import Assets Modal
A template for importing assets in bulk has been provided and can be downloaded to your personal device by clicking “View Templates for Importing.” Each of the columns in the downloaded CSV are specific to the asset type and are listed in the order as they are defined.
When your CSV file with new account information is complete, ensure it is saved with the CSV format UTF-8. Click “Choose File” and select the correct CSV file from your computer. Click the “Next >” button opening the Import Assets Page.
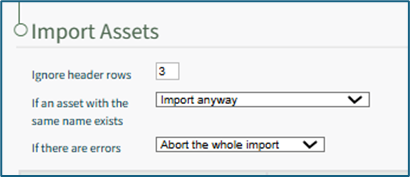
Input the number of header rows in your file that are to be ignored by KAStrack in the import. Specify your preference on how the system should respond if an asset with the same name already exists from a dropdown menu. Options include Import anyway, Import if the duplicate is elsewhere, Do not import the asset, and Abort the whole import. Specify your preference on how the system should respond if if there are errors with the import from a dropdown menu. Options include Abort the whole import or Import rows without headers. If you downloaded a CSV template, the columns labels should already match the system requirements. If you created your own CSV headers, select the correct column header to be associated with each asset field.
To abandon the import, select the “Cancel” button at the bottom of the screen. To complete the import, select the “Import” button at the bottom of the screen. The system will confirm the import was successful. | ||||||||||||||||||||||||||||||||||||||
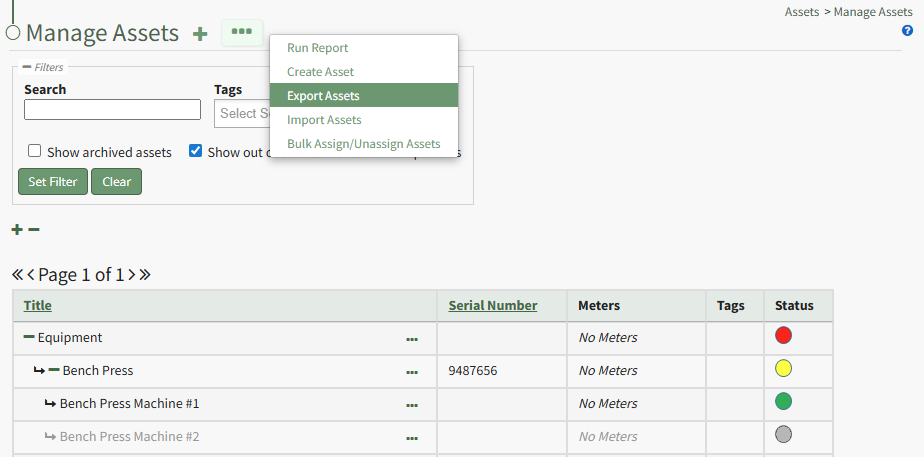
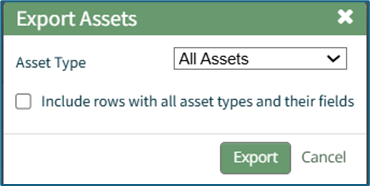
Import Assets | Selecting “Import Assets” from the context menu opens the Import Assets Modal, which allows asset details to be imported into KAStrack for efficiency. A template has been provided for ease in uploading data. Import Asset InformationTo bulk export asset information as a .csv file, select the Manage Assets Page from the Main Menu in the Assets Module and click the three dot (…) icon to the right of the page header opening the Manage Assets Page Context Menu.
Select “Export Assets” from the context menu to open the Export Assets Modal.
The Asset Type dropdown menu offers the option to export “All Assets,” “No Asset Type,” or individual asset types. Asset types and unique fields created for specific asset types can be included in the export by selecting the “Include rows with all asset types and their fields” checkbox. Select the “Export” button to export asset information as a CSV file to your personal device’s downloads folder. | ||||||||||||||||||||||||||||||||||||||
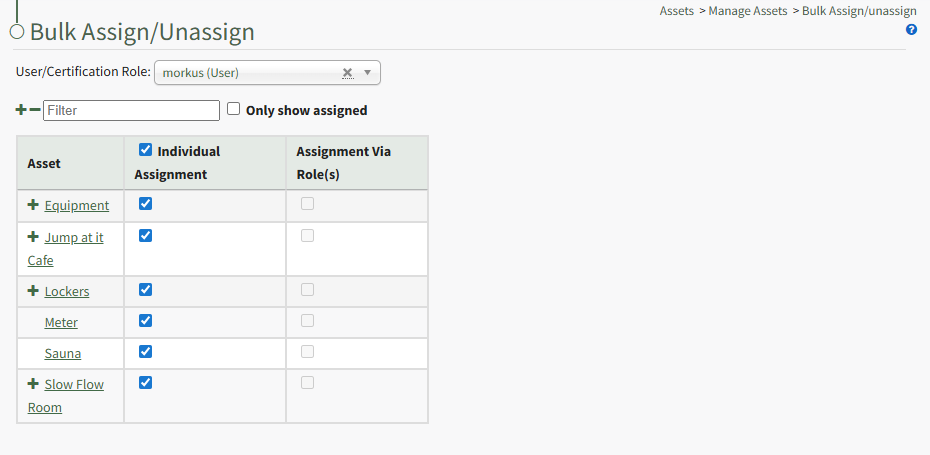
Bulk Assign / Unassign Assets | Selecting “Bulk Assign/Unassign Assets” from the context menu opens the Bulk Assign/Unassign Page. This allows an account administrator to assign assets in bulk to individual users or via certification roles. How To: Bulk Assign / Unassign AssetsTo bulk assign / unassign users to assets, open the Manage Asset Page in the Assets Module on the Main Menu. Click the three-dot icon to the right of the Manage Assets Page header opening the Manage Assets Page Context Menu.
Select “Bulk Assign/Unassign Assets” from the context menu to open the Bulk Assign/Unassign Page.
From the User/Certification Role dropdown menu, select the individual user or certification role that you wish assign/unassign assets to. The Bulk Assignment Table is now visible. Selecting the plus or minus sign icon to the left of the filter box will expand/collapse the assets and their components in the table. Selecting the plus or minus sign icon to the left of the asset title in the table will expand/collapse the specified asset.
Selecting the checkbox assigns the asset to the user/certification role. Deselecting a checkbox unassigns the asset from the user/certification role. Changes are automatic on the Bulk Assign/Unassign Page and do not need to be saved to be reflected in the system. | ||||||||||||||||||||||||||||||||||||||


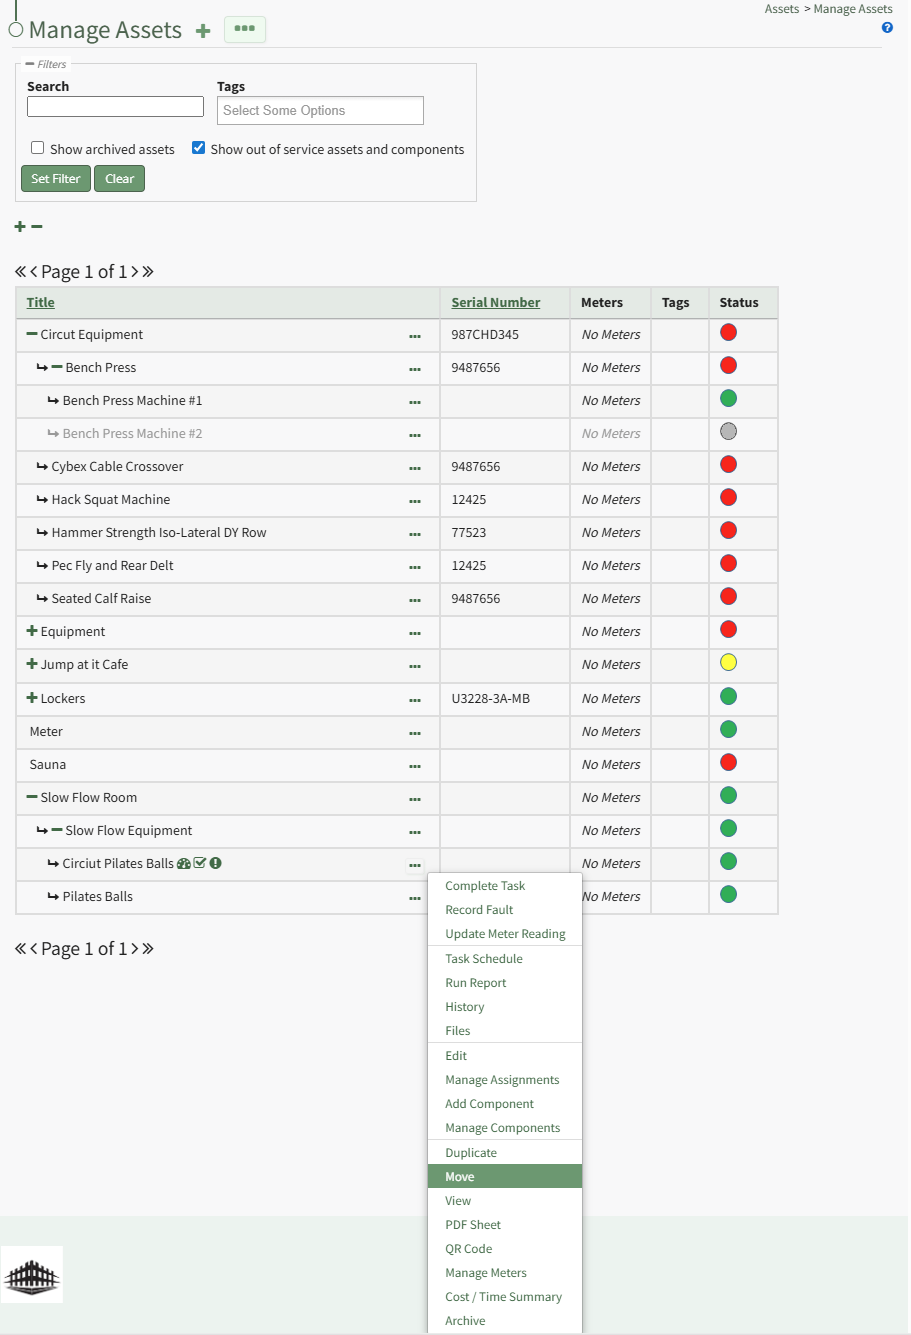
To the right of each asset/component title in the Manage Assets Table is a three-dot icon that, when clicked, opens the Asset Management Context Menu. The options on that context menu are explained in the table below.
Asset Management Context Menu Option Explanations | |||||||||||||||||||||||||
Option | Explanation | ||||||||||||||||||||||||
Complete Task | Selecting “Complete Task” on the context menu opens the Complete Task Modal, allowing a user to record necessary details and mark the task as complete. How To: Log a Task has been CompletedIn order to log that a task has been completed and is current/up to date (a green task status), go to the Upcoming Task Table on the Home Page of the Assets Module. Select the “Complete Task” button from the top of the Your Upcoming Tasks Page.
The Choose Asset Modal will prompt you to identify which asset you want to log data for. Click the bulleted list icon to access your assets. Selecting the plus sign “+” icon will expand the components under the asset. Selecting “Complete Task” from the three dot (…) context menu to the right of the asset / component title will open the same modal for the specified asset.
Select the appropriate asset, opening the asset's Complete Task Modal. Click the green View All clickable link to list all tasks associated with the selected asset, including tasks that are current / up to date (green status).
Serial numbers and the asset description will show at the top of the modal. Clicking the “Show Subcomponents” checkbox shows any subcomponent tasks associated with the asset, expanding the modal when selected. Beneath the task in bold is a note that indicates the parameters for the task, referred to as a trigger in KAStrack. Triggers refer to the task behavior, frequency or usage standards that KAStrack will applies to tasks to determine their schedule for completion. To log the task, select the checkbox of the completed task. You can manually enter the date (MM/DD/YYYY format) and time (hh:mm:ss format) that the task was completed, or select “Now” in order to input the current date and time. Click the “Complete Task” button to save the changes and complete the task. Click cancel to return to the Assets Module Homepage. | ||||||||||||||||||||||||
Record Fault | Selecting “Record Fault” on the context menu opens the Record Fault Modal, allowing a user to record any necessary details about a fault. How To: Record a FaultLogging faults allows your company to track trending data in KAStrack by recording incidents and any data associated with this issue/failure. In order to record fault with an equipment issue/failure, go to the Upcoming Task Table on the Asset Module Homepage and select the "Record Fault" button beneath the page header.
The Choose Asset Modal will prompt you to identify which asset you want to log data for. Click the bulleted list icon to access your assets. Selecting the plus sign “+” icon will expand the components within the Asset. Selecting “Record Fault” from the three dot (…) context menu will open the same modal for the specified asset.
Select the appropriate asset, opening the Record Fault Modal.
Select the “Log Fault” button to record the incident. Select the “Log Fault and Resolve” button to complete two actions in one step: log the issue and indicate that it has been addressed. Click cancel to return to the Assets Module Homepage. | ||||||||||||||||||||||||
Update Meter Reading | Selecting “Update Meter Reading” on the context menu opens the Update Meter Reading Modal, allowing a user to record details regarding a meter reading. How To: Update a Meter ReadingIn order to update an asset's meter reading, go to the Assets Module Home Page opening the Upcoming Tasks Table. Click the “Update Meter Reading" button from the Asset Module Homepage.
The Choose Asset Modal will prompt you to identify which asset you want to log data for. Click the bulleted list icon to access your assets. Selecting the plus sign “+” icon will expand the components within the Asset. Selecting “Update Meter Reading” from the Upcoming Task Table Context Menu will open the same modal for the specified asset.
Select the appropriate asset, opening the Update Meter Reading Modal.
The meters associated with the asset/component selected show in a dropdown menu. Select the meter whose meter data you wish to record. The most recent meter reading shows in the Update Meter Reading Modal as the “Last Entered Reading.” KAStrack automatically inputs the current date and time. The user can enter an elapsed value (if preferred) and KAStrack will input the new actual, or the user can input the new meter reading and the elapsed value will be automatically input. Attach any files (if there are checklists, forms, etc.) associated with the meter reading. Select the “Log Reading” button to update the meter usage. Click cancel to return to the Assets Module Homepage. | ||||||||||||||||||||||||
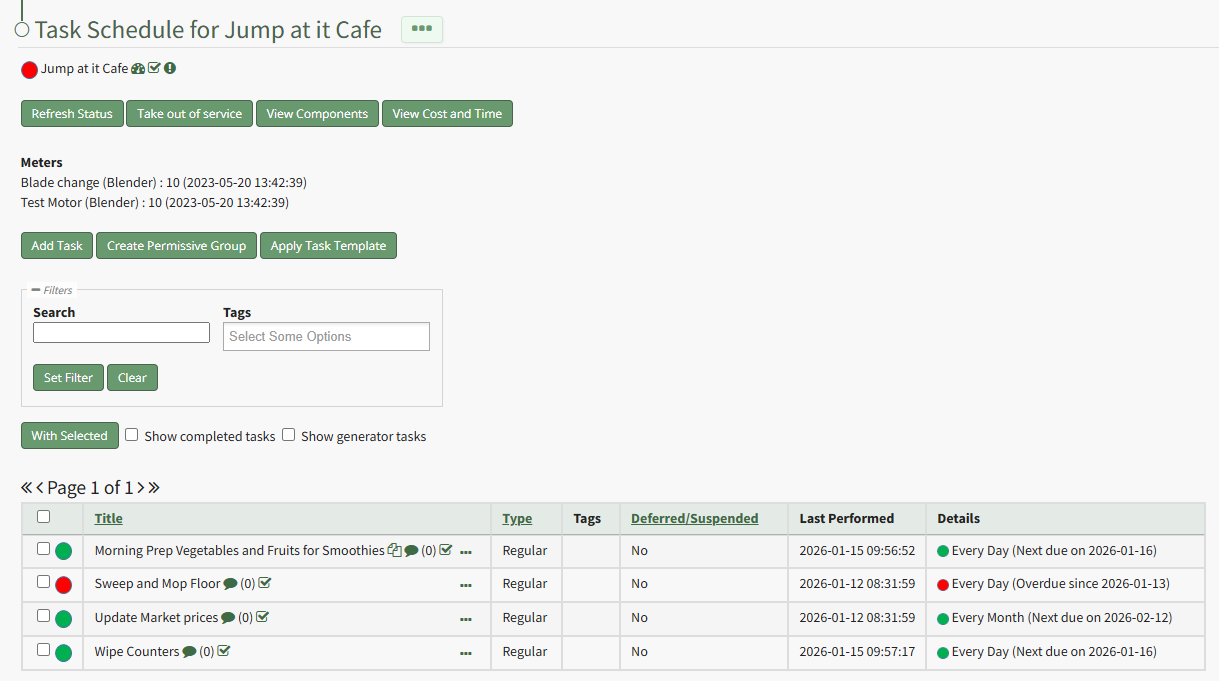
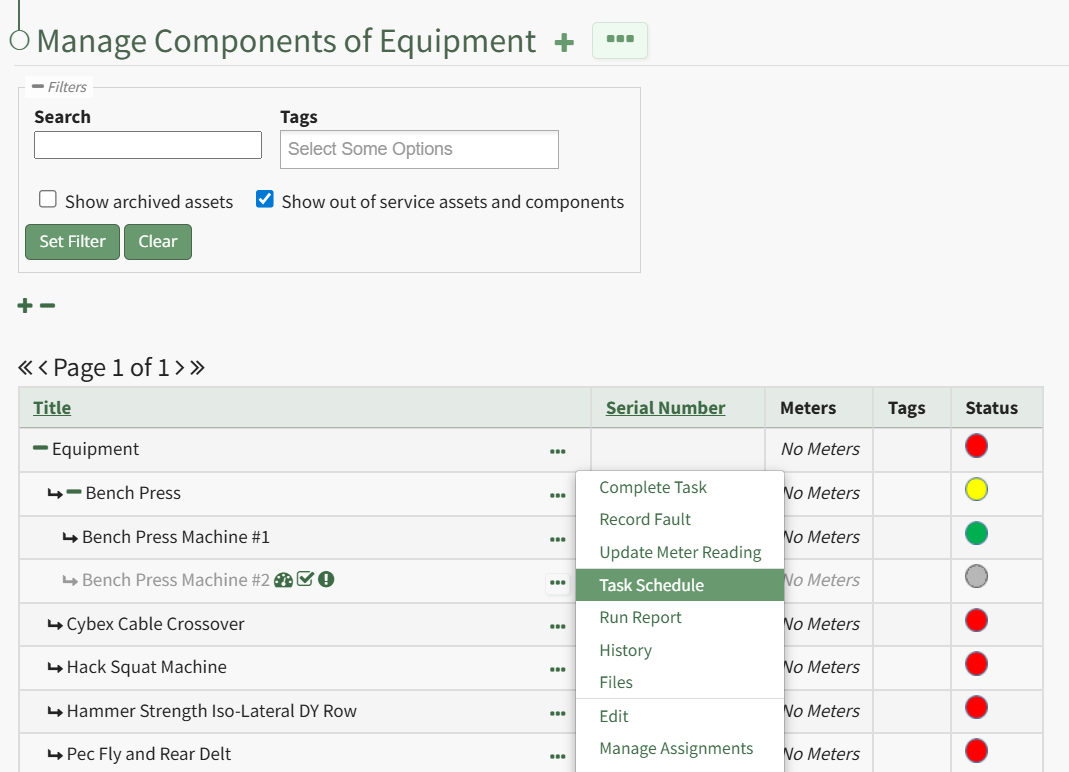
Task Schedule | Selecting "Task Schedule" on the context menu opens an asset's Task Schedule, where new tasks can be added and existing tasks can be managed. How To: View an Asset's Task ScheduleTo view an asset's task schedule, open the Manage Assets Page in the Assets Module on the Main Menu. Use filters as needed and identify the asset/component whose task schedule you wish to view. Click the three-dot icon to the right of the asset title opening the Asset Management Context Menu.
Select the "Manage Components" option, opening the Manage Asset Components Page. Select the three-dot icon to the right of the asset/component you wish to add interim notes to and select Task Schedule from the context menu.
This opens the asset's Task Schedule Page.
| ||||||||||||||||||||||||
Run Report | Selecting “Run Report” from the context menu open the Assets Report Modal, allowing the user to select between five customizable Asset Reports. How To: Run an Asset ReportTo run an asset report, open the My Asset Page in the Assets Module on the Main Menu. Use filters as needed and identify the asset/component you want to run a report on. Click the three-dot icon to the right of the asset title opening a context menu.
Select "Run Report" from the context menu opening the Assets Report Modal with options for running various types of reports.
Reports can be run for an asset in its entirety, specific components or subcomponents. They type of report can be selected from a dropdown menu on the Assets Report Modal. An explanation of report types is included in the table below.
Select the "Create Report" button after completing the inputs on the Assets Report Modal and the system will generate your report in the viewing preference you selected. | ||||||||||||||||||||||||
History | Selecting “History” from the context menu opens the Asset History Page with historical entries for the components/sub-components that were selected. The Asset History Page contains four historical logs - tasks completed, tasks deferred, as well meter and fault logs. How To: View an Asset's Historical LogsAn asset's historical data can be accessed from an asset's History Page. To access an asset's history, go to the My Assets Page in the Assets Module on the Main Menu. Use the filters as needed to identify the access whose history you wish to view, and click the three-dot icon to the right of the asset name. This opens a context menu.
Select "History" from the context menu opening the Asset History Page. | ||||||||||||||||||||||||
Files | Selecting “Files” from the context menu will open the Files Modal and display any files attached to the asset or component. Only users with appropriate permissions will be able to access files associated with an asset or task. How To: View Files Associated with an Asset/ComponentTo view the files associated with an asset and its components, open the Manage Assets Page in the Assets Module on the Main Menu. Use filters as needed and identify the asset/component whose files you wish to view. Click the three-dot icon to the right of the asset title opening the Asset Management Context Menu.
Select "Files" from the context menu opening the Asset Files Modal.
Upload files such as operating manuals that are related to the asset here. Upload files related to a task, such as a maintenance log, or a renewed license as part of completing the task. You are now able to view all files associated with the asset. | ||||||||||||||||||||||||
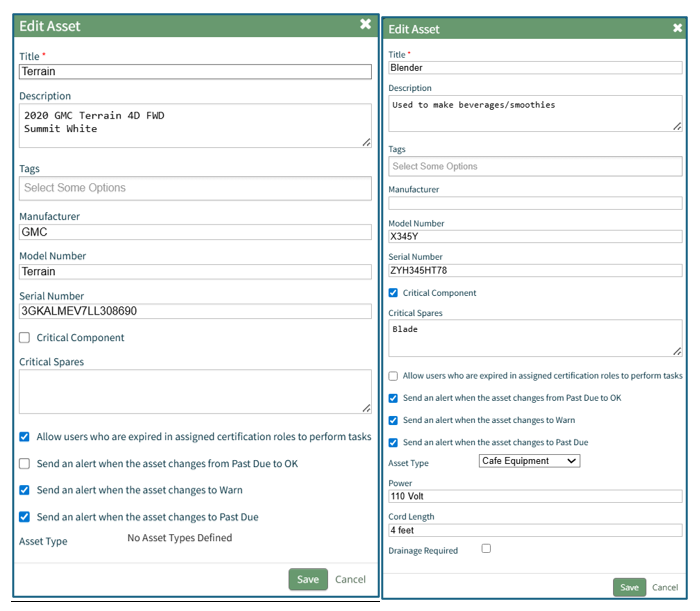
Edit | Selecting "Edit" on the context menu opens the Edit Asset Modal, which is used to alter asset details. How To: Edit an AssetTo edit an asset, open the Manage Assets Page in the Assets Module on the Main Menu. Use filters as needed and identify the asset/component whose details you want to edit. Click the three-dot icon to the right of the asset title opening the Asset Management Context Menu. 
Select "Edit" from the context menu opening the Edit Asset Modal.
Key details about the asset can be added directly from this modal, an asset type can be assigned, and alert preferences can be altered as desired. Click the "Save" after making the desired changes.
A popup confirms that the asset edits have been saved. | ||||||||||||||||||||||||
Manage Assignments | Selecting "Manage Assignments" on the context menu opens the Asset Assignments Modal which allows individual users and certification roles to be assigned to an asset. How To: Assign / Unassign Users and Certification Roles to an AssetTo assign or unassign users and certification roles for a specific asset, open the Manage Asset Pages in the Assets Module on the Main Menu. Use filters as needed and identify the asset/component you want to assign/unassign users and roles to. Click the three-dot icon to the right of the asset title opening a context menu.
Select "Manage Assignments" from the context menu opening the Asset Assignments Modal.
Click in the textbox beneath Assignments and a dropdown menu will allow you to assign the asset to multiple individuals or certification roles.
To unassign an individual, click the X icon to the right of the user name or certification role. When done, select the "Save Assignments" button.
A popup confirms that the asset assignments were saved. | ||||||||||||||||||||||||
Add Component | Selecting "Add Component" on the context menu opens the New Component Modal, which allows new components to be added to an asset. How To: Add Components to a Parent AssetTo add components to an asset, open the Manage Assets Page in the Assets Module from the Main Menu. In order to create components, the parent asset must have already been created. How To: Create a New AssetTo create a new asset, open the Manage Assets Page in the Asset Module and click the plus sign (+) icon to open the New Asset modal.
You can also access the New Asset Modal by clicking the three dot (…) icon and selecting “Create Asset” from the context menu.
The New Asset Modal requires the entry of an Asset Title. Optional fields include an asset description, tags, manufacturer, model number, serial number, and critical spares. Select the "Critical Component" checkbox to designate this asset as a critical component. This term is subjective for your organization to define. Designating an asset as a critical component will result in a hazard symbol being used as a visual indicator.
Critical items are prioritized and show separately on the Assets Module Summary. An entire asset is designated as a critical. All components and associated tasks will also have a critical component designation. KAStrack’s default setting prevents users with an expired certification role from performing tasks (such as completing tasks, recording faults, and updating meter readings. Select the “Allow users who are expired in assigned certification roles to perform tasks” checkbox to allow a user to perform tasks regardless of their assigned certification role status. The remaining three checkbox options all relate to asset status alert preferences. The “Send an alert when the asset changes from Past Due to OK” checkbox will send an alert via email to the assigned users when the task status changes from past due (red) to current/up to date (green). The “Send an alert when the asset changes to Warn” checkbox will send an alert via email to all users assigned to the asset when the task status changes from current/up to date (green) to warn (yellow). The “Send an alert when the asset changes to Past Due” checkbox will send an alert via email to all users assigned to the asset when the task status changes to past due (red). Asset Types are customizable to your company and are created on the Settings Page of the Asset Module. Once an asset type has been created, you can select one from the dropdown menu in the New Asset Modal to enable additional filtering capabilities. Asset Types allows your organization to add customizable fields unique to individual assets. How To: Create a New Asset TypeTo create a new asset type, open the Asset Types Tab on the Settings Page of the Assets Module.
Selecting the “Add Asset Type” button opens the New Asset Type modal.
Input the title of the New Asset Type and click “Save”. The newly created Asset Type will now show in the table on the Asset Type tab on the Settings page and is ready for you to add fields to. How To: Add Fields to an Asset Type{{@496}} Select the “Save” button at the bottom of the New Asset Modal to create the new asset or click “Cancel” to close the modal without saving and return to the Manage Assets Page. After an asset is created, it will appear in the Manage Asset Table where it can be managed.
Identify the pre-existing asset (or component) that you would like to place this new component under, and click the three dot (…) icon to the right of the asset name in the Manage Assets table opening the Manage Asset Context Menu. Select "Add Component" opening the New Component Modal.
The fields on the New Component modal ask for the same information on the New Asset Modal. For a detailed description of the fields, refer to the How To Create a New Asset page. Select the “Save” button and the component will appear underneath its asset in the Manage Asset table (if the view is expanded) where it can be managed. Subcomponents/additional child components can also be created for components if desired. Select the three dot (…) menu to the right of the component you would like to add an additional subcomponent in the asset’s hierarchal structure. | ||||||||||||||||||||||||
Manage Components | Selecting “Manage Components” from the context menu will open the Manage Asset Components Page where assets and their components can be managed. Only users with appropriate permissions will have access to this page. | ||||||||||||||||||||||||
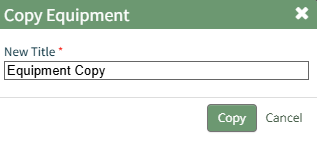
Duplicate | Selecting "Duplicate" on the context menu opens the Copy Asset Modal that allows you to rename the asset before copying. How To: Copy and Rename an AssetTo copy and rename an asset, select Manage Assets from the Main Menu under the Asset Module. Use filters as needed and identify the asset/component you want to copy. Click the three-dot icon to the right of the asset title opening a context menu.
Select "Duplicate" from the context menu opening the Copy Asset Modal.
Edit the new title of the copied asset. When done, click the "Copy" button and the renamed copied asset will now show on the Manage Assets Page.
| ||||||||||||||||||||||||
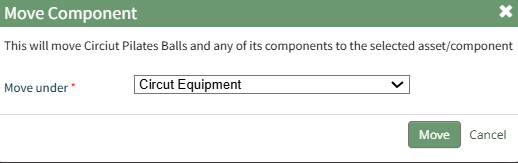
Move | Selecting "Move" on the context menu opens the Move Asset Modal, allowing you to move an asset/component under another asset/component. How To: Move an Asset/Component under Another Asset/ComponentTo move an existing asset to a new hierarchal position, under another asset/component, open the Manage Assets Page in the Assets Module on the Main Menu. Use filters as needed and identify the asset/component you want to move. Click the three-dot icon to the right of the asset title opening the Asset Management Context Menu.
Select "Move" opening the Move Component Modal.
Click the "Move" button and a popup confirms the move was successful.
| ||||||||||||||||||||||||
View | Selecting “View” from the context menu opens an Asset Summary Modal with a summary of the asset/component information. The read-only modal displays details, any associated meters, sub-components, assignments, and tasks associated with an asset. How To: View an Asset's Summary ModalTo view an asset's summary modal that lists all relevant information regarding an asset, go to the My Assets Page under the Assets Module on the Main Menu. Use filters as needs to pull up the asset you wish to view. Click the three-dot icon to the right of the asset/component title opening the context menu and select "View".
This opens the Asset Summary Modal. The read-only modal shows the asset details, meters associated with the asset, lists the components of the asset, the users assigned to the asset, and any tasks on the asset's task schedule.
Click the close button to return to the My Assets Page. | ||||||||||||||||||||||||
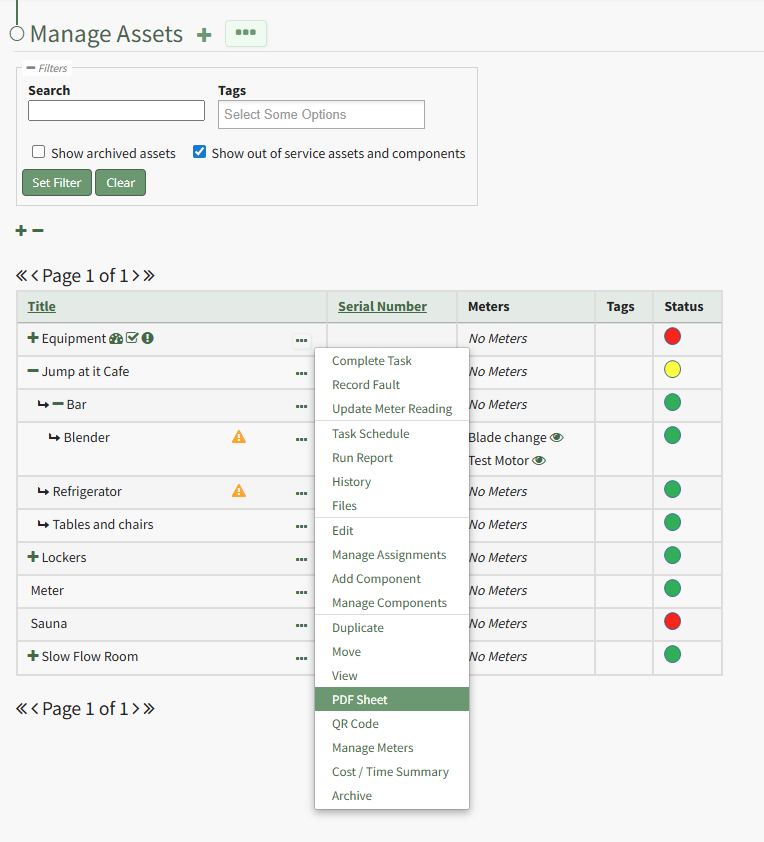
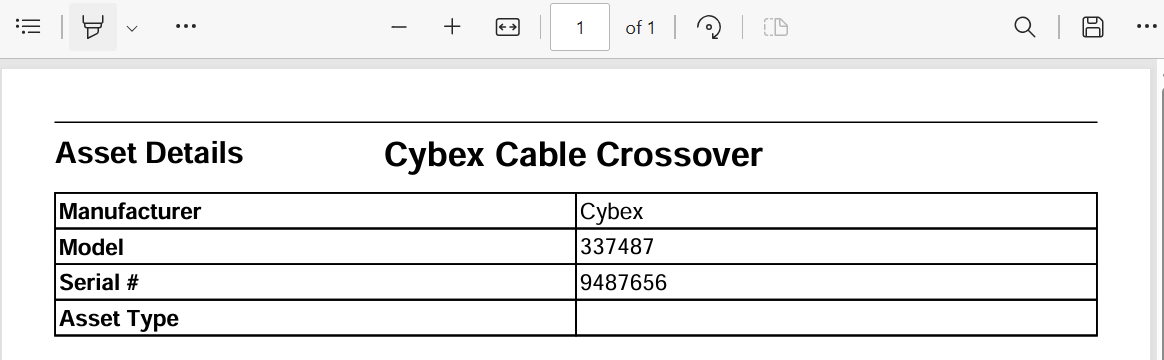
PDF Sheet | Selecting "PDF Sheet" on the context menu opens a PDF Copy of an Asset Data Sheet in a new widow. How To: Access and Asset's PDF Data SheetTo access an asset's PDF data sheet, open the Manage Asset Page in the Assets Module on the Main Menu. Use filters as needed and identify the asset/component you want to run a report on. Click the three-dot icon to the right of the asset title opening the Asset Management context menu.
Select "PDF Sheet" from the context menu. This opens a PDF of the asset/component data sheet in the existing tab.
Select the back button on your browser to return to the My Assets Page. | ||||||||||||||||||||||||
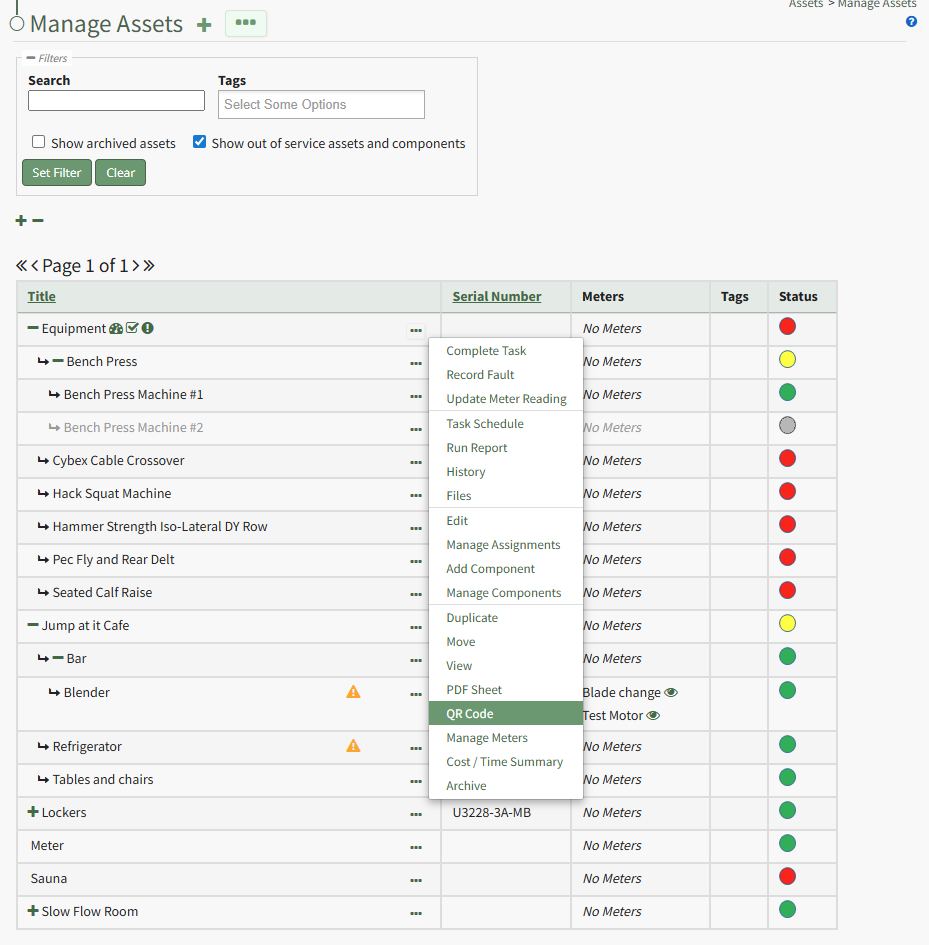
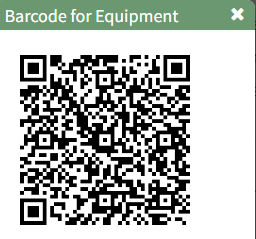
QR Code | Selecting "QR Code" on the context menu opens the Asset QR Code modal, which displays the QR Code associated with the Asset that when scanned will link a user to asset details. How To: Access an Asset's QR CodeTo access an asset's QR Code, open the Manage Asset Page in the Assets Module on the Main Menu. Use filters as needed and identify the asset/component whose QR Code you want to access. Click the three-dot icon to the right of the asset title opening the Asset Management context menu.
Select "QR Code" from the context menu. This opens the Asset Barcode Modal that displays an asset/component's QR Code that can be used for quick access to an asset.
Close the modal when done to return to the Manage Assets Page. | ||||||||||||||||||||||||
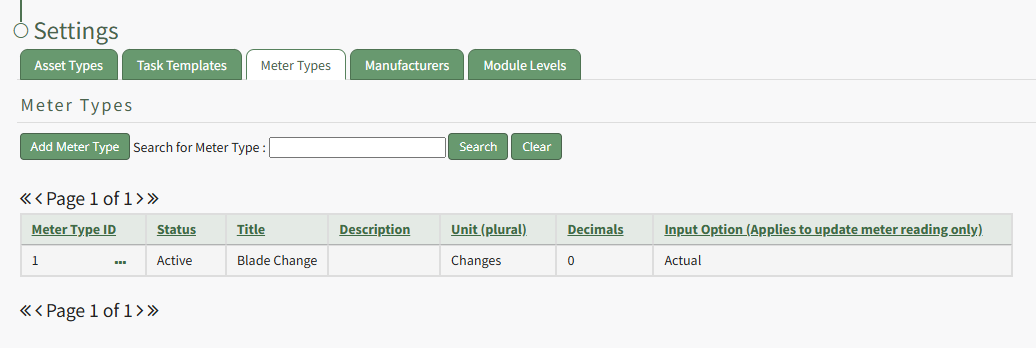
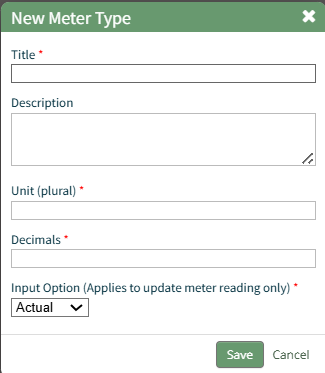
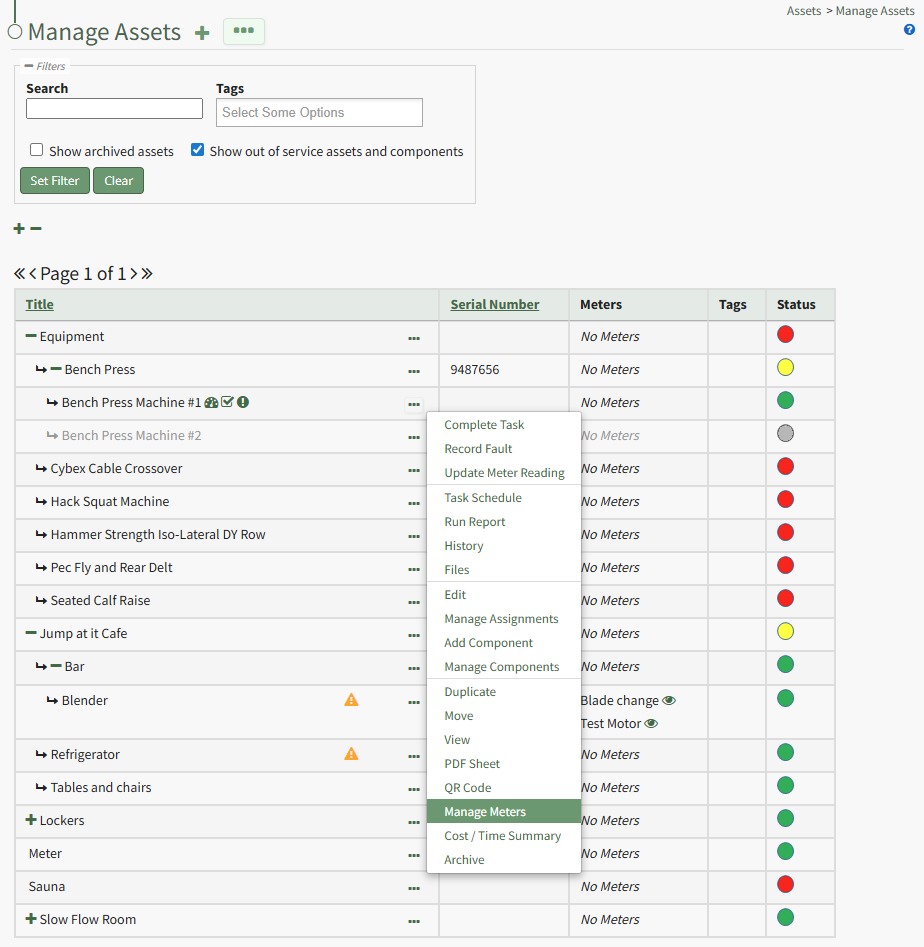
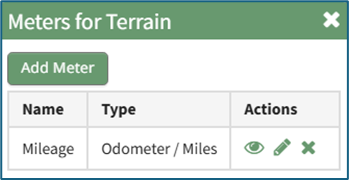
Manage Meters | Selecting "Manage Meters" on the context menu opens the Asset Meter Modal which lists all meters associated with the asset and allows for new meters to be created. How To: Add a Meter to an AssetTo add a meter to an asset, the Meter Type must already be created through the Assets Settings Page. How To: Create a Meter TypeTo create a new meter type, open the Meter Types Tab on the Settings Page of the Assets Module.
Select “Add Meter” opening the New Meter Type Modal. This opens the New Meter Type modal.
Input the desired meter type title and description. Include the units associated with this meter type. Meter units should always be entered in plural form. Input an integer to determine the number of place values after the decimals you would like recorder. Input 0 if you do not want to see any values after the decimal. The Input Option dropdown menu has three options: Actual, Elapsed, Both. If you select both, a user can input the actual reading and elapsed value will be calculated. A user can also input the elapsed reading and the actual will be calculated. Select the “Save” button and the New Meter Type will be created and now shows on the Meters Tab on the Settings Page of the Assets Module. To add a meter to an asset, select the Manage Assets Page from the Main Menu in the Assets Module. Use filters as needed and identify the asset/component you want to add a meter to. Click the three dot (…) icon next to the Asset/Component Title to open the Asset Management Context Menu.
Selecting “Manage Meters” from the context menu opens the Asset Meters Modal.
To add a new meter, select the “Add Meter” button opening the Add Meter to (Asset Name) Modal.
Select the Meter Type from the dropdown menu. Input a title for the new Meter. Include any notes about the meter. Select the “Save” button and the new meter is now shown when you select “Manage Meters” from the context menu. | ||||||||||||||||||||||||
Cost / Time Summary | Selecting "Cost / Time Summary" on the context menu opens the Cost and Time Summary Modal. How To: View an Asset's Cost / Time SummaryTo view the Cost/Time Summary associated with the asset's tasks, open the Manage Assets Page in the Assets Module on the Main Menu. Use filters as needed and identify the asset/component with the task whose task's cost/time summary you want to view. Click the three-dot icon to the right of the asset title opening the Asset Management Context Menu.
Select the "Manage Components" option, opening the Manage Asset Components Page. Select the three-dot icon to the right of the asset/component you wish to add interim notes to and select Task Schedule from the context menu.
This opens the asset's Task Schedule.
Click the "View Cost and Time" button to open the Cost/Time Summary Modal for that Task Schedule. | ||||||||||||||||||||||||
Archive | Selecting "Archive" on the context menu opens the Archive Confirmation Modal which states, "Are you sure you want to archive this asset? This will also archive any components." How To: Archive an Asset or ComponentTo archive an asset or component, go to the Manage Assets Page of the Assets Module on the main menu. Use filters as needed to identify the asset or component you want to archive and click the three-dot icon to the right of the asset title opening the Manage Asset Context Menu.
Select "Archive" from the context menu opening the Archive Asset Confirmation Modal which states, "Are you sure you want to archive this asset? This will also archive any components."
Click the "Confirm" button and the asset will not be assigned an archive status. | ||||||||||||||||||||||||


Assets Files Page
Files in the Asset module are not automatically included the Documents Module, although they can be manually added to both.
Selecting the Files Page in the Assets Module from the Main Menu opens the File Library page. Any files uploaded in conjunction with the Asset Module are stored in the File Library Table.
Users can query for specific files via the search box located above the table. Selecting clear will remove the filter applied by a user’s search.
The File Library table lists uploaded files and their version number, allowing revisions to be tracked.
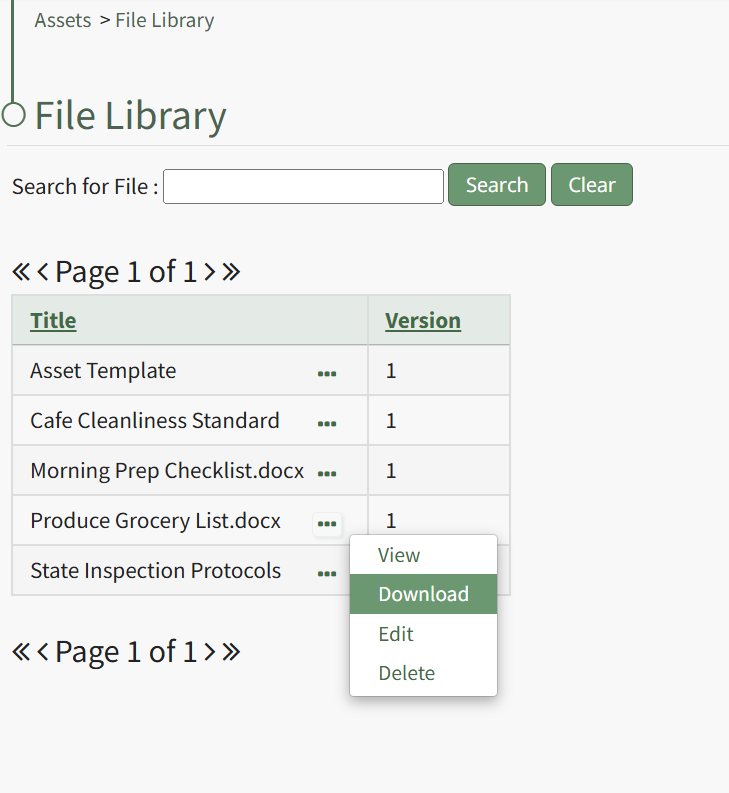
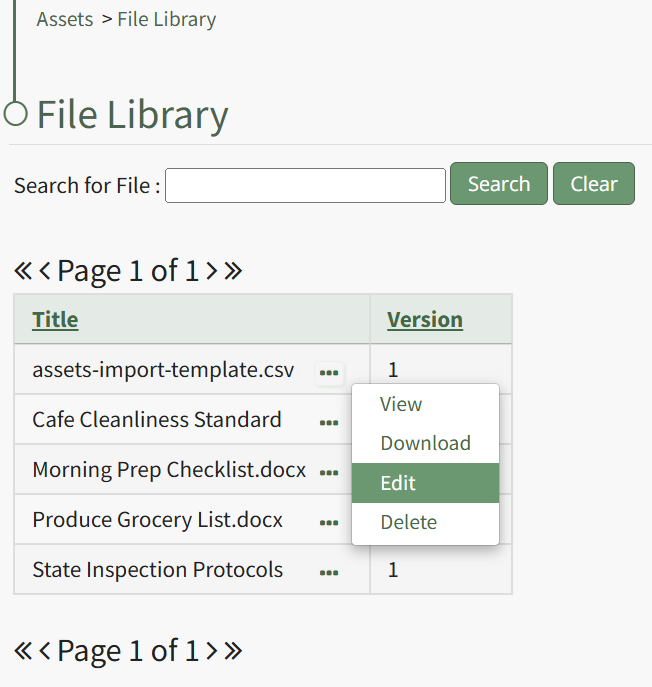
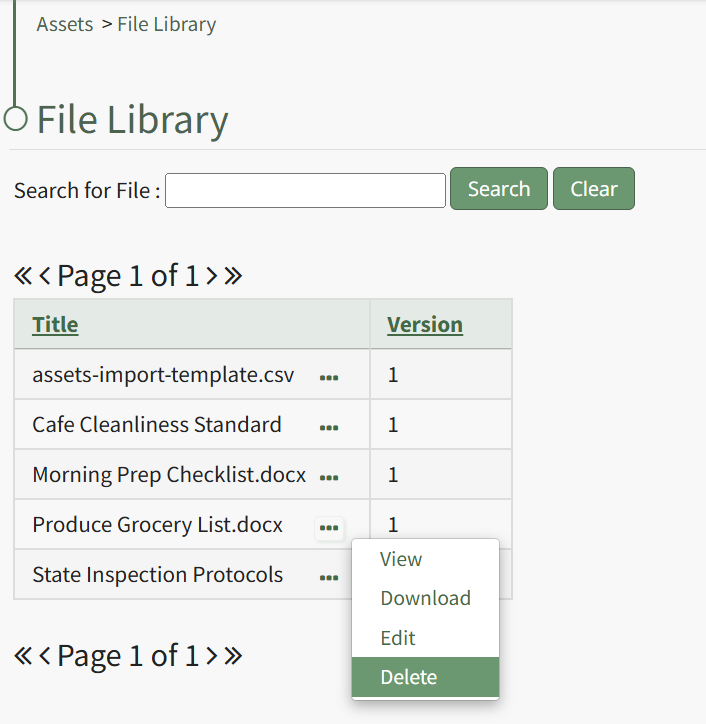
Clicking the three dot (…) icon to the right of the file title opens the Files Context Menu whose options are explained in the table below.
Asset Files Context Menu Option Explanation Table | |
Option | Explanation |
View |
Selecting "View"on the Files Context Menu opens the read-only View File Modal which states the file title, version number, and file description. Any references to the file are stated on the modal.
|
Download | Selecting "Download" on the Files Context Menu will automatically download the selected file to your personal device. How To: Download a File from the File LibraryTo download a file from the Asset Module File Library, select the Files Page in the Assets Module on the Main Menu. Click the three-dot icon to the right of the file you wish to download in the File Library Table to open the Files Context Menu.
Select "Download" from the context menu and the file will automatically be downloaded to your personal device. |
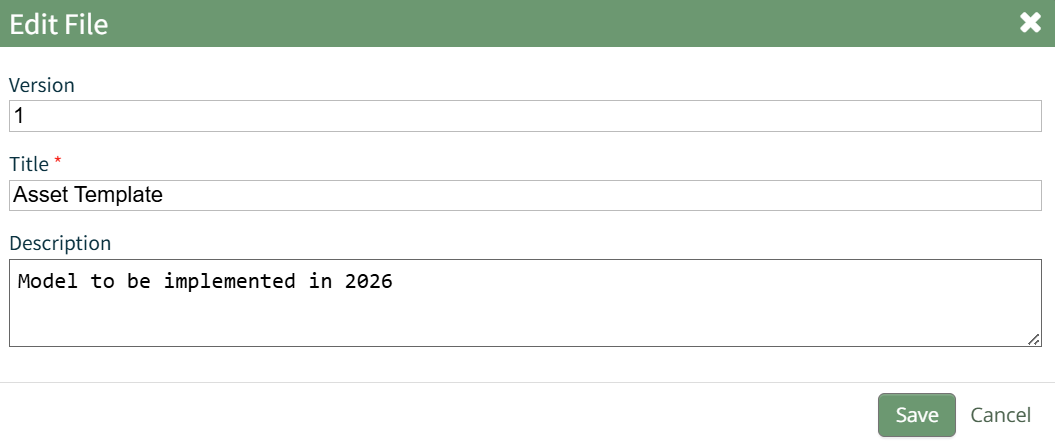
Edit | Selecting "Edit" on the Files Context Menu opens the Edit File Modal, where the version number, file title, and file description can be edited. How To: Edit a File's Details in the File LibraryTo edit the details associated with a file in the Asset Module File Library, select the Files Page in the Assets Module on the Main Menu. Click the three-dot icon to the right of the file you wish to edit the File Library Table to open the Files Context Menu.
Select "Edit" from the context menu opening the Edit File Modal.
Changes to the file version number, title, and description can be made directly in the modal. Select the "Save" button and a popup confirms that the file edits have been saved. The changes are reflected on the File Library Table. |
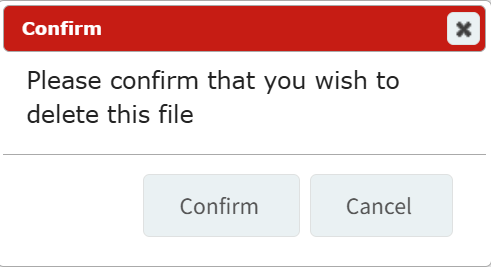
Delete | Selecting "Delete" on the Files Context Menu opens the Delete File Confirmation modal which states, "Please confirm that you wish to delete this file." How To: Delete a File in the File LibraryTo delete a file from the Asset Module's File Library, select the Files Page in the Assets Module on the Main Menu. Click the three-dot icon to the right of the file you wish to delete from the File Library Table to open the Files Context Menu.
Select "Delete" from the context menu opening a Delete File Confirmation Modal which states, "Please confirm that you wish to delete this file."
Click the "Confirm" button and a pop up will confirm that the file has been deleted. A file cannot be deleted unless it is not referenced by anything. |
Assets Reports Page
KAStrack’s Asset Module was developed before the Reports Module. This is now a legacy page. It is recommended that you use the Reports Module to create customizable reports.
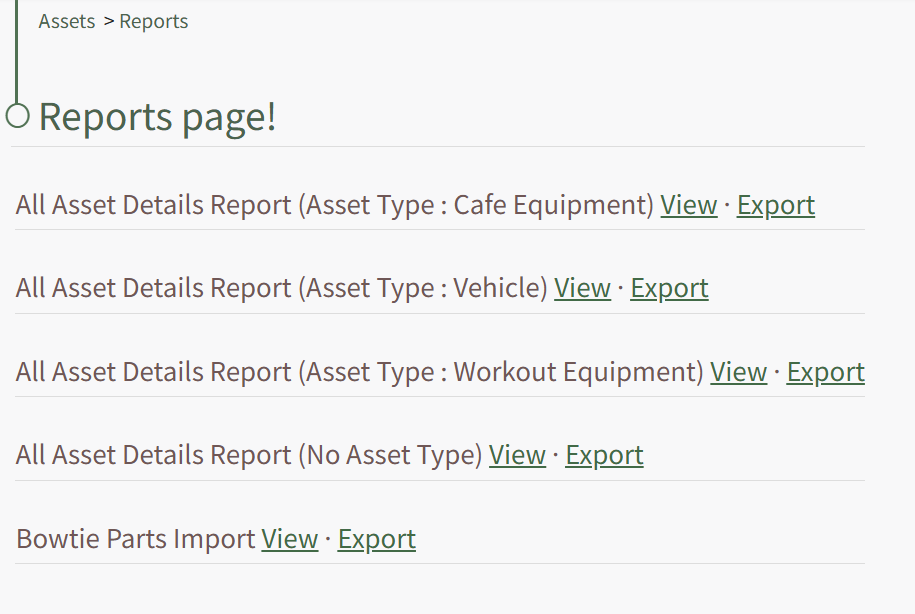
The Reports page still allows a user to view or export an All Asset Detail Report summarized by Asset Type.
If your company uses BowTieXP, you can export information from the Reports Page in the Assets Module to create a systems import for Bowtie XP.
How To: Run an Asset Report
To run an asset report, open the My Asset Page in the Assets Module on the Main Menu. Use filters as needed and identify the asset/component you want to run a report on. Click the three-dot icon to the right of the asset title opening a context menu.
Select "Run Report" from the context menu opening the Assets Report Modal with options for running various types of reports.
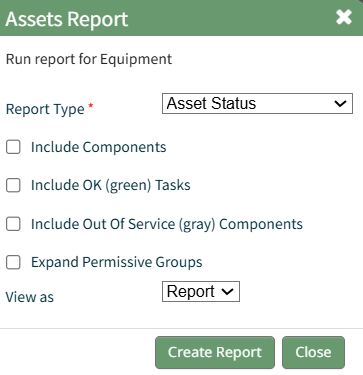
Reports can be run for an asset in its entirety, specific components or subcomponents. They type of report can be selected from a dropdown menu on the Assets Report Modal. An explanation of report types is included in the table below.
Asset Report Type Explanation Table | ||
Report Type | Assets Report Modal Image | Description / Notes |
Asset Status Report Modal |
| Options to include within the report include the following, which are selectable via checkbox:
Include Subcomponents Include Green Tasks Include Out-of-Service Components Expand Permissive Groups |
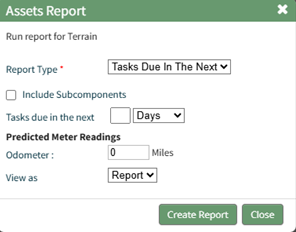
Tasks Due in the Next Report Modal |
| The “Tasks Due in the Next” Report allows the user to identify all upcoming tasks due over a customizable period of days / weeks / months / years. The report can be generated based on a period or usage. |
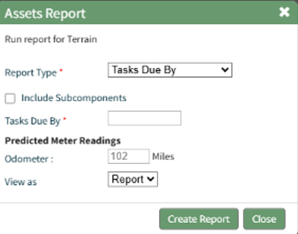
Tasks Due By Report Modal |
| The “Tasks Due By” Report provides the same information, but allows the user to enter a specific calendar date. Both reports allow the user to include subcomponents if desired. The report can be generated on a period or usage. |
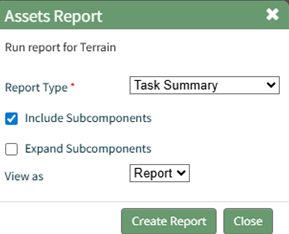
Task Summary Report Modal |
| The Task Summary Report provides a summary of the status of all tasks. This report does not list all tasks associated with an asset. |
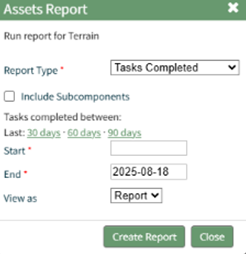
Tasks Completed Report Modal |
| The Tasks Completed Report Modal shows all tasks completed in a 30/60/90-day window or a specified date range. |
Each Asset Report can be viewed as a report in KAStrack's Report Module, a PDF File, or an Excel Document. | ||
Select the "Create Report" button after completing the inputs on the Assets Report Modal and the system will generate your report in the viewing preference you selected.
Assets Settings Page: Asset Types Tab
Creating Asset Types allows a user to organize and group assets. Asset Types allows a user to include additional information through the use of fields that can be used as a filter value if needed.
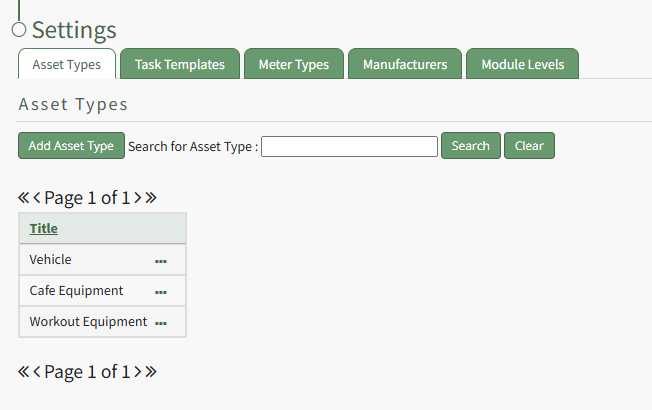
Asset Types are listed in table format on the Asset Types Tab of the Assets Module Settings Page.
Selecting the “Add Asset Type” button opens the New Asset Type modal.
How To: Create a New Asset Type
To create a new asset type, open the Asset Types Tab on the Settings Page of the Assets Module.
Selecting the “Add Asset Type” button opens the New Asset Type modal.
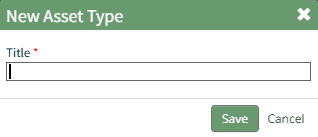
Input the title of the New Asset Type and click “Save”.
The newly created Asset Type will now show in the table on the Asset Type tab on the Settings page and is ready for you to add fields to.
How To: Add Fields to an Asset Type
In order to include unique, customized additional information regarding an Asset, you must first create an asset type and then add fields to it. This allows your organization to specify whatever information they choose to regarding their assets.
How To: Create a New Asset Type
To create a new asset type, open the Asset Types Tab on the Settings Page of the Assets Module.
Selecting the “Add Asset Type” button opens the New Asset Type modal.
Input the title of the New Asset Type and click “Save”.
The newly created Asset Type will now show in the table on the Asset Type tab on the Settings page and is ready for you to add fields to.
How To: Add Fields to an Asset Type
{{@496}}
To add additional fields to an asset type, go to the Asset Types Tab on the Settings Page of the Assets Module. Click the three-dot icon to the right of the Asset Type title to open the Asset Type Context Menu.
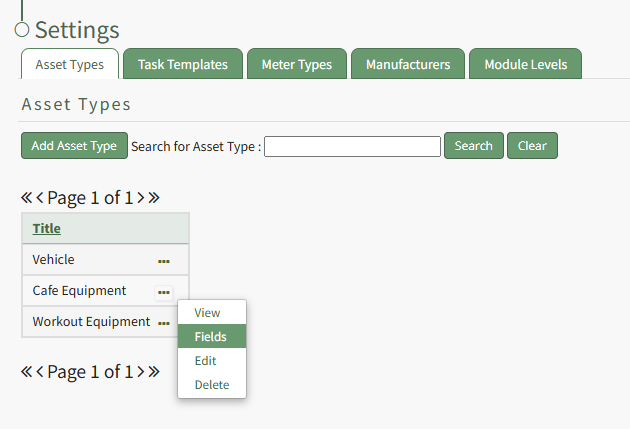
Select "Fields" from the context menu opening the Asset Type Fields Page.
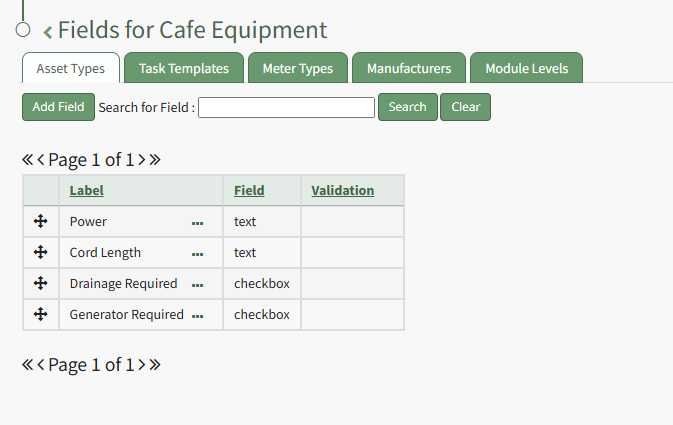
Click the "Add Field" button opening the New Field Modal.
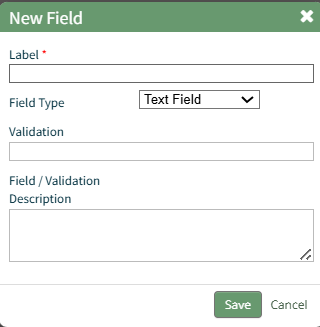
Input a label for the field and select the field type from a dropdown menu. Options include: text field, number, password field, text box, date field, and checkbox.
Validation uses standard JavaScript RegExp constructor for validating Field input values entered by end-users. Entering a RegExp validation string will check against the input value.
Include a description of the field of validation (optional).
Select “Save” and a popup confirms that the asset has been saved. The new field now shows on the Asset Type Field Page.
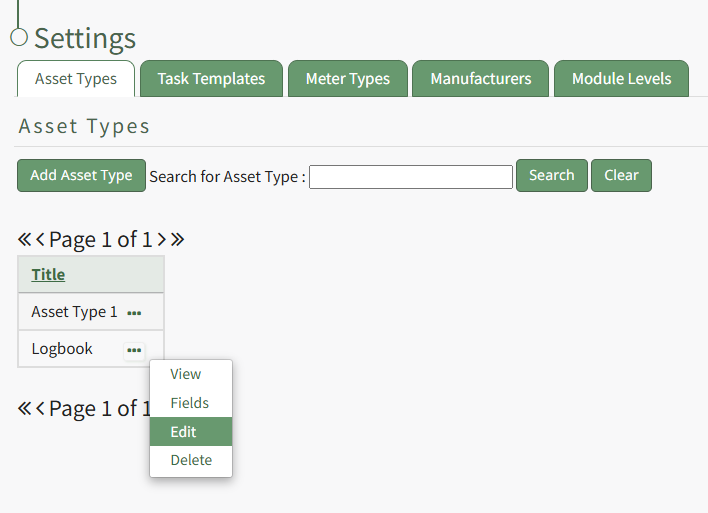
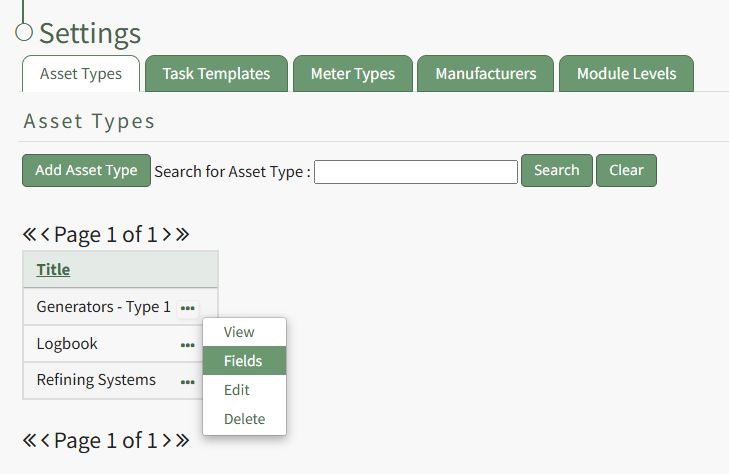
Newly created Asset Type will show in the table on the Asset Type tab on the Settings page. Selecting the three dot (…) icon to the right of the Asset Title opens the asset type context menu with options for Asset Type Management that are explained in the table below. View, Fields, Edit, or Delete.
Asset Type Context Menu Option Explanation Table | |
Option | Explanation |
View | Selecting "View" from the asset type context menu opens the View Asset Type Modal which displays the title of the asset type and lists any fields associated with it. |
Fields | Selecting "Fields" from the asset type context menu opens the asset type fields page where asset type fields can be added and managed. How To: Add Fields to an Asset TypeIn order to include unique, customized additional information regarding an Asset, you must first create an asset type and then add fields to it. This allows your organization to specify whatever information they choose to regarding their assets. How To: Create a New Asset TypeTo create a new asset type, open the Asset Types Tab on the Settings Page of the Assets Module.
Selecting the “Add Asset Type” button opens the New Asset Type modal.
Input the title of the New Asset Type and click “Save”. The newly created Asset Type will now show in the table on the Asset Type tab on the Settings page and is ready for you to add fields to. How To: Add Fields to an Asset TypeIn order to include unique, customized additional information regarding an Asset, you must first create an asset type and then add fields to it. This allows your organization to specify whatever information they choose to regarding their assets. How To: Create a New Asset Type{{@470}} To add additional fields to an asset type, go to the Asset Types Tab on the Settings Page of the Assets Module. Click the three-dot icon to the right of the Asset Type title to open the Asset Type Context Menu.
Select "Fields" from the context menu opening the Asset Type Fields Page.
Click the "Add Field" button opening the New Field Modal.
Input a label for the field and select the field type from a dropdown menu. Options include: text field, number, password field, text box, date field, and checkbox. Validation uses standard JavaScript RegExp constructor for validating Field input values entered by end-users. Entering a RegExp validation string will check against the input value. Include a description of the field of validation (optional). Select “Save” and a popup confirms that the asset has been saved. The new field now shows on the Asset Type Field Page. To add additional fields to an asset type, go to the Asset Types Tab on the Settings Page of the Assets Module. Click the three-dot icon to the right of the Asset Type title to open the Asset Type Context Menu.
Select "Fields" from the context menu opening the Asset Type Fields Page.
Click the "Add Field" button opening the New Field Modal.
Input a label for the field and select the field type from a dropdown menu. Options include: text field, number, password field, text box, date field, and checkbox. Validation uses standard JavaScript RegExp constructor for validating Field input values entered by end-users. Entering a RegExp validation string will check against the input value. Include a description of the field of validation (optional). Select “Save” and a popup confirms that the asset has been saved. The new field now shows on the Asset Type Field Page. How To: Edit Asset Type FieldsTo edit a field associated with an asset type, go to the Asset Types Tab on the Settings Page of the Assets Module. Select the three-dot icon to the right of the asset type whose field you wish to edit opening the Asset Types Context Menu.
Select "Fields" from the context menu opening the Asset Type Field Table. Click on the three-dot icon to the right of the field you wish to edit opening the Asset Type Fields Context Menu.
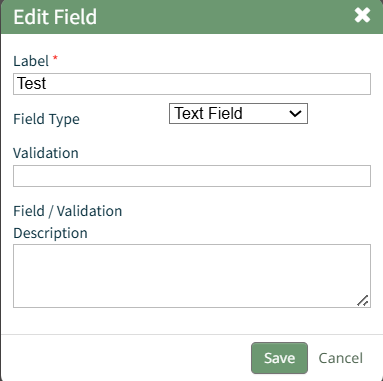
Select "Edit" opening the Edit Field Modal.
This modal will vary based on the field type associated with the field. Make the desired changes to the field and select the "Save" button.
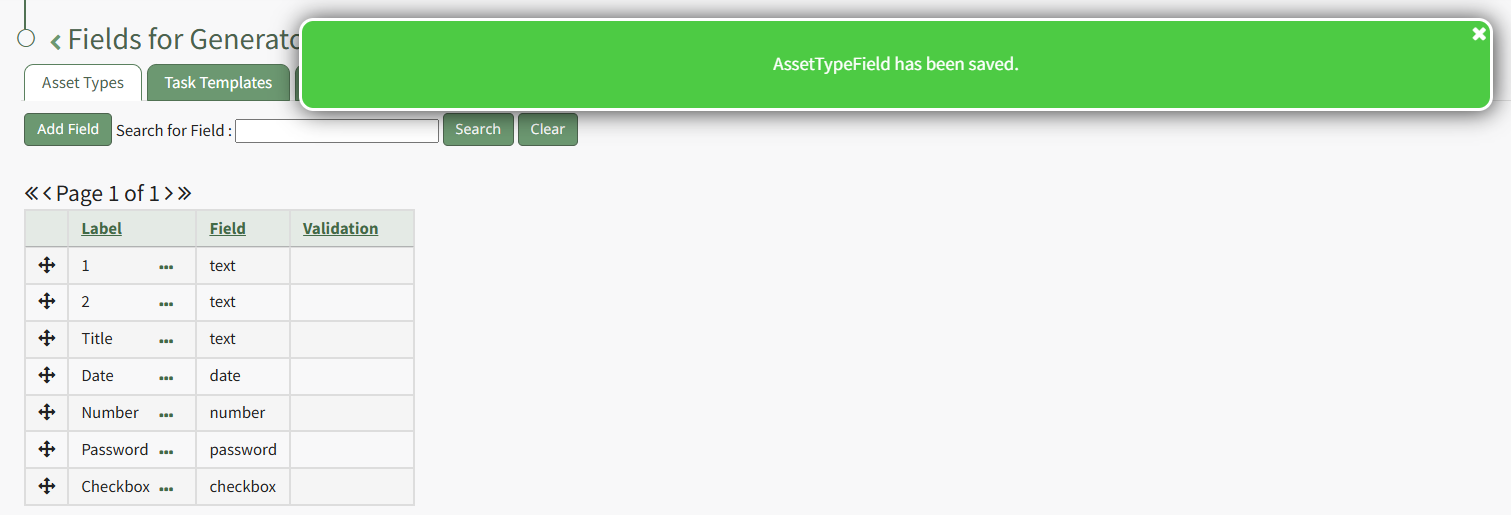
A pop up confirms that the Asset Type Field has been changed, and the edits are reflected on the Asset Type Fields Table. |
Edit | Selecting "Edit" from the asset type context menu opens the Edit Asset Type Modal where the title of the asset type can be altered. How To: Change an Asset Type NameTo change an Asset Type name, go to the Asset Type Tab on the Settings Page of the Assets Module. Click the three-dot icon to the right of the Asset Type whose name you wish to change, opening the Asset Type Context Menu.
Select "Edit" opening the Edit Asset Type Modal.
Edit the Asset Type name as desired and select the "Save" button. A pop up confirms that they asset type has been edited, and the changes in the title are now reflected on the Asset Type Table.
|
Delete | Selecting "Delete" from the asset type context menu opens the Delete Asset Type Confirmation Modal which states the number of assets impacted by the deletion. How To: Delete an Asset TypeTo delete an asset type, go to the Asset Type Tab on the Settings Page of the Assets Module. Click the three-dot icon to the right of the asset type you wish to delete, opening the Asset Type Context Menu.
Select "Delete" opening the Delete Asset Type Confirmation Modal which states, "Are you sure you want to delete this asset type?"
Click the "Delete" button and a pop up will confirm that the asset type has been deleted.
The deleted asset type no longer shows in the Asset Type Table.
|
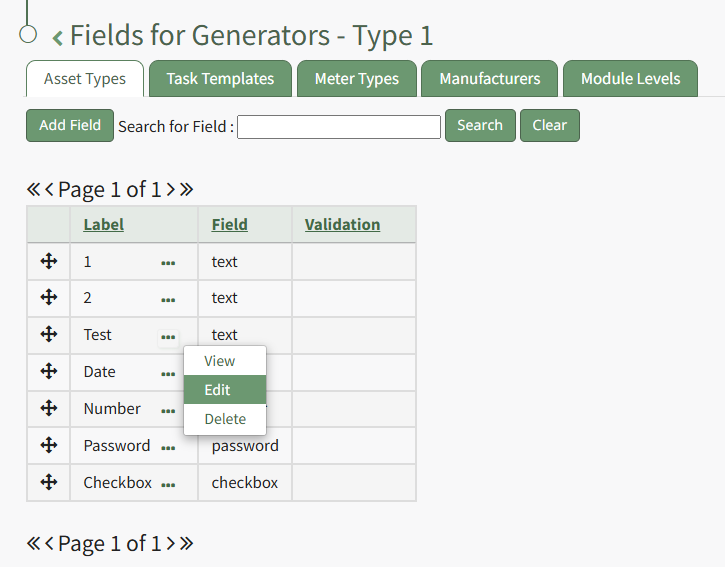

Once an Asset Type has been created, fields can be added to it. Selecting Fields from the Asset Type Context Menu opens the Asset Type Fields Page where new fields can be added and existing fields are managed.
Asset Type Fields Table Context Menu Option Explanation Table | |
Option | Explanation |
View | Selecting "View" from the asset type fields context menu opens the View Asset Type Fields Modal which displays the existing Asset Type Fields and information associated with it. How To: View the Fields Associated with an Asset TypeTo view the information associated with an asset type, go to the Asset Types Tab on the Settings Page of the Assets Module. Click the three-dot icon to the right of the asset type whose details you wish to view opening the Asset Type Context Menu.
Select "View" opening the View Asset Type Modal, stating the title of the Asset Type and the fields that are associated with it.
The View Asset Type Modal is read-only. Select the "Close" button and return to the Asset Types Tab. |
Edit | Selecting "Edit" from the asset type fields context menu opens the Edit Asset Type Field Modal where the field details can be altered. How To: Edit an Asset Type FieldTo edit a field associated with an asset type, go to the Asset Types Tab on the Settings Page of the Assets Module. Select the three-dot icon to the right of the asset type whose field you wish to edit opening the Asset Types Context Menu.
Select "Fields" from the context menu opening the Asset Type Field Table. Click on the three-dot icon to the right of the field you wish to edit opening the Asset Type Fields Context Menu.
Select "Edit" opening the Edit Field Modal.
This modal will vary based on the field type associated with the field. Make the desired changes to the field and select the "Save" button.
A pop up confirms that the Asset Type Field has been changed, and the edits are reflected on the Asset Type Fields Table. |
Delete | Selecting "Delete" from the asset type fields context menu opens the Delete Asset Type Field Confirmation Modal which states the number of assets impacted by the deletion. The modal will state the number of forms references that must first be removed if necessary for deletion. How To: Delete an Asset Type FieldTo delete an asset type field, go to the Asset Types Tab on the Settings Page of the Assets Module. Click the three-dot icon to the right of the asset type that contains the asset type field you wish to delete opening the Asset Type Context Menu.
Select "Fields" from the context menu opening the Asset Type Fields Table. Click the three-dot icon to the right of the Field Label opening the Asset Type Fields Context Menu.
Select "Delete" from the context menu opening the Delete Asset Type Field Confirmation modal. Select "Delete" and the field is removed from the Asset Type Fields Table. |
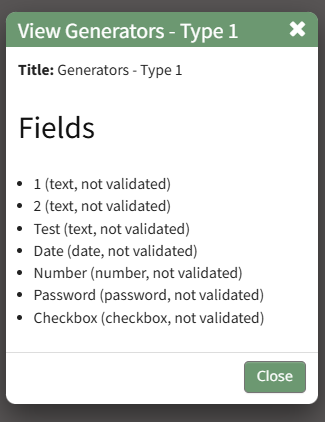
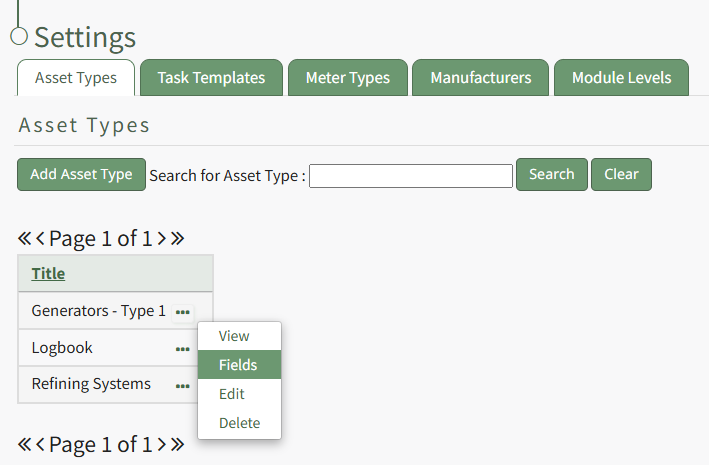
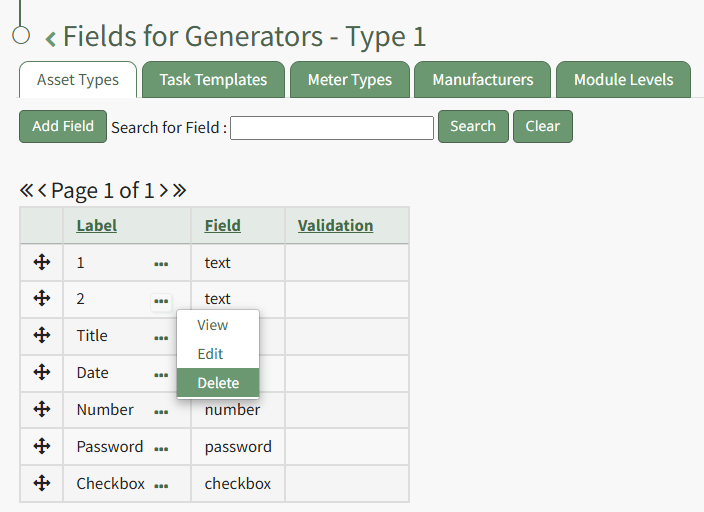
Assets Settings Page: Task Template Tab
A Task Template is a user generated tool used to aid bulk task schedule creation. Task templates are created from the task schedule of a pre-existing asset.
The Task Template Tab on the Settings Page shows all existing templates in tabular format. A user can search for different task templates through the filter. New task templates are created through the Add Task Template button on this tab.
How To: Create a New Task Schedule Template
To create a new task schedule template, open the Task Template Tab on the Settings Page in the Assets Module.
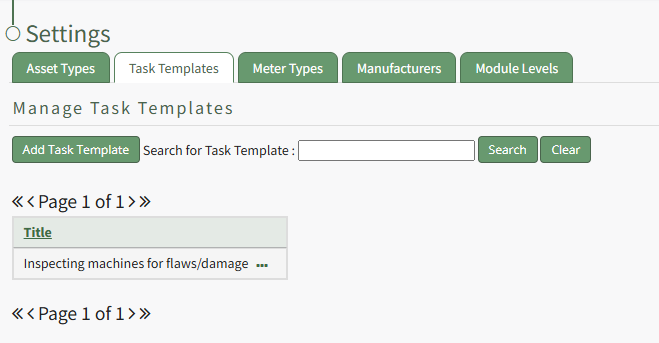
Click the “Add Task Template” button, opening the New Task Template modal.
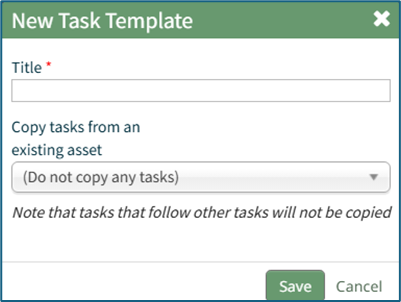
Input the desired Title for the new task template.
Select which asset or component whose task schedule you want to create the template from.
Click “Save” and the new task template will show in the Task Template Table.
Tasks that follow other tasks will not be copied into the Task Template.

Existing task templates are shown by title in the Task Template Table on this tab.
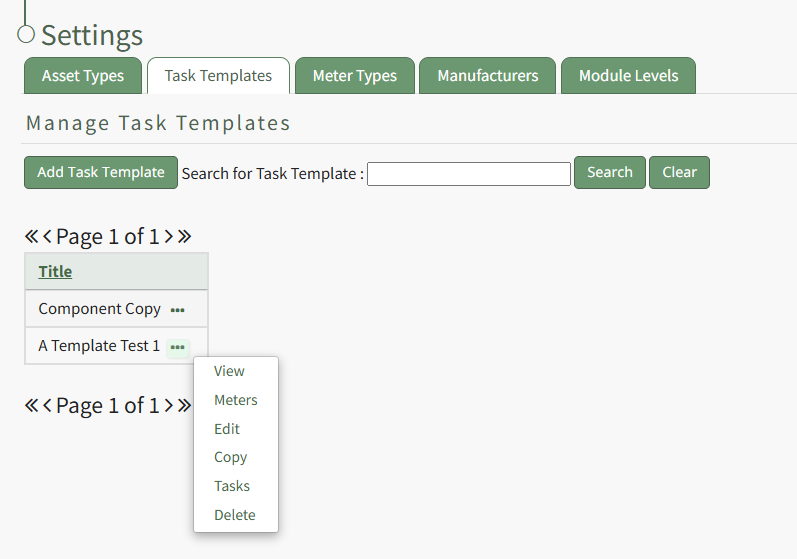
Selecting the three-got icon to the right of the Task Template title will open the Task Template Context Menu which displays options
Task Template Context Menu Option Explanation Table | |
Option | Explanation |
View |
Select “View” from the context menu to open the View Modal that shows the title of the Task Template.
|
Meters | Select “Meters” from the context menu to open the Meters for (Name of Task Template) modal. The modal provides a list of all meters associated with the Task Template and includes an “Add Meter” button that allows the user to add additional meters to the Task Template. How To: Add Meters to a Task TemplateTo add a meter to a task template, go the the Task Template Tab on the Settings Page of the Assets Module.
Select the three-dot icon to the right of the task template you wish to add a meter to, opening the task template context menu. Select "Meters".
This opens the Meters for Task Templates Modal.
Select the "Add Meter" button, opening the Add Meter Modal.
Specify the Meter Type and input a title and any relevant notes regarding the new meter for the task template. The fields visible on the Add Meter Modal will vary based on the meter type selected. Select "Save" and the new meter will show on Meter Modal for the task template.
|
Edit | Select “Edit” from the to open the Edit Task Template modal, which allows the user to change the task template name. How To: Change a Task Template NameTo change a task template name, go to the Task Template Tab on the Settings Page of the Assets Module.
Click the three-dot icon to the right of the Task Template whose title you wish to change and select "Edit" from the Task Template Context Menu.
This opens the Edit Task Template Modal, where the name can be altered.
Make the desired changes and select the "Save" button. A pop up confirms that the template has been edited, and the change is reflected on the Task Template Table.
|
Copy | Select “Copy” from the context menu to open the Copy (Name of Task Template) Modal in order to make a copy of the task template from a pre-existing task template. How To: Copy and Rename a Task TemplateTo copy and rename a task template, go to the Task Template Tab on the Settings Page of the Assets Module.
Select the three-dot icon to the right of the task template you wish to copy opening the Task Template Context Menu and select "Copy".
This opens the Copy Task Template Modal, where a title for the newly copied task template can be altered.
Select the "Copy" button and pop up confirms that the task template was copied.
The new Task Template is now visible in the Task Template Table.
|
Tasks | Select “Tasks” from the context menu to open the Task Schedule for the Task Template Page. Additional tasks and permissive groups can be added to the task template here. How To: Add Tasks to a Task TemplateTo add tasks to a task template, go to the Task Template Tab on the Settings Page of the Assets Module.
Select the three-dot icon to the right of the task template you wish to add a task to opening the Task Template Context Menu. Select "Tasks".
This opens the Task Template Task Schedule. Select the "Add Task" button beneath the page header.
This opens the New Task Modal.
Input the information for the New Task and select the "Save" button. For a detailed explanation on creating new tasks, refer to the How To Add a Task to an Asset. How To: Create a New Task on the Task ScheduleThere are three tables in the People Module than can be customized for your organization's specific needs.
The Users Table (on the Users Page of the People Module), the Users Assigned to a Role Table (on the Assigned Users Tab of a certification role's Details Page), and the Users Associated with a Certification Table (on the Associated Users Tab of a certification's Details Page) are all customizable. How To: Edit the People Module Users TableTo edit the Users Table in the People Module, go to the Table Defaults Tab in the Site Settings Module. Select “People: Users” from the dropdown menu.
Select the “Edit Columns” button, opening the Choose Columns Modal. The default column choices include users, certifications, reports, username, email, first name, last name, employee ID, phone, Address 1, and Address 2. Customizable account information fields can be created on the Account Fields Tab of the Site Settings Module. How To: Add a Custom/Additional User Account Information Field{{@856}} The bars icon allows the columns to be positioned in the order of your choosing. Click “Cancel” to return to the Table Defaults Tab without making any changes. Select the “Save” button to make the desired changes and return to the Table Defaults Tab. A preview of the first five rows of the table is shown. Select the “View Live Table” button to be directed to the live table in the People Module. How To: Edit the People Module Users Assigned to a Role TableTo edit the Users Assigned to a Role Table in the People Module, go to the Table Defaults Tab in the Site Settings Module. Select “People: Users Assigned to a Role” from the dropdown menu.
Select the “Edit Columns” button, opening the Choose Columns Modal. The default column choices include name, username, email, first name, last name, employee ID, phone, Address 1, and Address 2. Customizable account information fields can be created on the Account Fields Tab of the Site Settings Module. How To: Add a Custom/Additional User Account Information Field{{@856}} The bars icon allows the columns to be positioned in the order of your choosing. Click “Cancel” to return to the Table Defaults Tab without making any changes. Select the “Save” button to make the desired changes and return to the Table Defaults Tab. A preview of the first five rows of the table is shown. Select the “View Live Table” button to be directed to the live table in the People Module. How To: Edit the People Module Users Associated with a Certification TableTo edit the Users Associated with a Certification Table in the People Module, go to the Table Defaults Tab in the Site Settings Module. Select “People: Users Associated with a Certification” from the dropdown menu.
Select the “Edit Columns” button, opening the Choose Columns Modal. The default column choices include: name, username, certification expiration date, attachment(s), time until expiration, required, other required certification, email, first name, last name, employee ID, phone, Address 1, and Address 2. Customizable account information fields can be created on the Account Fields Tab of the Site Settings Module. How To: Add a Custom/Additional User Account Information Field{{@856}} The bars icon allows the columns to be positioned in the order of your choosing. Click “Cancel” to return to the Table Defaults Tab without making any changes. Select the “Save” button to make the desired changes and return to the Table Defaults Tab. A preview of the first five rows of the table is shown. Select the “View Live Table” button to be directed to the live table in the People Module. Customizable user account information fields can be created and utilized in the tables as needed. How To: Add a Custom / Additional User Account Information FieldTo add a user account information field, open the Account Fields Tab in the Site Settings Module from the Main Menu.
Click the "Add a Field" clickable link above the Custom / Additional User Account Information Fields opening the Add Field Modal.
Input the label for the field. Select the field type (text or email) from the dropdown menu. Selecting the checkbox enables customization to "Allow multiple values," make the field "Required," or make it a "Sensitive Field." Designating the field as a "Sensitive Field" allows an extra step in form security when integrating these fields within the Form module. The Form Designer must explicitly choose when they wish to use a sensitive field. The Permissions Table determines who can view / edit their own and other user's fields. Selecting the checkbox gives the individual the specified permission. Deselecting the checkbox removed the permission. Select the "Save" button and the custom field now shows in the table. Use the Drag Me icon to drag and drop the field into your desired position of choice. A pop up confirms that the task has been saved.
The new task now shows on the task schedule for the task template.
|
Delete | Select “Delete” from the context menu to open the Task Template Deletion Confirmation modal. Select “Confirm” to delete the task template. How To: Delete a Task TemplateTo delete a task template, go to the Task Template Tab on the Settings Page of the Assets Module.
Select the three-dot icon to the right of the Task Template you wish to delete, opening the Task Template Context Menu. Select "Delete".
This opens the Deletion Confirmation Modal which states, "Please confirm that you wish to delete this task template."
Select the "Confirm" button and a pop up confirms that the task template has been deleted.
The deleted Task Template no longer shows on the Task Template Table.
|

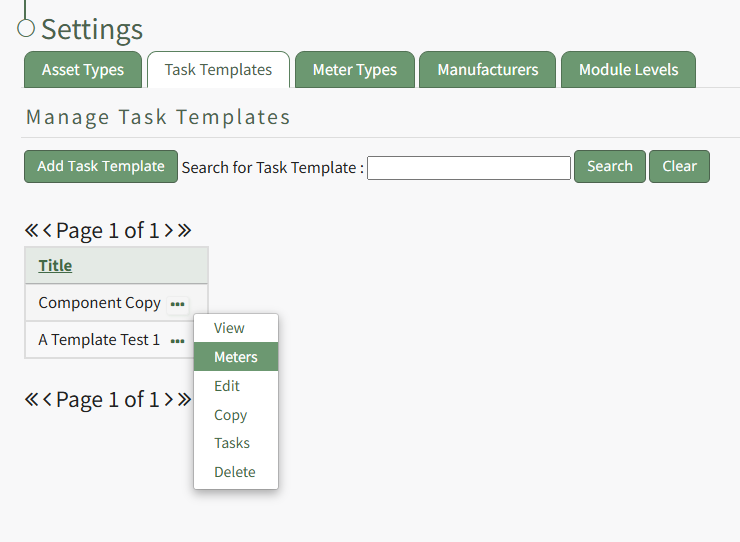
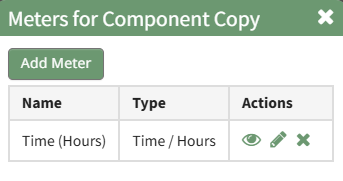


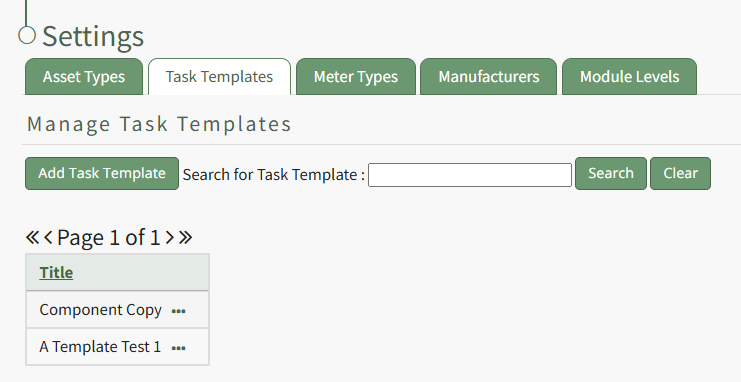
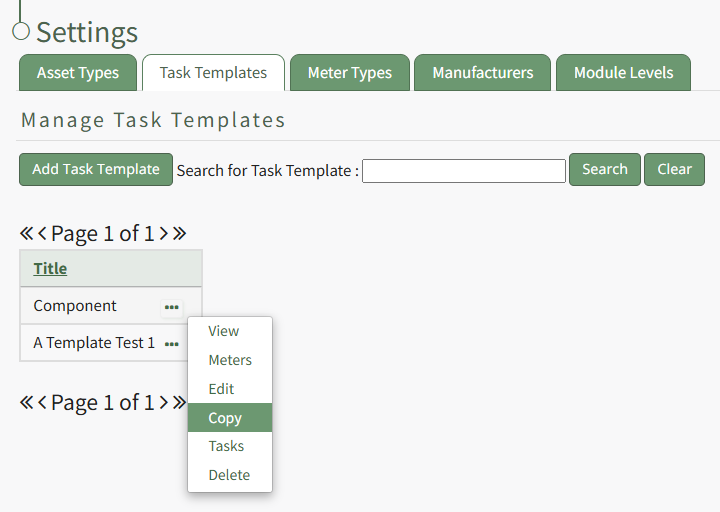
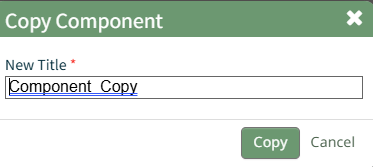

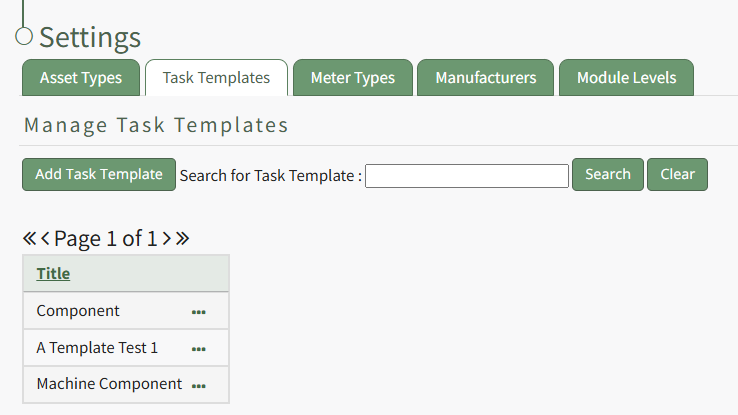
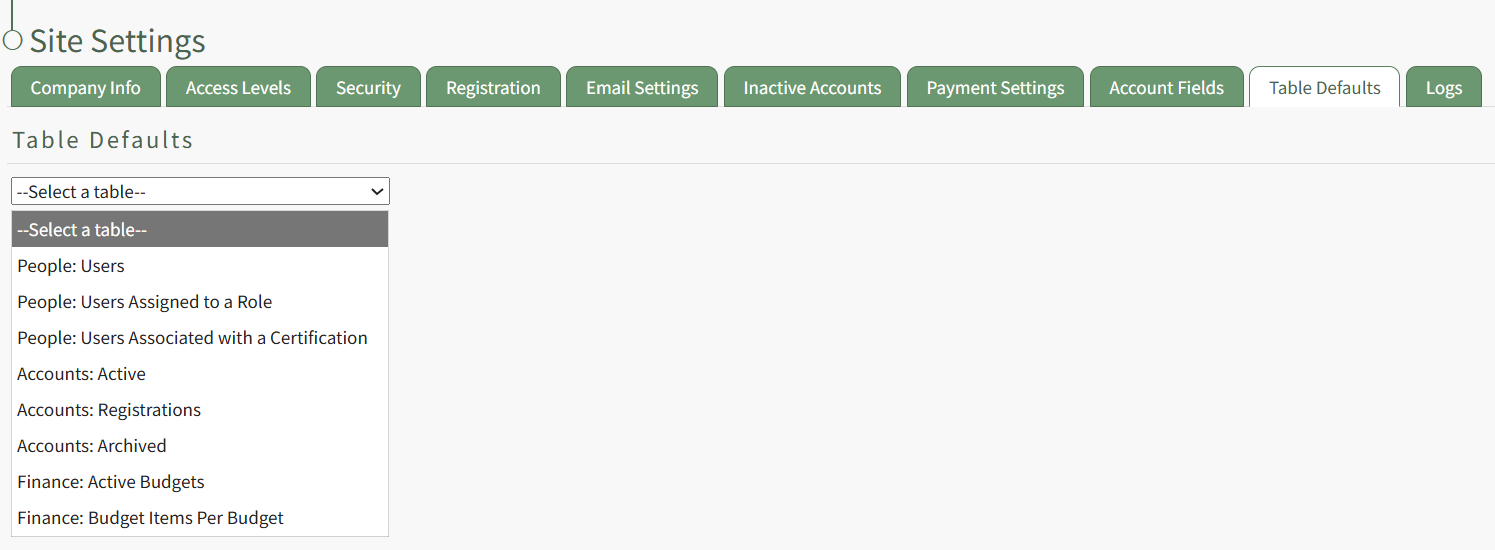
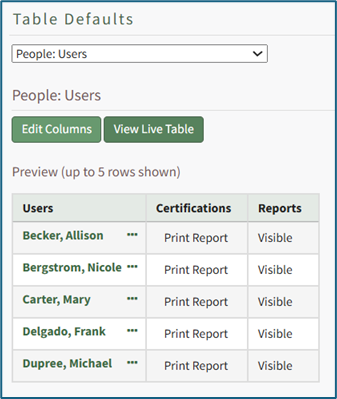
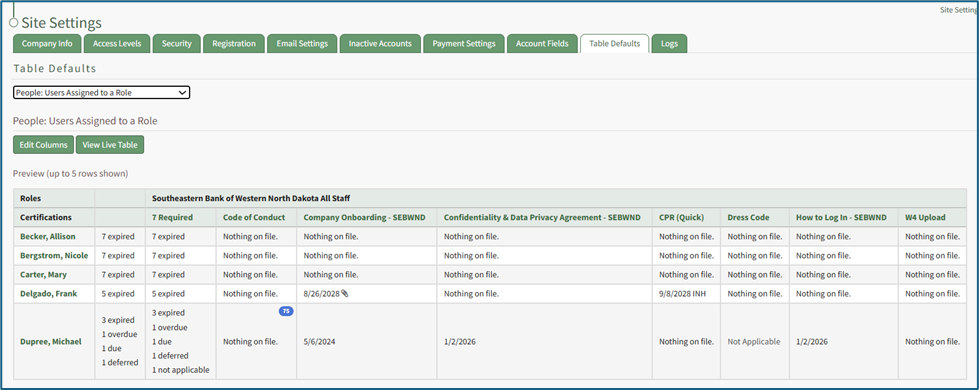

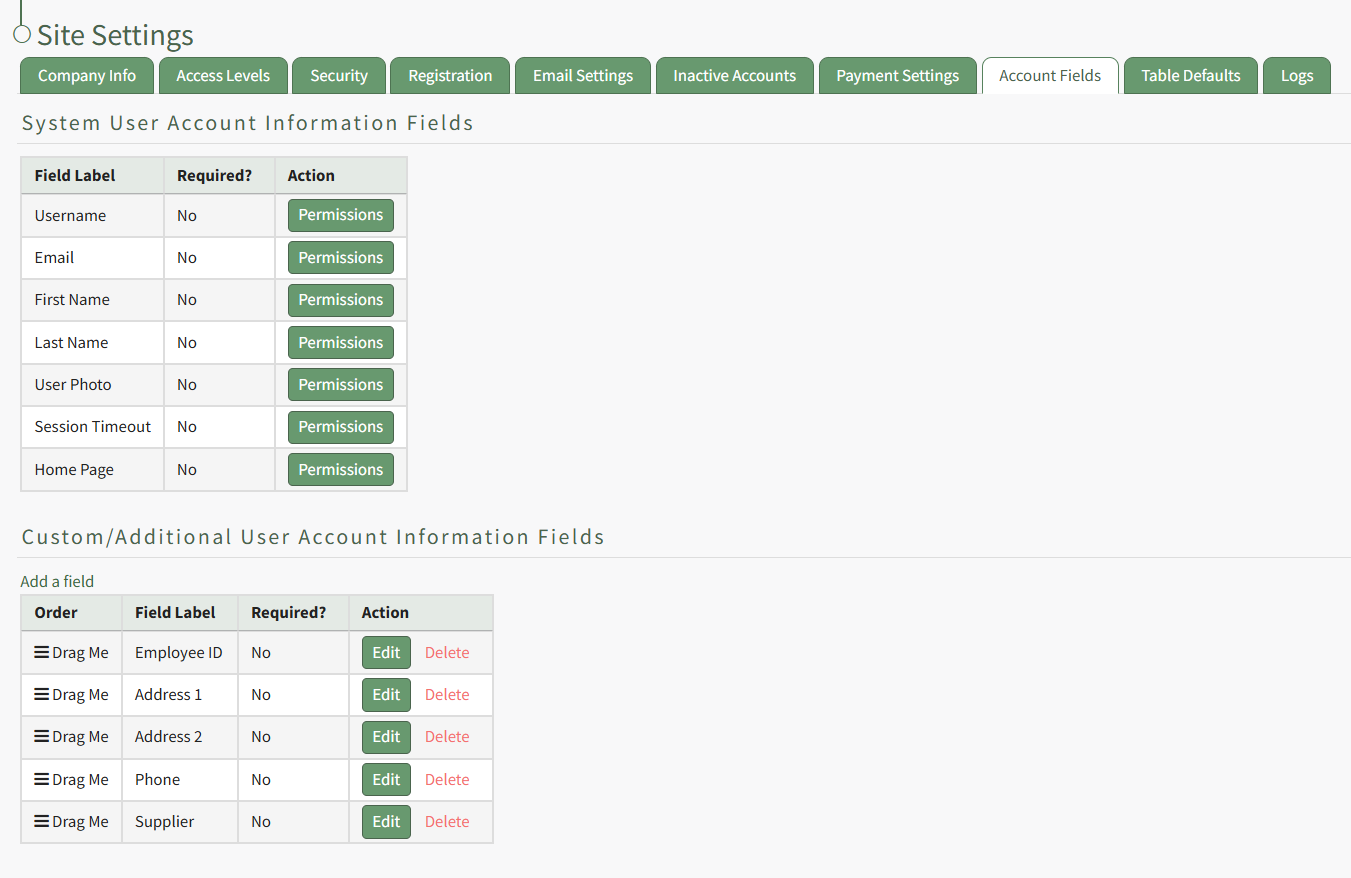
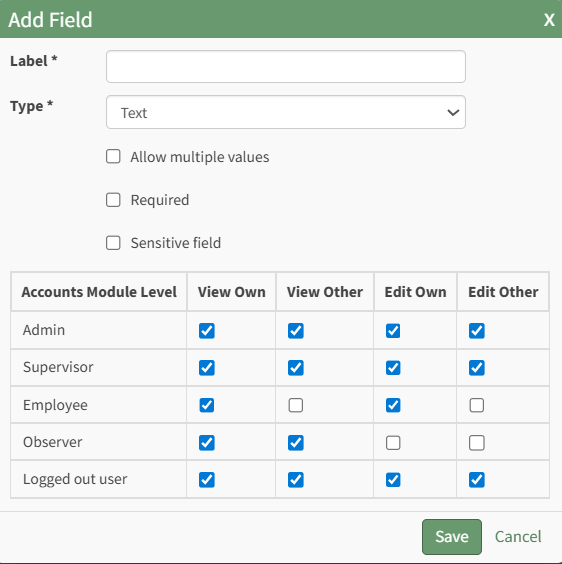

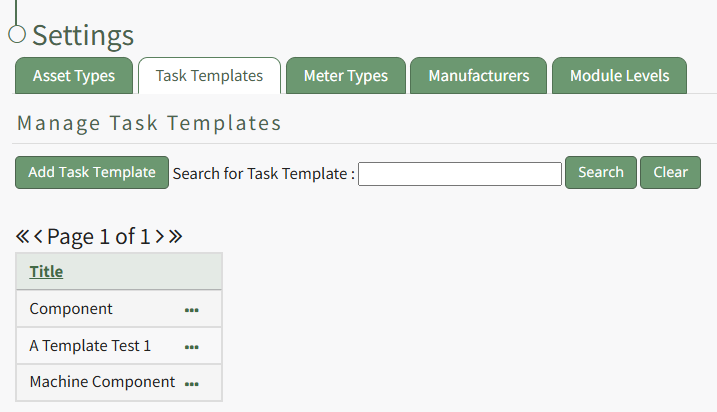
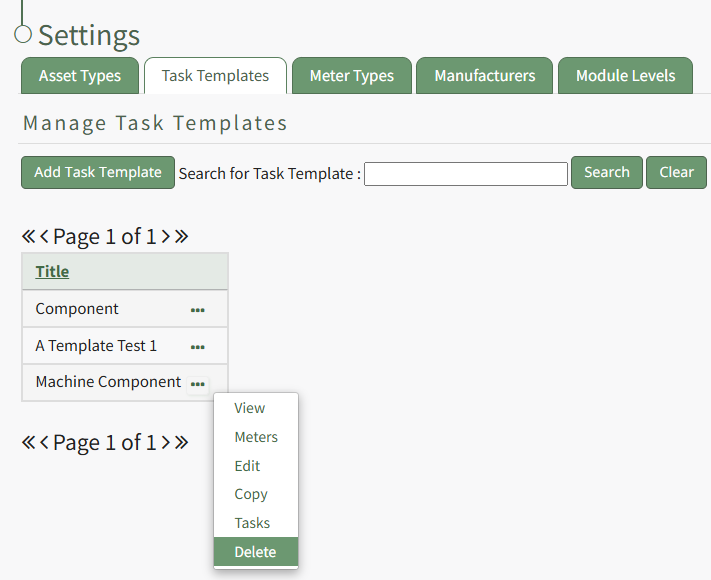
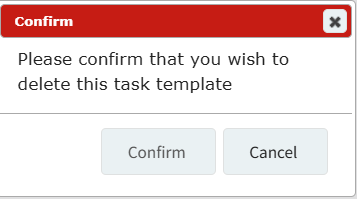

The Task Schedule for a Task Template Page
The Task Schedule for a Task Template Page is where the task template's tasks and permissive groups can be customized.
Assets Settings Page: Meter Types Tab
Various types of meters can be created and managed from the Meter Type Tab on the Settings Page of the Assets Module.
The table shows types of meters, not a list of individual meters. New meter types will be listed in table format on the Meter Type Tab with the meter data fields as column headers.

Selecting the green “Add Meter Type" button will open the New Meter Type Modal, from which a new meter can be named and parameters designated.
The dropdown list of log input options includes “actual,” “elapsed” or “both” to allow one to select an applicable data metric to track the new meter.
Selecting the three-dot icon to the right of a Meter Type title will open the Meter Type Context Menu. The options available to manage the Meter Type are explained in the table below.
Meter Type Context Menu Option Explanations Table | |
Option | Explanation |
View | Selecting "View" from the context menu will open the View Meter Type Modal which lists all key information regarding the specified meter type.
How To: View a Meter Type's Key InformationTo view the key information about a specific meter type, go to the Meter Types Tab on the Settings Page of the Assets Module. Select the three-dot icon to the right of the meter type ID opening the Meter Type Context Menu.
Select "View" from the context menu opening the View Meter Type Modal which states all information regarding the specific meter type.
The View Meter Type Modal is read-only. Select the "Close" button and return to the Meter Types Tab on the Settings Page. |
Edit | Selecting “Edit” from the context menu will open the Edit Meter Type Modal where the meter fields can be altered. How To: Edit a Meter TypeTo edit a meter type, go to the Meter Types Tab on the Settings Page of the Assets Module. Select the three-dot icon to the right of the meter type ID you wish to edit opening the Meter Type Context Menu.
Select "Edit" from the context menu opening the "Edit Meter Type" modal.
Make any desired changes and select the "Save" button.
A pop up confirms that the changes to the meter type were saved. |
Delete | Selecting Delete from the Meter Type Context menu will open a deletion confirmation modal that states, "Please confirm you wish to delete this meter type." How To: Delete a Meter TypeTo delete a meter type, go to the Meter Types Tab on the Settings Page of the Assets Module. Click the three-dot icon to the right of the meter type ID that you wish to delete opening the Meter Types Context Menu.
Select "Delete" from the context menu opening the Delete Meter Type Confirmation Modal which states, "Please confirm you wish to delete this meter type."
Select the "Confirm" button.
A pop up confirms the Meter Type has been deleted and is removed from the Meter Type Table.
|
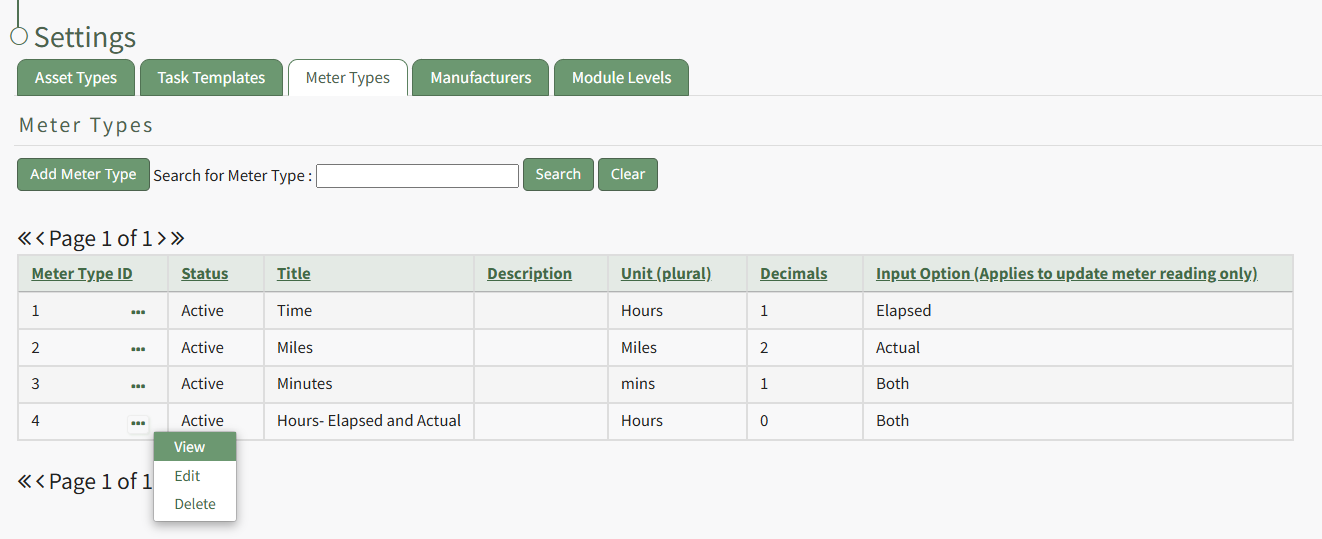
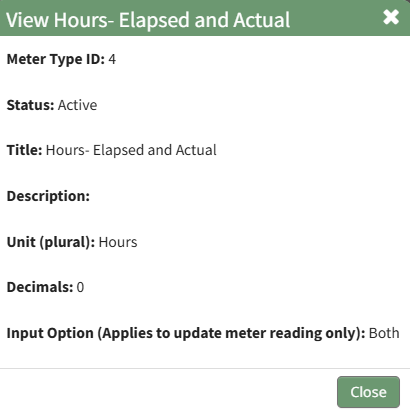
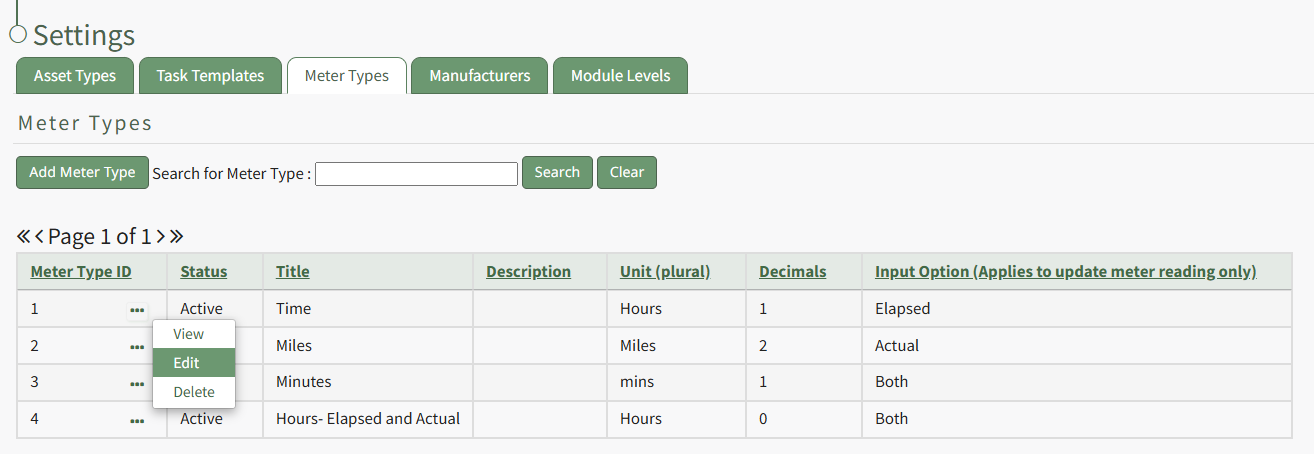
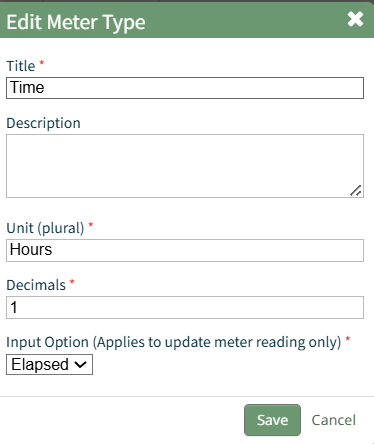
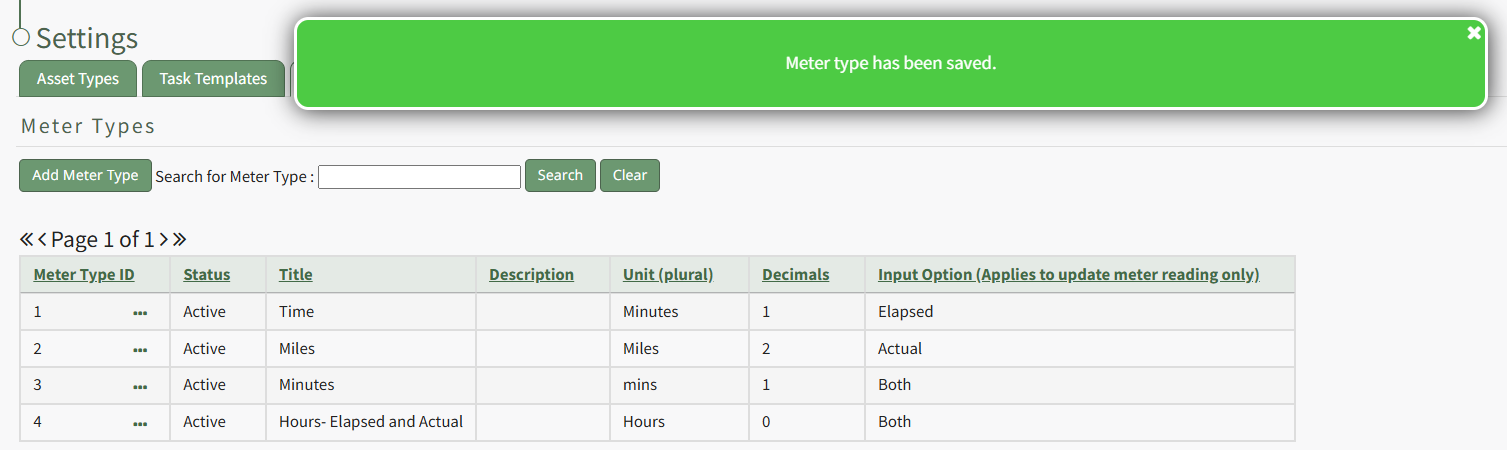
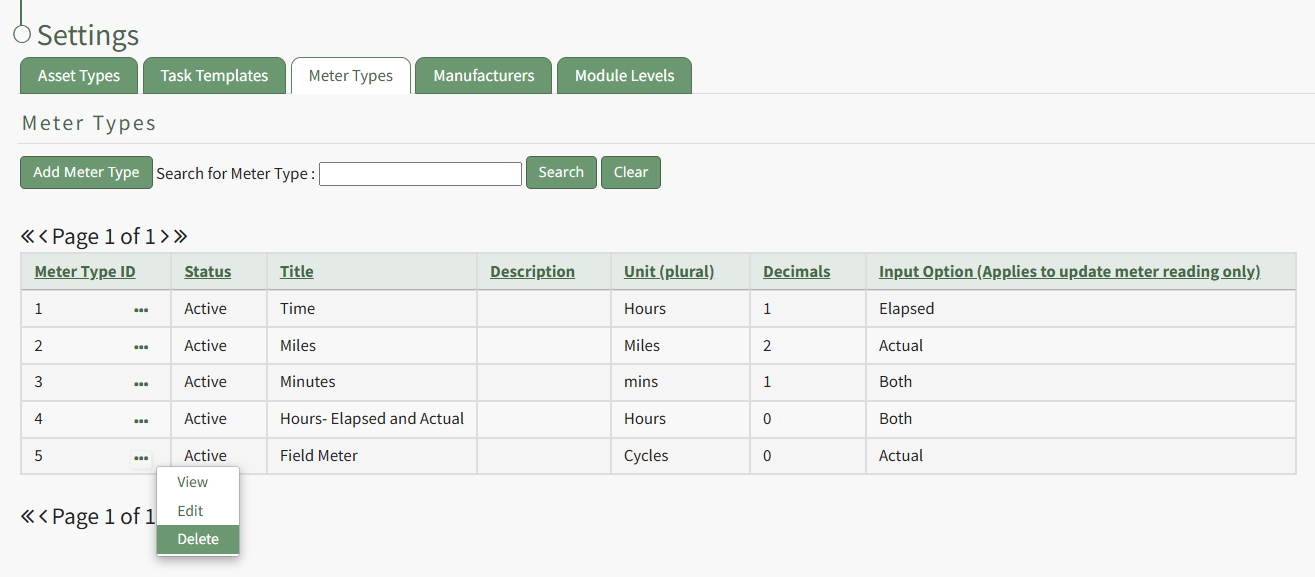
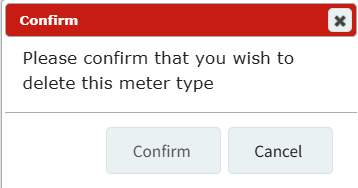
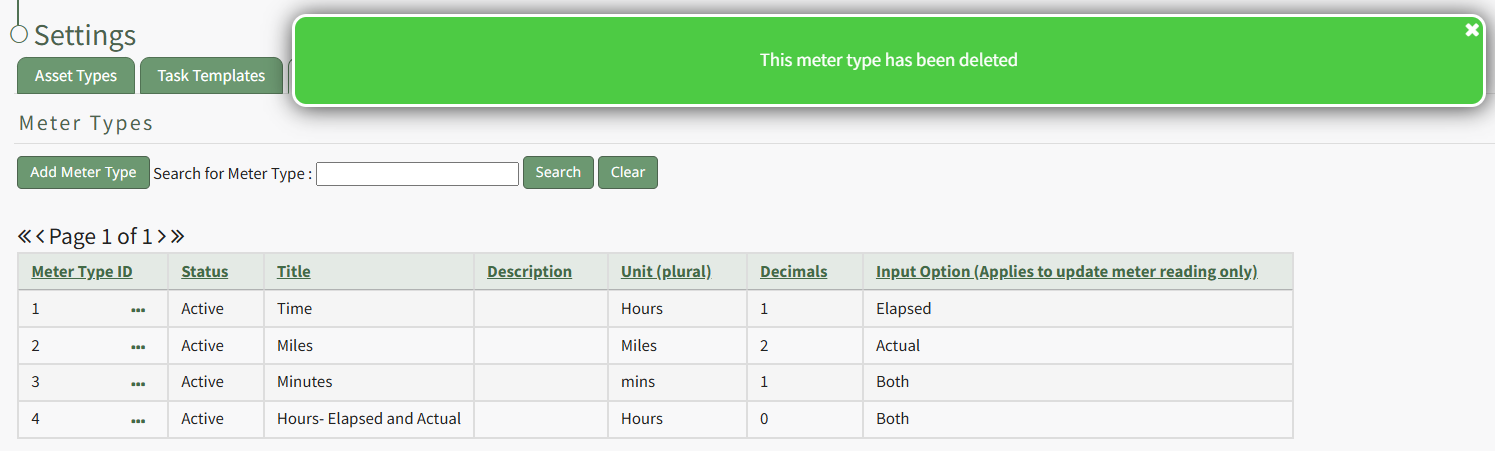
Assets Settings Page: Manufacturers Tab
The Manufacturers Tab on the Settings Page of the Assets Module allows the user to add new manufacturers, search through existing manufacturers and manage them from this page.
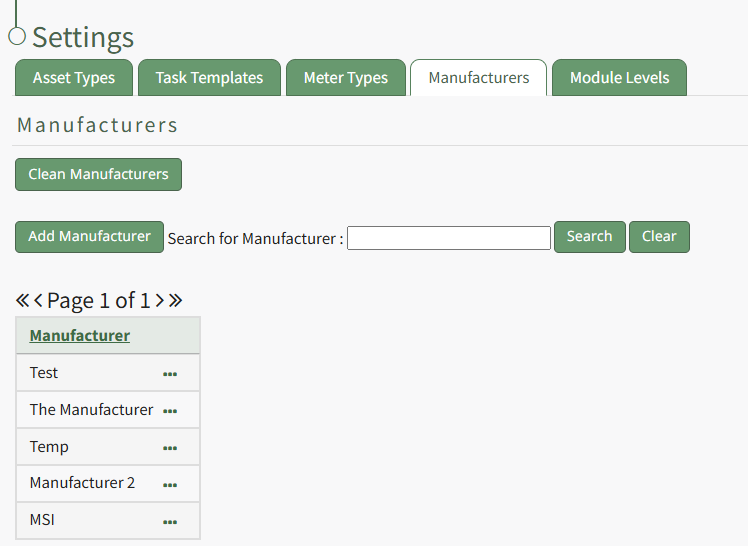
Selecting the green “Add Manufacturer” button will open a modal that will allow the user to add a new manufacturer who will be added to the table on the Manufacturer tab.
How To: Add a New Manufacturer
To add a new manufacturer, open the Manufacturer Tabs on the Settings Page in the Assets Module from the Main Menu.
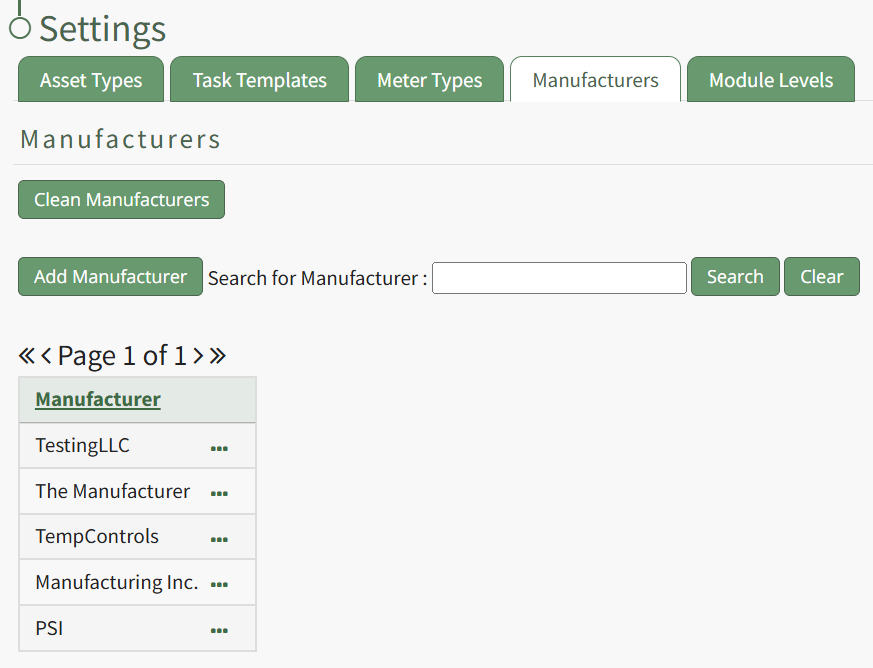
Select the Add Manufacturer button opening the New Manufacturer Modal.
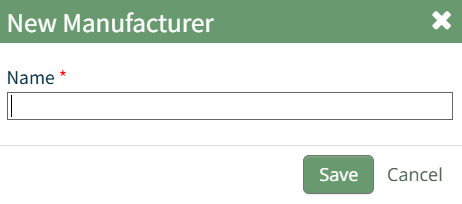
Input the name of the new manufacturer and click the "Save" button.
The new manufacturer will now show in the Manufacturer Table.
The “Clean Manufacturers” allows the user to remove any manufacturers with no asset associated and to merge any duplicate manufacturers listed.
KAStrack is programmed to require a backup of data prior to cleaning the manufacturers, so if this button is selected and a backup has not yet been completed, a prompt will appear to remind the user to first save the data and then return to this page.
Selecting the three-dot icon located to the right of the manufacturer in the Manufacturer Title table allows you to Manage the specific Manufacturer information.
Manufacturer Context Menu Option Explanations Table | |
Option | Explanation |
View | Selecting "View" from the context menu will open the Manufacturer Modal which lists assets, task templates, and files associated with the specified manufacturer. How To: View a Manufacturer's Key InformationTo view the relevant information associated with a manufacturer, go to the Manufacturers Tab on the Settings Page of the Assets Module. Click the three-dot icon to the right of the manufacturer whose key information you wish to view. This opens the Manufacturers Context Menu.
Select "View" from the context menu opening the Manufacturer Modal. Any assets, task templates, or files associated with the manufacturer will show on this modal.
The Manufacturer Modal is read-only. Select "Close" to return to the Manufacturers Tab on the Settings Page.
|
Edit | Selecting “Edit” from the context menu will open the Edit Manufacturer Modal where the manufacturer name can be altered. How To: Change a Manufacturer's NameTo edit the name of a manufacturer, go to the Manufacturers Tab on the Settings Page of the Assets Module. Select the three-dot icon to the right of the manufacturer whose name you wish to change.
Select "Edit" from the Manufacturers Context Menu opening the Edit Manufacturer Modal.
Make the necessary changes and select the "Save" button.
A pop up confirms that the edits to the Manufacturer have been saved, and the changes are now reflected in the Manufacturers Table.
|
Delete | Selecting Delete from the context menu will open a deletion confirmation modal that states, "Please confirm you wish to delete this manufacturer." How To: Delete a ManufacturerTo delete a manufacturer, go to the Manufacturers Tab on the Settings Page of the Assets Module and click the three-dot icon to the right of the manufacturer you wish to delete opening the Manufacturers Context Menu.
Select "Delete" from the context menu opening the Delete Manufacturer Confirmation Modal which states, "Please confirm that you wish to delete this manufacturer."
Select the "Confirm" button and a pop up confirms the manufacturer has been deleted.
The deleted Manufacturer has been removed from the Manufacturer Table. |

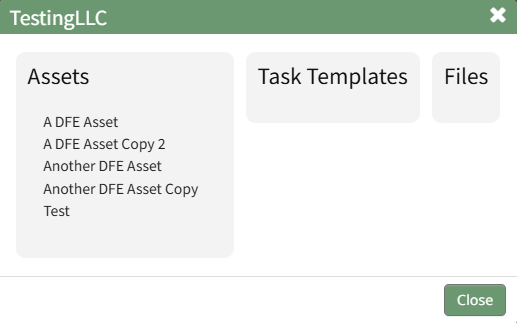


Assets Settings Page: Module Level Tab
The Module Levels Tab of Settings Page can be accessed from the Main Menu. The system default module levels for the module are visible in the Module Levels Table. New module levels with customizable permissions can be created and managed on this tab.

There are four system default module levels associated with Tags Module. An explanation of the permissions associated with each default module level are shown in the Assets Module Level Permissions Table below.
System default module levels cannot be customized.
Assets Module Level Permissions Table | |
Module Level | Permissions |
Admin | clean manufacturers, manage all assets, edit/delete/download files, log file uploads/faults/maintenance/modifications, log/view assets, pull reports, delete/modify log entries, add/delete/edit/assign/maintenance assets, add/delete meters and meter readings, view/edit/delete maintenance templates, maintenance comments, bulk editing permission |
Maintainer | upload files, log fault, log maintenance, add meter data, view/log assets |
Manager | delete/edit library files, delete/download files, upload files, log faults, log maintenance, add meter data, log/view assets, view reports, add maintenance comments, add/delete/edit/assign/copy assets, add/delete meters, edit/delete meter components, bulk editing permission |
Observer | Download files, view/log assets, view reports |
New Module Levels can be created in order to customize module level permissions. An explanation of the icons associated with customized module levels have been provided in the table below.
Module Level Customization Icons | |
Icon | Explanation |
| The eyeball icon allows you to view users assigned to the module level as well as the permissions assigned to them. |
| The bulleted list icon allows you to assign permissions to customized module levels. |
| The pencil icon opens the Edit Module Level Modal. |
| The trashcan icon opens the Delete Module Level Confirmation Modal. |


How To: Create a New Module Level (Assets Module)
To create a new module level with customizable permissions in the Assets Module, go to the Module Level Tab on the Settings Page of the Assets Module.
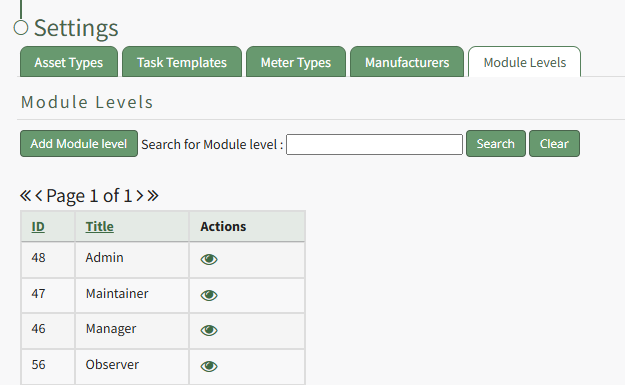
Select the “Add Module Level” button opening the New Module Level Modal.

Selecting “New Module Level” on the Manage Module Levels page opens the New Module Level modal. Input the name of the customized model level.
Any users with the selected certification roles will automatically get the permissions for this Assets module level.
You have the option to assign the people associated with specific roles to the new module level and add any notes.
Select “Save.” Module levels will be listed alphabetically.

Users must select which permissions are allowed for a customized module level. Select the bullet list icon in the Actions Column of the new Module Level opening the Module Level Permissions Modal.
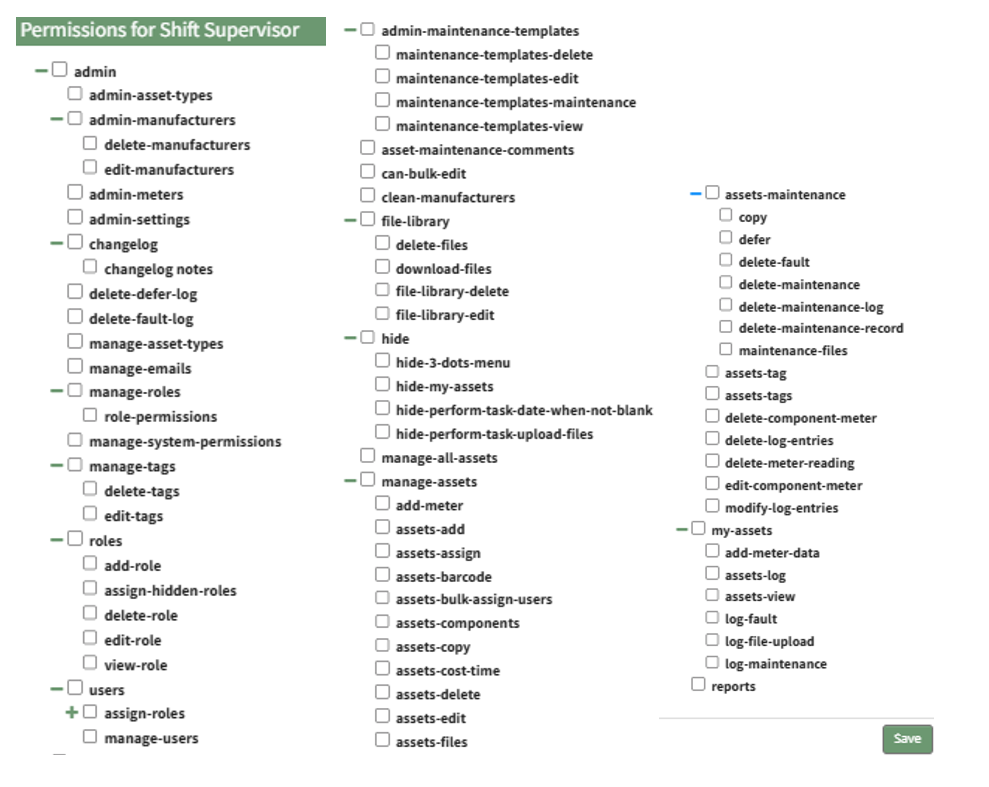
Click the checkboxes to assign permissions to the new Module Level.
Select “Save” and the permissions have been assigned to the Module Level.
Access levels for all modules can also be managed in the Site Settings Module under Access Levels.
