Accounts Module
- Accounts: Introduction
- Accounts Module Summary
- Understanding Access Levels
- Understanding User Status
- Understanding KAStrack's Password and Username Requirements
- Understanding My Channels
- Accounts Page
- Accounts Page Active Tab
- Accounts Page Org Chart Tab
- Accounts Page Registrations Tab
- Accounts Page Archived Tab
- Accounts Page Create Tab
- Accounts Page Import Tab
- Accounts Page Export Tab
- My Accounts Page
- My Accounts Page: Account Info Tab
- My Accounts Page: Notifications Tab
- My Accounts Page: Notifications History Tab
- My Accounts Page: Payment History Tab
- My Accounts Page: Reset Password Tab
- Accounts: Supplemental Resources
Accounts: Introduction
Accounts Module Summary
The Accounts Module is where all KAStrack user information (username, password, contact information, etc.) can viewed and managed. There are two pages in this module: My Accounts Page (each user has access) and the Accounts Page (for those given managerial access). Both pages are subdivided into tabs.
The Accounts Module has its own communication feature, called Channels, that serves as a commenting / bulletin board feature only visible to an individual and their supervisors. All accounts have one channel by default, called the Supervisor Channel. Additional channels can be created by administrators if desired.
Understanding Access Levels
An Access Level is an authority designation in KAStrack. There are four default Access Levels: Admin, Supervisor, Employee, and Observer. The permissions granted to each Access Level are outlined in the Site Settings Module on the Access Levels Tab. Customized Access Levels and the permissions associated with them can be created and customized for your organization. A user can have multiple Access Level designations but must be assigned one per module in order to access that module in KAStrack.
By default, a user with an Admin Access Level will not be seen in the People Module unless they are also given the designation an Employee Access Level.
Understanding User Status
The Status column designates if a KAStrack user is active or inactive. Inactive account parameters are established on the Inactive Accounts Tab in the Site Settings Module.
Understanding KAStrack's Password and Username Requirements
The default settings in KAStrack require passwords to be a minimum of 8 characters. By default, a temporary password is entered for a new user, who is required to update their password at initial login. Individuals with an Admin access level can alter password requirements by going to the Security Tab of the Site Setting Module.
All passwords created through an import of information will be designated as temporary.
How To: Edit Password Requirements
To edit password requirements, open the Security Tab in the Site Settings Module. The current settings will show before changes are made.

Select the “Edit Security Settings” button, opening an editable Password Requirements Page.

Input a whole number as your preferred minimum length requirement into the textbox.
Select the appropriate checkboxes to require users to have an uppercase letter, lowercase letter, special character, and/or number in the password.
Selecting the “Force users who do not meet requirements to reset on next login” checkbox will require any existing users whose password is no longer compliant to reset their password when they attempt to login next.
New users will be forced to meet the requirements when they login for the first time / register their account.

Click “Cancel” to return to the Security Tab without making any changes.
Select the “Save” button and return to the Security Tab. The changes made and saved are now reflected on the Security Tab.
Usernames can only include alphabetical lowercase letters, numbers, hyphens (-), underscores (_), periods (.), or “at” signs (@). No other special characters or spaces are permitted, and usernames cannot start with an underscore.
Understanding My Channels
The Accounts Module has its own communication feature referred to as Channels that allows for comments to be sent between individuals and their supervisors and for comments to be shared between supervisory roles only. A date and time stamp are assigned to each comment as it is sent. An individual can access Channels on the Account Info Tab on the My Account Page.
For individuals with Supervisor and Admin module level access, channels are divided into two tabs: My Channels and All Channels.

The My Channels Tab will list all comment channels that an individual has access to.
The All Channels Tab will list all comment channels. The Supervisor Chanel is a default channel that allows comments to be made that are accessible by an individual and that individual’s supervisors.

Only individuals with Admin module access will see the clickable “Add Comment Channel” link.
If an individual does not have access to the channel the statement, “You do not have permission to view this channel because you are not a participant,” will show in place of the comment textbox.

Accounts Page
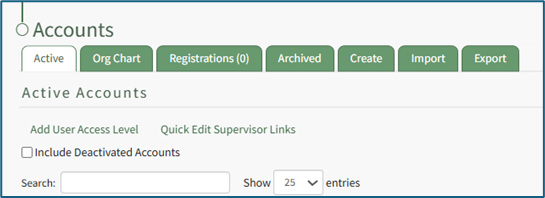
Accounts Page Active Tab
The Active Tab in the Accounts Module displays the Active Accounts Table, which lists user accounts in the KAStrack system.
Individuals with Supervisor module level access will only see the users they supervise on this table, while individuals with Admin module level access will see all users sitewide.
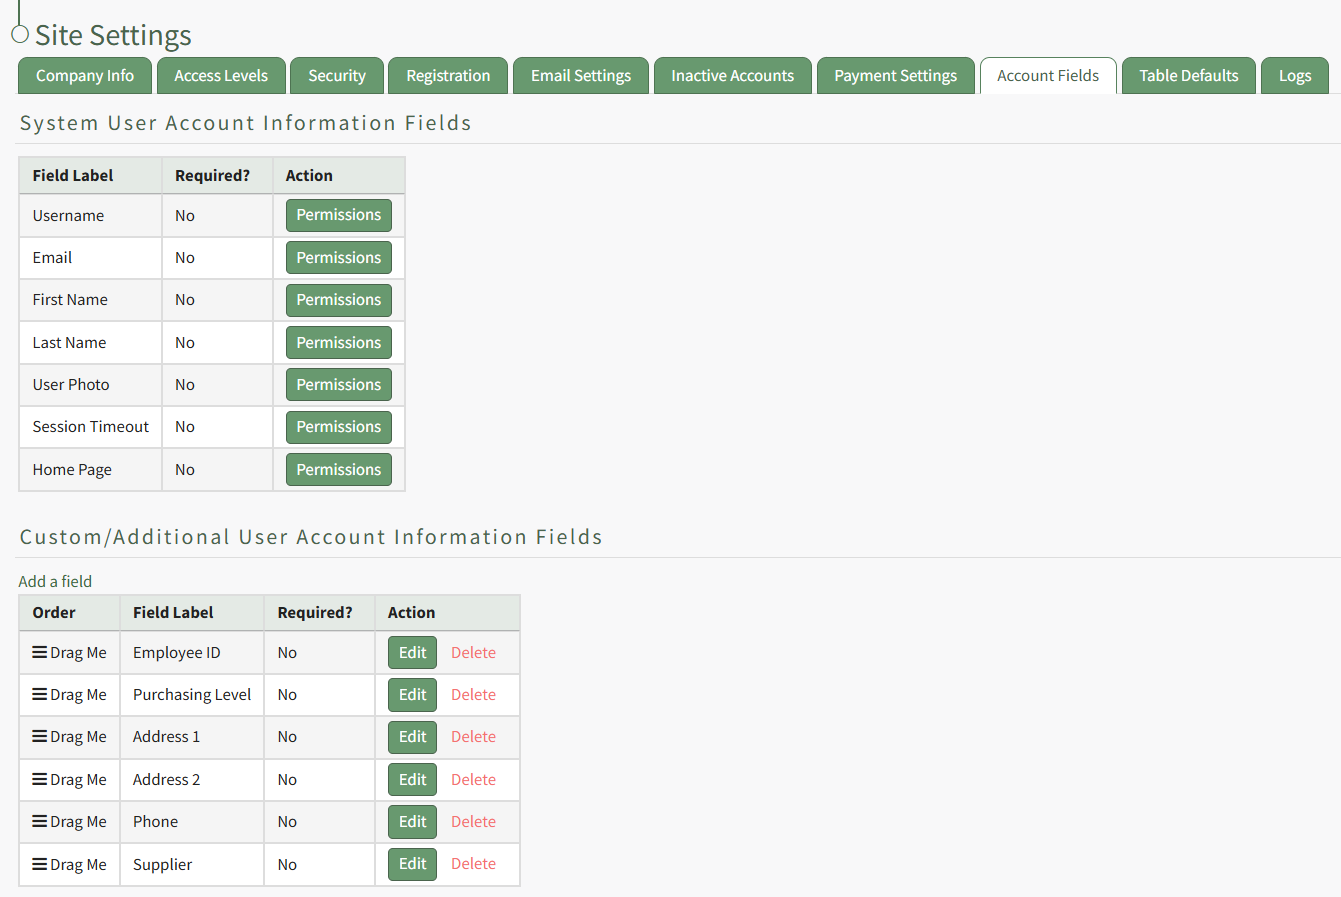
The Active Accounts Table shows account data. Account fields are used as the column headers. The default columns are Name, Username, Email, Access Levels, Supervisors, Status (active/inactive), and Last Active.
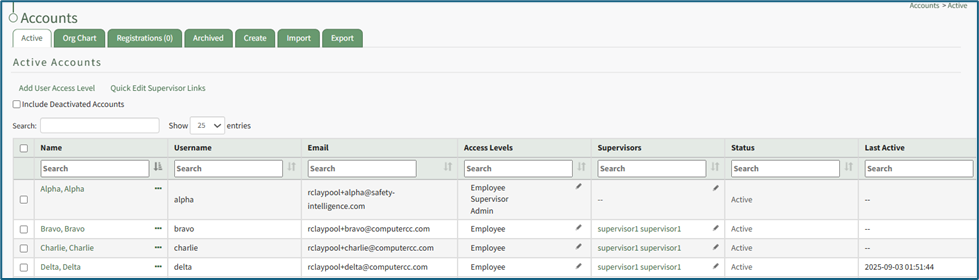
Any desired account field can be created by an administrator.
How To: Add a Custom/Additional User Account Information Field
To add a user account information field, open the Account Fields Tab in the Site Settings Module from the Main Menu.
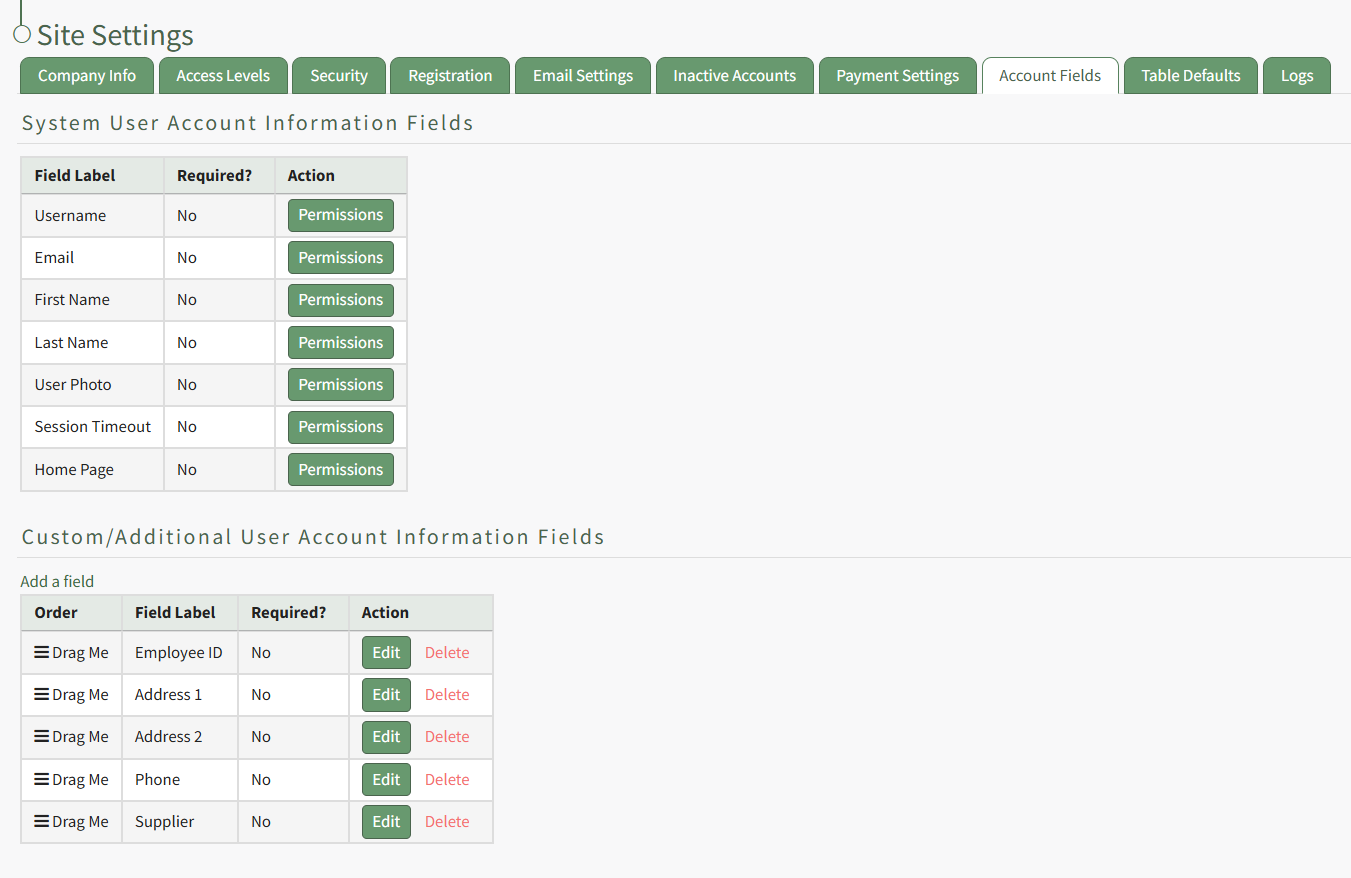
Click the "Add a Field" clickable link above the Custom / Additional User Account Information Fields opening the Add Field Modal.
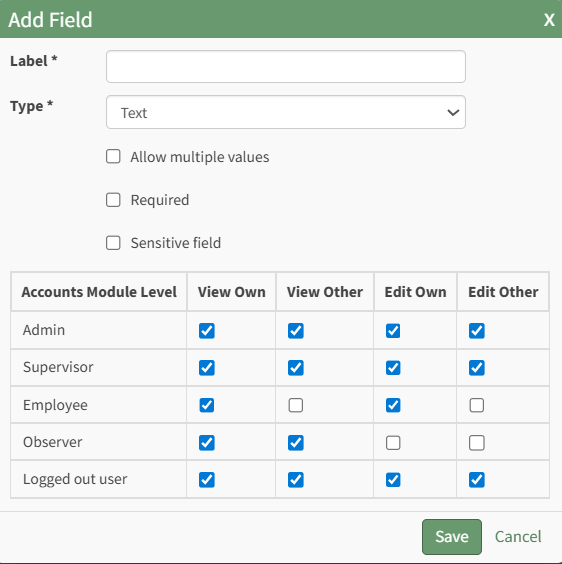
Input the label for the field.
Select the field type (text or email) from the dropdown menu.
Selecting the checkbox enables customization to "Allow multiple values," make the field "Required," or make it a "Sensitive Field."
Designating the field as a "Sensitive Field" allows an extra step in form security when integrating these fields within the Form module. The Form Designer must explicitly choose when they wish to use a sensitive field.
The Permissions Table determines who can view / edit their own and other user's fields. Selecting the checkbox gives the individual the specified permission. Deselecting the checkbox removed the permission.
Select the "Save" button and the custom field now shows in the table.
Use the Drag Me icon to drag and drop the field into your desired position of choice.
The Active Accounts table can be customized on the Table Defaults Tab of the Site Settings Module.
How To: Edit the Accounts Module Active Accounts Table
To edit the Active Accounts Table in the Accounts Module, go to the Table Defaults Tab in the Site Settings Module.
Select “Accounts: Active” from the dropdown menu.

Select the “Edit Columns” button, opening the Choose Columns Modal. The default column choices include: name, username, email, access levels, supervisors, become, status, last active, login, archive, first name, last night, employee ID, phone, Address 1 and Address 2 and any customized account fields.
How To: Add a Custom/Additional User Account Information Field
To add a user account information field, open the Account Fields Tab in the Site Settings Module from the Main Menu.
Click the "Add a Field" clickable link above the Custom / Additional User Account Information Fields opening the Add Field Modal.
Input the label for the field.
Select the field type (text or email) from the dropdown menu.
Selecting the checkbox enables customization to "Allow multiple values," make the field "Required," or make it a "Sensitive Field."
Designating the field as a "Sensitive Field" allows an extra step in form security when integrating these fields within the Form module. The Form Designer must explicitly choose when they wish to use a sensitive field.
The Permissions Table determines who can view / edit their own and other user's fields. Selecting the checkbox gives the individual the specified permission. Deselecting the checkbox removed the permission.
Select the "Save" button and the custom field now shows in the table.
Use the Drag Me icon to drag and drop the field into your desired position of choice.
The bars icon allows the columns to be positioned in the order of your choosing.
Click “Cancel” to return to the Table Defaults Tab without making any changes.
Select the “Save” button to make the desired changes and return to the Table Defaults Tab. A preview of the first five rows of the table is shown. Select the “View Live Table” button to be directed to the live table in the Accounts Module.
This would include any additional account fields created as discussed above plus other existing account fields such as First Name, Last Name, Employee ID, Phone, Address 1, and Address 2.
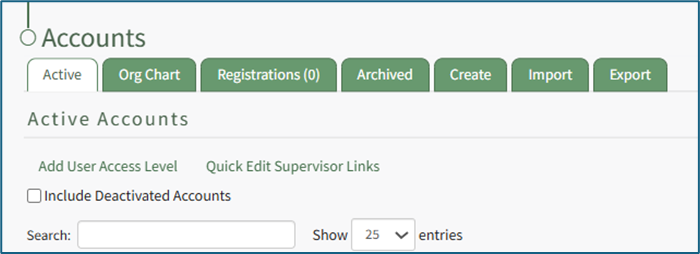
The Active Tab has two clickable links: Add User Access Level (allows for the alteration of a user’s access levels) and Quick Edit Supervisor Links (allows for the alteration of the users a supervisor manages.)
How To: Add an Access Level for an Individual
To add an access level for an individual user, go to the Active Tab on the Accounts Page of the Accounts Module. This tab is also accessible from the Main Menu. There are three ways to add an access level for a user from the Active Tab.

You can also update multiple users’ access levels via the Import Tab on the Accounts Page. When doing so, make sure to separate each access level with a semicolon.
How To: Bulk Import Account Information
Before bulk importing several new accounts, be sure that your organization has customized the account information fields to meet your needs. WIKI LINK TO ACCOUNT FIELDS TAB: SITE SETTINGS Once your account information preferences have been established in the Site Settings Module, you can begin organizing the CSV file for bulk imports.
Open the Import Tab on the Accounts Page in the Accounts Module.

Select the “Download Template” button to have KAStrack generate a template with the appropriate fields in separate columns that match the designated preferences in the Site Settings Module.
When your CSV file with new account information is complete, ensure it is saved with the CSV format UTF-8.
Click “Choose File,” and select the correct CSV file from your computer. Click “Open”.
Each of the Account Information fields will now show below the selected CSV file.
KAStrack scans the first row of your CSV file for matching column headers and attempts to map your column headers to the appropriate Account Fields. The dropdown menu next to each field will automatically be set to any matching column headings from the CSV.
If a matching column couldn't be found, you can manually choose which column should map to those Account Fields by choosing an option from the dropdown.
Select the “Import Accounts” button to import the information. Click “Cancel” to return to the Active Tab on the Accounts Page without saving information.
The Import Tab can also be used to update existing account information. The KAStrack- generated unique user ID is a required column in the CSV file if editing an existing account. This can be found in the URL at the top of your browser when viewing a user’s Account Info page, or by doing an account export.
How To: Export User Account Information
Open the Export Tab on the Accounts Page in the Accounts Module.

There are two checkboxes that allow for customization of your export. Both or neither can be included.
Select “Include archived accounts in export” to include archived accounts in your export. Select “Include inactive accounts in export” to include inactive accounts in your export.
Click “Export local accounts” and a CSV file will automatically be downloaded to your personal device.
Helpful Tips for Bulk Imports
The CSV document created to import account information will vary based on your customized Site Settings. Required account fields are username, password, first and last name. Required status for fields is designated by an asterisk (*). Each included field should be represented by its own column in the CSV document.
Required system user account information fields do not show as required on the Account Fields Tab on the Site Settings Page.
Helpful Tips for Account Information Bulk Imports | |
Field | Comments / Suggestions |
User ID | The User ID is a unique system ID for the user. Leave blank to create a new user. |
Username* | Required Field. Character usage is limited to lowercase letters, numbers, hyphens, underscores, periods, or at signs. A username cannot contain spaces and cannot start with an underscore. When editing an existing account via imports, the username and email cannot be changed simultaneously. |
This field may be left blank when creating a new user. If so, an email address will be generated for the user with the format: username@sitename.kastrack.com. When editing an existing account via imports, the username and email cannot be changed simultaneously. | |
Password* | Required Field. Default settings require a minimum of 8 characters. All passwords created in an import will be temporary. Users will be required to update their password upon their initial login. |
First Name* | Required Field. |
Last Name* | Required Field. |
Access Levels | KAStrack defaults: Employee, Supervisor, Admin, Observer. Customized Access Levels can be created. Separate multiple values with a semi-colon. If a user is not assigned an Access Level, they will not have access to ANY modules. This column can be left blank if the Access Level is identified in the Registration Profile applied to the user. |
Supervisor | The supervisor’s username must be entered verbatim. Separate multiple values with a semi-colon. This column can be left blank if the Supervisor is identified in the Registration Profile applied to the user. |
Certification Role | Allows assignment of roles in the People Module. Multiple values should be separated with a semi-colon. Role names must be preceded by Company name as listed in the People Module, e.g. CompanyName RoleName. This column can be left blank if Certification Roles are identified in the Registration Profile applied to the user. |
Status | User status cannot be changed through import. All new imported accounts will automatically be Active. |
Employee ID | This is an optional field (included by default settings) that can be edited or removed by going to the Account Fields Tab in Site Settings. |
Phone | This is an optional field (included by default settings) that can be edited or removed by going to the Account Fields Tab in Site Settings. |
Address 1 | This is an optional field (included by default settings) that can be edited or removed by going to the Account Fields Tab in Site Settings. |
Address 2 | This is an optional field (included by default settings) that can be edited or removed by going to the Account Fields Tab in Site Settings. |
Registration Profile | This column is used to apply Registration Profiles to accounts. The full name of the Registration Profile must be entered. The following fields listed above can be modified through the Registration Profile: Access Levels, Supervisors, and Certification Roles. |
Custom Fields | If other custom fields have been created on the Account Fields Tab in Site Settings, they can be included as column headers in an Import. These fields may or may not be required based on their settings in the Account Fields Tab. |
Adding an Access Level Using the Add User Access Level Quick Link
To add an access level using the add user access level quick link, go to the Active Tab on the Accounts Page.
“Add User Access Level” opening the Add Access Level Modal.

Select the individual user from the list provided on the dropdown menu.
Select the Access Level you would like to add to the user’s account.
Select the “Save” button to save the changes within the system or click “Cancel” to return to the Active Tab on the Accounts Page.
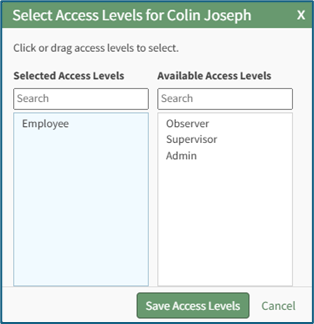
A second way to edit a user’s access levels is from the Active Accounts Table (if the Access Level column is included on the Active Accounts Table, which can be customized).
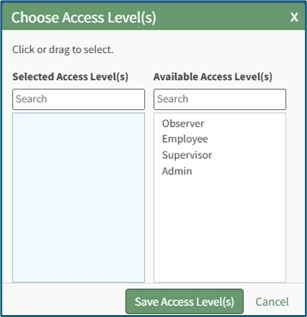
The modal will display two columns: Selected Access Levels (what has been assigned to the user) and Available Access Levels (what can still be assigned). Drag and drop the designations as desired or click an item to move it from its current column to the other.
Select the “Save Access Levels” button at the bottom of the modal to save the changes or click “Cancel” to return to the Active Accounts Tab on the Accounts Page.
Adding an Access Level by Editing a User's Account Information
To add an access level by editing a user’s account information, go to the Active Tab of the Accounts Page. Select the three dots (…) icon in the Name column opening the context menu for the specific user, and select “Edit Account Info”. Click “Add/Edit Access Level(s)” in the Access Levels Field.

The Select Access Levels Modal will display the two-column drag-and-drop tool.
Adding an Access Level from the Active Accounts Table
Adding an access level from the active accounts table is only possible if the access level column shows on the active accounts table, which is included by default. If the column is not visible, it can be added through the Site Settings Module.
How To: Edit the Accounts Module Active Accounts Table
To edit the Active Accounts Table in the Accounts Module, go to the Table Defaults Tab in the Site Settings Module.
Select “Accounts: Active” from the dropdown menu.
Select the “Edit Columns” button, opening the Choose Columns Modal. The default column choices include: name, username, email, access levels, supervisors, become, status, last active, login, archive, first name, last night, employee ID, phone, Address 1 and Address 2 and any customized account fields.
How To: Add a Custom/Additional User Account Information Field
To add a user account information field, open the Account Fields Tab in the Site Settings Module from the Main Menu.
Click the "Add a Field" clickable link above the Custom / Additional User Account Information Fields opening the Add Field Modal.
Input the label for the field.
Select the field type (text or email) from the dropdown menu.
Selecting the checkbox enables customization to "Allow multiple values," make the field "Required," or make it a "Sensitive Field."
Designating the field as a "Sensitive Field" allows an extra step in form security when integrating these fields within the Form module. The Form Designer must explicitly choose when they wish to use a sensitive field.
The Permissions Table determines who can view / edit their own and other user's fields. Selecting the checkbox gives the individual the specified permission. Deselecting the checkbox removed the permission.
Select the "Save" button and the custom field now shows in the table.
Use the Drag Me icon to drag and drop the field into your desired position of choice.
The bars icon allows the columns to be positioned in the order of your choosing.
Click “Cancel” to return to the Table Defaults Tab without making any changes.
Select the “Save” button to make the desired changes and return to the Table Defaults Tab. A preview of the first five rows of the table is shown. Select the “View Live Table” button to be directed to the live table in the Accounts Module.
To add an access level from the Active Accounts Table, go to the Active Tab on the Accounts Page.

Select the pencil icon to the right of the access level in the Access Levels Column. This opens the Select Access Levels Modal.
The modal will display two columns: Selected Access Levels (what has been assigned to the user) and Available Access Levels (what can still be assigned). Drag and drop the designations as desired or click an item to move it from its current column to the other.
Select the “Save Access Levels” button at the bottom of the modal to save the changes or click “Cancel” to return to the Active Accounts Tab on the Accounts Page.
How To: Edit a User's Supervisor
To edit an individual user’s supervisor in KAStrack, go to the Active Tab on the Accounts Page of the Accounts Module. This tab is also accessible from the Main Menu. There are three ways to edit a supervisor from the Active Tab.
You can also update multiple users’ access levels via the Import Tab on the Accounts Page. When doing so, make sure to separate each access level with a semicolon.
How To: Bulk Import Account Information
Before bulk importing several new accounts, be sure that your organization has customized the account information fields to meet your needs. WIKI LINK TO ACCOUNT FIELDS TAB: SITE SETTINGS Once your account information preferences have been established in the Site Settings Module, you can begin organizing the CSV file for bulk imports.
Open the Import Tab on the Accounts Page in the Accounts Module.
Select the “Download Template” button to have KAStrack generate a template with the appropriate fields in separate columns that match the designated preferences in the Site Settings Module.
When your CSV file with new account information is complete, ensure it is saved with the CSV format UTF-8.
Click “Choose File,” and select the correct CSV file from your computer. Click “Open”.
Each of the Account Information fields will now show below the selected CSV file.
KAStrack scans the first row of your CSV file for matching column headers and attempts to map your column headers to the appropriate Account Fields. The dropdown menu next to each field will automatically be set to any matching column headings from the CSV.
If a matching column couldn't be found, you can manually choose which column should map to those Account Fields by choosing an option from the dropdown.
Select the “Import Accounts” button to import the information. Click “Cancel” to return to the Active Tab on the Accounts Page without saving information.
The Import Tab can also be used to update existing account information. The KAStrack- generated unique user ID is a required column in the CSV file if editing an existing account. This can be found in the URL at the top of your browser when viewing a user’s Account Info page, or by doing an account export.
How To: Export User Account Information
Open the Export Tab on the Accounts Page in the Accounts Module.
There are two checkboxes that allow for customization of your export. Both or neither can be included.
Select “Include archived accounts in export” to include archived accounts in your export. Select “Include inactive accounts in export” to include inactive accounts in your export.
Click “Export local accounts” and a CSV file will automatically be downloaded to your personal device.
Helpful Tips for Bulk Imports
The CSV document created to import account information will vary based on your customized Site Settings. Required account fields are username, password, first and last name. Required status for fields is designated by an asterisk (*). Each included field should be represented by its own column in the CSV document.
Required system user account information fields do not show as required on the Account Fields Tab on the Site Settings Page.
Helpful Tips for Account Information Bulk Imports | |
Field | Comments / Suggestions |
User ID | The User ID is a unique system ID for the user. Leave blank to create a new user. |
Username* | Required Field. Character usage is limited to lowercase letters, numbers, hyphens, underscores, periods, or at signs. A username cannot contain spaces and cannot start with an underscore. When editing an existing account via imports, the username and email cannot be changed simultaneously. |
This field may be left blank when creating a new user. If so, an email address will be generated for the user with the format: username@sitename.kastrack.com. When editing an existing account via imports, the username and email cannot be changed simultaneously. | |
Password* | Required Field. Default settings require a minimum of 8 characters. All passwords created in an import will be temporary. Users will be required to update their password upon their initial login. |
First Name* | Required Field. |
Last Name* | Required Field. |
Access Levels | KAStrack defaults: Employee, Supervisor, Admin, Observer. Customized Access Levels can be created. Separate multiple values with a semi-colon. If a user is not assigned an Access Level, they will not have access to ANY modules. This column can be left blank if the Access Level is identified in the Registration Profile applied to the user. |
Supervisor | The supervisor’s username must be entered verbatim. Separate multiple values with a semi-colon. This column can be left blank if the Supervisor is identified in the Registration Profile applied to the user. |
Certification Role | Allows assignment of roles in the People Module. Multiple values should be separated with a semi-colon. Role names must be preceded by Company name as listed in the People Module, e.g. CompanyName RoleName. This column can be left blank if Certification Roles are identified in the Registration Profile applied to the user. |
Status | User status cannot be changed through import. All new imported accounts will automatically be Active. |
Employee ID | This is an optional field (included by default settings) that can be edited or removed by going to the Account Fields Tab in Site Settings. |
Phone | This is an optional field (included by default settings) that can be edited or removed by going to the Account Fields Tab in Site Settings. |
Address 1 | This is an optional field (included by default settings) that can be edited or removed by going to the Account Fields Tab in Site Settings. |
Address 2 | This is an optional field (included by default settings) that can be edited or removed by going to the Account Fields Tab in Site Settings. |
Registration Profile | This column is used to apply Registration Profiles to accounts. The full name of the Registration Profile must be entered. The following fields listed above can be modified through the Registration Profile: Access Levels, Supervisors, and Certification Roles. |
Custom Fields | If other custom fields have been created on the Account Fields Tab in Site Settings, they can be included as column headers in an Import. These fields may or may not be required based on their settings in the Account Fields Tab. |
Using the Quick Edit Supervisor Link
To add a supervisor for an employee using the Quick Edit Supervisor Link, go to the Active Tab on the Accounts Page.
Click “Quick Edit Supervisor Links” opening the Set Supervised Users Modal.
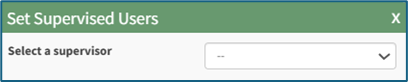
Select the supervisor from the dropdown menu provided. KAStrack will then open a list of users to be listed under the selected supervisor in the organization’s hierarchal structure.
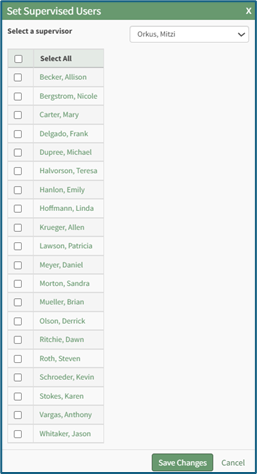
The checkbox on the first row allows for the selection of all employees listed. You can also click the appropriate checkboxes individually.
Select the “Save Changes” button to save the changes within the system or click “Cancel” to return to the Active Tab on the Accounts Page.
By Editing a User's Account Information
To edit a user’s supervisors by editing a user’s account information, go to the Active Tab of the Accounts Page. Select the three dots (…) icon in the Name column opening the context menu for the specific user and select “Edit Account Info”.
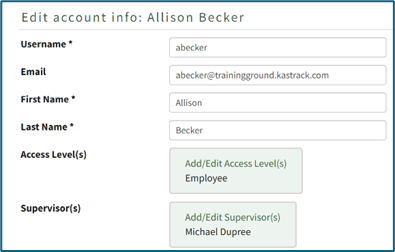
Click “Add/Edit Supervisor(s)” in the Supervisor(s) Field opening the Choose Supervisor Modal.
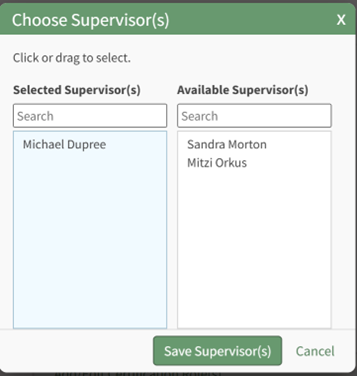
The Choose Supervisor(s) Modal will display the two-column drag-and-drop tool.
There are two columns: Selected Supervisor(s) (what has been assigned to the user) and Available Supervisor(s) (what can still be assigned). Drag and drop the designations as desired or click an item to move it from its current column to the other.
Select the “Save Supervisor(s)” button at the bottom of the modal to save the changes or click “Cancel” to return to the Edit Account Info Page.
From the Active Accounts Table
Editing a supervisor from the active accounts table is only possible if the Supervisor column shows on the Active Accounts Table, which included by default. If the column is not visible, it can be added through the Site Settings Module.
How To: Edit the Accounts Module Active Accounts Table
To edit the Active Accounts Table in the Accounts Module, go to the Table Defaults Tab in the Site Settings Module.
Select “Accounts: Active” from the dropdown menu.
Select the “Edit Columns” button, opening the Choose Columns Modal. The default column choices include: name, username, email, access levels, supervisors, become, status, last active, login, archive, first name, last night, employee ID, phone, Address 1 and Address 2 and any customized account fields.
How To: Add a Custom/Additional User Account Information Field
To add a user account information field, open the Account Fields Tab in the Site Settings Module from the Main Menu.
Click the "Add a Field" clickable link above the Custom / Additional User Account Information Fields opening the Add Field Modal.
Input the label for the field.
Select the field type (text or email) from the dropdown menu.
Selecting the checkbox enables customization to "Allow multiple values," make the field "Required," or make it a "Sensitive Field."
Designating the field as a "Sensitive Field" allows an extra step in form security when integrating these fields within the Form module. The Form Designer must explicitly choose when they wish to use a sensitive field.
The Permissions Table determines who can view / edit their own and other user's fields. Selecting the checkbox gives the individual the specified permission. Deselecting the checkbox removed the permission.
Select the "Save" button and the custom field now shows in the table.
Use the Drag Me icon to drag and drop the field into your desired position of choice.
The bars icon allows the columns to be positioned in the order of your choosing.
Click “Cancel” to return to the Table Defaults Tab without making any changes.
Select the “Save” button to make the desired changes and return to the Table Defaults Tab. A preview of the first five rows of the table is shown. Select the “View Live Table” button to be directed to the live table in the Accounts Module.
To add a supervisor for an employee from the Active Accounts Table, go to the Active Tab on the Accounts Page.

Select the pencil icon to the right of the supervisor in the Supervisors Column. This opens the Select Supervisors Modal.
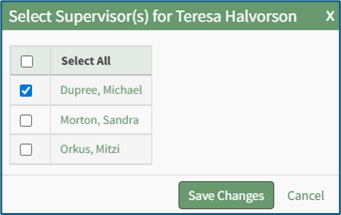
Select the checkboxes to the left of the desired supervisor(s). Then select the “Save Changes” button to save the changes within the system or click “Cancel” to return to the Active Tab on the Accounts Page.
Select the “Include Deactived Accounts” checkbox to view accounts that are inactive on the active accounts table.
Individuals will only be able to see deactivated accounts that they directly supervise. Individuals with admin access level will see all deactivated accounts.
On the Active Tab, bulk actions are only available to individuals with Admin module level access. Selecting any checkbox in a row opens a bulk actions modal above the table. Selecting the checkbox in the first column of the top row selects / deselects all rows in the table.

Bulk action options are Deactivate, Archive, and Export QR Codes.
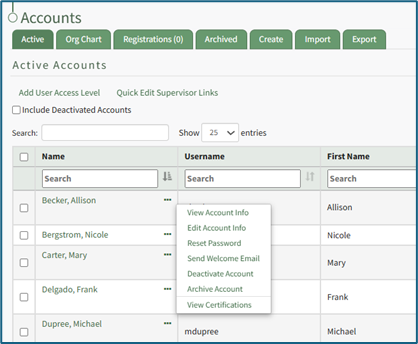
Active Accounts Table Context Menu Explanations
The three dot (…) icon shown in the Name Column of the Active Accounts Table opens the Active Accounts Table context menu. The context menu has seven options for account management: View Account Info, Edit Account Info, Reset Password, Send Welcome Email, Deactivate Account, Archive Account, and View Certificates.
Active Accounts Table Context Menu Explanations | |
Option | Explanation |
View Account Info | Selecting “View Account Info” from the context menu opens the Account Info Tab for the user selected. The context menu from this page offers the same options as the Active Accounts Table. |
Edit Account Info | Selecting “Edit Account Info” from the context menu opens the Edit Account Info Tab for the user selected. Changes can be made to a user’s personal information from this page. You must select “Save” at the bottom of the page for changes to be saved in the system. Required fields are denoted by an asterisk (*). When editing an existing account, only the username or the email fields can be changed at the same time. |
Reset Password | Selecting “Reset Password” opens the Reset Password Tab for the user selected. How To: Reset the Password for Another UserTo reset the password for another user, you must have Admin or Supervisor Module Level access for the Accounts Module. By default, both Admin and Supervisor Access Levels have the ability to change passwords. Access levels are customized in the Site Settings Module. Open the Active Accounts Table on the Active Tab of the Accounts Page and select the three dot (…) icon next to the name of the user whose password you wish to reset.
Select “Reset Password” from the context menu opening the Reset Password Tab on the Accounts Page.
It is required that you enter your account password to reset another user’s password. Then enter the new password for the user selected in the “Enter new password” textbox. Default settings require the new password be a minimum of 8 characters. Re-enter the new password in the “Confirm new password” textbox to ensure the new password is as intended. The eyeball icon allows you to see what was entered and check for errors. An email will be sent to the user with a password reset link. The user will not need the temporary password you selected to reset their password. Password requirements can be altered by administrators for all users of the KAStrack system by visiting the Security page of the Site Settings Module. How To: Edit Password RequirementsTo edit password requirements, open the Security Tab in the Site Settings Module. The current settings will show before changes are made.
Select the “Edit Security Settings” button, opening an editable Password Requirements Page.
Input a whole number as your preferred minimum length requirement into the textbox. Select the appropriate checkboxes to require users to have an uppercase letter, lowercase letter, special character, and/or number in the password. Selecting the “Force users who do not meet requirements to reset on next login” checkbox will require any existing users whose password is no longer compliant to reset their password when they attempt to login next. New users will be forced to meet the requirements when they login for the first time / register their account.
Click “Cancel” to return to the Security Tab without making any changes. Select the “Save” button and return to the Security Tab. The changes made and saved are now reflected on the Security Tab. If you select the “Set as a temporary password” checkbox, the user will be required to reset their password on their next login. Select “Save” to reset the password and email the user the password reset link. Click “Cancel” and return to the Account Info: (User’s Name) Page without resetting the password. |
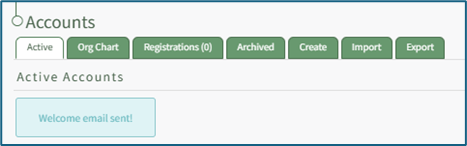
Send Welcome Email | Selecting “Send Welcome Email” from the context menu will automatically send a welcome email to the user without additional prompting.
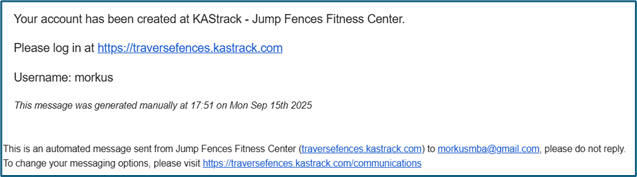
Confirmation that the welcome email was sent is indicated by a confirmation message stating “Welcome email sent!” that shows under the Active Accounts Page header. The user will receive an automated message sharing their username and a link to your organization’s KAStrack login page. The default message is shown below.
Whether or not welcome emails are sent to a user when their account is created is a customizable choice designated on the Email Settings Tab of the Site Settings Module. |
Deactivate Account | Deactivated accounts are not visible anywhere in KAStrack, including Reports. Users have the ability to personally re-activate a deactivated account by logging in (if permission to do so has been granted in the Site Settings Module). Selecting “Deactivate Account” from the context menu will open a confirmation modal for account deactivation. How To: Deactivate a User AccountTo deactivate an account, open the Active Tab on the Accounts Page in the Accounts Module.
Click the three dot (…) icon next to the user in the Active Accounts Table, opening the context menu. Select “Deactivate Account” from the context menu, opening a Confirmation Modal for account deactivation.
The modal states, “Are you sure you want to deactivate this account? Deactivated accounts are not visible anywhere on the site, including reports. Users with deactivated accounts may be allowed to re-activate their accounts by logging in depending on settings in Site Settings.” Select the “OK” button to deactivate the selected user account. Select the “Cancel” button and return to the Active Tab on the Accounts Page. |
Make Active | Make Active only shows on the context menu when a user account has been deactivated, replacing the “Deactivate Account” option. Selecting “Make Active” from the context menu will reactivate a deactivated account. How To: Reactivate a Deactivated AccountTo reactivate a deactivated account, open the Active Tab on the Accounts Page in the Accounts Module. Select the “Include Deactivated Accounts” checkbox above the Active Accounts Table.
Any deactivated accounts will now show in the Active Accounts Table. They are identified by red highlighted cells.
Click the three dot (…) icon in the Name column of the deactivated account to open the context menu.
Select “Make Active”.
|
Archive Account | Archived accounts are not visible anywhere in KAStrack, including Reports, and archived users are unable to log back into KAStrack unless an administrator restores their account first. Selecting “Archive Account” from the context menu opens a Confirmation Modal allowing for an account to be archived. An account must first be archived before it can be deleted. How To: Archive a User AccountTo archive an account, open the Active Tab on the Accounts Page in the Accounts Module. Click the three dot (…) icon next to the user in the Active Accounts Table, opening the context menu. Select “Archive Account”.
Selecting “Archive Account” from the context menu will open a Confirmation Modal.
The modal states, “Are you sure you want to archive this account? Archived accounts are not visible anywhere on the site, including reports.” Select the “OK” button to archive the selected user account. The user account will be removed from the table of active accounts. Their account information is now found under the Archived Tab on the Accounts Page. Select the “Cancel” button and return to the Active Tab on the Accounts Page. How To: Permanently Delete a User AccountAn account must first be archived before it can be deleted. How To: Archive a User AccountTo archive an account, open the Active Tab on the Accounts Page in the Accounts Module. Click the three dot (…) icon next to the user in the Active Accounts Table, opening the context menu. Select “Archive Account”.
Selecting “Archive Account” from the context menu will open a Confirmation Modal.
The modal states, “Are you sure you want to archive this account? Archived accounts are not visible anywhere on the site, including reports.” Select the “OK” button to archive the selected user account. The user account will be removed from the table of active accounts. Their account information is now found under the Archived Tab on the Accounts Page. Select the “Cancel” button and return to the Active Tab on the Accounts Page. To permanently delete a user account, go to the Archived Tab on the Accounts Page in the Accounts Module.
Identify the user whose account you want to permanently delete and click “Permanently Delete” within that user’s information row.
A confirmation modal appears stating, “This cannot be undone! Are you sure you want to permanently delete this account and all associated certifications from the system?” Select the “OK” button to permanently delete the user’s account. Click “Cancel” to return to the Archived Tab without making any changes. If you wish to delete multiple accounts at once, use the checkboxes beside each account to select multiple accounts, then click the Permanently Delete button from the With Select popup above the table once checkboxes have been selected. How To: Restore an Archived User AccountTo restore an archived account, go to the Archived Tab on the Accounts Page in the Accounts Module.
All archived accounts show in the Archived Accounts Table. Identify the user whose account you want to restore and select the “Un-archive” button.
A message will appear in blue indicating that the selected user has been un-archived. The user no longer appears on the Archived Tab, showing on the Active Account Table on the Active Tab instead. If you wish to restore multiple accounts at once, use the checkboxes beside each account to select multiple accounts, then click the Un-archive button from the With Select popup that shows above the table once checkboxes have been selected. |
View Certificates | Selecting “View Certificates” from the context menu will open the User Page on the User Certifications Tab in the People Module. If “View Certificates” does not show on the context menu, it’s likely that user does not have access to the People Module. |
Accounts Page Org Chart Tab
The Org Chart Tab on the Accounts Page in the Accounts Module is a visual representation of the organizational hierarchy established in KAStrack. When the Org Chart Tab is selected, a tree diagram representing the designated hierarchy appears as a quick visualization tool.

Hovering the cursor over a name will cause either directional arrows or “+” / “-“signs to appear. Click on the directional arrows around a user’s name to expand / collapse the org chart.
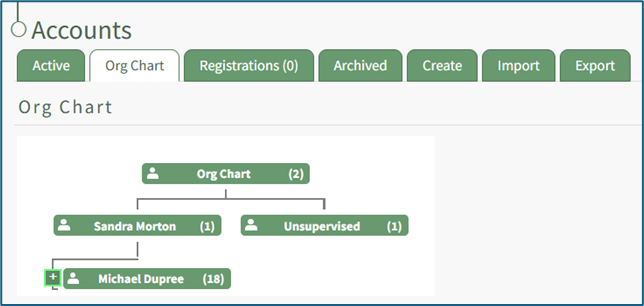
Click on the “+” icon next to the left of a user’s name for continued expansion of the hierarchy.

The “-” sign to the left of a name will collapse and hide the list below.
Accounts Page Registrations Tab
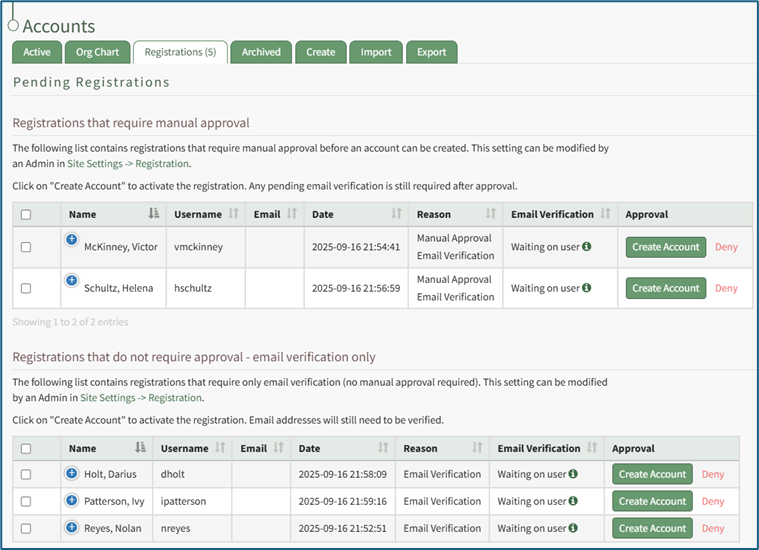
The Registration Tab on the Accounts Page displays the Pending Registration Table which allows for a quick view of the pending new user account registrations. Approvals/Verifications only show on the Registrations Tab when an individual manually registers themselves. The number of registrations that require approval show directly on the tab, Registrations (#), and as a badge next to the Registration page on the Main Menu.
Only individuals with an Admin module level access will see the Archived Accounts Tab.
The Pending Registrations Table shows account information for the user accounts whose system registration is pending confirmation. Account fields are used as the column headers. The default columns are Name, Username, Email, Date, Reason, Email Verification, and Approval.
Any desired account field can be created by an administrator.
How To: Add a Custom/Additional User Account Information Field
To add a user account information field, open the Account Fields Tab in the Site Settings Module from the Main Menu.
Click the "Add a Field" clickable link above the Custom / Additional User Account Information Fields opening the Add Field Modal.
Input the label for the field.
Select the field type (text or email) from the dropdown menu.
Selecting the checkbox enables customization to "Allow multiple values," make the field "Required," or make it a "Sensitive Field."
Designating the field as a "Sensitive Field" allows an extra step in form security when integrating these fields within the Form module. The Form Designer must explicitly choose when they wish to use a sensitive field.
The Permissions Table determines who can view / edit their own and other user's fields. Selecting the checkbox gives the individual the specified permission. Deselecting the checkbox removed the permission.
Select the "Save" button and the custom field now shows in the table.
Use the Drag Me icon to drag and drop the field into your desired position of choice.
The Pending Registrations Table is customizable via the Table Defaults Tab in the Site Settings Module.
How To: Edit the Accounts Module Pending Registrations Table
To edit the Pending Registrations Table in the Accounts Module, go to the Table Defaults Tab in the Site Settings Module.
Select “Accounts: Registration” from the dropdown menu.

Select the “Edit Columns” button, opening the Choose Columns Modal. The default column choices include: name, username, email, date, reason, email verification, approval, first name, last name, employee ID, phone, Address 1 and Address 2 and any customized account fields.
How To: Add a Custom/Additional User Account Information Field
To add a user account information field, open the Account Fields Tab in the Site Settings Module from the Main Menu.
Click the "Add a Field" clickable link above the Custom / Additional User Account Information Fields opening the Add Field Modal.
Input the label for the field.
Select the field type (text or email) from the dropdown menu.
Selecting the checkbox enables customization to "Allow multiple values," make the field "Required," or make it a "Sensitive Field."
Designating the field as a "Sensitive Field" allows an extra step in form security when integrating these fields within the Form module. The Form Designer must explicitly choose when they wish to use a sensitive field.
The Permissions Table determines who can view / edit their own and other user's fields. Selecting the checkbox gives the individual the specified permission. Deselecting the checkbox removed the permission.
Select the "Save" button and the custom field now shows in the table.
Use the Drag Me icon to drag and drop the field into your desired position of choice.
The bars icon allows the columns to be positioned in the order of your choosing.
Click “Cancel” to return to the Table Defaults Tab without making any changes.
Select the “Save” button to make the desired changes and return to the Table Defaults Tab. A preview of the first five rows of the table is shown. Select the “View Live Table” button to be directed to the live table in the Accounts Module.
This would include any additional account fields created as discussed above plus other existing account fields such as First Name, Last Name, Employee ID, Phone, Address 1, and Address 2.
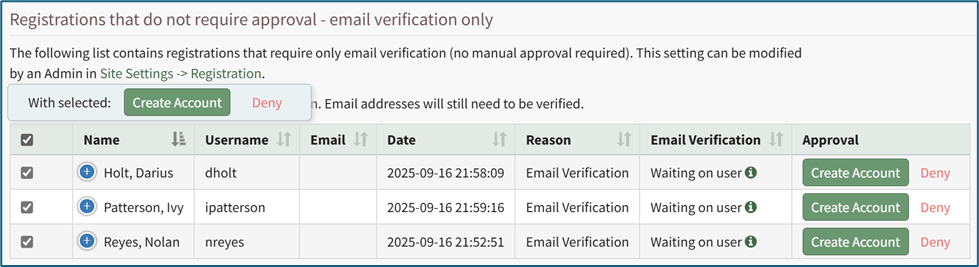
Pending registrations are separated into two tables: Registrations that require manual approval and Registrations that do not require approval (email verification only). Registrations require manual approval when a user creates an account using a KAStrack registration link if the registration profile is set to require it. The parameters for registration links are established on the Registration Tab in the Site Settings Module.
How To: Manually Approve / Deny User Registrations
To manually approve user registrations, open the Registrations Tab on the Accounts Page in the Accounts Module.
Approvals/Verifications only show on the Registrations Tab when an individual manually registers themselves.
Selecting any checkbox in a row opens a bulk actions modal above the table. Selecting the checkbox in the first column of the top row selects / deselects all rows in the table.
Bulk action options on the Registrations Tab are Create Account and Deny.
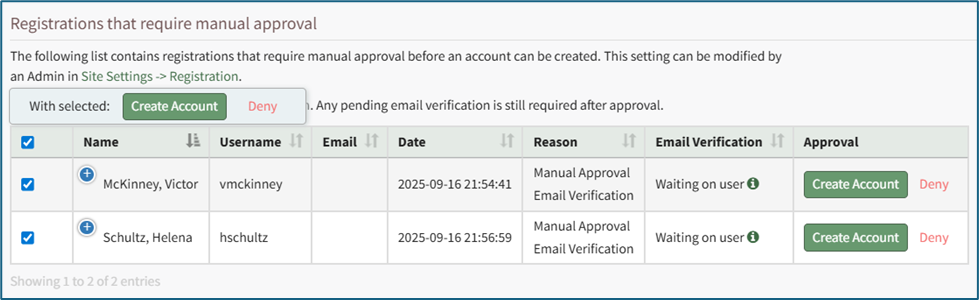
There are two options in the Approval column for all prospective accounts in the Pending Registrations table. Select “Create Account” to manually approve it or click “Deny” to deny an individual user.
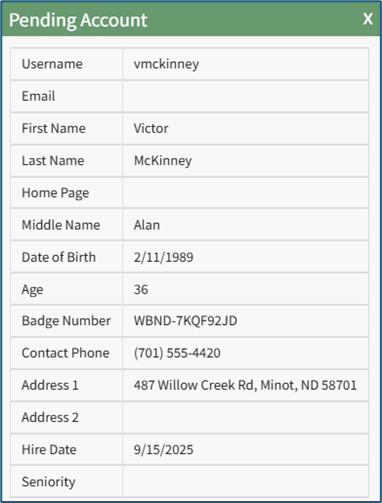
There are two icons that can be selected to open modals in the Pending Registrations Table: the plus sign icon in the Name column and the information icon in the Email Verification column.

Selecting the plus sign icon to the left of the user’s name opens the Pending Account Modal which lists all the account information for the new user.
Selecting the information icon to the right of “Waiting on user” opens the Email Verification Requirement Modal. The modal states, “This user has not yet verified their email address and will not be able to log in until they click the verification link sent to the provided email address.”
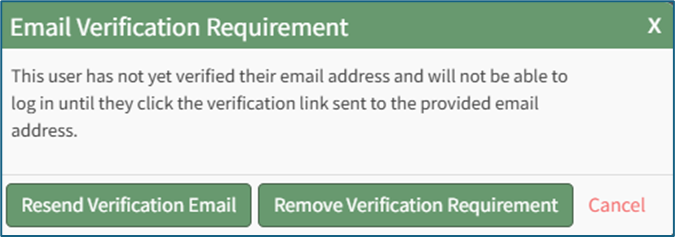
Select the “Resend Verification Email” to resend the verification email to the new user. A confirmation modal will appear, confirming the verification email was resent.
Select the “Remove Verification Requirement” button and a warning modal appears stating, “Warning: This user has not verified their email address. Removing the email verification requirement will allow the user to log in without verifying their email address. Are you sure you want to proceed?”
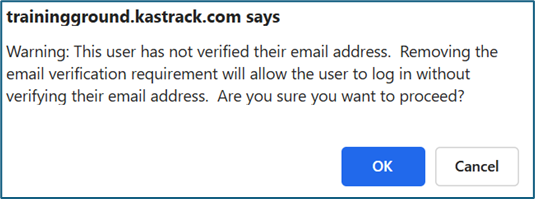
Select the “OK” button to remove the verification requirement, or click “Cancel” to return to the registration tab without saving any changes.
If there are no pending registrations, the tables are not visible. In their place is the statement, “There are no registrations that require manual approval/email verification at this time.”

Selecting any checkbox in a row opens a bulk actions modal above the table. Selecting the checkbox in the first column of the top row selects / deselects all rows in the table.
Bulk action options on the Registrations Tab are Create Account and Deny.
Accounts Page Archived Tab
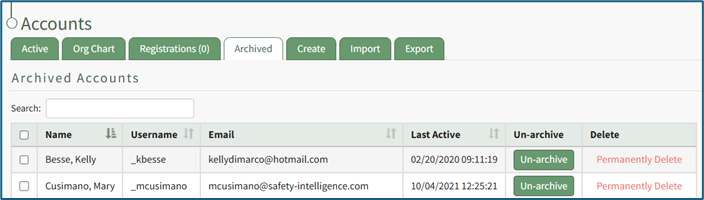
The Archived Tab on the Accounts Page displays the Archived Accounts Table, which shows the user accounts that have been intentionally archived. Archived accounts are not visible anywhere in KAStrack other than this table, including Reports. Archived users will be unable to log back into KAStrack unless an administrator restores their account first.
Only individuals with an Admin module level access will see the Archived Accounts Tab.
The Archived Account Table shows user account information for user accounts that have been archived. Account fields are used as the column headers. The default columns are Name, Username, Email, Last Active, Un-archive, and Delete.
Any desired account field can be created by an administrator.
How To: Add a Custom/Additional User Account Information Field
To add a user account information field, open the Account Fields Tab in the Site Settings Module from the Main Menu.
Click the "Add a Field" clickable link above the Custom / Additional User Account Information Fields opening the Add Field Modal.
Input the label for the field.
Select the field type (text or email) from the dropdown menu.
Selecting the checkbox enables customization to "Allow multiple values," make the field "Required," or make it a "Sensitive Field."
Designating the field as a "Sensitive Field" allows an extra step in form security when integrating these fields within the Form module. The Form Designer must explicitly choose when they wish to use a sensitive field.
The Permissions Table determines who can view / edit their own and other user's fields. Selecting the checkbox gives the individual the specified permission. Deselecting the checkbox removed the permission.
Select the "Save" button and the custom field now shows in the table.
Use the Drag Me icon to drag and drop the field into your desired position of choice.
The Archived Accounts Table is customizable via the Table Defaults Tab in the Site Settings Module.
How To: Edit the Accounts Module Archived Accounts Table
To edit the Archived Accounts Table in the Accounts Module, go to the Table Defaults Tab in the Site Settings Module.
Select “Accounts: Archived” from the dropdown menu.

Select the “Edit Columns” button, opening the Choose Columns Modal. The default column choices include: name, username, email, last active, un-archive, delete, first name, last name, employee ID, phone, Address 1 and Address 2 and any customized account fields.
How To: Add a Custom/Additional User Account Information Field
To add a user account information field, open the Account Fields Tab in the Site Settings Module from the Main Menu.
Click the "Add a Field" clickable link above the Custom / Additional User Account Information Fields opening the Add Field Modal.
Input the label for the field.
Select the field type (text or email) from the dropdown menu.
Selecting the checkbox enables customization to "Allow multiple values," make the field "Required," or make it a "Sensitive Field."
Designating the field as a "Sensitive Field" allows an extra step in form security when integrating these fields within the Form module. The Form Designer must explicitly choose when they wish to use a sensitive field.
The Permissions Table determines who can view / edit their own and other user's fields. Selecting the checkbox gives the individual the specified permission. Deselecting the checkbox removed the permission.
Select the "Save" button and the custom field now shows in the table.
Use the Drag Me icon to drag and drop the field into your desired position of choice.
The bars icon allows the columns to be positioned in the order of your choosing.
Click “Cancel” to return to the Table Defaults Tab without making any changes.
Select the “Save” button to make the desired changes and return to the Table Defaults Tab. A preview of the first five rows of the table is shown. Select the “View Live Table” button to be directed to the live table in the Accounts Module.
This would include any additional account fields created as discussed above plus other existing account fields such as First Name, Last Name, Employee ID, Phone, Address 1, and Address 2.
Selecting any checkbox in a row opens a bulk actions modal above the table. Selecting the checkbox in the first column of the top row selects / deselects all rows in the table.
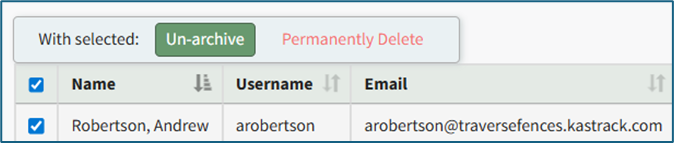
Bulk action options on the Archived Tab are Un-archive and Permanently Delete.
How To: Archive a User Account
To archive an account, open the Active Tab on the Accounts Page in the Accounts Module.
Click the three dot (…) icon next to the user in the Active Accounts Table, opening the context menu. Select “Archive Account”.

Selecting “Archive Account” from the context menu will open a Confirmation Modal.

The modal states, “Are you sure you want to archive this account? Archived accounts are not visible anywhere on the site, including reports.”
Select the “OK” button to archive the selected user account. The user account will be removed from the table of active accounts. Their account information is now found under the Archived Tab on the Accounts Page.
Select the “Cancel” button and return to the Active Tab on the Accounts Page.
How To: Restore an Archived User Account
To restore an archived account, go to the Archived Tab on the Accounts Page in the Accounts Module.

All archived accounts show in the Archived Accounts Table. Identify the user whose account you want to restore and select the “Un-archive” button.

A message will appear in blue indicating that the selected user has been un-archived. The user no longer appears on the Archived Tab, showing on the Active Account Table on the Active Tab instead.
If you wish to restore multiple accounts at once, use the checkboxes beside each account to select multiple accounts, then click the Un-archive button from the With Select popup that shows above the table once checkboxes have been selected.
How To: Permanently Delete a User Account
An account must first be archived before it can be deleted.
How To: Archive a User Account
To archive an account, open the Active Tab on the Accounts Page in the Accounts Module.
Click the three dot (…) icon next to the user in the Active Accounts Table, opening the context menu. Select “Archive Account”.
Selecting “Archive Account” from the context menu will open a Confirmation Modal.
The modal states, “Are you sure you want to archive this account? Archived accounts are not visible anywhere on the site, including reports.”
Select the “OK” button to archive the selected user account. The user account will be removed from the table of active accounts. Their account information is now found under the Archived Tab on the Accounts Page.
Select the “Cancel” button and return to the Active Tab on the Accounts Page.
To permanently delete a user account, go to the Archived Tab on the Accounts Page in the Accounts Module.

Identify the user whose account you want to permanently delete and click “Permanently Delete” within that user’s information row.

A confirmation modal appears stating, “This cannot be undone! Are you sure you want to permanently delete this account and all associated certifications from the system?”
Select the “OK” button to permanently delete the user’s account. Click “Cancel” to return to the Archived Tab without making any changes.
If you wish to delete multiple accounts at once, use the checkboxes beside each account to select multiple accounts, then click the Permanently Delete button from the With Select popup above the table once checkboxes have been selected.
Accounts Page Create Tab
The Create Tab opens to the Create Account tab allowing for the generation of new user accounts.
Only individuals with an Admin module level access will see the Create Tab.
How To: Create an Individual New User Account
The Create Tab opens to the Create Account Page. To bulk import the information for several new user accounts, go to the Import Tab on the Accounts Page.
How To: Bulk Import Account Information
Before bulk importing several new accounts, be sure that your organization has customized the account information fields to meet your needs. WIKI LINK TO ACCOUNT FIELDS TAB: SITE SETTINGS Once your account information preferences have been established in the Site Settings Module, you can begin organizing the CSV file for bulk imports.
Open the Import Tab on the Accounts Page in the Accounts Module.
Select the “Download Template” button to have KAStrack generate a template with the appropriate fields in separate columns that match the designated preferences in the Site Settings Module.
When your CSV file with new account information is complete, ensure it is saved with the CSV format UTF-8.
Click “Choose File,” and select the correct CSV file from your computer. Click “Open”.
Each of the Account Information fields will now show below the selected CSV file.
KAStrack scans the first row of your CSV file for matching column headers and attempts to map your column headers to the appropriate Account Fields. The dropdown menu next to each field will automatically be set to any matching column headings from the CSV.
If a matching column couldn't be found, you can manually choose which column should map to those Account Fields by choosing an option from the dropdown.
Select the “Import Accounts” button to import the information. Click “Cancel” to return to the Active Tab on the Accounts Page without saving information.
The Import Tab can also be used to update existing account information. The KAStrack- generated unique user ID is a required column in the CSV file if editing an existing account. This can be found in the URL at the top of your browser when viewing a user’s Account Info page, or by doing an account export.
How To: Export User Account Information
Open the Export Tab on the Accounts Page in the Accounts Module.
There are two checkboxes that allow for customization of your export. Both or neither can be included.
Select “Include archived accounts in export” to include archived accounts in your export. Select “Include inactive accounts in export” to include inactive accounts in your export.
Click “Export local accounts” and a CSV file will automatically be downloaded to your personal device.
Helpful Tips for Bulk Imports
The CSV document created to import account information will vary based on your customized Site Settings. Required account fields are username, password, first and last name. Required status for fields is designated by an asterisk (*). Each included field should be represented by its own column in the CSV document.
Required system user account information fields do not show as required on the Account Fields Tab on the Site Settings Page.
Helpful Tips for Account Information Bulk Imports | |
Field | Comments / Suggestions |
User ID | The User ID is a unique system ID for the user. Leave blank to create a new user. |
Username* | Required Field. Character usage is limited to lowercase letters, numbers, hyphens, underscores, periods, or at signs. A username cannot contain spaces and cannot start with an underscore. When editing an existing account via imports, the username and email cannot be changed simultaneously. |
This field may be left blank when creating a new user. If so, an email address will be generated for the user with the format: username@sitename.kastrack.com. When editing an existing account via imports, the username and email cannot be changed simultaneously. | |
Password* | Required Field. Default settings require a minimum of 8 characters. All passwords created in an import will be temporary. Users will be required to update their password upon their initial login. |
First Name* | Required Field. |
Last Name* | Required Field. |
Access Levels | KAStrack defaults: Employee, Supervisor, Admin, Observer. Customized Access Levels can be created. Separate multiple values with a semi-colon. If a user is not assigned an Access Level, they will not have access to ANY modules. This column can be left blank if the Access Level is identified in the Registration Profile applied to the user. |
Supervisor | The supervisor’s username must be entered verbatim. Separate multiple values with a semi-colon. This column can be left blank if the Supervisor is identified in the Registration Profile applied to the user. |
Certification Role | Allows assignment of roles in the People Module. Multiple values should be separated with a semi-colon. Role names must be preceded by Company name as listed in the People Module, e.g. CompanyName RoleName. This column can be left blank if Certification Roles are identified in the Registration Profile applied to the user. |
Status | User status cannot be changed through import. All new imported accounts will automatically be Active. |
Employee ID | This is an optional field (included by default settings) that can be edited or removed by going to the Account Fields Tab in Site Settings. |
Phone | This is an optional field (included by default settings) that can be edited or removed by going to the Account Fields Tab in Site Settings. |
Address 1 | This is an optional field (included by default settings) that can be edited or removed by going to the Account Fields Tab in Site Settings. |
Address 2 | This is an optional field (included by default settings) that can be edited or removed by going to the Account Fields Tab in Site Settings. |
Registration Profile | This column is used to apply Registration Profiles to accounts. The full name of the Registration Profile must be entered. The following fields listed above can be modified through the Registration Profile: Access Levels, Supervisors, and Certification Roles. |
Custom Fields | If other custom fields have been created on the Account Fields Tab in Site Settings, they can be included as column headers in an Import. These fields may or may not be required based on their settings in the Account Fields Tab. |
To manually create a single new account, open the Create Tab on the Accounts Page in the Accounts Module. The fields that show are customizable and your organization has the ability to create any desired fields.
An asterisk indicates that the input field is a required entry. You can create new Account Fields and modify existing ones, including which Account Fields are required, on the Account Fields Tab in the Site Settings Module.
How To: Edit a Custom/Additional User Account Information Field
To edit a custom user account information field, open the Account Fields Tab in the Site Settings Module from the Main Menu.
Custom Fields show in the Additional User Account Information Fields Table. Click the Edit button in the Action column of the table opening the Edit Field Modal.
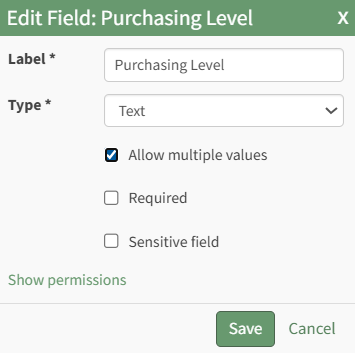
Make the desired changes and select the Save button, returning to the Account Fields Tab.
The email field can be left blank when creating a new user account. If so, KAStrack will generate a unique email address for the user, formatted like: username@sitename.kastrack.com.
If no email address is entered, a user will not be able to receive email reports/alerts, however, reports and alerts are still delivered to the user’s account. Users can access system messaging through the Notifications History Tab on the My Accounts Page in the Accounts Module. If you want to designate an email address to receive all notices sent to an account that does not have their own email address, this can be done by “Enabling Catch Missing CC” on the Settings Page of the Communications Module.
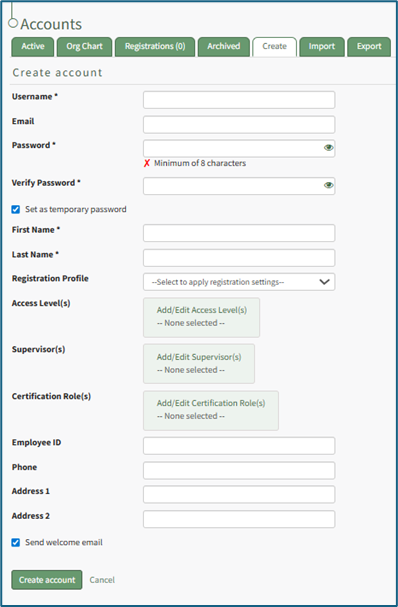
Enter the requested information for the new user.
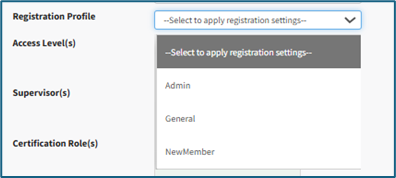
Registration profiles act as templates when creating new user accounts. Select which registration profile (listed in the registration tab of Site Settings) you would like to apply to the new user account from the dropdown menu to assign predetermined access level(s), supervisor(s), and Certification Role(s).
These fields will not populate on screen until the account is saved.
How To: Create Registration Profiles
To create a new registration profile, go to the Registration Tab in the Site Settings Module.

Click the plus icon next to the Registration Profiles header or select “Create” from the three dot (…) icon context menu. This will open the Create Registration Profile Page.
The fields used in a Registration Profile are optional. You are not required to make selections for all when generating a new profile.
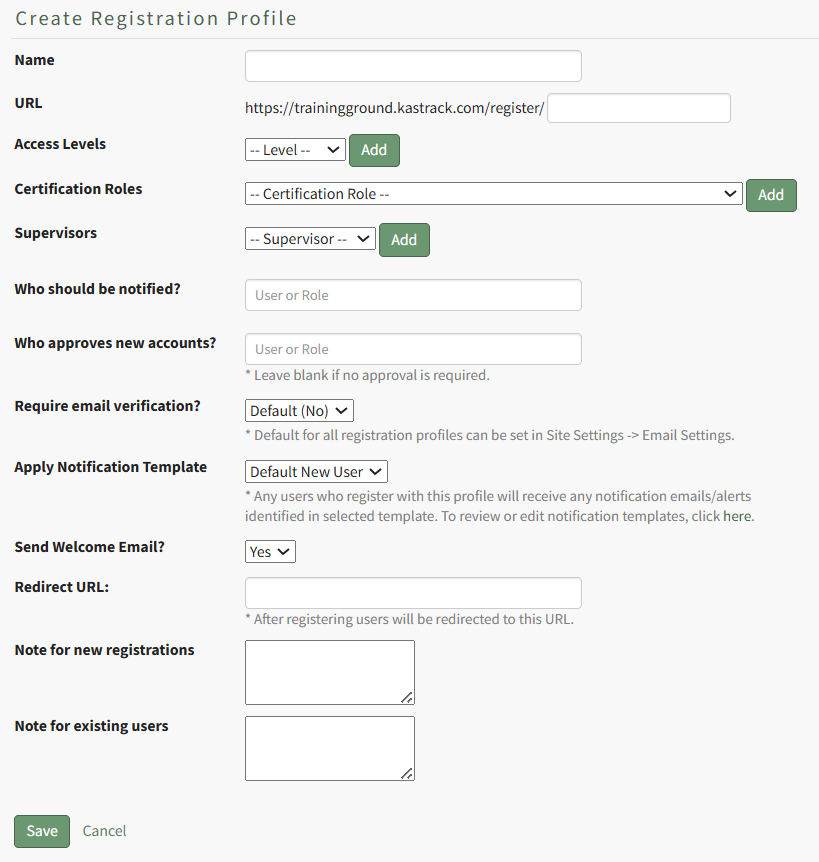
Input a name for the new registration profile, which will automatically fill in the URL link textbox.

Select any desired access level(s) for this registration profile from the dropdown menu list and click “Add”. Multiple Access Levels can be selected. The X icon to the left of the access level will remove the selection if it was made in error.
It is recommended to include at least one access level if this Registration Profile will be used to register new user accounts, as they must have an access level to see anything in KAStrack.

Select any desired Certification Role(s) for this registration profile from the dropdown menu list and click “Add”. Multiple Certification Roles can be selected. The X icon to the left of the Certification Roles will remove the selection if it was made in error.

Select any desired supervisor(s) that are to be assigned to the new accounts that register with this profile from the dropdown menu list and click “Add”. Multiple supervisors can be selected. The X icon to the left of the supervisor will remove the selection if it was made in error.

If desired, you can specify individual users and/or certification roles that are to receive notification of the new user account’s registration. When you type into the textbox, users and certification roles will show on a dropdown menu for selection. Multiple users and/or certification roles can be selected. The X icon to the left of the user / role will remove the selection if it was made in error.
If new registrations require approval, you can specify individual users and/or certification roles that are responsible for approving the new registrations. When you type into the textbox, users and certification roles will show on a dropdown menu for selection. Multiple users and/or certification roles can be selected. The X icon to the left of the user / role will remove the selection if it was made in error. Leave this field blank if no approval is required.
The default is set to not require email verification for new account generation, but you can select Yes or No from a dropdown menu. Users will then receive an email after registration asking them to verify their email address.
The default for all registration profiles can be set on the Email Settings Tab in the Site Settings Module, but the Registration Profile being created will override the default settings.
A default new user notification template is applied for all registration profiles.

Any users who register with this profile will receive notification emails/alerts that have been specified through the new user template. The Default New User Notification Template details are shown on the Notification Templates Tab on the Settings Page of the Communications Module. Clicking the word “here” will redirect the user to the Notification Template Tab where the Default New User Template can be edited or a new notification template can be created for your organization’s preferences.
How To: Edit New User Notification Templates
To edit new user notification templates, go to the Notification Templates Tab on the Settings Page of the Communications Module.
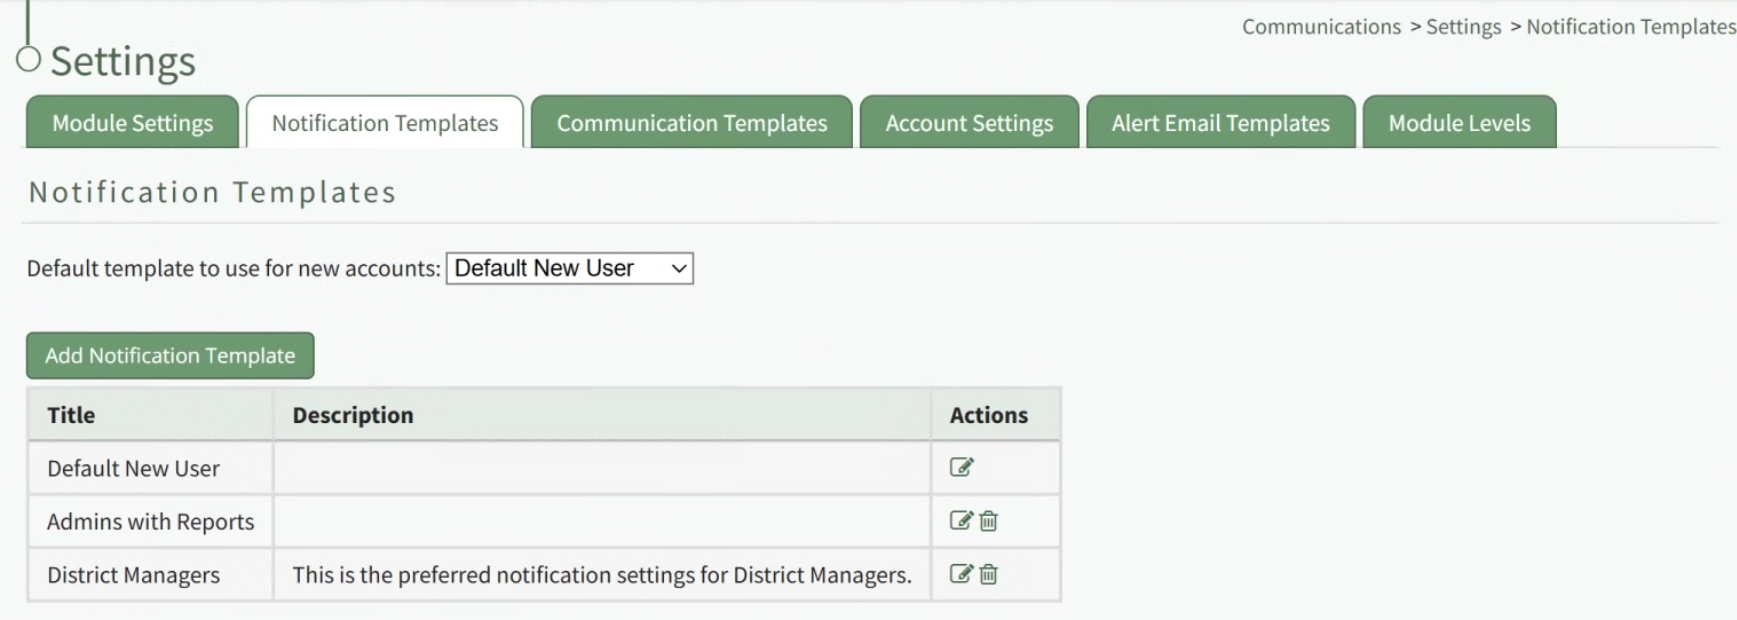
Existing templates will be shown in the Notification Template Table.
Select the edit icon in the action column of the template you wish to edit opening the Edit Notification Template Page.
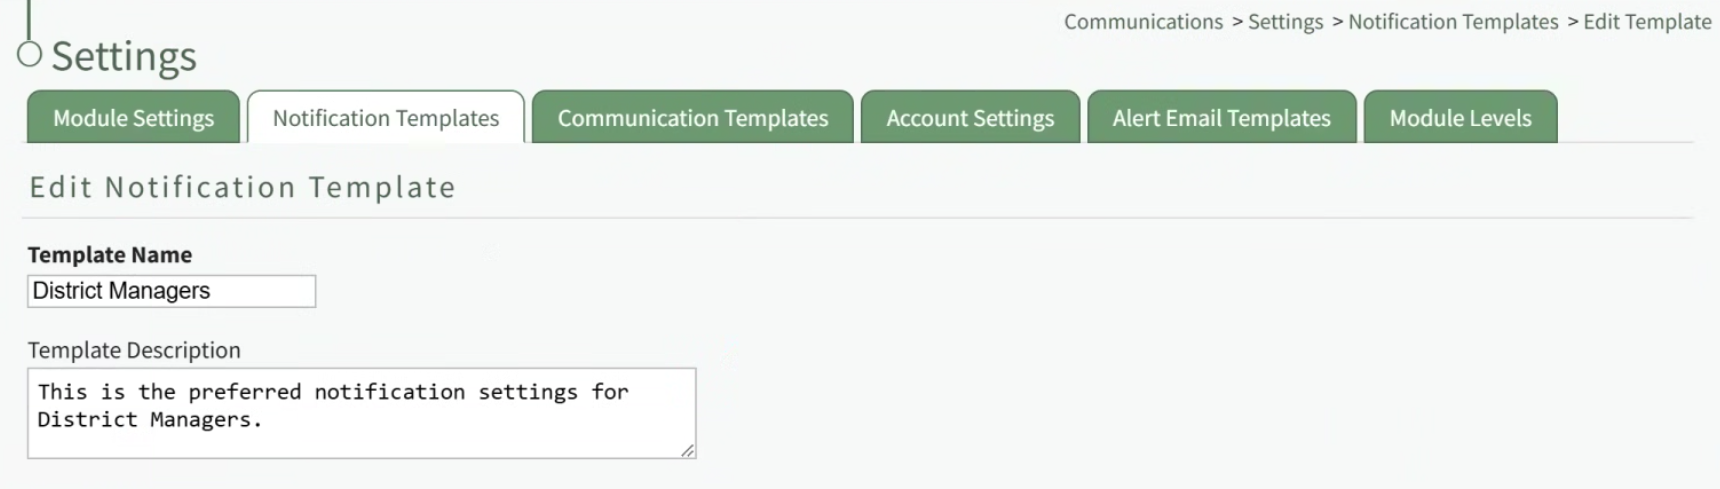
A notification template is comprised of two parts: Reports and Alerts.
Indicate the desired status for email report notifications: Not Active or Active.
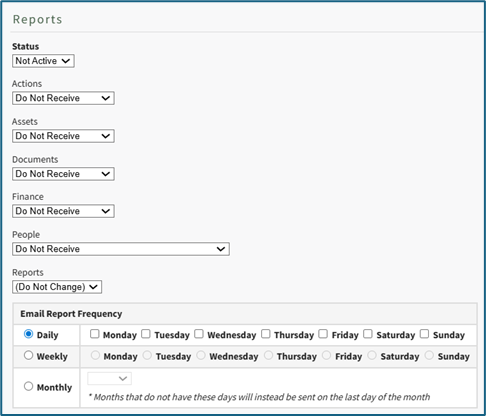
Alter the desired reports selected for each module or leave as “Do Not Receive”.
Email Report Frequency has three options: daily (or on specified days of the week), weekly (on the day of your choosing), or monthly (which requires the user to specify which numerical day of the month from a dropdown menu you wish to receive the report summary).
After setting template preferences for reports, scroll down to set template preferences for email alerts.
Alter email preferences as set by module through a dropdown menu with three options that designate when an email alert should be sent: “Real Time”, “Digest”, and “Do Not Receive”.

After making edits to your preferences for both Email Report and Email Alert Settings, select “Save”, returning you to the Notification Templates Tab on the Settings Page of the Communications Module.
The newly created notification template will now be shown on the Notification Template Table.
If you would like new user accounts that use this registration profile to receive a Welcome Email, select yes from the dropdown menu.
The default for all registration profiles can be set on the Email Settings Tab in the Site Settings Module, but the Registration Profile being created will override the default settings.
A redirect URL can be designated, so that any user registering with this profile will be redirected to the specified URL after registering.

Input a custom message for new registrations and a custom message for existing users if desired.
If an existing user logs in from a Registration Profile link, the access level(s), certification role(s), and supervisor(s) listed on the Registration Profile will be added to the user’s account. Any existing access levels, certification roles, and supervisors on their account are not removed.
Select “Cancel” at any time to return to the Registration Profile Tab in the Site Settings Module without saving the profile. Select the “Save” button and the new registration profile now shows on the Registration Tab in the Registration Profile Table.
Registration profiles can be enabled/disabled via a checkbox in the Registration Profile Table so that your organization has control of when this link is activated.
Click “Add/Edit Access Level(s)” opening the Choose Access Levels Modal.

The Modal will display two columns: Selected Access Level(s) (what has been assigned to the user) and Available Access Level(s) (what can still be assigned). Drag and drop the designations as desired or click an item to move it from its current column to the other.
Select the “Save Access Level(s)” button at the bottom of the modal to save the changes or click “Cancel” to return to Create Tab on the Accounts Page.
Click “Add/Edit Supervisor(s)” opening the Choose Supervisors Modal.

The Modal will display two columns: Selected Supervisor(s) and Available Supervisor(s). Drag and drop the designations as desired or click an item to move it from its current column to the other.
Select the “Save Supervisor(s)” button at the bottom of the modal to save the changes or click “Cancel” to return to the Create Tab on the Account Page.
Click “Add/Edit Certification Role(s) opening the Choose Certification Role(s) Modal.

The Modal will display two columns: Selected Certification Role(s) and Available Certification Role(s). Drag and drop the designations as desired or click an item to move it from its current column to the other.
Select the “Save Certification Role(s)” button at the bottom of the modal to save the changes or click “Cancel” to return to the Create Tab on the Account Page.
Select the optional “Send welcome email” checkbox to send a welcome e-mail.
Select the “Create Account” button to create the new user account or click “Cancel” to return to the Active Tab on the Accounts Page without saving changes.
Accounts Page Import Tab
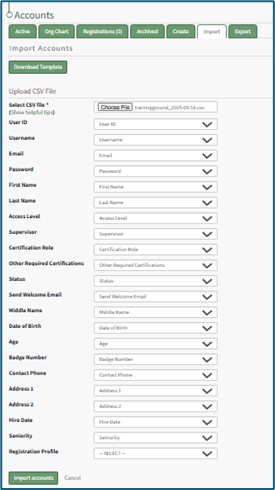
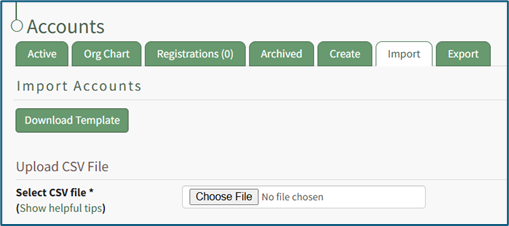
The Import Tab opens to the Import Accounts Page, where new account information can be imported using a Comma Separated Value (CSV UTF-8) document for both new and existing accounts.
Only individuals with an Admin module level access will see the Import Tab.
When downloading the template for Account information, all possible fields in the KAStrack system will show as column headers. Leave cells blank if the information isn’t relevant to your organization’s requirements.
Instructions associated with the bulk importation of user information can be found in the How To: Bulk Import Several New Accounts.
How To: Bulk Import Account Information
Before bulk importing several new accounts, be sure that your organization has customized the account information fields to meet your needs. WIKI LINK TO ACCOUNT FIELDS TAB: SITE SETTINGS Once your account information preferences have been established in the Site Settings Module, you can begin organizing the CSV file for bulk imports.
Open the Import Tab on the Accounts Page in the Accounts Module.
Select the “Download Template” button to have KAStrack generate a template with the appropriate fields in separate columns that match the designated preferences in the Site Settings Module.
When your CSV file with new account information is complete, ensure it is saved with the CSV format UTF-8.
Click “Choose File,” and select the correct CSV file from your computer. Click “Open”.
Each of the Account Information fields will now show below the selected CSV file.
KAStrack scans the first row of your CSV file for matching column headers and attempts to map your column headers to the appropriate Account Fields. The dropdown menu next to each field will automatically be set to any matching column headings from the CSV.
If a matching column couldn't be found, you can manually choose which column should map to those Account Fields by choosing an option from the dropdown.
Select the “Import Accounts” button to import the information. Click “Cancel” to return to the Active Tab on the Accounts Page without saving information.
The Import Tab can also be used to update existing account information. The KAStrack- generated unique user ID is a required column in the CSV file if editing an existing account. This can be found in the URL at the top of your browser when viewing a user’s Account Info page, or by doing an account export.
How To: Export User Account Information
Open the Export Tab on the Accounts Page in the Accounts Module.
There are two checkboxes that allow for customization of your export. Both or neither can be included.
Select “Include archived accounts in export” to include archived accounts in your export. Select “Include inactive accounts in export” to include inactive accounts in your export.
Click “Export local accounts” and a CSV file will automatically be downloaded to your personal device.
Helpful Tips for Bulk Imports
The CSV document created to import account information will vary based on your customized Site Settings. Required account fields are username, password, first and last name. Required status for fields is designated by an asterisk (*). Each included field should be represented by its own column in the CSV document.
Required system user account information fields do not show as required on the Account Fields Tab on the Site Settings Page.
Helpful Tips for Account Information Bulk Imports | |
Field | Comments / Suggestions |
User ID | The User ID is a unique system ID for the user. Leave blank to create a new user. |
Username* | Required Field. Character usage is limited to lowercase letters, numbers, hyphens, underscores, periods, or at signs. A username cannot contain spaces and cannot start with an underscore. When editing an existing account via imports, the username and email cannot be changed simultaneously. |
This field may be left blank when creating a new user. If so, an email address will be generated for the user with the format: username@sitename.kastrack.com. When editing an existing account via imports, the username and email cannot be changed simultaneously. | |
Password* | Required Field. Default settings require a minimum of 8 characters. All passwords created in an import will be temporary. Users will be required to update their password upon their initial login. |
First Name* | Required Field. |
Last Name* | Required Field. |
Access Levels | KAStrack defaults: Employee, Supervisor, Admin, Observer. Customized Access Levels can be created. Separate multiple values with a semi-colon. If a user is not assigned an Access Level, they will not have access to ANY modules. This column can be left blank if the Access Level is identified in the Registration Profile applied to the user. |
Supervisor | The supervisor’s username must be entered verbatim. Separate multiple values with a semi-colon. This column can be left blank if the Supervisor is identified in the Registration Profile applied to the user. |
Certification Role | Allows assignment of roles in the People Module. Multiple values should be separated with a semi-colon. Role names must be preceded by Company name as listed in the People Module, e.g. CompanyName RoleName. This column can be left blank if Certification Roles are identified in the Registration Profile applied to the user. |
Status | User status cannot be changed through import. All new imported accounts will automatically be Active. |
Employee ID | This is an optional field (included by default settings) that can be edited or removed by going to the Account Fields Tab in Site Settings. |
Phone | This is an optional field (included by default settings) that can be edited or removed by going to the Account Fields Tab in Site Settings. |
Address 1 | This is an optional field (included by default settings) that can be edited or removed by going to the Account Fields Tab in Site Settings. |
Address 2 | This is an optional field (included by default settings) that can be edited or removed by going to the Account Fields Tab in Site Settings. |
Registration Profile | This column is used to apply Registration Profiles to accounts. The full name of the Registration Profile must be entered. The following fields listed above can be modified through the Registration Profile: Access Levels, Supervisors, and Certification Roles. |
Custom Fields | If other custom fields have been created on the Account Fields Tab in Site Settings, they can be included as column headers in an Import. These fields may or may not be required based on their settings in the Account Fields Tab. |
The Import Tab can also be used to update existing account information.
The KAStrack-generated unique user ID is a required column in the CSV file if editing an existing account. This can be found in the URL at the top of your browser when viewing a user’s Account Info page, or by doing an account export. 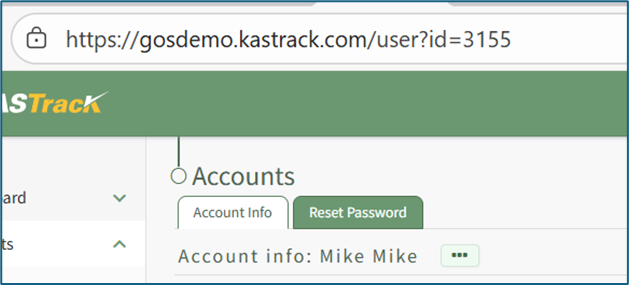
How To: Export User Account Information
Open the Export Tab on the Accounts Page in the Accounts Module.
There are two checkboxes that allow for customization of your export. Both or neither can be included.
Select “Include archived accounts in export” to include archived accounts in your export. Select “Include inactive accounts in export” to include inactive accounts in your export.
Click “Export local accounts” and a CSV file will automatically be downloaded to your personal device.
Accounts Page Export Tab
The Export Tab allows for the transfer of account information from KAStrack to a CSV file. There are checkboxes that designate whether to include archived and/or inactive accounts within the export.
Only individuals with an Admin module level access will see the Export Tab.
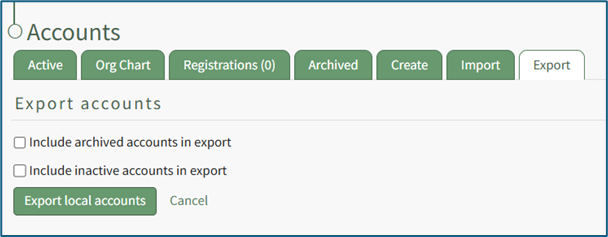
If utilized, Export will create a CSV file with all possible fields in the KAStrack system, even fields not being utilized by your organization.
How To: Export User Account Information
Open the Export Tab on the Accounts Page in the Accounts Module.
There are two checkboxes that allow for customization of your export. Both or neither can be included.
Select “Include archived accounts in export” to include archived accounts in your export. Select “Include inactive accounts in export” to include inactive accounts in your export.
Click “Export local accounts” and a CSV file will automatically be downloaded to your personal device.
My Accounts Page
Each KAStrack user has access to the My Account Page in the Accounts Module. It is comprised of up to five tabs: Account Info, Notifications, Notification History, Payment History (if enabled), and Reset Password. Each tab can also be accessed from the Main Menu.
The My Accounts Page allows a user to access and update their account information, utilize Communication Channels, indicate report and alert notification preferences, review their notification history, reset their password, and see any historical payment submissions (if payments have been enabled).
My Accounts Page: Account Info Tab
The Account Info Tab on the My Accounts Page displays a user’s personal information. Default fields include: Username, Email, First Name, Last Name, Home Page, Employee ID, Phone Number, Address 1, and Address 2. Other Custom Fields may show depending on settings designated in the Account Fields Tab of the Site Settings Module.
The link https://[INSERT YOUR COMPANY'S DOMAIN NAME].kastrack.com/user?id=me can be provided to any user and will take them directly to their My Account Page.
How To: Add a Custom/Additional User Account Information Field
To add a user account information field, open the Account Fields Tab in the Site Settings Module from the Main Menu.
Click the "Add a Field" clickable link above the Custom / Additional User Account Information Fields opening the Add Field Modal.
Input the label for the field.
Select the field type (text or email) from the dropdown menu.
Selecting the checkbox enables customization to "Allow multiple values," make the field "Required," or make it a "Sensitive Field."
Designating the field as a "Sensitive Field" allows an extra step in form security when integrating these fields within the Form module. The Form Designer must explicitly choose when they wish to use a sensitive field.
The Permissions Table determines who can view / edit their own and other user's fields. Selecting the checkbox gives the individual the specified permission. Deselecting the checkbox removed the permission.
Select the "Save" button and the custom field now shows in the table.
Use the Drag Me icon to drag and drop the field into your desired position of choice.
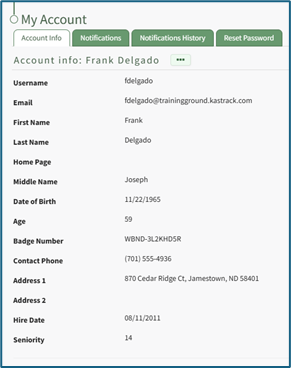
At the bottom of the Account Info Page, comment channels allow an individual to view or generate comments from/to their supervisors or other users added to the channels.
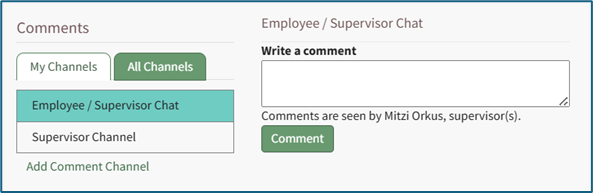
My Channels Explanation
The Accounts Module has its own communication feature referred to as Channels that allows for comments to be sent between individuals, their supervisors, and/or other accounts and certification roles. A date and time stamp is assigned to each comment as it is sent. Channels can be accessed at the bottom of the Account Info: (User Name) Page on the Account Info Tab of the Accounts. Module.
Channels are divided into two tabs: My Channels and All Channels. The My Channels Tab will list all comment channels that an individual has access to.
The All Channels Tab will list all comment channels. The Supervisor Chanel is a default channel that allows comments to be made that are only accessible by an individual’s supervisors. If an individual does not have access to the channel the statement, “You do not have permission to view this channel because you are not a participant,” will show in place of the comment textbox.

Account Info Tab Context Menu Explanations
To manage your personal account information, click on the three dot (…) icon to the right of the Account Info: (User Name) header to open a context menu with the options: Edit Account Info, Reset Password, and View Certifications (will only show if the individual has access to the People Module).
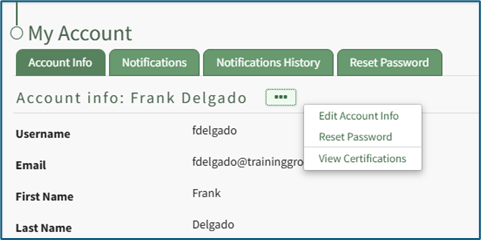
Account Info Tab Context Menu Explanations | |
Option | Explanation |
Edit Account Info | Selecting “Edit Account Info” from the context menu will open the Edit Account Info: (User Name) Page under the Account Info Tab. How To: Edit Your Personal Account InfoTo edit your own account information, select the Account Info Tab on the My Accounts Page of the Accounts Module.
The Account Info Tab can also be accessed from the Main Menu or by clicking your username in the top right corner of the site and then choosing My Account.
When editing an existing account, only the username or the email fields can be changed at the same time. Click the three dot (…) icon to the right of the Account info: (User Name) header to open the context menu. Select “Edit Account Info”.
This opens the Edit Account Info Page on the Account Info Tab. An account profile picture can be uploaded through the User Photo field. The image can be cropped as part of the upload process. It is recommended to upload an image less than 5MB. By default, a user logging in to KAStrack will be taken to the Dashboard Module. The Home Page field allows a user to designate the URL within KAStrack of their preference. Enter the page URL in this field if you wish to start on a different page than the Dashboard. For example, if you’d like to start in the Documents Module after login, set Home Page to: https://sitename.kastrack.com/r/documents. As a shortcut, you can also simply use the part after the .com, entering /r/documents in the field. After making changes to the account information, select “Save” and the changes made will be reflected on the Account Info: (User Name) Page. Click “Cancel” and return to the Account Info: (User Name) Page without any information being altered. |
Reset Password | Selecting “Reset Password” from the context menu will open the Reset Password Tab on the My Account Page in the Account Module. How To: Reset Your Own PasswordTo reset your own password, select the Reset Password Tab on the My Accounts Page of the Accounts Module. The Account Info Tab can also be accessed from the Main Menu.
Enter the required following information: your current password, your new password, and the new password a second time to confirm. Ensure your new password meets all displayed security requirements, which are listed under the Enter new password textbox.
When the password security requirement is met, the “X” will change to a “Check”. Click the “Save” button to change your password. Click “Cancel” and you will return to the Account Info Tab on the My Account Page. |
View Certifications | Selecting “View Certifications” from the context menu will open the My Certifications Tab on the User: (User Name) Page in the People Module If “View Certificates” does not show on the context menu, it’s likely that user does not have access to the People Module. |
My Accounts Page: Notifications Tab
The Notifications Tab on the My Account Page allows a KAStrack user to make their own selections regarding the type and frequency of email reports and email alerts they wish to receive. There are two checkboxes that if selected, expand with additional options for customization: “Send Me Regular Email Reports” and “Send Me Email Alerts”.

KAStrack generates and sends reports for the following modules: Actions, Assets, Documents, Finance, People, and Reports. If the “Send Me Regular Email Reports” box is checked, the user will be able to designate whether or not they wish to receive regular reports for each of those modules.
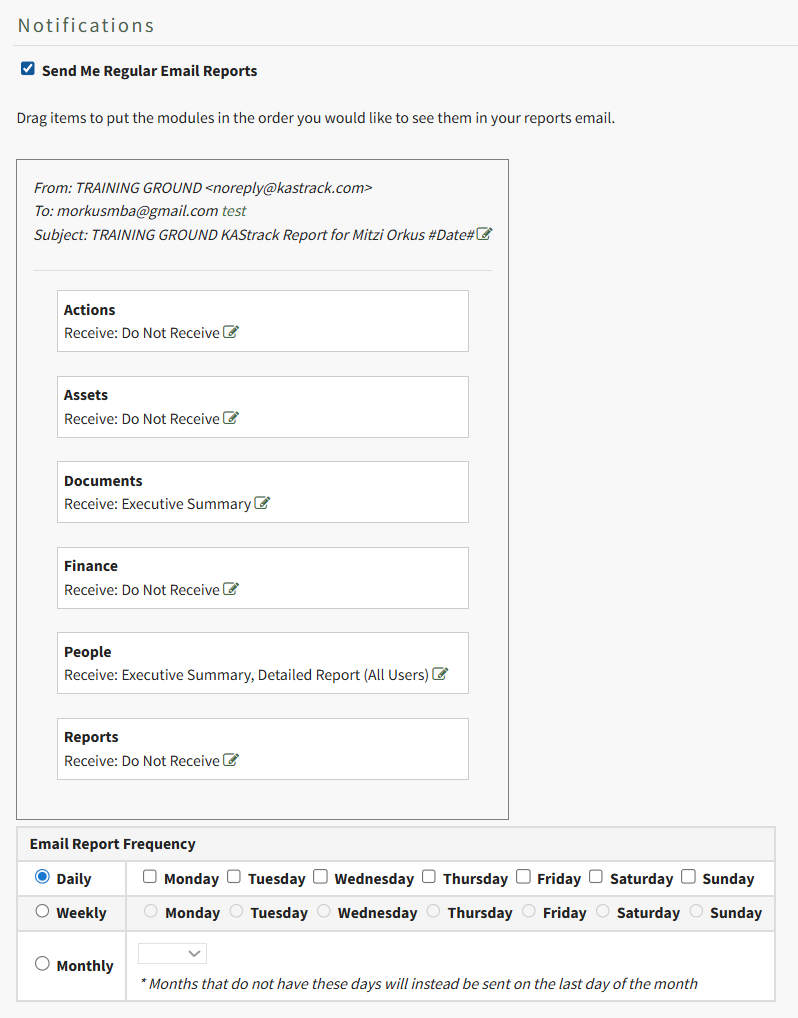
A preview of the email header and subject are shown above the listed modules. Press “test” on the To: line to be sent a test email of the report summary based on the settings below. If you’d like to edit the content of the email’s Subject, select the green pen at the end of the Subject line.
The items in the list can be dragged and dropped as desired according to user preference or priority. Changing the order modules are listed in changes the order reports are presented in on the actual email.
Each item has the word “Receive” located underneath it with a text box located to the right to permit selection of the report/summary. If the cursor is placed within the box, a default report type is offered for that menu item via drop-down list from which multiple reports can be chosen. The table below indicates the reports are available for each module. Save the field with no selected reports to set it as Do Not Receive.
Regular Reports Available via Email Notifications | |
Module | Reports Available |
Actions | Executive Summary |
Assets | Executive Summary, Detailed Report |
Documents | Executive Summary |
Finance | My Budgets, Executive Summary |
People | Executive Summary, Detailed Report (All Users), Detailed Report (Supervised Users), Detailed Report (All Users Grouped by Supervisor) Detailed Report (All Users Group By Supervisor) |
Reports | Accounts: Current Accounts, All Payments, Budgets: All Budget Items, Budgets: Approval Status, Budgets: Pending Approvals, Budgets: Rejected Budget Items, Budgets: Summary, People: Certification Status, People: Certification Status by Certification Role, People: Pending Approvals, People: Role Status The reports available from the Reports Module will vary per user based on what the individual has access to. |
How To: Edit Your Individual Email Report Preferences
KAStrack sends email alerts for the following modules: Accounts, Actions, Assets, Dispatch, Documents, Finance, Forms, Meetings, and People.
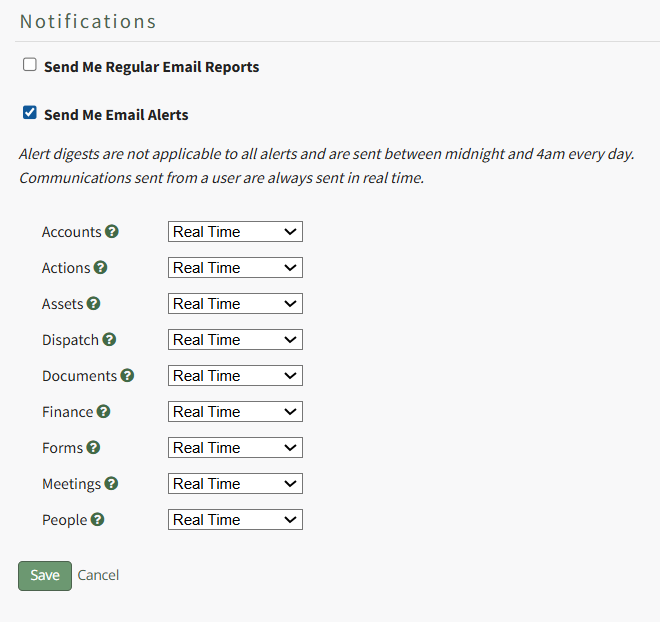
Each module has a dropdown menu with three options that designate when an email alert is sent: “Real Time”, “Digest”, and “Do Not Receive”.
Real Time is the default setting that sends email alerts in real time. Digest is KAStrack’s delayed timing feature. Selecting “Digest” will summarize all alerts with this designation to be sent daily between midnight and 4 a.m., Central Time (United States). Alert digests are not applicable to all alerts.
Whether or not an alert is digestible is specified by an individual with an admin access level.
Do Not Receive designates that the user does not wish to receive email alerts about that specific module.
Communications sent from users are always sent in real time.
How To: Edit Your Individual Email Alert Preferences
To edit your email alert preferences, open the Notifications Tab on the My Accounts Page in the Accounts Module. This tab is also accessible from the Main Menu.
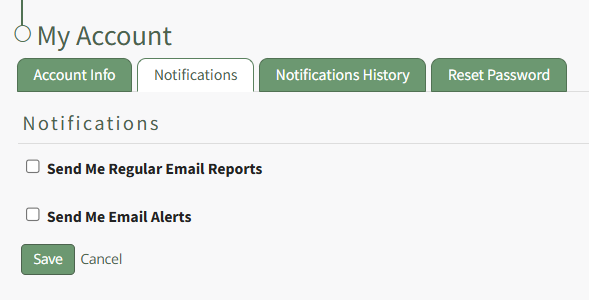
Select the “Send Me Email Alerts” checkbox opening the selections to be made for customization.
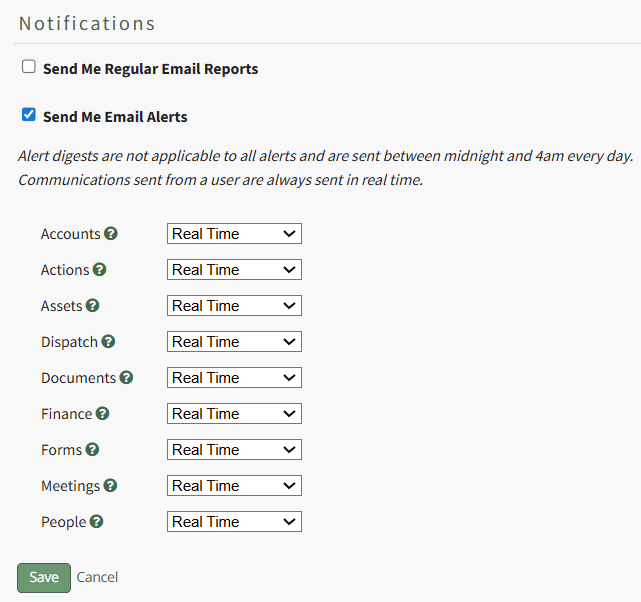
KAStrack sends email alerts for the following modules: Accounts, Actions, Assets, Dispatch, Documents, Finance, Forms, Meetings, and People. Each module has a dropdown menu with three options that designate when an email alert is sent: “Real Time”, “Digest”, and “Do Not Receive”.
Real Time is the default setting that sends email alerts in real time. Digest is KAStrack’s delayed timing feature. Selecting “Digest” will summarize all alerts with this designation to be sent daily between midnight and 4 a.m. Central Time (United States). Alert digests are not applicable to all alerts.
Whether or not an alert is digestible is specified by an individual with an admin access level.
Do Not Receive designates that the user does not wish to receive email alerts about that specific module.
Communications sent from users are always sent in real time.
When your desired selections are made, click on the “Save” button at the bottom of the screen. Clicking “Cancel” will not save changes and revert back to the previously saved preferences on the Notifications Tab of the My Account Page.
My Accounts Page: Notifications History Tab
The Notifications History Tab shows a user the chronology of notifications that have been received and sent in the system.

The notifications history is shown in table format. There is both a Received and Sent Tab.
The Received Communications Table separates Pending and Processed Communications. The columns show the date and module communications occurred in, the outcome of the attempt, the subject, and has a clickable link to view details.
Selecting “View” in the Outcome column opens the Outcome Modal showing who the email was sent to, the result, when it was sent, and if the read receipt has been received.

Selecting “View” in the Details column opens the View Communication Modal which states the subject of the notification and provides a clickable link to view the asset.
The default history shown for received communications is the past 7 days. Click “Load another 7 days” to extend the notification history another week. KAStrack will state how many days of historical communications are showing.\

If there is no communication history for a seven-day period, KAStrack will state that there were no processed communications. Note: KAStrack can show all history since account creation.

The Sent Communications Table similarly shows all Sent Communications for the previous 7 days.
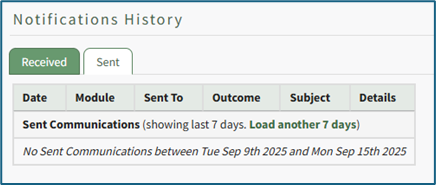
Click “Load another 7 days” to extend the notification history another week. KAStrack will state how many days of history are showing. If there is no sent communication history for a seven-day period, KAStrack will state that there were no sent communications.
My Accounts Page: Payment History Tab
The Payment History Tab shows a user the chronology of payments that have been made from their account while filling out payment-enabled Forms from the Forms Module. If a Form requires a payment, the transaction will be logged to the user’s account and history maintained on this page.
The payment history is shown in table format. Transactions are listed with the most recent entry first. The Description field is the posted description of the transaction, which is set by the Form designer. In the Attachment(s) column, you can download a receipt of the transaction to keep with your local records.
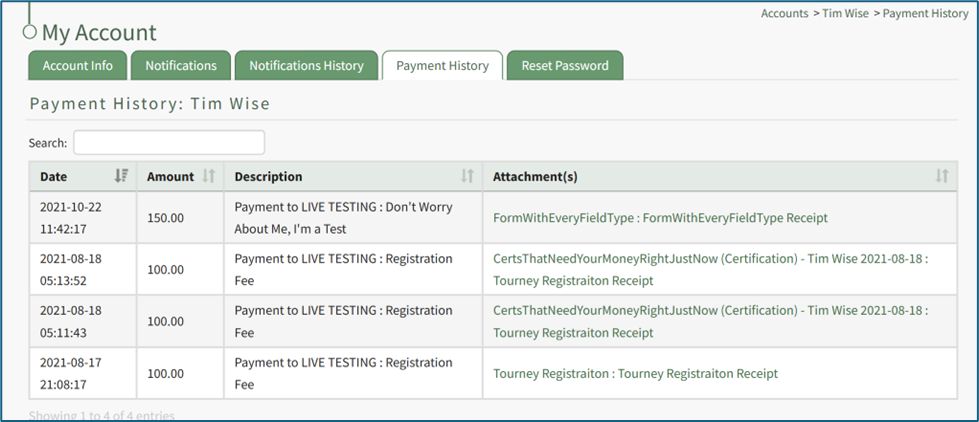
My Accounts Page: Reset Password Tab
The Reset Password Tab on the My Accounts Page allows a user to reset their password.
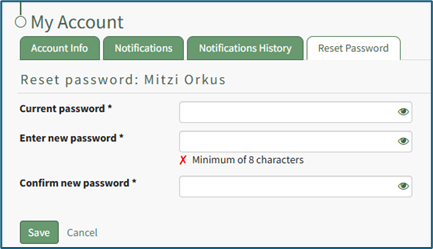
How To: Reset Your Own Password
To reset your own password, select the Reset Password Tab on the My Accounts Page of the Accounts Module. The Account Info Tab can also be accessed from the Main Menu.

Enter the required following information: your current password, your new password, and the new password a second time to confirm. Ensure your new password meets all displayed security requirements, which are listed under the Enter new password textbox.

When the password security requirement is met, the “X” will change to a “Check”.
Click the “Save” button to change your password. Click “Cancel” and you will return to the Account Info Tab on the My Account Page.
Accounts: Supplemental Resources
There are seven different email alerts associated with the Accounts Module.
Account Module Email Alert Summary
Users can enable and set their own notifications preferences for system emails on the Notifications Tab of the My Accounts Page in the Accounts Module.
How To: Edit Your Individual Email Report Preferences
Editing Your Individual Email Report Preferences
To edit your email report preferences, open the Notifications Tab on the My Accounts Page in the Accounts Module. This tab is also accessible from the Main Menu.

Select the “Send Me Regular Email Reports” checkbox, opening selections to be made for customization.
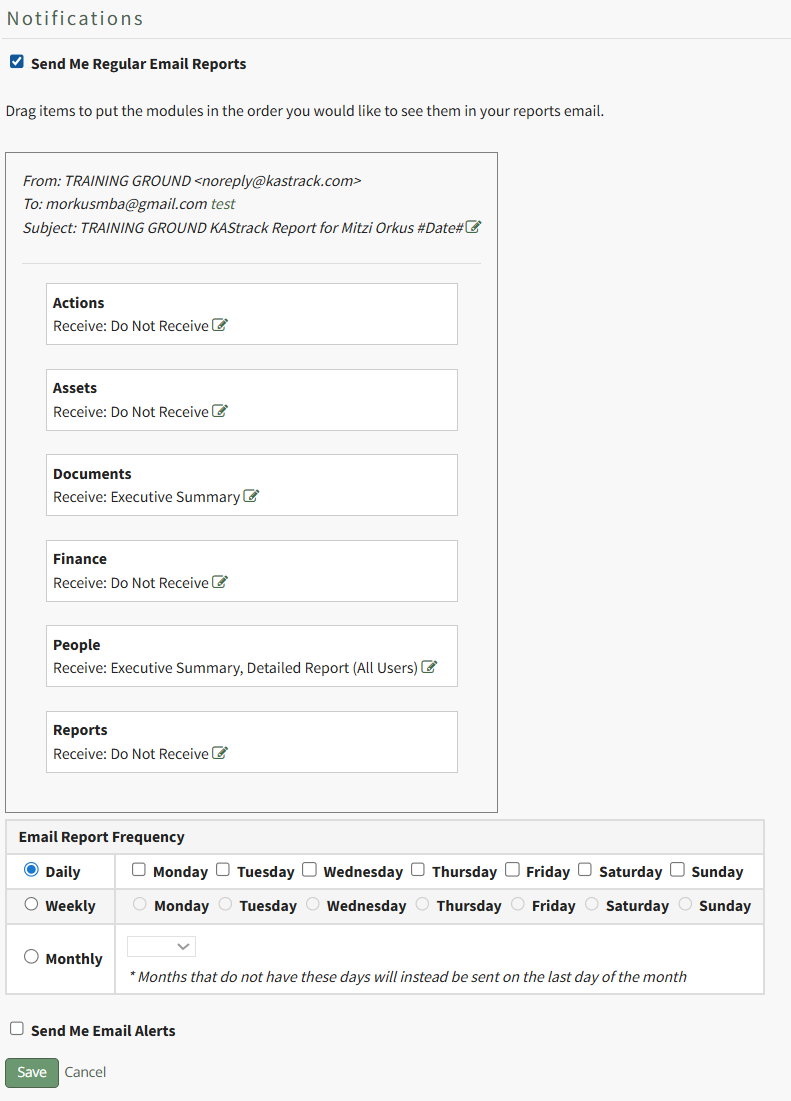
There are six modules with reports that can be emailed at the frequency of your choosing. The types of reports available for each module are shown below.
Regular Reports Available via Email Notifications | |
Module | Reports Available |
Actions | Executive Summary |
Assets | Executive Summary, Detailed Report |
Documents | Executive Summary |
Finance | My Budgets, Executive Summary |
People | Executive Summary, Detailed Report (All Users), Detailed Report (Supervised Users), Detailed Report (All Users Group By Supervisor) |
Reports | Accounts: Current Accounts, All Payments, Budgets: All Budget Items, Budgets: Approval Status, Budgets: Pending Approvals, Budgets: Rejected Budget Items, Budgets: Summary, Open Invoices, People: Certification Status, People: Certification Status by Certification Role, People: Pending Approvals, People: Role Status, Time Summary (Previous Month), Time Summary (Current Month) The reports available from the Reports Module will vary per user based on what the individual has access to |
The modules listed can be dragged and dropped as desired for user preference or priority.
Email Report Icon Explanations | |
Icon | Explanation |
| The edit icon opens a dropdown menu with the reports available for that module. |
| The check icon saves the report selections that were made. |
| The X icon cancels changes made to the reports selections. |


Adding Email Reports From Your Preferences
Click the edit icon to open the dropdown menu of available reports for the selected module.

Select the reports you would like to receive from the dropdown menu of options and click the check icon to save your preferences.

If no reports are selected and the box is left blank, your preference will show as “Do Not Receive”.
Click the check icon to save your selection.
Deleting Email Reports from Your Preferences
Click the edit icon to the right of the list of reports you are currently receiving.


Click the check icon to save your selection.
Setting the Frequency of Email Report Notifications
KAStrack users can customize the frequency of their e-mail report notifications on a daily, weekly, or monthly basis.

Daily email report notifications can be sent every day of the week, or on specific days. Select the appropriate checkboxes to indicate your preference. Selecting a weekly email report notification requires you to indicate which day of the week you prefer the report summary email to be sent. Selecting a monthly frequency requires the user to specify which numerical day of the month from a dropdown menu you wish to receive the report summary. The days that are not included in every month (29, 30, 31) have an asterisk next to them. If the current month does not have that particular date, the system will send the report on the final day of the month.
If you are not altering your email alert status, select the “Save” button to save your email report notification preferences. Clicking “Cancel” will not save changes and revert back to the previously saved preferences on the Notifications Tab of the My Account Page.
How To: Edit Your Individual Email Alert Preferences
To edit your email alert preferences, open the Notifications Tab on the My Accounts Page in the Accounts Module. This tab is also accessible from the Main Menu.
Select the “Send Me Email Alerts” checkbox opening the selections to be made for customization.
KAStrack sends email alerts for the following modules: Accounts, Actions, Assets, Dispatch, Documents, Finance, Forms, Meetings, and People. Each module has a dropdown menu with three options that designate when an email alert is sent: “Real Time”, “Digest”, and “Do Not Receive”.
Real Time is the default setting that sends email alerts in real time. Digest is KAStrack’s delayed timing feature. Selecting “Digest” will summarize all alerts with this designation to be sent daily between midnight and 4 a.m. Central Time (United States). Alert digests are not applicable to all alerts.
Whether or not an alert is digestible is specified by an individual with an admin access level.
Do Not Receive designates that the user does not wish to receive email alerts about that specific module.
Communications sent from users are always sent in real time.
When your desired selections are made, click on the “Save” button at the bottom of the screen. Clicking “Cancel” will not save changes and revert back to the previously saved preferences on the Notifications Tab of the My Account Page.
Account Module Email Alerts Summary Table | |
Email Alert | Digestible |
Account Deactivated | Can be sent via digest |
Account Inactivity Warning | Can be sent via digest |
Password Changed | Sent in Real Time Only |
Password Reset | Sent in Real Time Only |
Account Role or Certification Red Warning | Can be sent via digest |
User Registration | Sent in Real Time Only |
Welcome Email | Sent in Real Time Only |
Administrators can update the system default settings (including whether they are sent in real-time or digestible) for alert emails on the Settings Page of the Communications Module.
Complete List of Account Module How Tos
How To: Add an Access Level for an Individual
To add an access level for an individual user, go to the Active Tab on the Accounts Page of the Accounts Module. This tab is also accessible from the Main Menu. There are three ways to add an access level for a user from the Active Tab.
You can also update multiple users’ access levels via the Import Tab on the Accounts Page. When doing so, make sure to separate each access level with a semicolon.
How To: Bulk Import Account Information
Before bulk importing several new accounts, be sure that your organization has customized the account information fields to meet your needs. WIKI LINK TO ACCOUNT FIELDS TAB: SITE SETTINGS Once your account information preferences have been established in the Site Settings Module, you can begin organizing the CSV file for bulk imports.
Open the Import Tab on the Accounts Page in the Accounts Module.
Select the “Download Template” button to have KAStrack generate a template with the appropriate fields in separate columns that match the designated preferences in the Site Settings Module.
When your CSV file with new account information is complete, ensure it is saved with the CSV format UTF-8.
Click “Choose File,” and select the correct CSV file from your computer. Click “Open”.
Each of the Account Information fields will now show below the selected CSV file.
KAStrack scans the first row of your CSV file for matching column headers and attempts to map your column headers to the appropriate Account Fields. The dropdown menu next to each field will automatically be set to any matching column headings from the CSV.
If a matching column couldn't be found, you can manually choose which column should map to those Account Fields by choosing an option from the dropdown.
Select the “Import Accounts” button to import the information. Click “Cancel” to return to the Active Tab on the Accounts Page without saving information.
The Import Tab can also be used to update existing account information. The KAStrack- generated unique user ID is a required column in the CSV file if editing an existing account. This can be found in the URL at the top of your browser when viewing a user’s Account Info page, or by doing an account export.
How To: Export User Account Information
{{@131}}
Helpful Tips for Bulk Imports
The CSV document created to import account information will vary based on your customized Site Settings. Required account fields are username, password, first and last name. Required status for fields is designated by an asterisk (*). Each included field should be represented by its own column in the CSV document.
Required system user account information fields do not show as required on the Account Fields Tab on the Site Settings Page.
Helpful Tips for Account Information Bulk Imports | |
Field | Comments / Suggestions |
User ID | The User ID is a unique system ID for the user. Leave blank to create a new user. |
Username* | Required Field. Character usage is limited to lowercase letters, numbers, hyphens, underscores, periods, or at signs. A username cannot contain spaces and cannot start with an underscore. When editing an existing account via imports, the username and email cannot be changed simultaneously. |
This field may be left blank when creating a new user. If so, an email address will be generated for the user with the format: username@sitename.kastrack.com. When editing an existing account via imports, the username and email cannot be changed simultaneously. | |
Password* | Required Field. Default settings require a minimum of 8 characters. All passwords created in an import will be temporary. Users will be required to update their password upon their initial login. |
First Name* | Required Field. |
Last Name* | Required Field. |
Access Levels | KAStrack defaults: Employee, Supervisor, Admin, Observer. Customized Access Levels can be created. Separate multiple values with a semi-colon. If a user is not assigned an Access Level, they will not have access to ANY modules. This column can be left blank if the Access Level is identified in the Registration Profile applied to the user. |
Supervisor | The supervisor’s username must be entered verbatim. Separate multiple values with a semi-colon. This column can be left blank if the Supervisor is identified in the Registration Profile applied to the user. |
Certification Role | Allows assignment of roles in the People Module. Multiple values should be separated with a semi-colon. Role names must be preceded by Company name as listed in the People Module, e.g. CompanyName RoleName. This column can be left blank if Certification Roles are identified in the Registration Profile applied to the user. |
Status | User status cannot be changed through import. All new imported accounts will automatically be Active. |
Employee ID | This is an optional field (included by default settings) that can be edited or removed by going to the Account Fields Tab in Site Settings. |
Phone | This is an optional field (included by default settings) that can be edited or removed by going to the Account Fields Tab in Site Settings. |
Address 1 | This is an optional field (included by default settings) that can be edited or removed by going to the Account Fields Tab in Site Settings. |
Address 2 | This is an optional field (included by default settings) that can be edited or removed by going to the Account Fields Tab in Site Settings. |
Registration Profile | This column is used to apply Registration Profiles to accounts. The full name of the Registration Profile must be entered. The following fields listed above can be modified through the Registration Profile: Access Levels, Supervisors, and Certification Roles. |
Custom Fields | If other custom fields have been created on the Account Fields Tab in Site Settings, they can be included as column headers in an Import. These fields may or may not be required based on their settings in the Account Fields Tab. |
Adding an Access Level Using the Add User Access Level Quick Link
To add an access level using the add user access level quick link, go to the Active Tab on the Accounts Page.
“Add User Access Level” opening the Add Access Level Modal.
Select the individual user from the list provided on the dropdown menu.
Select the Access Level you would like to add to the user’s account.
Select the “Save” button to save the changes within the system or click “Cancel” to return to the Active Tab on the Accounts Page.
A second way to edit a user’s access levels is from the Active Accounts Table (if the Access Level column is included on the Active Accounts Table, which can be customized).
The modal will display two columns: Selected Access Levels (what has been assigned to the user) and Available Access Levels (what can still be assigned). Drag and drop the designations as desired or click an item to move it from its current column to the other.
Select the “Save Access Levels” button at the bottom of the modal to save the changes or click “Cancel” to return to the Active Accounts Tab on the Accounts Page.
Adding an Access Level by Editing a User's Account Information
To add an access level by editing a user’s account information, go to the Active Tab of the Accounts Page. Select the three dots (…) icon in the Name column opening the context menu for the specific user, and select “Edit Account Info”. Click “Add/Edit Access Level(s)” in the Access Levels Field.
The Select Access Levels Modal will display the two-column drag-and-drop tool.
Adding an Access Level from the Active Accounts Table
Adding an access level from the active accounts table is only possible if the access level column shows on the active accounts table, which is included by default. If the column is not visible, it can be added through the Site Settings Module.
How To: Edit the Accounts Module Active Accounts Table
To edit the Active Accounts Table in the Accounts Module, go to the Table Defaults Tab in the Site Settings Module.
Select “Accounts: Active” from the dropdown menu.
Select the “Edit Columns” button, opening the Choose Columns Modal. The default column choices include: name, username, email, access levels, supervisors, become, status, last active, login, archive, first name, last night, employee ID, phone, Address 1 and Address 2 and any customized account fields.
How To: Add a Custom/Additional User Account Information Field
{{@856}}
The bars icon allows the columns to be positioned in the order of your choosing.
Click “Cancel” to return to the Table Defaults Tab without making any changes.
Select the “Save” button to make the desired changes and return to the Table Defaults Tab. A preview of the first five rows of the table is shown. Select the “View Live Table” button to be directed to the live table in the Accounts Module.
To add an access level from the Active Accounts Table, go to the Active Tab on the Accounts Page.
Select the pencil icon to the right of the access level in the Access Levels Column. This opens the Select Access Levels Modal.
The modal will display two columns: Selected Access Levels (what has been assigned to the user) and Available Access Levels (what can still be assigned). Drag and drop the designations as desired or click an item to move it from its current column to the other.
Select the “Save Access Levels” button at the bottom of the modal to save the changes or click “Cancel” to return to the Active Accounts Tab on the Accounts Page.
How To: Archive a User Account
To archive an account, open the Active Tab on the Accounts Page in the Accounts Module.
Click the three dot (…) icon next to the user in the Active Accounts Table, opening the context menu. Select “Archive Account”.
Selecting “Archive Account” from the context menu will open a Confirmation Modal.
The modal states, “Are you sure you want to archive this account? Archived accounts are not visible anywhere on the site, including reports.”
Select the “OK” button to archive the selected user account. The user account will be removed from the table of active accounts. Their account information is now found under the Archived Tab on the Accounts Page.
Select the “Cancel” button and return to the Active Tab on the Accounts Page.
How To: Bulk Import Account Information
Before bulk importing several new accounts, be sure that your organization has customized the account information fields to meet your needs. WIKI LINK TO ACCOUNT FIELDS TAB: SITE SETTINGS Once your account information preferences have been established in the Site Settings Module, you can begin organizing the CSV file for bulk imports.
Open the Import Tab on the Accounts Page in the Accounts Module.
Select the “Download Template” button to have KAStrack generate a template with the appropriate fields in separate columns that match the designated preferences in the Site Settings Module.
When your CSV file with new account information is complete, ensure it is saved with the CSV format UTF-8.
Click “Choose File,” and select the correct CSV file from your computer. Click “Open”.
Each of the Account Information fields will now show below the selected CSV file.
KAStrack scans the first row of your CSV file for matching column headers and attempts to map your column headers to the appropriate Account Fields. The dropdown menu next to each field will automatically be set to any matching column headings from the CSV.
If a matching column couldn't be found, you can manually choose which column should map to those Account Fields by choosing an option from the dropdown.
Select the “Import Accounts” button to import the information. Click “Cancel” to return to the Active Tab on the Accounts Page without saving information.
The Import Tab can also be used to update existing account information. The KAStrack- generated unique user ID is a required column in the CSV file if editing an existing account. This can be found in the URL at the top of your browser when viewing a user’s Account Info page, or by doing an account export.
How To: Export User Account Information
Open the Export Tab on the Accounts Page in the Accounts Module.
There are two checkboxes that allow for customization of your export. Both or neither can be included.
Select “Include archived accounts in export” to include archived accounts in your export. Select “Include inactive accounts in export” to include inactive accounts in your export.
Click “Export local accounts” and a CSV file will automatically be downloaded to your personal device.
Helpful Tips for Bulk Imports
The CSV document created to import account information will vary based on your customized Site Settings. Required account fields are username, password, first and last name. Required status for fields is designated by an asterisk (*). Each included field should be represented by its own column in the CSV document.
Required system user account information fields do not show as required on the Account Fields Tab on the Site Settings Page.
Helpful Tips for Account Information Bulk Imports | |
Field | Comments / Suggestions |
User ID | The User ID is a unique system ID for the user. Leave blank to create a new user. |
Username* | Required Field. Character usage is limited to lowercase letters, numbers, hyphens, underscores, periods, or at signs. A username cannot contain spaces and cannot start with an underscore. When editing an existing account via imports, the username and email cannot be changed simultaneously. |
This field may be left blank when creating a new user. If so, an email address will be generated for the user with the format: username@sitename.kastrack.com. When editing an existing account via imports, the username and email cannot be changed simultaneously. | |
Password* | Required Field. Default settings require a minimum of 8 characters. All passwords created in an import will be temporary. Users will be required to update their password upon their initial login. |
First Name* | Required Field. |
Last Name* | Required Field. |
Access Levels | KAStrack defaults: Employee, Supervisor, Admin, Observer. Customized Access Levels can be created. Separate multiple values with a semi-colon. If a user is not assigned an Access Level, they will not have access to ANY modules. This column can be left blank if the Access Level is identified in the Registration Profile applied to the user. |
Supervisor | The supervisor’s username must be entered verbatim. Separate multiple values with a semi-colon. This column can be left blank if the Supervisor is identified in the Registration Profile applied to the user. |
Certification Role | Allows assignment of roles in the People Module. Multiple values should be separated with a semi-colon. Role names must be preceded by Company name as listed in the People Module, e.g. CompanyName RoleName. This column can be left blank if Certification Roles are identified in the Registration Profile applied to the user. |
Status | User status cannot be changed through import. All new imported accounts will automatically be Active. |
Employee ID | This is an optional field (included by default settings) that can be edited or removed by going to the Account Fields Tab in Site Settings. |
Phone | This is an optional field (included by default settings) that can be edited or removed by going to the Account Fields Tab in Site Settings. |
Address 1 | This is an optional field (included by default settings) that can be edited or removed by going to the Account Fields Tab in Site Settings. |
Address 2 | This is an optional field (included by default settings) that can be edited or removed by going to the Account Fields Tab in Site Settings. |
Registration Profile | This column is used to apply Registration Profiles to accounts. The full name of the Registration Profile must be entered. The following fields listed above can be modified through the Registration Profile: Access Levels, Supervisors, and Certification Roles. |
Custom Fields | If other custom fields have been created on the Account Fields Tab in Site Settings, they can be included as column headers in an Import. These fields may or may not be required based on their settings in the Account Fields Tab. |
How To: Create a New Channel
To create a new channel on a user’s account, go to the specific user’s Account Info: (User Name) Page in the Accounts Module for the individual you wish to create a new channel for.
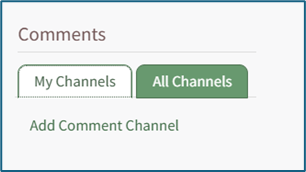
Select the “My Channels” tab at the bottom of the Account Info: (User Name) Page. Then click “Add Comment Channel” underneath opening the Add Comment Channel Modal.
Creating new channels is only visible to individuals with Admin module level access.

Input the new comment channel title.
Select participants by name or certification role. Begin typing in the field and a list of available accounts and certification roles will appear that contain the text you've entered. Checkboxes allow for the inclusion the user and the individual’s supervisor.
After selecting the accounts and/or roles, participant names are listed as Non-Admins in the below boxes. Names can be dragged and dropped between the Admins and Non-Admins boxes to designate who will be administrators of the new comment channel.
Select the “Save” button and the comment channel will be added to an individual’s Channels. Click “Cancel” and return to the individual’s Account Info Page.
Only admins, supervisors, and the employee in question will have access to an employee's Account Info Page by default.
How To: Create an Individual New User Account
The Create Tab opens to the Create Account Page. To bulk import the information for several new user accounts, go to the Import Tab on the Accounts Page.
How To: Bulk Import Account Information
Before bulk importing several new accounts, be sure that your organization has customized the account information fields to meet your needs. WIKI LINK TO ACCOUNT FIELDS TAB: SITE SETTINGS Once your account information preferences have been established in the Site Settings Module, you can begin organizing the CSV file for bulk imports.
Open the Import Tab on the Accounts Page in the Accounts Module.
Select the “Download Template” button to have KAStrack generate a template with the appropriate fields in separate columns that match the designated preferences in the Site Settings Module.
When your CSV file with new account information is complete, ensure it is saved with the CSV format UTF-8.
Click “Choose File,” and select the correct CSV file from your computer. Click “Open”.
Each of the Account Information fields will now show below the selected CSV file.
KAStrack scans the first row of your CSV file for matching column headers and attempts to map your column headers to the appropriate Account Fields. The dropdown menu next to each field will automatically be set to any matching column headings from the CSV.
If a matching column couldn't be found, you can manually choose which column should map to those Account Fields by choosing an option from the dropdown.
Select the “Import Accounts” button to import the information. Click “Cancel” to return to the Active Tab on the Accounts Page without saving information.
The Import Tab can also be used to update existing account information. The KAStrack- generated unique user ID is a required column in the CSV file if editing an existing account. This can be found in the URL at the top of your browser when viewing a user’s Account Info page, or by doing an account export.
How To: Export User Account Information
{{@131}}
Helpful Tips for Bulk Imports
The CSV document created to import account information will vary based on your customized Site Settings. Required account fields are username, password, first and last name. Required status for fields is designated by an asterisk (*). Each included field should be represented by its own column in the CSV document.
Required system user account information fields do not show as required on the Account Fields Tab on the Site Settings Page.
Helpful Tips for Account Information Bulk Imports | |
Field | Comments / Suggestions |
User ID | The User ID is a unique system ID for the user. Leave blank to create a new user. |
Username* | Required Field. Character usage is limited to lowercase letters, numbers, hyphens, underscores, periods, or at signs. A username cannot contain spaces and cannot start with an underscore. When editing an existing account via imports, the username and email cannot be changed simultaneously. |
This field may be left blank when creating a new user. If so, an email address will be generated for the user with the format: username@sitename.kastrack.com. When editing an existing account via imports, the username and email cannot be changed simultaneously. | |
Password* | Required Field. Default settings require a minimum of 8 characters. All passwords created in an import will be temporary. Users will be required to update their password upon their initial login. |
First Name* | Required Field. |
Last Name* | Required Field. |
Access Levels | KAStrack defaults: Employee, Supervisor, Admin, Observer. Customized Access Levels can be created. Separate multiple values with a semi-colon. If a user is not assigned an Access Level, they will not have access to ANY modules. This column can be left blank if the Access Level is identified in the Registration Profile applied to the user. |
Supervisor | The supervisor’s username must be entered verbatim. Separate multiple values with a semi-colon. This column can be left blank if the Supervisor is identified in the Registration Profile applied to the user. |
Certification Role | Allows assignment of roles in the People Module. Multiple values should be separated with a semi-colon. Role names must be preceded by Company name as listed in the People Module, e.g. CompanyName RoleName. This column can be left blank if Certification Roles are identified in the Registration Profile applied to the user. |
Status | User status cannot be changed through import. All new imported accounts will automatically be Active. |
Employee ID | This is an optional field (included by default settings) that can be edited or removed by going to the Account Fields Tab in Site Settings. |
Phone | This is an optional field (included by default settings) that can be edited or removed by going to the Account Fields Tab in Site Settings. |
Address 1 | This is an optional field (included by default settings) that can be edited or removed by going to the Account Fields Tab in Site Settings. |
Address 2 | This is an optional field (included by default settings) that can be edited or removed by going to the Account Fields Tab in Site Settings. |
Registration Profile | This column is used to apply Registration Profiles to accounts. The full name of the Registration Profile must be entered. The following fields listed above can be modified through the Registration Profile: Access Levels, Supervisors, and Certification Roles. |
Custom Fields | If other custom fields have been created on the Account Fields Tab in Site Settings, they can be included as column headers in an Import. These fields may or may not be required based on their settings in the Account Fields Tab. |
To manually create a single new account, open the Create Tab on the Accounts Page in the Accounts Module. The fields that show are customizable and your organization has the ability to create any desired fields.
An asterisk indicates that the input field is a required entry. You can create new Account Fields and modify existing ones, including which Account Fields are required, on the Account Fields Tab in the Site Settings Module.
How To: Edit a Custom/Additional User Account Information Field
To edit a custom user account information field, open the Account Fields Tab in the Site Settings Module from the Main Menu.
Custom Fields show in the Additional User Account Information Fields Table. Click the Edit button in the Action column of the table opening the Edit Field Modal.
Make the desired changes and select the Save button, returning to the Account Fields Tab.
The email field can be left blank when creating a new user account. If so, KAStrack will generate a unique email address for the user, formatted like: username@sitename.kastrack.com.
If no email address is entered, a user will not be able to receive email reports/alerts, however, reports and alerts are still delivered to the user’s account. Users can access system messaging through the Notifications History Tab on the My Accounts Page in the Accounts Module. If you want to designate an email address to receive all notices sent to an account that does not have their own email address, this can be done by “Enabling Catch Missing CC” on the Settings Page of the Communications Module.
Enter the requested information for the new user.
Registration profiles act as templates when creating new user accounts. Select which registration profile (listed in the registration tab of Site Settings) you would like to apply to the new user account from the dropdown menu to assign predetermined access level(s), supervisor(s), and Certification Role(s).
These fields will not populate on screen until the account is saved.
How To: Create Registration Profiles
To create a new registration profile, go to the Registration Tab in the Site Settings Module.
Click the plus icon next to the Registration Profiles header or select “Create” from the three dot (…) icon context menu. This will open the Create Registration Profile Page.
The fields used in a Registration Profile are optional. You are not required to make selections for all when generating a new profile.
Input a name for the new registration profile, which will automatically fill in the URL link textbox.
Select any desired access level(s) for this registration profile from the dropdown menu list and click “Add”. Multiple Access Levels can be selected. The X icon to the left of the access level will remove the selection if it was made in error.
It is recommended to include at least one access level if this Registration Profile will be used to register new user accounts, as they must have an access level to see anything in KAStrack.
Select any desired Certification Role(s) for this registration profile from the dropdown menu list and click “Add”. Multiple Certification Roles can be selected. The X icon to the left of the Certification Roles will remove the selection if it was made in error.
Select any desired supervisor(s) that are to be assigned to the new accounts that register with this profile from the dropdown menu list and click “Add”. Multiple supervisors can be selected. The X icon to the left of the supervisor will remove the selection if it was made in error.
If desired, you can specify individual users and/or certification roles that are to receive notification of the new user account’s registration. When you type into the textbox, users and certification roles will show on a dropdown menu for selection. Multiple users and/or certification roles can be selected. The X icon to the left of the user / role will remove the selection if it was made in error.
If new registrations require approval, you can specify individual users and/or certification roles that are responsible for approving the new registrations. When you type into the textbox, users and certification roles will show on a dropdown menu for selection. Multiple users and/or certification roles can be selected. The X icon to the left of the user / role will remove the selection if it was made in error. Leave this field blank if no approval is required.
The default is set to not require email verification for new account generation, but you can select Yes or No from a dropdown menu. Users will then receive an email after registration asking them to verify their email address.
The default for all registration profiles can be set on the Email Settings Tab in the Site Settings Module, but the Registration Profile being created will override the default settings.
A default new user notification template is applied for all registration profiles.
Any users who register with this profile will receive notification emails/alerts that have been specified through the new user template. The Default New User Notification Template details are shown on the Notification Templates Tab on the Settings Page of the Communications Module. Clicking the word “here” will redirect the user to the Notification Template Tab where the Default New User Template can be edited or a new notification template can be created for your organization’s preferences.
How To: Edit New User Notification Templates
{{@111}}
If you would like new user accounts that use this registration profile to receive a Welcome Email, select yes from the dropdown menu.
The default for all registration profiles can be set on the Email Settings Tab in the Site Settings Module, but the Registration Profile being created will override the default settings.
A redirect URL can be designated, so that any user registering with this profile will be redirected to the specified URL after registering.
Input a custom message for new registrations and a custom message for existing users if desired.
If an existing user logs in from a Registration Profile link, the access level(s), certification role(s), and supervisor(s) listed on the Registration Profile will be added to the user’s account. Any existing access levels, certification roles, and supervisors on their account are not removed.
Select “Cancel” at any time to return to the Registration Profile Tab in the Site Settings Module without saving the profile. Select the “Save” button and the new registration profile now shows on the Registration Tab in the Registration Profile Table.
Registration profiles can be enabled/disabled via a checkbox in the Registration Profile Table so that your organization has control of when this link is activated.
Click “Add/Edit Access Level(s)” opening the Choose Access Levels Modal.
The Modal will display two columns: Selected Access Level(s) (what has been assigned to the user) and Available Access Level(s) (what can still be assigned). Drag and drop the designations as desired or click an item to move it from its current column to the other.
Select the “Save Access Level(s)” button at the bottom of the modal to save the changes or click “Cancel” to return to Create Tab on the Accounts Page.
Click “Add/Edit Supervisor(s)” opening the Choose Supervisors Modal.
The Modal will display two columns: Selected Supervisor(s) and Available Supervisor(s). Drag and drop the designations as desired or click an item to move it from its current column to the other.
Select the “Save Supervisor(s)” button at the bottom of the modal to save the changes or click “Cancel” to return to the Create Tab on the Account Page.
Click “Add/Edit Certification Role(s) opening the Choose Certification Role(s) Modal.
The Modal will display two columns: Selected Certification Role(s) and Available Certification Role(s). Drag and drop the designations as desired or click an item to move it from its current column to the other.
Select the “Save Certification Role(s)” button at the bottom of the modal to save the changes or click “Cancel” to return to the Create Tab on the Account Page.
Select the optional “Send welcome email” checkbox to send a welcome e-mail.
Select the “Create Account” button to create the new user account or click “Cancel” to return to the Active Tab on the Accounts Page without saving changes.
How To: Customize Your Default KAStrack Login Screen
By default, a user logging in to KAStrack will be taken to the Dashboard Module. The Home Page field allows a user to designate the URL within KAStrack of their preference.
To customize your KAStrack Home Page and open your user account to a page other than Dashboard, go to the Account Info Tab on the My Account Page of the Accounts Module.
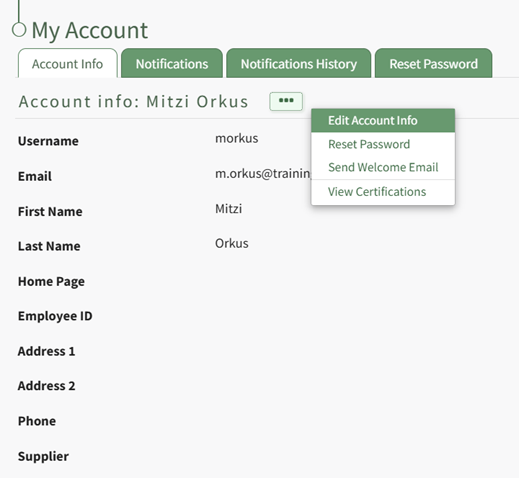
Select the three-dot icon opening the context menu and select “Edit Account Info”. This enables you to edit your own account information. Enter the page URL in this field if you wish to start on a different page than the Dashboard. For example, if you’d like to start in the Documents Module after login, set Home Page to: https://sitename.kastrack.com/r/documents.

As a shortcut, you can also simply use the part after the .com, entering /r/documents in the field.
After making changes to the account information, select “Save” and the changes made will be reflected on the Account Info: (User Name) Page.
How To: Deactivate a User Account
To deactivate an account, open the Active Tab on the Accounts Page in the Accounts Module.

Click the three dot (…) icon next to the user in the Active Accounts Table, opening the context menu. Select “Deactivate Account” from the context menu, opening a Confirmation Modal for account deactivation.

The modal states, “Are you sure you want to deactivate this account? Deactivated accounts are not visible anywhere on the site, including reports. Users with deactivated accounts may be allowed to re-activate their accounts by logging in depending on settings in Site Settings.”
Select the “OK” button to deactivate the selected user account. Select the “Cancel” button and return to the Active Tab on the Accounts Page.
How To: Delete a Channel
To delete a channel, go to the specific user’s Account Info: (User Name) Page in the Accounts Module for the individual’s channel you wish to delete.

Click the three dot (…) icon located on the right of the desired channel.
Select the “Delete” option from the drop-down list, and a Confirmation Modal appears asking, “Are you sure you want to permanently delete this comment channel and all associated comments for this user?”

Select “OK” to permanently delete the channel and comments. Click “Cancel” to return to the Account Info: (User Name) Page.
An individual must have Admin module level access to edit a channel.
How To: Edit a Channel
To edit a channel on a user’s account, go to the specific user’s Account Info: (User Name) Page in the Accounts Module for the individual’s channel you wish to edit.
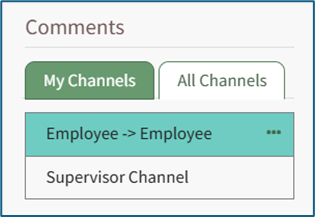
Click the three dot (…) icon located on the right of the desired channel.
Select “Edit” and the Edit Comment Channel Modal will appear for that channel. Make any desired changes. Select “Save” to make the changes to the Chanel. Click “Cancel” to return to the Account Info: (User Name) Page.
An individual must have Admin module level access to edit a channel.
How To: Edit a User's Supervisor
To edit an individual user’s supervisor in KAStrack, go to the Active Tab on the Accounts Page of the Accounts Module. This tab is also accessible from the Main Menu. There are three ways to edit a supervisor from the Active Tab.
You can also update multiple users’ access levels via the Import Tab on the Accounts Page. When doing so, make sure to separate each access level with a semicolon.
How To: Bulk Import Account Information
Before bulk importing several new accounts, be sure that your organization has customized the account information fields to meet your needs. WIKI LINK TO ACCOUNT FIELDS TAB: SITE SETTINGS Once your account information preferences have been established in the Site Settings Module, you can begin organizing the CSV file for bulk imports.
Open the Import Tab on the Accounts Page in the Accounts Module.
Select the “Download Template” button to have KAStrack generate a template with the appropriate fields in separate columns that match the designated preferences in the Site Settings Module.
When your CSV file with new account information is complete, ensure it is saved with the CSV format UTF-8.
Click “Choose File,” and select the correct CSV file from your computer. Click “Open”.
Each of the Account Information fields will now show below the selected CSV file.
KAStrack scans the first row of your CSV file for matching column headers and attempts to map your column headers to the appropriate Account Fields. The dropdown menu next to each field will automatically be set to any matching column headings from the CSV.
If a matching column couldn't be found, you can manually choose which column should map to those Account Fields by choosing an option from the dropdown.
Select the “Import Accounts” button to import the information. Click “Cancel” to return to the Active Tab on the Accounts Page without saving information.
The Import Tab can also be used to update existing account information. The KAStrack- generated unique user ID is a required column in the CSV file if editing an existing account. This can be found in the URL at the top of your browser when viewing a user’s Account Info page, or by doing an account export.
How To: Export User Account Information
{{@131}}
Helpful Tips for Bulk Imports
The CSV document created to import account information will vary based on your customized Site Settings. Required account fields are username, password, first and last name. Required status for fields is designated by an asterisk (*). Each included field should be represented by its own column in the CSV document.
Required system user account information fields do not show as required on the Account Fields Tab on the Site Settings Page.
Helpful Tips for Account Information Bulk Imports | |
Field | Comments / Suggestions |
User ID | The User ID is a unique system ID for the user. Leave blank to create a new user. |
Username* | Required Field. Character usage is limited to lowercase letters, numbers, hyphens, underscores, periods, or at signs. A username cannot contain spaces and cannot start with an underscore. When editing an existing account via imports, the username and email cannot be changed simultaneously. |
This field may be left blank when creating a new user. If so, an email address will be generated for the user with the format: username@sitename.kastrack.com. When editing an existing account via imports, the username and email cannot be changed simultaneously. | |
Password* | Required Field. Default settings require a minimum of 8 characters. All passwords created in an import will be temporary. Users will be required to update their password upon their initial login. |
First Name* | Required Field. |
Last Name* | Required Field. |
Access Levels | KAStrack defaults: Employee, Supervisor, Admin, Observer. Customized Access Levels can be created. Separate multiple values with a semi-colon. If a user is not assigned an Access Level, they will not have access to ANY modules. This column can be left blank if the Access Level is identified in the Registration Profile applied to the user. |
Supervisor | The supervisor’s username must be entered verbatim. Separate multiple values with a semi-colon. This column can be left blank if the Supervisor is identified in the Registration Profile applied to the user. |
Certification Role | Allows assignment of roles in the People Module. Multiple values should be separated with a semi-colon. Role names must be preceded by Company name as listed in the People Module, e.g. CompanyName RoleName. This column can be left blank if Certification Roles are identified in the Registration Profile applied to the user. |
Status | User status cannot be changed through import. All new imported accounts will automatically be Active. |
Employee ID | This is an optional field (included by default settings) that can be edited or removed by going to the Account Fields Tab in Site Settings. |
Phone | This is an optional field (included by default settings) that can be edited or removed by going to the Account Fields Tab in Site Settings. |
Address 1 | This is an optional field (included by default settings) that can be edited or removed by going to the Account Fields Tab in Site Settings. |
Address 2 | This is an optional field (included by default settings) that can be edited or removed by going to the Account Fields Tab in Site Settings. |
Registration Profile | This column is used to apply Registration Profiles to accounts. The full name of the Registration Profile must be entered. The following fields listed above can be modified through the Registration Profile: Access Levels, Supervisors, and Certification Roles. |
Custom Fields | If other custom fields have been created on the Account Fields Tab in Site Settings, they can be included as column headers in an Import. These fields may or may not be required based on their settings in the Account Fields Tab. |
Using the Quick Edit Supervisor Link
To add a supervisor for an employee using the Quick Edit Supervisor Link, go to the Active Tab on the Accounts Page.
Click “Quick Edit Supervisor Links” opening the Set Supervised Users Modal.
Select the supervisor from the dropdown menu provided. KAStrack will then open a list of users to be listed under the selected supervisor in the organization’s hierarchal structure.
The checkbox on the first row allows for the selection of all employees listed. You can also click the appropriate checkboxes individually.
Select the “Save Changes” button to save the changes within the system or click “Cancel” to return to the Active Tab on the Accounts Page.
By Editing a User's Account Information
To edit a user’s supervisors by editing a user’s account information, go to the Active Tab of the Accounts Page. Select the three dots (…) icon in the Name column opening the context menu for the specific user and select “Edit Account Info”.
Click “Add/Edit Supervisor(s)” in the Supervisor(s) Field opening the Choose Supervisor Modal.
The Choose Supervisor(s) Modal will display the two-column drag-and-drop tool.
There are two columns: Selected Supervisor(s) (what has been assigned to the user) and Available Supervisor(s) (what can still be assigned). Drag and drop the designations as desired or click an item to move it from its current column to the other.
Select the “Save Supervisor(s)” button at the bottom of the modal to save the changes or click “Cancel” to return to the Edit Account Info Page.
From the Active Accounts Table
Editing a supervisor from the active accounts table is only possible if the Supervisor column shows on the Active Accounts Table, which included by default. If the column is not visible, it can be added through the Site Settings Module.
How To: Edit the Accounts Module Active Accounts Table
To edit the Active Accounts Table in the Accounts Module, go to the Table Defaults Tab in the Site Settings Module.
Select “Accounts: Active” from the dropdown menu.
Select the “Edit Columns” button, opening the Choose Columns Modal. The default column choices include: name, username, email, access levels, supervisors, become, status, last active, login, archive, first name, last night, employee ID, phone, Address 1 and Address 2 and any customized account fields.
How To: Add a Custom/Additional User Account Information Field
{{@856}}
The bars icon allows the columns to be positioned in the order of your choosing.
Click “Cancel” to return to the Table Defaults Tab without making any changes.
Select the “Save” button to make the desired changes and return to the Table Defaults Tab. A preview of the first five rows of the table is shown. Select the “View Live Table” button to be directed to the live table in the Accounts Module.
To add a supervisor for an employee from the Active Accounts Table, go to the Active Tab on the Accounts Page.
Select the pencil icon to the right of the supervisor in the Supervisors Column. This opens the Select Supervisors Modal.
Select the checkboxes to the left of the desired supervisor(s). Then select the “Save Changes” button to save the changes within the system or click “Cancel” to return to the Active Tab on the Accounts Page.
How To: Edit Your Individual Email Alert Preferences
To edit your email alert preferences, open the Notifications Tab on the My Accounts Page in the Accounts Module. This tab is also accessible from the Main Menu.
Select the “Send Me Email Alerts” checkbox opening the selections to be made for customization.
KAStrack sends email alerts for the following modules: Accounts, Actions, Assets, Dispatch, Documents, Finance, Forms, Meetings, and People. Each module has a dropdown menu with three options that designate when an email alert is sent: “Real Time”, “Digest”, and “Do Not Receive”.
Real Time is the default setting that sends email alerts in real time. Digest is KAStrack’s delayed timing feature. Selecting “Digest” will summarize all alerts with this designation to be sent daily between midnight and 4 a.m. Central Time (United States). Alert digests are not applicable to all alerts.
Whether or not an alert is digestible is specified by an individual with an admin access level.
Do Not Receive designates that the user does not wish to receive email alerts about that specific module.
Communications sent from users are always sent in real time.
When your desired selections are made, click on the “Save” button at the bottom of the screen. Clicking “Cancel” will not save changes and revert back to the previously saved preferences on the Notifications Tab of the My Account Page.
How To: Edit Your Individual Email Report Preferences
Editing Your Individual Email Report Preferences
To edit your email report preferences, open the Notifications Tab on the My Accounts Page in the Accounts Module. This tab is also accessible from the Main Menu.
Select the “Send Me Regular Email Reports” checkbox, opening selections to be made for customization.
There are six modules with reports that can be emailed at the frequency of your choosing. The types of reports available for each module are shown below.
Regular Reports Available via Email Notifications | |
Module | Reports Available |
Actions | Executive Summary |
Assets | Executive Summary, Detailed Report |
Documents | Executive Summary |
Finance | My Budgets, Executive Summary |
People | Executive Summary, Detailed Report (All Users), Detailed Report (Supervised Users), Detailed Report (All Users Group By Supervisor) |
Reports | Accounts: Current Accounts, All Payments, Budgets: All Budget Items, Budgets: Approval Status, Budgets: Pending Approvals, Budgets: Rejected Budget Items, Budgets: Summary, Open Invoices, People: Certification Status, People: Certification Status by Certification Role, People: Pending Approvals, People: Role Status, Time Summary (Previous Month), Time Summary (Current Month) The reports available from the Reports Module will vary per user based on what the individual has access to |
The modules listed can be dragged and dropped as desired for user preference or priority.
Email Report Icon Explanations | |
Icon | Explanation |
| The edit icon opens a dropdown menu with the reports available for that module. |
| The check icon saves the report selections that were made. |
| The X icon cancels changes made to the reports selections. |
Adding Email Reports From Your Preferences
Click the edit icon to open the dropdown menu of available reports for the selected module.
Select the reports you would like to receive from the dropdown menu of options and click the check icon to save your preferences.
If no reports are selected and the box is left blank, your preference will show as “Do Not Receive”.
Click the check icon to save your selection.
Deleting Email Reports from Your Preferences
Click the edit icon to the right of the list of reports you are currently receiving.
Click the check icon to save your selection.
Setting the Frequency of Email Report Notifications
KAStrack users can customize the frequency of their e-mail report notifications on a daily, weekly, or monthly basis.
Daily email report notifications can be sent every day of the week, or on specific days. Select the appropriate checkboxes to indicate your preference. Selecting a weekly email report notification requires you to indicate which day of the week you prefer the report summary email to be sent. Selecting a monthly frequency requires the user to specify which numerical day of the month from a dropdown menu you wish to receive the report summary. The days that are not included in every month (29, 30, 31) have an asterisk next to them. If the current month does not have that particular date, the system will send the report on the final day of the month.
If you are not altering your email alert status, select the “Save” button to save your email report notification preferences. Clicking “Cancel” will not save changes and revert back to the previously saved preferences on the Notifications Tab of the My Account Page.
How To: Edit Your Individual Email Alert Preferences
To edit your email alert preferences, open the Notifications Tab on the My Accounts Page in the Accounts Module. This tab is also accessible from the Main Menu.
Select the “Send Me Email Alerts” checkbox opening the selections to be made for customization.
KAStrack sends email alerts for the following modules: Accounts, Actions, Assets, Dispatch, Documents, Finance, Forms, Meetings, and People. Each module has a dropdown menu with three options that designate when an email alert is sent: “Real Time”, “Digest”, and “Do Not Receive”.
Real Time is the default setting that sends email alerts in real time. Digest is KAStrack’s delayed timing feature. Selecting “Digest” will summarize all alerts with this designation to be sent daily between midnight and 4 a.m. Central Time (United States). Alert digests are not applicable to all alerts.
Whether or not an alert is digestible is specified by an individual with an admin access level.
Do Not Receive designates that the user does not wish to receive email alerts about that specific module.
Communications sent from users are always sent in real time.
When your desired selections are made, click on the “Save” button at the bottom of the screen. Clicking “Cancel” will not save changes and revert back to the previously saved preferences on the Notifications Tab of the My Account Page.
How To: Edit Your Personal Account Info
To edit your own account information, select the Account Info Tab on the My Accounts Page of the Accounts Module.
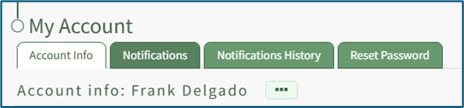
The Account Info Tab can also be accessed from the Main Menu or by clicking your username in the top right corner of the site and then choosing My Account.
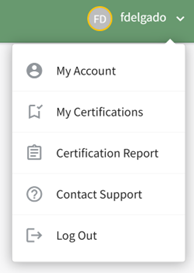
When editing an existing account, only the username or the email fields can be changed at the same time.
Click the three dot (…) icon to the right of the Account info: (User Name) header to open the context menu. Select “Edit Account Info”.

This opens the Edit Account Info Page on the Account Info Tab.
An account profile picture can be uploaded through the User Photo field. The image can be cropped as part of the upload process.
It is recommended to upload an image less than 5MB.
By default, a user logging in to KAStrack will be taken to the Dashboard Module. The Home Page field allows a user to designate the URL within KAStrack of their preference. Enter the page URL in this field if you wish to start on a different page than the Dashboard. For example, if you’d like to start in the Documents Module after login, set Home Page to: https://sitename.kastrack.com/r/documents.
As a shortcut, you can also simply use the part after the .com, entering /r/documents in the field.
After making changes to the account information, select “Save” and the changes made will be reflected on the Account Info: (User Name) Page. Click “Cancel” and return to the Account Info: (User Name) Page without any information being altered.
How To: Export User Account Information
Open the Export Tab on the Accounts Page in the Accounts Module.
There are two checkboxes that allow for customization of your export. Both or neither can be included.
Select “Include archived accounts in export” to include archived accounts in your export. Select “Include inactive accounts in export” to include inactive accounts in your export.
Click “Export local accounts” and a CSV file will automatically be downloaded to your personal device.
How To: Manually Approve/Deny User Registrations
To manually approve user registrations, open the Registrations Tab on the Accounts Page in the Accounts Module.
Approvals/Verifications only show on the Registrations Tab when an individual manually registers themselves.
Selecting any checkbox in a row opens a bulk actions modal above the table. Selecting the checkbox in the first column of the top row selects / deselects all rows in the table.
Bulk action options on the Registrations Tab are Create Account and Deny.
There are two options in the Approval column for all prospective accounts in the Pending Registrations table. Select “Create Account” to manually approve it or click “Deny” to deny an individual user.
How To: Permanently Delete a User Account
An account must first be archived before it can be deleted.
How To: Archive a User Account
To archive an account, open the Active Tab on the Accounts Page in the Accounts Module.
Click the three dot (…) icon next to the user in the Active Accounts Table, opening the context menu. Select “Archive Account”.
Selecting “Archive Account” from the context menu will open a Confirmation Modal.
The modal states, “Are you sure you want to archive this account? Archived accounts are not visible anywhere on the site, including reports.”
Select the “OK” button to archive the selected user account. The user account will be removed from the table of active accounts. Their account information is now found under the Archived Tab on the Accounts Page.
Select the “Cancel” button and return to the Active Tab on the Accounts Page.
To permanently delete a user account, go to the Archived Tab on the Accounts Page in the Accounts Module.
Identify the user whose account you want to permanently delete and click “Permanently Delete” within that user’s information row.
A confirmation modal appears stating, “This cannot be undone! Are you sure you want to permanently delete this account and all associated certifications from the system?”
Select the “OK” button to permanently delete the user’s account. Click “Cancel” to return to the Archived Tab without making any changes.
If you wish to delete multiple accounts at once, use the checkboxes beside each account to select multiple accounts, then click the Permanently Delete button from the With Select popup above the table once checkboxes have been selected.
How To: Reactivate a Deactivated Account
To reactivate a deactivated account, open the Active Tab on the Accounts Page in the Accounts Module.
Select the “Include Deactivated Accounts” checkbox above the Active Accounts Table.

Any deactivated accounts will now show in the Active Accounts Table. They are identified by red highlighted cells.

Click the three dot (…) icon in the Name column of the deactivated account to open the context menu.

Select “Make Active”. 
A confirmation modal will confirm that the user account is now activated.
How To: Reset the Password for Another User
To reset the password for another user, you must have Admin or Supervisor Module Level access for the Accounts Module. By default, both Admin and Supervisor Access Levels have the ability to change passwords. Access levels are customized in the Site Settings Module.
Open the Active Accounts Table on the Active Tab of the Accounts Page and select the three dot (…) icon next to the name of the user whose password you wish to reset.

Select “Reset Password” from the context menu opening the Reset Password Tab on the Accounts Page.
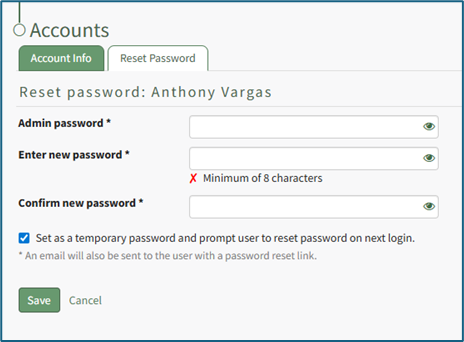
It is required that you enter your account password to reset another user’s password. Then enter the new password for the user selected in the “Enter new password” textbox. Default settings require the new password be a minimum of 8 characters. Re-enter the new password in the “Confirm new password” textbox to ensure the new password is as intended. The eyeball icon allows you to see what was entered and check for errors.
An email will be sent to the user with a password reset link. The user will not need the temporary password you selected to reset their password.
Password requirements can be altered by administrators for all users of the KAStrack system by visiting the Security page of the Site Settings Module.
How To: Edit Password Requirements
To edit password requirements, open the Security Tab in the Site Settings Module. The current settings will show before changes are made.
Select the “Edit Security Settings” button, opening an editable Password Requirements Page.
Input a whole number as your preferred minimum length requirement into the textbox.
Select the appropriate checkboxes to require users to have an uppercase letter, lowercase letter, special character, and/or number in the password.
Selecting the “Force users who do not meet requirements to reset on next login” checkbox will require any existing users whose password is no longer compliant to reset their password when they attempt to login next.
New users will be forced to meet the requirements when they login for the first time / register their account.
Click “Cancel” to return to the Security Tab without making any changes.
Select the “Save” button and return to the Security Tab. The changes made and saved are now reflected on the Security Tab.
If you select the “Set as a temporary password” checkbox, the user will be required to reset their password on their next login.
Select “Save” to reset the password and email the user the password reset link. Click “Cancel” and return to the Account Info: (User’s Name) Page without resetting the password.
How To: Reset Your Own Password
To reset your own password, select the Reset Password Tab on the My Accounts Page of the Accounts Module. The Account Info Tab can also be accessed from the Main Menu.
Enter the required following information: your current password, your new password, and the new password a second time to confirm. Ensure your new password meets all displayed security requirements, which are listed under the Enter new password textbox.
When the password security requirement is met, the “X” will change to a “Check”.
Click the “Save” button to change your password. Click “Cancel” and you will return to the Account Info Tab on the My Account Page.
How To: Restore an Archived User Account
To restore an archived account, go to the Archived Tab on the Accounts Page in the Accounts Module.
All archived accounts show in the Archived Accounts Table. Identify the user whose account you want to restore and select the “Un-archive” button.
A message will appear in blue indicating that the selected user has been un-archived. The user no longer appears on the Archived Tab, showing on the Active Account Table on the Active Tab instead.
If you wish to restore multiple accounts at once, use the checkboxes beside each account to select multiple accounts, then click the Un-archive button from the With Select popup that shows above the table once checkboxes have been selected.
Customizable Tables in the Accounts Module
There are three tables in the Accounts Module than can be customized for your organization's specific needs.
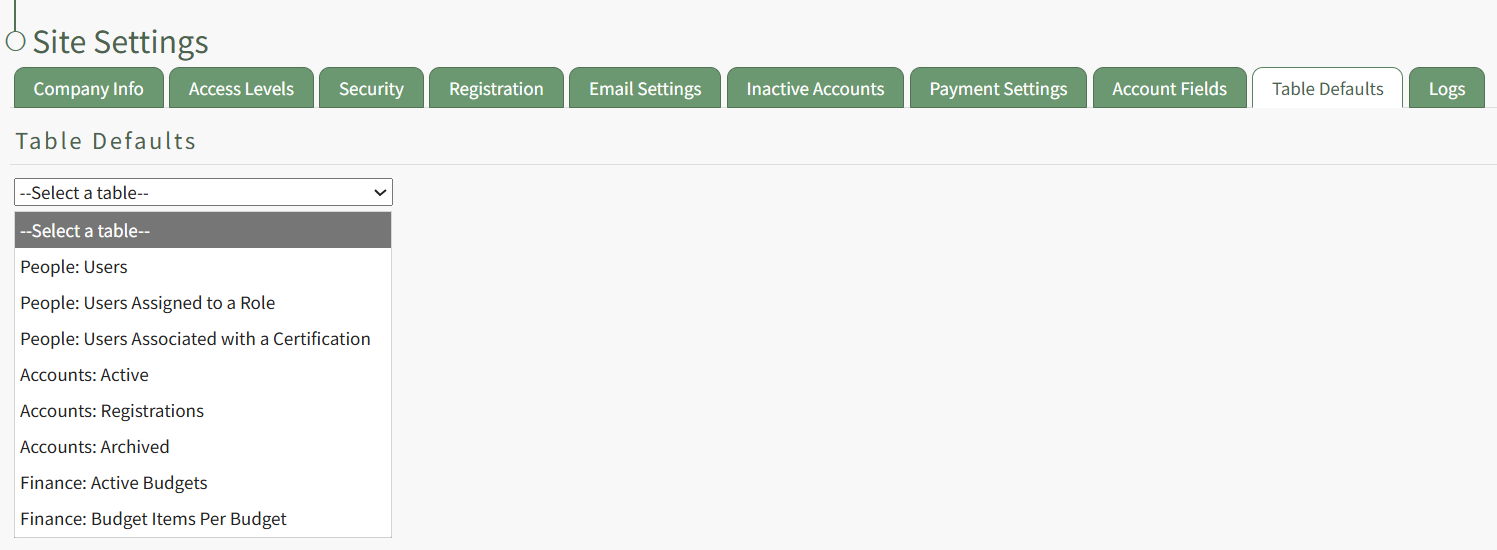
The Active Accounts Table (on the Active Tab of the Accounts Module), the Archived Accounts Table (on the Archived Tab of the Accounts Module), and the Pending Account Registrations Table (on the Registrations Tab of the Accounts Module) are all customizable.
How To: Edit the Accounts Module Active Accounts Table
To edit the Active Accounts Table in the Accounts Module, go to the Table Defaults Tab in the Site Settings Module.
Select “Accounts: Active” from the dropdown menu.
Select the “Edit Columns” button, opening the Choose Columns Modal. The default column choices include: name, username, email, access levels, supervisors, become, status, last active, login, archive, first name, last night, employee ID, phone, Address 1 and Address 2 and any customized account fields.
How To: Add a Custom/Additional User Account Information Field
To add a user account information field, open the Account Fields Tab in the Site Settings Module from the Main Menu.
Click the "Add a Field" clickable link above the Custom / Additional User Account Information Fields opening the Add Field Modal.
Input the label for the field.
Select the field type (text or email) from the dropdown menu.
Selecting the checkbox enables customization to "Allow multiple values," make the field "Required," or make it a "Sensitive Field."
Designating the field as a "Sensitive Field" allows an extra step in form security when integrating these fields within the Form module. The Form Designer must explicitly choose when they wish to use a sensitive field.
The Permissions Table determines who can view / edit their own and other user's fields. Selecting the checkbox gives the individual the specified permission. Deselecting the checkbox removed the permission.
Select the "Save" button and the custom field now shows in the table.
Use the Drag Me icon to drag and drop the field into your desired position of choice.
The bars icon allows the columns to be positioned in the order of your choosing.
Click “Cancel” to return to the Table Defaults Tab without making any changes.
Select the “Save” button to make the desired changes and return to the Table Defaults Tab. A preview of the first five rows of the table is shown. Select the “View Live Table” button to be directed to the live table in the Accounts Module.
How To: Edit the Accounts Module Archived Accounts Table
To edit the Archived Accounts Table in the Accounts Module, go to the Table Defaults Tab in the Site Settings Module.
Select “Accounts: Archived” from the dropdown menu.
Select the “Edit Columns” button, opening the Choose Columns Modal. The default column choices include: name, username, email, last active, un-archive, delete, first name, last name, employee ID, phone, Address 1 and Address 2 and any customized account fields.
How To: Add a Custom/Additional User Account Information Field
To add a user account information field, open the Account Fields Tab in the Site Settings Module from the Main Menu.
Click the "Add a Field" clickable link above the Custom / Additional User Account Information Fields opening the Add Field Modal.
Input the label for the field.
Select the field type (text or email) from the dropdown menu.
Selecting the checkbox enables customization to "Allow multiple values," make the field "Required," or make it a "Sensitive Field."
Designating the field as a "Sensitive Field" allows an extra step in form security when integrating these fields within the Form module. The Form Designer must explicitly choose when they wish to use a sensitive field.
The Permissions Table determines who can view / edit their own and other user's fields. Selecting the checkbox gives the individual the specified permission. Deselecting the checkbox removed the permission.
Select the "Save" button and the custom field now shows in the table.
Use the Drag Me icon to drag and drop the field into your desired position of choice.
The bars icon allows the columns to be positioned in the order of your choosing.
Click “Cancel” to return to the Table Defaults Tab without making any changes.
Select the “Save” button to make the desired changes and return to the Table Defaults Tab. A preview of the first five rows of the table is shown. Select the “View Live Table” button to be directed to the live table in the Accounts Module.
How To: Edit the Accounts Module Pending Registrations Table
To edit the Pending Registrations Table in the Accounts Module, go to the Table Defaults Tab in the Site Settings Module.
Select “Accounts: Registration” from the dropdown menu.
Select the “Edit Columns” button, opening the Choose Columns Modal. The default column choices include: name, username, email, date, reason, email verification, approval, first name, last name, employee ID, phone, Address 1 and Address 2 and any customized account fields.
How To: Add a Custom/Additional User Account Information Field
To add a user account information field, open the Account Fields Tab in the Site Settings Module from the Main Menu.
Click the "Add a Field" clickable link above the Custom / Additional User Account Information Fields opening the Add Field Modal.
Input the label for the field.
Select the field type (text or email) from the dropdown menu.
Selecting the checkbox enables customization to "Allow multiple values," make the field "Required," or make it a "Sensitive Field."
Designating the field as a "Sensitive Field" allows an extra step in form security when integrating these fields within the Form module. The Form Designer must explicitly choose when they wish to use a sensitive field.
The Permissions Table determines who can view / edit their own and other user's fields. Selecting the checkbox gives the individual the specified permission. Deselecting the checkbox removed the permission.
Select the "Save" button and the custom field now shows in the table.
Use the Drag Me icon to drag and drop the field into your desired position of choice.
The bars icon allows the columns to be positioned in the order of your choosing.
Click “Cancel” to return to the Table Defaults Tab without making any changes.
Select the “Save” button to make the desired changes and return to the Table Defaults Tab. A preview of the first five rows of the table is shown. Select the “View Live Table” button to be directed to the live table in the Accounts Module.
Customizable user account information fields can be created and utilized in the tables as needed.
How To: Add a Custom / Additional User Account Information Field
To add a user account information field, open the Account Fields Tab in the Site Settings Module from the Main Menu.
Click the "Add a Field" clickable link above the Custom / Additional User Account Information Fields opening the Add Field Modal.
Input the label for the field.
Select the field type (text or email) from the dropdown menu.
Selecting the checkbox enables customization to "Allow multiple values," make the field "Required," or make it a "Sensitive Field."
Designating the field as a "Sensitive Field" allows an extra step in form security when integrating these fields within the Form module. The Form Designer must explicitly choose when they wish to use a sensitive field.
The Permissions Table determines who can view / edit their own and other user's fields. Selecting the checkbox gives the individual the specified permission. Deselecting the checkbox removed the permission.
Select the "Save" button and the custom field now shows in the table.
Use the Drag Me icon to drag and drop the field into your desired position of choice.