# Accounts Page

# Accounts Page Active Tab

<span style="white-space: pre-wrap;">The Active Tab in the Accounts Module displays the Active Accounts Table, which lists user accounts in the KAStrack system. </span>

<p class="callout info">Individuals with Supervisor module level access will only see the users they supervise on this table, while individuals with Admin module level access will see all users sitewide.</p>

The Active Accounts Table shows account data. Account fields are used as the column headers. The default columns are Name, Username, Email, Access Levels, Supervisors, Status (active/inactive), and Last Active.

[![image.png](https://kaswiki.kastrack.com/uploads/images/gallery/2025-11/scaled-1680-/Togimage.png)](https://kaswiki.kastrack.com/uploads/images/gallery/2025-11/Togimage.png)

<span style="white-space: pre-wrap;">Any desired account field can be created by an administrator. </span>

<details id="bkmrk-how-to%3A-add-a-custom"><summary>How To: Add a Custom/Additional User Account Information Field</summary>

{{@856}}

</details><span style="white-space: pre-wrap;">The Active Accounts table can be customized on the Table Defaults Tab of the Site Settings Module. </span>

<details id="bkmrk-how-to%3A-edit-the-acc"><summary>How To: Edit the Accounts Module Active Accounts Table</summary>

{{@96}}

</details>This would include any additional account fields created as discussed above plus other existing account fields such as First Name, Last Name, Employee ID, Phone, Address 1, and Address 2.

The Active Tab has two clickable links: Add User Access Level (allows for the alteration of a user’s access levels) and Quick Edit Supervisor Links (allows for the alteration of the users a supervisor manages.)

[![image.png](https://kaswiki.kastrack.com/uploads/images/gallery/2025-11/scaled-1680-/XrFimage.png)](https://kaswiki.kastrack.com/uploads/images/gallery/2025-11/XrFimage.png)

<details id="bkmrk-how-to%3A-add-an-acces"><summary>How To: Add an Access Level for an Individual</summary>

{{@119}}

</details><details id="bkmrk-how-to%3A-edit-a-user%27"><summary>How To: Edit a User's Supervisor</summary>

{{@127}}

</details><span style="white-space: pre-wrap;">Select the “Include Deactived Accounts” checkbox to view accounts that are inactive on the active accounts table. </span>

<p class="callout info"><span style="white-space: pre-wrap;">Individuals will only be able to see deactivated accounts that they directly supervise. Individuals with admin access level will see all deactivated accounts. </span></p>

On the Active Tab, bulk actions are only available to individuals with Admin module level access. Selecting any checkbox in a row opens a bulk actions modal above the table. Selecting the checkbox in the first column of the top row selects / deselects all rows in the table.

[![image.png](https://kaswiki.kastrack.com/uploads/images/gallery/2025-11/scaled-1680-/xN1image.png)](https://kaswiki.kastrack.com/uploads/images/gallery/2025-11/xN1image.png)

Bulk action options are Deactivate, Archive, and Export QR Codes.

#### Active Accounts Table Context Menu Explanations

The three dot (…) icon shown in the Name Column of the Active Accounts Table opens the Active Accounts Table context menu. The context menu has seven options for account management: View Account Info, Edit Account Info, Reset Password, Send Welcome Email, Deactivate Account, Archive Account, and View Certificates.

[![image.png](https://kaswiki.kastrack.com/uploads/images/gallery/2025-11/scaled-1680-/Q4Nimage.png)](https://kaswiki.kastrack.com/uploads/images/gallery/2025-11/Q4Nimage.png)

<table id="bkmrk-active-accounts-tabl-1"><colgroup><col style="width: 151px;"></col><col style="width: 646px;"></col></colgroup><tbody><tr><td colspan="2">**Active Accounts Table Context Menu Explanations**

</td></tr><tr><td>**Option**

</td><td>**Explanation**

</td></tr><tr><td>View Account Info

</td><td>Selecting “View Account Info” from the context menu opens the Account Info Tab for the user selected. The context menu from this page offers the same options as the Active Accounts Table.

</td></tr><tr><td>Edit Account Info

</td><td>Selecting “Edit Account Info” from the context menu opens the Edit Account Info Tab for the user selected. Changes can be made to a user’s personal information from this page. You must select “Save” at the bottom of the page for changes to be saved in the system.

<p class="callout info">Required fields are denoted by an asterisk (\*).</p>

<p class="callout info">When editing an existing account, only the username or the email fields can be changed at the same time.</p>

</td></tr><tr style="height: 10px;"><td>Reset Password

</td><td>Selecting “Reset Password” opens the Reset Password Tab for the user selected.

<details><summary>How To: Reset the Password for Another User</summary>

{{@136}}

</details></td></tr><tr><td>Send Welcome Email

</td><td>Selecting “Send Welcome Email” from the context menu will automatically send a welcome email to the user without additional prompting.

[![image.png](https://kaswiki.kastrack.com/uploads/images/gallery/2025-11/scaled-1680-/P98image.png)](https://kaswiki.kastrack.com/uploads/images/gallery/2025-11/P98image.png)

Confirmation that the welcome email was sent is indicated by a confirmation message stating “Welcome email sent!” that shows under the Active Accounts Page header.

The user will receive an automated message sharing their username and a link to your organization’s KAStrack login page. The default message is shown below.

[![image.png](https://kaswiki.kastrack.com/uploads/images/gallery/2025-11/scaled-1680-/7Ibimage.png)](https://kaswiki.kastrack.com/uploads/images/gallery/2025-11/7Ibimage.png)

Whether or not welcome emails are sent to a user when their account is created is a customizable choice designated on the Email Settings Tab of the Site Settings Module.

</td></tr><tr style="height: 10px;"><td>Deactivate Account

</td><td><span style="white-space: pre-wrap;">Deactivated accounts are not visible anywhere in KAStrack, including Reports. Users have the ability to personally re-activate a deactivated account by logging in (if permission to do so has been granted in the Site Settings Module). </span>

<span style="white-space: pre-wrap;">Selecting “Deactivate Account” from the context menu will open a confirmation modal for account deactivation. </span>

<details><summary>How To: Deactivate a User Account</summary>

{{@124}}

</details></td></tr><tr><td>Make Active

</td><td><span style="white-space: pre-wrap;">Make Active only shows on the context menu when a user account has been deactivated, replacing the “Deactivate Account” option. Selecting “Make Active” from the context menu will reactivate a deactivated account. </span>

<details><summary>How To: Reactivate a Deactivated Account</summary>

{{@135}}

</details></td></tr><tr><td>Archive Account

</td><td><span style="white-space: pre-wrap;">Archived accounts are not visible anywhere in KAStrack, including Reports, and archived users are unable to log back into KAStrack unless an administrator restores their account first. Selecting “Archive Account” from the context menu opens a Confirmation Modal allowing for an account to be archived. </span>

<p class="callout info">An account must first be archived before it can be deleted.</p>

<details><summary>How To: Archive a User Account</summary>

{{@120}}

</details><details><summary>How To: Permanently Delete a User Account</summary>

{{@134}}

</details><details><summary>How To: Restore an Archived User Account</summary>

{{@138}}

</details></td></tr><tr><td>View Certificates

</td><td>Selecting “View Certificates” from the context menu will open the User Page on the User Certifications Tab in the People Module.

<p class="callout info">If “View Certificates” does not show on the context menu, it’s likely that user does not have access to the People Module.</p>

</td></tr></tbody></table>

# Accounts Page Org Chart Tab

The Org Chart Tab on the Accounts Page in the Accounts Module is a visual representation of the organizational hierarchy established in KAStrack. When the Org Chart Tab is selected, a tree diagram representing the designated hierarchy appears as a quick visualization tool.

<span style="white-space: pre-wrap;"> </span>[![image.png](https://kaswiki.kastrack.com/uploads/images/gallery/2025-11/scaled-1680-/OpGimage.png)](https://kaswiki.kastrack.com/uploads/images/gallery/2025-11/OpGimage.png)

Hovering the cursor over a name will cause either directional arrows or “+” / “-“signs to appear. Click on the directional arrows around a user’s name to expand / collapse the org chart.

[![image.png](https://kaswiki.kastrack.com/uploads/images/gallery/2025-11/scaled-1680-/7zvimage.png)](https://kaswiki.kastrack.com/uploads/images/gallery/2025-11/7zvimage.png)

Click on the “+” icon next to the left of a user’s name for continued expansion of the hierarchy.

[![image.png](https://kaswiki.kastrack.com/uploads/images/gallery/2025-11/scaled-1680-/Lnximage.png)](https://kaswiki.kastrack.com/uploads/images/gallery/2025-11/Lnximage.png)

The “-” sign to the left of a name will collapse and hide the list below.

<span style="white-space: pre-wrap;"></span>

# Accounts Page Registrations Tab

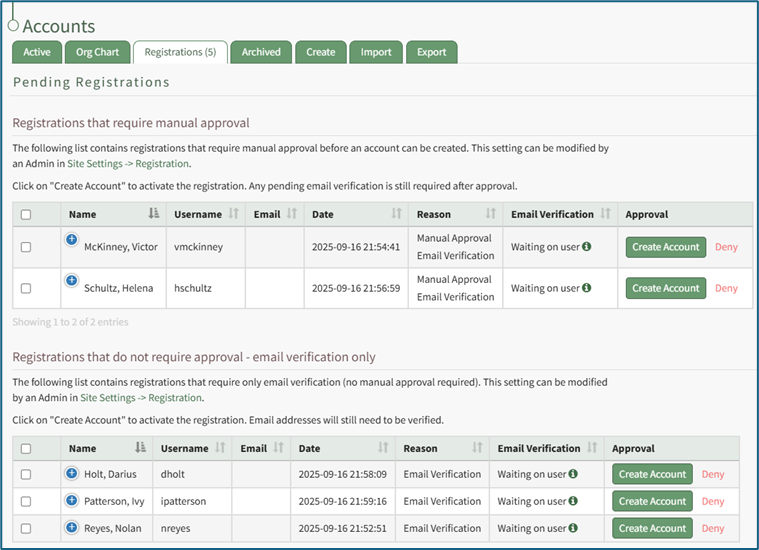
<span style="white-space: pre-wrap;">The Registration Tab on the Accounts Page displays the Pending Registration Table which allows for a quick view of the pending new user account registrations. Approvals/Verifications only show on the Registrations Tab when an individual manually registers themselves. The number of registrations that require approval show directly on the tab, Registrations (#), and as a badge next to the Registration page on the Main Menu. </span>

<p class="callout info">Only individuals with an Admin module level access will see the Archived Accounts Tab.</p>

The Pending Registrations Table shows account information for the user accounts whose system registration is pending confirmation. Account fields are used as the column headers. The default columns are Name, Username, Email, Date, Reason, Email Verification, and Approval.

[![image.png](https://kaswiki.kastrack.com/uploads/images/gallery/2025-11/scaled-1680-/vwZimage.png)](https://kaswiki.kastrack.com/uploads/images/gallery/2025-11/vwZimage.png)
<span style="white-space: pre-wrap;">Any desired account field can be created by an administrator. </span>

<details id="bkmrk-how-to%3A-add-a-custom"><summary>How To: Add a Custom/Additional User Account Information Field</summary>

{{@856}}

</details><span style="white-space: pre-wrap;">The Pending Registrations Table is customizable via the Table Defaults Tab in the Site Settings Module. </span>

<details id="bkmrk-how-to%3A-edit-the-acc"><summary>How To: Edit the Accounts Module Pending Registrations Table</summary>

{{@98}}

</details>This would include any additional account fields created as discussed above plus other existing account fields such as First Name, Last Name, Employee ID, Phone, Address 1, and Address 2.

Pending registrations are separated into two tables: Registrations that require manual approval and Registrations that do not require approval (email verification only). Registrations require manual approval when a user creates an account using a KAStrack registration link if the registration profile is set to require it. The parameters for registration links are established on the Registration Tab in the Site Settings Module.

<details id="bkmrk-how-to%3A-manually-app"><summary>How To: Manually Approve / Deny User Registrations</summary>

{{@132}}

</details>There are two icons that can be selected to open modals in the Pending Registrations Table: the plus sign icon in the Name column and the information icon in the Email Verification column.

[![image.png](https://kaswiki.kastrack.com/uploads/images/gallery/2025-11/scaled-1680-/RB5image.png)](https://kaswiki.kastrack.com/uploads/images/gallery/2025-11/RB5image.png)

Selecting the plus sign icon to the left of the user’s name opens the Pending Account Modal which lists all the account information for the new user.

[![image.png](https://kaswiki.kastrack.com/uploads/images/gallery/2025-11/scaled-1680-/V7Rimage.png)](https://kaswiki.kastrack.com/uploads/images/gallery/2025-11/V7Rimage.png)

Selecting the information icon to the right of “Waiting on user” opens the Email Verification Requirement Modal. The modal states, “This user has not yet verified their email address and will not be able to log in until they click the verification link sent to the provided email address.”

[![image.png](https://kaswiki.kastrack.com/uploads/images/gallery/2025-11/scaled-1680-/wfaimage.png)](https://kaswiki.kastrack.com/uploads/images/gallery/2025-11/wfaimage.png)

Select the “Resend Verification Email” to resend the verification email to the new user. A confirmation modal will appear, confirming the verification email was resent.

<span style="white-space: pre-wrap;"> Select the “Remove Verification Requirement” button and a warning modal appears stating, “Warning: This user has not verified their email address. Removing the email verification requirement will allow the user to log in without verifying their email address. Are you sure you want to proceed?”</span>

[![image.png](https://kaswiki.kastrack.com/uploads/images/gallery/2025-11/scaled-1680-/UOmimage.png)](https://kaswiki.kastrack.com/uploads/images/gallery/2025-11/UOmimage.png)

Select the “OK” button to remove the verification requirement, or click “Cancel” to return to the registration tab without saving any changes.

If there are no pending registrations, the tables are not visible. In their place is the statement, “There are no registrations that require manual approval/email verification at this time.”

[![image.png](https://kaswiki.kastrack.com/uploads/images/gallery/2025-11/scaled-1680-/OR9image.png)](https://kaswiki.kastrack.com/uploads/images/gallery/2025-11/OR9image.png)

Selecting any checkbox in a row opens a bulk actions modal above the table. Selecting the checkbox in the first column of the top row selects / deselects all rows in the table.

[![image.png](https://kaswiki.kastrack.com/uploads/images/gallery/2025-11/scaled-1680-/Uvvimage.png)](https://kaswiki.kastrack.com/uploads/images/gallery/2025-11/Uvvimage.png)

Bulk action options on the Registrations Tab are Create Account and Deny.

# Accounts Page Archived Tab

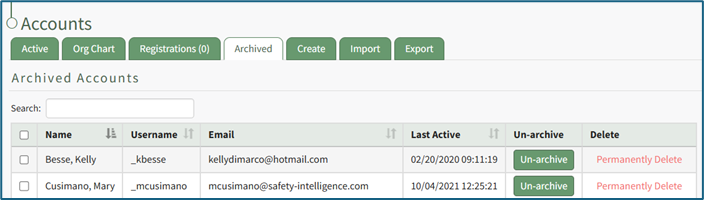
<span style="white-space: pre-wrap;">The Archived Tab on the Accounts Page displays the Archived Accounts Table, which shows the user accounts that have been intentionally archived. Archived accounts are not visible anywhere in KAStrack other than this table, including Reports. Archived users will be unable to log back into KAStrack unless an administrator restores their account first. </span>

<p class="callout info">Only individuals with an Admin module level access will see the Archived Accounts Tab.</p>

The Archived Account Table shows user account information for user accounts that have been archived. Account fields are used as the column headers. The default columns are Name, Username, Email, Last Active, Un-archive, and Delete.

[![image.png](https://kaswiki.kastrack.com/uploads/images/gallery/2025-11/scaled-1680-/fyfimage.png)](https://kaswiki.kastrack.com/uploads/images/gallery/2025-11/fyfimage.png)
<span style="white-space: pre-wrap;">Any desired account field can be created by an administrator. </span>

<details id="bkmrk-how-to%3A-add-a-custom"><summary>How To: Add a Custom/Additional User Account Information Field</summary>

{{@856}}

</details><span style="white-space: pre-wrap;">The Archived Accounts Table is customizable via the Table Defaults Tab in the Site Settings Module. </span>

<details id="bkmrk-how-to%3A-edit-the-acc"><summary>How To: Edit the Accounts Module Archived Accounts Table</summary>

{{@97}}

</details>This would include any additional account fields created as discussed above plus other existing account fields such as First Name, Last Name, Employee ID, Phone, Address 1, and Address 2.

Selecting any checkbox in a row opens a bulk actions modal above the table. Selecting the checkbox in the first column of the top row selects / deselects all rows in the table.

[![image.png](https://kaswiki.kastrack.com/uploads/images/gallery/2025-11/scaled-1680-/1Dmimage.png)](https://kaswiki.kastrack.com/uploads/images/gallery/2025-11/1Dmimage.png)

Bulk action options on the Archived Tab are Un-archive and Permanently Delete.

<details id="bkmrk-how-to%3A-archive-a-us"><summary>How To: Archive a User Account</summary>

{{@120}}

</details><details id="bkmrk-how-to%3A-restore-an-a"><summary>How To: Restore an Archived User Account</summary>

{{@138}}

</details><details id="bkmrk-how-to%3A-permanently-"><summary>How To: Permanently Delete a User Account</summary>

{{@134}}

</details>

# Accounts Page Create Tab

<span style="color: black;">The Create</span><span style="white-space: pre-wrap;"> Tab opens to the Create Account tab allowing for the generation of new user accounts. </span>

<p class="callout info">Only individuals with an Admin module level access will see the Create Tab.</p>

<details id="bkmrk-how-to%3A-create-an-in"><summary>How To: Create an Individual New User Account</summary>

{{@133}}

</details>

# Accounts Page Import Tab

<span style="white-space: pre-wrap;">The Import Tab opens to the Import Accounts Page, where new account information can be imported using a Comma Separated Value (CSV UTF-8) document for both new and existing accounts. </span>

<p class="callout info">Only individuals with an Admin module level access will see the Import Tab.</p>

When downloading the template for Account information, all possible fields in the KAStrack system will show as column headers. Leave cells blank if the information isn’t relevant to your organization’s requirements.

[![image.png](https://kaswiki.kastrack.com/uploads/images/gallery/2025-11/scaled-1680-/e9Himage.png)](https://kaswiki.kastrack.com/uploads/images/gallery/2025-11/e9Himage.png)

<span style="white-space: pre-wrap;">Instructions associated with the bulk importation of user information can be found in the How To: Bulk Import Several New Accounts. </span>

<details id="bkmrk-how-to%3A-bulk-import-"><summary>How To: Bulk Import Account Information</summary>

{{@121}}

</details><span style="white-space: pre-wrap;">The Import Tab can also be used to update existing account information. </span>

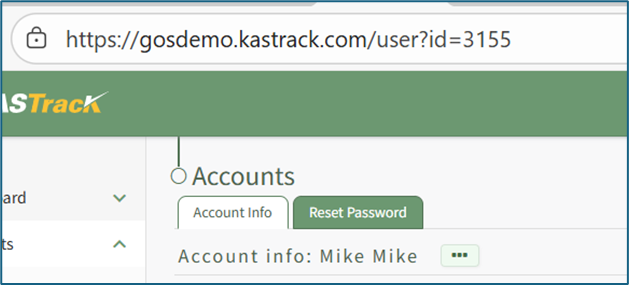
<p class="callout info"><span style="white-space: pre-wrap;">The KAStrack-generated unique user ID is a required column in the CSV file if editing an existing account. This can be found in the URL at the top of your browser when viewing a user’s Account Info page, or by doing an account export. </span>[![image.png](https://kaswiki.kastrack.com/uploads/images/gallery/2026-01/scaled-1680-/AIGimage.png)](https://kaswiki.kastrack.com/uploads/images/gallery/2026-01/AIGimage.png)</p>

<details id="bkmrk-how-to%3A-export-user-"><summary>How To: Export User Account Information</summary>

{{@131}}

</details>

# Accounts Page Export Tab

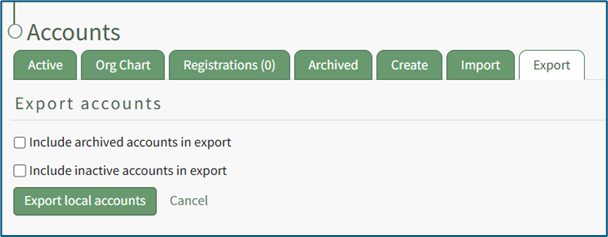
<span style="color: black; white-space: pre-wrap;">The Export Tab allows for the transfer of account information from KAStrack to a CSV file. There are checkboxes that designate whether to include archived and/or inactive accounts within the export. </span>

<p class="callout info">Only individuals with an Admin module level access will see the Export Tab.</p>

[![image.png](https://kaswiki.kastrack.com/uploads/images/gallery/2025-11/scaled-1680-/HIrimage.png)](https://kaswiki.kastrack.com/uploads/images/gallery/2025-11/HIrimage.png)

<span style="color: black;">If utilized, Export will create a CSV file with all possible fields in the KAStrack system, even fields not being utilized by your organization.</span>

<details id="bkmrk-how-to%3A-export-user-"><summary>How To: Export User Account Information</summary>

<span style="color: black;">{{@131}}</span>

</details>

# Accounts Settings

<p class="callout info">There is no Setting Page for the Accounts Module, however there are system default module levels that can be accessed through the Access Levels Tab of the Site Settings Page from the Main Menu.</p>

There are four system default module level associated with the Accounts Module. An explanation of the permissions associated with each default module level are shown in the Account Module Level Permissions Table below. Accounts Module permissions are organized differently than other modules. Permissions take into account if you do or do not supervise other users.

<p class="callout info">System default module levels cannot be customized.</p>

<table id="bkmrk-accounts-module-leve"><colgroup><col style="width: 122px;"></col><col style="width: 709px;"></col></colgroup><tbody><tr><td colspan="2">**Accounts Module Level Permissions**

</td></tr><tr><td>**Module Level**

</td><td>**Permissions**

</td></tr><tr><td>Admin

</td><td>Can change their own password  
<u>Regarding Non-Supervised Users</u>: Can access all user accounts; Can access accounts that have no assigned access level; Can edit/delete comments on accounts

<u>Regarding Supervised Users</u>: Can supervise users regardless of their Accounts Module module level; Can edit/delete comments on accounts

<u>Regarding Administration</u>: Can set up relationships between users regardless of their Accounts Module module level; Can edit company info; Can edit company settings; Can edit security settings; Can reset/change passwords for existing accounts; Can create, archive, un-archive, deactivate, reactivate, and permanently delete user accounts; Can assign user access levels; Can edit companies; Can create or delete companies

</td></tr><tr><td>Supervisor

</td><td>Can change own password  
<u>Regarding Non-Supervised Users:</u> *No permissions for non-supervised users*

<u>Regarding Supervised Users</u>: Can supervise users regardless of their Accounts Module module level; Can edit/delete comments on the accounts of Supervised Users

<u>Regarding Administration</u>: Can reset/change password for ANY existing accounts

</td></tr><tr><td>Employee

</td><td>Can change own password

</td></tr><tr><td>Observer

</td><td>Can change own password

<u>Regarding Non-Supervised Users</u>: Can access all user accounts that are assigned an access level

</td></tr></tbody></table>

<span style="color: rgb(68, 68, 68); background-color: rgb(255, 255, 255);">New Module Levels can be created in order to customize module level permissions. </span>

<details id="bkmrk-how-to%3A-create-a-new"><summary>How To: Create a New Module Level (Accounts Module)</summary>

<span style="color: rgb(68, 68, 68); background-color: rgb(255, 255, 255);">{{@946}}</span>

</details><span style="color: rgb(68, 68, 68); background-color: rgb(255, 255, 255);">To edit the permissions for a customized Module Level in the Accounts Module, click the edit button in the Accounts Module Level Table, which is visible on the Access Levels Tab in the Site Settings Module.</span>

[![image.png](https://kaswiki.kastrack.com/uploads/images/gallery/2026-06/scaled-1680-/k1dimage.png)](https://kaswiki.kastrack.com/uploads/images/gallery/2026-06/k1dimage.png)

<span style="color: rgb(68, 68, 68); background-color: rgb(255, 255, 255);">A complete list of all permissions associated with Accounts Module have been provided below.</span>

[![image.png](https://kaswiki.kastrack.com/uploads/images/gallery/2026-06/scaled-1680-/ONBimage.png)](https://kaswiki.kastrack.com/uploads/images/gallery/2026-06/ONBimage.png)